SPIETH Gymnastics Climbing Island Use and care manual

Art. 1555534
Sternsprossenwand
Climbing Island
1
SPIETH Gymnasti s GmbH – offizieller Partner von:
Aufbau
-
und Gebrau hsanleitung
Assembly and user manual
SPIETH Gymnasti s GmbH
In den Weiden 13
73776 Altbach
Telefon +49 (0)7153/ 50 32 800
Telefa +49 (0)7153/ 50 32 811
www.spieth-gymnastics.com

Art. 1555534
Sternsprossenwand
Climbing Island
2
Bes hreibung
Die Sternsprossenwand ist eine freistehende,
rollbare Sprossenwand für Kinder im Alter von 3 bis
8 Jahren mit ma imal 50 kg Körpergewicht.
Die Konstruktion ermöglicht ein einfaches minu-
tenschnelles Auf-und Abbauen für Übungsstunden
in Kindergarten, Schule und Turnverein. Sie ist
ohne zusätzliche Bodenbefestigung verwendbar
und integrierte Bodenmatten sorgen für Sicherheit.
Vielfältige Variationen sind durch die klappbaren
Flügel und die Möglichkeit zur Kombination mit
anderen Geräten gegeben.
Norm:
EN 913 und EN 12346
Abmaße:
Alle Maße beziehen sich auf den jeweils mini-
malen Platzbedarf der unterschiedlichen Aufstell-
varianten:
Länge Höhe Breite
228 216 95 cm (zusammengeklappt)
235 216 375 cm (ausgeklappt 90 Grad)
350 216 350 (ausgeklappt 120 Grad)
Verpa kungsinfo:
Netto-Gewicht: 182 kg
Brutto-Gewicht: 205 kg
Verpackung: 1 Palette 240 100 235 cm
Lieferumfang:
Komplett montiert
Benötigte Werkzeuge:
Keine
Des ription
The Climbing Island is a freestanding rollable wall
bars for children aged 3 to 8 years with a ma imum
weight of 50 kg.
This construction enables a fast assembly and
dismantling within a few minutes. It is suitable for
p.e. lessons in Kindergartens, Schools or Clubs. No
further attachment to the floor is needed and the
integrated floor mats provide safety. A vast variety
of combinations is given through foldable wings
and the option to include further equipment.
Norm:
EN 913 and EN 12346
Dimensions:
All measures refer to the minimal space needed to
install this option.
Length Height Width:
228 216 95 cm (folded up)
235 216 375 cm (opened 90 degree)
350 216 350 (opened 120 degree)
Pa king Data:
Net-weight: 182 kg
Gross-weight: 205 kg
Packaging: 1 Pallet 240 100 235 cm
S ope of delivery:
Completely mounted
Required Tools:
None
Art. 1555534
Sternsprossenwand
Climbing Island
3
Bedienungs- und Aufbauanleitung
ACHTUNG!
Bitte lesen Sie diese Anweisung, bevor Sie das
Gerät zusammenbauen.
Bitte das Gerät während der Benutzung nicht ver-
stellen.
Bei diesem Gerät handelt es sich um ein Sportgerät
und nicht um ein Spielgerät, deshalb darf es nur
unter der Anleitung von qualifiziertem Personal
genutzt werden.
Zahl der Benutzer:
Das Gerät ist ma . für eine Person pro Flügel der
Sternsprossenwand zugelassen.
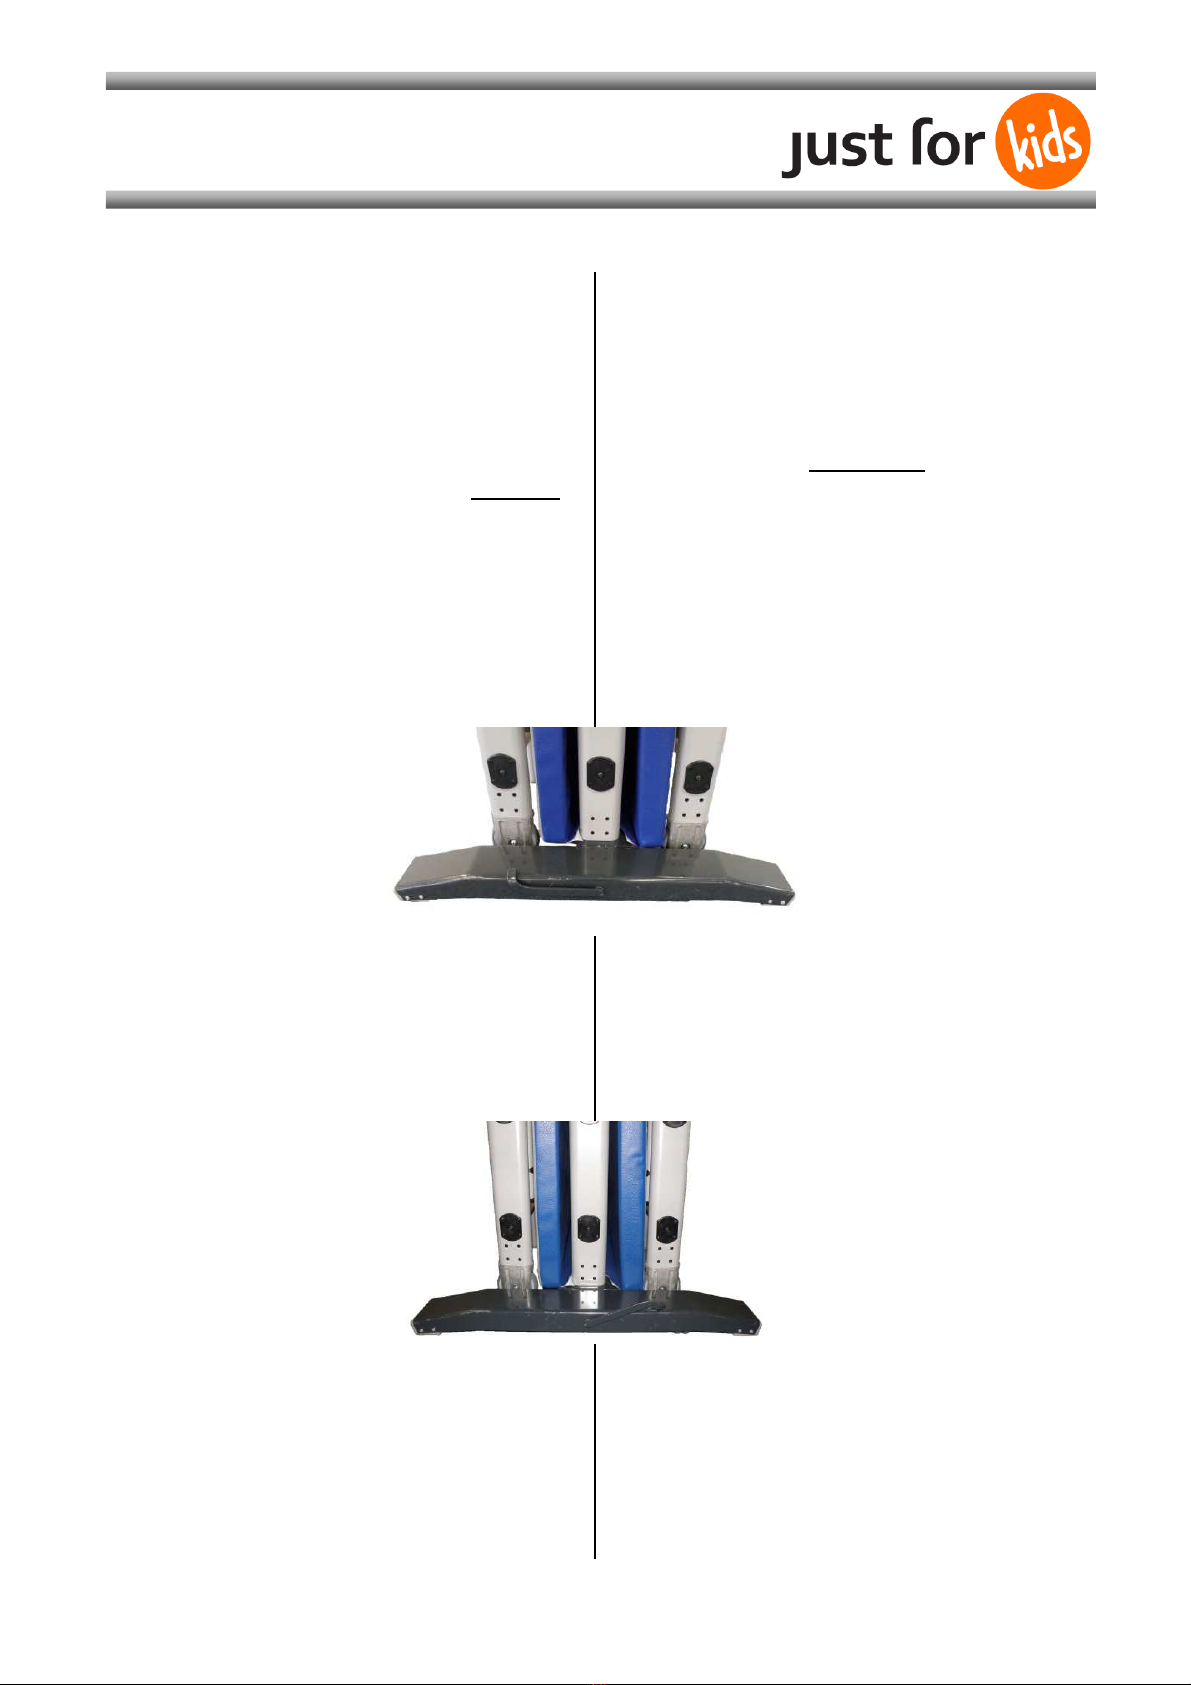
Abbildung 1: Absenkstellung
Die Sternsprossenwand darf grundsätzlich nur in
abgesenkter Stellung des Klemmhebels benutzt
oder abgestellt werden (siehe Abb. 1).
Abbildung 2: Fahrstellung
Zum Verrollen der Sternsprossenwand legen Sie
die Klemmhebel auf den Stirnseiten von links nach
rechts vollständig bis zum Anschlag um
(siehe Abb. 2).
User and Assembly Manual
CAUTION!
Please read this instru tion in advan e of the
assembly.
Please do not adjust the apparatus while using it.
This apparatus is a sports devi e and not play
equipment, therefore it must be used in
accordance with this manual and only under
supervision of trained and qualified instructors.
Number of users:
The apparatus cannot be used by more than one
person on each wing at the same time.
Pi ture 1: Lower Position
The Climbing Island is only allowed to use or to
park with a clamping lever in lower position (see
Pict. 1.)
Pi ture 2: Driving Position
To roll the Climbing Island, put the clamping lever
on the front completely from left to the right side
until it stops (see Pict. 2).
Art. 1555534
Sternsprossenwand
Climbing Island
4
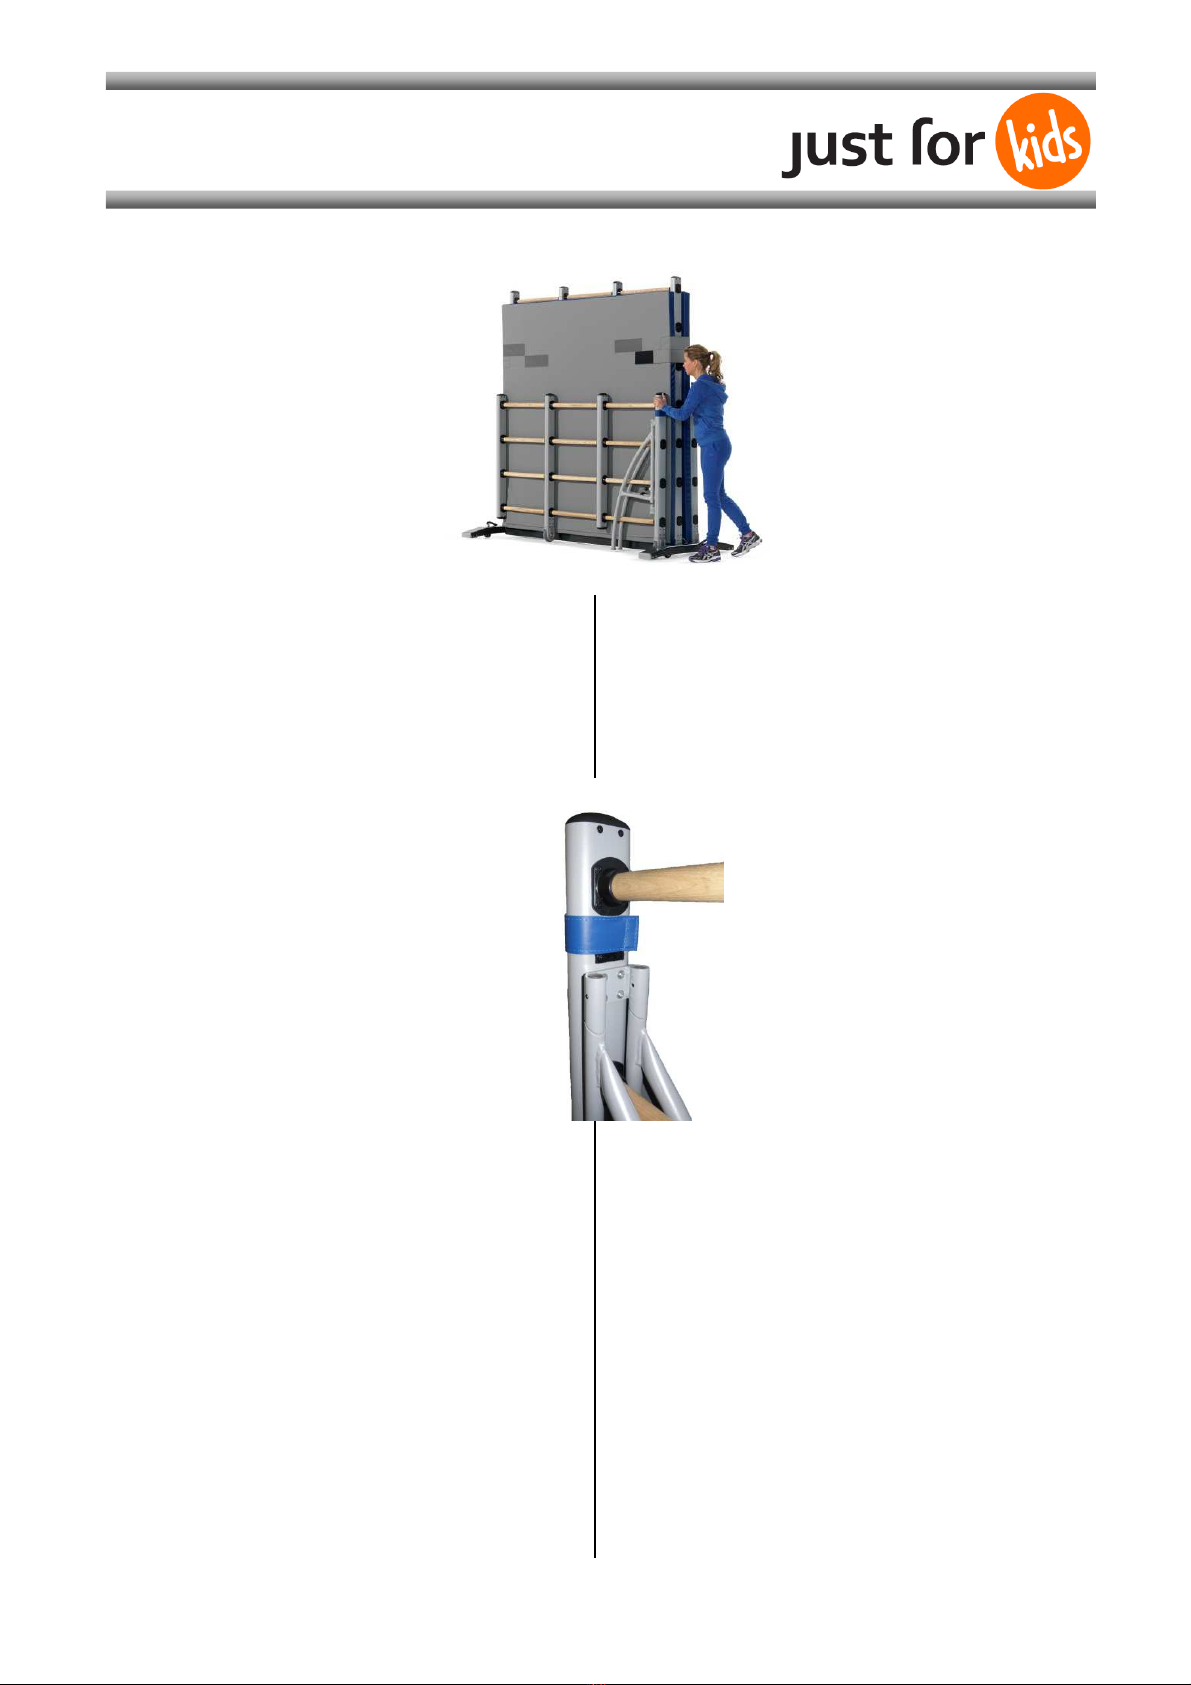
Abbildung 3: Aufstellposition
Rollen Sie nun an den gewünschten Aufstellplatz
(siehe Abb. 3). Achten Sie beim Abstellen des
Geräts auf genügend Freiraum für die seitlichen
Ausleger der Sprossenwand (siehe Abmessungen
auf Seite 2).
Abbildung 4: Befestigungsband lösen
Ist die Sternsprossenwand an der gewünschten
Stelle platziert und über den Klemmhebel in die
Absenkstellung gebracht (siehe Abb. 1), lösen Sie
das Klettband an den Seitenflügeln (Siehe Abb. 4).
Pi ture 3: Positioning
Roll the Climbing Island to the intended position
(see Pict. 3). Before lowering the level, pay
attention if there is enough space for the wings to
fold up (see dimensions on page 2).
Pi ture 4: Release the fixation strap
As soon as the Climbing Island is positioned and
lowered by using the clamping lever (see Pict. 1),
release the fi ation strap on the lower wing (see
Pict. 4).
Art. 1555534
Sternsprossenwand
Climbing Island
5
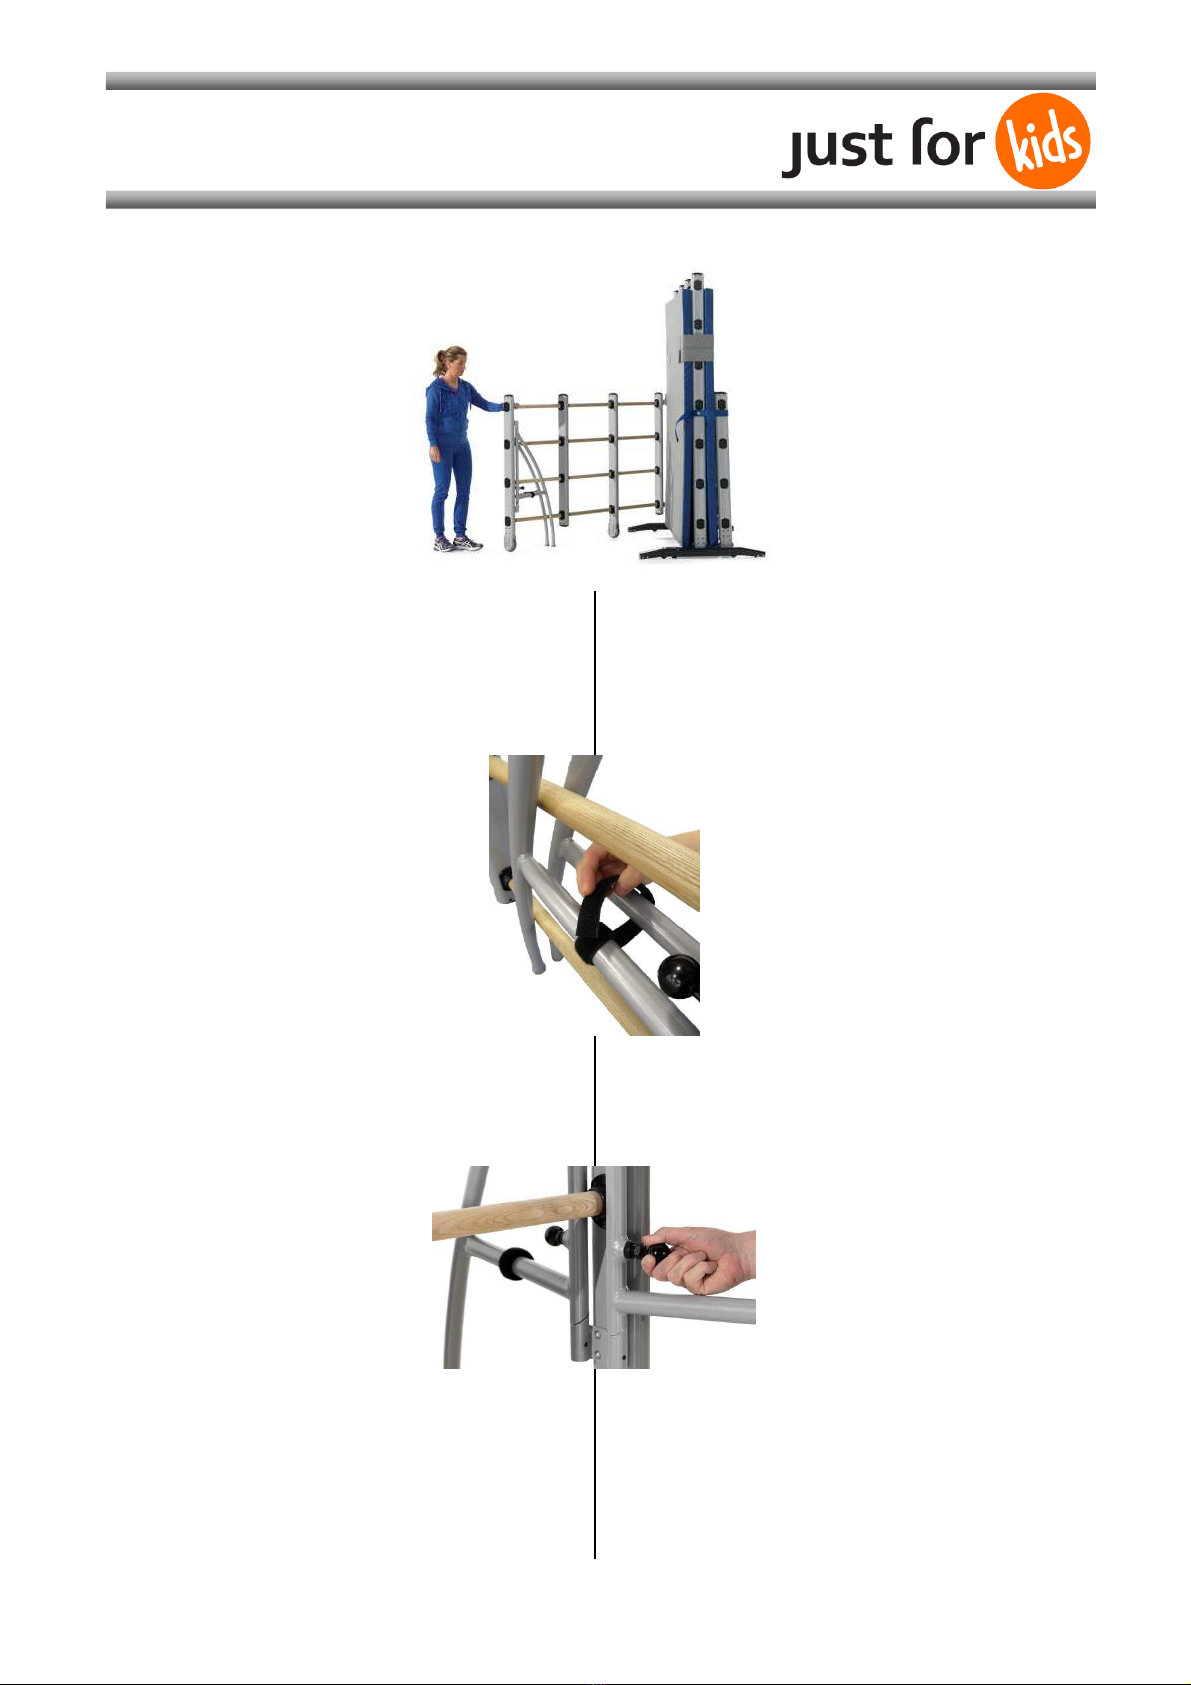
Abbildung 5: Aufklappen der Seitenflügel
Achten Sie beim Aufklappen darauf (siehe Abb. 5),
dass die seitliche Sprossenwände vorzugsweise in
einem Winkel von 90° zur Hauptsprossenwand
stehen, jedoch ma . 120° nicht überschreiten
dürfen.
Abbildung 6: Lösen des Si herungsbandes
Lösen Sie das Sicherungsband der Stabilisierungs-
Füße (siehe Abb. 6).
Abbildung 7: Arretierungsbolzen
Ziehen sie den runden Arretierungsbolzen heraus
(siehe Abb. 7), halten diesen fest und klappen
dabei die Füße aus. Ist die rechtwinklige Endposi-
tion erreicht, rastet der Arretierungsbolzen ein.
Pi ture 5: Folding up of lower wings
While opening the lower wings (see Pict. 5), pay
attention that the lower wings are positioned in a
90° position to the main wall bars. The lower wings
must not e ceed a 120° ancle.
Pi ture 6: Release se uring strap
Release the securing strap on the stabilisation legs
(see Pict. 6).
Pi ture 7: Lo king bolt
Pull out the round locking bolt (see Pict. 7), keep it
in a hold position and fold out the stabilisation
legs. As soon as a rectangular position is reached,
the locking bolt clicks into place.
Art. 1555534
Sternsprossenwand
Climbing Island
6
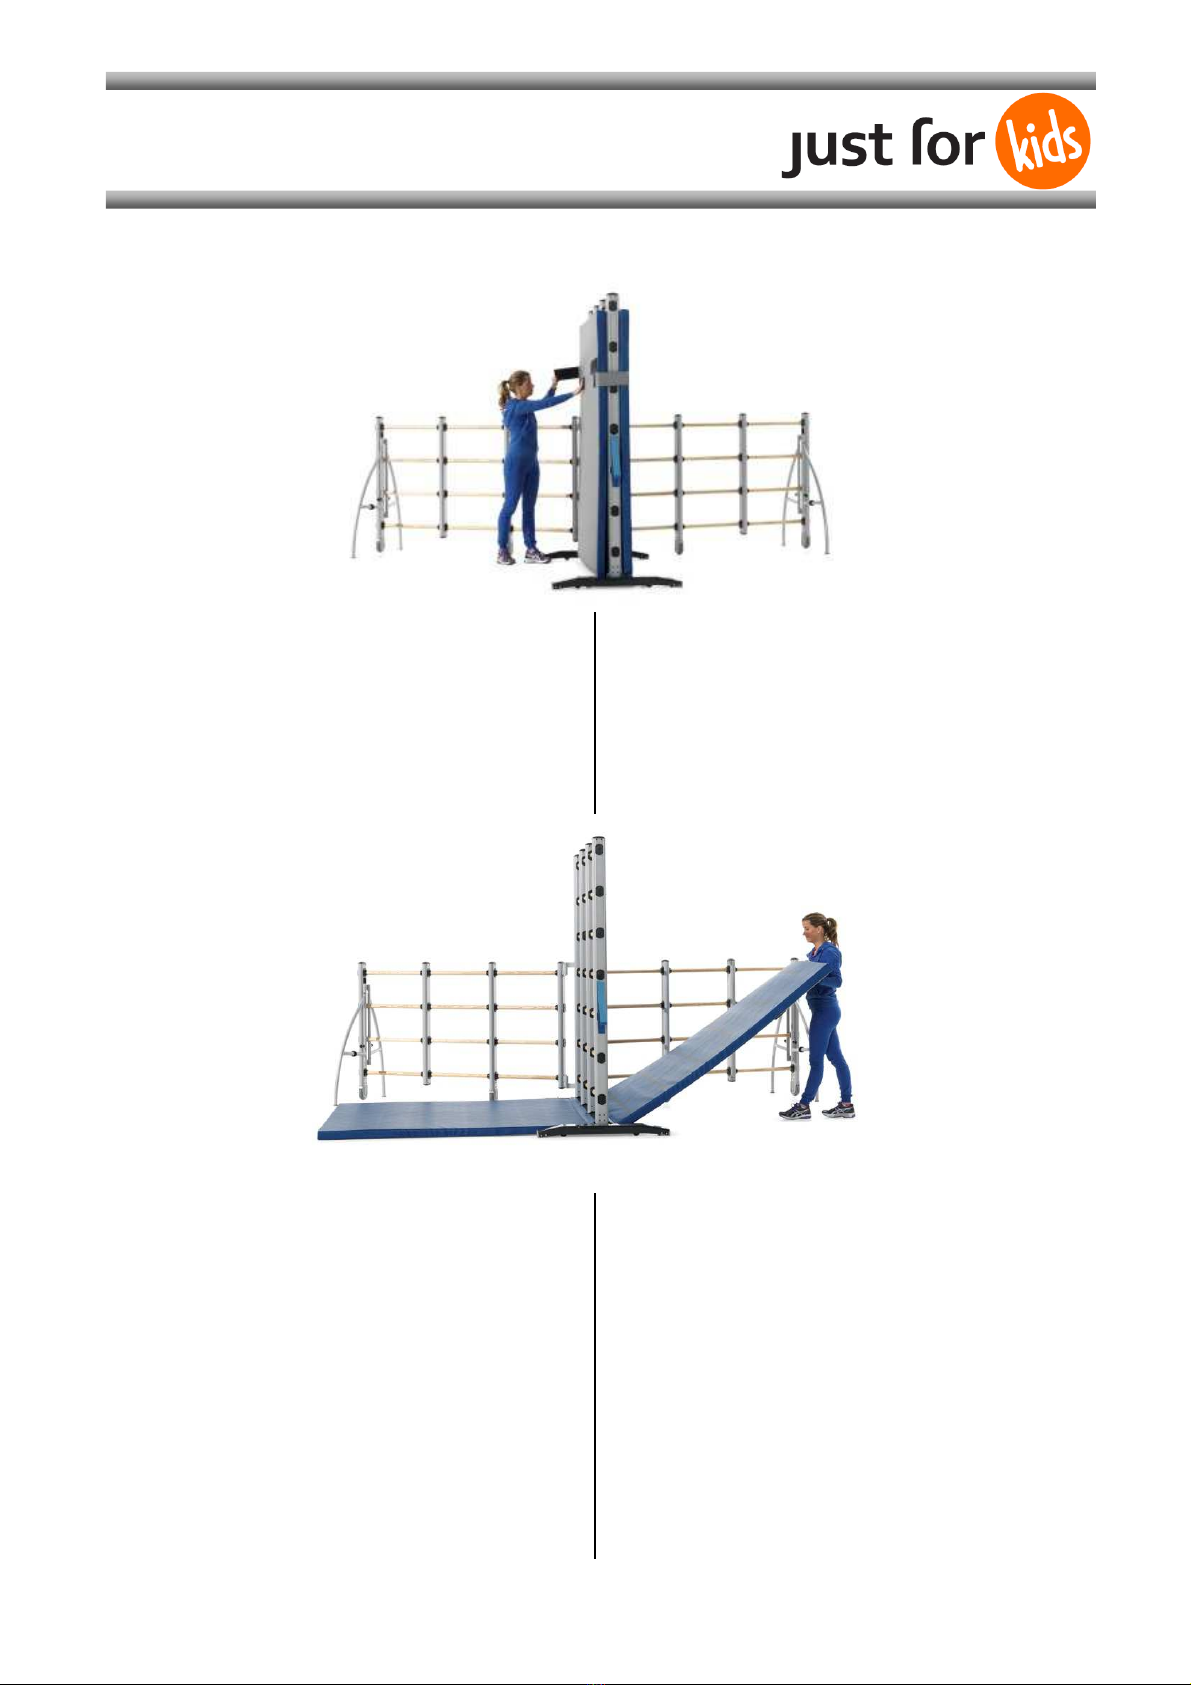
Abbildung 8: Lösen der Befestigungsbänder
Ziehen Sie die Befestigungsbänder an den
hochgeklappten Matten ab (Siehe Abb. 8) und
befestigen diese auf den dafür vorgesehenen
Stellen an der gegenüberliegenden Matte.
Abbildung 9: Herunterlassen der Matten
Die integrierten Matten langsam nacheinander auf
den Boden ablassen (siehe Abb. 9).
Pi ture 8: Release of fixation straps
Pull off the fi ation straps on the mats (see Pict. 8)
and fi them at the provided place on the opposite
mat.
Pi ture 9: Lower the mats
Lower slowly the integrated mats one after
another to the floor (see Pict. 9).
Art. 1555534
Sternsprossenwand
Climbing Island
7
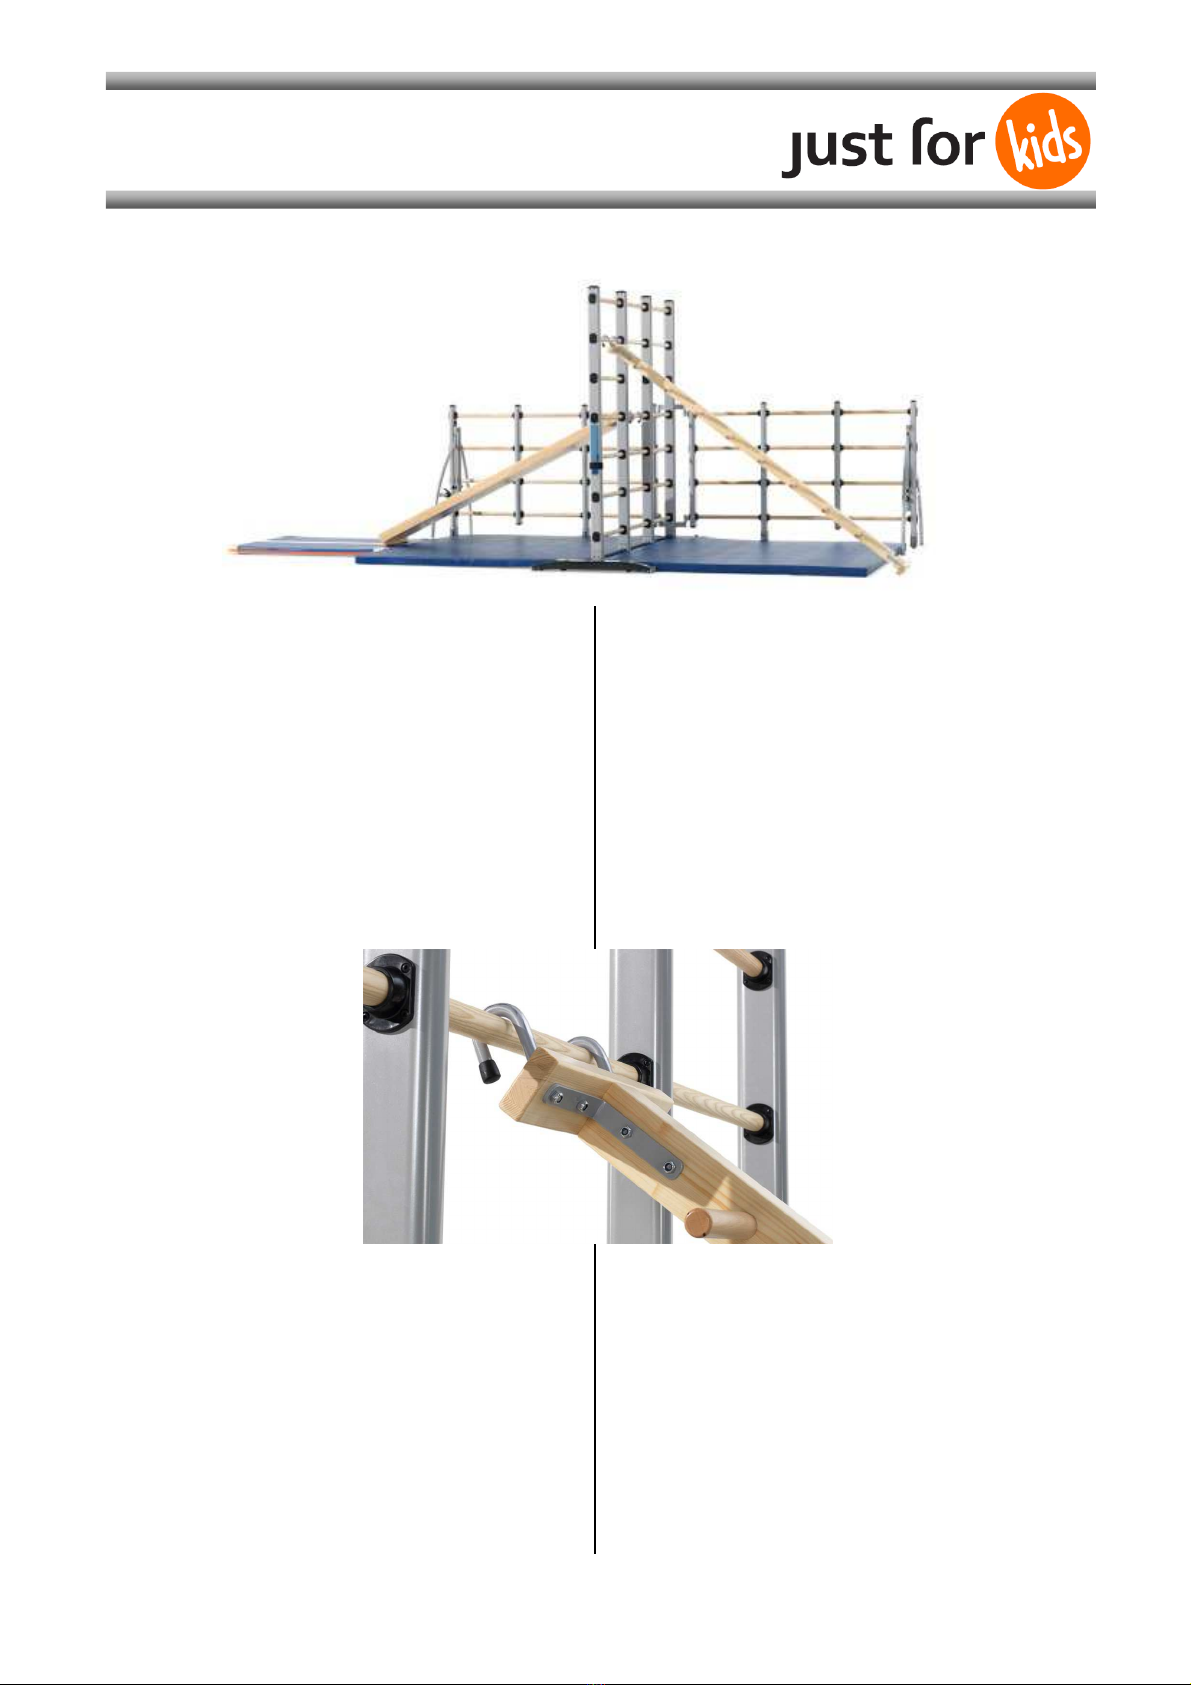
Abbildung 10: Aufgebaute Sternsprossenwand
Nach abschließender Überprüfung des Gerätes ist
die Sternsprossenwand einsatzbereit für die
Übungsstunde (Siehe Abbildung 10).
ACHTUNG:
Verwenden Sie nur Anbaugeräte die zum
Einhängen an den Sprossen zugelassen sind.
Die folgende Abbildungen 11 zeigt ein Beispiel:
Abbildung 11: eingehängte Zi k-Za k-Leiter
Pflegehinweise:
Das Holz, die Kunststoff- und Metallteile sowie die
Matten können mit einem feuchten Tuch ohne
Reinigungsmittel gereinigt werden.
Pi ture 10: Built-up Climbing Island
After a final check is the Climbing Island ready to
use for the p.e. lesson (See picture 10).
ATTENTION:
Only use accessory equipment which is admitted to
be hooked to bars.
The following picture 11 shows an e ample:
Pi ture 11: hooked Zig-Zag-Ladder
Care Instru tions:
The wooden, plastic and metal parts as well as the
mats can be cleaned with a wet cloth without
detergents.

Art. 1555534
Sternsprossenwand
Climbing Island
8
WARNUNG
WARNING
Beim Benutzen dieses Turngerätes übernehmen Sie ein
Verletzungsrisiko. Um dieses Risiko minimal zu halten und
um den sicheren Betrieb des Geräts zu gewährleisten,
müssen die folgenden Anweisungen beachtet werden:
1. Benutzen Sie das Turngerät nur unter Beobachtung
ausgebildeten und qualifizierten Personals.
2. Vor jedem Benutzen prüfen Sie dieses Gerät auf gute
Stabilität, Standsicherheit und einen einwandfreien
technischen Zustand.
3. Prüfen Sie das Turngerät vor jedem Einsatz auf korrekte
Installation sowie die Befestigungsmechanismen dieses
Gerätes. Sollten Sie im Zweifel sein, benutzen Sie dieses
Gerät nicht und lassen eine Prüfung durchführen.
4. Berücksichtigen Sie immer Ihre eigenen Grenzen und
die Begrenzungen dieses Turngerätes.
5. In der unmittelbaren Nähe des Geräts dürfen sich keine
hinderlichen Gegenstände oder Personen befinden.
6. Sorgen Sie für ausreichende Sicherheitsfläche im
Umfeld des Geräts.
7. Benutzen Sie das Gerät nicht, wenn Sie unter Einfluss
von Alkohol, Medikamenten oder Drogen stehen.
8. Schwangere Frauen oder Personen mit
gesundheitlichen Problemen sollen das Gerät nicht
benutzen.
SPIETH empfiehlt, keine Veränderungen an den gelieferten
Geräten vorzunehmen. Sollten die Geräte durch nicht
sachgemäße Manipulation verändert werden, lehnt SPIETH
jegliche Verantwortung in Schadensfällen ab. Dadurch tritt
automatisch auch die Produkthaftung außer Kraft.
Allgemeiner Hinweis:
Turngeräte und Matten haben eine begrenzte Lebensdauer,
und Materialien ermüden nach einer bestimmten Zeit. Bitte
prüfen Sie mindestens alle 3 Monate sämtliche Teile, die
einer verstärkten Abnützung unterliegen. Dies betrifft
hauptsächlich Sicherungen von verstellbaren Teilen und
Mechanismen, z.B. Barrenholme, Reckstangen, Ringe.
Ersetzen Sie alle abgenutzten, fehlerhaften und fehlenden
Teile. Im Zweifelsfall holen Sie sich einen Sachverständigen
zu Rate.
Aus Sicherheitsgründen empfehlen wir eine jährliche
Wartung der Turngeräte und Matten durch Spezialisten
durchführen zu lassen!
In order to reduce the risk of injury and to assure secure
functioning of the apparatus, rules mentioned below are to
be strictly followed:
1. Use this equipment only under the supervision of a
trained and qualified instructor.
2. Check this equipment for proper stability before each
training, use it only in perfect technical conditions.
3. Always check the apparatus for its correct installation,
particularly for the fi ation mechanism before each use.
If there are any doubts, do not use the apparatus and
get a professional check for the apparatus.
4. Please consider your own limits and the restrictions of
this gymnastics apparatus, while using it.
5. Obstructive items or persons in close pro imity of the
apparatus are not allowed.
6. Provide appropriate safety zones in the surroundings of
the apparatus.
7. Never use the apparatus under influence of alcohol,
medication or drugs.
8. Pregnant women or persons with health issues should
not use this apparatus.
SPIETH does not recommend any modification of the
equipment supplied. Should the equipment be modified
through improper manipulation, SPIETH assumes no
responsibility for the damages caused. This means the end
of warranty for the SPIETH product.
General advise:
The life period of gymnastic equipment and mats is limited.
Also materials wear off after a certain period of time. Please
check all parts, which are the subject to severe wear and
tear, at least once in 3 months. This is mainly relevant for
the security of adjustable parts and mechanisms, e.g. rails,
bars, rings. Replace any worn off, defective and missing
parts. If there are any doubts, ask for the advice of a
specialist.
For security reasons, we suggest to perform the
maintenance of gymnastics equipment and mats by a
specialist once a year!
Popular Home Gym manuals by other brands

Weider
Weider D700 ACHIEVER Assembly instructions

Life Fitness
Life Fitness SM62 Unpacking and assembly instructions

CAPITAL SPORTS
CAPITAL SPORTS Themis 10045214 manual

eGYM
eGYM M1 Leg Extension Operation manual

Infinity
Infinity R100APM instructions

Paramount Fitness
Paramount Fitness SF-0700 Assembly manual


SPORTS ART
SPORTS ART 2100 Repair guide

Weider
Weider 214 Bench Manuel de l'utilisateur

Hammer Strength
Hammer Strength MTS HIGH ROW Unpacking and assembly instructions

Body Solid
Body Solid Power Lift FID46 owner's manual

Weider
Weider Pro Xt55 user manual

body Power
body Power BK-167 installation instructions