Casall AMS900 User manual

ROWER AMS900

2
Owner’s Manual
Important: Please locate your serial number and record in the box below for service support
purposes.
Serial number here:
Serial number

Hardware chart

EXPLODED DIAGRAM

Parts List
No. Description Quantity
A,A-1 Console and screw 1 SET
B Handlebar 1 PCS
B-1 Foam grip for handlebar 2 PCS
B-2 Cap for handlebar 2 PCS
C Main frame 1 PCS
C-1 Console post for main frame 1 PCS
C-2 Console bracket holder 1 PCS
C-3 Screw M6xP1.0x57L 1 PCS
C-4 Nylon nut M6 1 PCS
C-5 Flat washer φ6xφ16x1t 2 PCS
C-6 Fixed stopper for bracket holder 2 PCS
C-7 Allen bolt M6x14L(4m/m) 4 PCS
C-8 Flat washer φ6xφ13x1t 4 PCS
C-9 Holder for gear box 1 PCS
C-10 Screw M6xP1.0x10L 2 PCS
C-11 Flat washer φ6xφ13x2t 2 PCS
C-12 Upper cover for main frame 1 PCS
C-13 Screw M5x14L 6 PCS
C-14 Handlebar holder 1 PCS
C-15 Screw M4x15L 4 PCS
C-16 Locking knob 1 PCS
C-17 Cable for console 1 PCS
C-18 DC cable 1 PCS
C-19 Pulse wire for console 1 PCS
C-20 Sensor holder 1 PCS
C-21 Flat washer φ5xφ10x1t 1 PCS
C-22 Screw M4x10L 1 PCS
C-23 Sensor box 1 PCS
C-24 Chain cover (R/L) 2 PCS
C-25 Fixed holder for chain cover 2 PCS
C-26 Screw M4x12L 4 PCS
C-27 Screw M4x16 4 PCS
C-28 Side cover for chain cover 2 PCS
C-29 Screw M4x14L 12 PCS
C-30 Fan fixed cover 1 PCS
C-31 Gear box 1 PCS
C-32 Upper decorative cover 2 PCS
C-33 Down decorative cover 2 PCS
C-34 Screw M4x20L 6 PCS
C-35 Fan blades fixed holder 1 PCS
C-36 Screw M3x10L 4 PCS
C-37 Fan blades 7 PCS
C-38 Connect bar for fan blades 1 PCS
C-39 Adjusting gear for fan blades 1 PCS
C-40 Strap hole 1 PCS
C-41 Adjusting pad for main frame 1 PCS

6
C-42 Connect seat 1 PCS
C-43 Stick for connect seat 1 PCS
C-44 Stopper for connect seat 1 PCS
C-45 Fixed shaft for connect seat 1 PCS
C-46 Hex. screw M8*P1.25*16L 2 PCS
C-47 Locking pin 1 PCS
D Magnetic set (一) 1 PCS
D-1 Allen bolt M8*P1.25*16L 2 PCS
D-2 Flat washer φ8xφ16x2t 2 PCS
D-3 Magnetic set (二) 1 PCS
D-4 Allen bolt M8xP1.25x12L 2 PCS
E Delving pulley set 1 SET
E-2 Hex. screw 3/8"x61mm 1 PCS
E-3 Nylon nut 3/8"x7t 1 PCS
E-4 Bushing φ10xφ14x6mm 1 PCS
E-5 Bushing φ10xφ14x3mm 1 PCS
E-6 Flat washer φ10xφ18x1t 1 PCS
F-1,F-4~F-7 Flywheel assembly 1 SET
F-8~F-18,F-20,F-22,F-23 Spring box assembly 1 SET
F-19 Pattern nut for flywheel 2 PCS
F-21 Hex. screw M4x5L 1 PCS
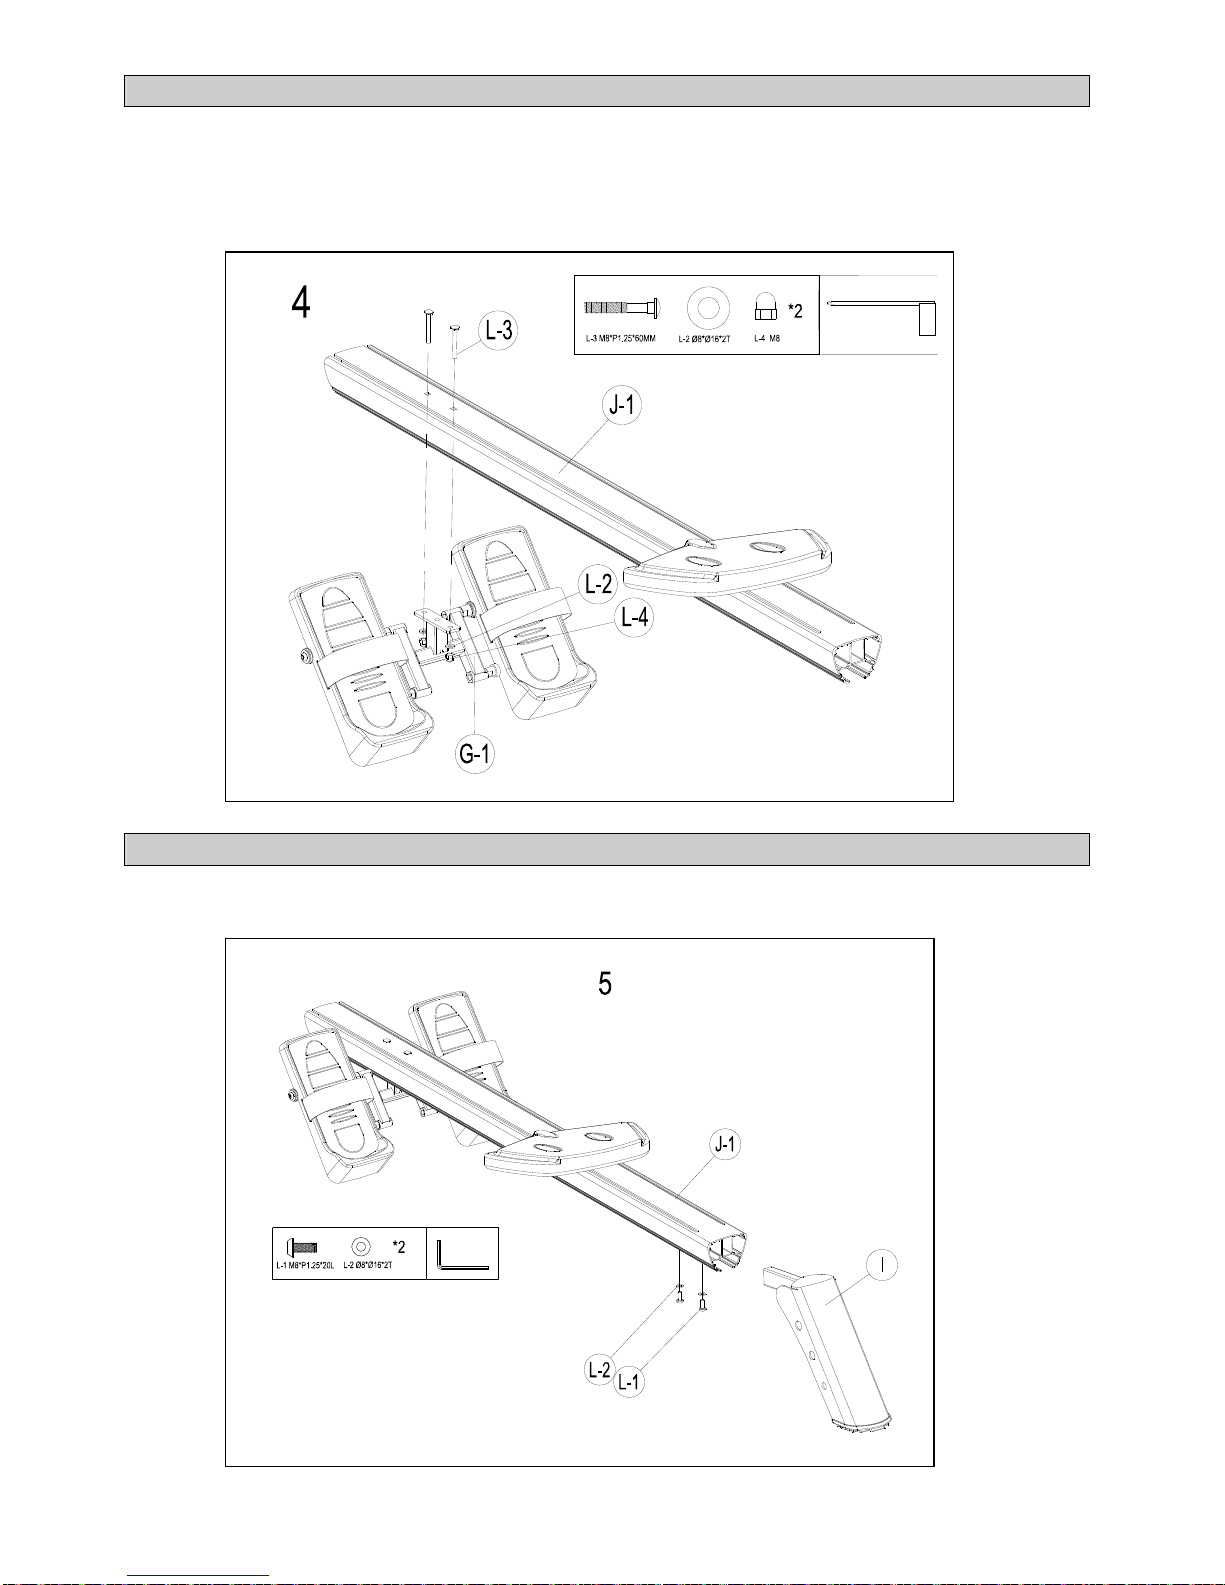
G-1 Pedal holder 1 PCS
G-2 Pedal fixing plate assembly 2 PCS
G-3 Bushing 4 PCS
G-4 Pedal (R/L) 2 PCS
G-5 Strip for pedal 2 PCS
G-6 Allen bolt M8xP1.25x20L 2 PCS
G-7 Flat washer φ8xφ25x2 2 PCS
G-8 Rotary shaft for pedal 2 PCS
G-9 Stop axle 2 PCS
G-10 Foam for stop axle 2 PCS
G-11 Screw M5xP0.8x10L 8 PCS
G-12 Pedal pad 2 PCS
H-1 Front stabilizer 1 PCS
H-2 End cap for front stabilizer 2 PCS
H-3 Adjusting pad for front stabilizer 2 PCS
H-4 Transportation wheel for front stabilizer 2 PCS
H-5 C-type ring φ8 4 PCS
H-6 Speedy nut M8 2 PCS
I-1 Rear stabilizer 1 PCS
I-2 Foot pad for rear stabilizer 1 PCS
I-3 Allen bolt M8xP1.25x12L 3 PCS
I-4 Connect bar for rear stabilizer 1 PCS
I-5 Stopper for rear stabilizer 1 PCS
I-6 Hex. nut M8 1 PCS
J-1 Slippery rail 1 PCS
J-2 Fixed for rail 1 PCS

7
J-3 Screw M5xP0.8x8L 2 PCS
J-4 Screw M4x8L 2 PCS
J-5 Plug for rail 1 PCS
J-6 Wireless pulse receiver for rail 1 PCS
K-1 Rolling slider 1 SET
K-2 Roller wheel 6 PCS
K-3 Screw M6xP0.8x15L 4 PCS
K-4 Hex. nut M6 6 PCS
K-5 Spring washer φ6 6 PCS
K-6 Seat 1 PCS
K-7 Hex. screw M6xP1.0x22L 6 PCS
L-1~L-4 Bolts & nuts pack 1 SET
M Adaptor 1 PCS
ASSEMBLY STEPS
Steps 1
1. Fit the front stabilizer (H-1) to the main frame (C) and secure it with 4 of allen bolt (L-1), 4 flat
washers (L-2). Make sure they are securely tightened.

8
Steps 2
1. Assemble the two stop axle (G-9) onto the pedal holder (G-1) in side.
2. Assemble the two pedals (G-4 L/R) onto the pedal holder (G-1) with a screw driver in side.
Remarks: screw the left pedal’s spindle counter-clockwise and the right pedal’s spindle clockwise.
Use a wrench (or screwdriver) to screw the four spindles completely.
Steps 3
1. Pass the slippery rail (J-1) through the slide seat (K-6)

9
Steps 4
1. Fit pedal holder (G-1) to the slippery rail (J-1) and secure it with 2 carriage screws (L-3) and 2 flat
washers (L-2) , and two nuts (L-4). Make sure they are securely tightened.
Remarks: Do not screw one set of the Screws and Nuts too firm at one time. It is better to fix the
two sets firmly at the same time because it helps you to change angles and to fix easily.
Steps 5
1. Attach the rear stabilizer (I) to the slippery rail (J-1) and secure it with 2 allen bolt (L-1), 2 flat
washers (L-2). Make sure they are securely tightened.

10
Steps 6
1. Please remove the locking pin (C-47) and locking knob (C-16) on the main frame (C).
2. Connect the Wireless pulse receiver (J-6) with pulse wire (C-19).
3. Insert the slippery rail (J-1) to the main frame (C) and fasten it with 2 flat washers (L-2) and 2
allen bolt (L-1).
4. Lay down the slippery rail (J-1) to be flat.
5. Lock main frame (C) to the using locking knob (C-16), Insert locking pin (C-47) the main frame
(C).
Steps 7
1. Connect the pulse wire (C-19) and cable (upper) (C-17) with the console (A).
2. Attach the console (A) to the main frame (C) using 4pcs screw (A-1).

11
Steps 8
Connect the adaptor (M) to the DC hole (located on the front of the main frame).
Folding the rowing machine:
1. Remove the locking knob (C-16).
2. Remove the locking pin (C-47).
3. Fold the slippery rail (J-1) upward and secure the locking pin (C-47).
4. Insert the locking knob (C-16) with the hole on the main frame as shown.
When unfolding the machine, proceed in the reverse assembly sequence and always make
sure that you rowing machine in stored safely.

12
Moving the rowing machine:
Take the rear foot of the rowing machine and tilt the machine forward until it can be pushed easily.
* Remove the metal treads prior to moving the machine using the transport rollers.
*Never move the machine over steps or other obstacles on your own.

13
SM5887-64 INSTRUCTIONAL MANUAL
!!!Forsimpleexercise,itisnotalwaysnecessarytoselectatrainingprogramormanuallysetthe
TIME,DISTANCEorothervalues.Youcansimplystartpedaling.
System Plug Connection Socket
Connection For Pulse

14
Assoonasthecomputerisconnectedwithpowersupply,anacousticsignalsoundsandallofthedisplays
areshownonLCDfor2seconds.
Ifnobuttonarepressedandthepedalshavenotbeenmovedforapprox.4minutes,thecomputerwill
switchtopowersavingmode.Anddisplayclock,calendarandroomTemp.Only.
DISPLAY&BUTTONFUNCTIONS
TrainingValuesDisplayRangeDescription/SettingRange
SPM0~999‐Strokesperminute
TIME/500m0.0~99:00min.‐Userexercisingtimedisplaying;
‐Itwillscaninevery6sanddisplaytheremaintimetofinish500
metersrowingaccordingtocurrentspeed.
METERS0~9999m‐Settingrange50~1000
CALORIES0~9999Cal.‐Burnedcaloriesduringrowing.
‐Settingrange0~9990
STROKES 0~9999 ‐Themovementswhencompleterowing.
PULSE30‐240BPM0‐30~240Bpm
AcousticSignals
Allsettingsmadewiththecomputerareconfirmedwithanacousticsignal:
1shotbeep=settingconfirmed
2shotbeeps=Itisimpossibletomakeanysettings
TrainingData
Thecomputercalculatesanddisplaysallvaluesautomaticallyaccordingtouserrowingstatus(seetable).
Takenote:
*Ifonlya“P”isshowninsteadofpulsevalue,itisimpossibletomeasuretheHR.Wearthechestbelt
properlysothatcomputercandetectyourhearrate.
*Theprofiledisplayedinthecenterfielddependsonthetypeofexercisethathasbeenset.
Thecomputerprovidesanumberofwaystovarytheexercisesessionandmakeitmoremotivating.
BUTTONFUNCTION
UP‐Increaseresistancelevel
‐Functionselection
DOWN‐Decreaseresistancelevel
‐Functionselection
ENTER‐Confirmsettingorselection.
Reset
‐Holdonpressingfor2seconds,computerwillreboot.
‐Resetallvaluestozero.
‐Reversetomainmenuafterfinishingaworkout.
Start/Stop‐StartorStoprowingtraining.
Recovery‐TrackuserHeartrateinrecoveryphase.

15
Thefollowingexercisingisavailable:
‐ManualTraining(trainingwithoutprograms)
‐TrainingwithPrograms(thereare12programspreset,P01~P12)
‐TrainingwiththeHeartRateprogram(H.R.C)
‐Trainingwithcompetitionprogram(RACE)
‐Trainingwithyourownprogram(Userprogram)
Startingexerciseimmediately(MANUAL)
ThenMANUAL‐‐>PROGRAM‐‐>H.R.C.‐‐>RACE‐‐>USERisflashingwith1Hz.PressUPandDOWNto
chooseMANUALandconfirmbypressingENTER.Ifyouhavepreviouslyselectedaprogramorstarted
yourworkout,pressRESETtoreturntothestartingdisplay.
‐PressSTART/STOPbuttontostartworkoutimmediatelywithoutenteringfurthersettings.
‐PressUPandDOWNkeystoinputyourpersonalsettingsandpressENTERtoconfirm.Thefollowing
fieldswillflashinturn:
.Resistancelevel(1~16)
.TIME(orMETERS)(TimeandMeterscan
’
tpresetatthesametime.)
.CALORIES
.PULSE
UseUP&DOWNtosetvaluesandconfirmyourselectionbyENTERbutton.
PressSTART/STOPtostartworkout.
AssoonasoneofthesetvaluesreachthepresetTarget,thecomputerwillalarmwithBi‐bisoundand
stop.
‐YoucanadjustthelevelofresistanceonthepaddleswhilerowingbypressingUPandDOWNkeys.The
newlysetlevelvaluewillbeshownintheprofile(defaultvalueisLevel1).
‐PressSTART/STOPtoendexercising.Allexercisingvaluewillremain.
‐PressRESETtoreversetoworkoutselectionmenu.
SelectingaProgramtodotraining(PROGRAM)
‐PressUPandDOWNkeystoscanMANUAL→PROGRAM→H.R.C.→RACE→USER.
‐ChoosePROGRAMandpressENTERtoconfirm.Theprogramsarepresetwith12profiles.PressUPand
DOWNtoselectonefromthe12presetprofiles.SetthedesiredsessionvalueandconfirmbyENTER:
.Resistancelevel(1~16)
.TIME
PressSTATR/STOPtostartworkout.

16
‐YoucanadjustthelevelofresistanceonthepaddleswhilerowingbypressingUPandDOWNkeys.The
newlysetlevelvaluewillbeshownintheprofile(defaultvalueisLevel1).
‐Programprofiles:
IntervalprogramsP2‐P3‐P7‐P12
IncreasingresistancelevelprogramsP6‐P9‐P11
IncreasinganddecreasingresistancelevelprogramsP1‐P4‐P5‐P8‐P10
Thestoredtrainingprogramsaredesignedespeciallytoenhanceaerobicbasefitness.
.Asabeginneryoushouldstartwiththoseprogramsslowlyandsetalowpaddleresistance.
.YoushouldonlygraduatetoIntervalprogramsonceyouhavebeenrowingforseveraltimes.
‐PressSTART/STOPtoendexercising.Allexercisingvaluewillremain.
‐PressRESETtoreversetoworkoutselectionmenu.
Setprogramaccordingtoheartrate(H.R.C.)
Inthisprogram,therowerreactstoyourpulseasmeasuredbythechestbelt.
Thisprogramsallowsyoutorowingefficientlyandsafelywithinyourrequiredheartratezone.
Inaddition,simplegraphicsalsoshowyouwhetheryouneedtoneedtoincreaseordecreaseyourstress
Level.Youcanchoosebetween:
HRC55Hereyouarerowingintheveryefficientrangeof55%,idealforbeginnersandforgeneralfat
Burning.
HRC75Thisrangeof75%ofthemaximumpulserateissuitableforexperiencedusersandathletes.
HRC90Theanaerobicrangeof90%ofthemaximumpulserateisonlysuitableforcompetitiveathletes
andshortsprintexercises.
TAGThecomputerusesyourAgetocalculateatargetpulserate,whichyoucanchangeasperyour
willing.Neverselectatargetpulsethatishigherthanyourage‐determinedmaximumpulse
rate.
‐PressUP&DOWNtoselectH.R.C.andenterbypressingMODE.ChooseHRC55‐‐>HRC75‐‐>HRC90‐>
TARGET.
WithHRC55,HRC75,HRC90,themax.Heartratewillbecalculatedbythecomputerautomatically.

17
‐WiththeTARGETprogram,thepresetvalue100willbeshown.PressUP&DOWNbuttonstosetavalue
between30~240andconfirmbyENTER.Theprogramhasbeensaved.
‐SetthedesiredsessionTIMEwithUP&DOWNbuttonsandpressENTERbuttontoconfirm.
‐PressSTATR/STOPtostartworkout.
Forthisprogram,itisnecessarytowearthechestbeltsothatcomputercandetectanddisplayyour
heartratevalue.
Programsequence:
Thecomputersetsapaddleresistancethatkeepsyouexercisingconstantlywithinyourtargetpulserate.
.Ifyouarerowingandgobelowyourpresetpulserate,thepaddleresistancewillautomaticallyriseby
onestresslevelevery30seconds.
.Ifyouareexercisingandgoaboveyourpresetpulserate,thepaddleresistancewillautomatically
decreasebyonestresslevelevery15seconds.Ifyouhavealreadyreachedthelowestlevel“1”andyour
pulserateisstillhigherthanyourpresetvalue,thenafterabout30secondsanacousticsignalwillalarm
andcomputerprogramwillendautomatically.
Trainingwithcompetitionmode(RACE)
Inthisprogram,youcanenjoyrowingjustlikeacompetition,whileyourrivalisthecomputer.
‐PressUP&DOWNtoselectRACEandpressENTERtoconfirm.
‐PressUP&DOWNtosetSPMandconfirmbypressingENTER.
‐PressUPandDOWNtoselectdesiredrowingMETERSandconfirmbyENTER.
‐PressUPandDOWNtoadjustpaddleresistancelevel.
‐PressSTATR/STOPtostartworkout.ComputerwilldisplayUSER&PCworkoutstatus.
‐PressUPandDOWNtoadjustresistancelevel.
EitherPCorUserfinishthesetrowingdistancefirst,computerwillstopandshowPCwinorUserwin.
‐PressSTART/STOPtoendexercising.Allexercisingvaluewillremain.
‐PressRESETtoreversetoworkoutselectionmenu.
User‐definedprofile(USERPROGRAM)

18
Hereyoucandesignyourownprofilewithbarsjustlikethepresetprogramprofiles.
‐PressUP&DOWNtoselectUSERPROGRAMandpressENTERtoconfirm.Thefirstbarwillbedisplayed.
‐PressUP&DOWNtosetresistancelevelandconfirmbyMODEbutton.Thenextbarwillbedisplayed.
‐Continuethisprocesstillsetup16bars.Themaxresistancelevelis16.Tofinishyoursettingorquit
setting,holdonpressingENTERbutton.
‐SetthedesiredsessionTIMEwithUP&DOWNbuttonsandpressENTERtoconfirm.
‐PressSTATR/STOPtostartworkout.
AssoonasoneofthesetvaluesreachthepresetTarget,thecomputerwillalarmwithBi‐bisoundand
stop.
‐YoucanadjustthelevelofresistanceonthepaddleswhilerowingbypressingUPandDOWNkeys.The
newlysetlevelvaluewillbeshownintheprofile(defaultvalueisLevel1).
‐PressSTART/STOPtoendexercising.Allexercisingvaluewillremain.
‐PressRESETtoreversetoworkoutselectionmenu.
Recoveryphase
Itisrecommendedtoendanintensiverowingsessionwitharecoveryphase.Duringthisphaseyou
shouldbeabletorelaxandpaddlewithoutstrongresistanceuntilyourpulseslowsclosetoitsusualrate.
‐PressREVOCERYbuttonandwearchestbeltagain.ThenonlyTIMEisshowingwithcountingdownfrom
60secondsto0,allotherfunctionsarenotavailable.
Oncethe60secondsrecoveryphaseisover,anevaluationoftheachievedheartratewillbeshown.
‐Ifyourheartrateisstillveryhighafter60s(Fisbetween4and6),youcouldrestarttherecovery
program
tograduallyslowyourheartratefurther.
Troubleshooting:
E‐2:Motorstrokeoverthenormalrange.Plugtheadaptoragain.Repoweringontheconsoleandthe
motorwillbacktothenormalrange.
E‐7:Checkifcableswerewellconnectedordamaged.
Attention! All preset data will be lost when unplug the power (adaptor) from the "machine".

19
GARANTI och SERVICE
Vid garantiärende och service
kontaktar du Casall´s serviceavdelning på www.service.casall.se
Där gör du din felanmälan, ställer frågor angående teknisk support mm. På denna sida finner du även
aktuella manualer.
•Kvittopåköpetskaalltidredovisasvidenreklamation
•Vidreklamationsärendemåstedualltiduppgeproduktensserienummer.Noteradetta nummerredanvid
montering.Seproduktensmanualförhänvisningtillvarduhittarserienumret.
•Casallföljerkonsumentköplagen.Reklamerarköpareninteinomtreårfråndetatthanhartagitemotvaran,
förlorarhanrättenattåberopafelet.Lag(2005:62).
•CasallSportsskyldigheterunderdennaperiodärbegränsadetillreparationellerbyte,enligtvadCasallSport
anserlämpligt,tillsammaellerenjämförbarmodell.
Table of contents
Other Casall Home Gym manuals