Spirit Halloween Zombie Tech Squad SINISTER GOTHIC GARGOYLE User manual
A
BC
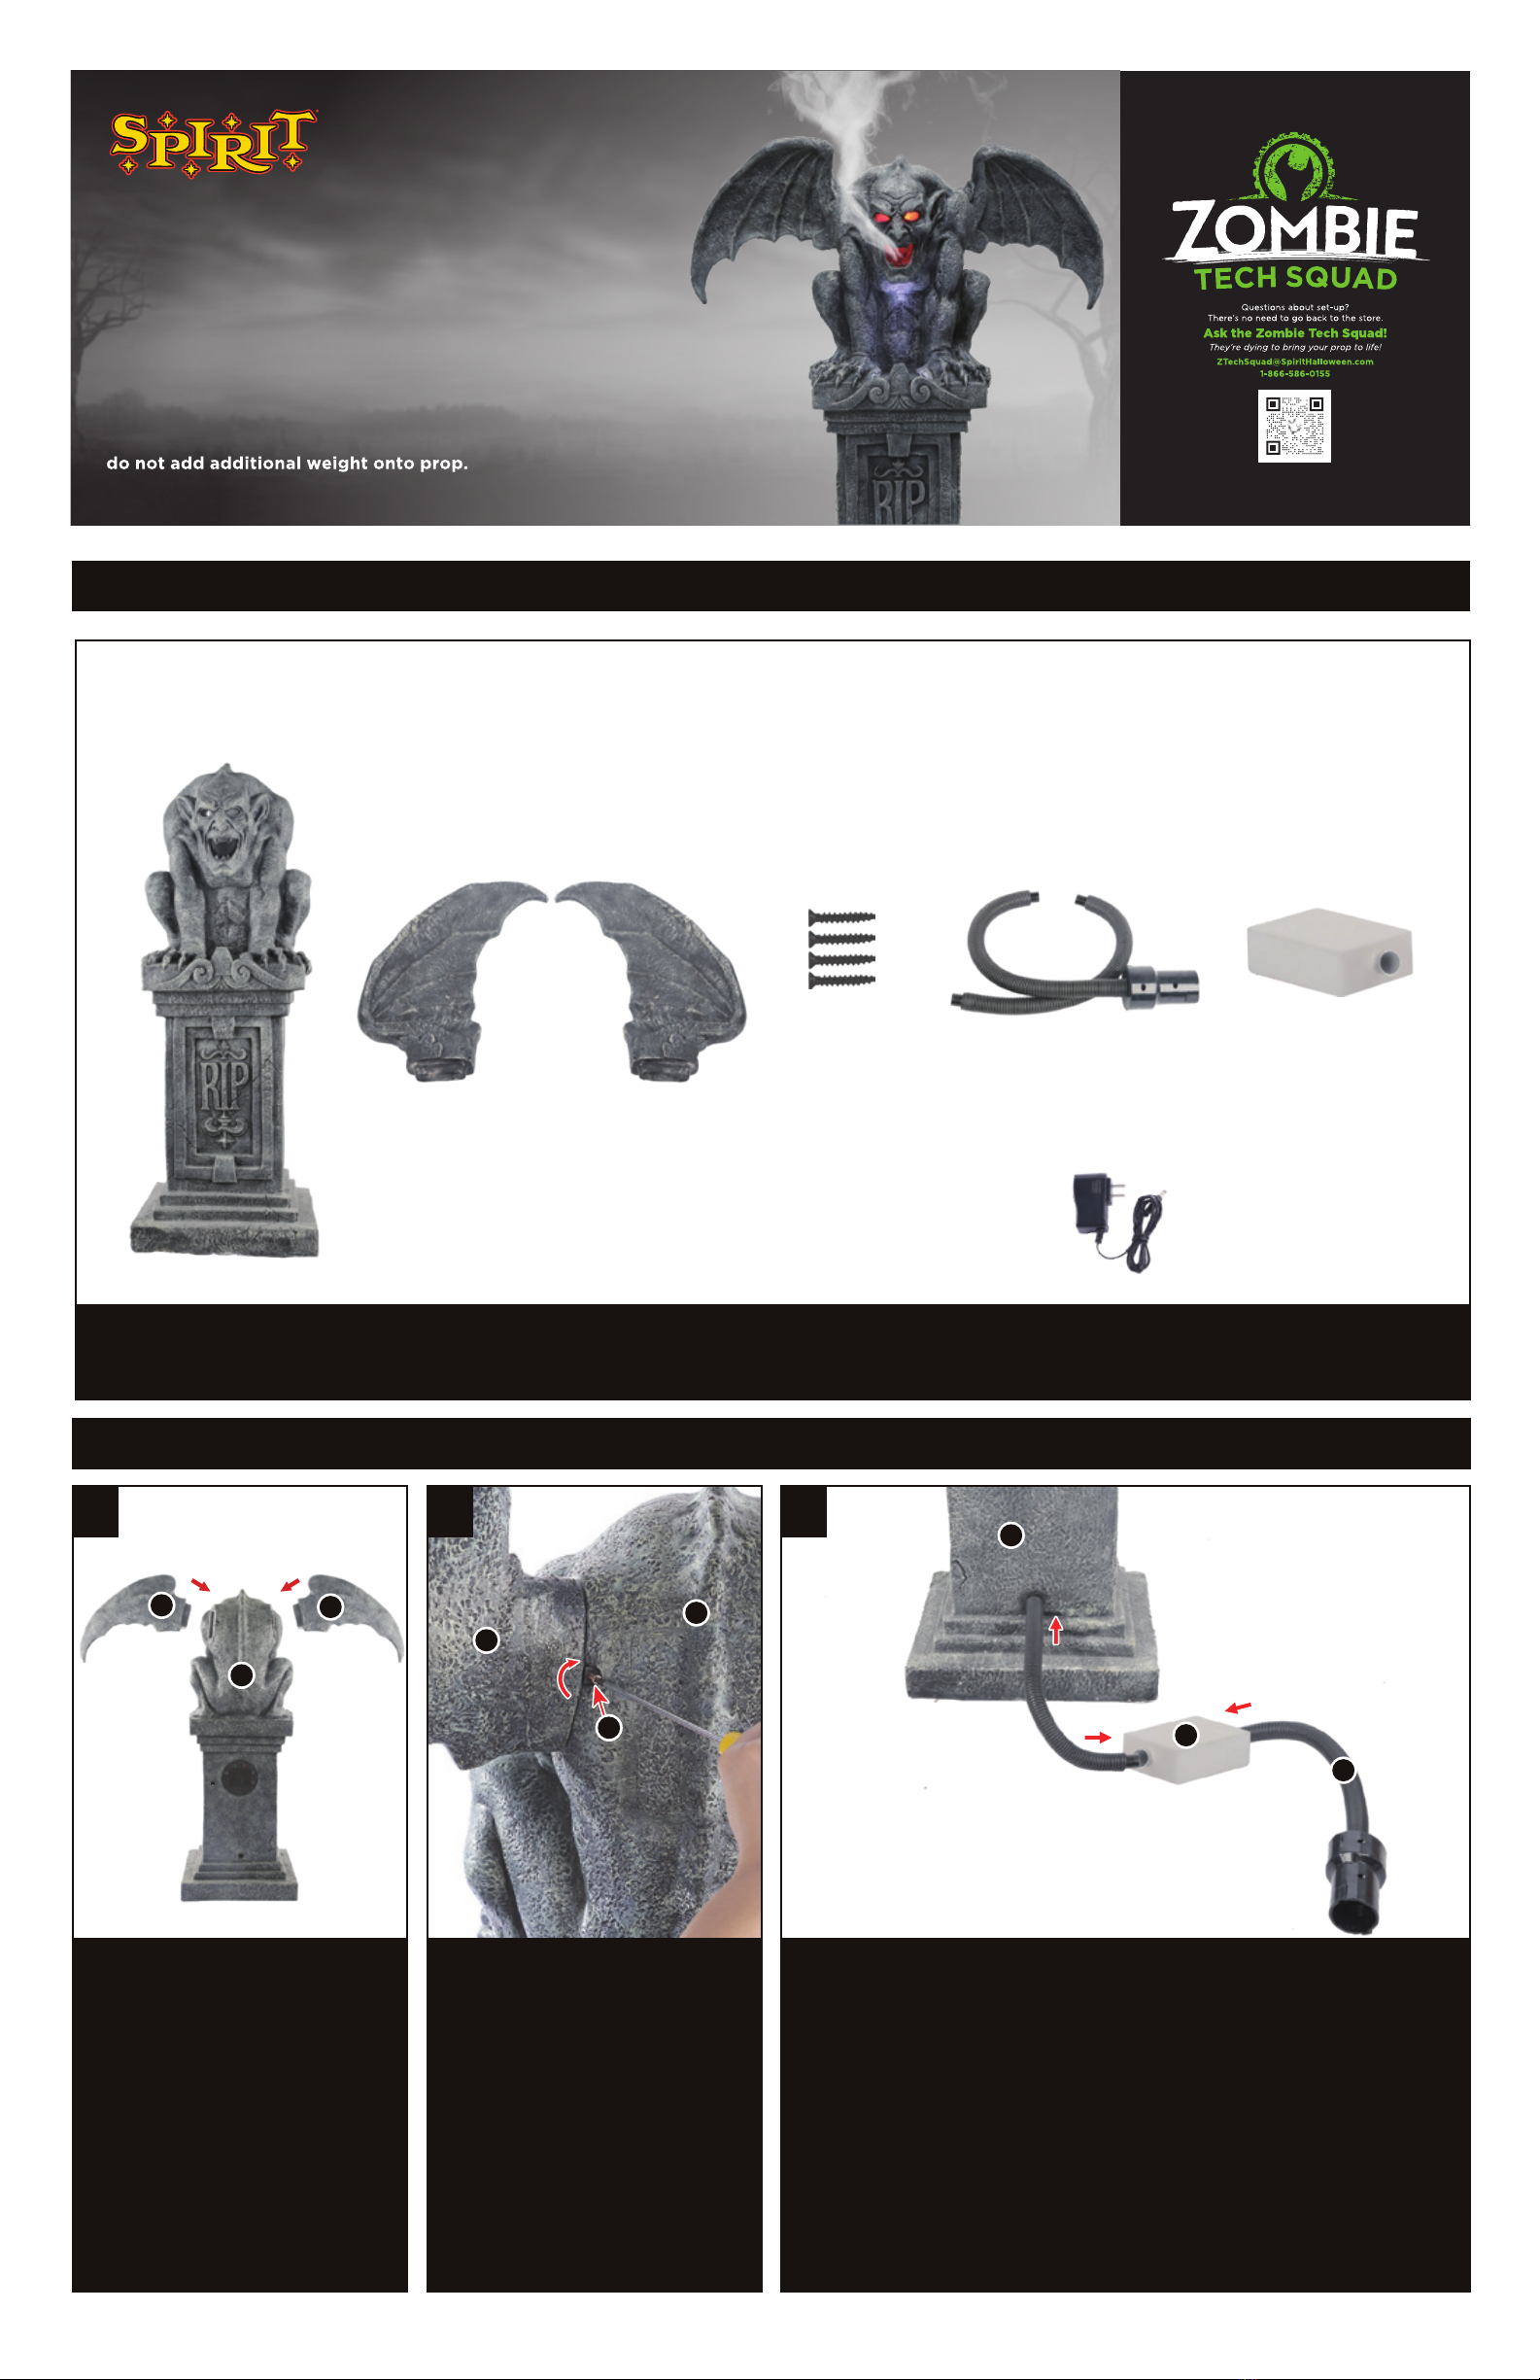
FRAME:
A
C D EB F
G
PARTS:
*AC Adapter Spec
Input: 100-240V AC 50/60Hz
Output: 5.9V 1.5A
1/3
SINISTER GOTHIC
GARGOYLE
A. Body
B. Left Wing
ASSEMBLY
1 2 3
1. Gently slide the rectangular
ends of the (B) Left Wing and
the (C) Right Wing into the
corresponding rectangular slots
and holes on the (A) Body as
shown in Figure 1.
2. Twist the (D) Screws onto the
exposed bolt screw tips, and
tighten to securely attach the
wings to the body. CAUTION: DO
NOT OVERTIGHTEN as shown in
Figure 2.
3. Optional: this item can be connected to most standard 400 Watt fog
machines (not included) to have fog come out of the gargoyle’s mouth. To
achieve this function, insert the small end of the (E) Fog Hose into the Fog
Hose Attachment Hole located on the back of the Gargoyle Base, connect
the (E) Fog Hoses and the (F) Moisture Trap Tank together as shown, and
then attach the large end of the hose onto the nozzle of your fog machine
as shown in Figure 3.
When using the Fog Effect, Remove and Empty the (F) Moisture Trap Tank
as needed.
RightLeft
Back
Front
C. Right Wing
D. Screws x 4
E. Fog Hose
F. Moisture Trap Tank
G. Adapter
Assembly and Operating Instructions
WARNING: Do not turn prop on until fully assembled.
Stay clear of the prop while operating.
Keep all plastic and wire parts away from children.
Prop is intended for use with included
components. For optimum performance,
2 people are recommended for assembly.
B
A
A
DF
E

2/3
Care and Storage Instructions
For best performance operate your item indoors. When not in use, store this
product in its original packaging. Keep away from heat and moisture.
• Please use the transformer supplied by manufacturer.
• Please assemble item according to instructions. Connect all wires
according to matching color.
• Children should be supervised by adults. The item should not be grabbed, as it becomes a
tipping hazard. Keep all away from the transformer, as it heats up during operation.
Trouble Shooting Steps
• Be sure to assemble on a flat surface.
• Only use the power adapter that came with this item.
• Make sure all cables are connected securely before operation. NOTE that cables are
color-coded and could affect function if not connected correctly.
AA 1.5V
AA 1.5V
AA 1.5V
AA de 1.5V cc
Made in China
Fabriqué en Chine
Hecho en China
Adapter
OPTIONAL FOG MACHINE SETUP
4
Attach the other end of the (E) Fog Hose to the fog machine as shown
in Figure 4.
NOTE: If the connector does not fit, remove the inner adapter ring and
re-connect to the nozzle of Fog Machine.
Adapter
Fog Hose Connector
IMPORTANT INFORMATION:
1. The infrared sensor distance and ambient temperature are directly
related. When the body temperature (98.6° F) is different to the
ambient air temperature, the infrared sensor distance will be farther.
When the body temperature (98.6° F) is close to the ambient air
temperature, the infrared sensor distance will be shorter.
2. Do not use this item in an environment where air currents are
caused by a window, air conditioning, or air outlet.
3. Do not have the infrared sensor face a direct source of heat such
as a heater.
OPERATION INSTRUCTIONS
: This setting will activate sound and lights only when the sensor is triggered. The item will
operate 1 audio-cycle with each sensor activation.
: OFF - No function.
: Timer - 6 Hours ON/18 Hours OFF. ON operates as Light ON and Sensor ON.
: SOUND VOLUME CONTROL - Raise or lower the volume down to zero using the
push-button volume controls.
Optional: If you choose to use the (G) Adapter, Plug the (G) Adapter into the input receiving jack
marked “DC 5.9V” on the Function Control Box and Route to the bottom of the item
* 4 AA 1.5V BATTERIES REQUIRED (NOT INCLUDED)
You will need a screw driver(Not Included).
Locate the battery compartment on the product. Remove the battery compartment cover by using a
screw driver to unscrew the four screws. After removing or installing the batteries, place the battery
compartment cover into position, ensuring that weather-resistant seal is properly seated. Secure the
battery compartment door by tightening the four screws, being careful not to overtighten.
Battery Replacement Instructions
For Indoor or Covered Porch Use Only.

3/3
BATTERY INSTALLATION WARNINGS
Battery installation should be performed by an adult.
• Use only batteries recommended in the instructions.
• Do not mix old and new batteries.
• Do not mix alkaline, rechargeable, standard,
or different types of batteries.
• Be mindful to insert batteries with correct polarity as indicated.
• Remove all exhausted batteries.
• Rechargeable batteries are only to be charged under adult supervision.
• Rechargeable batteries are to be removed from prop
before being charged.
• Non-rechargeable batteries are not to be recharged.
• The supply terminals are not to be short-circuited.
• Keep away from open flame.
• This product is designed for indoor or covered porch
use only and should not be placed outdoors
subject to the weather.
• This item is not a toy. For decoration only.
• Choking hazard due to small parts.
• Keep all plastic and wire parts away from children.
• This product is intended for use by persons
15 years of age and older. Not intended for use
by children ages 14 and under.
This device complies with Part 15 of the FCC Rules. Operation is subject to the following two conditions: (1) This device may not cause harmful
interference, and (2) this device must accept any interference received, including interference that may cause undesired operation.
Caution: Changes or modifications not expressly approved by the party responsible for
compliance could void the user’s authority to operate the equipment.
NOTE: This equipment has been tested and found to comply with the limits for a Class B digital device, pursuant to Part 15 of the FCC Rules.
These limits are designed to provide reasonable protection against harmful interference in a residential installation. This equipment generates,
uses and can radiate radio frequency energy and, if not installed and used in accordance with the instructions, may cause harmful interference to radio
communications. However, there is no guarantee that interference will not occur in a particular installation. If this equipment does cause harmful
interference to radio or television reception, which can be determined by turning the equipment off and on, the user is encouraged to try to correct
the interference by one or more of the following measures: Reorient or relocate the receiving antenna, Increase the separation between the
equipment and receiver, connect the equipment into an outlet on a circuit different from that to which the receiver is connected. Consult
the dealer or experienced radio/TV technician for help.
READ AND FOLLOW ALL SAFETY INSTRUCTIONS.
Read and follow all instructions that are on the product or provided with the product. For a cord-connected or direct plug-in power unit, do not use an
extension cord. Reference the National Electrical Code, NFPA 70, specifically for the installation of wiring and clearances from power and lighting
conductors. Installation work and electrical wiring must be done by qualified person(s) in accordance with all applicable codes and standards, including
fire-rated construction. For a cord-connected or direct plug-in power unit, do not install or use within 10 feet of a pool. WARNING: Risk of Electric Shock.
When used outdoors, install only to a covered Class A GFCI protected receptacle that is weatherproof with the power unit connected to the receptacle. If
one is not provided, contact a qualified electrician for proper installation. Ensure that the power unit and cord do not interfere with completely closing
the receptacle cover. WARNING: Risk of Fire. Installation involves special wiring methods to run wiring through a building structure. Consult a qualified
electrician. SAVE THESE INSTRUCTIONS.
This manual suits for next models
1
Other Spirit Halloween Outdoor Furnishing manuals

Popular Outdoor Furnishing manuals by other brands

PHI VILLA
PHI VILLA THD7-103-2401 Use and care guide

PHI VILLA
PHI VILLA E02GF119 Use and care guide

Action
Action ARUNDEL TWIN technical information

BENITO
BENITO Urban Brico A54N Assembly instructions

Outsider
Outsider PLATEAU SEAT 195 Mounting manual

Rutland County Garden Furniture
Rutland County Garden Furniture Felt Shingle Car Port Assembly instructions


