SPX GE-50576-A Mounting instructions
- 1 -
GE-50576-A Acoustic Belt Tension Tester
User’s Operation Manual
This manual will guide the operation of GE-50576-A.
Please read this manual carefully before use to understand all functions of GE-50576-A.
Revised 3 JAN 2013

- 2 -
Contents
Table Of Contents
1. Safety Precautions .....................................................................2
2. Overview ........................................................................................2
3. GE-50576-A Components ....................................................3
4. Display.............................................................................................5
5. Operation Instructions.............................................................6
6. Set-up..............................................................................................7
7. Noise Cancelation......................................................................8
8. Testing Belts .................................................................................9
9. Charging Instructions...............................................................9
10. Technical Specifications........................................................ 10
11. Certifications ............................................................................. 10
12. Maintenance.............................................................................. 10
13. Warranty & Service................................................................ 10
1. Safety Precautions
Please read this section carefully for safe operation.
WARNING !!
Do not drop or allow GE-50576-A to be hit.
Remove the microphone from GE-50576-A after
use and place in the storage case.
Do not use the tool near flammable substances.
Do not use the tool near water or other liquids.
When performing the test in vehicle, let the engine
cool down before testing.
CAUTION !!
Do not store in a humid area.
Do not place heavy objects on the GE-50576-A.
Do not wash the tool with liquid cleaners. Wipe
with a clean, dry cloth.
Store the tool in an area away from heat or direct
sunlight.
GE-50576-A goes into sleep mode after 5 minutes
without operation, but does not power off. Users
should perform the power-off operation manually
after testing is complete.
2. Overview
GE-50576-A Acoustic Belt Tension Tester enables
belt tension measurement with no direct contact.
GE-50576-A is used to measure the belt tension of
engine accessory belt systems and Electronic
Power Steering (EPS) steering racks.
When the microphone is held close to the belt,
belt vibration is captured by the microphone when
the belt is plucked, and the frequency is displayed.
For more detailed procedures, please consult
published service information for the vehicle or
component being serviced.

- 3 -
3. GE-50576-A Components
No
Item No
Description
Model Name / Specification
1
GE-50576-05
Li-Ion Battery
3.7V, 800mA
2
GE-50576-06
STORAGE CASE
MATERIAL : PLASTIC
DIMENSION(MM) : 160*100*60(mm)
3
GE-50576-01
ACOUSTIC BELT TENSION
TESTER
DIMENSION : Approx. 120*75*20(mm)
4
GE-50576-04
TOUCH PEN
GENERAL RESISTIVE TOUCH PEN
5
GE-50576-03
USB CABLE
GENERAL USB CABLE
6
GE-50576-02
MICROPHONE
UNI-DIRECTIONAL TYPE, 30CM FLEXIBLE TYPE
7
GE-50576-07
LCD PROTECTION FILM
(not shown)
PROTECTION FILM-4.3 INCH LCD
8
GE-50576-08
User Manual (not shown)
User Operation Manual –download from
https://gmspecialservicetools.spx.com/ToolDetails.aspx?id=6403
9
GE-50576-09
Protective Boot
DIMENSION : Approx. 120*75*20(mm)
≈
①Microphone
②Microphone connector (Nut type)
⑪Power Button
⑩Start Button
⑨Touch LCD
③Tool Body
⑦USB Connector
⑥Charge LED
⑤Power LED
④DC Adaptor Jack
⑧Upgrade Button

- 4 -
No
Name
Description
Remark
○
1
Microphone
Flexible shaft directional microphone
○
2
MIC Connector
Nut type microphone connector
○
3
Tool Body
Tool Body
○
4
DC Adaptor Jack
AD/DC converter adaptor jack
DC 12V, 2A output is recommended when USB charging is
not available.
User supplied per local
requirements
○
5
Power LED
Power status LED : Displays Power status
∙Power on : Blinks Green
for 4 seconds, then turns
On solid Green
∙Normal status : Solid
Green
∙Red Blink : Sleep mode
(up to 5 minutes)
∙Green/Red Blink: Timed
out –Power must be
turned Off, then back On
○
6
Charge LED
Charge status LED : Displays Charge status
Note: If the unit is powered on while being charged (via DC
adapter or USB cable), the charge LED will turn green.
∙Red : Charging
∙Red Blink : Low Battery
∙Green : Charge complete
○
7
USB Connector
USB connection port for charging & firmware update
○
8
Update Button
Depress the update button through the hole in the case
when software updates are required.
○
9
Touch LCD
Resistive touch panel LCD display
∙3.4”, 480RGB, 272Dots
○
10
Start Button
Mechanical Start Button
Operation is the same as the start button on main display
○
11
Power Button
Mechanical Power on/off (Sliding type)
Power On : Slide the button to turn on ()
Power Off : Slide the button to turn off ()
Auto Sleep mode: Automatic LCD power-off after 5
minutes without operation. Wakes up when the screen
is touched
∙Sleep mode is not the
same as Power Off. The
processor is active, but
the display is off.

- 5 -
4. Display
4-1. Booting Screen
4-2. Main Screen
Push to Start Test
Push to Pause Test, Hold to
Resume Test
Set-up mode
Sound Decibel
4-3. Set-up Selection Screen
4-4. Min/Max Range Setting
Booting Image
Company Logo
Caution Image
Measured Value
Average Value
Battery Status
Start/Stop
Button
Set-up Button
Min/Max Range
Selection
Return
Touch
Selection
MIN Range
MAX Range
MIN (-/+)
MAX (-/+)
Return
Save
Reset
Test Order
Unit
dB Indicator

- 6 -
5. Operation Instructions
1
Remove the microphone from the storage case
and carefully connect it to GE-50576-A
2
Slide the power button to turn on the unit. The
Power LED will blink, then turn solid green.
3
In normal operation, the Booting Screen is
displayed. Please minimize background noise as
much as possible during testing.
4
Main Screen Displayed. Place the microphone
close to the belt (approximately 1cm) without
bending the microphone shaft excessively.
4-1
To ensure proper readings, the range may need
to be adjusted to reduce the impact of
background noise. Please refer to Section “7,
Noise Cancelation”for more information.
5
Touch Start button on the screen or push Start
button on the tester body. The button image will
change to a red square, and a tone will sound.
6
Pluck the belt (while minimizing background
noise) and the result will display on the screen.
When a reading is registered on GE-50576-A, a
tone will sound, and the start button image
changes from ■→▶→■
7
Please wait to perform the next pluck until the
image changes to ■. When the start/stop
button is ready, pluck the belt again. GE-50576-A
displays the result and calculated average.
8
After three readings, the start button image
changes to ▶again. To re-test, touch the start
button on the screen, or push the mechanical
start button on the tool body.

- 7 -
9
GE-50576-A can be paused at any time during
testing by touching the start button on the
screen, or pressing the mechanical start button
on the tool body.
10
To re-set GE-50576-A, touch or press either start
button for more than 3 seconds. All current
results will be cleared, and the unit will go back
to the 1st step.
6. Set-up
1
To go to the set-up menu, touch the icon on the
right.
2
The Set-up menu includes 2 settings such as
min/max value and touch screen re-calibration.
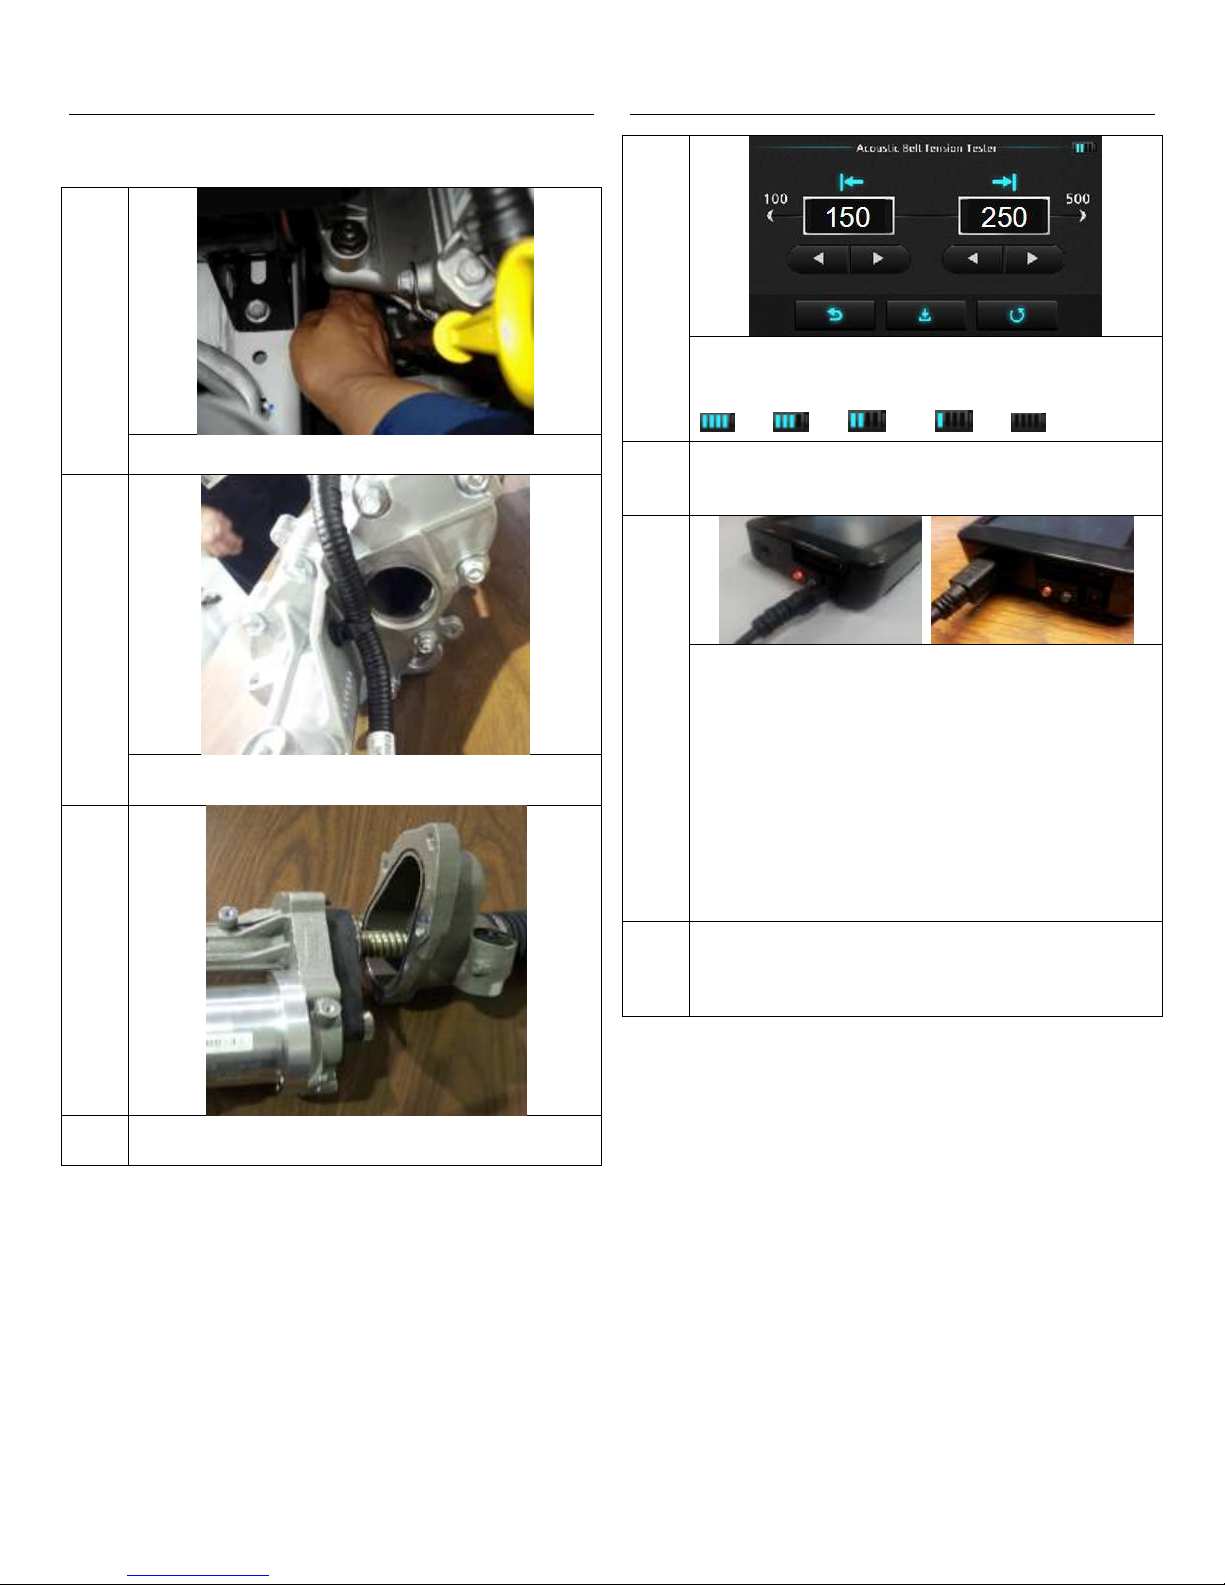
2-1
The 1st button, allows adjustment of the
tested frequency limits. The min/max threshold
can be adjusted from 100~500 Hz by touching
the left/right. A single touch will move +/- 1
increment, and holding the arrow will move +/-
5 increments.
2-2
When the desired values are displayed, touch the
center button to save these settings. A
tone will sound to indicate a successful save.
Touch the right button to return to the
default settings, and the left button to
return to the previous menu,
2-3
To re-calibrate the touch screen, touch the 2nd
button, on the set-up screen.
When a “+”symbol appears on the display, press
the center of the “+”. After 5 steps for each
corner and the center, the display will return to
the set-up menu.

- 8 -
7. Noise Cancelation
1
To reduce the effects of background noise, the
frequency range specification of the belt being
measured must be known.
Please refer to published service information for
the vehicle or component being serviced.
2
If possible, make the measurements in a quiet
area.
3
If background noise causes interference, touch
the set-up button and choose the Min/Max
setting menu
4
Adjust the min/max range as follows;
Min : Service information specification -
100Hz
Max : Service information specification
+100Hz
5
Perform the test again with normal background
noise, and adjust threshold again to a tighter
range if background noise continues to be an
issue.
Min : Service information specification –
50Hz
Max : Service information specification
+50Hz
- 9 -
8. Testing Belts
Please refer to vehicle service information for belt specifications
1
Engine Accessory Belt
2
Limited access EPS rack
3
Split-case EPS rack
9. Charging Instructions
1
As the battery level decreases, the battery status
indicator turns off each segment in turn.
→→→→
2
To charge the battery, turn off the power button
of the tester.
3
Connect the USB cable to the USB connector on
the bottom of the tool body. When connecting
to the USB port, the end of the cable should be
inserted correctly to the lap-top computer or
USB hub. Some regions may require a DC
adapter. In these regions, connect the adaptor
to the adaptor jack on the bottom of the tool
body.
3-1
Note: If the unit is powered on while being charged
(via DC adapter or USB cable), the charge LED will
turn green.

10
10. Technical Specifications
Power Supply : Li-Ion Battery Pack, 3.7V, 800mA
DC Charge : General USB Charging
recommended / 12V AD/DC Adaptor
capability
Normal Charge Time (battery fully
discharged) : 4~5 hours with USB port
connection , 2~3 hours with 12V AC/DC
adapter
Operation Temperature / Humidity
10℃~50℃(50F~122F), 80% RH
Dimension : 119.7*74.7*18 (mm)
Mass : 550g package, 110g body
Microphone Length : 30cm
11. Certifications
No
Cert.
Date
Region
By
1
FCC
2012.6.20
NA
SPX, Korea
2
CE
2012.6.20
EU
SPX, Korea
3
IC
2012.6.20
Canada
SPX Korea
3
KC
2012.6.20
S.Korea
SPX, Korea
4
ROHS
2012.6.20
Global
SPX, Korea
5
WEEE
2012.6.20
Global
SPX, Korea
12. Maintenance
Manually perform Power Off after completing
testing
Charge until charge LED turns to Green
Disconnect the microphone from the tool and store
it after use
Removing the battery from the tool is
recommended when storing GE-50576-A for a long
time.
13. Services & Warranty
Services
-For any issues with GE-50576-A, please contact
SPX Customer Service.
Warranty
-The GE-50576-A Acoustic Belt Tension Tester is
warranted against defects in material and
workmanship for one year, with the battery and
microphone warranted for a period of 90 days
from date of purchase.
-For any issues outside of the warranty period,
please contact SPX Customer Service
To Order parts, or speak to a technical service expert, call our
technical support line,
Region
Location
TEL
Asia
Japan
Tokyo,
Japan
+81 354363620
China,
Taiwan,
Hong
Kong
Shanghai,
China
+86 21 2208 5618
Korea
Seoul,
Korea
+82(0)314579520
India
New Delhi,
India
+91(0) 11 4517 1717
All others
Melbourne,
Australia
+61(0)395446222
Oceania
North America
Warren, MI
USA
+1-800-662-2001
Central and
South America
Sao Paulo,
Brazil
+52(0)5525951630
Mexico City,
Mexico
+52(0)5525951630 /
800-504-5111
Europe
Hamburg,
Germany
Direct : 0049 ( 0 )
6182 - 959 412
Free : 00800 779779
50
Middle East,
Russia
Africa
Table of contents
Other SPX Test Equipment manuals


