Spy Tec WAVBAND WRISTBANDAUDIO RECORDER User manual
WAVBAND WRISTBAND
AUDIO RECORDER
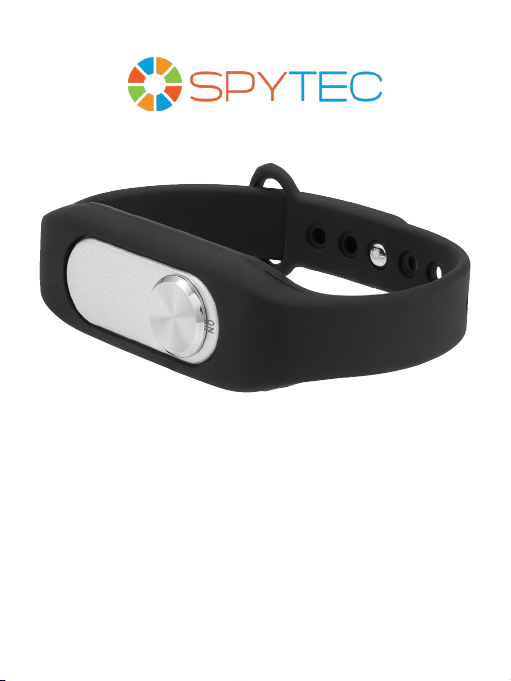
Hidden in an innocent-looking tness tracker, the WAVband Wristband Audio
Recorder is a simple, one-button device for recording conversations, meetings,
dictation notes or ambient sounds. The tiny recorder slips into a rubberized wristband
that adjusts to your wrist size. The rechargeable battery can power a recording for up
to 20 hours and the built-in 8GB of memory can store up to 140 hours of audio. The
WAVband comes with a USB cable for charging and transferring recordings into a
Windows computer.
In the Box
Recorder
Rubberized wrist strap
USB data/charging cable
User manual
WAVBAND WRISTBAND AUDIO RECORDER USER GUIDE 2
Precautions
• Don’t store or operate the device where high temperatures, dampness or dust
prevail.
• Avoid dropping the device or banging it against something.
• Back up les regularly.
• This product should not be used in illegal ways. Observe relevant laws.
Getting Started
Connect the included cable to the micro USB port on the tip of the WAVband and
a standard USB port on your computer. It should take between one and two hours
to charge the WAVband. While charging, a red LED will ash on an edge of the
WAVband. When fully charged, the LED will turn a steady red.
Note: If you use an AC adapter/USB charger (not included), see Specications (pg.
5). A typical phone charger may destroy the WAVband. Don’t use a charger with
current higher than 0.5A.
Make sure the WAVband appears as an external drive such as “Removable Disk (D:)”
on your Windows computer. If you don’t see it, turn the power button on and off.You
should hear an audio cue on your computer as the drive letter appears.
WAVBAND WRISTBAND AUDIO RECORDER USER GUIDE 3
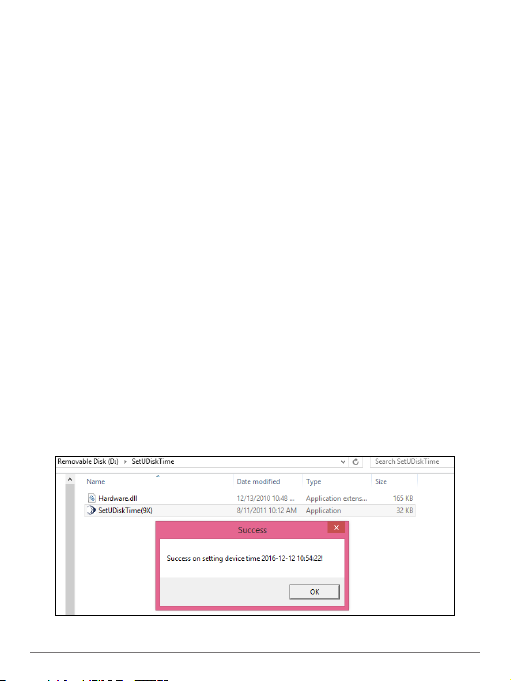
Double click on the drive to see two folders: SetUDiskTime and Record. The former
contains a utility to set the date and time on the WAVband; the latter will contain your
recordings.
To synchronize the current date and time from your computer to the WAVband,
double click on SetUDiskTime. Then double click on the SeUDiskTime(9X)
application. A conrming message that you’ve successfully set the date and time will
appear. (See image on previous page.) You can now remove the WAVband from your
computer and insert it in the wrist strap.
Wearing and Operating
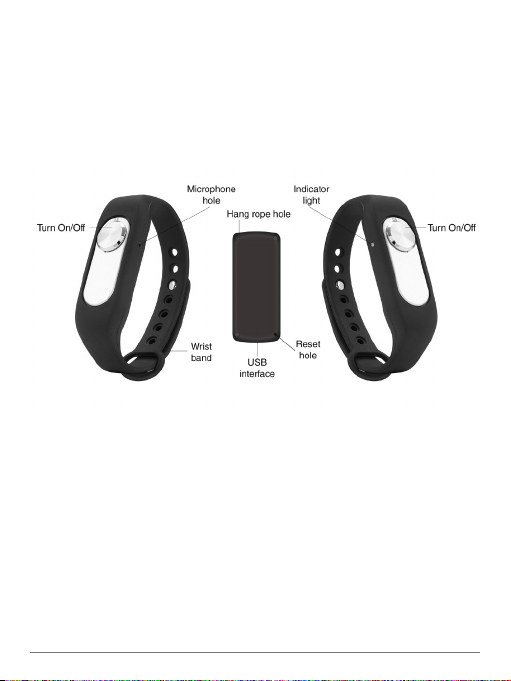
When you insert the recorder into the wristband, make sure to line up the microphone
with the hole on the edge of the band. The mic is on the opposite side of the On
button from the LED indicator. So, if you’re looking at the recorder with the On label
pointed up, the mic is on the right edge from the button.
Place the rubberized band over your wrist. Pull the metal-button tip through the other
end and tug the band into a tight but comfortable position so that you can push the
fastener into one of the holes and it stays in place.
Tip: Unless you’re doing self-dictation, mount the band on either wrist so that the mic
points outward to pick up voices in front of you.
As an alternative to wearing the recorder in the band, you can thread string or oss
(not included) through the rope hole in a corner of the WAVband and create a loop to
hang the device from clothing or a fashion accessory.

WAVBAND WRISTBAND AUDIO RECORDER USER GUIDE 4
Slide the button toward the On position. You’ll see a steady red LED. Once the LED
turns to white, wait another two seconds for recording to begin. Thus, gure a wait
period of 10 seconds between turning on the WAVband and audio to be saved.
For the clearest audio, don’t block the path to the mic by inadvertently putting a nger
over the mic hole, letting a shirt or coat sleeve cover it or wearing a glove over it. Try
to keep the microphone side of the WAVband pointed in the direction of the speaker
whose voice you’re trying to capture.Your own voice likely will be louder since you’re
already close to the mic.
To end the recording, slide the button towards the Off position. The LED will turn from
white to red, then shut off.
If the LED indicator turns red and blinks during recording, it means the WAVband is
almost out of power. Stop recording and charge the device.
Playback and File Management
Plug the WAVband into a USB port on a Windows-compatible computer. Slide the
WAVband’s button to the On position, then to the Off position. You should hear a tone
from your computer and the device will appear as a removable drive such Removable
Disk (D:).
Recordings are stored under the Record folder. Double clicking on one will load the
Windows Media Player or another media player you specify.
If you want to archive a recording, copy it to your computer. Once the storage
capacity in the WAVband is exhausted, you will not be able to start a new recording.
You must delete les on the WAVband from your computer.

WAVBAND WRISTBAND AUDIO RECORDER USER GUIDE 5
Embedded memory 8GB that only supports the FAT32 format
Recording time About 140 hours
Card slot/removable memory None
Recording format WAV at 128 kbps (mono)
Continuous recording time from
full charge
About 20 hours
Port Micro USB
USB cable length 18˝ (45.7 cm)
Battery Non-removable polymer
Power supply 3.7v 110 mAh
AC adapter/USB charger (not
included)
5V, 500mA
Recorder size 1.7˝ x 0.7˝ x 0.4˝ (4.3 x 1.8 x 1 cm)
Recorder weight 0.3 oz. (8 g)
Strap size 9 ˝ x 0.5 ˝ (22.9 x 1.3 cm)
Strap weight 0.5 oz. (14 g)
SPECIFICATIONS
What can I do if the WAVband stops working?
Assuming you’ve charged the device, use a pin to press the reset hole located on
the rear of the WAVband around the edge from the micro USB port. (See diagram
on pg. 3.)
What happens when the WAVband’s memory capacity is reached?
When the memory lls up, the device cannot continue to record unless the user rst
transfers desired les to a computer, then deletes the les in the WAVband. The
device will not automatically delete old les to make room for new ones.
For continuous recording, does the WAVband automatically create smaller but
contiguous les?
Yes. Each le is 4 hours long.
What's the maximum distance the WAVband can be from the person speaking
to pick up the words?
About 9.7´ (6 m) but circumstances vary. Try to be as close as possible.
FAQs

WAVBAND WRISTBAND AUDIO RECORDER USER GUIDE 6
Can a WAVband be connected to a Macintosh computer to transfer recordings?
No. Though the Mac’s USB port will charge the device, the WAVband must be
connected to a Windows-compatible PC for les to be recognized.
Can the WAVband record while the USB cable is connected to a computer for
charging?
Yes. However, the WAVband won’t be recognized by the computer while recording.
When you slide the button to the On position, how much time elapses until
recording starts?
It takes about 10 seconds.Once the LED turns from red to white, gure another 2- or
3 seconds for the beginning of the recording to be picked up and saved.
Does the WAVband contain an earphone jack or a speaker?
No. Files must be played through a connected computer.
Why isn’t the date-time stamp always accurate?
You must run the SetUDiskTime utility with the WAVband connected to your
computer prior to the rst recording of the day—even if the WAVband is charged.
How can I keep the WAVband from falling off my wrist?
Make sure the metal fastener is rmly inserted in a hole on the band.
Is the WAVband a tness tracker?
No. It only looks like one.
Thanks for purchasing a SpyTec product! We appreciate your business and strive to
make your experience the best possible. If you have any issues with your product,
started.
Help

WAVBAND WRISTBAND AUDIO RECORDER USER GUIDE 7
Warranty
This Limited Warranty applies to physical goods sold by STI and lasts for a period
of 90 days from the date of sale of the device. This Limited Warranty covers any
manufacturing defects to the device or accessories encountered by normal use.
This warranty does NOT cover damages resulting from improper use of the
device (including the use of incompatible accessories such as chargers, storage
devices, etc.), unauthorized modications to the device, negligence, or from any
environmental or natural disasters, or from loss or theft. This warranty requires proof
of sale of the device from STI or from approved resellers only.
Devices that are covered will be repaired or replaced at STI’s discretion. Devices
requiring replacement will be fullled with a new or refurbished unit, or a similar unit if
the original unit is no longer available.
To take advantage of our warranty, go to http://www.spytecinc.com/return-policy/
and review our returns policy. If your device meets the above guidelines as well
as the guidelines on our website, please click the button to proceed to the Return
Authorization Form. In the event our online guidelines change, this warranty will
supersede any newer changes. Once you have lled out the Return Merchant
Authorization form, please wait for instructions. The date the form is lled out must
not exceed 90 days from the date of sale.
SpyTec is a registered trademark of Spy Tec International Inc., 2017.
All rights reserved

WAVBAND WRISTBAND AUDIO RECORDER USER GUIDE 8
Table of contents
Other Spy Tec Recording Equipment manuals


