ON
OFF 1 2 3 4
MEMORIZZAZIONE MANUALE COMANDI AL VOLANTE
I - Dopo aver effettuato i collegamenti, senza inserire il jack comandi al volante nel retro dell’autoradio
ruotare la chiave di accensione ed il led si illuminerà con un lampeggio di colore rosso.
- Per memorizzare correttamente le funzioni sui tasti dei comandi al volante, eseguire la programmazione
iniziando dalla funzione (VOLUME -).
- Premere il comando al volante VOLUME - ed il led si illuminerà con un lampeggio di colore rosso che confer-
ma l’avvenuta memorizzazione. Lo stesso metodo dovrà essere utilizzato per memorizzare le restanti funzioni.
ATTENZIONE: La centralina è predisposta per eseguire 8 funzioni che dovranno essere TUTTE Attivate o
Disattivate. L’attivazione avviene premendo i tasti presenti sul volante, mentre la disattivazione avviene pre-
mendo il tasto PRG presente sulla centralina.
Esempio di procedura per la programmazione di un’autoradio Clarion con disponibilità sul volante di 5 tasti
volendo ottenere i comandi di Vol-, Vol+, Seek-, Seek+, MUTE.
Sequenza: premere una sola volta Vol-, Vol+, Seek-, Seek+, il tasto PRG sulla centralina per disattivare la
funzione (FUNC), il tasto destinato al comando MUTE ed infine premere 2 volte il tasto PRG per
completare la programmazione. L’avvenuta corretta programmazione, sarà confermata dal lampeggiare
continuo del LED di colore rosso.
MEMORIZZAZIONE AUTOMATICA DEI SERVIZI
Un programma ad auto apprendimento, eseguirà l’aquisizione dei dati. A memorizzazione avvenuta, il
led lampeggerà con colore verde e continuerà a lampeggiare fino a quando si selezionerà il marchio dell’
autoradio. Se il led della centralina non lampeggierà di colore verde verificare la compatibilità.
GB - STORAGE MANUAL STEERING WHEEL CONTROLS
Once the connections have been carried out, turn the ignition key without inserting the steeringwheel
commands-Jack into the back of the car-radio. The Led will turn on red.
- To correctly memorize the functions of the steering-wheel commands, start programming from function (VOLU-
ME-). Press VOLUME- on the Steering-Wheel, so that the Led will switch Red, conrming that memorization has
successfully been carried out. The same memorization-procedure has to be used also for all remaining functions.
ATTENTION: The Central-Box is ready to effect 8 different Functions, ALL of which have to be Activated or
De-Activated. For Activation, press the Steering-Wheel-keys. For De-Activation, press the PRG-key situated on
the Central-Unit. Example for the programming-procedure of a CLARION-radio, with 5 keys available on the
Steering-Wheel, and the aim of memorizing the functions Vol- Vol+ Seek- Seek+ and Mute. Related procedure:
press one time only, the keys Vol- Vol+ Seek- Seek+, the PRG-key on the Central-unit in order to de-activate the
function (FUNC), and the Mute-key. Finally, press 2 times the PRG-key to complete the programming-phase.
Once the programming-phase has been correctly completed, the LED will turn RED and continue
flashing.
STORAGE AUTOMATIC SERVICES
An automatic software will search and keep the data. Once the function has been correctly completed the led
will turn green and continue flashing till the operator press the car radio trade mark. If the led of the central box
doesn’t ash green colour please check the compatibility table
FR - MÉMORISATION MANUELLE DES COMMANDES AU VOLANT
Après avoir effectués les branchements, tourner la clé de démarrage, sans introduire le Jack des commandes au
volant sur le dos de l’autoradio. Le Led devient rouge.
- Pour mémoriser correctement les fonctions sur les touches des commandes au volant,
faire la programmation en commençant par la touche VOLUME-
- Appuyer le commande au volant VOLUME- et le LED s’illuminera avec un clignotement de couleur rouge
qui confirme la réussite de la mémorisation. La même méthode sera utilisée pour mémoriser les fonctions
restantes ATTENTION la centrale est prédisposée à l’exécution de 8 fonctions qui devront tous être mises
en marches ou être débranchées. La mise en marche se fait en appuyant les touches qu’on trouve sur le volant,
par contre le débranchement se fait en appuyant sur la touche PRG qu’on trouve sur la centrale.
Exemple de procédure pour la programmation d’une autoradio CLARION avec 5 touches sur le volant, si
on veut obtenir les commandes de Vol-, Vol+, Seek-, Seek+, MUTE.
Procédure: appuyer une seule fois Vol-, Vol+, Seek-, Seek+, la touche PRG sur la centrale pour
débrancher la fonction, la touche prédestinée au commande MUTE et enn appuyer 2 fois la touche PRG
pour compléter la programmation. La correcte programmation sera confirmée par le clignotement continu
du LED de couleur rouge.
MÉMORISATION AUTOMATIQUE DES SERVICES
Un programme de détection automatique fera l’acquisition des données. Une fois que la mémorisation est
terminée, le led clignotera en vert et continuera à clignoter jusqu’à la sélection de la marque de l’autoradio.
D - MANUELLE SPEICHERUNG DER LENKRAD-STEUERUNGEN
Sobald die Verbindungen hergestellt sind, Zündschlüssel drehen. Jack-Verbinder für die Lenkradsteuerungen
dabei NICHT am Autoradio einstecken. Das Led leuchtet nun rot auf.
- Um die Funktionen korrekt auf die Lenkrad-Steuerungstasten abzustimmen, die Einspeicherungs-Prozedur,
beginnend von der Funktion (VOLUME-), vornehmen.
- Taste VOLUME- auf dem Lenkrad drücken: das Led leuchtet somit ROT auf und bestätigt dadurch die erfolgte
Einspeicherung. Dieselbe Einspeicherungs-Prozedur auch bei allen übrigen Funktionen vornehmen.
- HINWEIS: die Zentral-Einheit kann insgesamt 8 verschiedene Funktionen übernehmen, wobei man alle
Funktionen entweder AKTIVIEREN oder DE-AKTIVIEREN muss. Zur Aktivierung, bitte die Lenkrad-Tasten
drücken. Zur De-Aktivierung, PRG-Taste auf der Zentral-Einheit drücken. Beispiel einer Programmierungs-Proze
dur, für ein CLARION-Autoradio, mit 5 verfügbaren Lenkrad-Steuerungstasten und dem Ziel, die Funktionen Vol-
Vol+ Seek- Seek+ und Mute, einzuspeichern.
Hier notwendige Prozedur: ein Mal drücken auf: Vol- Vol+ Seek- Seek+ und auch auf PRG (auf der Zentral-Einheit,
PROGRAMMAZIONE • PROGRAMMING • PROGRAMMATION • PROGRAMMIERUNG • PROGRAMACION
SEqUENZA D’INSTALLAZIONE • INSTALLATION SEqUENCE • SéqUENCE D’INSTALLATION
INSTALLATIONS-VORGANG • SECUENCIA DE INSTALACIóN
I - Posizione dei commutatori per tutti i modelli auto
GB - Swicth position for all car type
FR - Position des commutateurs pour tous les modèles de voiture
D - Schalter-Stellung für die diversen Auto-Modelle
E - Posición de los conmutadores para todos los modelos de coches
Collegamenti / Connections / Branchements / Anschluss
Memorizzazione Comandi al volante / Storage Steering Wheel / Mémorisation commandes au volant
Einspeicherung der Lenkrad-Steuerungen
Memorizzazione servizi / Services storage / Mémorisation des services / Einspeicherung Services
Memorizzazione marchio autoradio / Car-radio storage / Einspeicherung der Autoradio-Marke
Mémorisation profil autoradio /
1
2
3
4
um die Funktion FUNC zu de-aktivieren) und Mute. Dann, vier Mal auf PRG-Taste drücken, um die
Programmierungs-Phase abzuschließen.
Sobald die Programmierung korrekt durchgeführt worden ist, leuchtet das LED ROT auf und blinkt kontinuierlich.
AUTOM. SPEICHERUNG DER FUNKTIONEN
Ein selbst-lernendes Programm ermittelt alle notwendigen Daten und speichert diese ein. Daraufhin blinkt
das Led so lange grün, bis die Autoradio-Marke eingegeben wird. Sollte das Led der Zentral-Einheit nicht
grün blinken, bitte die Kompatibilitätsliste zu Hilfe holen.
MEMORIZACION MANUAL DE LOS MANDOS DE VOLANTE
E - Después de efectuar las conexiones, sin insertar el jack del mando de volante en la parte trasera del autoradio.
Girar la llave de encendido, el Led se iluminará con un destello de color rojo.
- Para memorizar correctamente las funciones de las teclas del los mandos del volante, ejecutar la programación
empezando por la función de VOLUMEN -
- Pulsar el mando de volante VOLUMEN - el Led puesto en la centralita parpadeará una vez color rojo esto
confirma que se ha memorizado correctamente. Con el mismo procedimiento se tendrán que memorizar las
demás funciones.
- ATENCION: La centralita esta predispuesta para ejecutar 8 funciones que tendrán que ser todas Activadas o
Desactivadas.
- La activación se consigue pulsando las teclas puestas en el volante, mientras que la desactivación se consigue
pulsando la tecla PRG presente en la centralita. Ejemplo de cómo configurar la centralita del interfaz con un
autoradio de Clarion con un teclado de 5 funciones en el volante para obtener los mandos de Vol.-, Vol+.
Seek-, Seek+, MUTE.Secuencia: presionar una vez Vol -, Vol +, Seek-, Seek+, la tecla PRG de la centralita para
desactivar la función (Func). La tecla destinada al mando MUTE, y a continuación presionar 2 veces la tecla PRG
para completar la programación. Si el proceso de configuración es correcto el Led de la centralita parpadeará de
continuo de color roco.
MEMORIZACION AUTOMATICA DE LOS SERVICIOS
Un programa de auto aprendizaje , ejecutará la adquisición de los datos. Una vez que la memorización ha
sido ejecutada con éxito, el Led parpadeará de color verde y seguirá parpadeando hasta que se selec-
cione la marca del autoradio. En el caso de que el Led no parpadease en color verde verificar la tabla de
compatibilidad.
MEMORIZZAZIONE MARCHIO AUTORADIO • CAR-RADIO SELECTION • SELECTION AUTORADIO
AUTORADIO-WAHL • SELECCIóN AUTORADIO • MEMORIZACIóN MARCA AUTORADIO
CLARION non premere / do not press 1 led verde / green SEEK +
KENWOOD 1 volta / once Vol + 2 led verde / green SEEK +
JVC 2 volte / times Vol + 3 led verde / green SEEK +
PIONEER 3 volte / times Vol + 4 led verde / green SEEK +
SONY - PHONOCAR VM040-041 4 volte / times Vol + 5 led verde / green SEEK +
ALPINE 5 volte / times Vol + 6 led verde / green SEEK +
PANASONIC 7 volte / times Vol + 8 led verde / green SEEK +
PANASONIC Car AV 8 volte / times Vol + 9 led verde / green SEEK +
BLAUPUNKT 9 volte / times Vol + 1 led rosso / red SEEK +
PHONOCAR 11 volte / times Vol + 1 led rosso / red + 2 verdi / green SEEK +
VM020 - VM021 - VM022 - VM023
PHONOCAR VM016 12 volte / times Vol + 2 led rosso / red + 3 verdi / green SEEK +
PHONOCAR VM030 - VM031 - VM032 13 volte / times Vol + 3 led rosso / red + 4 verdi / green SEEK +
PHONOCAR VM017 15 volte / times Vol + 4 led rosso / red + 5 verdi / green SEEK +
I - Aprire il dispositivo e inserire il “JUMPER” nella giusta posizione.
GB - Open the device and to insert the “JUMPER” into the correct positions.
F - Ouvrir le dispositif et introduire le “JUMPER” dans la position prévue.
D - Öffnen und die “JUMPER” in die notwendige Position geben.
E - Abrir el dispositivo e introducir los “JUMPER” (puentes) en la posición adecuada.
SOLO PER AUTORADIO BLAUPUNKT • ONLY FOR BLAUPUNKT CAR-RADIO
UNIqUEMENT POUR LES AUTORADIOS BLAUPUNKT • NUR FÜR BLAUPUNKT-AUTORADIOS
SOLO PARA AUTORADIO BLAUPUNKT.
I - Per effettuare la selezione agire sui comandi al volante: premendo VOLUME+ si seleziona il marchio
autoradio. Premendo SEEK si memorizza.
Es.: per memorizzare Alpine, premere 5 volte il tasto Volume+, il Led verde eseguirà cicli di 6 lampeggi rapidi
e una pausa, premere SEEK per memorizzare.
Nel caso che la selezione non sia corretta, verificare il numero di lampeggi corrispondenti al marchio e variarli,
utilizzando i tasti VOLUME+ per aumentarli e VOLUME- per diminuirli.
A memorizzazione ultimata, il Led s’illuminerà di verde.
RESET DISPOSITIVO:
Senza togliere il circuito dall’alimentazione, premere il tasto PRG fino a quando led verde non si spegne.
GB - To select the radio-model installed in the car, act on the steering-wheel commands:
press VOLUME+ to select the radio-model; press SEEK to memorize.
Ex.: for the programming-procedure of a ALPINE-radio press 5 times the Volume+ key, the green Led swicth whit
six quickly flash and one stop, press SEEK key to memorize.
Should the selection not be correct, please check the number of blinkings indicated for the radio-model and,
if necessary, rectify by pressing VOLUME+ (to increase) or VOLUME- (to reduce).
When memorization has ben completed, the Led will turn green.
RE-SETTING OF DEVICE: Without interrupting the power-supply to the circuit, press the PRG-key until the
green Led goes off. The Led will flash red, for some seconds, and then turn green, until a different radio-
model is selected.
FR - Pour sélectionner le modèle d’autoradio installée dans la voiture, utiliser les commandes au volant:
Appuyer sur la touche VOLUME+ pour sélectionner la marque d’autoradio.Appuyer sur la touche SEEK pour
mémoriser.
Exemple: pour mémoriser Alpine, appuyer 3 fois sur la touche Volume+. Le Led commence à clignoter en
cycles de 4 clignotements rapids et une pause. Appuyer sur SEEK pour mémoriser.
Dans le cas où la sélection ne résulte pas correcte, vérifier les clignotements selon la marque autoradio et, si
nécessaire, modifier. Appuyer VOLUME+ (pour augmenter) ou VOLUME- (pour réduire).
Quand la mémorisation a été complètée, le Led tourne vert.
RE-PROGRAMMATION (RESET): Sans interrompre l’alimentation du circuit, appuyer sur la touche PRG
jusqu’à ce que le Led Vert s’éteint. Le Led clignotera Rouge pour quelques secondes, puis il retournera Vert
jusqu’au moment où on sélectionnera un autre modèle d’autoradio.
D - Um das Modell des installierten Autoradios zu wählen, Lenkradfernbedienung wie folgt verwenden:
VOLUME+ so oft drücken, wie für das in Frage kommende Autoradio vorgesehen.
Dann SEEK drücken, um die Eingabe zu bestätigen.
Wurde die Wahl falsch getroffen, Blink-Anzahl nach Radio-Tabelle kontrollien und nach Bedarf korrigieren:
zum Erhöhen VOLUME+ drücken; zum Verringern VOLUME- drücken.
Nach positiv abgeschlossener Einspeicherung leuchtet das Led grün auf.
RE-SET DER VORRICHTUNG: Vorrichtung weiterhin am Strom angeschlossen halten. Taste PRG drücken,
bis das grüne Led erlischt. Das Led wird einige Sekunden lang rot blinken, dann auf Grün umschalten, bis
ein anderes Radiomodell gewählt wird.
E - Para seleccionar el modelo de autoradio instalado accionar los mandos del volante:
VOLUMEN+ para seleccionar el autoradio, en base al número de veces que viene pulsado y SEEK para la
memorización.
En el caso de que la selección no sea correcta, verificar el número de impulsos correspondientes y variarlos,
utilizando las teclas VOLUMEN + para aumentarlos y VOLUMEN - para disminuirlos.
Una vez memorizado, el Led se iluminará de color verde.
RESET DISPOSITIVO: Sin quitar la alimentación del circuito, pulsar la tecla PRG hasta que el Led verde no
se apague.
El Led parpadeará en color rojo durante unos segundos, después cambiará a verde en espera de la selec-
ción del nuevo modelo de radio.
AUTORADIO / CAR-RADIO PREMERE / PRESS N. LAMPEGGI / FLASH PREMERE / PRESS
Clarion Kenwood JVC Pioneer Sony Alpine Panasonic Panasonic
Blaunpunkt Phonocar
car AV
1
2
3
4
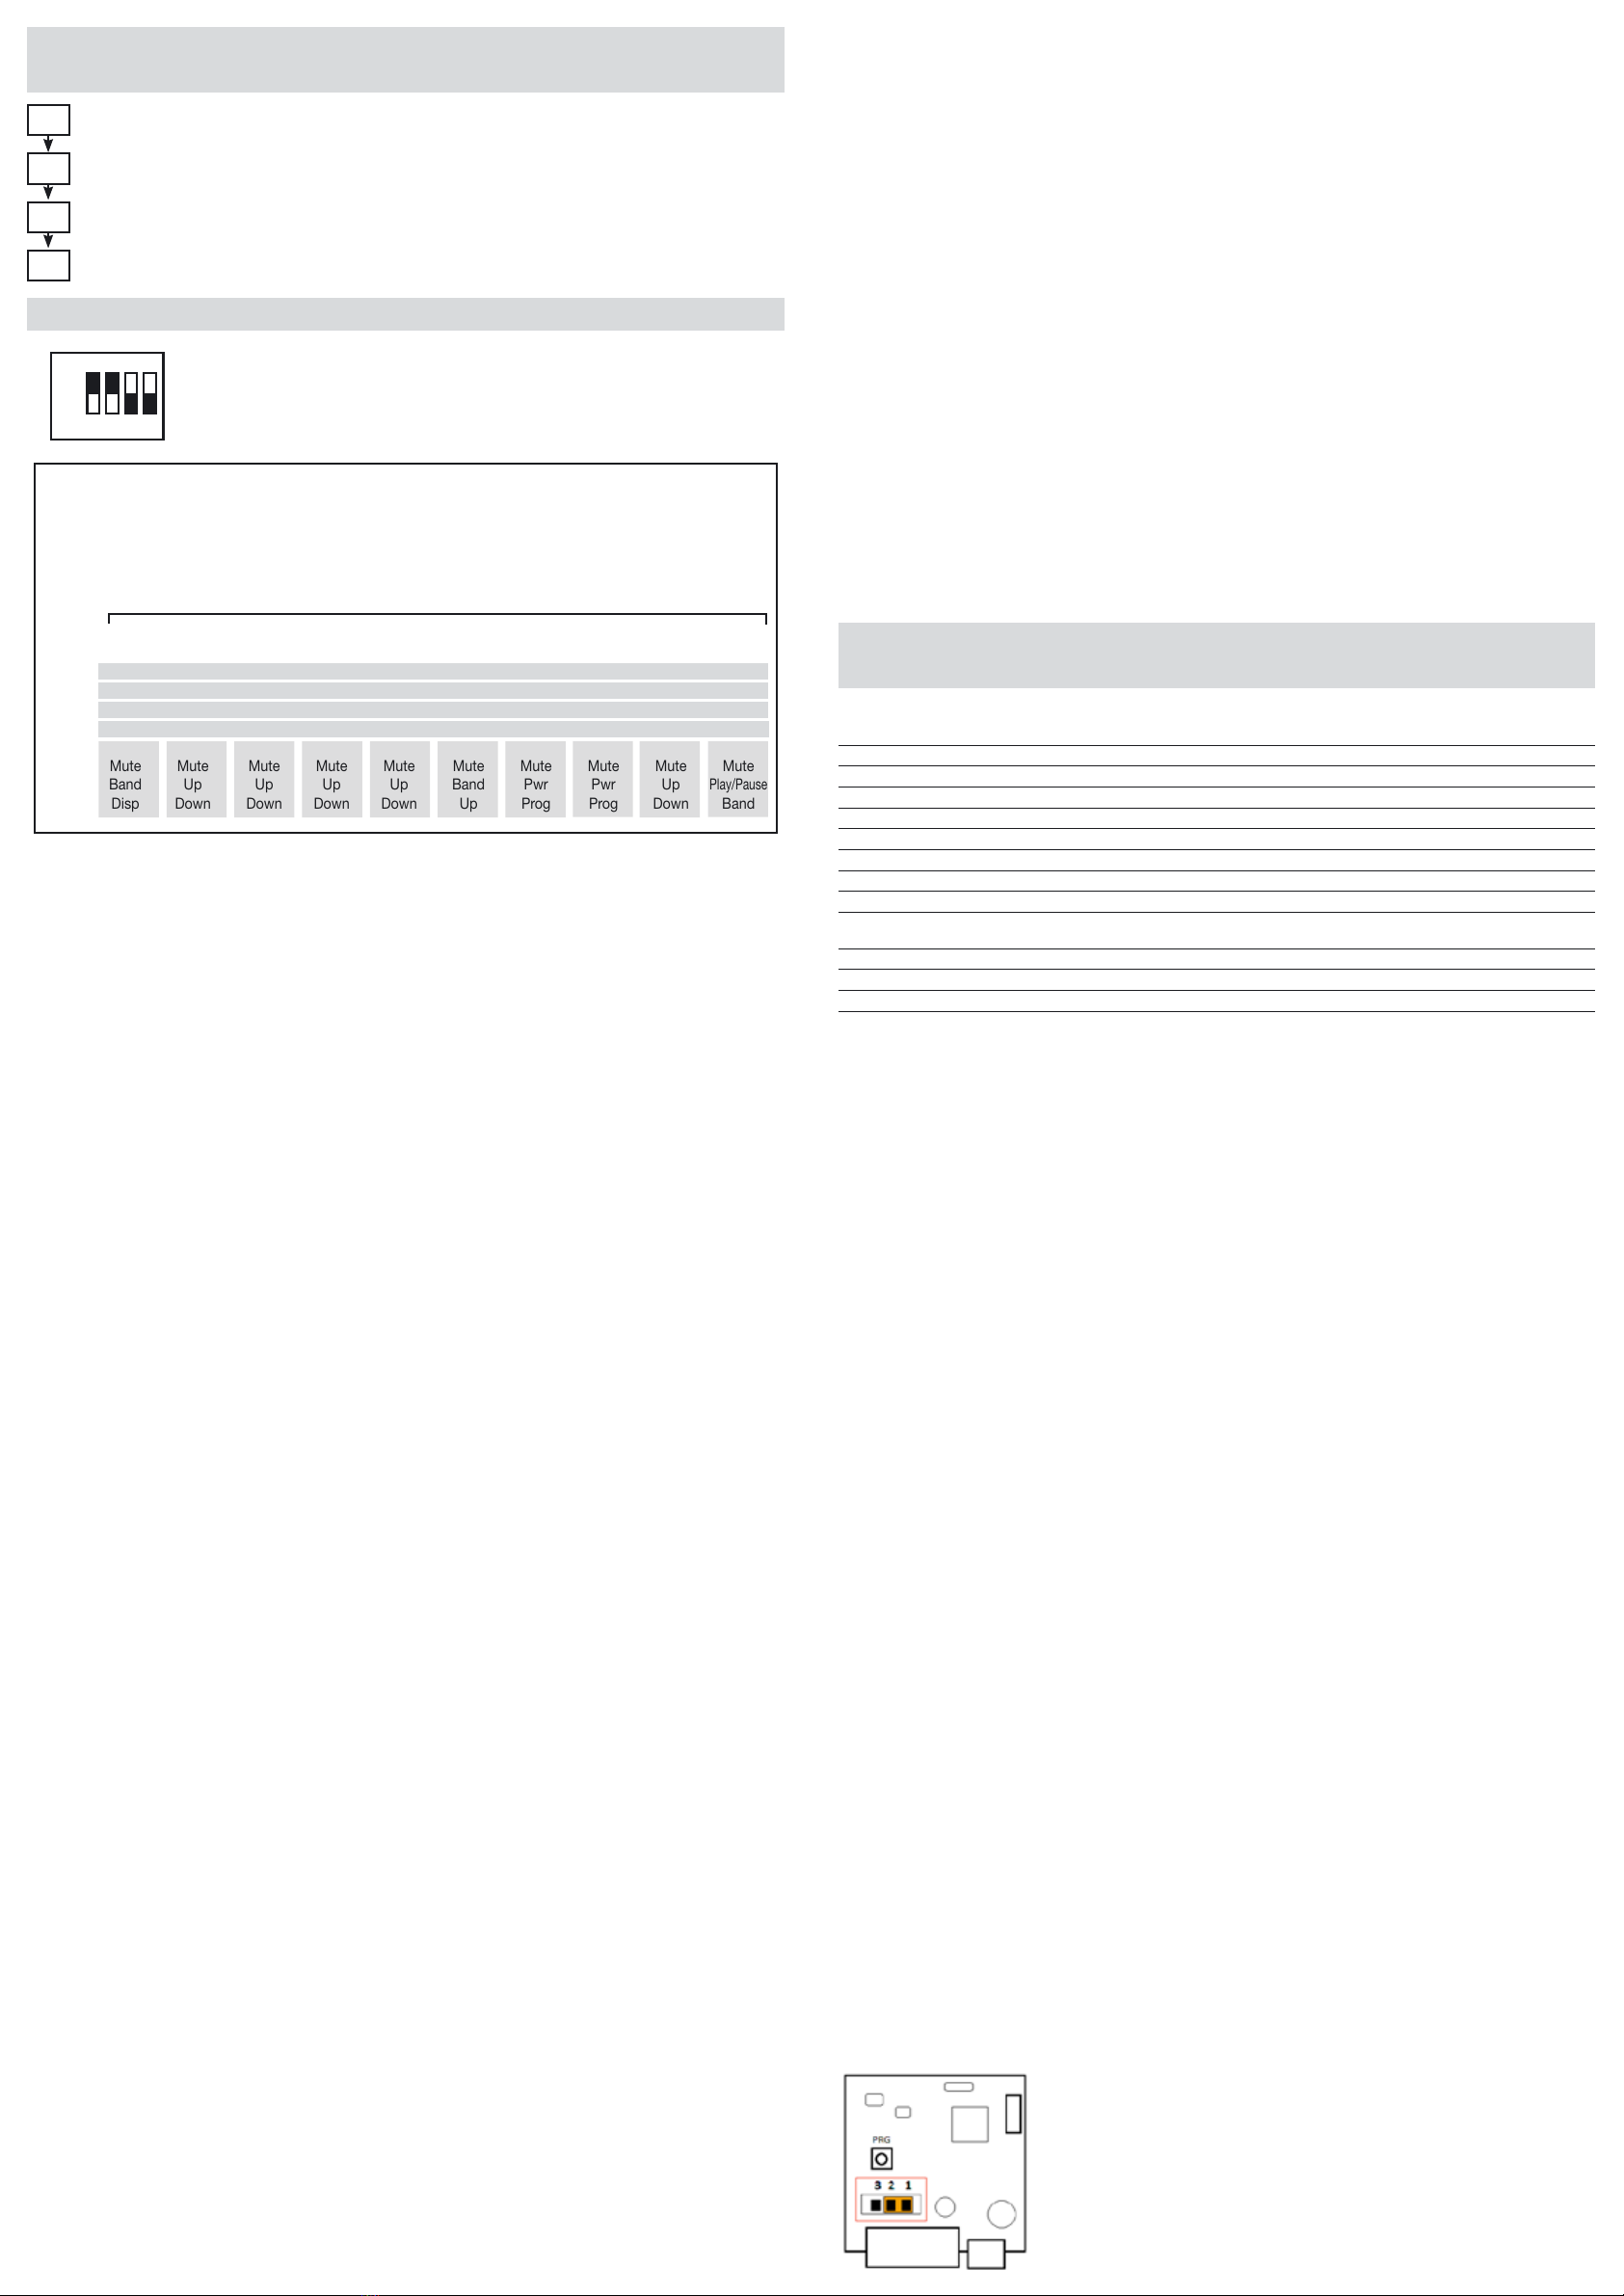
5Func Source Source Mode Source Source Mode Mode Source Mode
6Mute Mute Mute Mute Mute Mute Mute Mute Mute Mute
7Band Up Up Up Up Band Pwr Pwr Up
Play/Pause
8Disp Down Down Down Down Up Prog Prog Down Band
CAR RADIO
DESCRIZIONE DELLE FUNZIONI PRESENTI SUI TASTI AUTORADIO
FUNCTIONS DESCRIPTION OF THE CAR RADIO BOTTOM
DESCRIPTION DES FONCTIONS PRÉSENTES SUR LES TOUCHES DE L’AUTORADIO
BESCHREIBUNG DER EINZELNEN AUTORADIO-TASTEN UND DEREN FUNKTION
DESCRIPCIÓN DE LAS FUNCIONES PRESENTES EN EL TECLADO DEL AUTORADIO
VOLUME -
VOLUME +
SEEK -
SEEK +
Sequenza di memorizzazione
Sequence storage


