Spycentre Security 6956 User manual
SpyCentre.com Spy Shop Since 1993 1-800-292-7748
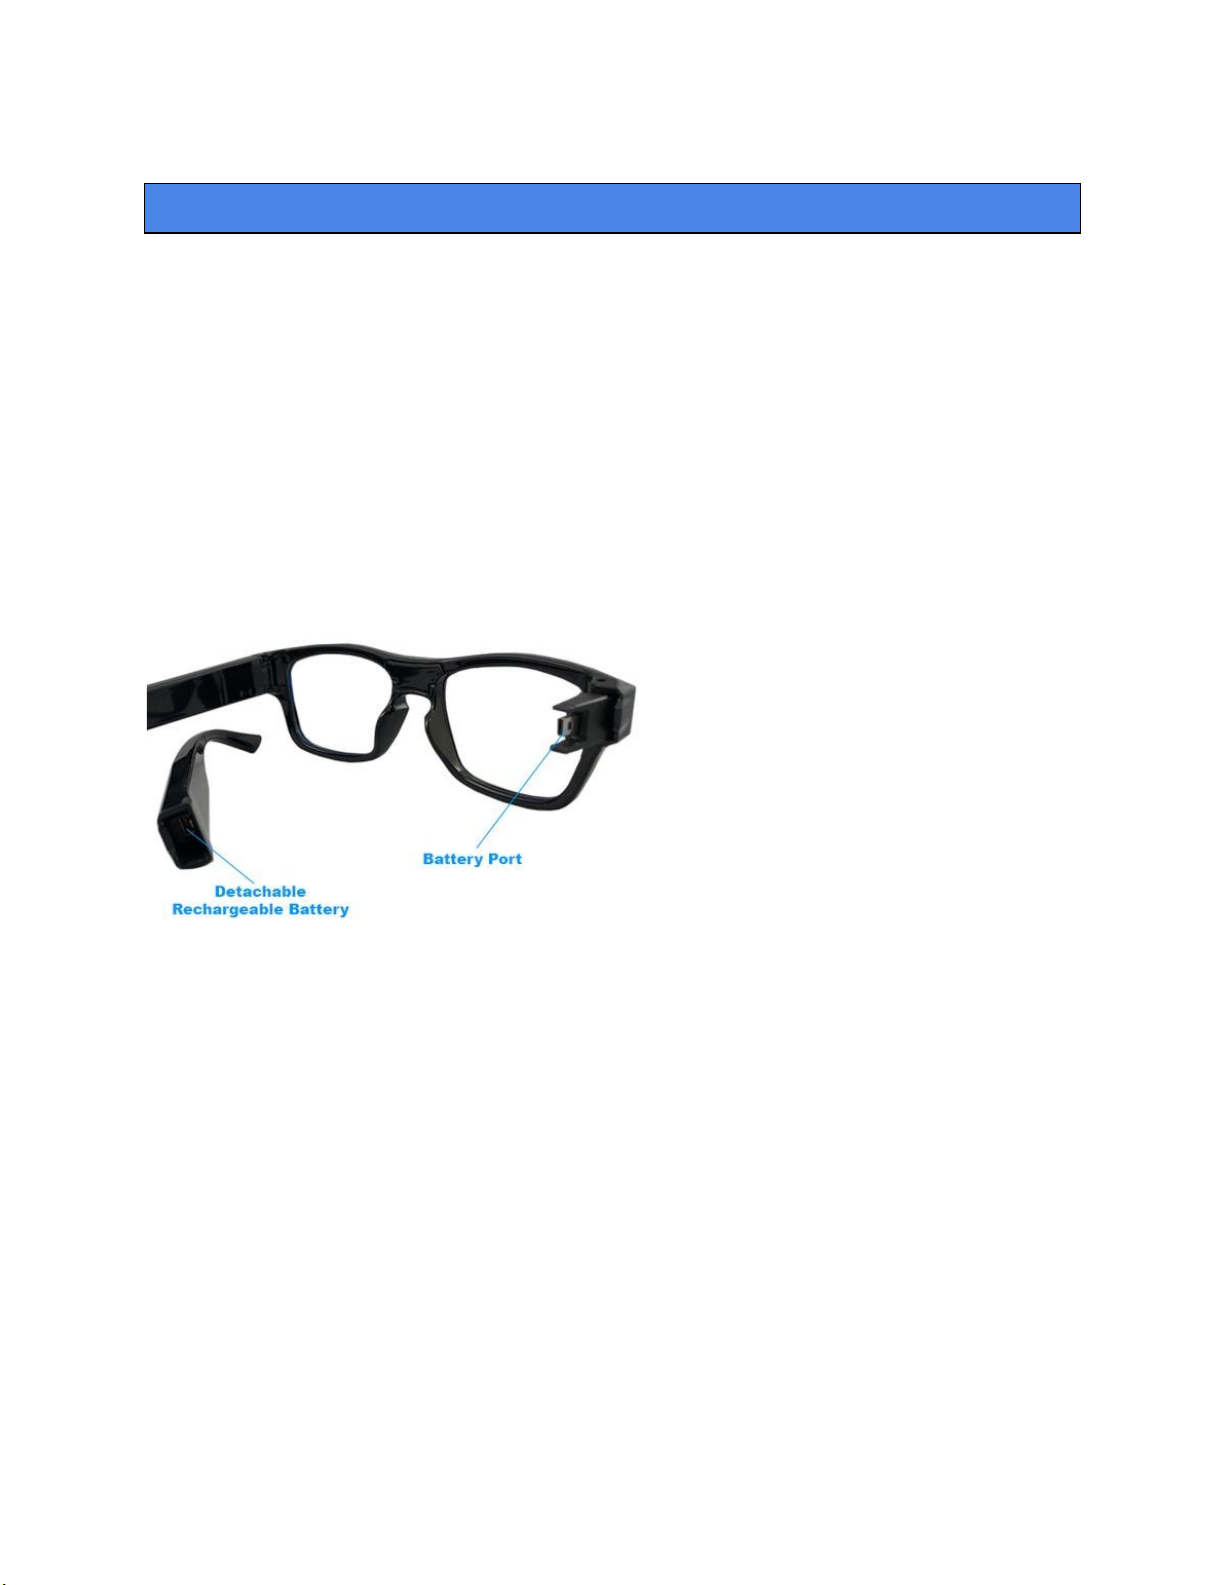
6956 1080p Video Spy Glasses
How to Charge the Battery:
● Plug the battery legs into the charger dock, then connect the charger dock with the
provided mini USB to USB cable
● Takes 50 minutes to fully charge each battery leg
● Red LED light = Charging
● No light = Fully Charged
How to Attach/Detach the Battery Leg:
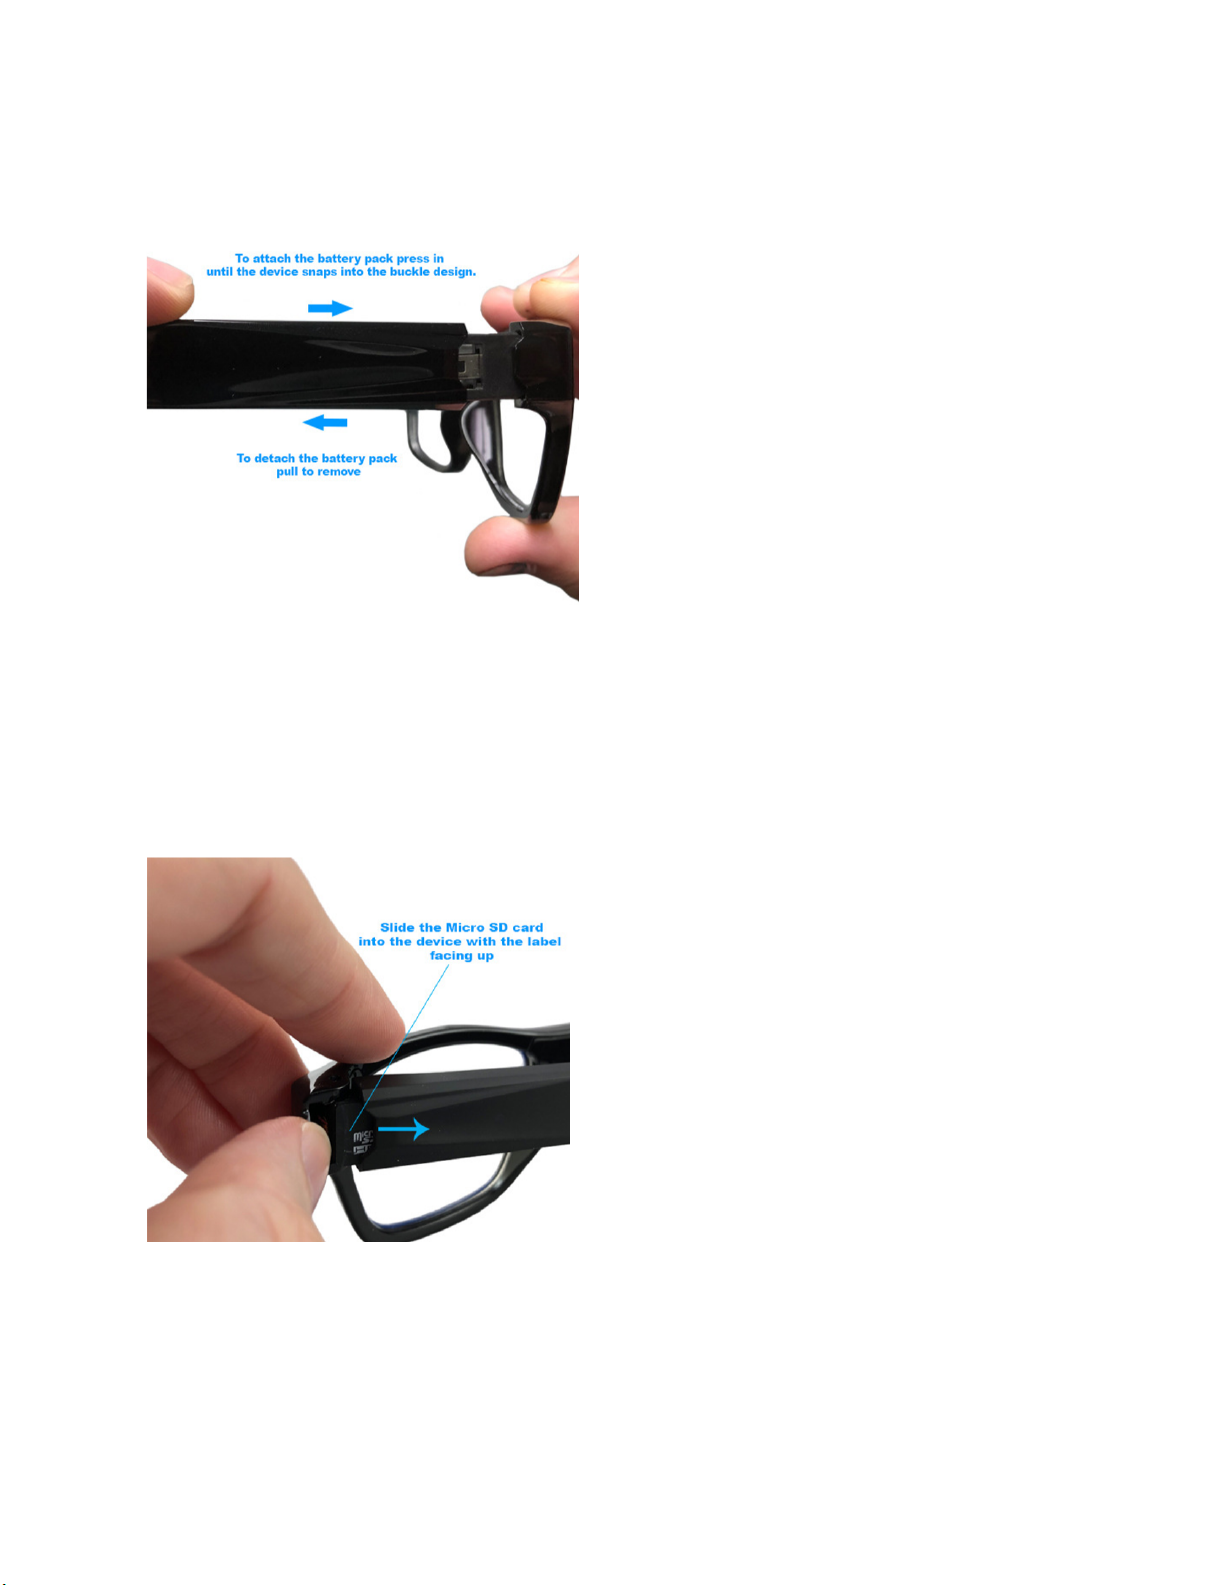
1. To attach the battery, Press the leg together till the battery snaps into the buckle
2. To detach the battery, pull to remove
Note: In order to record a Micro SD(32GB Max) card is required. The SD card mounting
location is on the back of the device. The SD card mounts with the metal contacts on the
SD card facing away from the One Touch ON/Off button.
How to Insert Micro SD Card:
1. The SD card slot is located on the left leg of the glasses
2. Once the SD card is in, make sure to fully insert the SD card. The card should easily
slide into place.
3. To remove the SD Card use the provided tweezers
(Note: These glasses do not have a release spring, so no click will occur when inserted
correctly.)
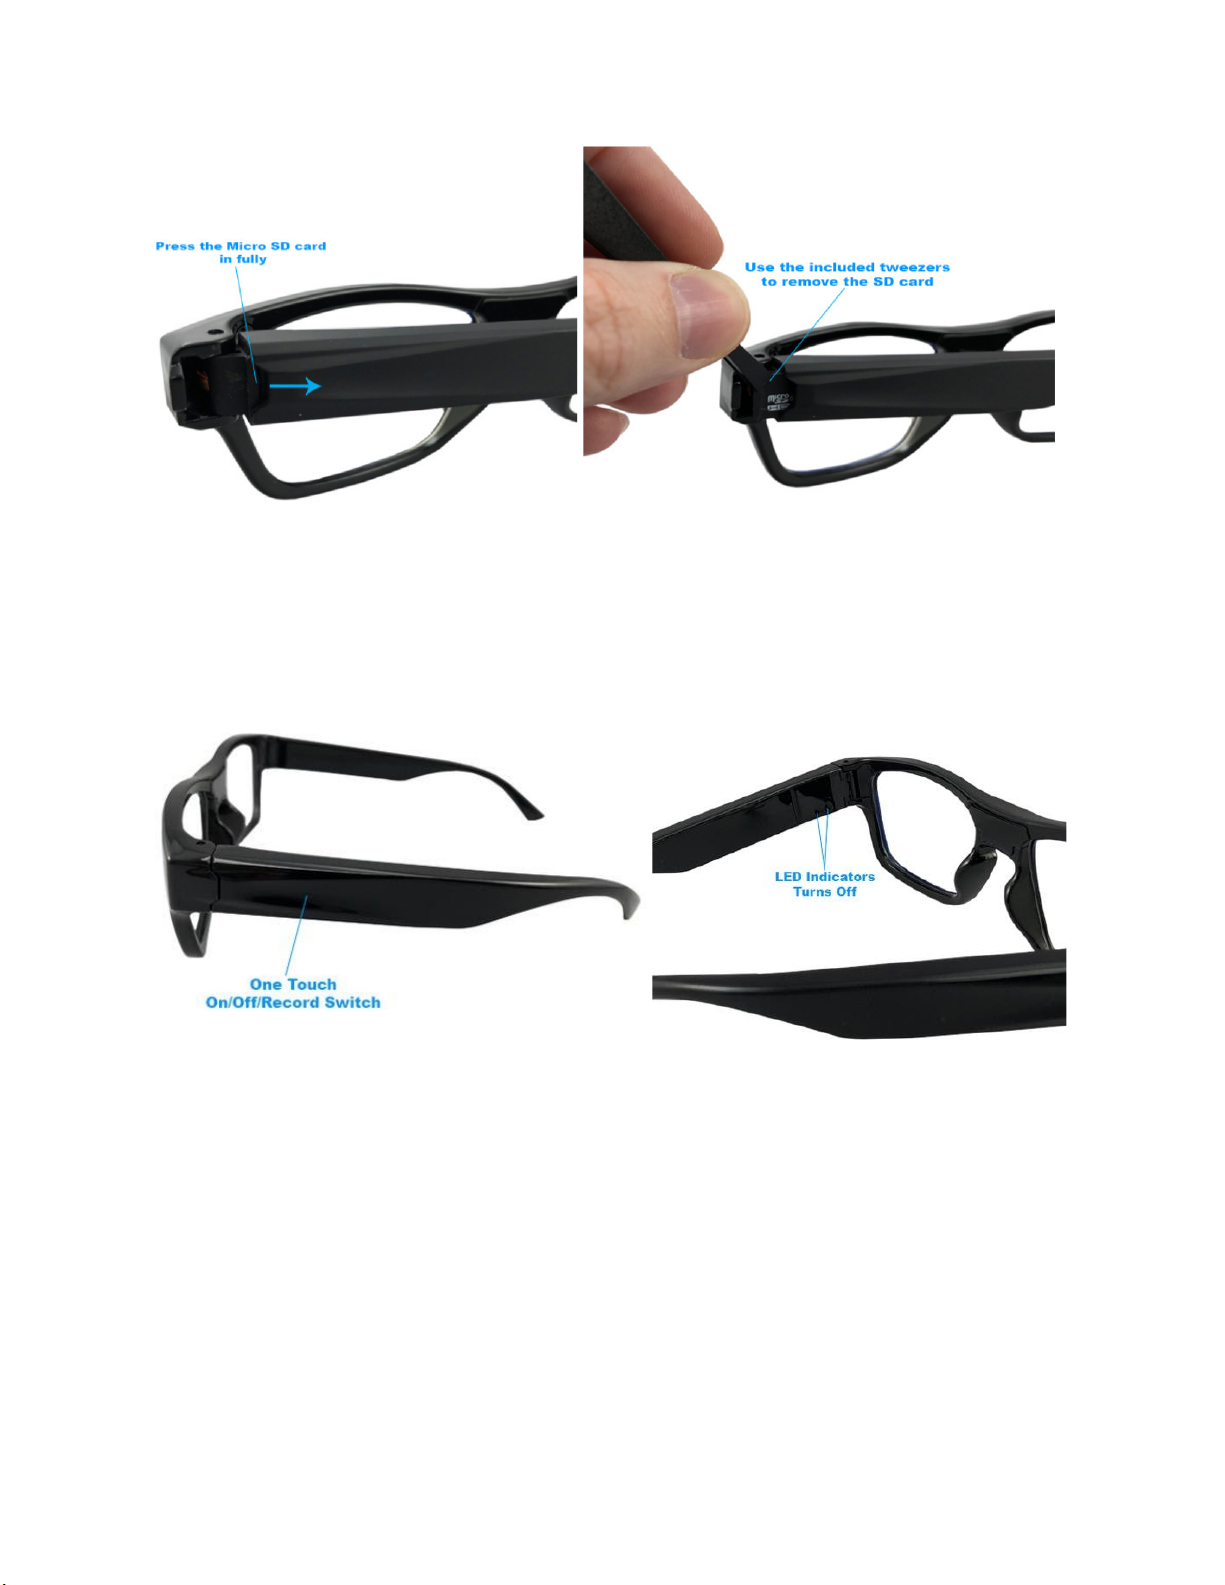
How to Record a VIDEO file:
(Note: The one touch On/Off is a touch sensor location, not a button, reference above
picture for exact location )
●Press and Hold the One Touch On/Off Button longer then 2 seconds
● The device will vibrate and a solid Green LED light will turn on then slowly blink 4 times
and disappear
● A video recording has begun
● To turn off the device Press and Hold the One Touch On/Off Button for 3-5 seconds
●The device will vibrate twice indicating the device is now off
NOTE: If the device runs out of power during the recording, it will finalize and save the
file before the battery dies
How to Playback files on a PC:
● Remove the Micro SD card from the device and connect it to the computer
● When connected the PC will recognize the device as a removable disk
● Open the DCIM folder
● Double Click to play
NOTE:
In order to playback the files on these devices you will need to download a media player
that can play .AVI format. We recommend VLC media player
How to Playback files on a MAC:
● Remove the Micro SD card from the device and connect it to the computer
● When connected the PC will recognize the device as a removable disk
● Open the DCIM folder
● Double Click to play
NOTE:
In order to playback the files on these devices you will need to download a media player
that can play .AVI format. We recommend VLC media player
How to Playback files on a Google ChromeBook:
● Connect the device to the USB port of the ChromeBook
● A pop up menu may occur, if so select “View Files”
● If a pop up does not occur, select the O icon (called the app launcher) “similar to a
windows icon button” located in the bottom left corner of the screen
● Underneath the Google Drive are My Drive, Downloads, New Services, and something
else that may be named “REMOVABLE DRIVE”
● Select the Removable Drive. If unsure of this step. Disconnect the device from the
Chrome Book and see what is no longer available under the Google Drive from Step 4
● After selecting the Removable drive you can now navigate the folders in the main folder
to find the recorded files.
● Double Click to play
NOTE:
In order to playback the files on these devices you will need to download an APP that can
play .AVI format. We recommend VLC media player, available for free at the GOOGLE
PLAY STORE
How to Playback files on an Android Smartphone or Tablet(No Apple Products):
● An OTG Cable is required for this process.
● Go to your Device Storage and look for the External Memory. Inside will be all your files
that you can click on in order to review what was captured.
● For all other steps refer to the OTG cable guide on spycentre.com
*OTG Cable Sold Separately. Purchase one on our website for $19.99 Part #4159*
NOTE:
In order to playback the files on these devices you will need to download an APP that can
play .AVI format. We recommend VLC media player, available for free at the GOOGLE
PLAY STORE
How to Delete the files on a PC:
● Open the DCIM folder
● Right Click on the file you wish to delete and Left click Delete in the pop up menu.
How to Delete the files on a MAC:
● Open the DCIM folder
● Click and DRAG the file you wish to delete to the Trash Bin
● Empty the Trash Bin to permanently delete the file from the device.
Note: If the above step is not completed the files will not be fully deleted from the device
and you will have a phantom folder that will contain the deleted files that can only be
seen by a Windows Computer

How to Set the TIME and DATE on a PC:
● Remove the Micro SD card from the device and connect it to the computer
● When connected the PC will recognize the device as a removable disk
● Open the Timerset file
● To format the time and date: YearMonthDayHourMinutesSeconds
● Place a “Y” to watermark the recordings
● Example: 20200402133000Y
● This would be 04/02/2020 at 1:30pm
● Save the file
● Create a new recording to import the corrected time and date stamp
How to Set the TIME and DATE on a MAC:
● Remove the Micro SD card from the device and connect it to the computer
● When connected the PC will recognize the device as a removable disk
● Open the Timerset file
● To format the time and date: YearMonthDayHourMinutesSeconds
● Place a “Y” to watermark the recordings
● Example: 20200402133000Y
● This would be 04/02/2020 at 1:30pm
● Save the file
● Safely eject the device from the computer and create a new recording to import the
corrected time and date stamp
● When the device is connected again to the computer the time file should no longer be
present indicating the device has accepted the new time and date
Specifications:
● MAX Memory capacity: 32GB
● Recording format: .AVI
● Video recording resolution quality: 1080p @ 30fps
● Video recordings are in 3 minute intervals
● Battery power consumption time with full charge: @ 1 Hour per battery leg
● Recording Consumption per Hr: 8.3GB
● Video Recording capacity:
● 16GB = 1.5Hr
● 32GB = 3.5Hr

VLC Media Player (Recommended for optimal usage)
How to Download VLC media (Mac)
● Go to www.videolan.org
● Click the “Download VLC”
● It will open a new window and begin downloading
● If it does not automatically begin downloading, press the Click here and select one of the
mirrored sites
● Once completed a new file named VLC will be visible on the desktop
● Open the folder and in the folder move the VLC to the applications folder by drag and
dropping it
● Once in the application folder the VLC player will complete the installation
● Open VLC media player in the Applications folder and simply drag your video files to the
“drag here” dialog box to open and play
● If the VLC player is not installing a change to the Security and Privacy settings is needed
● To access your Security and Privacy click on the Apple Icon on the task bar and select
“System preferences”
● Select “Security and Privacy”
● Make sure the Lock icon on the bottom of the screen is open and set to Make Changes
● Select the button “Open Anyways”
● VLC will now fully install
How to Download and use VLC media (Windows)
● Go to www.videolan.org
● Click the “Download VLC”
● It will open a new window and begin downloading
● If it does not automatically begin downloading, press the Click here and select one of the
mirrored sites
● Once downloading has completed select Run and install
● Once finished a VLC icon will now be available on your PC
● To default open a file in VLC media player, right click on the file you wish to open and
select “Open with” and choose VLC
● To change all files to default open with VLC media player: Right click and choose
properties then click on the “Change” button next to “Open with” and change it to VLC
and press OK. Now the files will default open with VLC

NOTE: If a folder does not automatically open when connected to PC, disconnect the
device and perform the following
1. Open Control Panel by typing “control panel” in the Search bar
2. Select Programs
3. Under Default Programs, Click “Change default settings for media or devices”
4. Under Removable Devices, select “Open folder to view files”
5. Save
6. Reconnect the device to the PC
The Spy Gear Superstore® Since 1993
Table of contents
Other Spycentre Security 3D Glasses manuals


