SQ Professional SQPro User manual
SQPro Pressure Cooker
INSTRUCTION MANUAL
Before using this pressure cooker, please read all the instructions completely.

All images are for illustration purposes only. Actual product may vary.
SQ Professional Ltd © 2017 All rights reserved
SQPro Pressure Cooker - Aluminium
T.O.C
ADVANTAGES
SQPro Pressure Cooker - Aluminium
3
2
TABLE OF CONTENTS
Advantages of pressure cooking .............................................................page 3
Features ................................................................................................page 4
Important safeguards .............................................................................page 5
Principle operation .................................................................................page 6
Operating instructions ...........................................................................page 6
Maintenance ..........................................................................................page 8
Replacement of worn parts ....................................................................page 8
Troubleshooting ....................................................................................page 9
Cooking times ......................................................................................page 10
RECIPES
Spanish chick peas (Garbanzo) ...........................................................page 11
Beets with dill and walnuts .................................................................page 11
Tofu curry ..........................................................................................page 12
Mexican chicken & rice . . . . . . . . . . . . . . . . . . . . . . . . . . . . . . . . . . . . . . . . . . . . . . . . . . . . . . . . . . . . . . . . . . . . . . .page 12
Mensaf - Jordanian lamb stew ............................................................page 13
Italian rice croquettes ........................................................................page 13
Potato salad . . . . . . . . . . . . . . . . . . . . . . . . . . . . . . . . . . . . . . . . . . . . . . . . . . . . . . . . . . . . . . . . . . . . . . . . . . . . . . . . . . . . . . .page 14
Mashed potatoes ...............................................................................page 14
Rice pudding ......................................................................................page 14
Service ................................................................................................ Page 15
Warranty ............................................................................................. Page 15
All images are for illustration purposes only. Actual product may vary.
SQ Professional Ltd © 2017 All rights reserved
SQPro Pressure Cooker - Aluminium
T.O.C
ADVANTAGES
SQPro Pressure Cooker - Aluminium
3
2
ADVANTAGES OF PRESSURE COOKING
Cooking with a pressure cooking is:
ECONOMICAL Cooking is up to three times faster. This saves time by using only one ele-
ment (less washing) and saves energy as only one hob is used (less gas or
electricity).
NUTRITIONAL Compared to conventional cooking, pressure cooking is recognised as one
of the healthiest ways of food preparation. This is due to the fact that it
VERSATILE Easy cooking and blanching of bulk food, tougher cuts of meat will become
tender.
How the pressure cooker works
boiling point rises as well. Pressure cooker is designed to allow pressure and cooking
temperature to build up safely thus reducing the cooking time. The result is delicious,
healthy and tender food.
Cooking times
Cooking times depend on the sizes of individual pieces of food. Vegetables cook quicker
in a pressure cooker so it is advisable to cut up the larger vegetables (root vegetables, po-
tatoes, etc.) in order to achieve the same cooking times as other foods cooked together.
Cooking can be interrupted by releasing pressure so that faster cooking foods can be
added at later time. A table of cooking times is given on page 10 of this manual and is
intended as a guide only.
Always check that food is cooked thoroughly before serving and cook a bit more if in
doubt. Meat, poultry and any derivatives should be cooked until the juices run clear. Fish
according to the guidelines on the package or label.
All images are for illustration purposes only. Actual product may vary.
SQ Professional Ltd © 2017 All rights reserved
SQPro Pressure Cooker - Aluminium
FEATURES
SAFEGUARDS
SQPro Pressure Cooker - Aluminium
5
4
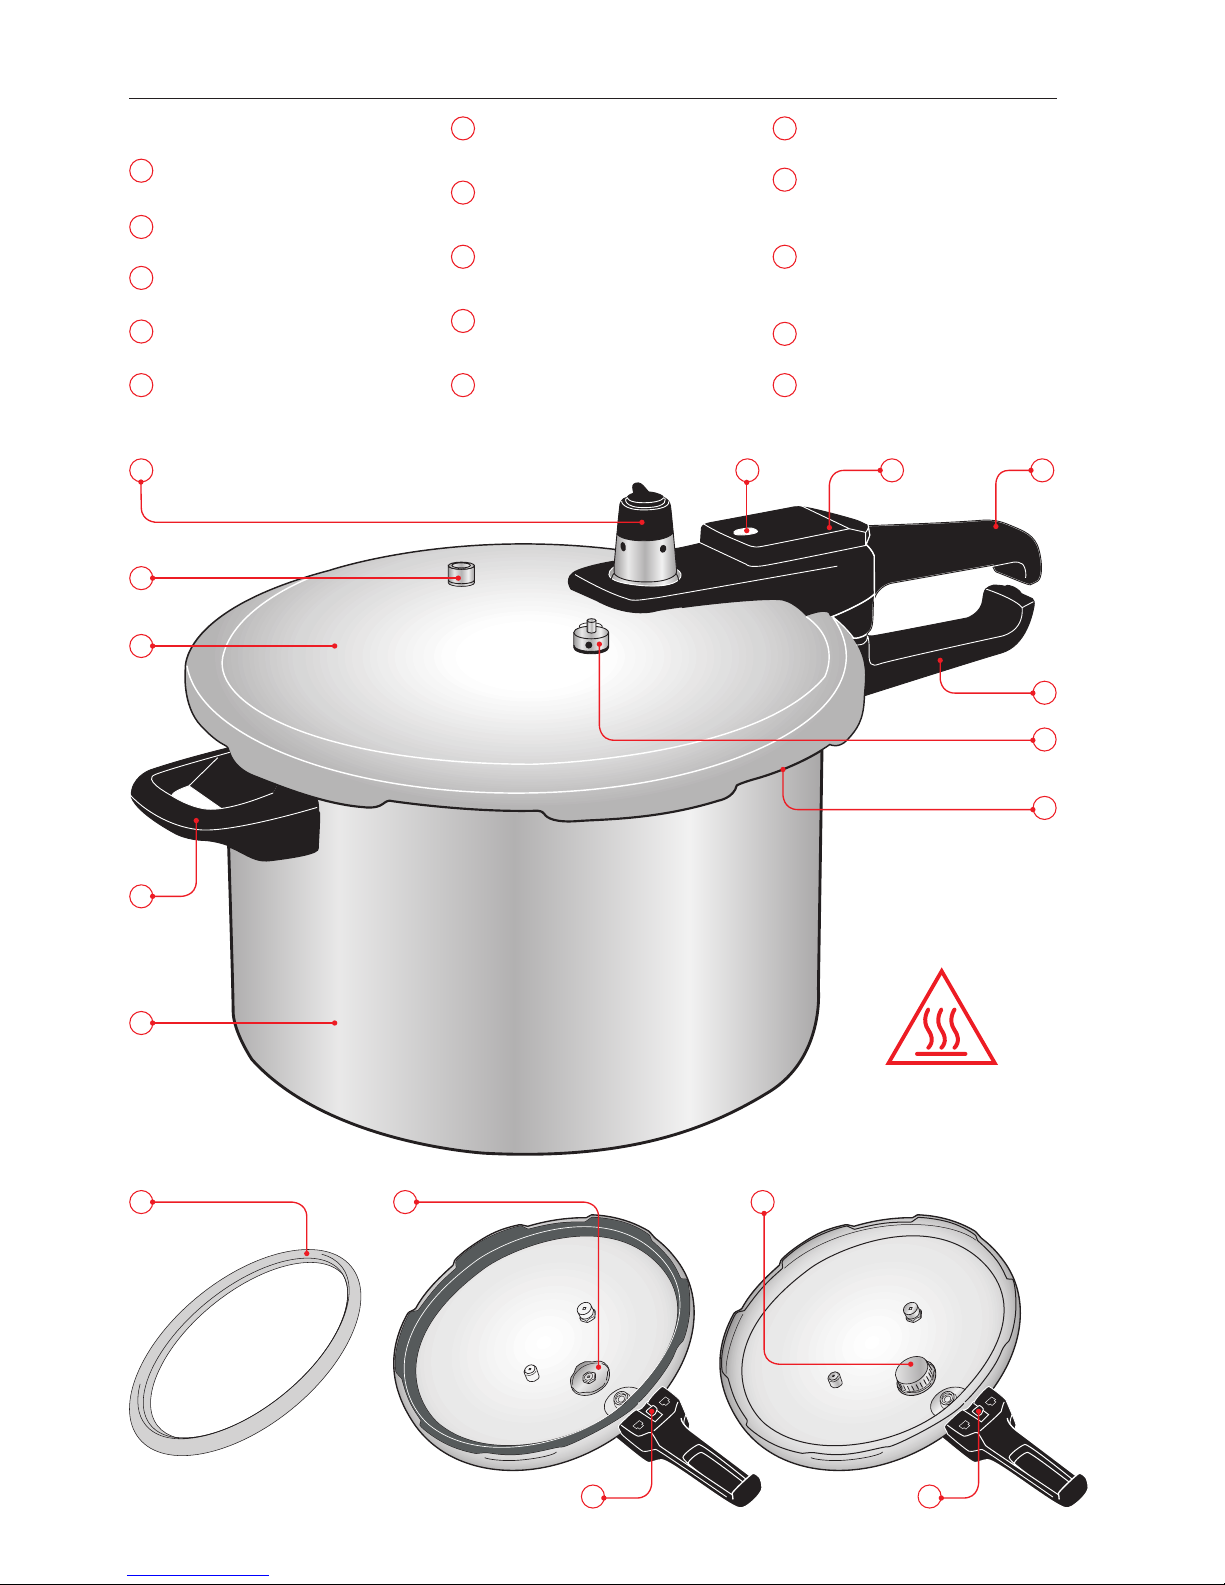
FEATURES
1Cooker Body
2
3Lid
4Fusible Safety Valve
5Pressure Limiting Valve
6Pressure Indicating Valve
7Push Plate
8
9
10 Spring Safety Valve
11 Sealing Gasket Ring
12 Removable Blockage
Guard
13 Exhaust Pipe
(under blockage guard)
14 Spare Seal Gasket
15 Lock Pin
1
2
3
4
5 6 7
9
10
11
121314
8
HOT SURFACE!
15 15

All images are for illustration purposes only. Actual product may vary.
SQ Professional Ltd © 2017 All rights reserved
SQPro Pressure Cooker - Aluminium
FEATURES
SAFEGUARDS
SQPro Pressure Cooker - Aluminium
5
4
IMPORTANT SAFEGUARDS
Read all instructions carefully!
Improper use of this pressure cooker
may result in bodily injury or property
damage.
Always check the exhaust pipe before
each use. Remove blockage guard by
turning it one-quarter (¼) counterclock-
up to light and
look through the exhaust pipe to en-
sure that it is clear and free of obstruc-
tion.
Always check pressure release devices for clogging
before use.
two-thirds (2
/3) full with food and/or li-
quid. When cooking foods that expand
during cooking, such as rice or dried
half (½) full. Never use less than 250ml
(1 cup) of liquid when pressure cooking.
See Operating Instructions for more information.
Do not pressure cook the following:
apples or applesauce, cranberries, rhu-
barb, pears, barley, oatmeal (or other
cereals), split peas or dried soup mixes.
Foods such as noodles, macaroni, spa-
ghetti or other pastas should not be
pressure cooked because they tend to
foam or froth and may block the pres-
sure release devices.
This appliance cooks under pressure.
Improper use may result in a scalding
injury. Ensure that the lid is properly
closed and locked to the pressure cooker
body before operating.
Do not attempt to use the pressure
cooker in a heated oven.
Extreme caution must be used when
moving a pressure cooker containing
hot liquid.
Do not touch hot surfaces. Always use
handles when moving the pressure
cooker.
Do not open or attempt to open the pres-
sure cooker until the internal pressure is
reduced completely and the pressure
indicating valve has dropped, allowing
the push plate to move over the valve.
The pressure limiting valve can now
be removed without any steam escaping.
To ensure safe operation and satisfactory perfor-
mance, replace the sealing ring gasket if it becomes hard,
deformed, cracked or shows any noticeable damage.
Close supervision is necessary when
operating the pressure cooker around
or near small children.
Do not use the pressure cooker for any-
thing other than its intended purpose.
Do not use the pressure cooker for
pressure frying with oil or roasting.
Always be sure that the handles are
properly assembled, fastened and tightly
secured to cooker body and lid .
Never store heavily salted liquids in
cooker as this might cause pitting.
Do not place pressure cooker on a tilted
worktop. This may cause the pressure
limiting valve to operate improperly.
Never use a pressure limiting valve
from any other brand of pressure cooker.
Use only the pressure limiting valve
provided with this appliance.
Never add any additional weight to the
top of the pressure limiting valve .
THIS APPLIANCE IS FOR HOUSEHOLD USE ONLY.
SAVE THESE INSTRUCTIONS
All images are for illustration purposes only. Actual product may vary.
SQ Professional Ltd © 2017 All rights reserved
SQPro Pressure Cooker - Aluminium
USE & MAINTENANCE
SQPro Pressure Cooker - Aluminium
7
6
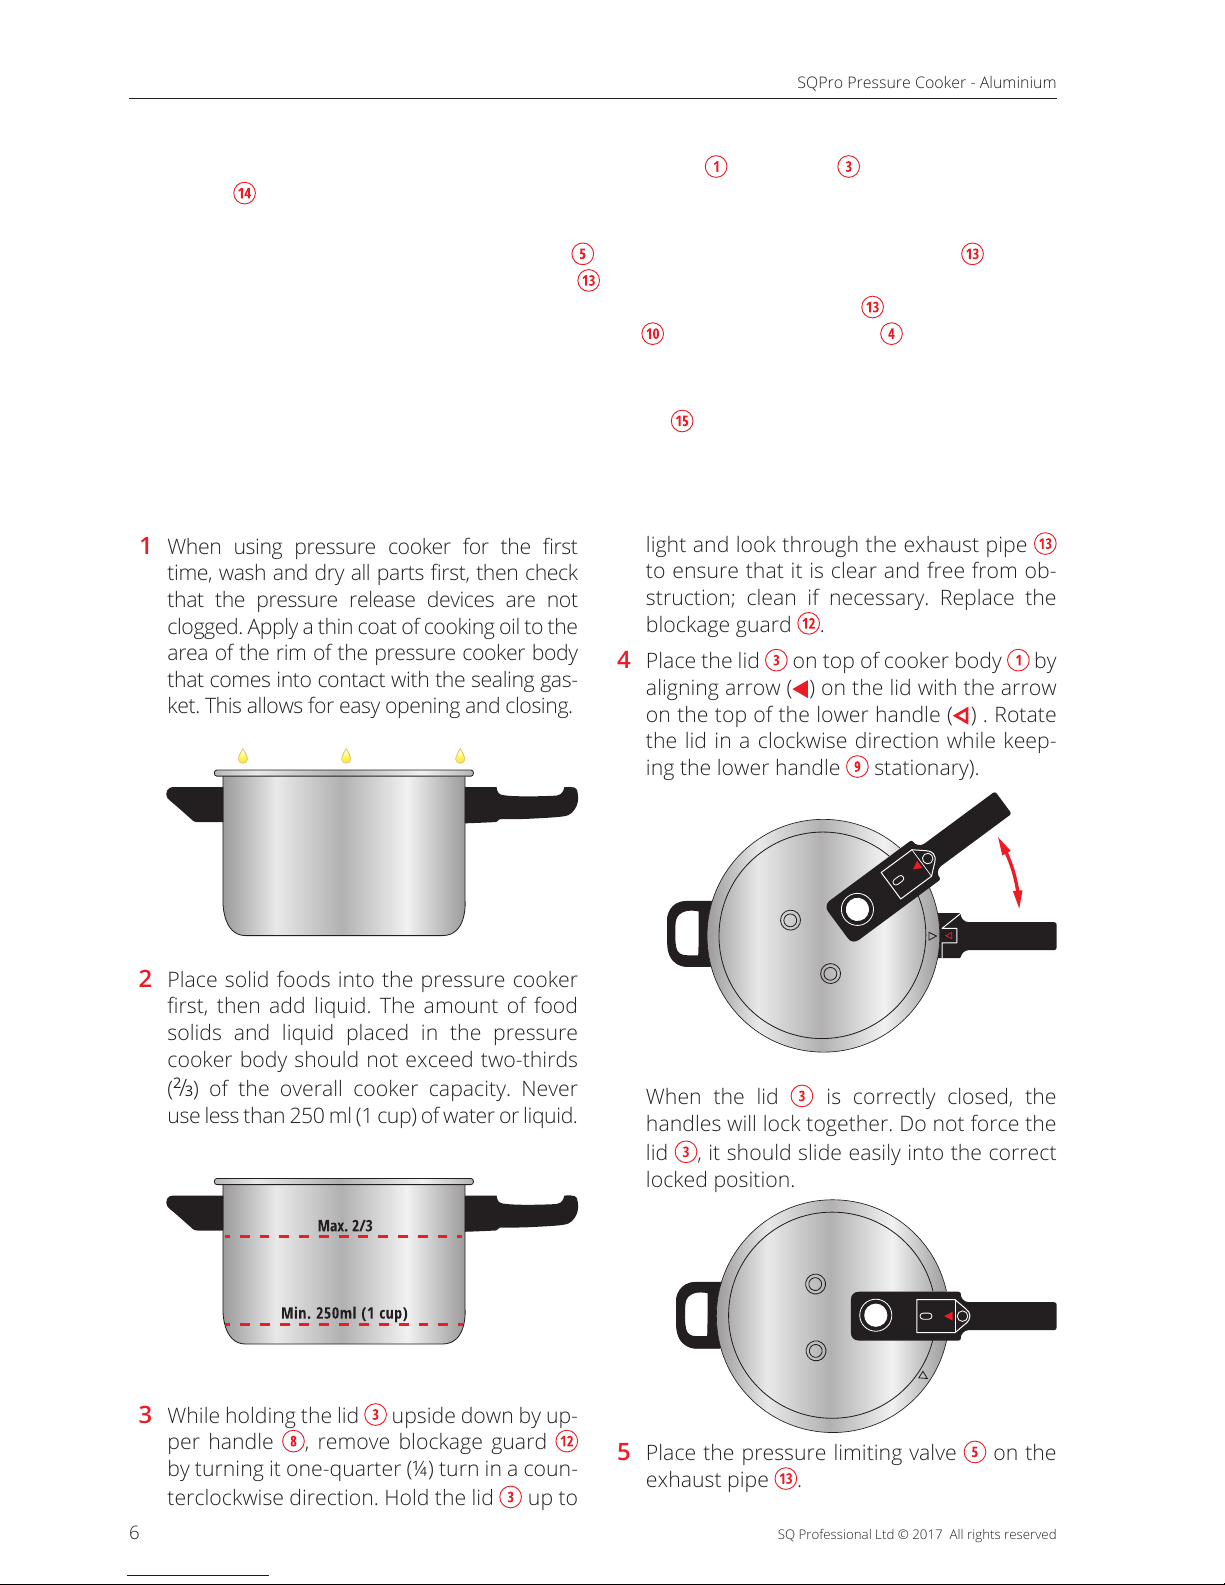
1
that the pressure release devices are not
clogged. Apply a thin coat of cooking oil to the
area of the rim of the pressure cooker body
that comes into contact with the sealing gas-
ket. This allows for easy opening and closing.
2 Place solid foods into the pressure cooker
solids and liquid placed in the pressure
cooker body should not exceed two-thirds
(2
/3) of the overall cooker capacity. Never
use less than 250 ml (1 cup) of water or liquid.
3 While holding the lid upside down by up-
per handle , remove blockage guard
by turning it one-quarter (¼) turn in a coun-
up to
light and look through the exhaust pipe
to ensure that it is clear and free from ob-
struction; clean if necessary. Replace the
blockage guard .
4 Place the lid on top of cooker body by
aligning arrow ( ) on the lid with the arrow
on the top of the lower handle ( ) . Rotate
the lid in a clockwise direction while keep-
ing the lower handle stationary).
When the lid is correctly closed, the
handles will lock together. Do not force the
lid , it should slide easily into the correct
locked position.
5 Place the pressure limiting valve on the
exhaust pipe .
PRINCIPLE OPERATION
For maximum moisture retention, the pressure cooker body and the lid are sealed by a seal-
ing gasket . During the heating process, the pressure inside the cooker increases gradually as
water is brought to its boiling point.
When this occurs, the pressure limiting valve pushes upward on the exhaust pipe . Steam
then begins to escape from the exhaust pipe , allowing the temperature and pressure inside
the cooker to remain at a constant level. If for some reason the exhaust pipe becomes blocked
by food, one of the safety devices (spring safety valve or fusible safety valve ) will release the
pressure automatically. If the the lid is not fully closed and in the locked position, the pressure
inside the cooker cannot reach more than 5 Kpa.
This pressure cooker has been equipped with a lock pin which will keep the the lid from being
removed from the cooker body until the pressure inside the cooker reduces to 3 Kpa or less.
OPERATING INSTRUCTIONS

All images are for illustration purposes only. Actual product may vary.
SQ Professional Ltd © 2017 All rights reserved
SQPro Pressure Cooker - Aluminium
USE & MAINTENANCE
SQPro Pressure Cooker - Aluminium
7
6
6 Begin the cooking process by placing the
pressure cooker on a burner ring on high.
NOTE!
not extend the diameter of the cooker
body. If using an electric stove the diameter
of the burner should not be larger than the
diameter of the cooker body. As pressure
starts to build up in the cooker, steam will
begin to escape through the lock pin
and around the handle until the lock pin
rises and seals the cooker. Steam and
a few drops of water may escape from the
exhaust pipe . Shortly thereafter steam
will start to escape rapidly from under the
pressure limiting valve , which may begin
from this moment.
CAUTION! Do not attempt to remove the pressure limiting
valve at any time during the cooking cycle.
7 If steam should escape from under the edge
of the lid and pressure fails to rise, cool
the pressure cooker under cold running wa-
ter for 1 to 3 minutes. Remove pressure limi-
ting valve and open the pressure cooker.
Wipe away any debris that may have accu-
mulated. Begin cooking process again.
8 Reduce heat to a medium/low setting. At
the correct setting the pressure limiting
valve should vibrate about 1 to 3 times
per minute. Constant vibrating indicates
too high a temperature. The occasional
vibrating and hissing sound ensures pres-
sure is being maintained.
Continue at this heat setting until remain-
ing cooking time is completed.
9 The pressure limiting valve should re-
lease steam about 1 to 3 times per minute
at the proper temperature setting. If the
temperature is too high, the pressure limit-
ing valve will release steam continuously.
If the temperature is too low, the pressure
will fall and the lock pin will drop. Adjust
the heat setting accordingly. Continue cook-
ing until the remaining time has elapsed.
10 When pressure has been maintained for
the required length of time, remove the
pressure cooker from heat source and al-
low pressure to drop before removing
the pressure limiting valve .
Allowing pressure to drop normally without
cooling under running water takes about 3
to 15 minutes, depending upon the amount
many recipes call for instant reduction of
pressure by placing the cooker under cold
running water for 1 to 3 minutes.
CAUTION! Do not allow water to enter the pressure cooker
through the safety lock valve.
11 After reducing pressure by either meth-
od, lightly touch pressure limiting valve
with an utensil to ensure that pressure
has been reduced. If steam is still present,
follow the previously mentioned steps to
reduce pressure. If no steam is present,
you may remove the pressure limiting
valve .
To unlock the upper and lower han-
dles, move the push plate forward with
your thumb in the direction indicated by
the arrow. While holding the push plate
forward, rotate the the lid counterclock-
wise until the arrows on the the upper
and lower handle align with each other.
Then gently lift up the the upper handle
to open. The lid should slide open with
ease.
Do not try to force the handles apart.If
handles do not slide apart easily, check the
pressure indicating valve to see if it has
been released. If it has not been released,
repeat the previous steps to reduce pres-
sure.

All images are for illustration purposes only. Actual product may vary.
SQ Professional Ltd © 2017 All rights reserved
SQPro Pressure Cooker - Aluminium
SQPro Pressure Cooker - Aluminium
9
8
MAINTENANCE
1 The pressure cooker should be cleaned
before and after each use:
All the parts of this pressure cooker, includ-
ing the sealing ring gasket and pressure
limiting valve , are made to be fully im-
mersed in water and should be washed after
each use. Be sure to remove the blockage
guard and wash it thoroughly. Also, wash
and inspect the exhaust pipe to ensure it
is clean and free of debris. Thoroughly dry all
parts of the pressure cooker before storing
and be sure to correctly reinstall the bloc-
kage guard .
Do not use harsh brushes or scourers on the
cooker surface to avoid abrasion.
Do not store food inside the cooker for ex-
tended periods of time.
2 Maintenance of the sealing ring gasket
Remove the gasket from the lid . Clean
the dirt from the ring and the lid .
tho-
roughly.
Place the gasket back in the lid . Do not
place the lid on the cooking pot when not
in use to prevent the gasket from being
squeezed and deformed.
CAUTION! The color and appearance of the gasket will
change with use, which is completely normal. The gasket
should be changed every two years or sooner if it is damaged
or deformed in any way. Please contact our customer services
for the replacement parts. Never use substitutes.
REPLACEMENT OF WORN PARTS
To ensure safe and continuous operation of
the pressure cooker, the sealing ring gasket ,
spring safety valve and fusible plate in the fu-
sible safety valve , should be replaced every
two years under normal usage.
Sealing Ring Gasket
For safe operation and satisfactory perfor-
mance, replace the sealing ring gasket if it
becomes hard, deformed, cracked or shows any
damage. To replace the sealing ring gasket ,
follow these steps:
1 Remove the old sealing ring gasket and
thoroughly wash the the lid . Ensure that
the area for the new sealing ring gasket is free
of any debris. Dry thoroughly.
2 Place the new sealing ring gasket around in-
ner lip of the lid . Make sure the new sealing
inner lip of the cooker.
3 With the new sealing ring gasket installed cor-
rectly, add a thin coat of cooking oil to the top
rim of the cooker body where it contacts the
lid gasket.
Spring Safety Valve
The spring safety valve is designed for long
life, and under normal operating conditions,
should not require dismantling. To clean and
check operation, lightly pull up on the ring and
rinse under warm water. If the valve leaks steam
during the cooking cycle, replace spring safety
valve immediately. Do not attempt to repair
the safety valve or use the pressure cooker
without the spring safety valve in place.
Lifting Ring
Locking Plug
Spring Safety Valve Core
Rubber Gasket
Acorn Nut
To replace the safety valve, follow these steps:
1 Remove the acorn nut and rubber gasket.
2 Remove hex nut.
3 Remove spring safety valve assembly and
gasket.
4 Discard all the old parts removed in above
steps 1 through 3.
5 Remove acorn nut from new safety spring
valve.

All images are for illustration purposes only. Actual product may vary.
SQ Professional Ltd © 2017 All rights reserved
SQPro Pressure Cooker - Aluminium
SQPro Pressure Cooker - Aluminium
9
8
TROUBLESHOOTING
If there is any unusual activity during cooking always TURN OFF the heat immediately, remove the
pressure cooker carefully and place it on a heat resistant level surface. Slowly pour cold water over
the lid (avoiding the valves) to reduce pressure and temperature.
PROBLEM POSSIBLE CAUSE SOLUTION
Steam evaporates
from safety lock
valve, the valve
does not rise.
Pressure inside the
cooker is low.
1There is not enough heat.
2
3Safety lock valve is clogged or the
screw is loose.
4Gasket is dirty.
5
1Increase the heat.
2Add more water.
3Clean the safety lock valve and tighten
the red screw.
4Clean the gasket, the cooker rim and
the lid.
5Fit the lid properly.
Steam evaporates
from the under
the lid.
1Gasket is dirty.
2Gasket is old (deformed).
1 Clean the gasket, the cooker rim and
the lid.
2Replace the gasket.
Lid does not t. 1Lid may have become deformed. 1Replace the lid.
During cooking, the
gasket bulges and
steam evaporates.
1Gasket is performing its safety
function (releasing the pressure in
the cooker due to faulty valves).
2Gasket is aged and deformed and
thus has lost its function.
1 Remove the pressure cooker from
heat and cool it down. Check all the
safety devices and replace the faulty
ones.
2Replace the gasket.
6 Remove hex nut from new safety spring
valve.
7 Insert new spring safety valve assembly
from the top into the hole in the lid . Make
sure the gasket is between locking plug and
top of the lid .
8 Install and tighten hex nut
snug on the bottom of the lid. Using wrench
tening, making sure not to over- tighten and
scratch the lid.
9 Install acorn nut
bottom of spring safety valve assembly.
10 Lightly pull on lifting ring to ensure new
spring safety valve operates properly. When
released, the lifting ring should snap back
rapidly to its original position without stopping.
Fusible Safety Valve
The fusible safety valve is equipped with a
fusible plate. When the pressure cooker’s other
vents and safety valves become blocked and
the pressure cooker reaches about 480 Kpa,
the fusible plate will melt and steam will rush
out from the fusible safety valve , thus ra-
pidly reducing the pressure inside the cooker.
After the pressure has been completely re-
-
ly cooled, the fusible plate must be replaced
before the pressure cooker can be used again.
To replace the fusible plate, follow these
steps:
1 Using
threaded valve core.
2 Turn the the lid over. Insert a small metal
wire or pin into the hole in the bottom of
the fusible valve body and push the melted
fusible plate out.
3 After the melted fusible plate is removed,
thoroughly wash out the fusible valve body
and threaded valve core. Use a small wire
or pin to clean the holes in the fusible body.
Thoroughly dry fusible valve body and inspect
for debris. Valve body must be clean and free
of all debris before placing new fusible plate
to body.
4 After fusible body has been cleaned, place
new fusible plate into fusible valve body. Be
bottom of the fusible valve body.
5 Reinstall the threaded valve core and tighten
¼ to ½ turn past snug.

All images are for illustration purposes only. Actual product may vary.
SQ Professional Ltd © 2017 All rights reserved
SQPro Pressure Cooker - Aluminium
SQPro Pressure Cooker - Aluminium
11
10
COOKING TIMES
The cooking times listed are only shown as a guide. You should always check that the food
is cooked thoroughly before serving. When cooking pre-packed food always follow any
guidelines on the package or label.
FOOD TYPE TIME
SOUPS
Chicken
Fish
Leek & potato
Vegetable
Onion
6 min
5 min
5 min
5 min
4 min
VEGETABLES
Asparagus
Artichokes
Broccoli, stalks
Brussel sprouts, whole
Cabbage, red or green, in quarters
Carrots
Courgettes
Potatoes
Runner beans
Corn on the cob
Broad beans
Brussels sprouts
Leeks
Spinach
Aubergine slices
Okra
Pumpkin, 50mm (2”) slices
7 min
6 min
2 min
5-6 min
4 min
3-4 min
6 min
2-3 min
2 min
6 min
6 min
5 min
4 min
4 min
4 min
4 min
3 min
2-3 min
3-4 min
PULSES
Chickpeas
Kidney beans
White beans
Lentils
20 min
15 min
15 min
12 min
FOOD TYPE TIME
SEAFOOD
Lobster
Crab
Skate wings
Mussels
Shrimp
Prawns
9min
7-9 min
4 min
4 min
3-4 min
2 min
2 min
2 min
MEAT (per 450g)
Beef
Lamb
Veal
Pork
12-15 min
10-13 min
10-12 min
12 min
POULTRY (whole)
Partridge
Pheasant
Chicken
8 min
8 min
5min/450g
FRUIT
Plums (halved & stoned)
Raspberries
Dried prunes
Damsons
Dried apricots
2-5 min
2-5 min
4-5 min
4-5 min
4 min
3-4 min

All images are for illustration purposes only. Actual product may vary.
SQ Professional Ltd © 2017 All rights reserved
SQPro Pressure Cooker - Aluminium
SQPro Pressure Cooker - Aluminium
11
10
RECIPES
SPANISH CHICK PEAS (GARBANZOS)
400g |14oz dried chick peas
soaked overnight and
drained
450g |1 can tomato pure
1onion
8garlic cloves
1 tbsp cumin
1 tbsp oregano
3 tbsp olive oil
2 tbsp oregano
340g | 2 cup green peppers
3 medium sized potatoes
cut in pieces
2pumpkin slices
cut in medium sized cubes
1 handful olives
1Chorizo or
chopped spanish sausage
1.5L | 6 cups water
Place the drained chickpeas into the pressure
cooker. Add water, olives, and salt. Cook for 25
minutes.
In a pan, sauté the onion, garlic, green peppers,
and the sausage. Cook for 2 minutes.
Release pressure then open the pressure cook-
er and check if the chickpeas have softened. If
they have not softened enough, let it cook for 5
more minutes.
Add the sautéed onions, garlic, green peppers,
and Chorizo to the pressure cooker together
with potatoes and the pumpkin slices and cook
for additional 15 minutes or to taste.
BEETS WITH DILL AND WALNUTS
900g | 2 lb beets
600ml | 2½ cups water
1 tbsp cider vinegar
1 tbsp fresh lemon juice
2 tsp sugar
1½ tsp Dijon mustard
3/4 tsp salt
½ tsp black pepper
freshly ground
3 tbsp olive oil
extra-virgin
2 tbsp fresh dill
chopped
2 tbsp walnuts
Beets are ready when they can be pierced with a fork
without too much resistance. If they’ are not quite ten-
der enough, put them back under pressure for a mi-
nute or two. Prepare the dressing while the beets cook.
Leave root and 2.5cm (1”) stem on beets. Scrub
with a brush then place in a pressure cooker and
add water. Close lid securely and bring to high
pressure over high heat. Reduce heat to medi-
um or level needed to maintain high pressure.
Cook for 10 minutes. Remove from heat and
let stand for 6 minutes. Release pressure then
open the pressure cooker.
vertically then cut each half into 4 wedges. Place
in a medium bowl.
Combine vinegar with lemon juice, sugar, mus-
tard, salt and pepper in a small bowl. Slowly driz-
zle in olive oil, stirring constantly with a whisk until
well combined. Toss oil mixture with beets and let
stand 15 minutes, tossing gently occasionally. Stir
in dill. Sprinkle ground walnuts before serving.

All images are for illustration purposes only. Actual product may vary.
SQ Professional Ltd © 2017 All rights reserved
SQPro Pressure Cooker - Aluminium
SQPro Pressure Cooker - Aluminium
13
12
TOFU CURRY
15ml | 1 tbsp olive oil
or as needed
1 large red onion
minced
2 Indian green chilies
halved
4 bay leaves
2g ground turmeric
pinch asafoetida powder
salt to taste
450g | 15 oz diced tomatoes
10g | 2 tbsp ground coriander
7g | 1 tbsp garam masala
3g | 1 tsp red chili powder
500ml | 2 cups water
290g | 2 cups green peas
455g | 16 oz tofu
medium heat; cook and stir in the red onion,
green chilies, bay leaves, turmeric, the asafoe-
tida powder, and salt until onions are translu-
cent, for about 10 minutes.
Add tomatoes, coriander, garam masala, and
chile powder, and mix well.
Place lid on pressure cooker; cook until onions
are tender and spices are fragrant, for about 8
to 10 minutes.
Release the pressure and remove the lid. Add
water, then return lid and bring the mixture to
a boil.
Release the pressure and remove the lid to add
peas and tofu. Stir well to combine then secure
the lid onto the pressure cooker
Bring up to medium pressure over medium
heat. Reduce heat to low to maintain pressure,
and cook until tofu is well cooked through and
onions are tender, for about 20 minutes.
Remove from heat, release pressure, and let
MEXICAN CHICKEN & RICE
1whole chicken
cut in pieces
400g |2 cup rice
700ml |3 cups water
450ml |2 cups cooking wine
1 can tomato sauce
1 tbsp cumin
1 tbsp oregano
8 cloves sliced garlic
2 cups chopped onions
175g |1 cup red or green bell pep-
pers
240g |1 cup cooked peas
cilantro and achiote
powder seasonings
can be purchased in the
ethnic food section of your
supermarket
1 tbsp paprika
6 tbsp olive oil
2 tsp salt
1bay leaf
1 can sweet peas
cooker. Add garlic, onions and pepper, while
stirring for 1 minute.
Add chicken pieces, tomato sauce, ground
cumin, whole oregano, cilantro, achiote, and
paprika. Pour in half of the cooking wine and
water and stir well.
Cook for 15 minutes in medium high heat.
Release the pressure and open the pressure
cooker.
Add rice and the remaining cooking wine. Stir
well to combine all the ingredients, then close
the pressure cooker. Increase the pressure to
high for approximately 20 minutes.
Release the pressure and open the lid. If no fur-
ther cooking is needed, stir in the olive oil and
sweet peas, and serve.

All images are for illustration purposes only. Actual product may vary.
SQ Professional Ltd © 2017 All rights reserved
SQPro Pressure Cooker - Aluminium
SQPro Pressure Cooker - Aluminium
13
12
MENSAF - JORDANIAN LAMB STEW
45ml |3 tbsp olive oil
680g |1.5lb boneless lamb shoulder
cut into 5cm (2”) pieces
1 litre |4 cups water
280g |1½ cup white rice
uncooked
25g |3 tbsp pine nuts
4½ pita bread rounds
180ml |¾ cup salted goat’s milk
jameed el-kasih
Place 1 tbsp of olive oil into a pressure cooker
over medium-high heat. Add the lamb and cook
until evenly browned on all sides. Remove the
lamb.
Put a trivet on the bottom of the pressure cooker
and place lamb on top. Pour in half of the water
and close the pressure cooker securely. Bring
cooker to full pressure over high heat then re-
duce heat to medium-high. Cook for 40 minutes.
Remove pressure cooker from heat and release
the pressure. Open the lid and remove lamb,
separate meat from bones, and keep warm.
Discard bones. Pour the broth into a bowl, and
set aside.
Place remaining water, 1 tbsp olive oil, and rice
into a saucepan. Bring to a boil over medium-high
heat.
Stir, reduce heat, cover, and simmer until all mois-
ture is absorbed, for about 20 minutes.
Place remaining olive oil into a skillet over me-
dium heat. Stir in the pine nuts and cook until
deep brown, for about 5 minutes.
Pour the reserved broth into a large pan. Pour
in the goat’s milk.
Add the lamb to the milk mixture. Simmer over
medium heat allowing the lamb to absorb some
of the liquid, for about 30 minutes.
To serve, arrange the pita bread over the bot-
tom of a large platter. Spoon rice over the
bread. Place the lamb on top of the rice, and
drizzle with any remaining milk mixture. Sprin-
kle pine nuts over the top.
ITALIAN RICE CROQUETTES
910g | 2lb chicken giblets
235ml | 1cup water
3g | ½ tsp salt
950ml | 4 cups salted water
370g | 2 cups long grain white rice
uncooked
160g | 2 cups Parmesan cheese
grated
120ml | ½ cup marinara sauce
25g | ¼ cup dry breadcrumbs
2 large eggs
8g | 2 tbsp fresh parsley
chopped
salt & black pepper
freshly ground to taste
110g | 1 cup dry bread crumbs
for coating
vegetable oil
for frying
Combine chicken giblets, water and salt in a
pressure cooker. Cook for about 20 minutes.
Drain giblets and let cool for 10 minutes. Chop
giblets and set aside.
Cook rice and salted water in a saucepan and
bring to the boil. Reduce heat to medium-low,
cover and simmer until the rice is tender and all
liquid has been absorbed. Spread cooked rice
onto a baking sheet to cool for 5 minutes then
transfer to a large bowl.
Mix in giblets, grated Parmesan cheese, mari-
nara sauce, bread crumbs, eggs, parsley, salt,
and ground pepper. Cover with plastic wrap
and refrigerate for 1 hour.
Remove the mixture from refrigerator and
form 5cm (2”) ball shaped croquettes. Roll cro-
quettes in bread crumbs and place on a baking
sheet.
heat. Cook breaded croquettes until browned
on all sides, about 10 minutes.
Transfer to a plate lined with paper towels to
absorb excess oil.

All images are for illustration purposes only. Actual product may vary.
SQ Professional Ltd © 2017 All rights reserved
SQPro Pressure Cooker - Aluminium
SQPro Pressure Cooker - Aluminium
15
14
POTATO SALAD
6medium red potatoes
scrubbed
235ml |1 cup water
40g |¼ cup onion
chopped
1 stalk celery
chopped
salt & pepper
3eggs
hard cooked, chopped
4g | 1 tbsp fresh dill
chopped
120ml | ½cup mayonnaise
5ml | 1 tsp yellow mustard
5ml | 1 tsp cider vinegar
Place potatoes in pressure cooker with water.
Cook on high pressure for 6 minutes or 7 min-
utes if potatoes are larger.
Release the steam and open the pressure
cooker. Remove potatoes and let them cool
enough to handle. Peel and dice the potatoes.
Alternate layers of potatoes, onion, and celery
in a large bowl.
Season each layer with salt and pepper. Top
with the chopped egg and sprinkle with dill.
Mix together the mayonnaise, mustard, and ci-
der vinegar in a small bowl.
Gently fold the mayonnaise mixture into the
potatoes.
Chill at least one hour before serving.
MASHED POTATOES
710 ml |3 cups cold water
or as needed
1.6kg |3½ lb russet potatoes
peeled and sliced 2cm
(¾“) thick
55g |¼ cup butter
120ml | ½ cup whole milk
10g | 2 tsp salt
1g | ½ tsp white pepper
Boil in an open pressure cooker over high heat
then add potatoes. Securely close the lid and
bring cooker up to high pressure. Reduce heat
to low, maintaining high pressure. Cook for 6
minutes.
Release the pressure to open the pressure
cooker. Drain potatoes and return them to
pressure cooker. Add butter and milk and cover
pressure cooker with lid for 5 minutes, allowing
the heat from the potatoes to melt the butter
and warm the milk.
Remove lid. Season with salt and white pepper,
and use a hand masher to mash potatoes until
lumps are mostly gone. Transfer to a bowl and
serve hot. Garnish with chopped chives.
RICE PUDDING
211g |1 cup rice
1cinnamon stick
2 litres | 8 cups water
30ml | 2 tbsp water
2 cans condensed milk
1lemon skin
7ml | ½ tbsp vanilla extract.
4g | ½ tbsp ground cinnamon
Add water, rice, cinnamon stick, lemon skin,
salt, and vanilla into the pressure cooker. Cook
on medium heat for 10 minutes.
Release the pressure and remove the lid. Add
the condensed milk and cook uncovered for
10 more minutes. Powder with cinnamon and
serve.

All images are for illustration purposes only. Actual product may vary.
SQ Professional Ltd © 2017 All rights reserved
SQPro Pressure Cooker - Aluminium
SQPro Pressure Cooker - Aluminium
15
14
SERVICE
If you ring Customer Service, please have the MODEL NO. to hand, as we won’t be
able to help you without it. If it is not operating correctly, read the instructions and
check that all the valves are free of debris and unclogged and that all the parts are
properly attached, and that no parts are missing.
If that does not solve the problem – ring Customer Service – they may be able to
If they advise you to return the product to us, pack it carefully, include a note with
your name, address, day phone number, and description of the problem. If under
a guarantee, say where and when it was purchased and include proof of purchase.
Send it to SQ Professional Ltd.
WARRANTY
CAUSED BY MISUSE OF GENERAL WEAR AND TEAR.

Voltage Business Centre |Units 1 - 3
6 Mollison Avenue |
T: 01992 716 070 |F: 01992 700 538
www.sqprofessional.com
Other manuals for SQPro
1
Table of contents


