SSR Motorsports Lazer6 User manual

Lazer6 Owner’s Manual

2
Preface
Thank You for purchasing the Lazer6 50cc Moped, it will bring you years of plea-
surable riding in a safe to operate package.
Riding a moped is one of the most exciting past times. For your safety, you
should read this owner’s manual carefully and follow these instructions before
you ride.
This manual introduces regular maintenance and service, please follow these
instructions, it will help you to keep your moped in good running order and func-
tioning for years to come.
Our company never stops improving our quality and performance, this may lead
to color or structural changes not outlined in this manual. We apologize if this
brings you any inconvenience.
SSR Motorsports

3
Important Notice
1. Driver ONLY!
This moped is designed for one driver only.
2. Road condition for driving
This moped is only suitable for driving on roads.
3. Please read this manual carefully. Following the instructions outlined here will make your
moped more durable and stable.
Please note the following words:
Warning: Means if you DO NOT follow the instructions, it could lead to serious damage for
driver and passenger.
Caution: Means if you DO NOT follow the instructions, it may cause the person/s to be injured
or damage to the moped.
Notice: Provide useful information
This user manual is proprietary to this moped. If this vehicle is sold, you should pass this
manual on to the new owner together with the vehicle.
Do not copy or translate any part of this manual without the expressed written permission of
SSR Motorsports.
This vehicle uses motorcycle grade engine oil.

4
Special Notice
Warning: This moped must use the correct spec fuse, DO NOT use other spec fuses or
operate without a fuse. Incorrect fuses may cause damage to the vehicle or re.
Fuse position: next to the battery.
Fuse spec: Main Fuse 10 Amp.
If you blow the main fuse, before you replace the fuse you should perform a simple check of
the vehicle for electrical shorts. If after replacing the fuse it blows again, send the vehicle to an
authorized SSR dealership for inspection.
Notice:
* When changing the battery for the rst time be aware of the positive and negative terminals.
If you connect the battery to the wrong terminals check the main fuse immediately. Even if the
main fuse is not blown you should take your motorcycle to a SSR dealership for inspection. An
incorrect connection could lead to electrical system damage.
* Before replacing the fuse, turn o the ignition switch and remove the key.
* When replacing the fuse, use caution not to damage the bottom of the fuse, otherwise it may
cause failure or other electrical system damage.
Forbidden Modications:
Please do not change the original parts position, otherwise it will seriously eect ve-
hicle performance and safety and may even cause the vehicle to operate improperly.
Modication examples include: electronic, emissions and/or fuel system, these changes
may also be illegal. Our company will not take any responsibility for any of these chang-
es made.

5
Preface
Important Notice
Special Notice
Safety Information........................................................6
Safe Riding..................................................................6
Riding Gear.................................................................6
Helmet..........................................................................6
Riding in Rain..............................................................6
Moped VIN Number.....................................................7
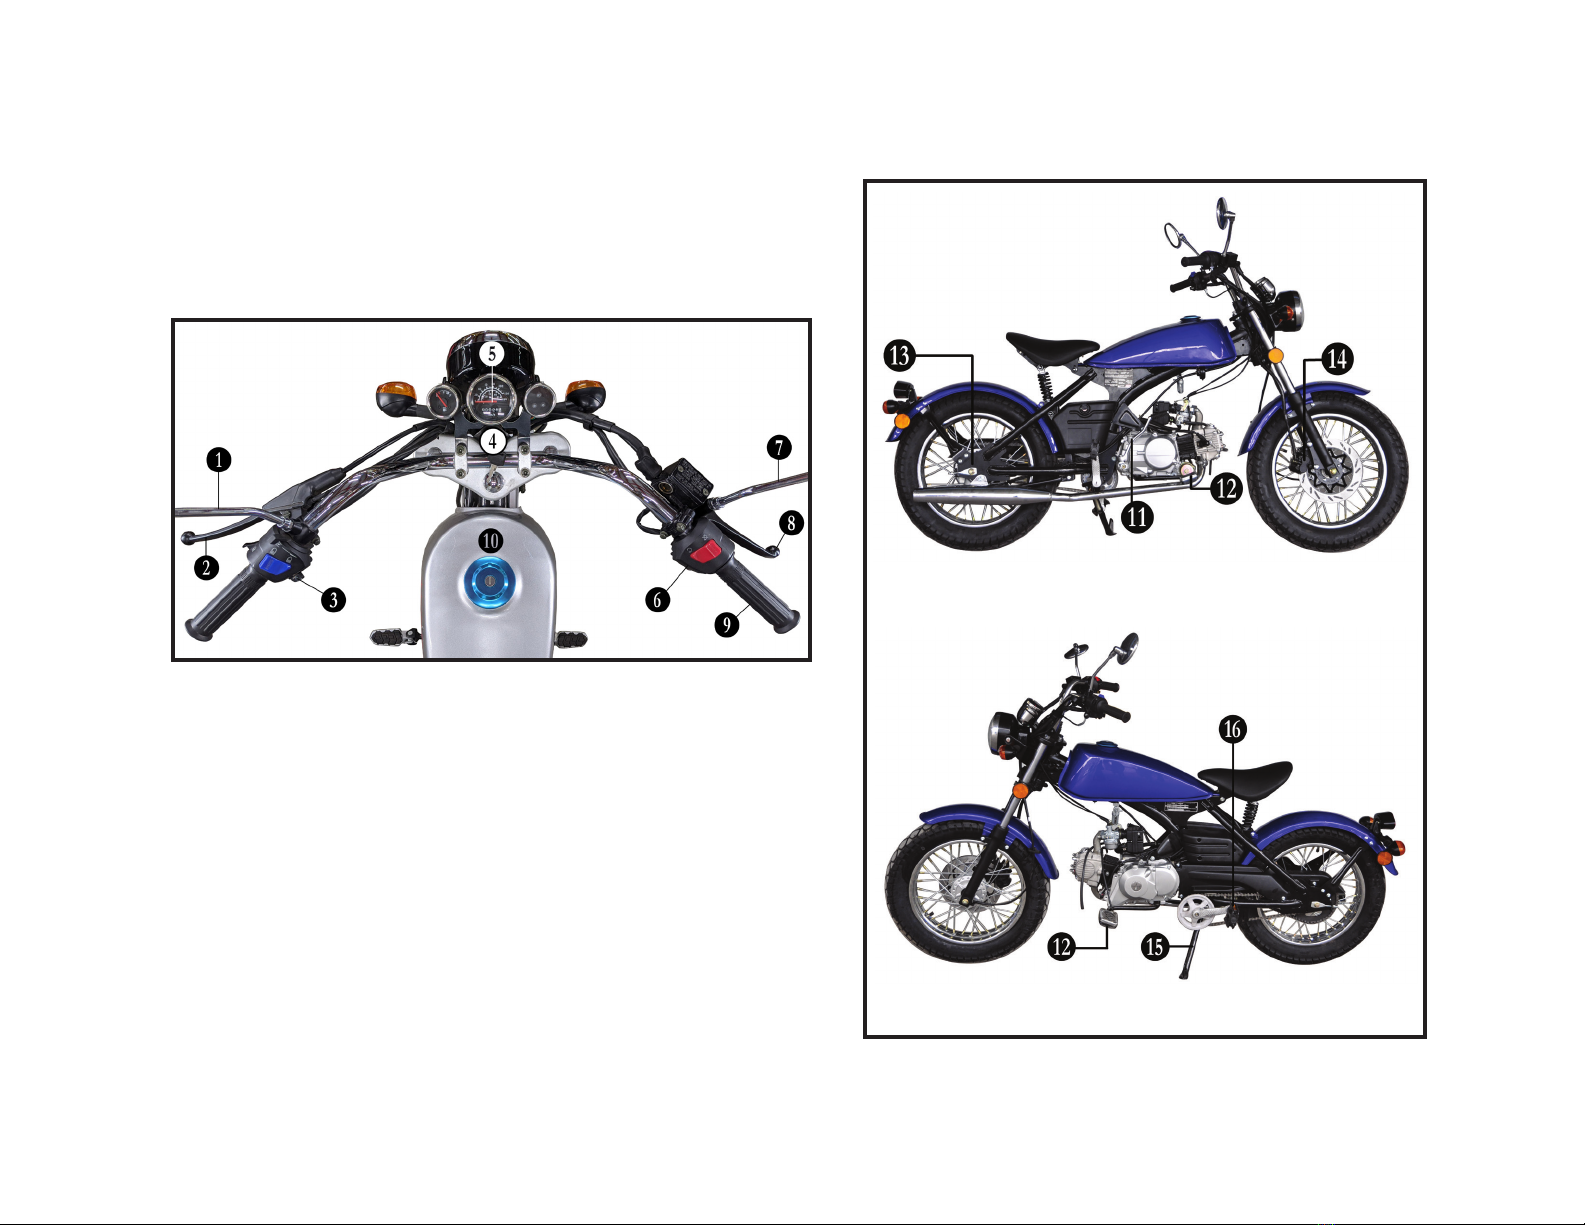
Part Description...........................................................8
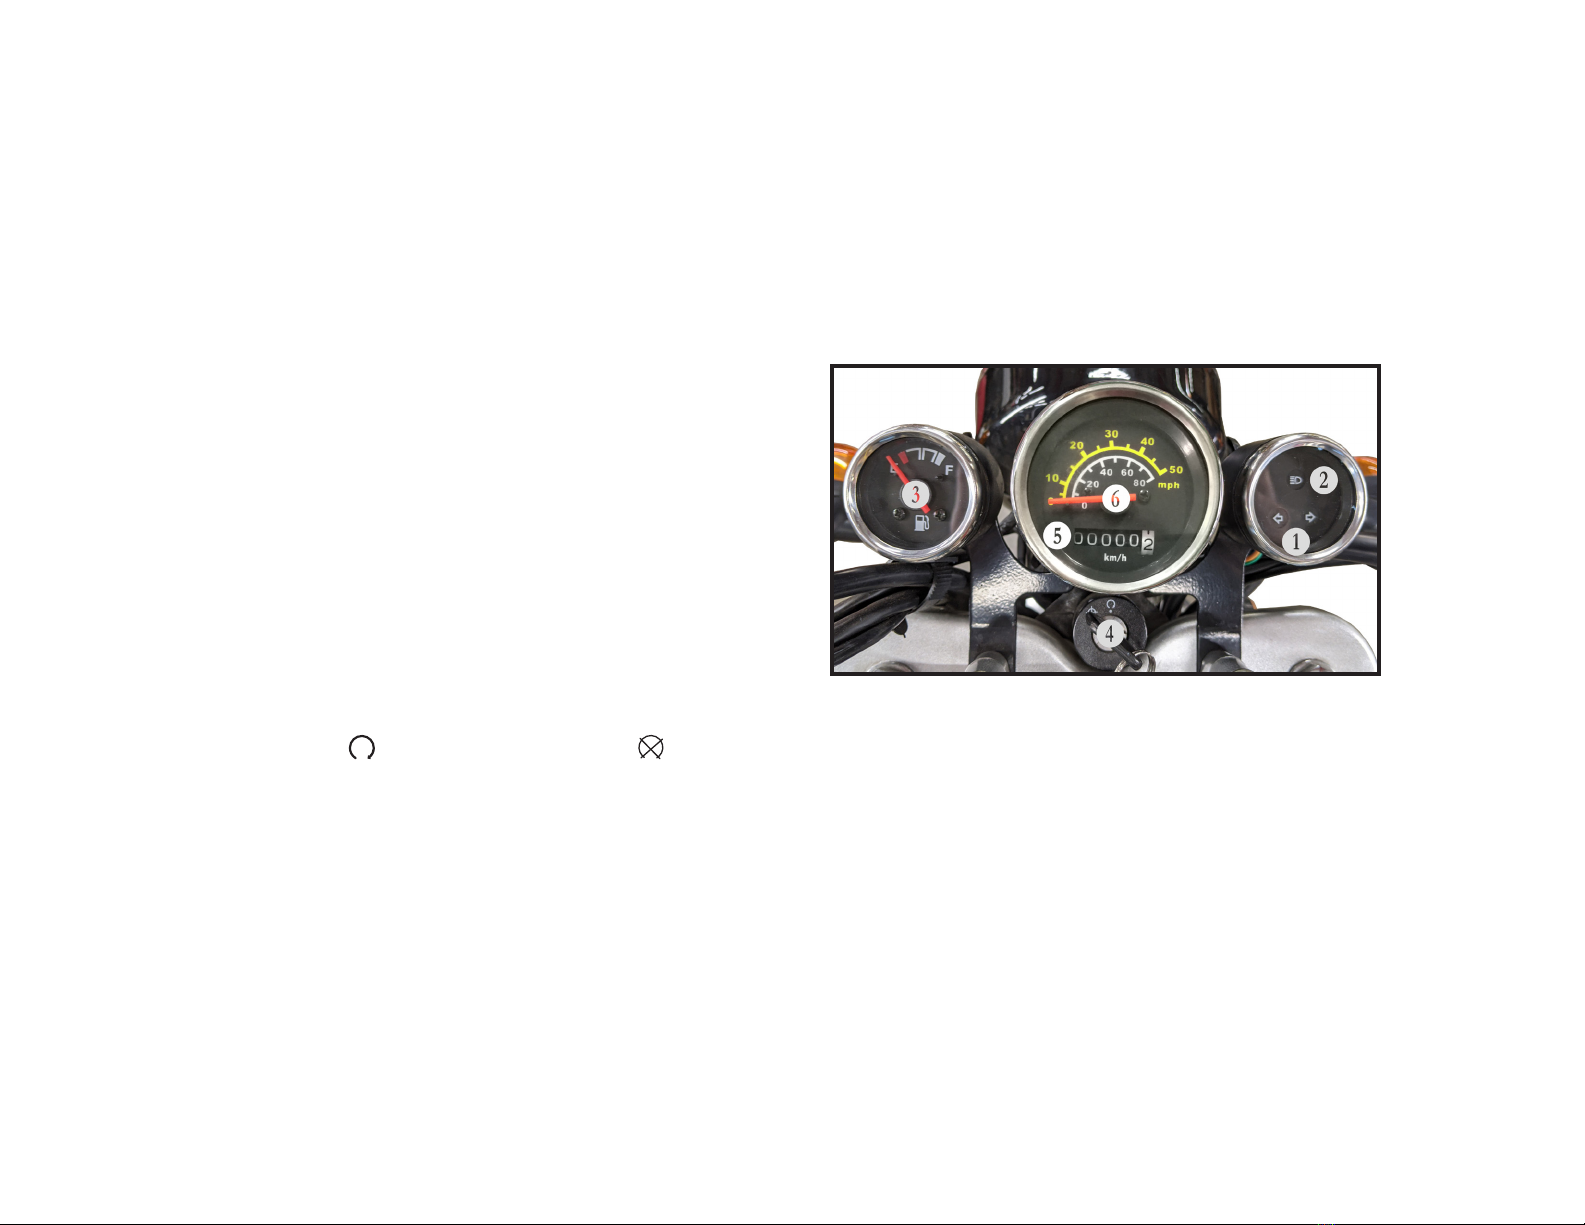
Speedometer................................................................9
Parts Operation..........................................................10
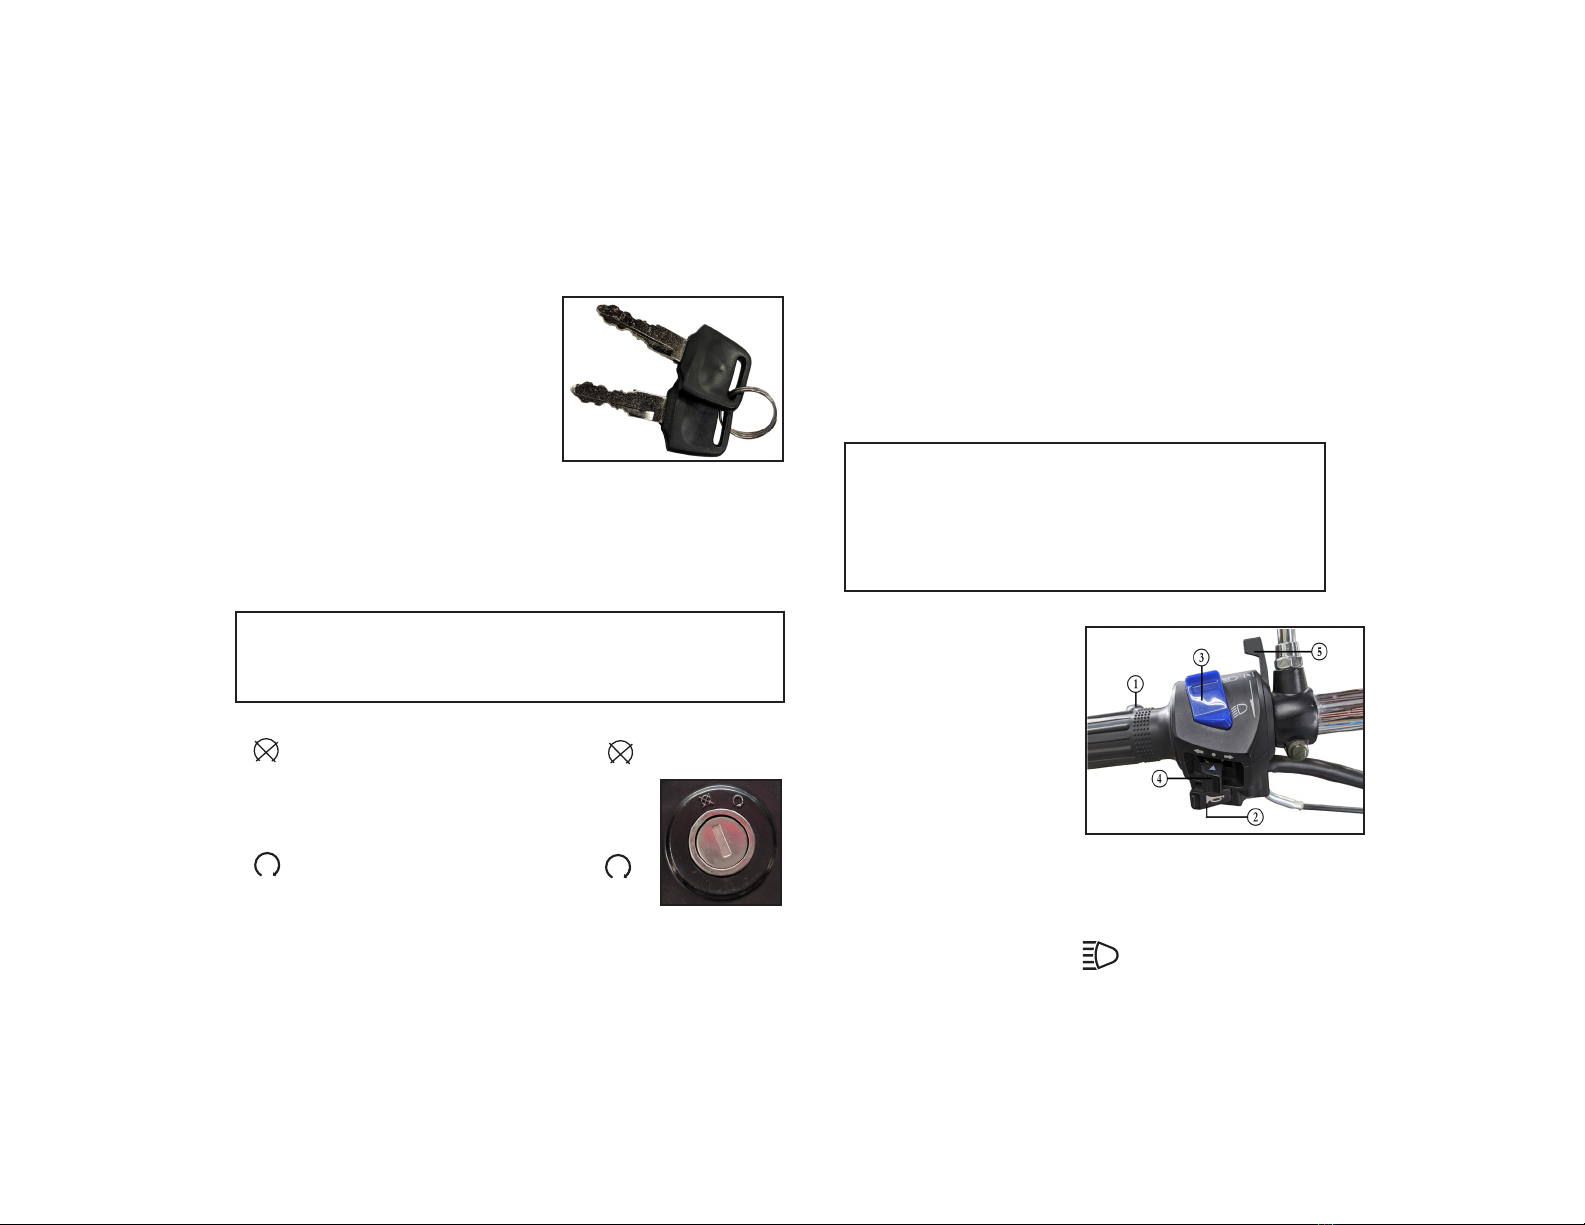
Key...............................................................10
Ignition Switch...............................................10
Left Switch....................................................10
Right Switch..................................................11
Fuel Tank......................................................12
Side Stand....................................................13
Tool Kit..........................................................13
Rear Shock Absorber....................................13
Mirrors...........................................................13
Gasoline and Engine Oil Information.........................14
Engine Break-In.........................................................14
Pre-riding Inspection..................................................15
Riding your Moped.....................................................16
Starting the Engine.......................................16
Starting.........................................................16
Riding Up Slopes..........................................16
Using the Brakes and Stopping....................16
Inspections and Maintenance....................................17
Maintenance Schedule............................17/18
Engine Oil Change........................................19
Spark Plug....................................................20
Throttle Cable Adjustment............................20
Idle Adjustment.............................................20
Carburetor.....................................................20
Drive Chain...................................................21
Brakes...........................................................22
Tires..............................................................23
Air Filter Maintenance...................................23
Parts Lubrication...........................................24
Battery...........................................................24
Fuse.............................................................25
Headlight.......................................................26
Bulb Replacement........................................26
Storage Information...................................................27
Specication...............................................................28
Electrical Diagram......................................................29
Emissions Warranty...................................................30
Table of Contents

6
Safety information
Safety Regulations:
1. Before riding perform a pre-ride inspection
of your vehicle to prevent accidents.
2. Rider must posses a legal driving license,
and do not allow those without a driving
license to use your moped.
3. To avoid accidents with other drivers the
rider should:
• Wear bright colored clothing.
• DO NOT ride close to other vehicles.
4. Strictly obey trac regulations, do not cut
in and out of trac rapidly.
5. Most accidents are caused by speeding,
you should follow the speed limit at all times.
6. When making turns, use the turn signal
indicators.
7. Use caution when riding in parking lots,
the fast lane, and at intersections.
8. DO NOT modify your moped or remove
parts, it may eect it’s function or void your
warranty.
9. DO NOT add accessories that will eect
riding your moped, DO NOT overload elec-
tronic parts.
Clothing:
1. For safety reasons, the rider must wear a
helmet, eye protection, boots, gloves and a
riding jacket/pants.
2. While riding, the exhaust system will be
hot, DO NOT touch the exhaust system while
riding or after riding until it has cooled com-
pletely.
3. DO NOT wear loose tting clothing while
riding, it could become caught on the motor-
cycle leading to an accident.
Helmet:
It is extremely important to wear a good qual-
ity helmet and glasses/goggles if not a full
face helmet.
Riding in the rain:
Take special care when riding in the rain, the
braking distances are twice as long when
compared to dry riding.

7
Moped VIN Number
Vehicle Identication Number (VIN) and the
engine number are used for registration of
your moped. Please record your numbers for
future use.
VIN Number is stamped into the vehicle
frame on the right side of the steering stem
(1). Engine Number is stamped on the lower
engine crankcase on the left side (2). Prod-
uct information label is on the vehicle frame
on the left side below the rear corner of the
fuel tank (3).
VIN Number:__________________________
Engine Number:_______________________

8
Parts Description
(1) Left Mirror
(4) Ignition Switch
(7) Right Mirror
(10) Fuel Tank
(13) Rear Brake
Drum
(16) Crank Pedals
(2) Rear Brake Lever
(5) Speedometer
(8) Front Brake Lever
(11) Oil Filler Cap
(14) Front Brake
Caliper
(3) Left HB Switch
(6) Right HB Switch
(9) Throttle Grip
(12) Rider Pedals
(15) Side Stand

9
Gauge Cluster
(1) Turn Signal Indicators
When the left turn signal is switched on, the left
indicator will ash.
When the right turn signal is switched on, the right
indicator will ash.
(2) High Beam Indicator
When the high beam headlight is switched on, the
high beam indicator will also turn on.
(3) Fuel Gauge
This displays the available fuel in the fuel tank
with F meaning Full and E meaning Empty. Fill the
fuel tank before it reaches the E marking. If your
moped runs out of fuel switch the fuel petcock on
the fuel tank to the lower Reserve position for a
small amount of additional fuel.
(4) Ignition Switch
The ignition switch has two positions “ON” dis-
played as and “OFF” displayed as . Turn the
ignition switch to the “ON” position in order to start
the engine using the start button.
(5) Odometer
This records the total driving distance.
(6) Speedometer
This indicates the driving speed in kph and mph.

10
Parts Operation
• Key
This vehicle comes with two
keys, both can be used to
start the moped and open
all the locks. Please keep
one key in a safe place. If
you loose your key or need
another one, please contact your closest
dealer.
• Ignition Switch
To prevent theft, when you park please use
this handlebar lock function. Turn the handle-
bars to the left, insert the key into the steer-
ing lock and turn the key to the right, it will
lock the handlebars. Then you can remove
the key from the steering lock.
• Left Switch Group
(1) Rear Brake Lever
When starting the
engine pull in either
brake lever to
prevent the vehicle
from lurching forward.
(2) Horn Button
When you press the horn
button, the horn will sound.
(3) Hi / Low Beam Switch
when the switch is in “ “ position, the high
beam is on, and the speedo high beam indi-
cator light will be on as well.
Warning:
DO NOT turn o the key or remove it while riding,
otherwise you could loose control of the vehicle.
“ “ logo......when the key is on “ “
position, there is no power and cannot
start engine, the key can be removed
from the switch.
“ “ logo......when the key is on “ “
position, it has electrical power and the
engine can be started, the key cannot
be removed.
• Steering Lock
Notice:
When parking your moped please lock
the handlebars and remove the key to pre-
vent theft. Always park your moped in an
appropriate place.

11
• Right Switch Group
(1) Start Button
When you press this “ “ button, the engine
will start.
(2) Throttle Grip
The throttle grip controls the speed of the en-
gine. When you want to accelerate, turn the
grip toward the rear of the motorcycle.
(3) Kill Switch
When in the “ “ position the engine can be
started using the start button. When in the
“ “ position the engine cannot be started.
(4) Front Brake Lever
When braking, please grip the right side lever
gradually.
When the switch is in “ “ position, the low
beam is on.
(4) Turn Signal Switch
Press the left side turn signal button “ “
the left side turn signal light will ash. Press
right side turn signal button “ “ the right
side turn signal light will ash. To turn o the
turn signal, press the switch in, in the middle
position.
(5) Choke Lever
When starting the engine from cold, pull the
choke lever toward you to engage it. The en-
gine will run at a fast idle to assist the engine
warming up. When warmed up, shut o the
choke by returning it to the forward position.
Warning:
When changing lanes or turning, always
use the turn signal indicator. Shut o the
turn signal as soon as you have completed
your turn.

12
• Fuel Tank
Your moped is equipped with a fuel gauge,
make sure to refuel your moped when the
fuel gauge reaches the E marker.
First insert the key and turn it clockwise to
unlock the cap. The fuel tank cap will pop up
so that you can remove it. After lling the fuel
tank with gasoline reinstall the fuel tank cap
by pointing the arrow toward the front of the
moped and press it straight down until you
see the key return to the unlocked position.
Then remove the key from the fuel tank cap.
• Fuel Petcocks
Your moped is also equipped with two fuel
petcock valves. One on the bottom left side
of the fuel tank and one on the right side of
the carburetor. The carburetor valve has two
postions, On and O. The fuel tank valve has
three positions On, O and Reserve. See
pictures below.
ON = Upper Symbol
OFF = “ •” Symbol
RESERVE = Lower Symbol (on fuel tank
petcock only)
Carburetor Petcock
Fuel Tank Petcock
Warning:
Please DO NOT overll the fuel tank.
DO NOT splash gasoline on the engine
while hot, it is very dangerous.
Notice:
Both are shown in the OFF position

13
• Side Stand
The side stand is on the left side of
the moped, be sure to use the side stand
when parking the vehicle.
• Tool Kit
Your moped includes a tool kit. The tool kit
includes a screw-driver, screwdriver handle,
a 14/12 wrench, a 10/8 wrench, an Allen
wrench, and a spark plug socket.
• Rear Shock Absorber
This vehicles rear shock absorber includes
a spring and liquid dampening. The shock
absorber can be adjusted according to dier-
ent road conditions. To adjust, use a spanner
wrench to rotate the collar at the bottom of
the spring on the rear shock. Use the dia-
gram below for reference.
• Adjustable Mirrors
To adjust the mirrors, loosen the bottom nut
if you need to move the mirror arm in closer.
Otherwise adjust the head of the mirror into
a position where you can see clearly behind
you.
Caution:
Don’t park your moped on a slope, other-
wise your moped may fall over.

14
Gasoline and Oil Information
• Gasoline
Please use unleaded gasoline. Please use
octane of #91 or above.
• Oil
Please use SJ or above SJ grade engine oil.
Use the viscosity chart below to determine
the best viscosity for your region.
Engine Break-In
• Top Speed
During the rst 1,000 miles of operation, do
not run the engine at high speed or acceler-
ate too quickly. RPM’s should not exceed
80% of the maximum RPM.
• Engine Speed Change
Speed should always be variable, it should
change frequently, it helps the engine parts
to break-in smoothly.
• Avoid Long Distances at Low Speeds
To help prevent damage and to assist the
engine break-in period long distance travel
at low speeds should be avoided until the
engine is past the rst 1,000 miles of use.
The chart below shows the recommended
maximum RPM’s during the break-in pe-
riod.
Caution:
Use only unleaded gasoline as this will
prolong the life of the spark plug.
First 500 miles Under 5,000 RPM
First 1,000 miles Under 6,000 RPM
Over 1,000 miles Under 7,500 RPM

15
• Before Riding
Check the engine oil level before operating
your moped every time.
• First Service Maintenance
The rst 600 mile maintenance is the most
important service to have performed. Please
tighten all hardware and change the oil.
• Special Notice
Once your moped has 200 miles on it return
the dealership for an oil change. Then after
600 miles return to the dealership for an oil
change and air lter cleaning. After the 600
mile service the next oil change will be done
at 1,500 miles or one year, whichever comes
rst.
Check engine oil level frequently.
• Before Riding
Before riding check the items in the chart to
the right.
Caution:
600 mile maintenance should be per-
formed according to this manual. Please
pay special attention to the “Caution” and
“Warning” notes.
Item Check Points
Handlebar
1) Stable
2) Turning Flexibly
3) Not Loose
Brakes 1) Brakes feel rm
2) No uid leaks
Tires
1) Correct Air Pressure
2) Check Tire Wear
3) No Cracks or Damage
Fuel Enough for planned
travel
Lights Check function of all
lights
Indicators Check high-beam and
turn signal indicators
Horn Check Function
Oil Check for correct level
Throttle 1) Rotates Freely
2) Engine Accelerates
Drive Chain 1) Correct Adjustment
2) Lubrication

16
Riding your Moped
• Starting the Engine
Turn the key to the “ “ position, and make
sure the right handlebar kill switch is in the
same position.
• Start
Apply the front brake by pulling in the lever,
then press the start button marked “ “
until the engine starts and runs, you will want
to use the choke if the engine is cold.
• Riding on Inclines
When riding up and incline, your mopeds
speed will decrease and it may stall. When
this happens you will want to also pedal your
moped to assist your hill climb.
• Using the Brakes and Parking
You should completely close the throttle and
gradually apply the front and rear brakes
evenly when bringing your moped to a stop.
Your moped should be parked on at ground
whenever possible. If your moped must be
parked on an incline, please lock the handle-
bars and angle the front wheel into the curb
to keep it from rolling.
Caution:
New riders tend to use only the front or
rear brake, this will cause either system
used to wear out the brake pads/shoes
rapidly. Using only the front or rear brake
will also increase braking distances.
Warning:
Only using the front or rear brakes is dan-
gerous, especially in wet conditions. This
can cause loss of control. Always apply
both brakes evenly. DO NOT brake sud-
denly as this may cause wheel lock up and
vehicle skidding.

17
Maintenance
The following chart shows the maintenance schedule. When each service interval is reached
you must perform the services outlined below. Suspension, Engine, Electronic System, Carburetor
and Tires are key components. These items may require a professional technician to perform.
Maintenance Symbols: I: Inspect/Adjust C: Clean R: Replace A: Adjust L: Lubricate T: Torque

18
* When the mileage exceeds the highest mileage on the table, please restart the table at the
600 mile interval
* If riding in a dusty environment clean/lube/oil the air lter and chain more frequently.

19
• Oil Change and Oil Level Check
Check the engine oil level
before you start the engine.
When checking the oil level,
make sure the vehicle is on
at ground and it is being
held up vertically. Remove
the dipstick and wipe it clean
it with a rag. Reinsert the
dipstick without screwing it in.
Remove the dipstick and
observe the oil level, it
should be at the upper area
of the XXXXX pattern.
The engine oil capacity is 700cc.
When draining the oil,
place an oil pan under
the drain plug, then
remove the drain plug.
(1). When completely
drained reinstall the
oil drain bolt.
Torque the bolt to 20-25Nm.
(2.) Fill the engine with 700cc’s of fresh oil.
(3.) Use a clean, dry rag to clean the oil ller
cap/dipstick and engine cover surface.
(4.) Check the oil level with the dipstick and
verify it is at the upper portion of the XXXXX.
(5.) Apply a small amount of oil to the dipstick
o-ring then screw it into place and tighten by
hand.
(6.) Start the engine and allow the engine to
idle for a few minutes then turn o the en-
gine.
(7.) Remove the dipstick and clean it with a
rag. Reinsert the dipstick without screwing it
in and then remove it to observe the oil level.
(8.) If the oil level is sucient, reinstall the
dipstick, if not repeat step 5 and 7 until the oil
level is correct.
Caution:
The best time to change the oil is when
the engine is warm. The moped should be
supported vertically so the warm oil will
exit the engine quickly.
Caution:
Replace the oil dipstick o-ring and the oil
drain bolt crush washer every time you
change the oil to avoid leakage.

20
• Spark Plug
Use a small wire brush
or a spark plug cleaner to
clean the carbon deposits
from the plug in the rst 600
miles of use and after every
2,600 miles of riding. Every
5,000 miles, the spark plug
should be replaced.
Spark Plug Type: NGK C7HSA
• Throttle Cable Adjustment
1. Turn the throttle grip to check if it reacts
quickly or not.
2. Check the throttle cable freeplay, it
should have 10° to 15° of freeplay at the
handlebar grip.
Caution:
DO NOT over torque the spark plug. Over
torque could lead to cylinder head thread
damage.
Please follow these steps to adjust the throt-
tle grip travel distance.
1. Pull back the throttle
cable cover.
2. Loosen the nut (1).
3. Adjust the screw (2)
until 10°~15° of travel
is achieved at the grip.
4. Tighten the nut (1).
• Engine Idle / Fuel Screw Adjustment
Use the idle adjustment screw to raise or
lower the idle as needed.
Table of contents
Other SSR Motorsports Motorcycle manuals

SSR Motorsports
SSR Motorsports SSR150 User manual

SSR Motorsports
SSR Motorsports SR300S User manual

SSR Motorsports
SSR Motorsports SNAKE EYES XF250-GS User manual

SSR Motorsports
SSR Motorsports Lazer5 User manual

SSR Motorsports
SSR Motorsports SR450S User manual

SSR Motorsports
SSR Motorsports SR250S User manual