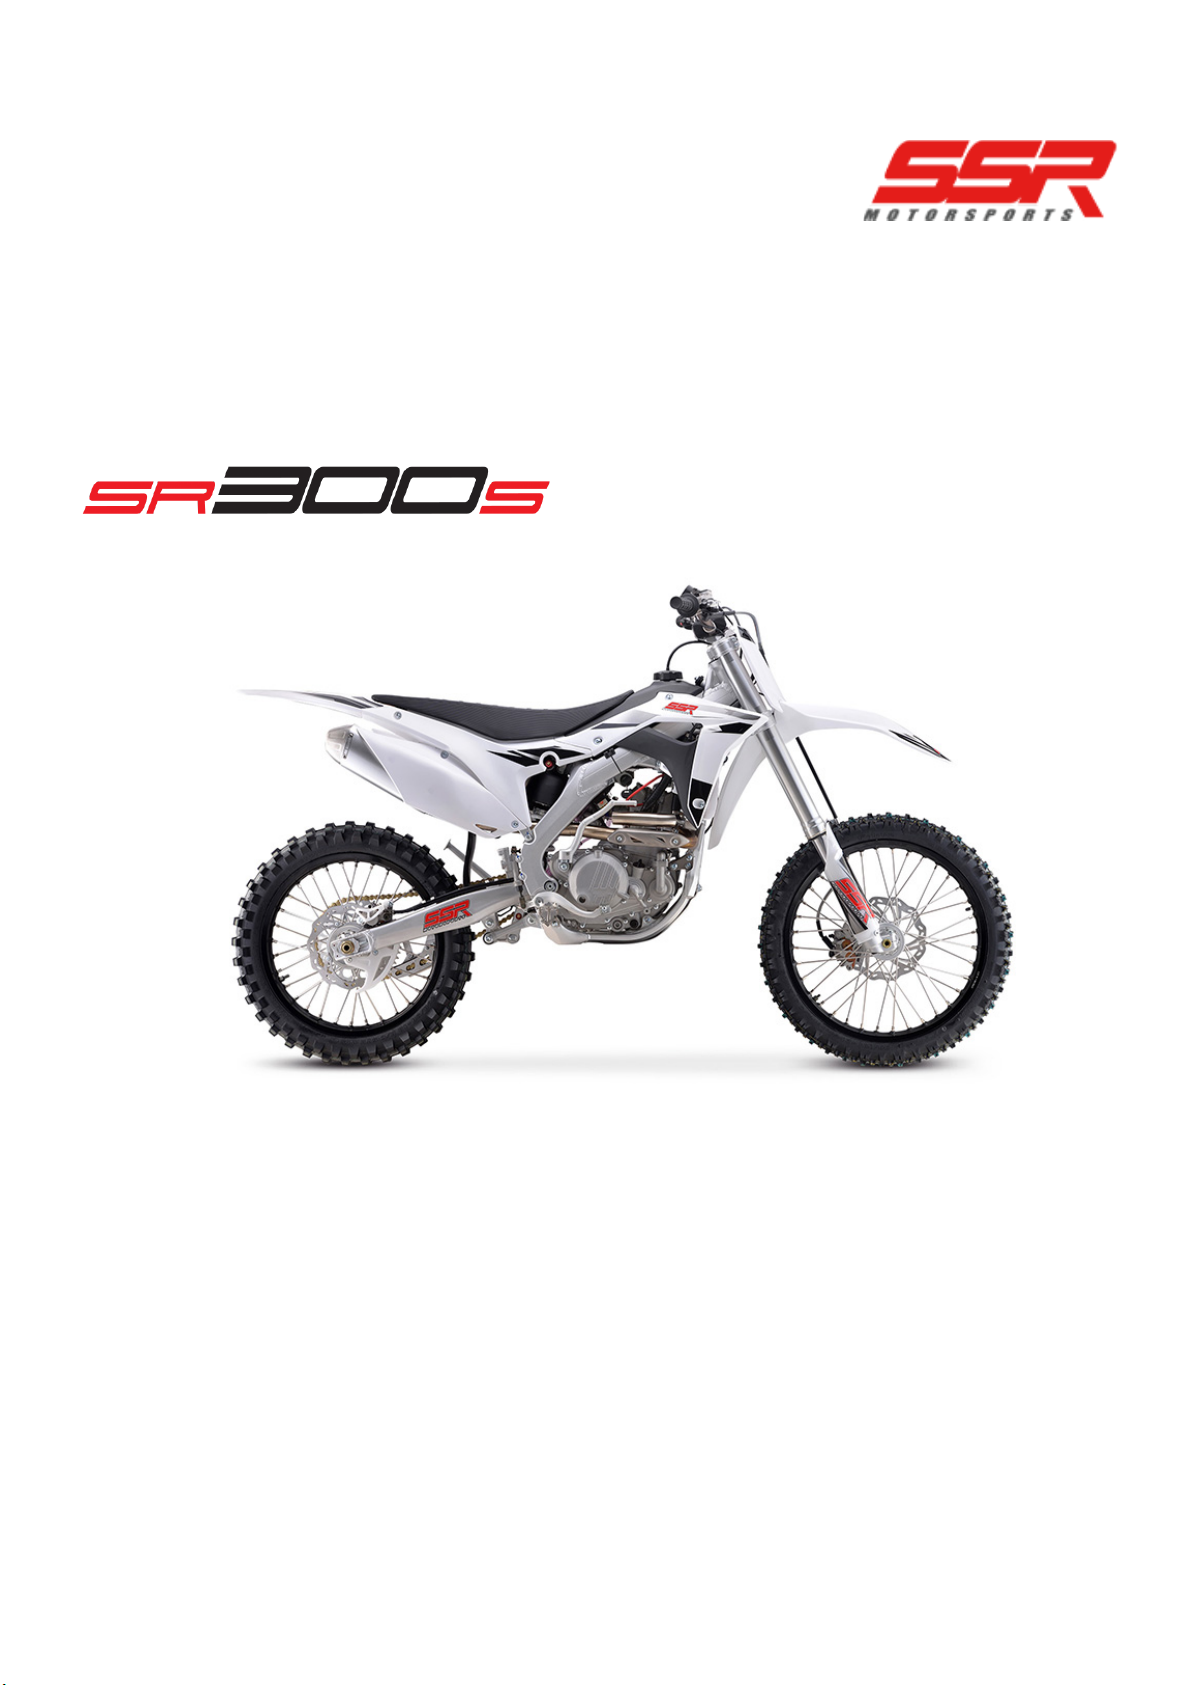
SSR Motorsports SR300S User manual
1
SR300S OWNER’S MANUAL | SSR MOTORSPORTS

2
TABLE OF CONTENTS
1. Starting the engine........................................................................................................................................................................ 12
2. When the engine is “cold”............................................................................................................................................................ 12
3. When the engine is “warm”......................................................................................................................................................... 12
1. Shifter operation........................................................................................................................................................................... 13
2. Climbing or turning ....................................................................................................................................................................... 13
3. Stopping ........................................................................................................................................................................................ 13
1. Periodic Maintenance Table ......................................................................................................................................................... 14
2. Engine Lubrication ........................................................................................................................................................................ 15
2.1. Engine lubricant type......................................................................................................................................................... 15
2.2. Oil level check .................................................................................................................................................................... 15
2.3. Oil change .......................................................................................................................................................................... 16
2.4. Adding engine oil ............................................................................................................................................................... 16
3. Cooling system .............................................................................................................................................................................. 17
3.1. Coolant reservoir ............................................................................................................................................................... 17
3.2. Coolant .............................................................................................................................................................................. 18
4. Spark plug ..................................................................................................................................................................................... 19
4.1. Choosing the spark plug .................................................................................................................................................... 19
4.2. Spark plug inspection and how to change it
...................................................................................................................... 19
5. Air filter ......................................................................................................................................................................................... 20
5.1. Cleaning the air filter ......................................................................................................................................................... 20
5.2. Special notes...................................................................................................................................................................... 20
6. Carburetor..................................................................................................................................................................................... 22
6.1. Adjustment of idle speed................................................................................................................................................... 22
6.2. Air/Fuel mixture ratio adjustment..................................................................................................................................... 22
7. Chain ............................................................................................................................................................................................. 23
7.1. Checking the chain............................................................................................................................................................. 23
7.2. Chain cleaning and lubrication .......................................................................................................................................... 23
7.3. Adjustment and replacement of the chain........................................................................................................................ 23
7.3.1. Adjustment............................................................................................................................................................. 23

3
7.3.2. Replacing the chain ................................................................................................................................................ 23
8. Brake system ................................................................................................................................................................................. 24
8.1. Checking the brake fluid .................................................................................................................................................... 24
9. Front and rear suspension ............................................................................................................................................................ 26
9.1.1.1. Adjustment of the front fork damping ........................................................................................................................ 26
9.1.1.2. Adjustment of the front fork rebound damping.......................................................................................................... 26
9.1.1.3. Air bleeder screws ....................................................................................................................................................... 26
9.2.1.1. Rear shock compression damping adjustment............................................................................................................ 27
9.2.1.2. Rear shock rebound damping adjustment .................................................................................................................. 27
9.2.1.3. Rear shock preload adjustment................................................................................................................................... 27
10. Wheels ........................................................................................................................................................................................ 31
10.1. Spokes.............................................................................................................................................................................. 31
10.2. Tires ................................................................................................................................................................................. 31
10.2.1. Tire air pressure ................................................................................................................................................... 31
10.2.2. Checking the tires................................................................................................................................................. 31
10.2.3. Changing the inner tubes ..................................................................................................................................... 32
10.2.4. Changing the tires ................................................................................................................................................ 32
11. Battery ........................................................................................................................................................................................ 33
11.1. Battery installation .......................................................................................................................................................... 33
11.2. Charging........................................................................................................................................................................... 33
11.3. Storage............................................................................................................................................................................. 33
11.4. Maintenance.................................................................................................................................................................... 33
12. Bearings ...................................................................................................................................................................................... 35
12.1. Steering stem taper bearings .......................................................................................................................................... 35
12.2. Linkage bearings .............................................................................................................................................................. 35
12.3. Swingarm bearings .......................................................................................................................................................... 36
12.4. Front wheel bearings and spacers................................................................................................................................... 36
12.5. Rear wheel bearings and spacers .................................................................................................................................... 37

4
INTRODUCTION
This manual introduces the basic operation and maintenance methods of the SSR Motorsports SR300.
Please read it carefully before riding.
DO NOT use this motorcycle on roads, streets or in residential areas.
Following the recommendations found in this manual will help ensure your safety while operating the vehicle, will
reduce the chance of malfunctions and will keep the vehicle operating at peak performance.
If you have any other questions not outlined in this manual about how to operate or maintain your SSR
Motorsports motorcycle contact your local dealer for further assistance.
The information, images, and specifications in the manual are based on the most recent product data
information available at the time of publication. Since changes may have occurred or improvements, there
may be differences between vehicles and this manual. SSR Motorsports reserves the right to make changes
any time, without having to make notification.

5
NOTICE
Be sure to use the utmost caution when riding a motorcycle. Do not drive until all of the safety requirements
outlined here are fully understood
.
This owner
’
s manual is a necessary piece of the motorcycle, when you sell it to other people please
attach it with the motorcycle.
This is an off-road motorcycle with two wheels and limited to be used by a single person only.
The recommended fuel octane rating is #91. Because fuel is flammable, if the fuel tank, fuel filter, intake
or carburetor are damaged or leaking, the motorcycle should not be used before it is repaired to correct
this issue.
Do not modify or change the electrical system in any way, changes to this system could result in
overloading of electrical circuits which may lead to blown fuses or electrical shorts which could lead to
fire or explosion. SSR Motorsports are not responsible for any consequences arising from the addition
or modification of the electrical equipment.
Users should maintain the parts listed in strict accordance with the requirements in the
“
Periodic
Maintenance Table
”
.
Before any repairs are made, please turn off the engine and wait until it is no longer hot to begin working
on it.
1. Before starting the engine make sure you are in a well-ventilated area.
2. The engine and exhaust system can only be touched after cooling, otherwise it will cause burns;
3. If when starting any abnormal running conditions/noise(s) are noted, please stop the engine
immediately. Have the motorcycle inspected by an SSR service department. Once the abnormal
condition is repaired, you can start the engine.
To reduce the possibility of fire or explosion, be careful when filling the fuel tank or handling gasoline.
Use only non-flammable solvents to clean parts. Keep cigarettes, sparks and flames away from all fuel-
related parts.
6
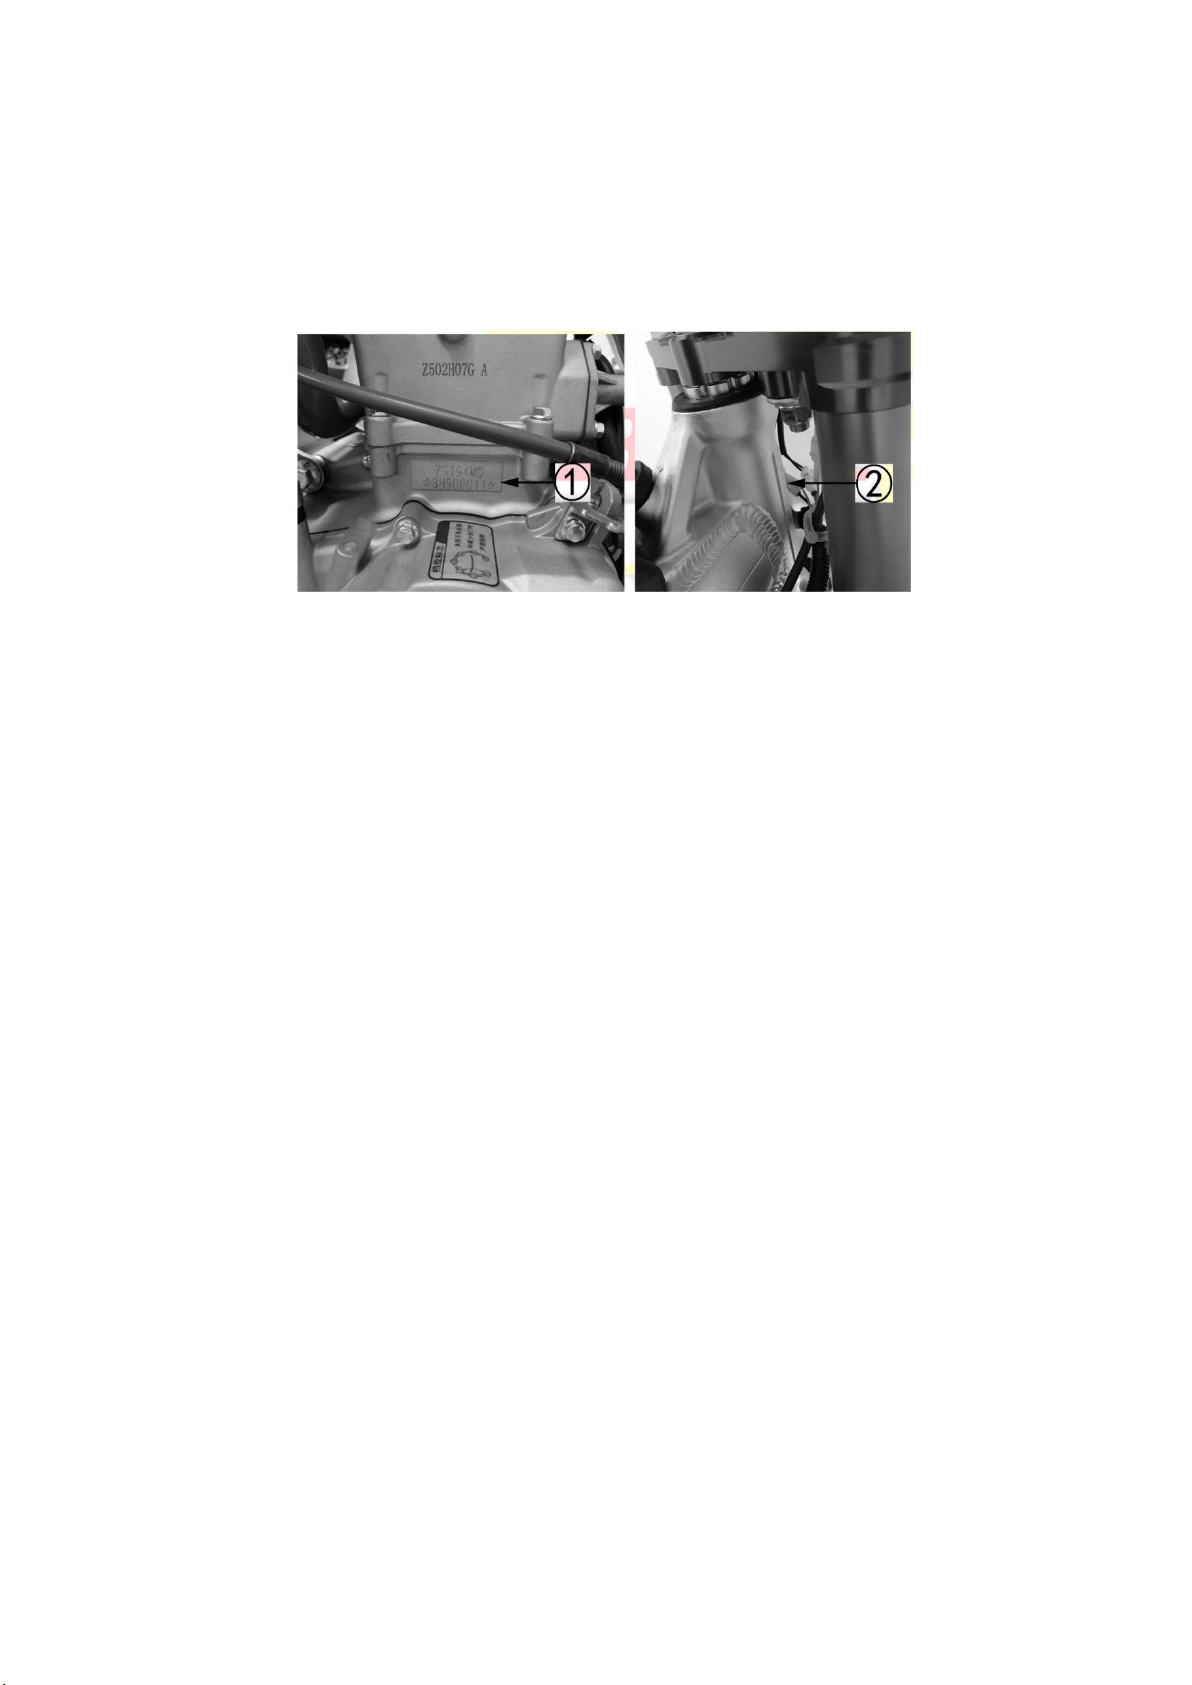
VIN AND ENGINE NUMBER LOCATION
Please record the numbers indicated in the following places, and keep the certificate issued with the
motorcycle for after-sales service.
Engine number (1) is on the middle of the cylinder of the engine.
Frame number (2) is on the right side of the frame head tube.
NOTE:
if the original frame number or engine number is scratched or changed, the dealer will not be
able to confirm the configuration list and batch of vehicle identity, which will affect the after-sales
processing, resulting in a state of inconsistency with the purchase status.
The frame number and engine number are the lifetime identification number of the vehicle and must
not be altered, tampered or scratched.

7
PRECAUTION AND INSPECTION BEFORE RIDING
1. Preparation before riding
Before riding you must be prepared as follows:
1.1. Read this instruction manual;
1.2. Ensure that you know the safety factors involved;
1.3. Ensure you know how to operate all parts of the motorcycle;
1.4. You understand the body positions necessary to properly control the motorcycle;
1.5. Make sure that you wear appropriate safety equipment including a helmet, goggles, and protective
clothing. In addition, make sure you are not under the effects of drugs or alcohol.
2. Safety equipment
In order to ensure your safety, you must wear a high-quality anti-collision helmet, goggles, gloves and
other protective equipment when riding or competing;
2.1. During the riding process, the temperature of the exhaust pipe will get very high, the rider should
be protected to avoid burns;
2.2. Do not wear loose or dangly clothing to prevent it from being caught by the handle levers, foot rests
or wheels. It may also be swept up by the wind and hooked by other vehicles and cause accidents.
Attention must be paid that high-quality protective equipment can only play a protective role, do not
ignore commonly known safety regulations/laws and always wear your protective equipment no matter
how long or far you are riding.
2.3. If you are riding the motorcycle at a closed race course you should wear a helmet, goggles, riding
pants, long sleeves, gloves, knee pads, elbow pads, a neck protector, a chest protector and boots to
make you as safe as possible while on a race track.
3. Check everything before riding
Be sure to carefully check the items in the table before riding, and never ignore the importance of these
checks. Complete all inspections and necessary repairs before riding to ensure that the vehicle is safe
and in optimum condition.
Part Inspected Inspection Details
Handlebar
(1)
Smooth with no deformation
(2)
The adjustment position is not off the scale printed on the handlebar
(3)
No axial movement and/or looseness
(4)
The handlebar bolts are completely fastened and torqued
Accelerator
(1)
Free play is properly adjusted
(2)
Smooth rotation without jamming, the throttle returns automatically

8
when the throttle is released
Fuel Quantity
Enough to ride the distance/time desired
Front and rear brake
systems
(1)
Brake pad material is above the minimum thickness
(2)
The brake lever free play distance (front & rear) is correct
(3)
Neither brake is spongey or dragging while operating
Tires
(1)
Proper air pressure
(2)
Proper tire thread depth
(3)
No broken off knobs or cracks
Fuel
Enough fuel for planned riding.
Engine Oil
Engine oil meets or exceeds the minimum requirement and is full
Chain
(1)
Proper adjustment
(2)
Proper lubrication
4. Rider Safety
4.1. Before riding your motorcycle, please recall the important safety information.
4.2. If you have ridden other motorcycles before, you need to familiarize yourself with this motorcycles
operation and use caution until you have mastered all aspects of your motorcycle.
4.3. This vehicle should be operated by a skilled rider with experience off-road riding, beginners should
only ride the motorcycle under the supervision of a skilled rider or instructor.
4.4. For your safety, please do not use the motorcycle in a closed environment. Exhaust gases from the
motorcycle are harmful to your health and may even cause death.
4.5. The motorcycle doesn
’
t have a lighting system, so please don
’
t ride it at night or in the dark.
4.6. This motorcycle is an off-road motorcycle and is strictly forbidden to be used on roads and streets
otherwise it may cause serious injury or death.
4.7. The rider must always wear a full set of off-road riding protective gear to avoid physical damage.

9
Main components and functions of your motorcycle
1.
Stop Switch: red button, hold the red button in until the engine stops.
2. Choke knob: used to reduce the amount of air entering the carburetor inlet at low temperatures, and
to increase the concentration of the fuel mixture to start when the engine is cold. Pull UP for ON, push
DOWN for OFF.
3. Clutch Lever
4. Start Switch: yellow button, press to engage the starter, hold until started.
5. Throttle: Controls the fuel flow rate to the carburetor, the free play is 2mm-6mm.
6. Front Brake Lever

10
1. Fuel Cap: Remove the fuel tank cap and look into fuel tank to check the fuel volume. To loosen the fuel
tank cap turn it counterclockwise.
2. Fuel switch
2.1. The fuel switch is located on the bottom of the fuel tank on the left-hand side, the fuel is filtered and
sent into the carburetor.
2.2. Before starting engine, turn the fuel switch to the "ON" position to supply fuel to the carburetor.
2.3. After the engine is turned off, turn the fuel switch to the "OFF" position to stop supplying fuel to the
carburetor.
2.4. The fuel switch is also supplied with a "RESERVE" position that leaves a small amount of spare fuel in the
tank to be used in emergency situations. After refueling return the fuel switch to the "ON" position to avoid
consuming the emergency "RESERVE" fuel.
3. Radiator and Coolant Reserve Tank
3.1. Opening method: Turn the cap in counterclockwise open water tank.
3.2. Closing method: Align the cap hook into the groove of the tank, press and turn the cap in clockwise
tightly.
4. Gear shifter: Change gear with clutch, changing gear without clutch is prohibited.
5. Side stand
6. The ignition switch must be turned on before starting the engine. After parking, please remove the key.
The key positions are shown in the following table:
Key Position Features Key State
OFF
The engine can
’
t be started The key can be pulled out
ON
The engine can be started The key can
’
t be pulled out
The engine can be started and
the headlight* is on.
The key can
’
t be pulled out
7.
F
oot brake lever

11
When the foot brake lever is pressed, the rear disc brake will slow down the motorcycle.
8. Kick Starting
Turn the ignition switch to the ON position, only kick start with the engine with the transmission in the neutral
position, pull in the clutch lever in with your left hand, turn the throttle a little with your right hand, press
downward on the kick starter strongly and quickly, until it bottoms out. Do not use the kick starter lever when
the engine is running. The electric starter and kick starter should not be used at the same time.

12
Break-in
1. Break-in Period
The break-in period refers to a treatment method in which your new motorcycle is used for the first
time in order to ensure that the engine surfaces between parts wear in optimally.
Notice:
1.1. During the break-in period, the throttle should not be fully opened, and the maximum engine RPM
should not exceed 5000r/min;
1.2. Each gear should be properly broken-in;
1.3. Do not ride the motorcycle at a fixed throttle position;
1.4. Change the engine oil every 125 miles during the break-in period and clean/oil the air filter.
2. Suggested operation during the break-in period
2.1. 0-125mi: The throttle is not turned beyond opening more than 1/3 of the maximum opening, and
the engine RPM is controlled at no more than 4000r/min;
2.2. 125-375mi: The throttle is not turned beyond opening more than 1/2 of the maximum opening,
and the engine RPM is controlled at no more than 6000r/min;
2.3. 375-950mi: The throttle is not turned beyond opening more than 3/4 of the maximum opening,
and the engine RPM is controlled at no more than 9000r/min.
3. When to change the engine oil during the break-in period
Change the engine oil for the first time after 125 miles of use, or after a race, or 2.5 hours of riding.
Next change the oil after 250 miles of use or 2 races, and so on until you exceed 1000 miles. Please
use the recommended oil grade during replacement.

13
Starting the motorcycle
1. To start the engine
1.1. Turn the fuel tank switch to the
‘
ON
’
position;
1.2. Turn the ignition switch to the
‘
ON
’
position;
1.3. Make sure the transmission is in neutral.
2. When the engine is
“
cold
”
Pull up the choke knob on the left side of the carburetor, pull in the clutch lever with your left hand,
press the yellow start button with your right hand, and open the throttle slightly. After the engine has
started and warmed up, press the choke knob down to shut it off.
Note:
The colder the weather, the longer it will take to warm the engine up. Operating your motorcycle
after the engine is fully warmed up will reduce engine wear.
3. When the engine is
“
warm
”
There is no need to use the choke, just press the yellow start button.
Note:
3.1. Once started, the engine should be allowed to warm up until the idle speed is stable, and the fuel
delivery feels smooth, so that the motorcycle will operate normally once ridden;
3.2. When using the electrical start, the starter button should be depressed no longer than 3-5 seconds,
and a second attempt should be separated by more than 15 seconds, otherwise it will cause the battery
to discharge too quickly and could affect the battery life;
3.3. After the engine is started, the start switch button should be released immediately. Once the engine
is running do not press the starter button again, otherwise the starter motor/system could be damaged;
3.4. Make sure that the side stand is up before riding away, leaving the stand down could hinder your
control or cause and accident when turning left;
3.5. Once started and while riding, you need to operate the throttle smoothly;
3.6. Do not start the motorcycle in enclosed spaces to avoid the danger of carbon monoxide poisoning;
3.7. If the clutch lever is damaged, you need to change it immediately;
3.8. DO NOT start the engine without first pulling the clutch lever in, if not it could cause damage to the
engine or cause and accident.
14
SAFE RIDING TIPS
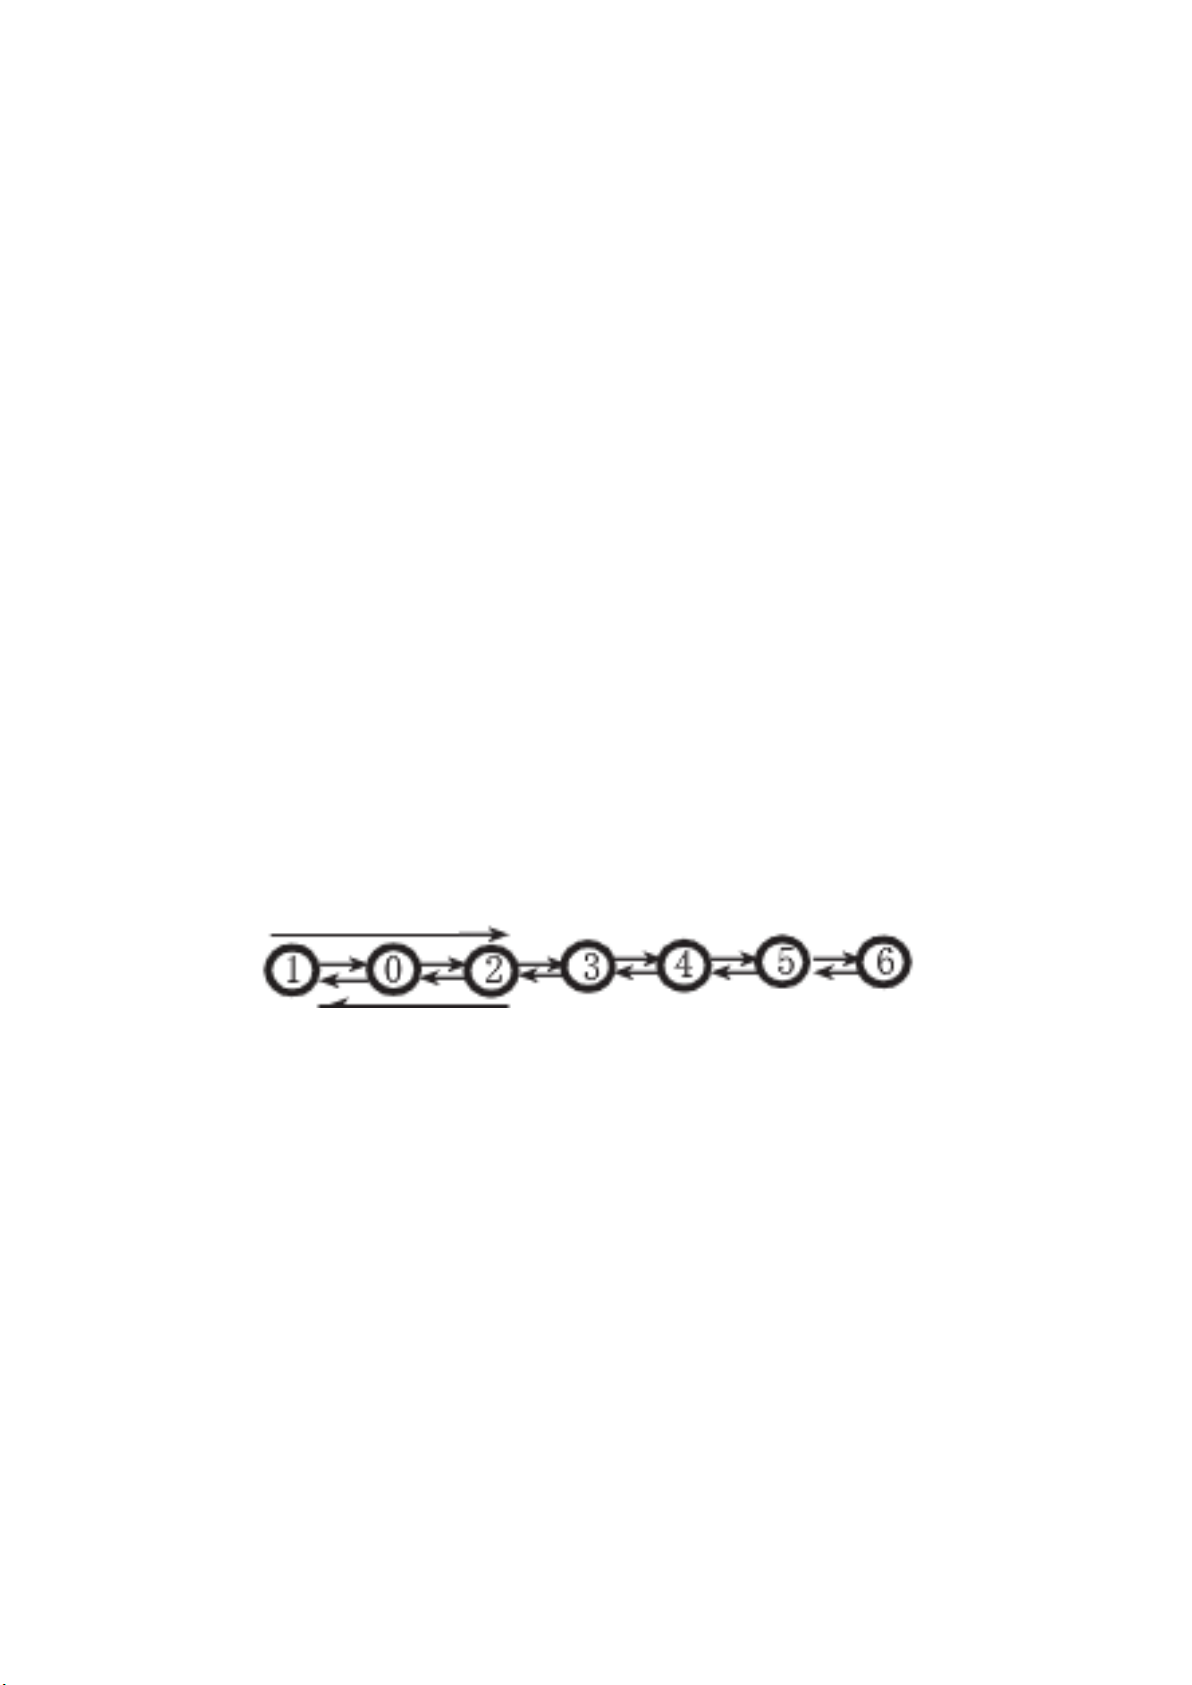
1. Shifter operation
You motorcycle has a six-speed transmission with a constantly meshing two-stage transmission. The first
and second gears are low speed, the third and fourth gears are mid-speed, and the fifth and sixth gears
are high speed. To shift, please refer to the following operations:
1.1. When the engine is idling, using your left hand pull in the clutch lever to disengage the clutch, then
using your left foot press down on the shifter lever to make the transmission engage the first gear
position;
1.2. Gradually increase the engine speed using the throttle while slowly releasing the clutch lever, these
two actions must be done in conjunction to ensure a smooth ride away;
1.3. After a smooth ride away, reduce the engine speed by allowing the throttle to close, pull in the
clutch lever, place your foot under the shifter lever and lift up to engage second gear, then gradually
increase the engine speed while simultaneously releasing the clutch lever slowly so that the two actions
coordinate with each other to ensure a smooth transition into second gear;
1.4. Use the same action as above to engage the other transmission gears;
1.5. When downshifting the transmission, the engine speed should be reduced. Use your left hand to
pull in the clutch lever to disengage the clutch and use your left foot to depress the shifter lever to
engage the next lowest gear. When downshifting do so gear by gear, do not skip any gears;
1.6. When shifting gears, make sure the shifter lever is fully engaged and the clutch lever is pulled in.
DO NOT
shift gears if the throttle is not fully closed or if the clutch is not fully disengaged, otherwise
the engine or transmission systems may be damaged, or a safety related accident may occur.
The picture below shows the transmission shifting pattern:
2. Climbing and turning
2.1. When the motorcycle is going uphill, even if the throttle is increased the unit will decelerate if the
transmission gear used is too high. Therefore, it is necessary to downshift before climbing hills. Also
shift down to lower gears to avoid other slower vehicles and to avoid the clutch slipping;
2.2. When turning the motorcycle, if you decelerate too fast due to an emergency you may forget to
downshift which will cause the rear wheel to slip. Therefore, when turning, close the throttle and use
the brake to first decelerate and then quickly downshift to a lower gear.
3. Stopping
3.1. Gradually close the throttle to reduce your speed;
3.2. Use the front and rear brakes evenly and softly to allow the motorcycle to stop smoothly;
3.3. Turn the ignition switch to the
“
OFF
”
position and remove the key. If your motorcycle will not be
ridden for a long time, please turn the fuel switch to the "OFF" position;
3.4. Put down the side stand to prop up the vehicle.

15
Motorcycle Maintenance
1. Periodic Maintenance Table
You need to maintenance your motorcycle according to the following table.
Inspection Items
Remarks
1 Ride
3 Rides 6 Rides 9 Rides 12 Rides
2.5 h 7.5 h 15 h 22.5h 30h
Oil screen
(4)
I
R
Throttle cable
I
Air filter element
(1)
C
Engine oil
(3)
I
R
Coolant
(2)
I
Cooling system
I
Spark plug
I
Drive chain
I,L
C
,
A
,
R
Chain guide /
Tensioner
I
C
Sprockets
I,L
C
Brake fluid
(2)
I
Clutch
I
Front/rear brakes
I
Cables
I,L
Rear shock/linkage
I
Front forks
L
Front/Rear wheel
I
Fasteners
I
Symbols in the above table: (I) means check and clean, adjust, lubricate or replace if it is necessary;
©
means clean; (A) means adjust; (L) means lubricate;
®
means replace.
Remarks table:
1. Anytime you use it in a dusty environment, you need to clean it;
2. Replace every two years, replacement requires some mechanic skill;
3. Change this after the first break-in period;
4. Replace yearly.
16
2. Engine Oil
2.1. Engine oil choice
The engine oil acts on the engine to reduce friction, increase sealing, cool parts, clean parts, and to prevent
rust. Poor quality oils, excessive use time, insufficient oil volume, etc., will accelerate the wearing of engine
parts, power loss, abnormal noise, clutch wear or slippage, increased engine temperatures, and even reduce
the overall service lifetime of your motorcycle.
Always use a high-quality, four-stroke engine oil to extend the overall engine life. Engine oils should be
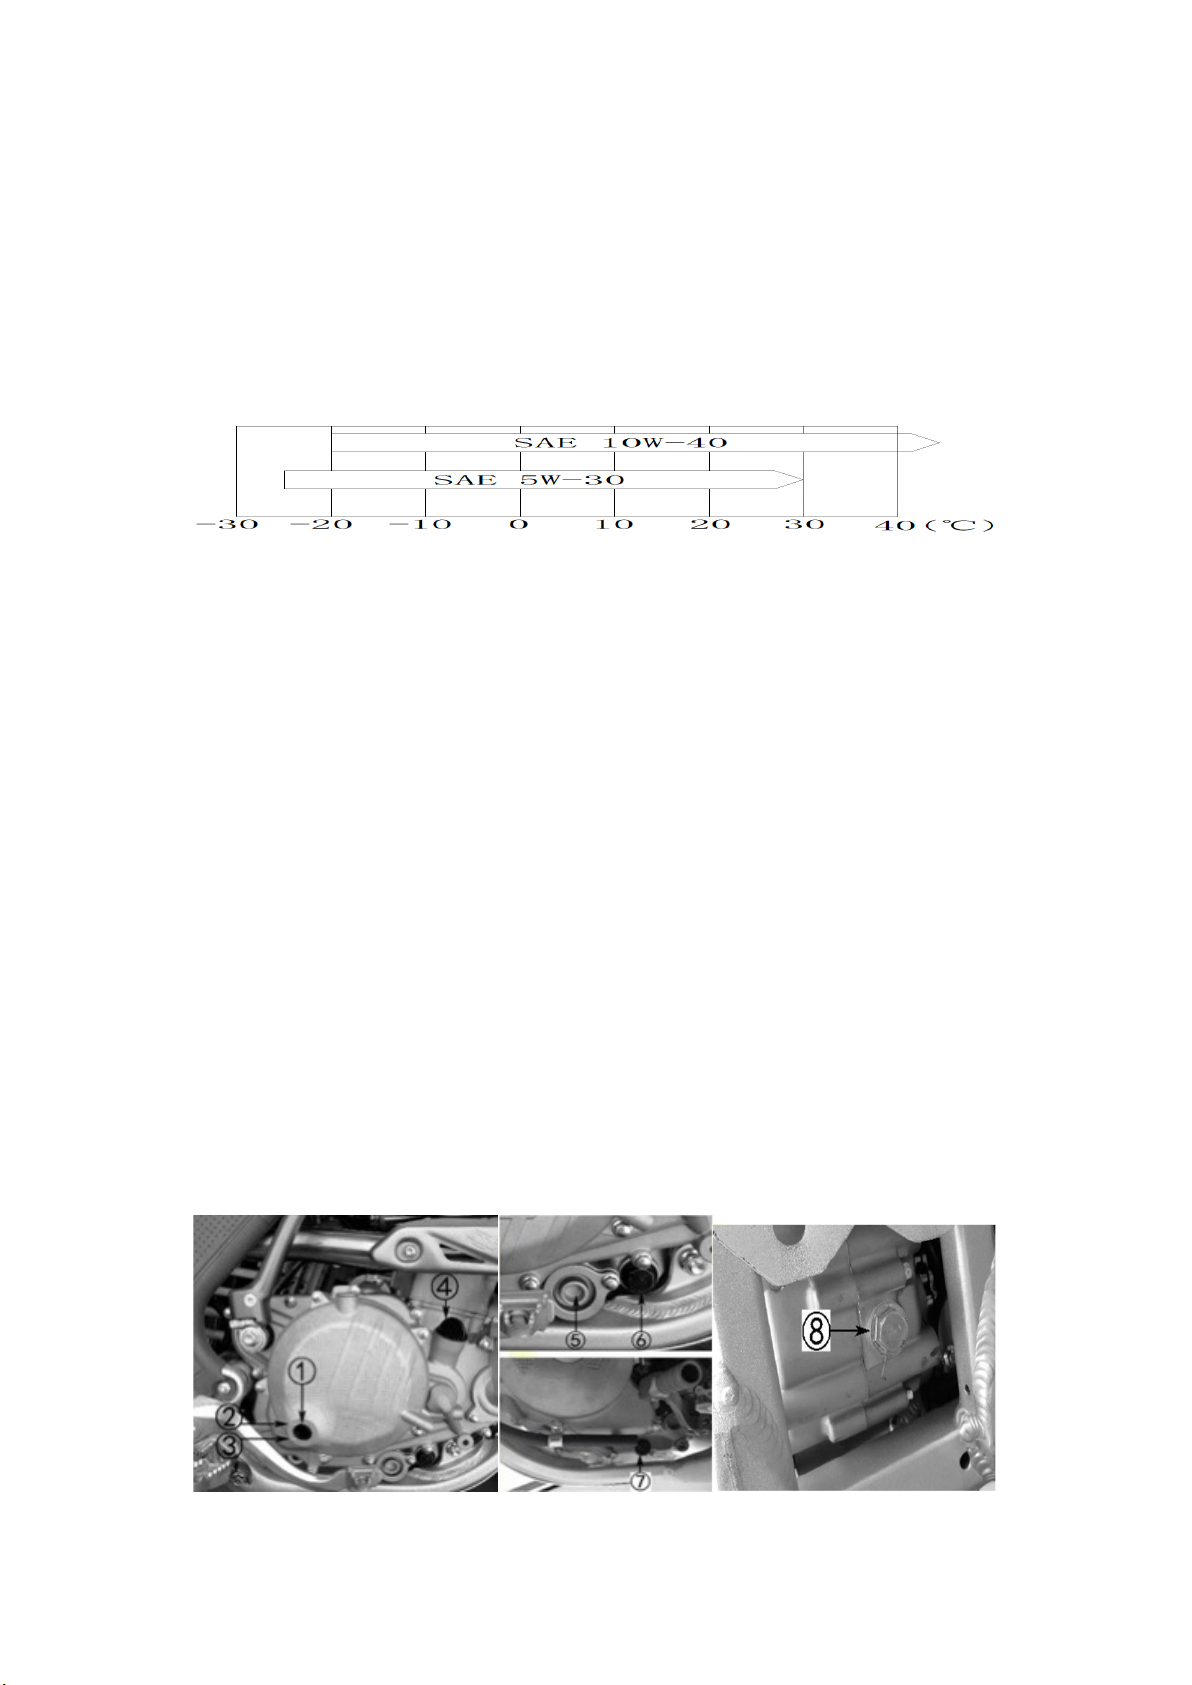
graded API, SG, SH, SJ, SL, SM, or SN. The oil viscosity is SAE 10W-40, or according to the local climate
please select the appropriate engine oil according to the table below:
Note:
2.1.1. DO NOT add any chemical additives to the lubricating oil;
2.1.2. Do not use any engine oils of poor quality.
2.2. Checking the engine oil level
The engine oil level must be checked before every use of the motorcycle. There is an oil level sight glass
window on the right crankcase cover, as shown in the image below. Follow the steps below to check the
engine oil level;
2.2.1. Start the engine and allow it to idle for 3 minutes, then turn it off;
2.2.2. Wait 3 minutes after turning off the engine to allow the engine oil throughout the engine to settle
in the bottom;
2.2.3. Hold the motorcycle in a vertical position while you are checking the oil level;
2.2.4. Check if the oil level is between the upper limit (2) and the lower limit (3) marks via the right
crankcase cover oil level window (1). If the oil level is at (2) or close to (2), you do not need to add oil; if
the oil level is below or near the lower level (3) mark, you need to add the recommended engine oil
until it reaches mark (2), taking care not to overfill the engine.

17
2.3. Changing the engine oil
2.3.1. Start the engine and allow it to idle for 3 minutes then turn the engine off;
2.3.2. Put the motorcycle on a dirt bike stand or other means to keep it in a vertical position;
2.3.3. On the right side of the engine, use tools to remove numbers (5) and (6) in order to drain the
engine oil and remove the filter screen;
2.3.4. On the left side of the engine remove number (7) using the appropriate tool;
2.3.5. Under the engine, remove number (8) using the appropriate tool;
2.3.6. Clean the engine oil filter screen using a low flash point solvent;
2.3.7. After the waste oil has been drained, reinstall the cleaned oil filter screen and reinstall the oil
drain bolts back into the engine;
2.3.8. We recommended that the engine oil and filter should be changed/cleaned every 6 rides or
approximately 15 hours of use, refer to the periodic maintenance table.
Please dispose of waste engine oil properly to avoid polluting the environment.
2.4. Adding engine oil
The oil filler cap (4) can be removed and engine oil can be added there, and the amount of oil filled can
be confirmed by the crankcase oil level window (1). Reinstall the engine oil filler cap (4) after setting the
proper oil level.

18
3. Cooling system
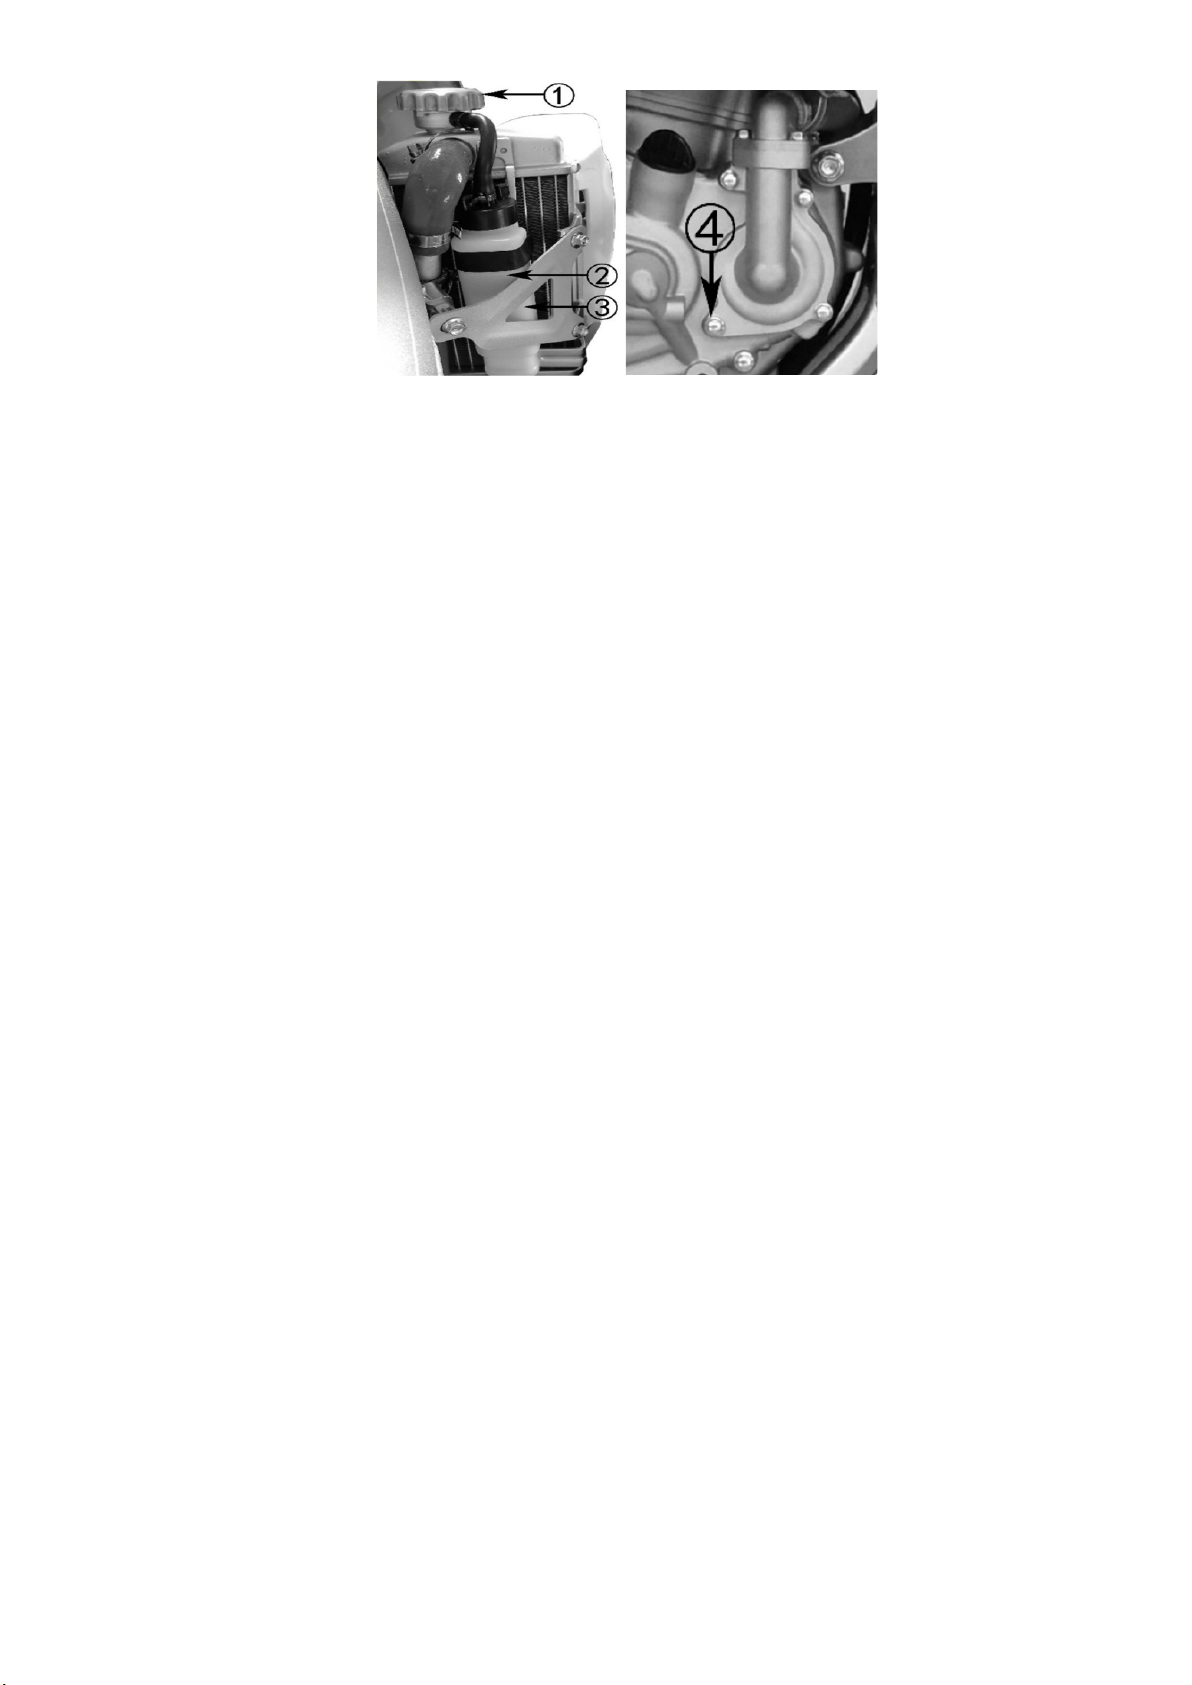
3.1. Coolant reservoir
The coolant reservoir is located behind the right radiator. According to the environment and conditions
the motorcycle is used in, the coolant reservoir should be cleaned regularly to remove dust and dirt.
3.2. Coolant
The coolant should be maintained according to the "Maintenance Schedule". When adding or replacing
the coolant, DO NOT use a non-glycol coolant, tap water or mineral water. Improper coolant use can
cause damage, such as corrosion in the engine, blockage of the coolant passages or radiators, and
premature wearing of the water pump seal. Please use a premixed glycol type coolant:
3.2.1. Check the coolant capacity
3.2.2. Hold the motorcycle in a vertical position while you are checking the coolant level;
3.2.3. Only check the coolant level once the engine has cooled down to avoid burns;
3.2.4. Ensure that the coolant level is between the upper limit (2) and lower limit (3) marking in the
coolant reservoir.
3.2.5. Adding coolant
3.2.6. If the coolant level is at or below the (3) mark, please add coolant until the level reaches the (2)
mark line. Use the following method:
3.2.6.1. Hold the motorcycle in a vertical position;
3.2.6.2. Remove the radiator cap (1) by turning it counterclockwise and add coolant until the level
reaches the upper level (2) marking position;
3.2.6.3. Start the engine to allow the coolant to circulate in the engine, and watch the position of the
coolant level in the reservoir bottle, if insufficient;
3.2.6.4. Reinstall the radiator cap (1)
3.2.6.5. Change the coolant
3.2.6.6. Place a container under the engine;
3.2.6.7. Remove the coolant drain bolt (4);
3.2.6.8. Loosen the radiator cap and tilt the motorcycle to the right as far as possible to drain the coolant
from the engine. Once the cap is loosened the coolant will start flowing so you may want to bring the
container up to the drain as the cap is loosened;
3.2.6.9. Reinstall the coolant drain bolt (4) with copper washer and tighten to prevent fluid leakage.
19
3.2.7. Special Notes:
3.2.7.
1. If the radiator cap is installed improperly, excessive coolant loss may occur, and the engine may
overheat causing damage;
3.2.7.
2. Always allow the engine and coolant to cool before removing the radiator cap. Hot coolant is
under pressure and will spray out if the cap is removed while hot potentially causing burns;
3.2.7.
3. Please dispose of waste coolant properly to protect the environment.
20
4. Spark plug
4.1. Choosing the spark plug
Spark plug used: Champion RG6YC.
The spark plug used on this series of motorcycle has been carefully selected and matched to suit the
largest working range. If the color of the spark plug when checked is different than the normal spark
plug, please return to using the original recommended spark plug. Selecting an inappropriate spark plug
could result in engine damage.
4.2. Checking the spark plug and how to change it
4.2.1. Check the spark plug according to the "Periodic Maintenance Table";
4.2.2. Remove the spark plug cap (1) and remove the spark plug (2) using a spark plug socket;
2.3. Inspect the spark plug for damage, electrode gap increase, if the gasket is intact. If any of these
problems are present, replace the spark plug immediately;
4.2.4. Check the electrode gap with a feeler gauge. The normal electrode gap is 0.8~0.9mm;
4.2.5. When you are installing the spark plug, first screw the spark plug in by hand and then tighten it
with the proper spark plug socket.
Table of contents
Other SSR Motorsports Motorcycle manuals

SSR Motorsports
SSR Motorsports SSR150 User manual

SSR Motorsports
SSR Motorsports SR450S User manual

SSR Motorsports
SSR Motorsports Lazer5 User manual

SSR Motorsports
SSR Motorsports Lazer6 User manual

SSR Motorsports
SSR Motorsports SNAKE EYES XF250-GS User manual

SSR Motorsports
SSR Motorsports SR250S User manual
Popular Motorcycle manuals by other brands


Evotech Performance
Evotech Performance KAWASAKI ZX6R 2007/8 installation instructions

KTM
KTM EXC 200 EXC owner's manual

KTM
KTM 350 SX-F Cairoli replica owner's manual

Victory Motorcycles
Victory Motorcycles 2005 Ness Signature Series Vegas owner's manual

Yamaha
Yamaha F DIVERSION XJ6F owner's manual

Yamaha
Yamaha X650 Assembly manual


