stabo WLAN indoorcam_fisheye User manual

Einschalten und Verbinden der Kamera
Verbinden Sie den USB-Stecker des Anschlusskabels mit der USB-
Buchse des Netzteils. Stecken Sie das Netzteil in eine 230 V-Netzsteck-
dose und verbinden Sie den Micro USB-Stecker mit der Micro USB-
Buchse der amera, diese schaltet sich nach dem Einstecken des USB-
Steckers sofort ein.
Nach ca. 30 sec. hören Sie die An-
sage System boot completed
und kurz danach AP build up.
Damit ist der Bootvorgang der a-
mera abgeschlossen, die Betriebs-
LED blinkt grün und die amera ist
zur Einrichtung bereit.
Einrichten eines Benutzer-
kontos und Verbinden von
Kamera und Mobilgerät
1. Stellen Sie sicher das Ihr Mobil-
gerät mit ihrem WLAN-Netzwerk
verbunden ist.
2. Öffnen Sie die App ano360S.
Danach erscheint kurz der Start-
bildschirm.
3. Um Ihr Benutzerkonto einzurichten, tippen Sie auf Register. Geben
Sie Ihre Benutzerkontoinformationen (E-Mail Adresse und Passwort)
ein und tippen anschließend auf Registrieren. Nach erfolgreicher
Registrierung erhalten Sie eine Bestätigungs-E-Mail.
Geben Sie nun in das Feld Benutzerkonto ihre E-Mail Adresse ein
und in das Feld Passwort das von Ihnen vergebene Passwort. An-
schließend tippen Sie auf Einloggen
Wichtiger Hinweis: Notieren Sie sich den Benutzernamen und das
ennwort. Sie benötigen beides später, um sich über Anmeldung
bei der App anzumelden.
Wichtig
Lesen Sie vor Inbetriebnahme des Geräts alle Bedienhinweise aufmerk-
sam und vollständig durch. Eine ausführliche Bedienungsanleitung
steht zum Herunterladen bereit:
http://stabo.de/fileadmin/BdA/BdA_stabo_WLAN_indoorcam_fisheye_DE_EN.pdf
Hinweis: Durch die ständige Aktualisierung des Produktes und der
Software ergibt sich möglicherweise eine Abweichung zwischen der
Bedienungsanleitung und der App-Oberfläche. Alle Anweisungen sind
abhängig von der tatsächlichen Bedienoberfläche.
Lieferumfang
Farbkamera mit integriertem WLAN-Modul
Netzteil (5 V DC/1,0 A)
USB DC-Anschlusskabel
Quickstart-Bedienungsanleitungen (Android/iOS) DE
Montagematerial
Bitte überprüfen Sie den Packungsinhalt auf Vollständigkeit. Prüfen
Sie vor der Benutzung des Geräts, ob äußerliche Beschädigungen
vorliegen. In diesem Fall nehmen Sie das Produkt nicht in Betrieb,
sondern setzen sich umgehend mit Ihrem Fachhändler in Verbindung.
Bitte entfernen Sie vor Inbetriebnahme die Schutzfolie vom Objektiv.
Inbetriebnahme / Installation
Laden Sie zunächst entsprechend des Betriebssystems Ihres Mobil-
geräts die iOS- bzw. Android-Version der App Pano360S aus dem App
Store bzw. Google Play Store. Geben Sie dazu Pano360S in die Such-
leiste ein, markieren die App, laden sie herunter und installieren sie.
Hinweis: In dieser Bedienungsanleitung werden alle Bedienschritte
am Beispiel der Android-Version der App beschrieben.
Wichtiger Hinweis: Eine Installationsanleitung für iOS-Geräte finden
Sie unter dem folgenden Link: http://stabo.de/fileadmin/BdA/BdA_
WLAN_ indoorcam_fisheye_Kurz_DE_EN.pdf
Kurz-
bedienungs-
anleitung
(Android)
digitale Funktechnik 2,4 GHz
WLAN indoorcam_fisheye
Video-Sicherheitssystem mit ntercom
Art.-Nr. 51091
4. Nach erfolgreicher
Registrierung er-
scheint der Startbild-
schirm.
Tippen Sie nun auf
Hinzufügen.
Es erscheint eine Aus-
wahl von Geräten.
Tippen Sie auf die Ab-
bildung Ihrer amera.
Wenn die grüne LED
blinkt, bestätigen Sie
mit "Yes" (Ja).
Tippen Sie anschlies-
send auf die gefunde-
ne ID-Nummer.
5. Geben Sie unter Passwort Ihren WPA-Versc lüsselungscode
für Ihr WLAN-Netzwerk ein und tippen Sie anschließend auf
Nächster.

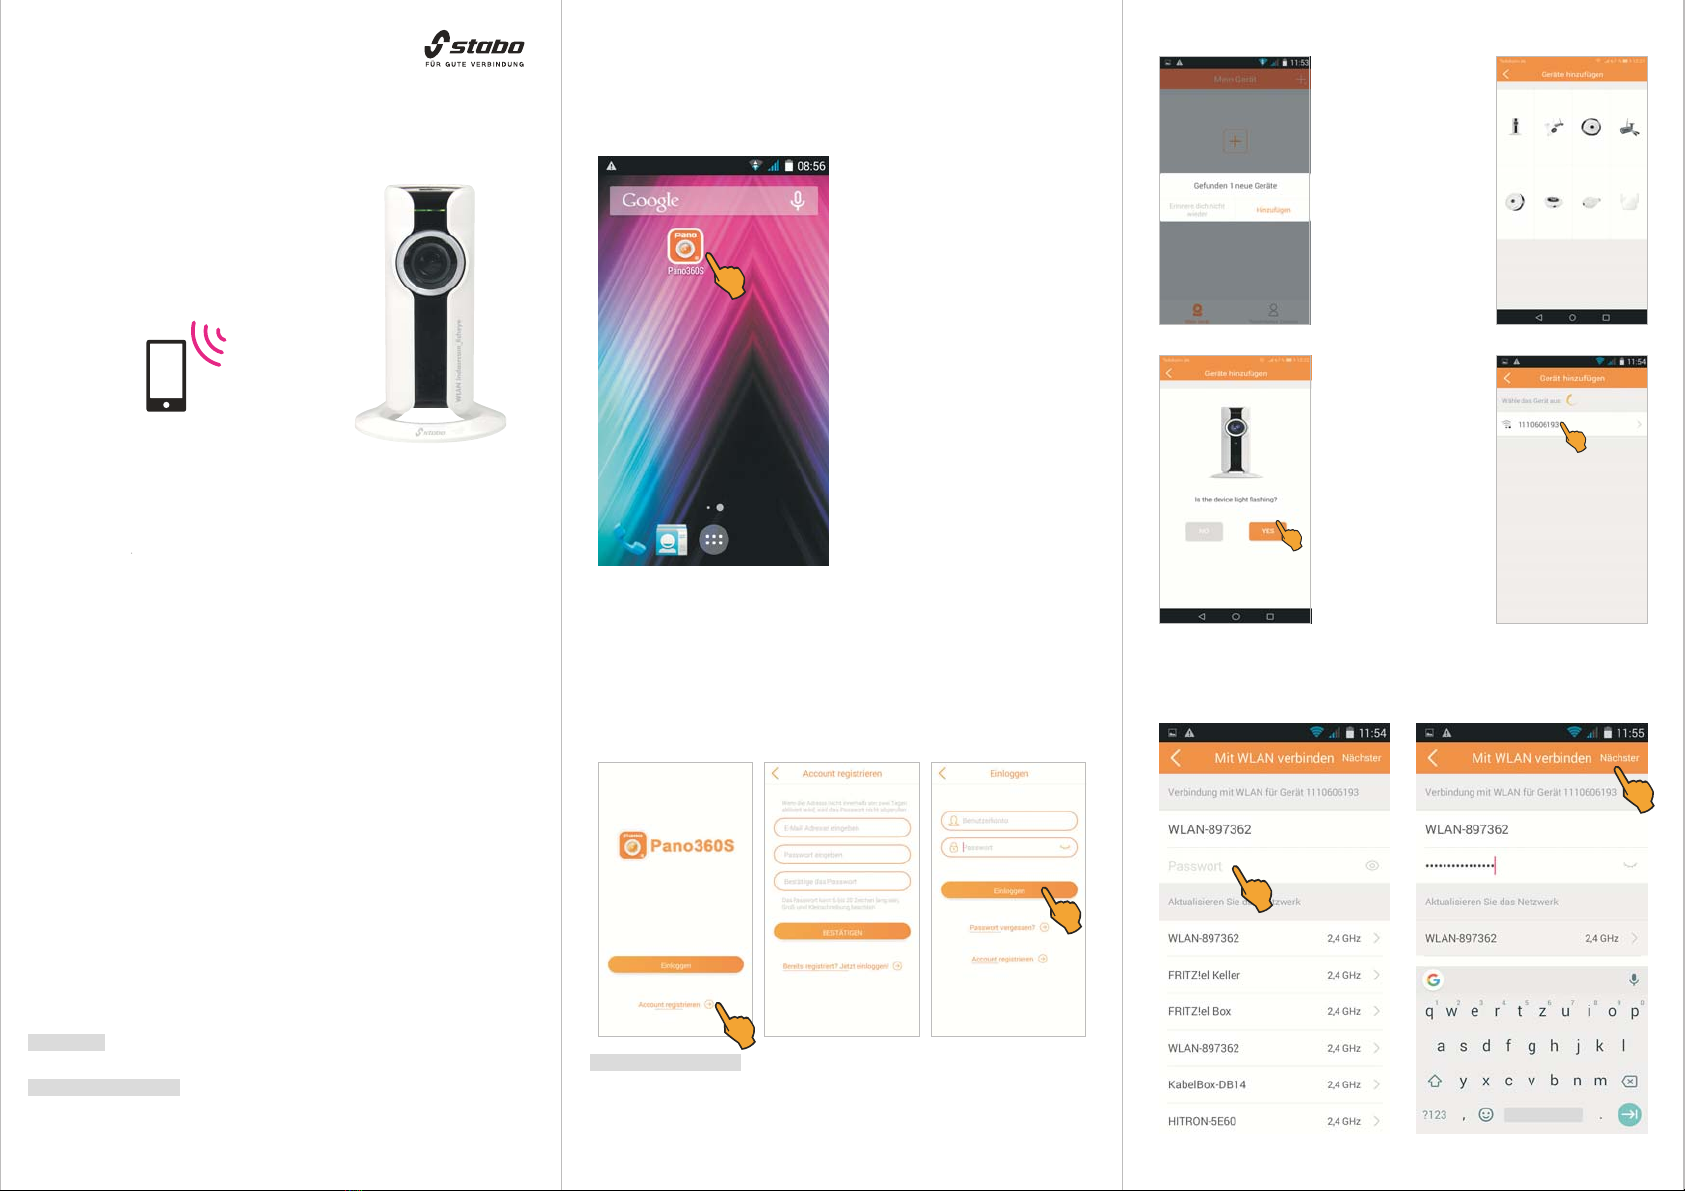
6. Die amera wird sich jetzt mit dem WLAN-Netzwerk verbinden.
Sobald die Einrichtung im Netzwerk abgeschlossen wurde, hören
Sie die Ansage Connecting is successfully.
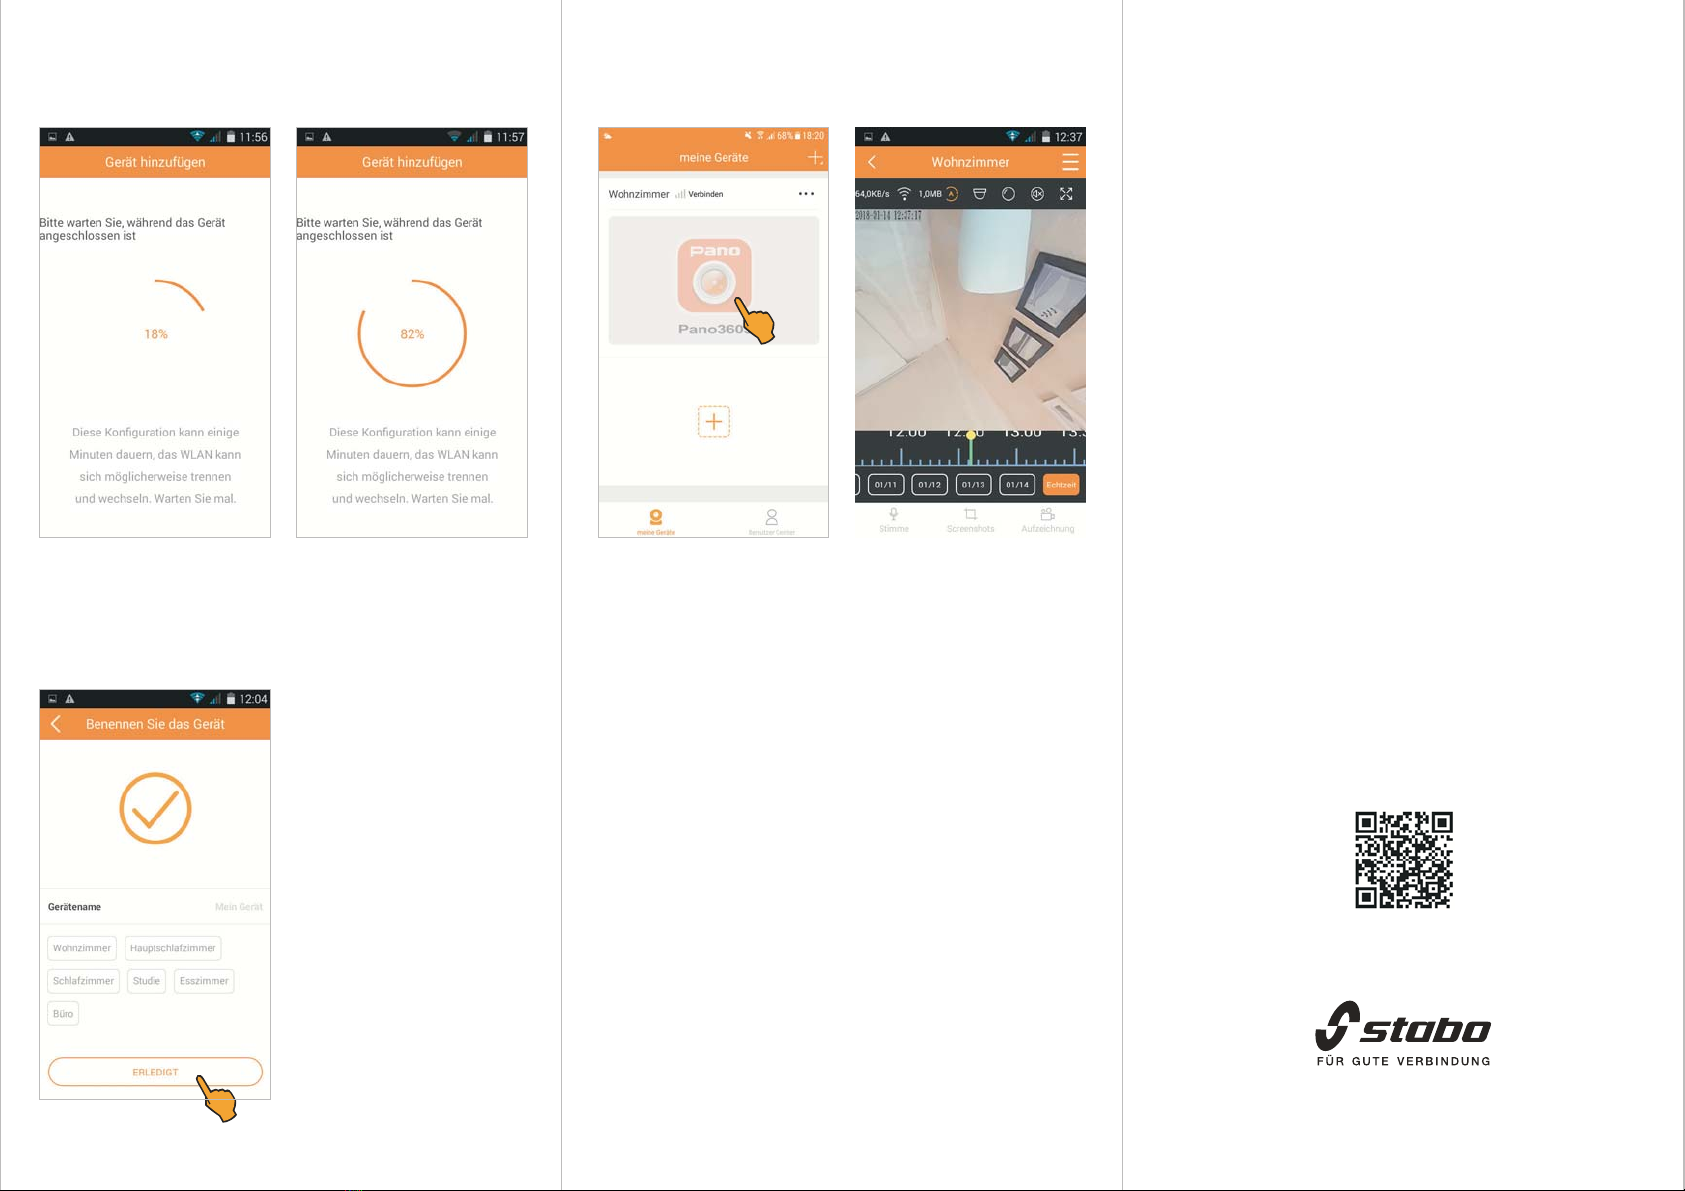
Nach erfolgreicher Installation haben Sie nun die Möglichkeit, der
amera einen Namen zu geben, entweder einen der vorgeschlagenen
Namen oder Sie vergeben unter Gerätenamen einen eigenen Namen.
Tippen Sie nun auf Erledigt.
7. Die amera ist nun betriebsbereit. Tippen Sie auf das Symbol
Pano360S, um auf das Livebild zu betrachten.
Montage und Anschluss der Kamera
Wichtige Hinweise:
Bedenken Sie bei der Wahl des Montageortes für die amera folgende
Punkte:
Reichweite: Prüfen Sie, ob am geplanten Montageort eine stabile Ver-
bindung zwischen amera und Ihrem WLAN-Netzwerk besteht.
Beleuchtungssituation: Die amera sollte nicht direkt auf starke Licht-
quellen oder starkes Sonnenlicht ausgerichtet werden, da dadurch die
Aufnahme überbelichtet wird.
Stromversorgung: Das Netzteil der amera und die amera dürfen
nicht den Witterungseinflüssen im Freien ausgesetzt werden!
Befestigung: Die amera ist für Wandmontage geeignet. Achten Sie
auf einen stabilen Untergrund, der starke Vibrationen und/oder Stürze
ausschließt.
Installieren Sie die amera zunächst provisorisch und prüfen Sie, ob
der gewünschte Überwachungsbereich vollständig erfasst wird, bevor
Sie Löcher für die amerahalterung bohren! Vergewissern Sie sich,
dass an der Stelle keine abel/Leitungen in der Wand liegen, die beim
Bohren beschädigt werden könnten!
Drücken Sie mit einem Schraubenzieher vorsichtig die beiden Blind-
stopfen heraus.
Markieren Sie die gewünschte Position der Schraublöcher, indem Sie
die amerahalterung als Schablone nutzen.
Bohren Sie die Montagelöcher und befestigen Sie die Halterung mit
für den Untergrund geeigneten Schrauben.
Stecken Sie das Netzteil in eine 230 V-Steckdose und verbinden Sie
den Micro USB- Stecker mit der DC IN-Buchse der amera.
Wenn die Betriebs-LED grün leuchtet, ist die amera betriebsbereit.
Irrtümer und Änderungen vorbehalten. Abbildungen: Abweichungen möglich.
Copyright © 07/2018 stabo Elektronik GmbH
stabo Elektronik GmbH
.
Münchewiese 16
.
31137 Hildesheim/Germany
Tel. +49 (0) 5121-76 20-0 . Fax: +49 (0) 5121- 51 29 79
Internet: www.stabo.de . E-Mail: [email protected]
Technische Daten
WiFi-Frequenz 2,4 - 2,4835 GHz
WiFi-Sicherheit WPA / PS
WiFi-Standard IEEE 802.11b/g/n
Bildauflösung 720P (1280 x 720)
Bildsensor ¼" CMOS Sensor für 750P
Blickwinkel (Diagonal) horizontal 185°/ vertikal 120°
Einzel-Bildrate 25 fps
Objektiv Fisheye, f = 1,44 mm
Alarm-Modus Motion Detection
Betriebsspannung 5 V DC / 1 A
Arbeits-Temperaturbereich - 15° C ~ 50° C
Nachtsichtweite 10 - 15 m
MicroSD card slot max. 128 GB ( arte nicht enthalten)
Maße/Gewicht mit Fuß Ø 75 mm, Höhe 120 mm, 97 g
Bedienungsanleitung
User Manual
stabo WLAN indoorcam_fisheye
Vereinfachte EU-Konformitätserklärung
Hiermit erklärt stabo Elektronik GmbH, dass die Funkanlage Typ stabo
WLAN indoorcam_fisheye der Richtlinie 2014/53/EU entspricht.
Der vollständige Text der EU- onformitätserklärung ist unter der folgen-
den Internetadresse verfügbar:
http://stabo.de/fileadmin/DoC/DoC_stabo_WLAN_indoorcam_fisheye_DE_EN.pdf

4. After successful
registration the wel-
come screen is shown.
Now tap Hinzufügen
(Add device).
A selection of devices
is displayed.
Now tap the image of
your camera.
When the green LED
flashes, tap "Yes" (Ja)
to confirm.
Afterwards, tap the ID
number found.
5. Use Password to enter the WPA encryption code for your WLAN
network and tap Nächster (Next) afterwards.
Switching on and connecting the camera
Connect the USB plug of the connecting cable to the USB socket of
the power supply unit. Plug the power supply unit into a socket and
connect the micro USB plug to the cameras micro USB socket which
is automatically switched on when inserting the USB plug.
After approx. 30 sec. you will hear
the announcement System boot
completed and AP build up
shortly afterwards. The booting
procedure of the camera is finished
now, the power LED flashes green
and the camera is ready for setup.
Setting up a user account and
connecting the camera and a
mobile device
1. Make sure that your mobile de-
vice is connected with your WLAN
router.
2. Open the app ano360S.
Afterwards the welcome screen
is shown.
3. For setting up your user account, tap Register. Enter your user
account data (e-mail address and password) and tap Registrieren
(Register) afterwards. After having registered successfully, you will
receive a confirmation e-mail.
Enter your e-mail address in the user account field and the password
that you have assigned in the password field. Afterwards tap Ein-
loggen (Login).
Important note: Make a note of your user name and password. You
will need both to log in later to the app via Login.
Important
Prior to using the device for the first time, carefully and completely read
through all operating instructions. Detailed operating instructions are
available for download:
http://stabo.de/fileadmin/BdA/BdA_stabo_WLAN_indoorcam_fisheye_DE_EN.pdf
Note: Due to the permanent updates of product and software, these
operating instructions and the user interface of the app will possibly
deviate from each other. All instructions depend on the actual user
interface.
Scope of delivery
Color camera with integrated WLAN module
Power supply unit (5 V DC / 1.0 A)
USB DC connecting cable
Quick start guide (German/English)
Mounting material
Please check the contents of the package for completeness.
Prior to using the device, examine it with respect to any external damage.
In case of an external damage, do not put the product into operation,
but contact your specialist dealer immediately.
Commissioning / installation
First download the iOS or Android version of the app Pano360S from
the App Store or Google Play Store according to the operating system
of your mobile device. To do so, enter Pano360S into the search bar,
highlight the app, download and install it.
Note: In these operating instructions, all operational steps are described
for the Android version of the app.
Note: You can find operating instructions for iOS devices under the
following link:
http://stabo.de/fileadmin/BdA/bda-indoorcam-fisheye-ios.pdf
Quick start
guide
(Android)
digital radio technology 2.4 GHz
WLAN indoorcam_fisheye
Video security system with ntercom function
Article no. 51091

Drill the mounting holes and fix the support using screws which are
suitable for the respective base material.
Plug the power supply unit into a socket (230 V) and connect the micro
USB plug to the DC IN socket of the camera.
If the power LED lights green, the camera is operable.
7. The camera is operable now. Tap the symbol Pano360S to see
the live image.
Mounting and connecting the camera
Important information:
Consider the following when selecting the camera position:
Range: Check whether the connection between the camera and your
WLAN network is stable at the intended position.
Lighting conditions: The camera should not be orientated towards
direct, strong light sources/sunlight, since overexposed images may
result.
ower supply: The camera's power supply unit and the camera must
not be exposed to the weather in the open!
Mounting: The camera is suitable for wall mounting.
Make sure that the mounting surface is stable and does not give rise
to strong vibrations and/or falls.
First, install the camera only provisionally and check whether the desired
monitored area is completely covered prior to drilling the holes for the
camera support! Make sure that no cables or conducts are placed in
the wall which may be damaged when drilling!
Use a screwdriver to remove the blind plugs from the camera support
carefully.
Mark the desired position for the drilling holes of the fixing screws by
using the camera support as drilling jig.
Errors and technical modification reserved, pictures may vary.
Copyright © 07/2018 stabo Elektronik GmbH
stabo Elektronik GmbH
.
Münchewiese 16
.
31137 Hildesheim/Germany
Tel. +49 (0) 5121-76 20-0 . Fax: +49 (0) 5121- 51 29 79
Internet: www.stabo.de . E-Mail: [email protected]
Bedienungsanleitung
User Manual
stabo WLAN indoorcam_fisheye
Technical data
WiFi frequency 2.4-2.4835 GHz
WiFi security WPA / PS
WiFi standard IEEE 802.11b/g/n
Image resolution 720P (1280 x 720)
Image sensor ¼" CMOS sensor for 750P
Angle of view (diagonal) horizontal 185°/ vertical 120°
Frame rate 25 fps
Objective Fish eye, f = 1.44 mm
Alarm mode Motion detection
Operating voltage 5 V DC / 1A
Service temperature range - 15° C ~ 50° C
Vision at night 10-15 m.
Micro SD card slot max. 128 GB (card not included)
Dimensions/Weight incl. base Ø 76 mm, height 120 mm, 97 g
6. The camera will now establish a connection to the WLAN network.
As soon as the network setup is finished, you will hear the an-
nouncement Connecting is successfully.
After successful installation, you can now assign a name to the camera
either a proposed name or an own name by using the field Geräte-
namen (Device names). Now tap Erledigt (Done).
Simplified EU Declaration of Conformity
Hereby, stabo Elektronik GmbH declares that the radio equipment type
stabo WLAN indoorcam_fisheye is in compliance with the Directive
2014/53/EU. The full text of the EU declaration of conformity is available
at the following Internet address:
http://stabo.de/fileadmin/DoC/DoC_stabo_WLAN_indoorcam_fisheye_DE_EN.pdf
Table of contents
Languages:
Other stabo Security Camera manuals