Stahls Hotronix Fusion IQ XF Parts list manual

Included Parts:
1. Controller
2. Triac
3. Temperature Strips
Required Tools:
1. Allen Wrenches (1/8” & 9/64”)
2. #2 Phillips Screwdriver
3. Needle Nose Pliers
4. Scissors
5. Paper Clip
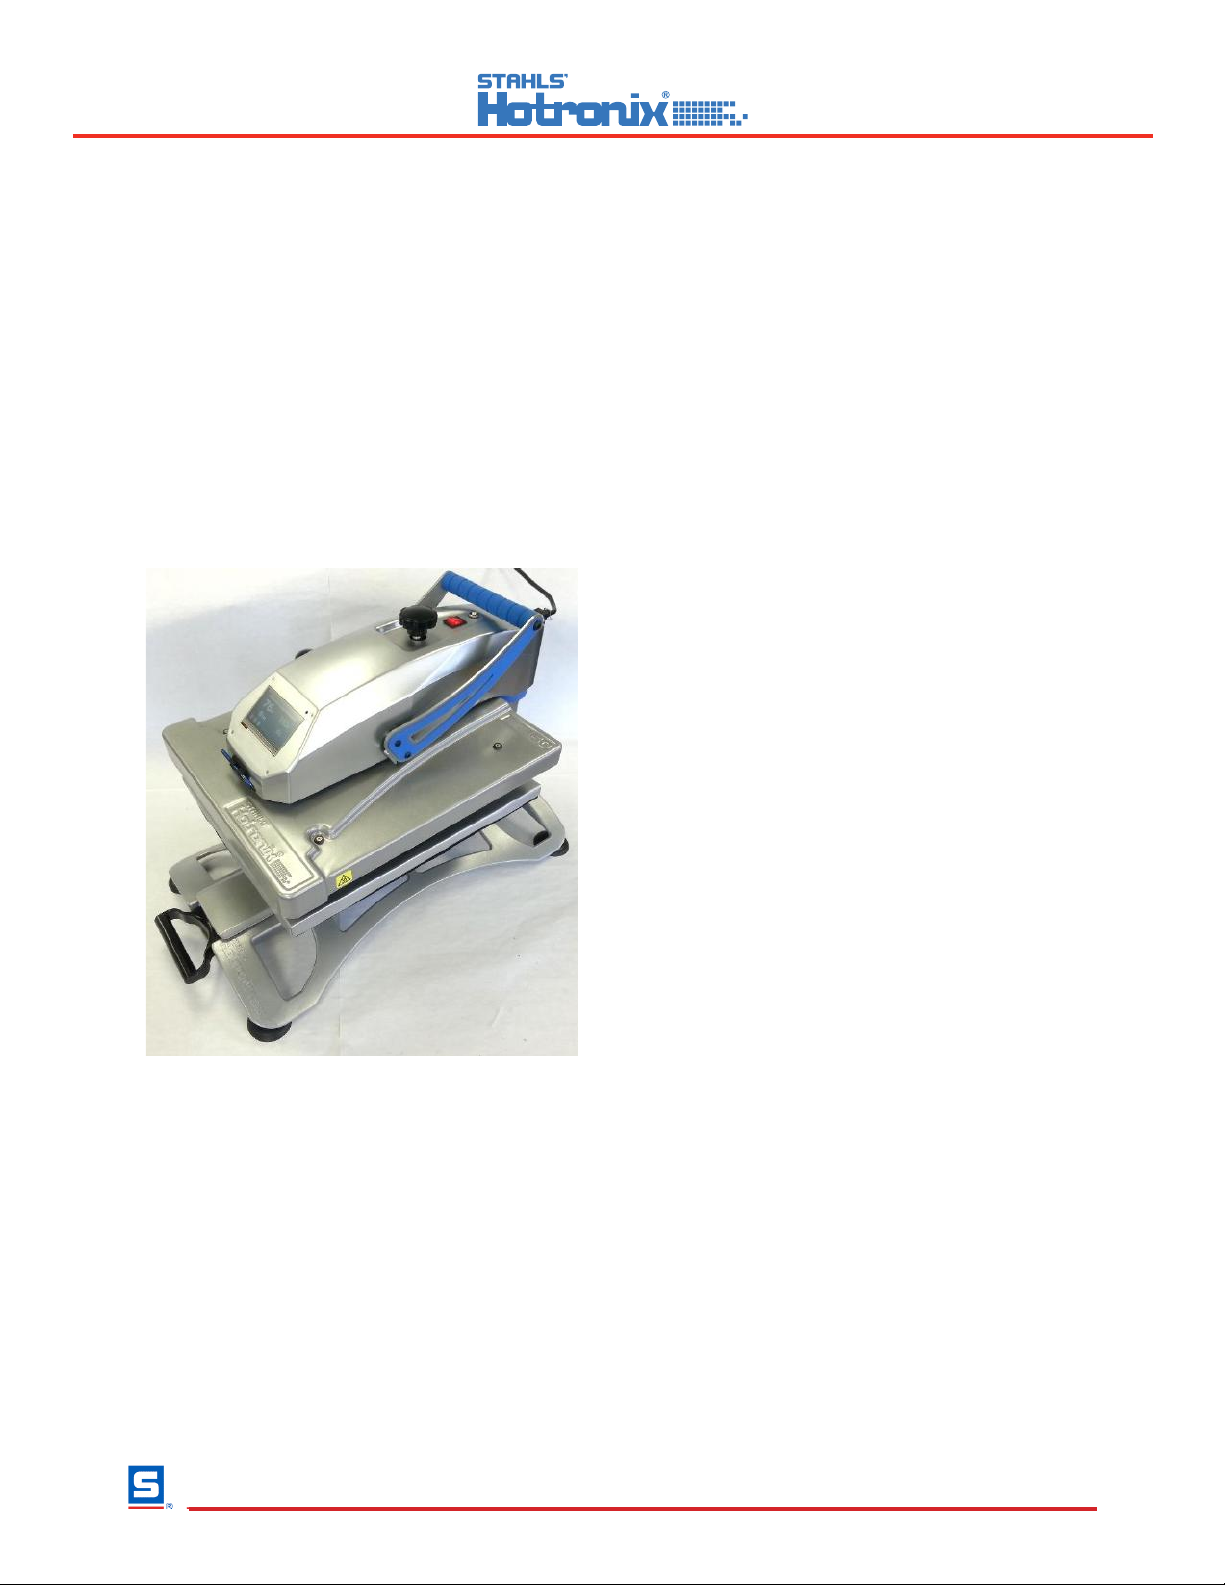
Fusion (Model XF)
Controller V4.5 & TRIAC Replacement
2015-03-08
Technical Assistance: 1-(800)-727-8520
Manuals: hotronix.com/heat-press-manuals Page 1 of 17
Included Parts:
1. Controller
2. Controller Overlay
3. Temperature strips
4. Zip ties
5. TRIAC
6. Adapter Harness (older models only)
7. 9-Pin Connector (where applicable)
Required Tools:
8. Allen Wrenches (3/32” & 9/64”)
9. #2 Phillips Screwdriver
10. #1 Phillips Screwdriver
11. 2mm Precision Flathead Screwdriver
12. Scissors
13. Wire Cutters (9-pin repair only)
14. Wire Strippers (9-pin repair only)
15. Permanent Marker (9-pin repair only)
CAUTION: Detach power cord before
proceeding
1
2
3
4
5
6
7
8
9
10
11
12
13
14
15
Fusion (Model XF)
Controller V4.5 & TRIAC Replacement
2015-03-08
Technical Assistance: 1-(800)-727-8520
Manuals: hotronix.com/heat-press-manuals
Page 1 of 17
Included Parts:
1. Controller
2. Controller Overlay
3. Temperature strips
4. Zip ties
5. TRIAC
6. Adapter Harness (older models only)
7. 9-Pin Connector (where applicable)
Required Tools:
8. Allen Wrenches (3/32” & 9/64”)
9. #2 Phillips Screwdriver
10. #1 Phillips Screwdriver
11. 2mm Precision Flathead Screwdriver
12. Scissors
13. Wire Cutters (9-pin repair only)
14. Wire Strippers (9-pin repair only)
15. Permanent Marker (9-pin repair only)
CAUTION: Detach power cord before
proceeding
1
2
3
4
5
6
7
8
9
10
11
12
13
14
15
Page 1 of 15
1. Required Tools: Paper Clip
2. CAUTION: Turn off power and detach power cord
3. Insert the Paper Clip into the small hole on either
side of the housing
4. Press in the Paper Clip until two clicks are heard:
the first click releases the Controller bezel and the
second click ejects it from the housing as shown
5. Repeat the process on the other side of housing
6. Remove the old Controller and insert the new
replacement Controller
7. Press on the two latch points with your thumb until
a click is heard; if the Controller bezel does not sit
flush with the housing plastic, it has not latched
8. Plug in and turn on heat press to verify function
Controller Replacement Guide
Fusion IQ (XF/XRF/XRF2)
Page 1 of 1
2018-04-26
1-800-727-8520
www.hotronix.com
Fusion (Model XF)
Controller V4.5 & TRIAC Replacement
2015-03-08
Technical Assistance: 1-(800)-727-8520
Manuals: hotronix.com/heat-press-manuals
Page 1 of 17
Included Parts:
1. Controller
2. Controller Overlay
3. Temperature strips
4. Zip ties
5. TRIAC
6. Adapter Harness (older models only)
7. 9-Pin Connector (where applicable)
Required Tools:
8. Allen Wrenches (3/32” & 9/64”)
9. #2 Phillips Screwdriver
10. #1 Phillips Screwdriver
11. 2mm Precision Flathead Screwdriver
12. Scissors
13. Wire Cutters (9-pin repair only)
14. Wire Strippers (9-pin repair only)
15. Permanent Marker (9-pin repair only)
CAUTION: Detach power cord before
proceeding
1
2
3
4
5
6
7
8
9
10
11
12
13
14
15
Page 2 of 15
1. Required Tools: Paper Clip
2. CAUTION: Turn off power and detach power cord
3. Insert the Paper Clip into the small hole on either
side of the housing
4. Press in the Paper Clip until two clicks are heard:
the first click releases the Controller bezel and the
second click ejects it from the housing as shown
5. Repeat the process on the other side of housing
6. Remove the old Controller and insert the new
replacement Controller
7. Press on the two latch points with your thumb until
a click is heard; if the Controller bezel does not sit
flush with the housing plastic, it has not latched
8. Plug in and turn on heat press to verify function
Controller Replacement Guide
Fusion IQ (XF/XRF/XRF2)
Page 1 of 1
2018-04-26
1-800-727-8520
www.hotronix.com
Remove the Touch Screen Controller
Insert the Paper Clip into the small hole on
either side of the housing.
Press in the paper clip until two clicks are
heard: The rst click releases the controller
bezel and the second click ejects it from the
housing as shown.
1. Required Tools: Paper Clip
2. CAUTION: Turn off power and detach power cord
3. Insert the Paper Clip into the small hole on either
side of the housing
4. Press in the Paper Clip until two clicks are heard:
the first click releases the Controller bezel and the
second click ejects it from the housing as shown
5. Repeat the process on the other side of housing
6. Remove the old Controller and insert the new
replacement Controller
7. Press on the two latch points with your thumb until
a click is heard; if the Controller bezel does not sit
flush with the housing plastic, it has not latched
8. Plug in and turn on heat press to verify function
Controller Replacement Guide
Fusion IQ (XF/XRF/XRF2)
Page 1 of 1
2018-04-26
1-800-727-8520
www.hotronix.com
Repeat the process on the other side of the housing.
1. Required Tools: Paper Clip
2. CAUTION: Turn off power and detach power cord
3. Insert the Paper Clip into the small hole on either
side of the housing
4. Press in the Paper Clip until two clicks are heard:
the first click releases the Controller bezel and the
second click ejects it from the housing as shown
5. Repeat the process on the other side of housing
6. Remove the old Controller and insert the new
replacement Controller
7. Press on the two latch points with your thumb until
a click is heard; if the Controller bezel does not sit
flush with the housing plastic, it has not latched
8. Plug in and turn on heat press to verify function
Controller Replacement Guide
Fusion IQ (XF/XRF/XRF2)
Page 1 of 1
2018-04-26
1-800-727-8520
www.hotronix.com
Remove the controller.

Fusion (Model XF)
Controller V4.5 & TRIAC Replacement
2015-03-08
Technical Assistance: 1-(800)-727-8520
Manuals: hotronix.com/heat-press-manuals Page 2 of 17
Lower heater but do not lock into place, such
that it rests gently on lower platen
Loosen set screw in shaft of pressure
adjustment knob and remove knob using
3/32” Allen Wrench
Remove 4 #8-32 x ½” Thumb Screws (right
2 shown) from underside of control housing
using 9/32” Allen Wrench
Fusion (Model XF)
Controller V4.5 & TRIAC Replacement
2015-03-08
Technical Assistance: 1-(800)-727-8520
Manuals: hotronix.com/heat-press-manuals
Page 1 of 17
Included Parts:
1. Controller
2. Controller Overlay
3. Temperature strips
4. Zip ties
5. TRIAC
6. Adapter Harness (older models only)
7. 9-Pin Connector (where applicable)
Required Tools:
8. Allen Wrenches (3/32” & 9/64”)
9. #2 Phillips Screwdriver
10. #1 Phillips Screwdriver
11. 2mm Precision Flathead Screwdriver
12. Scissors
13. Wire Cutters (9-pin repair only)
14. Wire Strippers (9-pin repair only)
15. Permanent Marker (9-pin repair only)
CAUTION: Detach power cord before
proceeding
1
2
3
4
5
6
7
8
9
10
11
12
13
14
15
Page 3 of 15
1. Required Tools: Paper Clip
2. CAUTION: Turn off power and detach power cord
3. Insert the Paper Clip into the small hole on either
side of the housing
4. Press in the Paper Clip until two clicks are heard:
the first click releases the Controller bezel and the
second click ejects it from the housing as shown
5. Repeat the process on the other side of housing
6. Remove the old Controller and insert the new
replacement Controller
7. Press on the two latch points with your thumb until
a click is heard; if the Controller bezel does not sit
flush with the housing plastic, it has not latched
8. Plug in and turn on heat press to verify function
Controller Replacement Guide
Fusion IQ (XF/XRF/XRF2)
Page 1 of 1
2018-04-26
1-800-727-8520
www.hotronix.com
Remove 4 #8 -32 x 1/2” Thumb Screws (right
2 shown) from underside of control housing
using 9/64” Allen Wrench.
Loosen set screw in shaft of pressure
adjustment knob and remove knob using
1/8” Allen Wrench.

Fusion (Model XF)
Controller V4.5 & TRIAC Replacement
2015-03-08
Technical Assistance: 1-(800)-727-8520
Manuals: hotronix.com/heat-press-manuals Page 3 of 17
Lift off control housing and lay it gently on
left side of press
Unplug ground wire (green with yellow
stripe) from IEC inlet at rear of housing
Unplug Black & White wires from Power
Switch as shown to disconnect from
Controller
Fusion (Model XF)
Controller V4.5 & TRIAC Replacement
2015-03-08
Technical Assistance: 1-(800)-727-8520
Manuals: hotronix.com/heat-press-manuals
Page 1 of 17
Included Parts:
1. Controller
2. Controller Overlay
3. Temperature strips
4. Zip ties
5. TRIAC
6. Adapter Harness (older models only)
7. 9-Pin Connector (where applicable)
Required Tools:
8. Allen Wrenches (3/32” & 9/64”)
9. #2 Phillips Screwdriver
10. #1 Phillips Screwdriver
11. 2mm Precision Flathead Screwdriver
12. Scissors
13. Wire Cutters (9-pin repair only)
14. Wire Strippers (9-pin repair only)
15. Permanent Marker (9-pin repair only)
CAUTION: Detach power cord before
proceeding
1
2
3
4
5
6
7
8
9
10
11
12
13
14
15
Page 4 of 15
1. Required Tools: Paper Clip
2. CAUTION: Turn off power and detach power cord
3. Insert the Paper Clip into the small hole on either
side of the housing
4. Press in the Paper Clip until two clicks are heard:
the first click releases the Controller bezel and the
second click ejects it from the housing as shown
5. Repeat the process on the other side of housing
6. Remove the old Controller and insert the new
replacement Controller
7. Press on the two latch points with your thumb until
a click is heard; if the Controller bezel does not sit
flush with the housing plastic, it has not latched
8. Plug in and turn on heat press to verify function
Controller Replacement Guide
Fusion IQ (XF/XRF/XRF2)
Page 1 of 1
2018-04-26
1-800-727-8520
www.hotronix.com
Fusion (Model XF)
Controller V4.5 & TRIAC Replacement
2015-03-08
Technical Assistance: 1-(800)-727-8520
Manuals: hotronix.com/heat-press-manuals Page 3 of 17
Lift off control housing and lay it gently on
left side of press
Unplug ground wire (green with yellow
stripe) from IEC inlet at rear of housing
Unplug Black & White wires from Power
Switch as shown to disconnect from
Controller
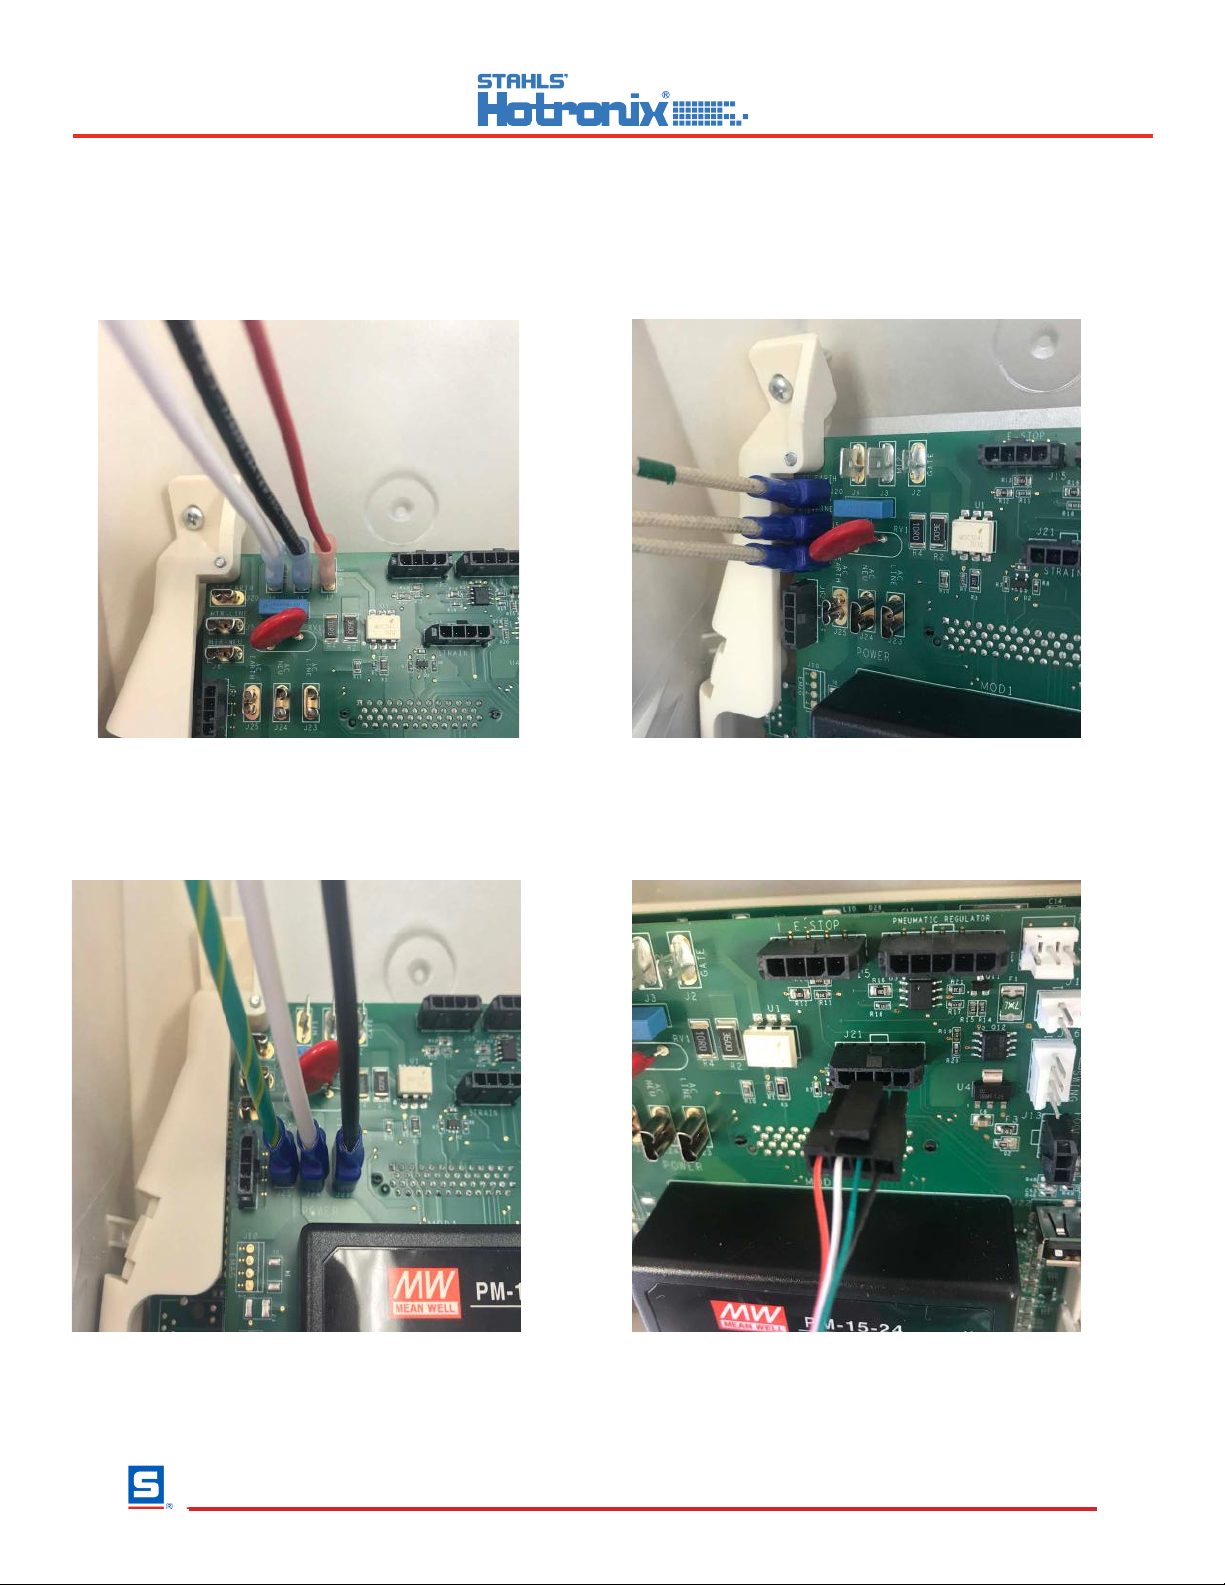
Unplug 3 Triac Wires Red, Black, & White
Wires From the Controller.
Unplug the 3 Braided Cloth Heater Wires
from the controller.
Unplug the ground wire and the 2 wires
from the On/O Switch from the controller.
Unplug the 4-pin Strain Gauge Connector
from the Controller depressing locking clip.
Fusion (Model XF)
Controller V4.5 & TRIAC Replacement
2015-03-08
Technical Assistance: 1-(800)-727-8520
Manuals: hotronix.com/heat-press-manuals
Page 1 of 17
Included Parts:
1. Controller
2. Controller Overlay
3. Temperature strips
4. Zip ties
5. TRIAC
6. Adapter Harness (older models only)
7. 9-Pin Connector (where applicable)
Required Tools:
8. Allen Wrenches (3/32” & 9/64”)
9. #2 Phillips Screwdriver
10. #1 Phillips Screwdriver
11. 2mm Precision Flathead Screwdriver
12. Scissors
13. Wire Cutters (9-pin repair only)
14. Wire Strippers (9-pin repair only)
15. Permanent Marker (9-pin repair only)
CAUTION: Detach power cord before
proceeding
1
2
3
4
5
6
7
8
9
10
11
12
13
14
15
Page 5 of 15
1. Required Tools: Paper Clip
2. CAUTION: Turn off power and detach power cord
3. Insert the Paper Clip into the small hole on either
side of the housing
4. Press in the Paper Clip until two clicks are heard:
the first click releases the Controller bezel and the
second click ejects it from the housing as shown
5. Repeat the process on the other side of housing
6. Remove the old Controller and insert the new
replacement Controller
7. Press on the two latch points with your thumb until
a click is heard; if the Controller bezel does not sit
flush with the housing plastic, it has not latched
8. Plug in and turn on heat press to verify function
Controller Replacement Guide
Fusion IQ (XF/XRF/XRF2)
Page 1 of 1
2018-04-26
1-800-727-8520
www.hotronix.com
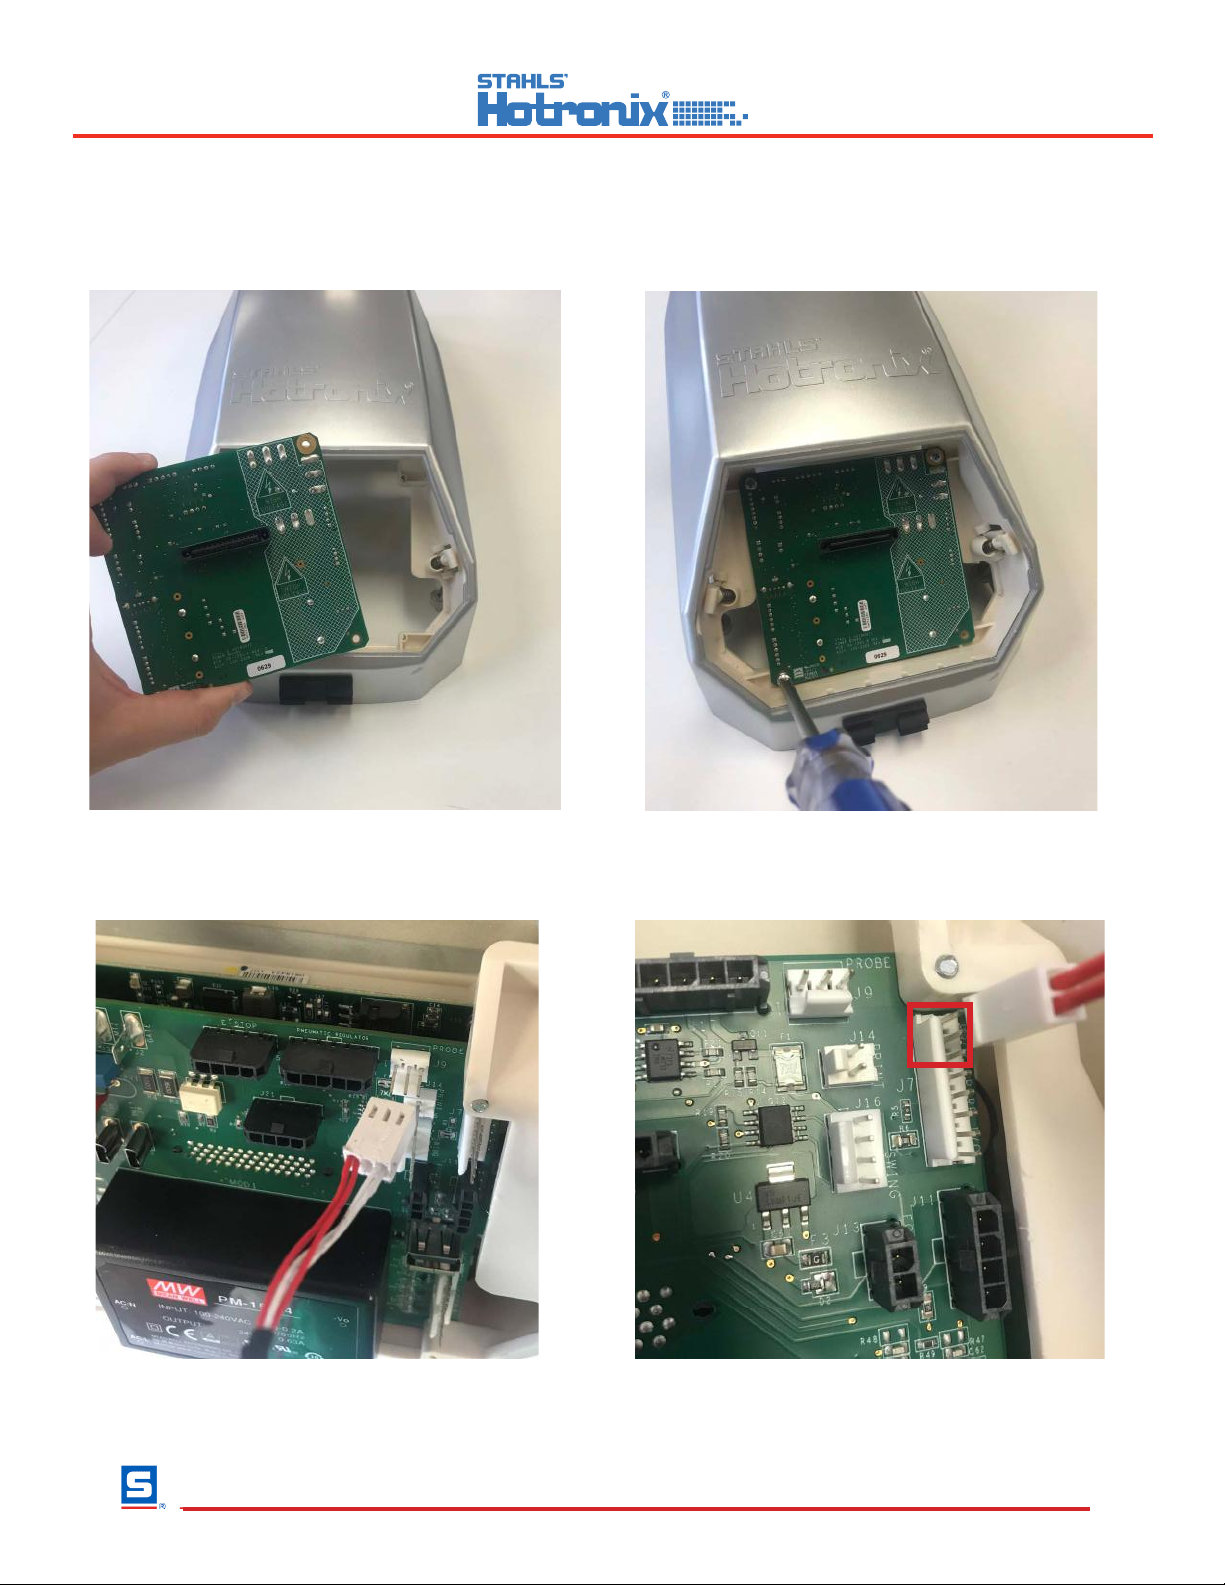
Remove the Power Board

Unplug the 3-pin Temperature Probe Connector
from the Controller depressing locking clip.
Unplug the 2-pin Proximity Sensor Connector
from the Controller depressing locking clip.
Remove the 4 screws from the outside
corners of the control board.
Remove the control board from the housing
bracket.
Fusion (Model XF)
Controller V4.5 & TRIAC Replacement
2015-03-08
Technical Assistance: 1-(800)-727-8520
Manuals: hotronix.com/heat-press-manuals
Page 1 of 17
Included Parts:
1. Controller
2. Controller Overlay
3. Temperature strips
4. Zip ties
5. TRIAC
6. Adapter Harness (older models only)
7. 9-Pin Connector (where applicable)
Required Tools:
8. Allen Wrenches (3/32” & 9/64”)
9. #2 Phillips Screwdriver
10. #1 Phillips Screwdriver
11. 2mm Precision Flathead Screwdriver
12. Scissors
13. Wire Cutters (9-pin repair only)
14. Wire Strippers (9-pin repair only)
15. Permanent Marker (9-pin repair only)
CAUTION: Detach power cord before
proceeding
1
2
3
4
5
6
7
8
9
10
11
12
13
14
15
Page 6 of 15
1. Required Tools: Paper Clip
2. CAUTION: Turn off power and detach power cord
3. Insert the Paper Clip into the small hole on either
side of the housing
4. Press in the Paper Clip until two clicks are heard:
the first click releases the Controller bezel and the
second click ejects it from the housing as shown
5. Repeat the process on the other side of housing
6. Remove the old Controller and insert the new
replacement Controller
7. Press on the two latch points with your thumb until
a click is heard; if the Controller bezel does not sit
flush with the housing plastic, it has not latched
8. Plug in and turn on heat press to verify function
Controller Replacement Guide
Fusion IQ (XF/XRF/XRF2)
Page 1 of 1
2018-04-26
1-800-727-8520
www.hotronix.com

Fusion (Model XF)
Controller V4.5 & TRIAC Replacement
2015-03-08
Technical Assistance: 1-(800)-727-8520
Manuals: hotronix.com/heat-press-manuals Page 7 of 17
Remove TRIAC using #2 Phillips
Screwdriver, saving #6-32 x ½” screw
Cut zip ties holding TRIAC wires using
scissors or wire cutters, careful not to
damage press wiring
Install TRIAC flat side down using existing
#6-32 x ½” screw, orienting it to direct wires
around adjustment spindle and towards front
of press as shown
Fusion (Model XF)
Controller V4.5 & TRIAC Replacement
2015-03-08
Technical Assistance: 1-(800)-727-8520
Manuals: hotronix.com/heat-press-manuals
Page 1 of 17
Included Parts:
1. Controller
2. Controller Overlay
3. Temperature strips
4. Zip ties
5. TRIAC
6. Adapter Harness (older models only)
7. 9-Pin Connector (where applicable)
Required Tools:
8. Allen Wrenches (3/32” & 9/64”)
9. #2 Phillips Screwdriver
10. #1 Phillips Screwdriver
11. 2mm Precision Flathead Screwdriver
12. Scissors
13. Wire Cutters (9-pin repair only)
14. Wire Strippers (9-pin repair only)
15. Permanent Marker (9-pin repair only)
CAUTION: Detach power cord before
proceeding
1
2
3
4
5
6
7
8
9
10
11
12
13
14
15
Page 7 of 15
1. Required Tools: Paper Clip
2. CAUTION: Turn off power and detach power cord
3. Insert the Paper Clip into the small hole on either
side of the housing
4. Press in the Paper Clip until two clicks are heard:
the first click releases the Controller bezel and the
second click ejects it from the housing as shown
5. Repeat the process on the other side of housing
6. Remove the old Controller and insert the new
replacement Controller
7. Press on the two latch points with your thumb until
a click is heard; if the Controller bezel does not sit
flush with the housing plastic, it has not latched
8. Plug in and turn on heat press to verify function
Controller Replacement Guide
Fusion IQ (XF/XRF/XRF2)
Page 1 of 1
2018-04-26
1-800-727-8520
www.hotronix.com
Place the new control board in the housing
bracket.
Install the 4 screws on the outside corners of
the control board.
Reconnect the 3-pin Temperature Probe
Connector to the depressing locking clip.
Reconnect the 2-pin Proximity Sensor to the top
2 wire pins on the depressing locking clip.
Fusion (Model XF)
Controller V4.5 & TRIAC Replacement
2015-03-08
Technical Assistance: 1-(800)-727-8520
Manuals: hotronix.com/heat-press-manuals
Page 1 of 17
Included Parts:
1. Controller
2. Controller Overlay
3. Temperature strips
4. Zip ties
5. TRIAC
6. Adapter Harness (older models only)
7. 9-Pin Connector (where applicable)
Required Tools:
8. Allen Wrenches (3/32” & 9/64”)
9. #2 Phillips Screwdriver
10. #1 Phillips Screwdriver
11. 2mm Precision Flathead Screwdriver
12. Scissors
13. Wire Cutters (9-pin repair only)
14. Wire Strippers (9-pin repair only)
15. Permanent Marker (9-pin repair only)
CAUTION: Detach power cord before
proceeding
1
2
3
4
5
6
7
8
9
10
11
12
13
14
15
Page 8 of 15
1. Required Tools: Paper Clip
2. CAUTION: Turn off power and detach power cord
3. Insert the Paper Clip into the small hole on either
side of the housing
4. Press in the Paper Clip until two clicks are heard:
the first click releases the Controller bezel and the
second click ejects it from the housing as shown
5. Repeat the process on the other side of housing
6. Remove the old Controller and insert the new
replacement Controller
7. Press on the two latch points with your thumb until
a click is heard; if the Controller bezel does not sit
flush with the housing plastic, it has not latched
8. Plug in and turn on heat press to verify function
Controller Replacement Guide
Fusion IQ (XF/XRF/XRF2)
Page 1 of 1
2018-04-26
1-800-727-8520
www.hotronix.com
Install the New Power Board

Reconnect the 3 Triac Wires Red,
Black, & White Wires to the Controller.
Reconnect the 3 Braided Cloth Heater
Wires to the controller.
Reconnect the ground wire and the 2 wires
from the On/O Switch to the controller.
Reconnect the 4-pin Strain Gauge Connector
to the Controller depressing locking clip.
Fusion (Model XF)
Controller V4.5 & TRIAC Replacement
2015-03-08
Technical Assistance: 1-(800)-727-8520
Manuals: hotronix.com/heat-press-manuals
Page 1 of 17
Included Parts:
1. Controller
2. Controller Overlay
3. Temperature strips
4. Zip ties
5. TRIAC
6. Adapter Harness (older models only)
7. 9-Pin Connector (where applicable)
Required Tools:
8. Allen Wrenches (3/32” & 9/64”)
9. #2 Phillips Screwdriver
10. #1 Phillips Screwdriver
11. 2mm Precision Flathead Screwdriver
12. Scissors
13. Wire Cutters (9-pin repair only)
14. Wire Strippers (9-pin repair only)
15. Permanent Marker (9-pin repair only)
CAUTION: Detach power cord before
proceeding
1
2
3
4
5
6
7
8
9
10
11
12
13
14
15
Page 9 of 15
1. Required Tools: Paper Clip
2. CAUTION: Turn off power and detach power cord
3. Insert the Paper Clip into the small hole on either
side of the housing
4. Press in the Paper Clip until two clicks are heard:
the first click releases the Controller bezel and the
second click ejects it from the housing as shown
5. Repeat the process on the other side of housing
6. Remove the old Controller and insert the new
replacement Controller
7. Press on the two latch points with your thumb until
a click is heard; if the Controller bezel does not sit
flush with the housing plastic, it has not latched
8. Plug in and turn on heat press to verify function
Controller Replacement Guide
Fusion IQ (XF/XRF/XRF2)
Page 1 of 1
2018-04-26
1-800-727-8520
www.hotronix.com

Fusion (Model XF)
Controller V4.5 & TRIAC Replacement
2015-03-08
Technical Assistance: 1-(800)-727-8520
Manuals: hotronix.com/heat-press-manuals Page 10 of 17
Plug in White & Black wires into Power
Switch on opposite sides of the divider as
shown to connect to Controller
Plug Green wire with Yellow band into IEC
outlet to connect to grounding circuit
Replace housing onto press and insert 4
#8-32 x ½” Thumb Screws (right 2 shown),
tightening with 9/32” Allen Wrench
Fusion (Model XF)
Controller V4.5 & TRIAC Replacement
2015-03-08
Technical Assistance: 1-(800)-727-8520
Manuals: hotronix.com/heat-press-manuals
Page 1 of 17
Included Parts:
1. Controller
2. Controller Overlay
3. Temperature strips
4. Zip ties
5. TRIAC
6. Adapter Harness (older models only)
7. 9-Pin Connector (where applicable)
Required Tools:
8. Allen Wrenches (3/32” & 9/64”)
9. #2 Phillips Screwdriver
10. #1 Phillips Screwdriver
11. 2mm Precision Flathead Screwdriver
12. Scissors
13. Wire Cutters (9-pin repair only)
14. Wire Strippers (9-pin repair only)
15. Permanent Marker (9-pin repair only)
CAUTION: Detach power cord before
proceeding
1
2
3
4
5
6
7
8
9
10
11
12
13
14
15
Page 10 of 15
1. Required Tools: Paper Clip
2. CAUTION: Turn off power and detach power cord
3. Insert the Paper Clip into the small hole on either
side of the housing
4. Press in the Paper Clip until two clicks are heard:
the first click releases the Controller bezel and the
second click ejects it from the housing as shown
5. Repeat the process on the other side of housing
6. Remove the old Controller and insert the new
replacement Controller
7. Press on the two latch points with your thumb until
a click is heard; if the Controller bezel does not sit
flush with the housing plastic, it has not latched
8. Plug in and turn on heat press to verify function
Controller Replacement Guide
Fusion IQ (XF/XRF/XRF2)
Page 1 of 1
2018-04-26
1-800-727-8520
www.hotronix.com
Fusion (Model XF)
Controller V4.5 & TRIAC Replacement
2015-03-08
Technical Assistance: 1-(800)-727-8520
Manuals: hotronix.com/heat-press-manuals Page 11 of 17
Replace Pressure Adjustment Knob, aligning
set screw with flat of shaft and tightening
with 3/32” Allen Wrench
Raise handle into open position, plug in
press and turn ON
Peel adhesive backing off of supplied
Overlay
Fusion (Model XF)
Controller V4.5 & TRIAC Replacement
2015-03-08
Technical Assistance: 1-(800)-727-8520
Manuals: hotronix.com/heat-press-manuals
Page 1 of 17
Included Parts:
1. Controller
2. Controller Overlay
3. Temperature strips
4. Zip ties
5. TRIAC
6. Adapter Harness (older models only)
7. 9-Pin Connector (where applicable)
Required Tools:
8. Allen Wrenches (3/32” & 9/64”)
9. #2 Phillips Screwdriver
10. #1 Phillips Screwdriver
11. 2mm Precision Flathead Screwdriver
12. Scissors
13. Wire Cutters (9-pin repair only)
14. Wire Strippers (9-pin repair only)
15. Permanent Marker (9-pin repair only)
CAUTION: Detach power cord before
proceeding
1
2
3
4
5
6
7
8
9
10
11
12
13
14
15
Page 11 of 15
1. Required Tools: Paper Clip
2. CAUTION: Turn off power and detach power cord
3. Insert the Paper Clip into the small hole on either
side of the housing
4. Press in the Paper Clip until two clicks are heard:
the first click releases the Controller bezel and the
second click ejects it from the housing as shown
5. Repeat the process on the other side of housing
6. Remove the old Controller and insert the new
replacement Controller
7. Press on the two latch points with your thumb until
a click is heard; if the Controller bezel does not sit
flush with the housing plastic, it has not latched
8. Plug in and turn on heat press to verify function
Controller Replacement Guide
Fusion IQ (XF/XRF/XRF2)
Page 1 of 1
2018-04-26
1-800-727-8520
www.hotronix.com
Replace Pressure Adjustment Knob, aligning
set screw with at edge of shaft and tightening
with the 1/8” Allen Wrench.

1. Required Tools: Paper Clip
2. CAUTION: Turn off power and detach power cord
3. Insert the Paper Clip into the small hole on either
side of the housing
4. Press in the Paper Clip until two clicks are heard:
the first click releases the Controller bezel and the
second click ejects it from the housing as shown
5. Repeat the process on the other side of housing
6. Remove the old Controller and insert the new
replacement Controller
7. Press on the two latch points with your thumb until
a click is heard; if the Controller bezel does not sit
flush with the housing plastic, it has not latched
8. Plug in and turn on heat press to verify function
Controller Replacement Guide
Fusion IQ (XF/XRF/XRF2)
Page 1 of 1
2018-04-26
1-800-727-8520
www.hotronix.com
Reconnect the Touch screen controller.
Fusion (Model XF)
Controller V4.5 & TRIAC Replacement
2015-03-08
Technical Assistance: 1-(800)-727-8520
Manuals: hotronix.com/heat-press-manuals
Page 1 of 17
Included Parts:
1. Controller
2. Controller Overlay
3. Temperature strips
4. Zip ties
5. TRIAC
6. Adapter Harness (older models only)
7. 9-Pin Connector (where applicable)
Required Tools:
8. Allen Wrenches (3/32” & 9/64”)
9. #2 Phillips Screwdriver
10. #1 Phillips Screwdriver
11. 2mm Precision Flathead Screwdriver
12. Scissors
13. Wire Cutters (9-pin repair only)
14. Wire Strippers (9-pin repair only)
15. Permanent Marker (9-pin repair only)
CAUTION: Detach power cord before
proceeding
1
2
3
4
5
6
7
8
9
10
11
12
13
14
15
Page 12 of 15
1. Required Tools: Paper Clip
2. CAUTION: Turn off power and detach power cord
3. Insert the Paper Clip into the small hole on either
side of the housing
4. Press in the Paper Clip until two clicks are heard:
the first click releases the Controller bezel and the
second click ejects it from the housing as shown
5. Repeat the process on the other side of housing
6. Remove the old Controller and insert the new
replacement Controller
7. Press on the two latch points with your thumb until
a click is heard; if the Controller bezel does not sit
flush with the housing plastic, it has not latched
8. Plug in and turn on heat press to verify function
Controller Replacement Guide
Fusion IQ (XF/XRF/XRF2)
Page 1 of 1
2018-04-26
1-800-727-8520
www.hotronix.com
Install the Touch Screen Controller
Press the two latch points with your thumb
until a click is heard; if the controller bezel
does not sit ush with the housing it is not
latched.
Plug in and turn on heat press to verify
function and calibrate the press.

When the press is at 350 degrees us the provided Temperature strips to check the actual temperature.
Fusion (Model XF)
Controller V4.5 & TRIAC Replacement
2015-03-08
Technical Assistance: 1-(800)-727-8520
Manuals: hotronix.com/heat-press-manuals
Page 1 of 17
Included Parts:
1. Controller
2. Controller Overlay
3. Temperature strips
4. Zip ties
5. TRIAC
6. Adapter Harness (older models only)
7. 9-Pin Connector (where applicable)
Required Tools:
8. Allen Wrenches (3/32” & 9/64”)
9. #2 Phillips Screwdriver
10. #1 Phillips Screwdriver
11. 2mm Precision Flathead Screwdriver
12. Scissors
13. Wire Cutters (9-pin repair only)
14. Wire Strippers (9-pin repair only)
15. Permanent Marker (9-pin repair only)
CAUTION: Detach power cord before
proceeding
1
2
3
4
5
6
7
8
9
10
11
12
13
14
15
Page 13 of 15
1. Required Tools: Paper Clip
2. CAUTION: Turn off power and detach power cord
3. Insert the Paper Clip into the small hole on either
side of the housing
4. Press in the Paper Clip until two clicks are heard:
the first click releases the Controller bezel and the
second click ejects it from the housing as shown
5. Repeat the process on the other side of housing
6. Remove the old Controller and insert the new
replacement Controller
7. Press on the two latch points with your thumb until
a click is heard; if the Controller bezel does not sit
flush with the housing plastic, it has not latched
8. Plug in and turn on heat press to verify function
Controller Replacement Guide
Fusion IQ (XF/XRF/XRF2)
Page 1 of 1
2018-04-26
1-800-727-8520
www.hotronix.com
Calibrate The Temperature
Set the Press temperature to 350 Degrees
Cut the Provided strips into
2 sections Use 1 of the 2 strips
Place the strip in the center of your
platen and press for 10 seconds at
Medium pressure.
The temperature strip will darken
on the bar indicating the actual
temperature your press is heated to.

You will need to be in the manager setting to access the calibration menu. Select the person Icon choose
manager and enter the password. (M) Then select the gear icon and choose calibration.
Fusion (Model XF)
Controller V4.5 & TRIAC Replacement
2015-03-08
Technical Assistance: 1-(800)-727-8520
Manuals: hotronix.com/heat-press-manuals
Page 1 of 17
Included Parts:
1. Controller
2. Controller Overlay
3. Temperature strips
4. Zip ties
5. TRIAC
6. Adapter Harness (older models only)
7. 9-Pin Connector (where applicable)
Required Tools:
8. Allen Wrenches (3/32” & 9/64”)
9. #2 Phillips Screwdriver
10. #1 Phillips Screwdriver
11. 2mm Precision Flathead Screwdriver
12. Scissors
13. Wire Cutters (9-pin repair only)
14. Wire Strippers (9-pin repair only)
15. Permanent Marker (9-pin repair only)
CAUTION: Detach power cord before
proceeding
1
2
3
4
5
6
7
8
9
10
11
12
13
14
15
Page 14 of 15
1. Required Tools: Paper Clip
2. CAUTION: Turn off power and detach power cord
3. Insert the Paper Clip into the small hole on either
side of the housing
4. Press in the Paper Clip until two clicks are heard:
the first click releases the Controller bezel and the
second click ejects it from the housing as shown
5. Repeat the process on the other side of housing
6. Remove the old Controller and insert the new
replacement Controller
7. Press on the two latch points with your thumb until
a click is heard; if the Controller bezel does not sit
flush with the housing plastic, it has not latched
8. Plug in and turn on heat press to verify function
Controller Replacement Guide
Fusion IQ (XF/XRF/XRF2)
Page 1 of 1
2018-04-26
1-800-727-8520
www.hotronix.com
If the temperature of the press is dierent than you have it set for follow
these steps to calibrate your temperature.
To Calibrate the temperature.
1.Choose Temperature Calibration 2. Adjust the Calibration Temperature
to the actual temperature on the test
strip.
3. After setting the calibration
temperature tap the check to save
the calibration.
Return to the main menu while the temperature adjusts and test again at 350 degrees to
conrm the calibration was successful.

Fusion (Model XF)
Controller V4.5 & TRIAC Replacement
2015-03-08
Technical Assistance: 1-(800)-727-8520
Manuals: hotronix.com/heat-press-manuals
Page 1 of 17
Included Parts:
1. Controller
2. Controller Overlay
3. Temperature strips
4. Zip ties
5. TRIAC
6. Adapter Harness (older models only)
7. 9-Pin Connector (where applicable)
Required Tools:
8. Allen Wrenches (3/32” & 9/64”)
9. #2 Phillips Screwdriver
10. #1 Phillips Screwdriver
11. 2mm Precision Flathead Screwdriver
12. Scissors
13. Wire Cutters (9-pin repair only)
14. Wire Strippers (9-pin repair only)
15. Permanent Marker (9-pin repair only)
CAUTION: Detach power cord before
proceeding
1
2
3
4
5
6
7
8
9
10
11
12
13
14
15
Page 15 of 15
1. Required Tools: Paper Clip
2. CAUTION: Turn off power and detach power cord
3. Insert the Paper Clip into the small hole on either
side of the housing
4. Press in the Paper Clip until two clicks are heard:
the first click releases the Controller bezel and the
second click ejects it from the housing as shown
5. Repeat the process on the other side of housing
6. Remove the old Controller and insert the new
replacement Controller
7. Press on the two latch points with your thumb until
a click is heard; if the Controller bezel does not sit
flush with the housing plastic, it has not latched
8. Plug in and turn on heat press to verify function
Controller Replacement Guide
Fusion IQ (XF/XRF/XRF2)
Page 1 of 1
2018-04-26
1-800-727-8520
www.hotronix.com
To Calibrate the Pressure
As Manger select the gear icon and choose calibration.
1.Choose Platen Pressure
Calibration
2. Tap the Calibrate Option to begin.
Pressure and a box will appear with 2.5v
on the display.
3. When you lock your press handle down
the v number will change. You will need to
manually adjust the pressure and lock the
press down until it is set to 2.6v when closed.
Then tap set Min Point.
The screen will prompt you that calibration is complete. You can return to the main menu
and start using your press.
4. After setting the Min Point increase the
pressure knob to set the max point you
want 2.9v to display when the press is
closed.
Then tap set Max Point.
This manual suits for next models
2
Table of contents
Other Stahls Hotronix Heater manuals

Popular Heater manuals by other brands

KING
KING KBP2406 Installation & maintenance manual

Superior Radiant
Superior Radiant SRP STEALTH Installation, operation and service instructions

Heator
Heator HEATOR R 271 C datasheet

Zibro
Zibro Kamin SRE 186 operating manual

GAME
GAME SolarPRO CONTOUR 4714 owner's manual

Somogyi Elektronic
Somogyi Elektronic home FK 31 instruction manual


