Star Progetti SC25000 User manual

Owner’s Manual
SC25000
Unpacking
After unpacking the unit, carefully inspect unit for any damage that may have
occurred during
transit. Check for any loose, missing, or damaged parts.
Specifications
Please read and save these instructions. Read carefully before attempting to assemble,
install, oper- ate or maintain the product described.
Protect yourself and others by observing all safety information. Failure to comply with
instructions could result in personal injury and / or property damage! Retain instructions for
future reference.
Portable
Air
Conditioners
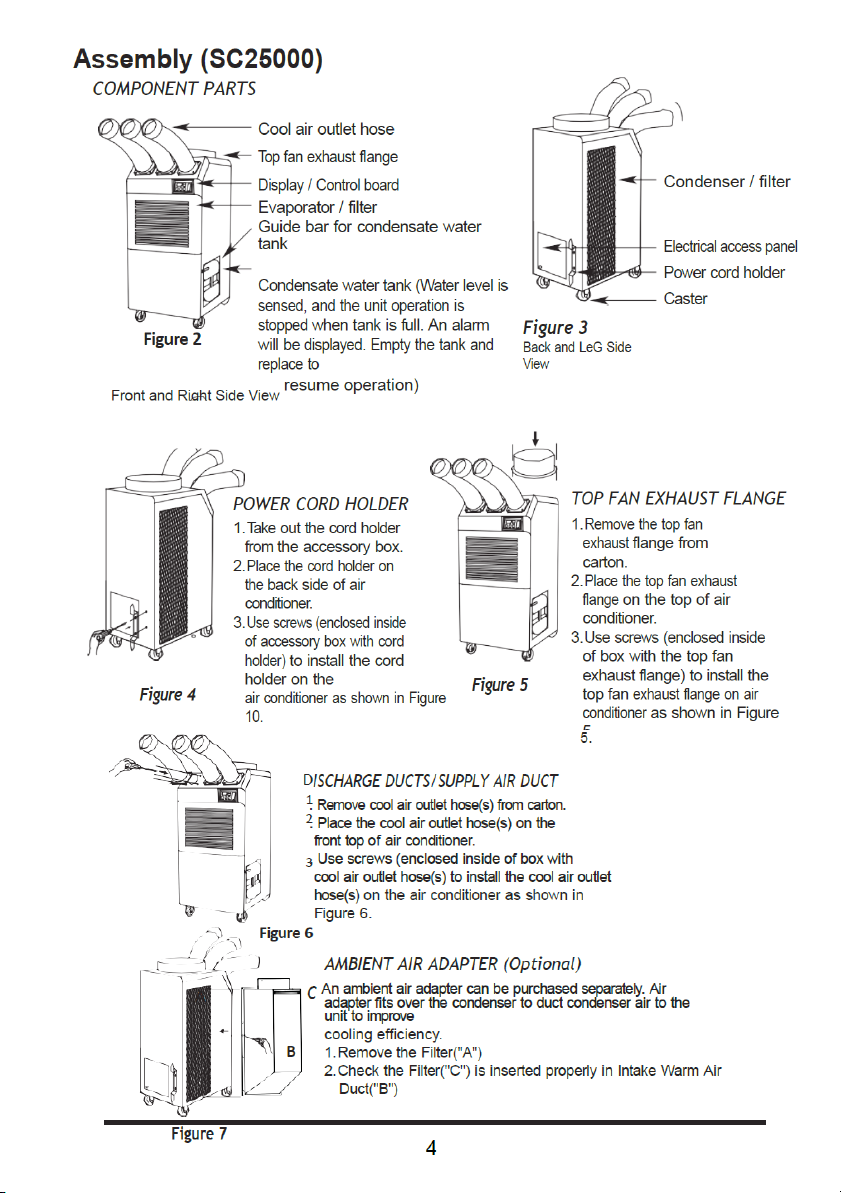
Description
STAR PROG TTI Portable Air Conditioners feature spot
cooling for large areas where cooling of the entire area is not
practical. A dedicated spot cooling thermostat controls the unit
in this application.
These air conditioners can also be used in smaller areas for
room
cooling.
A control panel provides ease of use and contains a self-diag-
nostic function and display, showing operating modes, room
and
set temperatures, and faults.
If an abnormal operation occurs, a visual display of the fault is
shown. Caster wheels are included for easy portability. Suitable
applications include: a factory or work place, computer room,
emergency cooling, etc.
SC25000
Figure
Model Coolling Capacity Refrigerant Alettrical supply Rated current
Amps
Power
consumption
Watt
SC25000 25.000 BTU R410A 230V,1phase 12,6 A 2,9 KW
(7.3Kw) (1.18kg) 50hz
Model Depth / Width/
Height/ Weight
Fan speeds Air flow (high/low)
Noise level at 3m
(high/low)
Operating
range
SC25000 561 / 747 / 1202 2 650 / 580 CFM B LOW 50 dBA 18~45°C
(mm) / 96 kg
1

Please read this manual carefully for instructions on correct installation and usage. Please
read
all safeguards.
1.
Transport and store the unit in an upright position only. Leave unit in an upright position
for at
least 3 hours before first use.
2. Always place the unit on an even, level surface.
3. nsure the unit is connected to a grounded power supply of the correct rating
/
capacity.
4.
The unit will cool when the room temperature is between 18°C (64°F) ~ 45°C(113°F)
depend-
ing on the thermostat setting.
5. DO NOT use this unit for functions other than those described in this instruction
manual.
6. DO NOT tilt the unit.
7. DO NOT cover or obstruct the unit’s inlet and outlet grilles.
8. DO NOT use the unit in areas where it will be exposed to rain or water.
9. N V R unplug the unit while it is operating.
Owner’s ManualSC25000
“Original instructions
General
Safety Information
WARNING:
WARNING:
2
SC25000
14.
DO NOT use the plug to start and to stop the unit. Always use the control panel to start
and
to stop the unit.
15. Always turn off the unit when it is not in use and unplug the power plug from the
electrical outlet.
16.
Always turn the unit off and unplug the main power plug from the electrical outlet before
cleaning, moving or performing maintenance.
17.
AVOID the use of adapter plugs or extension cords. If it is necessary to use an
extension cord
or an adapter plug to operate the unit, ensure that they are correctly
rated for the applica-
tion. Consult a local qualified lectrician and all local electrical
codes to ensure proper setup.
Any extension cord used with this device must be
rated for a minimum of 13A, 230V.
18.
DO NOT unplug the unit by pulling on the electrical cord. Keep electrical cord away from
heat sources and always completely unroll the cord to avoid overheating. If the
.
DO NOT operate the unit in explosive or flammable
environments.
10. DO NOT place any foreign objects on the unit.
11. DO NOT operate the unit with wet or damp hands.
12. DO NOT allow chemical substances to come into contact with the unit.
13.
DO NOT operate the unit in the presence of flammable substances or apors such as
alcohols,
pesticides, gasoline, etc.
DO NOT use the unit in wet environments, such as a laundry
room, to avoid
the risk of electrical shock.

19.The filters must be used with the product at all times. When the filters are removed
for
clean- ing, always ensure that the unit has been turned off and unplugged from the
electrical outlet.
20.Regularly clean the filters to maintain efficiency. If the filters are not cleaned
regularly,
the units output performance and efficiency will decline and energy consumption will
increase.
21.DO NOT operate the unit with a damaged power cord or plug, after it malfunctions,
has
been dropped or damaged.
22.Only use in the upright position on an even, flat surface. Unit must be positioned at
least 24 inches (60 cm) from the nearest object in any direction.
23.Stop operation immediately if abnormal noise or odor is noticed. Contact a local
service center.
24.This appliance is not intended for use by persons (including children) with reduced
physical, sensory or mental capabilities, or lack of experience and knowledge, unless
they have been given supervision or instruction concerning use of the appliance by a
person responsible for their safety.
25.This appliance can be used by children aged from 8 years and above and persons
with re duced physical, sensory or mental capabilities or lack of experience and
knowledge if they have been given supervision or instruction concerning use of the
appliance in a safe way and understand the hazards involved. Children shall not play
with the appliance. Cleaning and user maintenance shall not be made by children
without supervision.
26.The appliance shall be installed in accordance with national wiring regulations.
27.If the supply cord is damaged, it must be replaced by the manufacturer, its service
agent or similarly qualified persons in order to avoid a hazard.
28.This appliance is intended to be used by expert or trained users in shops, in light
industry and on farms, or for commercial use by lay persons..
SAVE HESE INS RUC IONS
SC25000
DO NOT operate a unit with a damaged power
cord..
WARNING :
3
4
※ Replaceable Fuse Rating
-
FUSE 1, 2 : 3.15A
/
250V, 20 50mm, Equivalent
Do not use de unit with a temperature lower than 18°C(64°F) or
higher than 45°C(113°F)
SC25000
OPERA ION
CONTROL PAN L
5
6
2 3 4
6
87
Figura 8 1
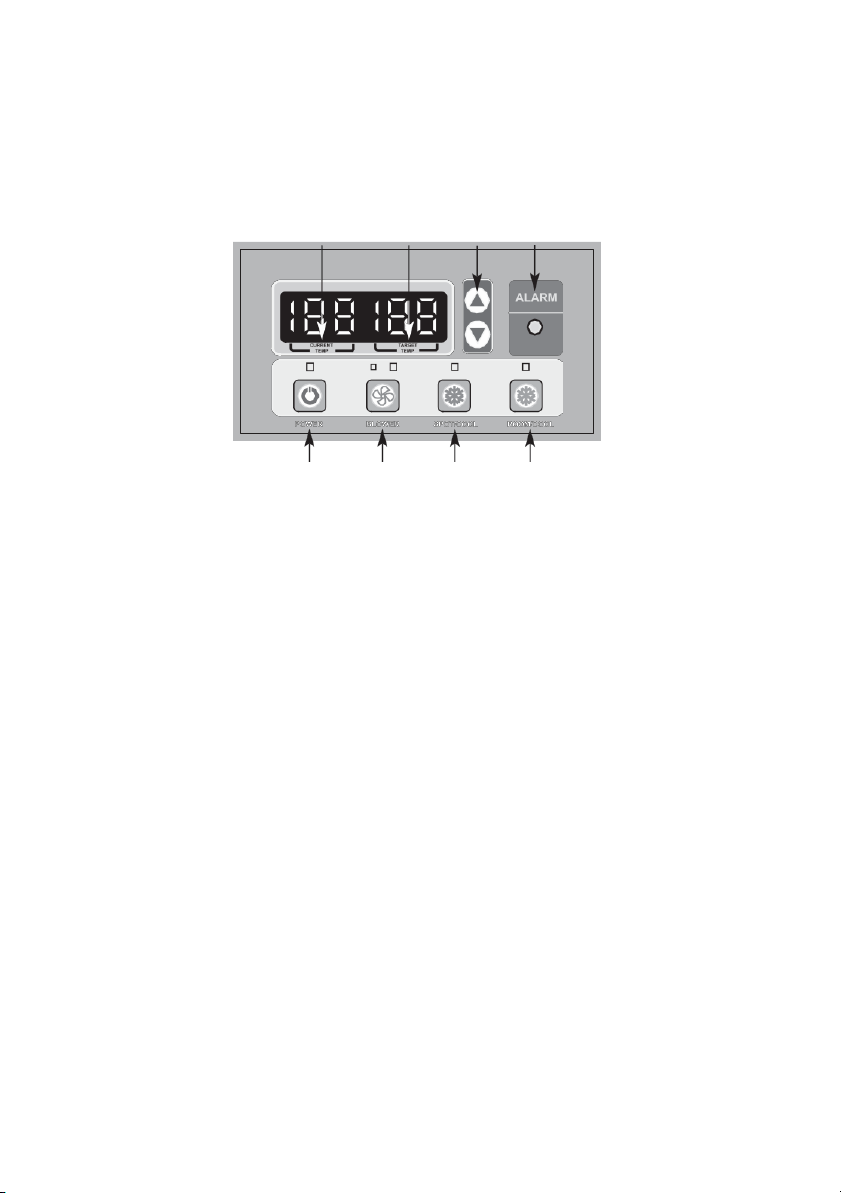
POW R BUTTON: Activates unit when POW R BUTTON is pressed. (Fan starts on low speed). If
power button is pressed during operation, unit stops.
BLOW R BUTTON: Changes fan speed from (Low) to (High) when pressed.
SPOT/COOL BUTTON: Activates compressor and begins producing cool air 5 seconds after
button
is pressed. Regulates temperature based on outlet cool air temperature.
ROOM/COOL BUTTON: Activates compressor and produces cool air 5 seconds after button is
pressed. Regulates temperature based on inlet ambient air temperature.
S T T MP BUTTONS: Change target temperature/data value by +/- 1. Change data value by +/-
10 by pressing continually. Press the S T T MP BUTTONS to set temperature. Upper button is
to
heighten temperature and Lower button is to lower temperture.
ALARM: Alarm indicator lights (blinks) and indicates abnormal system operation. If Alarm
occurs,
compressor stops.System operation stops when ALARM light is activated (blinks) longer
than 3
minutes.
CURR NT T MP: Displays current room temperature in display in Celsius. (In Room Cool Mode
only). SPOT/COOL Mode – Displays outlet (cool air) temperature during normal operations. In
order to change °C to °F, press SPOT/COOL and ROOM/COOL buttons together for 2 seconds.
F
will blink 2 times and Figure will change to °F. ALARM codes blink and are displayed when
abnormal operation occurs.
TARG T T MP: displays the unit set temperature for ROOM/COOL mode only.
OFF-TIMER:
Enter to Timer Setting Mode if you press BLOWER Button and
SPOT/COOL Button together for1 seconds. Press UP/DOWN Button to set the
timer until it shows the figure you want to set. After 5 seconds,the figure will be
memorized and the compressor will stop after the time set.
AUTO RESTART:
If the
unit goes off due to an electrical interruption, the unit will automatically
restart
when the power resumes.
MAIN ENANCE
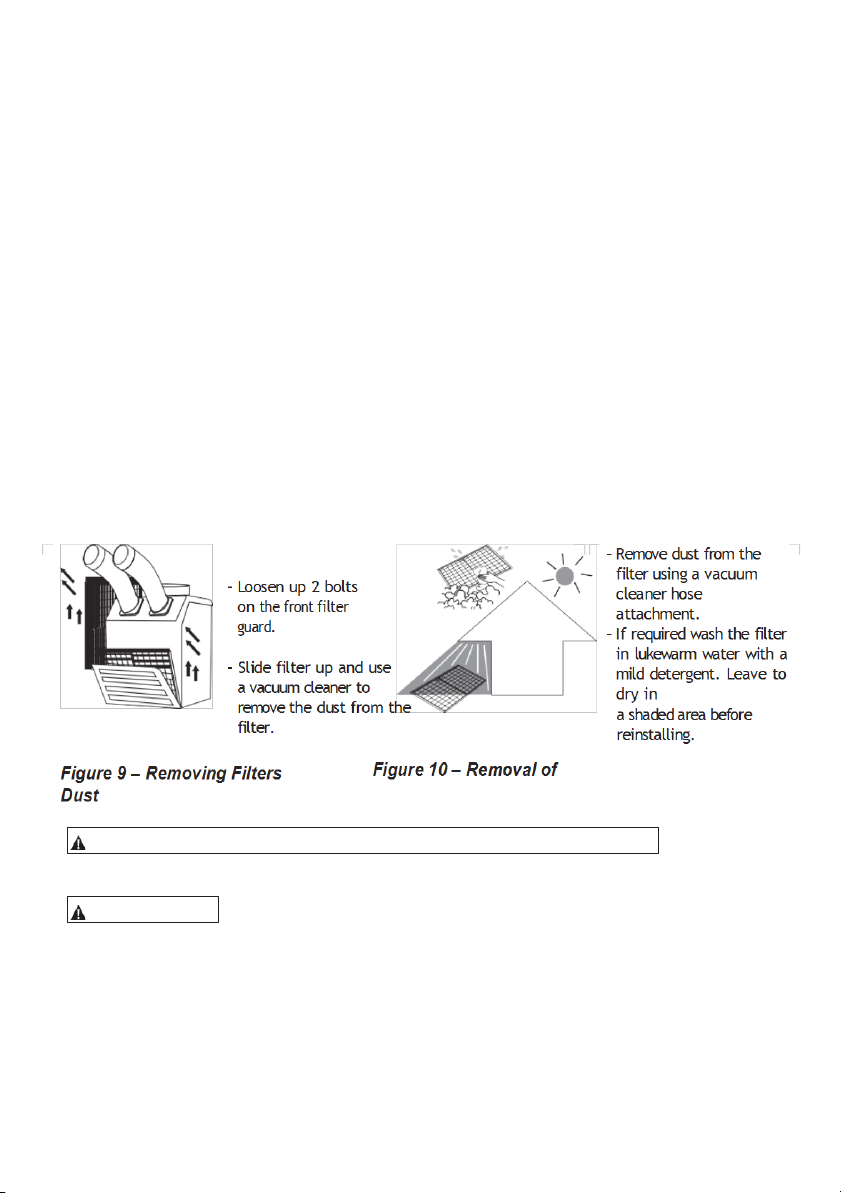
FILT R CL ANING
(See Figures 9 and 10)
1. There are two filters in the unit. The evaporator filter is located at the front of the
unit. The condenser filter is located at the side of the unit.
2. loosen up 2 bolts on the front filter guard.
3. Slide filter up and use a vacuum cleaner to remove the dust from the filter.
4. If the filter is heavily covered with dust and dirt, warm water and mild soap or
neutral deter-
gent may be used to wash the filter. Do not use any other chemicals to
clean filter, as they will
likely damage the filter.
5. Dry the filter in a shaded area before replacing it. Do not operate the unit
without the filter installed and the filter guard in the closed position.
6. Replace the clean filter and close the filter guard.
7. To clean the condenser filter, lift up on the side filter from the middle bar slightly
and then angle the filter outwards from the bottom and remove.
8. Use the same cleaning procedure as above (3 – 5).
9. To replace the condenser filter, place the top of the filter in the guide and slide
the filter up until the bottom of the filter clears the frame. Then push the bottom
of filter into the guide and let filter gently fall inside the guide.
NOT : For effective cooling clean the filter at least every 2 weeks.
-For your convenience, record the complete model number and product name (located on the
Product Identification Plate), the purchase date, purchase location, serial number, and warran-
ty period in the table below.
- Also, attach your purchase receipt as proof of purchase to this instruction manual for future
reference.
- To ensure your product is covered by warranty, the complete faulty product along with your
original purchase receipt must be provided at the place of purchase.
WARNING:
7
WARNING: Do not operate without the filter fitted.
SC25000
Do not operate the unit with a damaged cord or plug, a ter the unit mal unc-
tions, or i the unit has been dropped or damaged.

SC25000
Maintenance (Continued)
To ensure your product is covered by warranty, the complete faulty product along with
your original purchase receipt must be provided at the place of purchase..
Product Portable Air Conditioner
Modello No. __________________________
Date of Purchase ---------------------------------------
Place of Purchase --------------------------------------
Serial No.----------------------------------------------------
Periodo of Warranty _ _ _ _ _ _ _ _ _ _ _ __ _ _
Customer: Please read and keep
this manual for future reference
and keep sales receipt as proof of
purchase.
CS LF-DIAGNOSTIC
COD S (See Table 1)
The alarm light is activated if abnormal operation occurs, and a code is displayed on
the control panel. The compressor and condenser fan motor will stop operating. The
evaporator fan will continue to run for 3 minutes. If the fault is rectified within 3 minutes,
the unit will resume oper- ation. If the fault persists for more than 3 minutes, the
evaporator fan also stops. The fault must be rectified before the unit can resume
normal operation..
8
SPRING R PLAC M NT (See Figure 11)
There are two springs on the rear of condensate
water tank guide.
1.Release the screw on the spring hook.
2.Take off the spring hook, and then pull out the
opposite spring hook from hole in the condensate
water tank guide.
3.Replace with a new spring in reverse order.
4.Repeat this cycle for the other spring.
Figure 11 – The process o
spring replaccement

9

Wiring Diagram
Figure 2 - Circuit Wiring Diagram (SC25000)
Reset
Fig.13 10
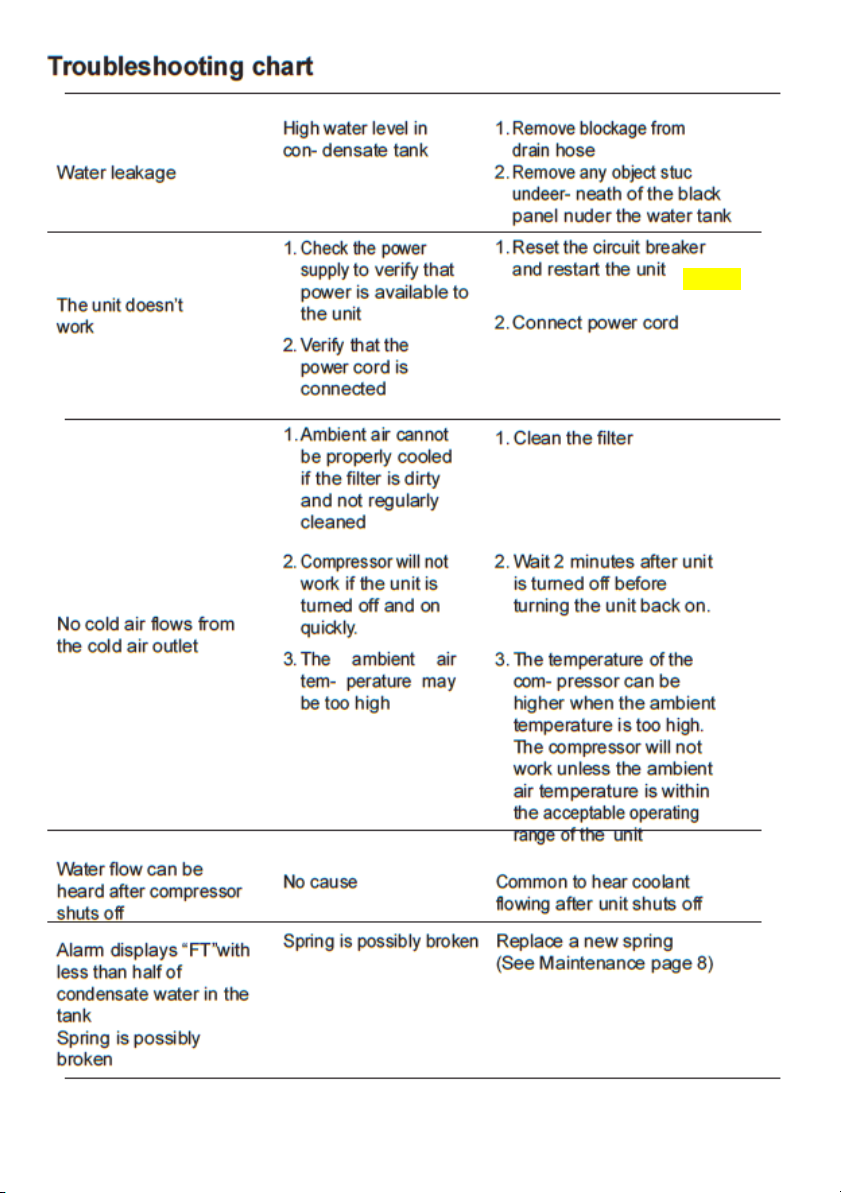
Fig.13
11

STAR PROGETTI Tecnologie Applicate SpA
Via Cassino D’Alberi 17 - 20067 TRIBIANO (MI) -
ITALY Tel +39/02/90639261 Fax +39/02/90639259
www.starprogetti.com info@starprogetti.com
www.starprogetti.com info@starprogetti.com
d 012019
SC25000
LIMITED WARRANTY
STAR PROGETTI ONE-YEAR LIMITED WARRANTY. STAR PROGETTI PORTABLE AIR CONDITIONERS, MODELS COVERED IN THIS
MANUAL, ARE
WARRANTED BY STAR PROGETTI TO THE ORIGINAL USER AGAINST DEFECTS IN WORK MANSHIP OR MATERIALS UNDER NORMAL USE
FOR ONE YEAR AFTER DATE OF PURCHASE. ANY PART WHICH IS DETER- MINED TO BE DEFECTIVE IN MATERIAL OR WORKMANSHIP
AND RETURNED TO AN AUTHORIZED SERVICE LO-
CATION, STAR PROGETTI DESIGNATES, SHIPPING COSTS PREPAID, WILL BE, AS THE
EXCLUSIVE REMEDY, REPAIRED OR REPLACED BY STAR PROGETTI OPTION. FOR LIMITED WARRANTY CLAIM PROCEDURES, SEE “PROMPT
DISPOSITION BELOW. THIS LIMITED WARRANTY GIVE PURCHASERS SPECIFIC LEGAL RIGHTS WHICH VARY FROM JURISDICT-
ION TO
JURISDICTION.
LIMITATION OF LIABILITY. TO THE EXTENT ALLOWABLE UNDER APPLICABLE LAW, STAR PROGETTI LIABILITY FOR CON-
SEQUENTIAL AND
INCIDENTAL DAMAGES IS EXPRESSLY DISCLAIMED. STAR PROGETTI LIABILITY
IN ALL EVENTS IS LIMITED TO AND SHALL NOT EXCEED THE PURCHASE PRICE PAID.
WARRANTY DISCLAIMER. A DILIGENT EFFORT HAS BEEN MADE TO PROVIDE PRODUCT INFORMATION AND
ILLUSTRATE THE PRODUCTS
IN THIS LITERATURE ACCURATELY; HOWEVER, SUCH INFORMATION AND ILLUSTRA- TIONS ARE FOR THE SOLE PURPOSE OF IDENTIFICATION, AND
DO NOT EXPRESS OR IMPLY A WARRANTY THAT THE PRODUCTS ARE MERCHANTABLE, OR FIT FOR PARTICULAR PURPOSE, OR THAT THE
PRODUCTS WILL NEC- ESSARILY CONFORM TO THE ILLUSTRATIONS OR DESCRIPTIONS. EXCEPT AS PROVIDED BELOW, NO WARRANTY
OF
AFFIRMATION OF FACT, EXPRESSED OR IMPLIED, OTHER THAT AS STATED IN THE “LIMITED WARRANTY
ABOVE IS MADE OR
AUTHORIZED BY STAR PROGETTI.
Technical Advice and Recommendations, Disclaimer. Notwithstanding any past practice or dealings or trade
custom, sales
shall not include the furnishing of technical advice or assistance or system design. STAR PROGETTI as- sumes no
obligations or liability on account of any unauthorized recommendations, opinions or advice as to
the choice,
installation or use of products.
Product Suitability. Many jurisdictions have codes and regulations governing sales, construction, installation,
and/or use of
products for certain purposes, which may vary from those in neighboring areas. While attempts are made to
assure that STAR PROGETTI products comply with such codes, STAR PROGETTI cannot guarantee compliance, and
cannot be responsible for how the product is installed or used. Before purchase and use of a product, review the
product applications, and all applicable national and local codes and regulations, and be sure that the
product,
installation, and use will comply with them.
Certain aspects of disclaimers are not applicable to consumer products; e.g., (a) some jurisdictions do not allow
the exclusion or limitation of incidental or consequential damages, so the above limitation or exclusion
may not
apply to you; (b) also, some jurisdictions do not allow a limitation on how long an implied warranty
lasts, consequently
the above limitation may not apply to you; and (c) by law, during the period of this Limited Warranty, any implied
warranties of implied merchantability or fitness for a particular purpose applicable to
consumer products purchased
by consumers, may not be excluded or otherwise disclaimed.
Prompt Disposition. A good faith effort will be made for prompt correction or other adjustment with the
respect to any
product which proves to be defective within limited warranty. For any product believed to be
defective within
limited warranty, first write or call dealer from whom the product was purchased. Dealer
will give additional directions.
If unable to resolve satisfactorily, write to STAR PROGETTI at the address below, giving dealer’s name, address,
date, and number of dealer’s invoice, and describing the nature of the defect. Title
and risk of loss pass to buyer on
delivery to common carrier. If product was damaged in transit to you, file claim with carrier.
Table of contents
Other Star Progetti Air Conditioner manuals


Popular Air Conditioner manuals by other brands


Daikin
Daikin RXF20D5V1B Installer's reference guide

Hisense
Hisense AVWT-76FKFSHA Technical handbook

Midea
Midea MB-09N8D6-i installation guide

nvent
nvent SPECTRACOOL G28 Series instruction manual
-P GAA installation manual")
Mitsubishi Electric
Mitsubishi Electric PU(H)-P GAA installation manual

Sanyo
Sanyo SPW-K075XH Specification sheet