star sat SR-X1000HD Premium User manual

NXP HD I 1
Content
Safety Precaution ...........................................................................................2
1. Reference
1.1 General Features .............................................................................3
1.2 Accessories .....................................................................................4
2. Basic Function
2.1 Front Panel ......................................................................................5
2.2 Rear Panel ......................................................................................6
2.3 Remote Control Unit ........................................................................7
3. Installation and Connection
3.1 Connecting to TV ............................................................................9
3.2 Connecting to Dish LNB .................................................................10
4. Installation and Operation
4.1 Installation .....................................................................................12
4.2 Channel manager .........................................................................18
4.3 System setting ..............................................................................19
4.4 Game .............................................................................................20
4.5 USB ...............................................................................................23
4.6 CA Menu .......................................................................................27
4.7 Other Useful Information .............................................................. 27
5. Additional Information
5.1 Problem Solving .......................................................................... 32
5.2 Technical Specification ................................................................33
5.3 Menu Screen Structure.................................................................35
5.4 Glossary .......................................................................................36

NXP HD I 2
Safety Precaution
This STB has been designed and manufactured to satisfy the international
safety standards. Please read the following safety precautions carefully
before operating this receiver.
Main Supply:
Before operating, please check the units operating voltage is 90~250V AC
50/60Hz.
Overload:
Do not overload a wall outlet, extension cord or adapter, neither use
damaged power cord or touch it with wet hand as this may result in electric
shock.
Liquid:
The receiver shall not be exposed to dripping or splashing water, and that no
objects filled with liquids, such as base, shall be placed on the apparatus.
Ventilation:
Keep the slots on top of the receiver uncover to allow sufficient airflow to the
unit. Do not put the receiver on soft furnishings or carpets. Do not expose the
receiver to direct light or do not place it near a heater or in humid conditions.
Do not stack other electronic equipments on top of the receiver.
Cleaning:
Plug out the receiver from the wall outlet before cleaning. Clean the receiver
by a soft cloth or mild solution of washing-up liquid (no solvents).
Connection:
Disconnect the receiver from the mains when you connect it to satellite LNB
or disconnect it from LNB. Failure would possibly cause damage to the LNB.
Location:
Put the receiver indoor in order to avoid lightening, raining or sunlight.
Uncover:
Do not remove the cover, to reduce the risk of electric shock. Contact
qualified and licensed service personnel to repair the receiver, or contact
your dealer.

NXP HD I 3
1. Reference
1.1 General Features
DVB-S/DVB-S2 Satellite Compliant (MPEG-II/ MPEG-IV/ H.264)
SCPC & MCPC receivable from Ku and C band satellites
Universal, Single, Single S & C Band Wideband LNB
Sensitive Tuner with Loop-Through
DiSEq C 1.0/1.1/1.2/1.3 (USALS)
Unicable Supported
Blind search supported.
Multi satellite search, network search, PID search, manual search and
Multi-TP Search
Fast Scan on Astra (19.2)
Auto DiSEqC Search
PAL/SECAM/NTSC Conversion
Variable aspect ratio (4:3,16:9)with PAN& SCAN vector or letter BOX option
Output Resolution: 480p&480i,576p & 576i, 720p&1080i50Hz,720p
&1080i60Hz
True full Color (32 bits)on screen display (OSD)
Storing memory: 100 satellite, 4000 transponders and 10000 channels
Supported satellite add, delete, move, rename
Supported transponder add, delete, edit
8 favorite group and parental lock supported.
Supported programmed lock, delete, move, rename.
Supported multi-language menu
Supported list of programmers, have six sort function:
Easy functions such as Group Move/ Recall History
Multi-language audio.
Multi-language DVB Subtitle output
7 days Electronic Program Guide (EPG)
Teletext output through VBI and OSD.
Multi-Picture supported
Software (data, kernel and file system) upgrade through USB or Ethernet
USB 2.0 Interface

1.2 Accessories
Users manual
Batteries
Remote Control Unit
A/V Cable
HDMI Cable
NXP HD I 4
Figure 1.Accessories
2. Basic Function
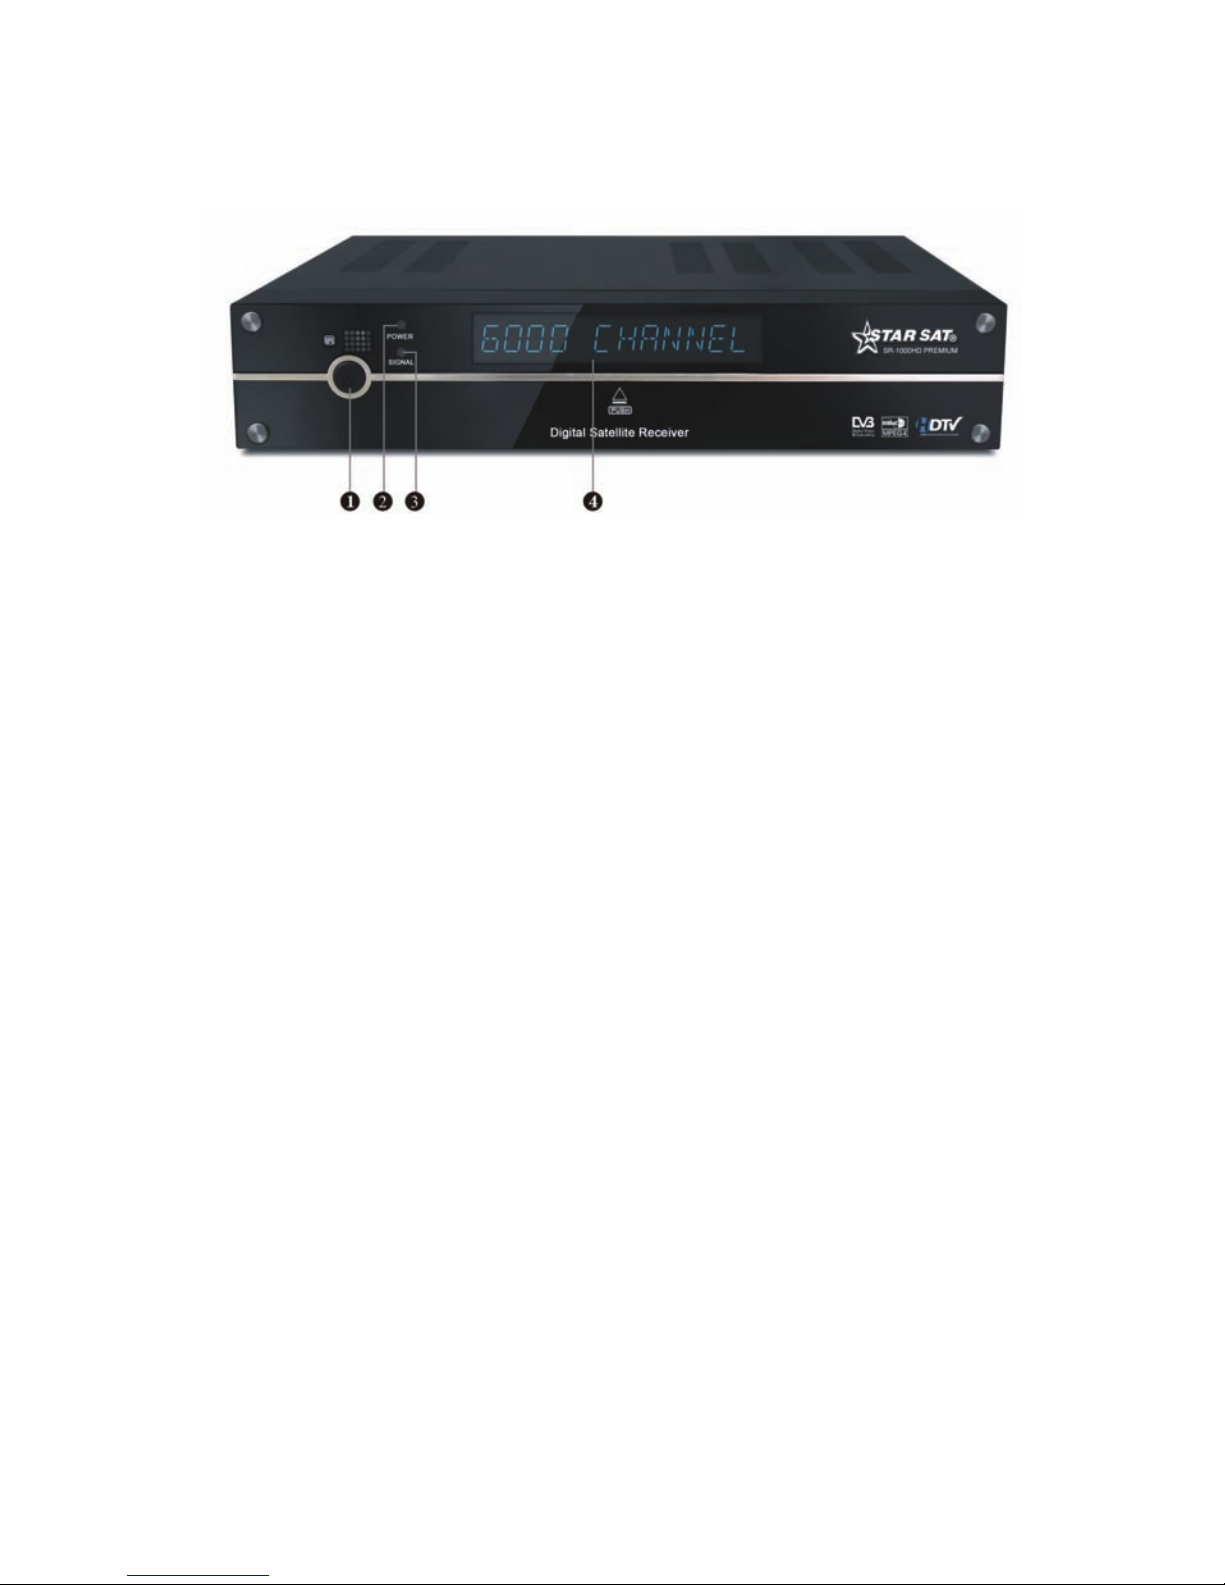
2.1 Front Panel
Figure 2. Front Panel
1. Power Button
The POWER button is used to turn the power on or to make it on Standby Mode.
2. Power LED
Power indicator.
3. Signal LED
Signal indicator.
4. Display(VFD)
The VFD displays channel information. In Standby mode the VFD displays local
NXP HD I 5
2.2 Rear Panel
Figure 3. Rear Panel
1. LNB IN
Connect the Satellite Dish LNB.
2. LOOP OUT
Output the Dish LNB IN signal.
3. RS232
Connect to serial port of PC for software upgrade.
4. TV SCART,
Connect to TV set with Scart cables.
5. AUDIO, VIDEO
Connect to Audio/Video of TV. Connect Yellow to Video port, connect Red
and White to Audio Right and Audio Left.
6. S/PDIF
Digital Audio output.
7. HDMI
HD signal output
8. LAN
LAN for Ethernet.
9. USB2.0
One USB 2.0 Host Port.
NXP HD I 6
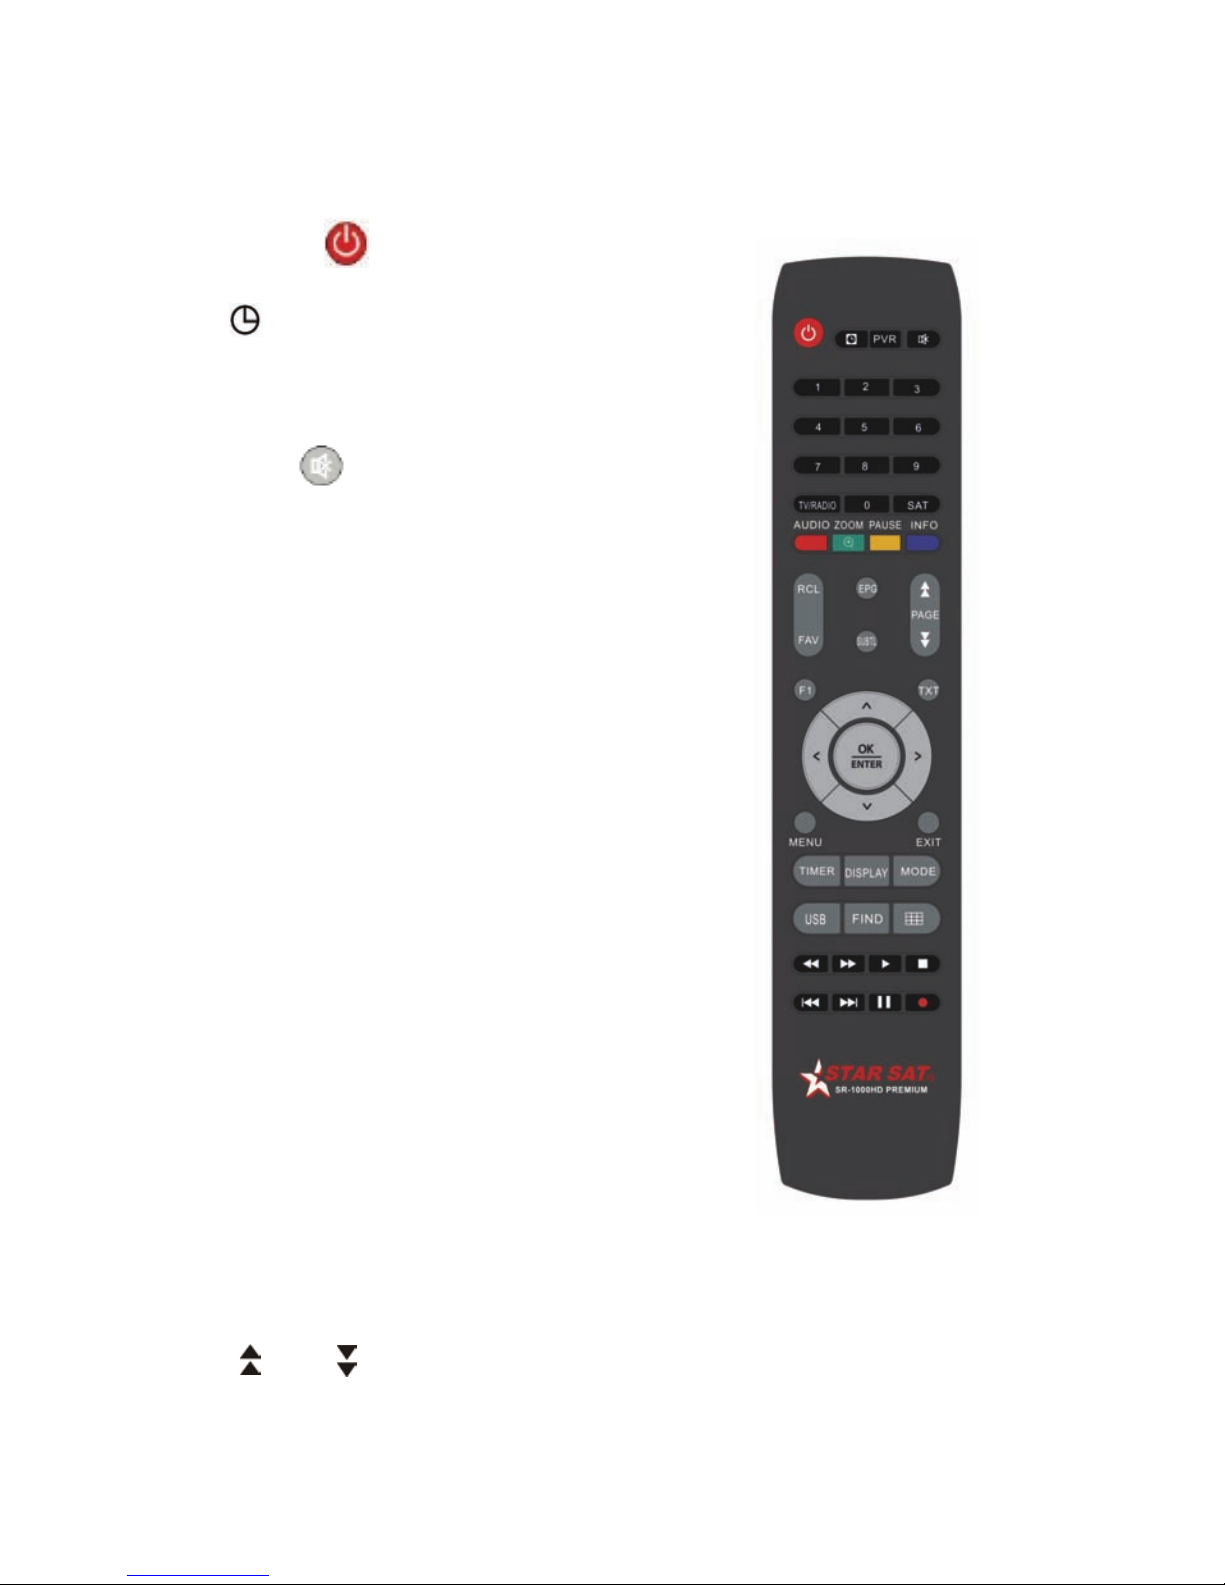
2.3 Remote Control Unit(RCU)
You can control this receiver by this remote controller with full function.
1. POWER :
Swith the receiver on or off.
2. :
Setting the time for turning the receiver off.
3.PVR
Enter into recoding information.
4.MUTE : Turn
The sound On/Off.
5. NUMERIC KEY (0~9):
Change program or input number.
4. TV/RADIO:
Switch between TV and RADIO.
5. SAT:
Show the scanned satellite list.
6. AUDIO :
Select or change the Audio.
7.ZOOM:
Picture Zooming function.
8. PAUSE:
Freeze the picture.
9. INFO (i):
Show the information of the current channel.
Press EXIT button to exit this menu.
10. RECALL:
Move to the previous viewed channel.
11. FAV:
To get favorite channel list you set before.
12. EPG (Electronic Program Guide):
Show the TV/Radio program guide. Figure 4. Remote Control Unit
13.SUB: Subtitle.
14. PAGE :
Change page up or down
NXP HD I 7

15. F1 :No function.
16. TXT:
show the teletext content if teletext is transmitted.
17. CH +/-:
Change program.
18. VOL +/-:
Change volume in viewing mode.
19. OK:
Confirm the highlighted menu item.
Open the program list.
20. MENU:
Activate main menu or exit to live channel.
21. EXIT :
Exit current menu step by step.
22. TIMER:
Enter timer event directly
23. DISPAY:
Switch the TV type.
24. MODE :
Switch 4:3 & 16:9 Screen Formats.
25. USB :
Showing Subtitle information if the channels contains.
26. FIND :、
Find the channel quickly
27. :
Multi picture display.
28.: Fast backward.
29. :Fast forward
24. :Start playing / Release pause
25. ■:Stop recording
26. I : Play previous item
27. I:Play next item.
28. II: Pause/ Time shift
29.●: Start recording
NXP HD I 8

3. Installation and Connection
The following diagram shows you the connections among receiver, TV,
LNB and other equipment, please read this first if you are not sure about the
connection, and it will guide you to the correct connection.
3.1 Connecting to TV
Figure 5. Connecting to TV
NXP HD I 9

3.2 Connecting to Dish LNB
You can connect one fixed dish LNB directly to the LNB IN, or connect
at least two dish LNB by DiSEqC Switch, you can also connect to HH mount
dish LNB.
Figure 6. Connecting to Dish LNB
NXP HD I 10
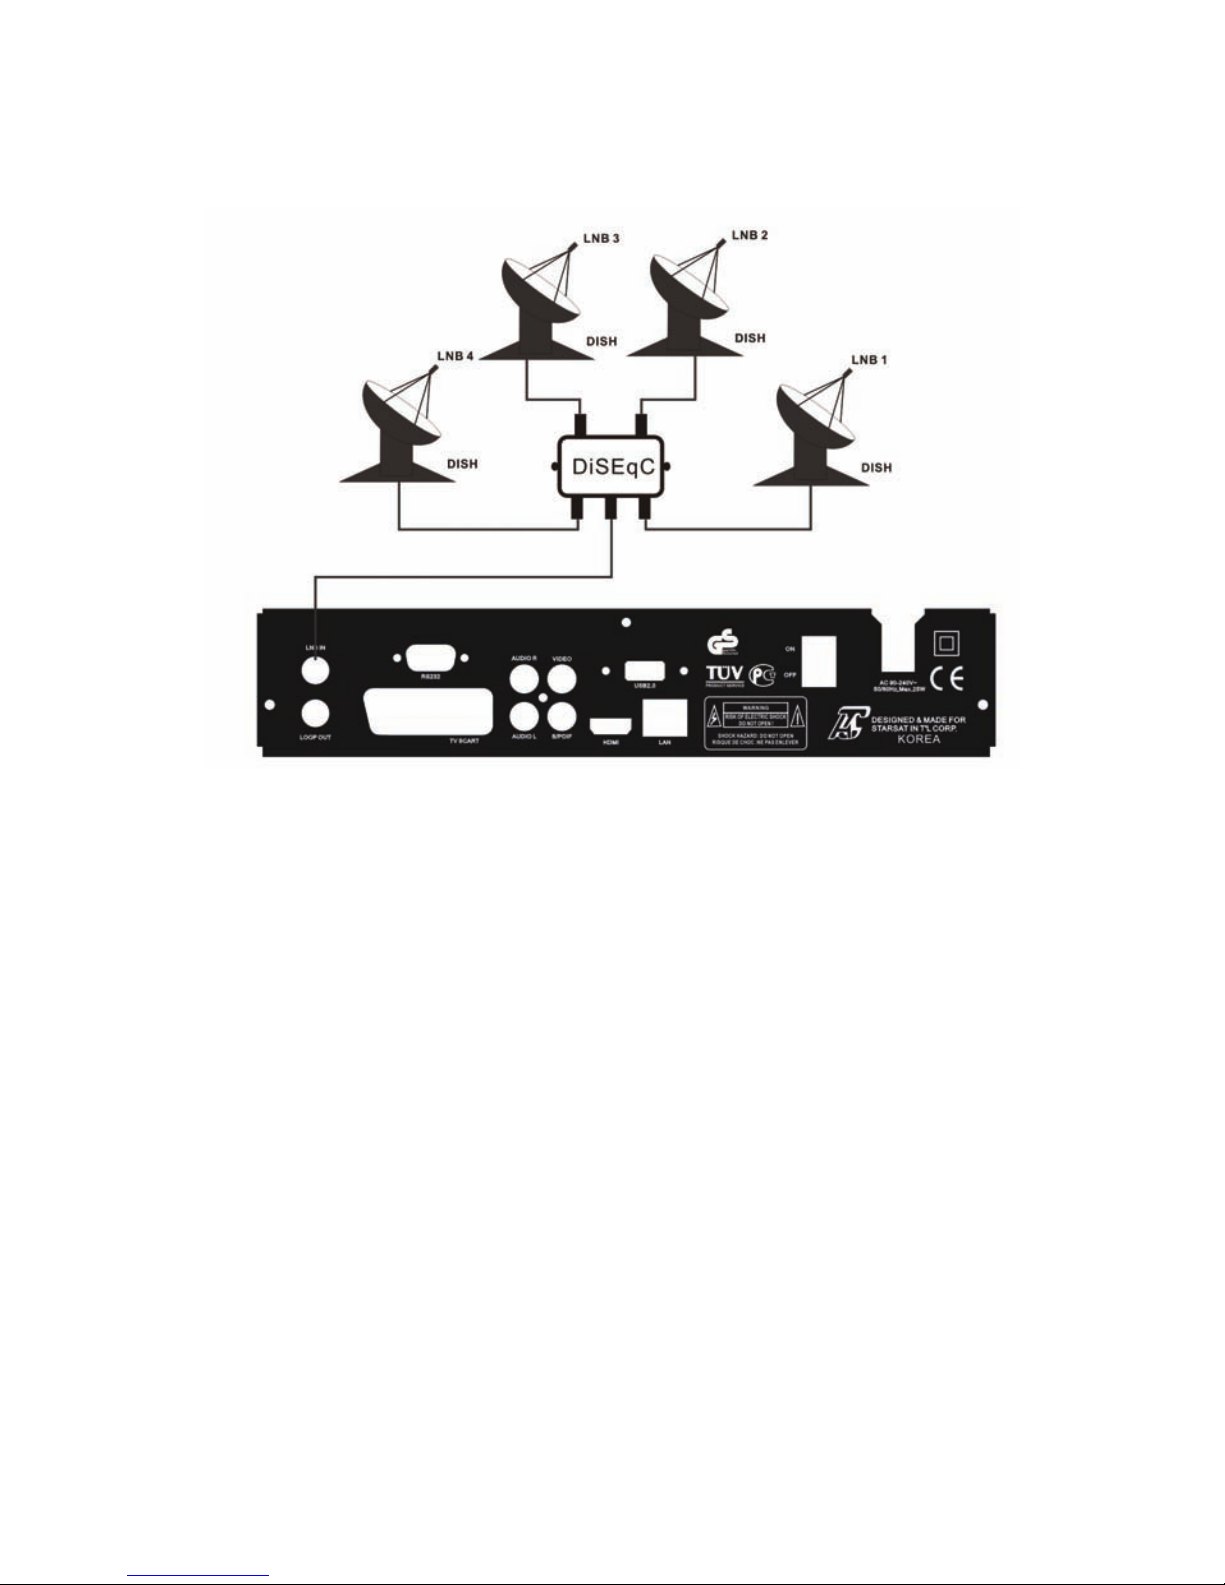
Figure7. Connecting to Dish LNB
NXP HD I 11
4. Installation and Operation
After connecting the receiver to other required equipment, turn on the
receiver, there should be no channel information available at the first startup,
you need to follow the procedure to setup your receiver to search the
channel.
NXP HD I 12
can make Satellite Search,
: Satellite List
, you can see the presorted
Main Menu
Press MENU button to activate main menu,
main menu consists of Installation, Channel
manager, system setting, Time Setting,
Expansion, Interface.
Use UP/DOWN button to select your subject and press OK to confirm your
selection and enter that sub menu, press EXIT button you can return to the
previous menu.
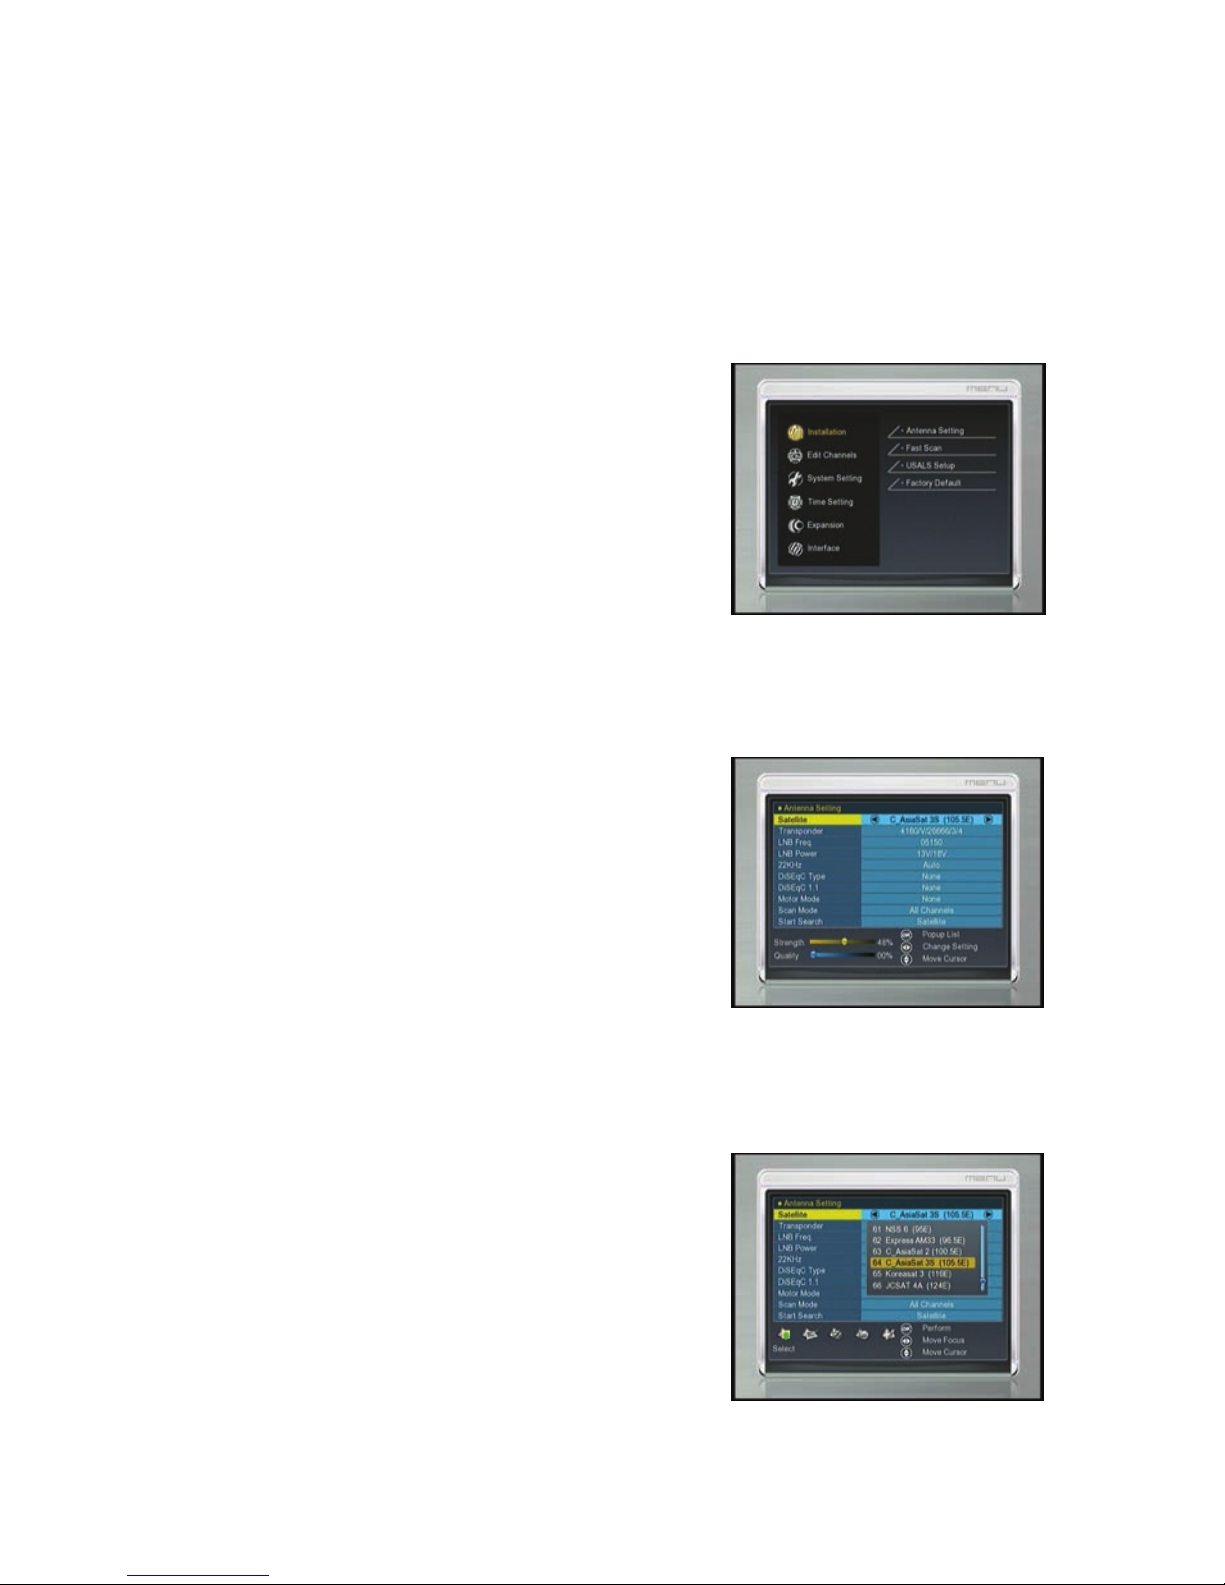
4.1 Installation
Select Installation, press OK button to activate
Installation menu, the Installation window will
be displayed.
A: Antenna Setting
Press OK to Enter Antenna Setting; here you
Satellite Edit, blind Search and other Functions.
a
Enter this picture
Satellite list, in this menu, you can select, add,
move, rename, delete Satellites.

NXP HD I 13
In this menu, you can press the UP/DOWN keys choose the satellite which
you want to use, then press the OK to confirm the setting, you can setting
other parameters
c. Add
Select the Add using the Left/Right keys.
Here you can input new Satellite angle,
Satellite Direction (east, west),Band (ku, c).
OK to confirm the setting ,and this new
satellite will be added to the end of the
Satellite list.
d.Move
In this menu, you can Select the satellite
that you want to move from the satellite list
using the UP/DOWN keys, then press OK,
you will be asked to move the satellite to
put where, input the destination number and
press OK. Then you can move one satellite
b: Select
from one position to another.
e. Delete
You can delete the user satellite. Press the
OK button select the satellite that you want to
delete from the satellite list. You will be asked
to confirm whether delete the satellite or not.
If you select YES, all the channels in the
selected satellite and transponder will be
deleted. Press OK key, and the selected
satellite will disappear.

NXP HD I 14
e Satellite
edit using the browse.
nsponder List
der frequency symbol rate,
hoose polarization (Ver,Hor) and Auto
/2, 2/3,3/4,6/5,7/8,Auto).
LNB frequency and power
keep LNB power to be 13V/18V
case you are using two antennas
22KHz tone switch box. You
y either 22KHz by setting “ON” or
f.Renam
You can also change the satellite name.
Select the Rename using the LEFT/RIGHT
keys. Press OK key and select the character
which you want to
Tra
If you change the satellite, the transponder w
You will find the transponder list of selected
satellite here In this menu you can select,
Delete, Edit and Add Transponder. The
Operation similar to the above, you can input
the transpon
ill be changed automatically.
c
(1
Here you need to check the LNB frequency according to your antenna, set
the correct frequency or define yourself, and
or 14V/19V.
22KHz
In
connected to a
an suppl
c
“OFF” to select antenna.
DiSEqC type DiSEqC1.1
If you connect antenna to DiSEqC Switch, yo
input to which your selected satellite have bee
u need to specify the DiSEqC
n configured.
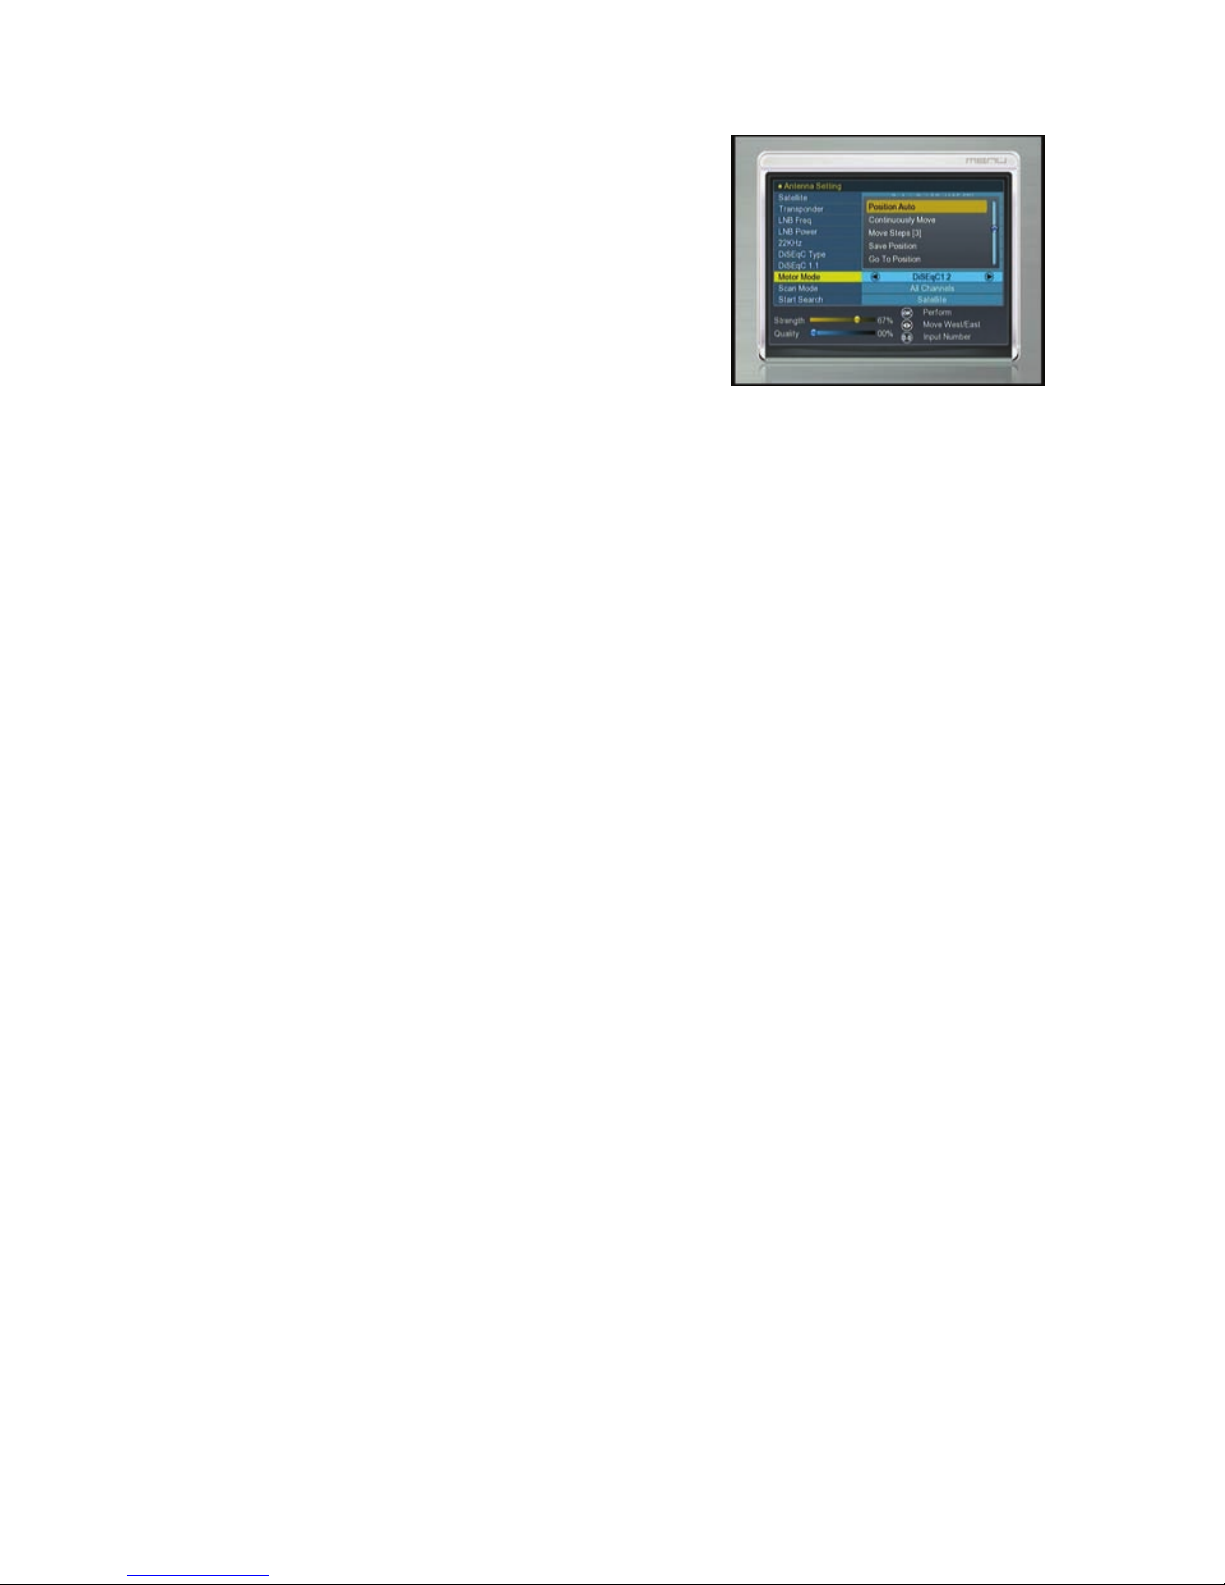
Motor
NXP HD I 15
res will be
nal.
signal bar.
moving step; Press RIGHT/LEFT button to move
ps.
ton to move the dish to the stored position.
Go to Reference
tton to move the dish to 0 position. nnel now
able East limit.
ALS, here one
more option you can move the dish to exact position of the satellite.
Note: Before you use USALS, you should go to Main Menu→Installation→
USALS Setup to set you local position firstly.
When you enable this option, and press OK,
you will get this window to show you how to
adjust position of the dish.
Move Auto [W/E]
s RIGHT/LEFT button, the dishP
motorized to East/West
continuously, it will stop until it find the best sig
Move west-east
Push RIGHT/LEFT button, the dish will be moto
step until you find the best signal showed on the
Fine Tuning(1)
Input digital button to set the
rized to East/West step by
ste
Store Position
Save the current position you searched.
Go to Position
Press OK but
Press OK bu
Press EXIT after setup, and you can search cha
Set West Limit
Enable West limit.
Set East Limit
En
Disable Limit
Disable West limit and East limit.
USALS: If you use USALS and select the Motor Mode to US

NXP HD I 16
ode F
Start Search
you want to start
twork, you can
e Multi-satellite search ,the operation as follows,
you can select more satellite at
e they are all configured to your DiSEqC Switch, after
ing the TV Channel
e listed separately.
ct one satellite which
then select the frequency,
e Polarization of that
onder, Symbol Rate,
ng. During
dio channel
se blind
scan m
In this menu, you can select all Channels & TA Channels by setting the
search option
In this menu, you can select Satellite &Multi-
Sat & Transponder which
search When you press ok you will be ask
whether searching by ne
choose yes or no
Satellite Search
n use one satellite search when select the scan mode for “satellite”You ca
and you also can use th
Selecting one satellite, and press OK to mark,
this time, but make sur
selecting, Pressing OK will start searching. During search
and Radio Channel will b
Transponder
Here you need to sele
your dish pointed,
you need to setup th
Selected Transp
FEC .Pressing OK will start searchi
searching, the TV channel and Ra
will be listed seperately.
NOTE: if you don’t know any message about the satellite, you can u
search.

B: Fast scan
NXP HD I 17
ansponder (12515, 22000, H,
), can fast search channels by different
e
d to
information from internet
input the accurate parameters about
o can save
In this view, when in Astar (19.2) satellite,
base on the tr
5/6
providers.
C:USALS Setup
You can setup the Dish position to th
satellite you want to search, you nee
check the detailed
and
your local position.
Press the Red button, you can choose
the country, press OK button again, you will
view the city in this country that as you
select.
D.Factory Default
You can erase all the channels and settings.
You made by selecting All, press OK you will
be asked to confirm whether you select
“YES” or “NO”. If you select “yes” all data
and setting will be lost. (as well as radio list
and scramble). in the end, you als
or load default Date
NXP HD I 18
anager
: Edit channel
lect Channel and Delete/
: Edit fav
ere you can set the channel to favorite in
,
,
color
ny sort press OK on viewing
ode, you can set the channel type
ccording to your mind.
in
A,
4.2 Channel m
In this menu you can edit channels & fav, or
sort channels and so on.
A
Here you can Se
Un- delete Channel, Rename Channel, Move
Channel, Lock Channel, Select TV Channels,
you will get this window. You also can group
move the channel.
B
H
different category, such as news, movies
music, sports, education, weather, children’s
social, culture. Press different function
button select a
m
a
C: Sort channel
In this menu you can sort the channels
different type, such as language, FT
satellite, transponder, favor ,Alphabet and
original channel list

NXP HD I 19
el
sked to confirm
hether you select “YES” or “NO”. If you
elect “yes” all data under this satellite will be
st.
: OSD
setup the OSD /TXT
format from 1080i to
20p/576I. After you confirm, the TV Type
an be changed
D: Delete satellite chann
In this view, you can delete satellite channels
press OK you will be a
w
s
lo
E: User channel list
In this menu, you can save and load the
channel list .
4.3 System setting
A: System
You can setup the menu language, audio
language according to the standard of your
country. You also can set the recall list
function on or off.
B
Here you can
transparency ,Time out means the duration
of the information bar. You also can setup the
HDMI, press Right /Left button, you will
change the HD
7
c

C: Parental Lock
NXP HD I 20
also you can change the
o d, the default password is 0000..
hen you choose yes, you can “change the
assword option to unlock or lock some menu
B, such as product name,
oftware & hardware ver, loader ver and so
n. When you need service from the dealer
is information in order
st after sales
ervice.
he default time setup is auto, you can select
nd input by hand, select the time
This function prevents children or
unauthorized persons from watching
programs. You can select if need the
password or not for Installation, Edit Channel
and System,
assw r
P
W
p enter
D: About STB
In this window, you can get the information
about the ST
s
o
you need to submit th
go get the correct and fa
s
4.4: Time Setting
D-1: Timer Setup
T
manual a
zone of your country and you will get the
correct current time which is based on TDT
(Time and Data Table) in the stream of the
current channel service.
The time you set will be shown on the front
to standby mode. panel when you set receiver
Table of contents
Other star sat Receiver manuals

star sat
star sat SR-Z10 User manual

star sat
star sat SR-X1200D User manual

star sat
star sat SR-2220H User manual

star sat
star sat SR-A5 User manual

star sat
star sat SR-X1500D TITANIUM User manual

star sat
star sat SR-X97USB TITANIUM User manual

star sat
star sat SR-999USB User manual

star sat
star sat SR-X7100USB User manual

star sat
star sat SR-X6300USB User manual

star sat
star sat SR-C10 User manual


