manuals.online logo
Brands
  1. Home
  2. •
  3. Brands
  4. •
  5. Star
  6. •
  7. Computer Hardware
  8. •
  9. Star IFBD-HI01X User manual

Star IFBD-HI01X User manual

100/10 BASE
SW
100/10 BASESW
1
2ON
1
2ON
100/10 BASE
S W
100/10 BASESW
100/10 BASE
S W
100/10 BASE
S W
■IFBD-HI01X ■IFBD-HI02X
Initializing Ethernet Settings
Set the push switches as described below to initialize the setting information. Push the switch-
es for 5 to 9 seconds while running under normal operating mode. The LED will ash with a red
regular pattern.
After that, push the switches once again in that state to turn OFF the LED. This will return the
settings of the interface board to their factory default settings. After the interface board has
been initialized, the printer will automatically reboot itself.
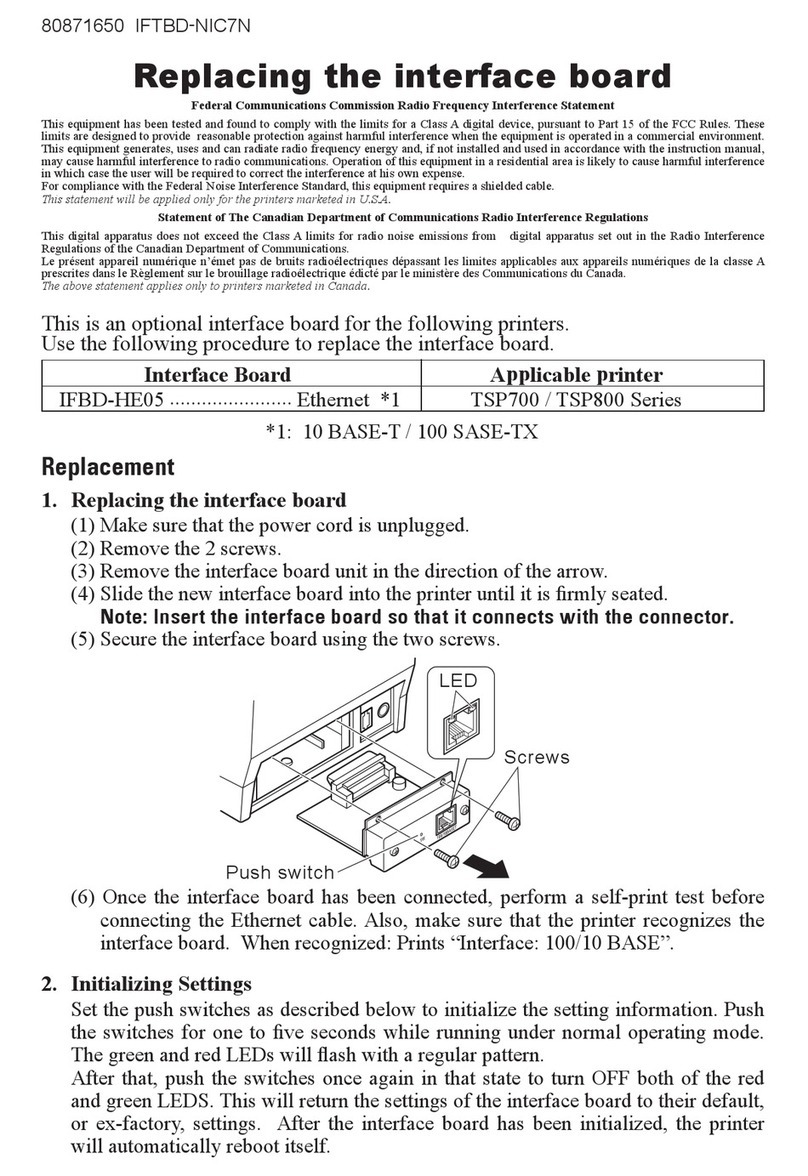
Use the following procedure to replace the interface board.
(1) Make sure that the power cord is unplugged.
(2) Remove the two screws, and remove the interface board unit.
(3) Slide the new interface board into the printer until it is rmly seated.
Note: Insert the interface board so that it connects with the connector.
(4) Secure the interface board using the two screws that you removed in step 2.
(5) Once the interface board has been connected, perform a self-print test before connecting
the Ethernet cable. Also, make sure that the printer recognizes the interface board. When
recognized: Prints “Interface: 100/10 BASE”.
© Copyright 2015-2016 Star Micronics Co., Ltd.
Screws
Screws
LEDLED Push Switch
Push Switch
DIP Switch DIP Switch
Printer Driver / Utility Software
The printer driver and utility software can be downloaded from the following site.
http://www.star-m.jp/prjump/000034.html
Printer Firmware
Not all versions of the printer rmware can be used with the IFBD-HI01X/IFBD-HI02X. For de-
tails, refer to the following site.
http://www.star-m.jp/prjump/000045.html
Connecting the USB device
You can use the USB device (such like the USB dongle for wireless communication and the bar-
code reader) which is supported by this product, by connecting it to the USB port (USB type A).
For information related to the USB devices supported by this product, please visit the following
website.
http://www.star-m.jp/prjump/000046.html
Setting the DIP Switches : Ethernet
The timeout time when acquiring the address from the DHCP/BOOTP server can be set using
DIP switch No. 1. If DIP switch No. 1 is set to ON, a timeout is not performed. If the address can-
not be acquired due to the timeout, set DIP switch No. 1 to ON.
DIP Switch No. Description ON OFF
1Timeout Time None 20 Seconds *
2 TFTP Client Valid Invalid *
* : factory default setting
im00372 IFBD-HI01X/IFBD-HI02X
Replacing the Interface Board Connecting to the Host Device (PC)
◆Ethernet Cable
Note that the Ethernet cable is not provided. Please use a cable that meets specications.
(1) Make sure the printer is turned o.
(2) Connect the Ethernet cable to the connector on the interface
board. Then, connect the other end of the cable to the hub or
the router.
(3) You can check the MAC address, the settings of the interface
board and the IP address by running a self-print.
◆USB Cable
Note that the USB cable is not provided. Please use a cable that meets specications.
(1) Make sure the printer is turned o.
(2) Connect the USB cable to the USB port (USB type B) of the
printer.
Note: When the USB cable is connected to this product, it protrudes
from the back face of the printer.
You cannot place the printer so as to closely t the wall or
install the printer vertically.
10/100 BASE
SW
Barcode reader
USB dongle
10/100 BASE
SW
100/10 BASE
S W
100/10 BASE
S W
100/10 BASE
SW
100/10 BASESW
1
2ON
1
2ON
100/10 BASE
S W
100/10 BASESW
ネジ
ネジ
プッシュスイッチプッシュスイッチ
ディップスイッチディップスイッチ
LEDLED
■ IFBD-HI01X ■ IFBD-HI02X
インタ
−
フェイスボ
−
ドは、下記の手順で交換してください。
① プリンターの電源スイッチをオフにして、電源コ−ドを取り外します。
② 2本のネジを取り外し、プリンターに取り付けられたインタ−フェイスボ−ドを取り外します。
③ 新しいインタ−フェイスボ−ドをプリンターに差し込みます。
注記 : プリンターのコネクターとインタ−フェイスボ−ドのコネクターが接続するように、しっかり
と差し込んでください。
④ 取り外した2本のネジを使ってインタ−フェイスボ−ドを固定します。
⑤ インターフェイスボードを接続後、ケーブルを接続する前に自己印字を行います。 正しく接続されて
いれば、Interface : 100/10BASE と印刷します。
ホスト機器(PC など)との接続
◆ イーサネットケーブル
イーサネットケーブルは添付されていませんので、仕様に合ったケーブルを用意してください。
① プリンターの電源が OFF になっていることを確認します。
② プリンターのイーサネットポートにイーサネットケーブルを接続し、
反対側をルーターやハブ等のイーサネットポートに接続します。
③ 自己印字を行うと、インタ
−
フェイスボ
−
ドの MAC アドレス、各種設
定と動作中の IP アドレスを確認できます。
◆ USB ケーブル
USB ケーブルは添付されていませんので、仕様に合ったケーブルを用意してください。
① プリンターの電源が OFF になっていることを確認します。
② プリンターの USB ポート(USB タイプ B) にUSB ケーブルを接続します。
注記 : 本製品に USB ケーブルを接続すると、プリンター背面からケーブ
ルの一部がはみ出る為、プリンター背面を壁面に密着させた設置、
プリンターの縦置き配置等ができません。
プリンタードライバー・ユーティリティー
プリンター本体に CD-ROM が添付されていない場合は、下記の WEB サイトからダウンロードして使用し
てください。
http://www.star-m.jp/prjump/000033.html
プリンターのファームウェアについて
本製品 (IFBD-HI01X/IFBD-HI02X) を組み合わせて利用できるプリンターのファームウェアのバージョンに
は制限があります。
詳細は下記の WEB サイトでご確認ください。
http://www.star-m.jp/prjump/000047.html
USB デバイスの接続
USB ポート(USB タイプ A)には、本製品の対応する USB デバイス(無線通信用 USB ドングルやバーコー
ドリーダーなど)を接続して使用できます。
本製品の対応する USB デバイスについては下記の WEB サイトでご確認ください。
http://www.star-m.jp/prjump/000048.html
ディップスイッチの設定 : イーサネット
ディップスイッチ 1 により、DHCP / BOOTP サーバーからアドレスを取得する際のタイムアウト時間を設
定できます。ON に設定した場合、タイムアウトを行ないません。タイムアウトによりアドレスを取得で
きない場合は、ディップスイッチ 1 を ON に変更してください。
スイッチ 内容 ON OFF
1 タイムアウト時間 なし 20 秒 *
2 TFTP クライアント 有効 無効 *
* : 工場出荷時設定
イーサネット設定の初期化
設定情報を初期化する場合は、プッシュスイッチを以下のようにしてください。
通常動作状態にて、プッシュスイッチを 5 秒~ 9 秒の間押してください。LED が規則的な赤点滅状態とな
ります。この状態からさらにもう一度短くプッシュスイッチを押すと、LED が消灯状態となり、インターフェ
イスボードの設定が工場出荷時の設定に戻ります。インターフェイスボードの初期化が終了した後、自動
的にプリンターにリブートがかかります。
© Copyright 2015-2016 Star Micronics Co., Ltd.
バーコードリーダー
USB ドングル
インタ
−
フェイスボ
−
ドの交換

This manual suits for next models

1

Other Star Computer Hardware manuals

Star IFBD-HE05 Series User manual

Star

Star IFBD-HE05 Series User manual

Star FL3X Interface-PMC User manual

Star

Star FL3X Interface-PMC User manual

Popular Computer Hardware manuals by other brands

Adaptec PM3332UW Specifications

Adaptec

Adaptec PM3332UW Specifications

ZyXEL Communications ZyAIR B-100 Quick installation guide

ZyXEL Communications

ZyXEL Communications ZyAIR B-100 Quick installation guide

Ista AMF2.0 Operator's manual

Ista

Ista AMF2.0 Operator's manual

Vecow SPC-2845 user manual

Vecow

Vecow SPC-2845 user manual

Kystar LS16 manual

Kystar

Kystar LS16 manual

ARM ARM1176JZF-S Technical reference manual

ARM

ARM ARM1176JZF-S Technical reference manual

Q-SYS Core 6000 CXR quick start guide

Q-SYS

Q-SYS Core 6000 CXR quick start guide

SOLIS DLS-W Connection guide

SOLIS

SOLIS DLS-W Connection guide

Connect Tech Sentry-X user guide

Connect Tech

Connect Tech Sentry-X user guide

Soho CableFREE NetBlaster II NCP110 Features & benefits

Soho

Soho CableFREE NetBlaster II NCP110 Features & benefits

Ruwido rf2ir user guide

Ruwido

Ruwido rf2ir user guide

Analog Devices ADSP-21065L EZ-KIT Lite manual

Analog Devices

Analog Devices ADSP-21065L EZ-KIT Lite manual

AXIOMTEK eBOX800-900-FL Series Quick installation guide

AXIOMTEK

AXIOMTEK eBOX800-900-FL Series Quick installation guide

Bosch ADC 0064 A installation manual

Bosch

Bosch ADC 0064 A installation manual

iPECS eMG80 Operation manual

iPECS

iPECS eMG80 Operation manual

Keil MCB2929 quick start guide

Keil

Keil MCB2929 quick start guide

Casio FP-231CE Operation manual

Casio

Casio FP-231CE Operation manual

AMX Multi-Disc Loader System MAX MDL200 installation guide

AMX

AMX Multi-Disc Loader System MAX MDL200 installation guide

manuals.online logo
manuals.online logoBrands
  • About & Mission
  • Contact us
  • Privacy Policy
  • Terms and Conditions

Copyright 2025 Manuals.Online. All Rights Reserved.