StarEcho PT0148A2S User manual

Assembly Instructions
Item Number: PT0148A2S
Thank you for your purchase!
We are pleased that you have chosen StarEcho for your outdoor gazebo purchase.
We hope that you enjoy the unmatched quality, comfort, and style of your new patio item.
Every piece is meticulously considered all the way down to the smallest details, exclusively
for you, by our world class design team. We know you have a choice when it comes to your
patio gazebo needs, so from our team to yours, thank you for letting us be a part of your
outdoors.
Made in China

SAFE INFORMATIONS
WARNING:
When assembling and using this product, basic safety precautions should always be
followed to reduce the risk of personal injury and damage to equipment. Please read all
instructions before assembly and usage.
Some parts may contain sharp edges, wear protective gloves if necessary.
This unit is heavy! Do not assemble this item alone. At least two or more people are
recommended for safe assembly.
Keep all children and pets away from assembly area.
Begin assembly not less than 6feet from any obstruction such as fence, garage, house,
overhanging branches, laundry line or electrical wires.
Install on level ground. This gazebo cannot be permanently staked or attached to
concrete floor or platform. The provided stakes are for soft ground use only. If
assembling on ahard surface like adeck or concrete, other forms of attachment must
be used such as expansion bolts that can be purchased locally.
This gazebo is intended for decorative and sunshade purposes only and is not meant to
withstand inclement weather including high winds, rain and snow. Gazebo fabric is
water resistant, not water proof and may leak during exposure to precipitation.
Please lay out all parts before assembling, checking to make sure all parts are there. If
expedited to you.
Do not leave the gazebo where there is arisk of high wind, as possible damage will
occur to the structure. Remove all excess snow from the roof.
Do not climb on top of the gazebo. Falling off the gazebo can result in serious injury.
KEEP ALL FLAME AND HEAT SOURCES AWAY FROM THIS GAZEBO FABRIC. This Gazebo
is made with fabric that meets CPAI-84specifications for flame resistance. It is not fire
proof. The fabric will burn if left in continuous contact with any flame source. The
application of any foreign substance to the gazebo fabric may render the flame-
resistant properties ineffective.

Parts Name
Item No. Parts Images
A1
A2 泗
C1 2z
C2 zz
G1 二
G2
H1 -�
H2
K5三
Qty.
鲁) 4
4
, 4
, 4
4
4
4
4
4
Parts Name Item No. Parts Images Qty
K4竺4
J 荨1
O1 二1
O2 0 1
P1 归 资
o o 4
BB 12
M6x18
II1 8
LL二32
Top Leg
Post
Lower Leg
Post
Across
Beam 1
Across
Beam 2
Upper
Slant Bar
Lower
Slant Bar
Upper Top
Bar
Lower Top
Bar
Long
Extension
Tube
Short
Extension
Tube
Top
Connector
Big
Canopy
Small
Canopy
Netting
Bolt
M6x18mm
Stake
Ring
io
。口门汇
2
People
Needed for assembly: (The following tools are not included)
Hammer
Ladder
Parts List
Hook
N
-3
1

Step 1: Connect Across Beam 1 (C1) and Across Beam 2 (C2).
Step 2: Connect Top Leg Post (A1) to assembled Across Beam 1/2 (D1/D2), locking by
Bolt (BB).
(Attention: lay flat beam on the ground, and face up.)
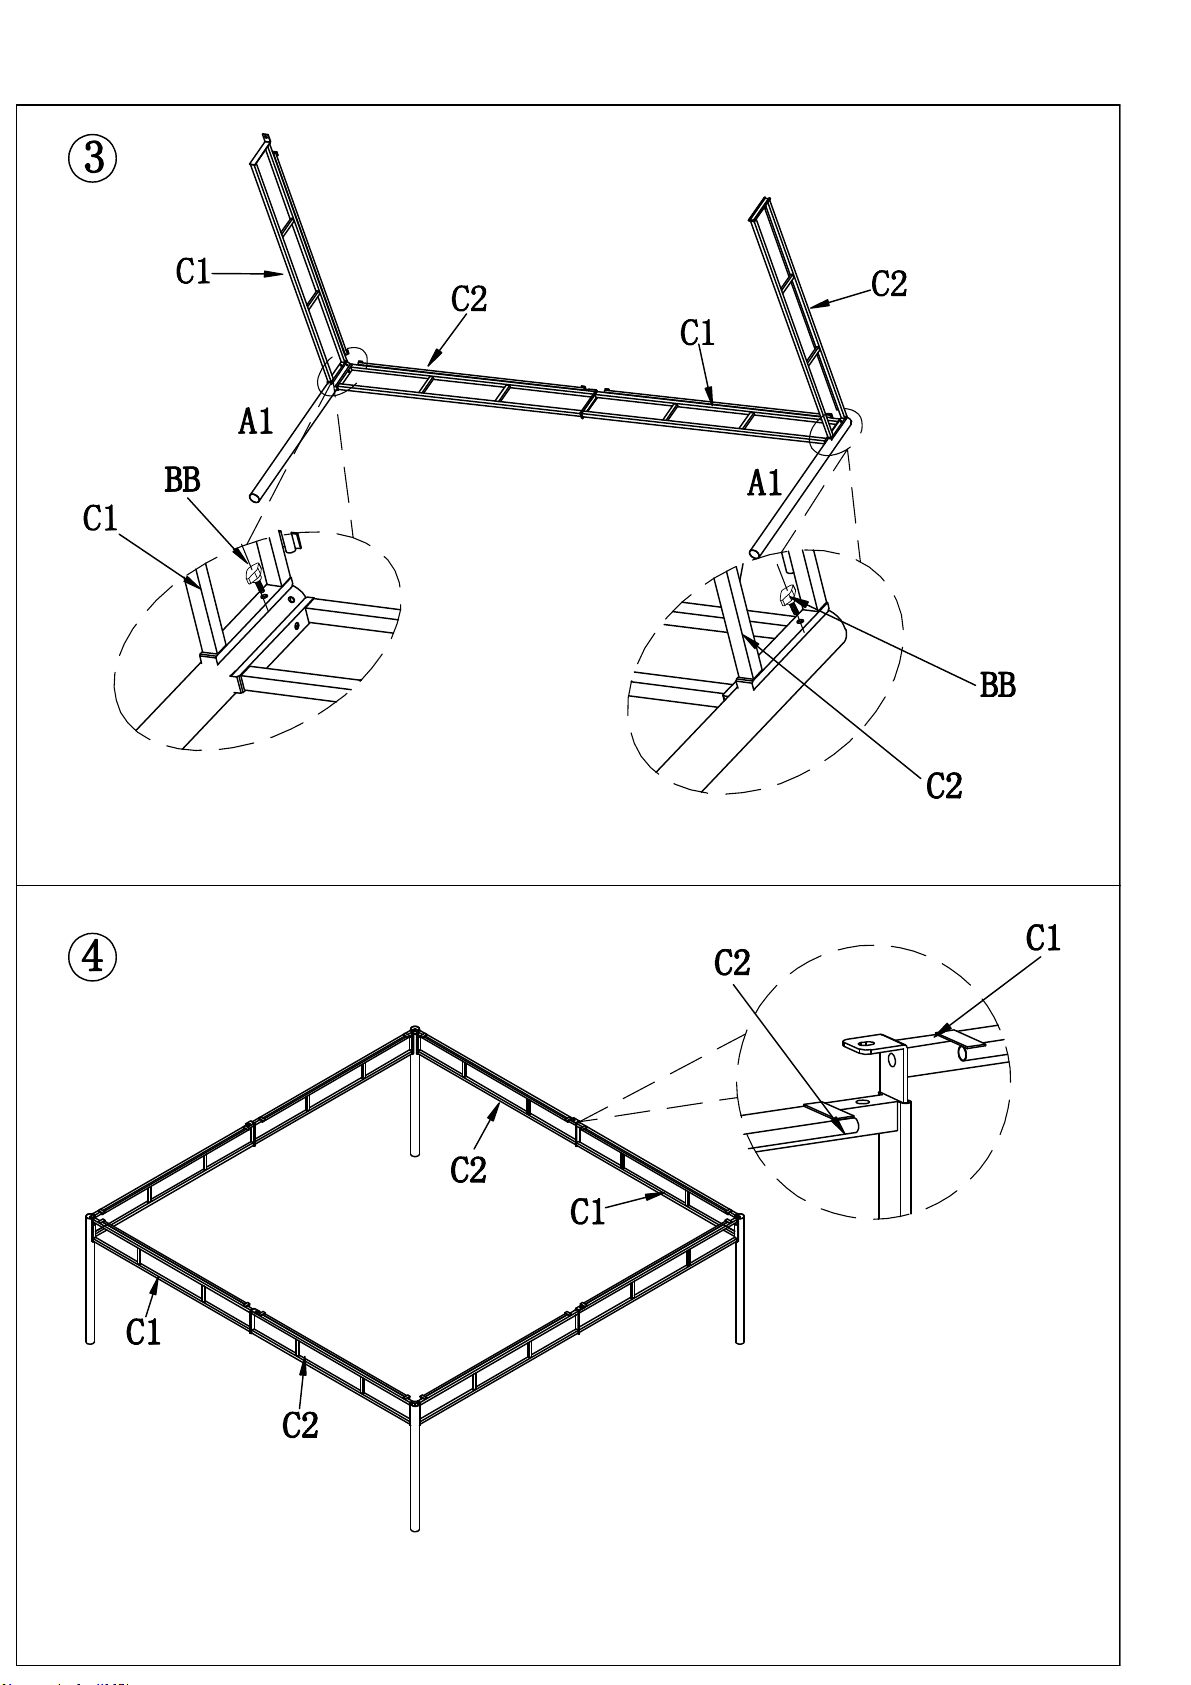
Step 3: Connect Across Beam 1/2 (C1/C2) to assembled Top Leg Post (A1) by Bolt (BB).
Step 4: Connect assembled Across Beam 1/2 (C1/C2).

Step 5: Insert Lower Slant Bar (G2) into Upper Slant Bar (G1);
Insert Lower Top Bar (H2) into Upper Top Bar (H1).
Step 6: Connect Upper Top Bar (H1) and Top Connector (J);
Connect Lower Top Bar (H2) and Across Beam 1/2 (C1/C2) by Bolt (BB).
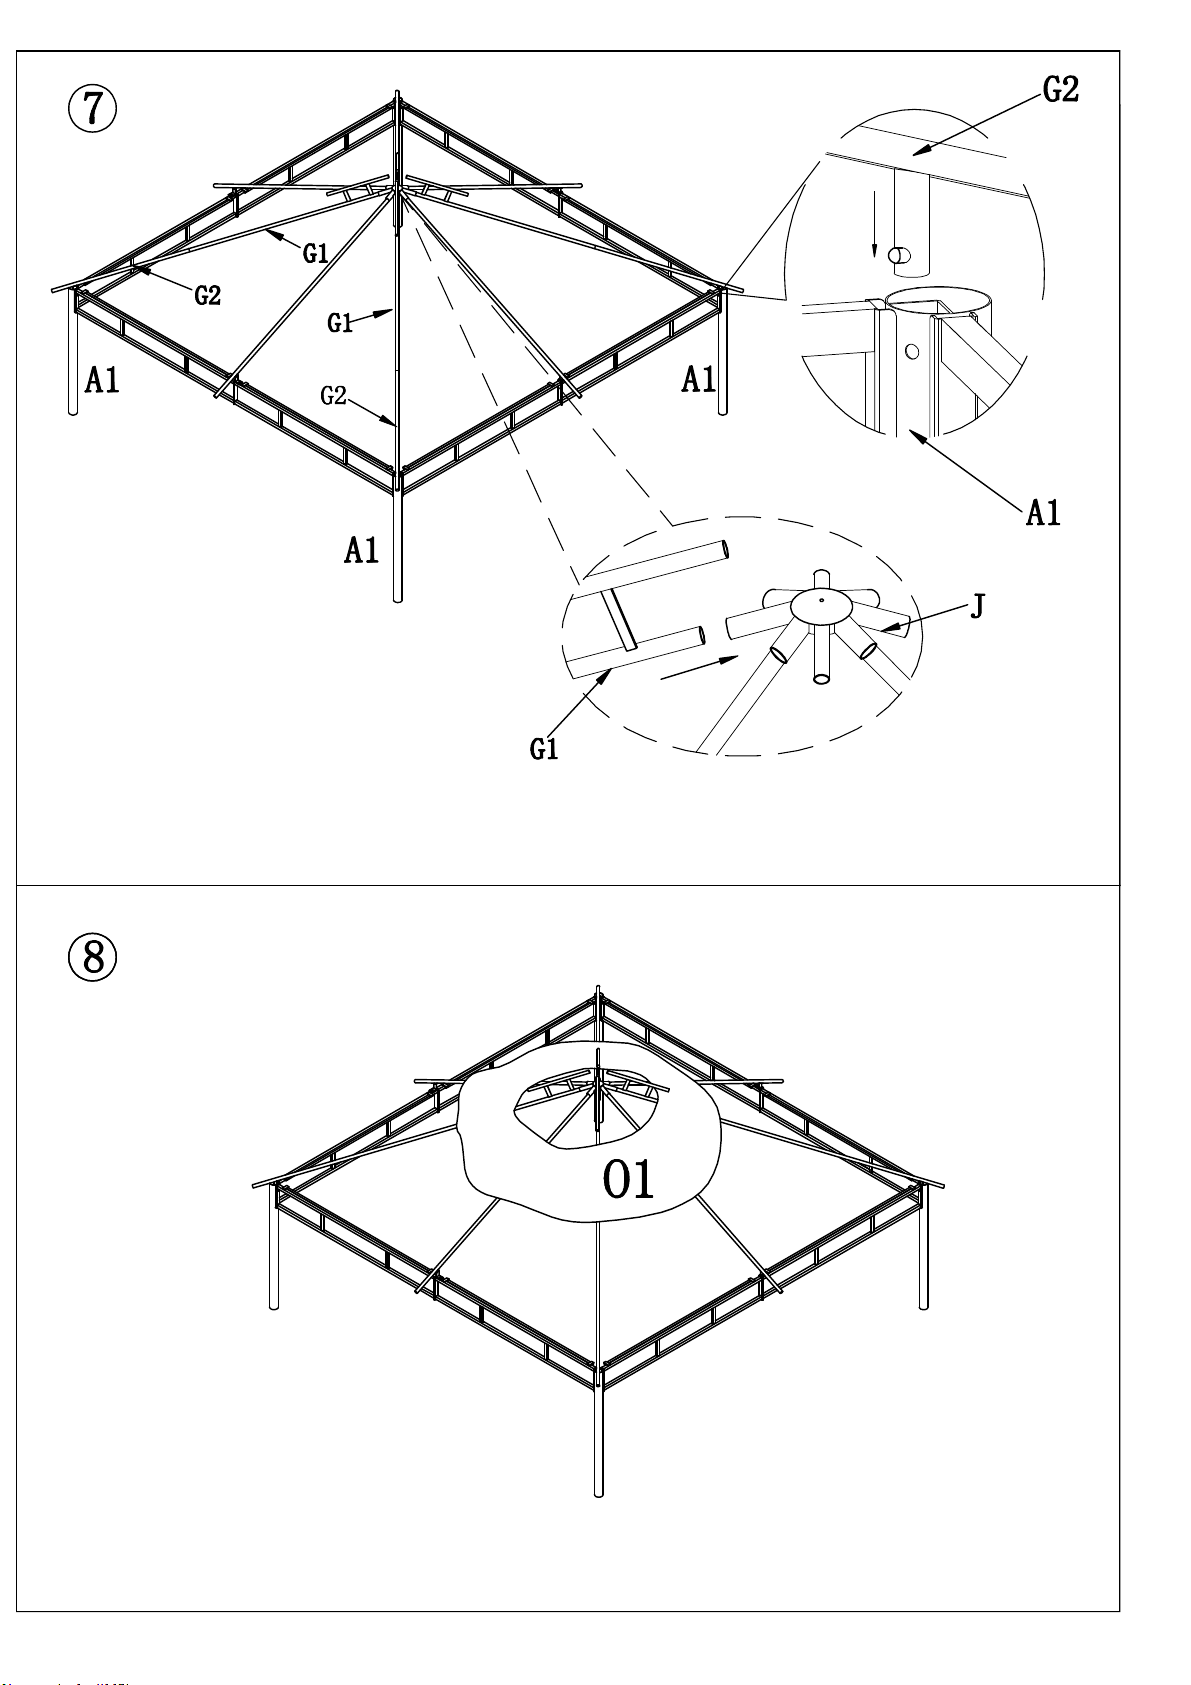
Step 7: Connect Upper Slant Bar (G1) and Top Connector (J); Insert Lower Slant
Bar (G2) into Top Leg Post (A1).
Step 8: Put Big Canopy (O1) on big roof frame.
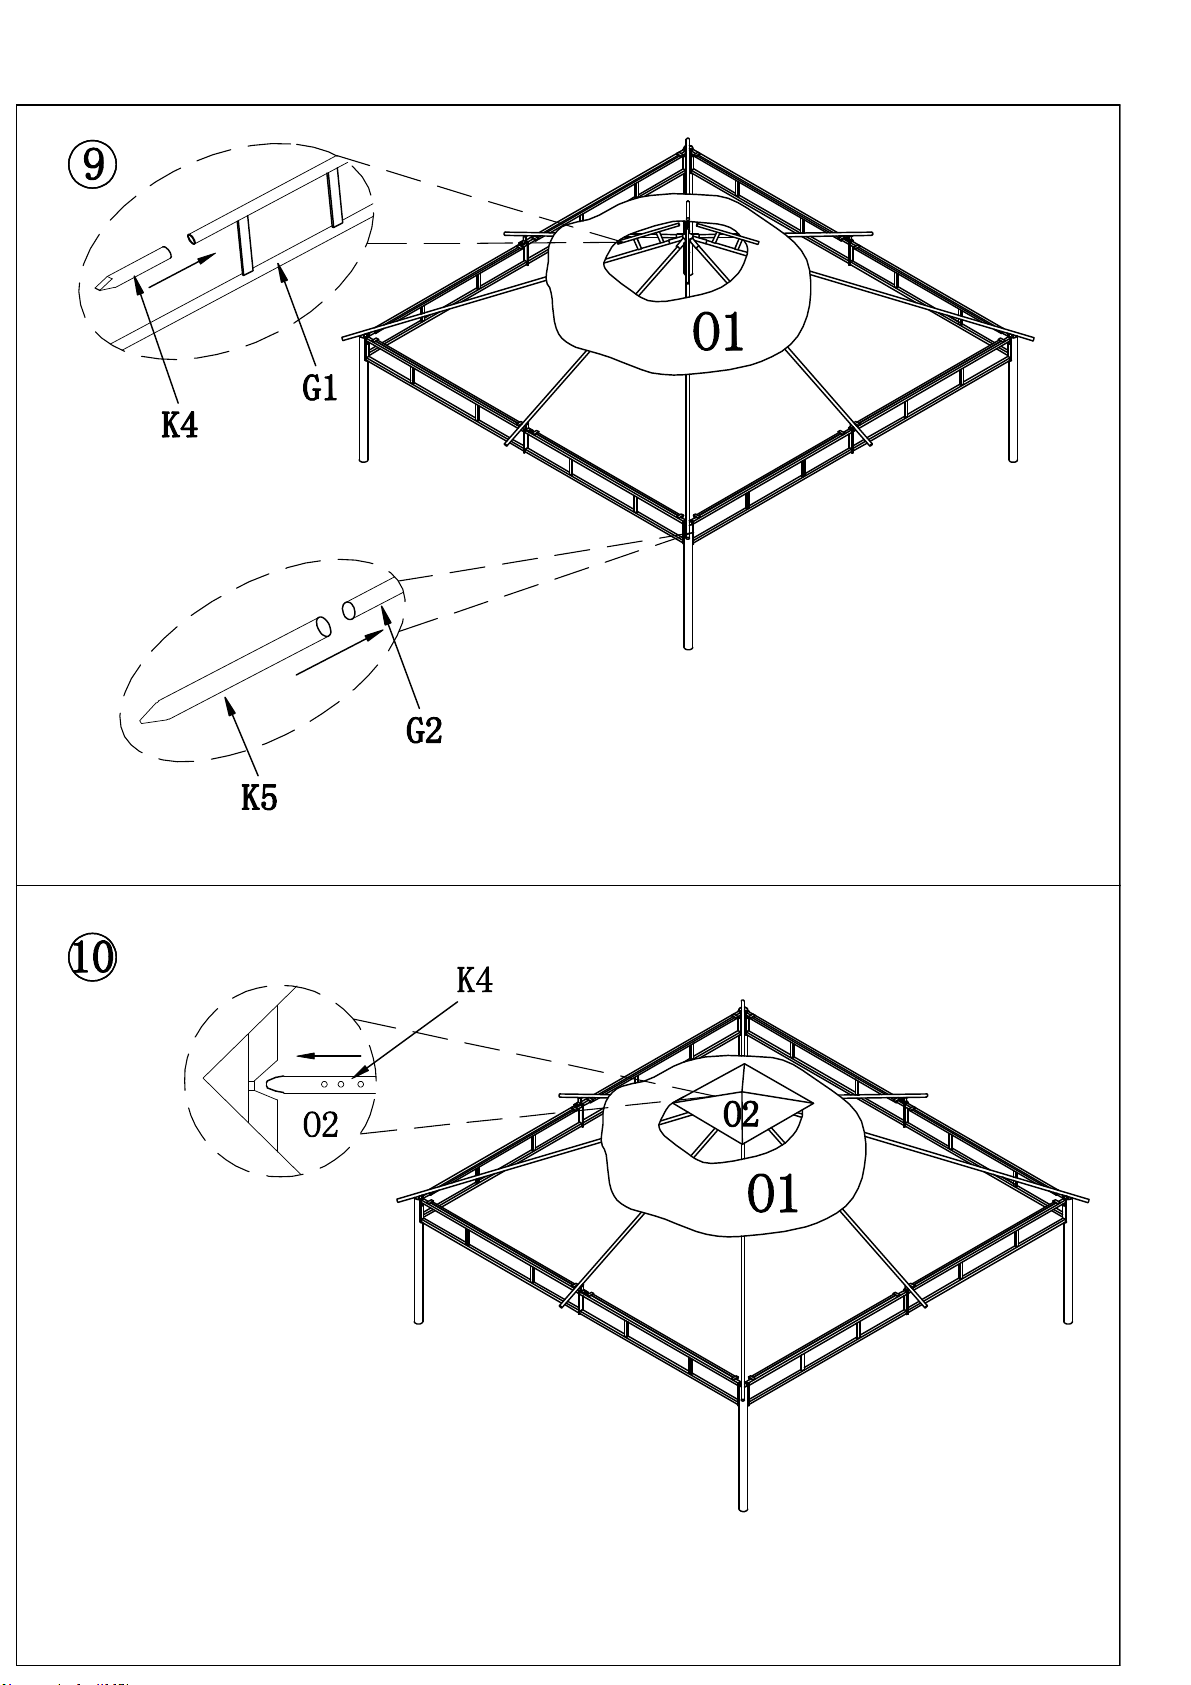
Step 9: Insert Short Extension Tube (K4) into Upper Slant Bar (G1); Insert Long
Extension Tube (K5) into Lower Slant Bar (G2).
Step 10: Put Small Canopy (O2) on small roof frame, fix four corners to Short Extension
Tube (K4) and adjust tube to suitable length.

Step 11: Insert to Middle Top Bar (H2) into side edge pocket on Big Canopy (O1);
Insert Long Extension Tube (K5) into Big canopy corner pocket, adjust the
tube to suitable length.
Step 12: Connect Lower Leg Post (A2) and Top Leg Post (A1).
(Attention:this step requirestwo persons).
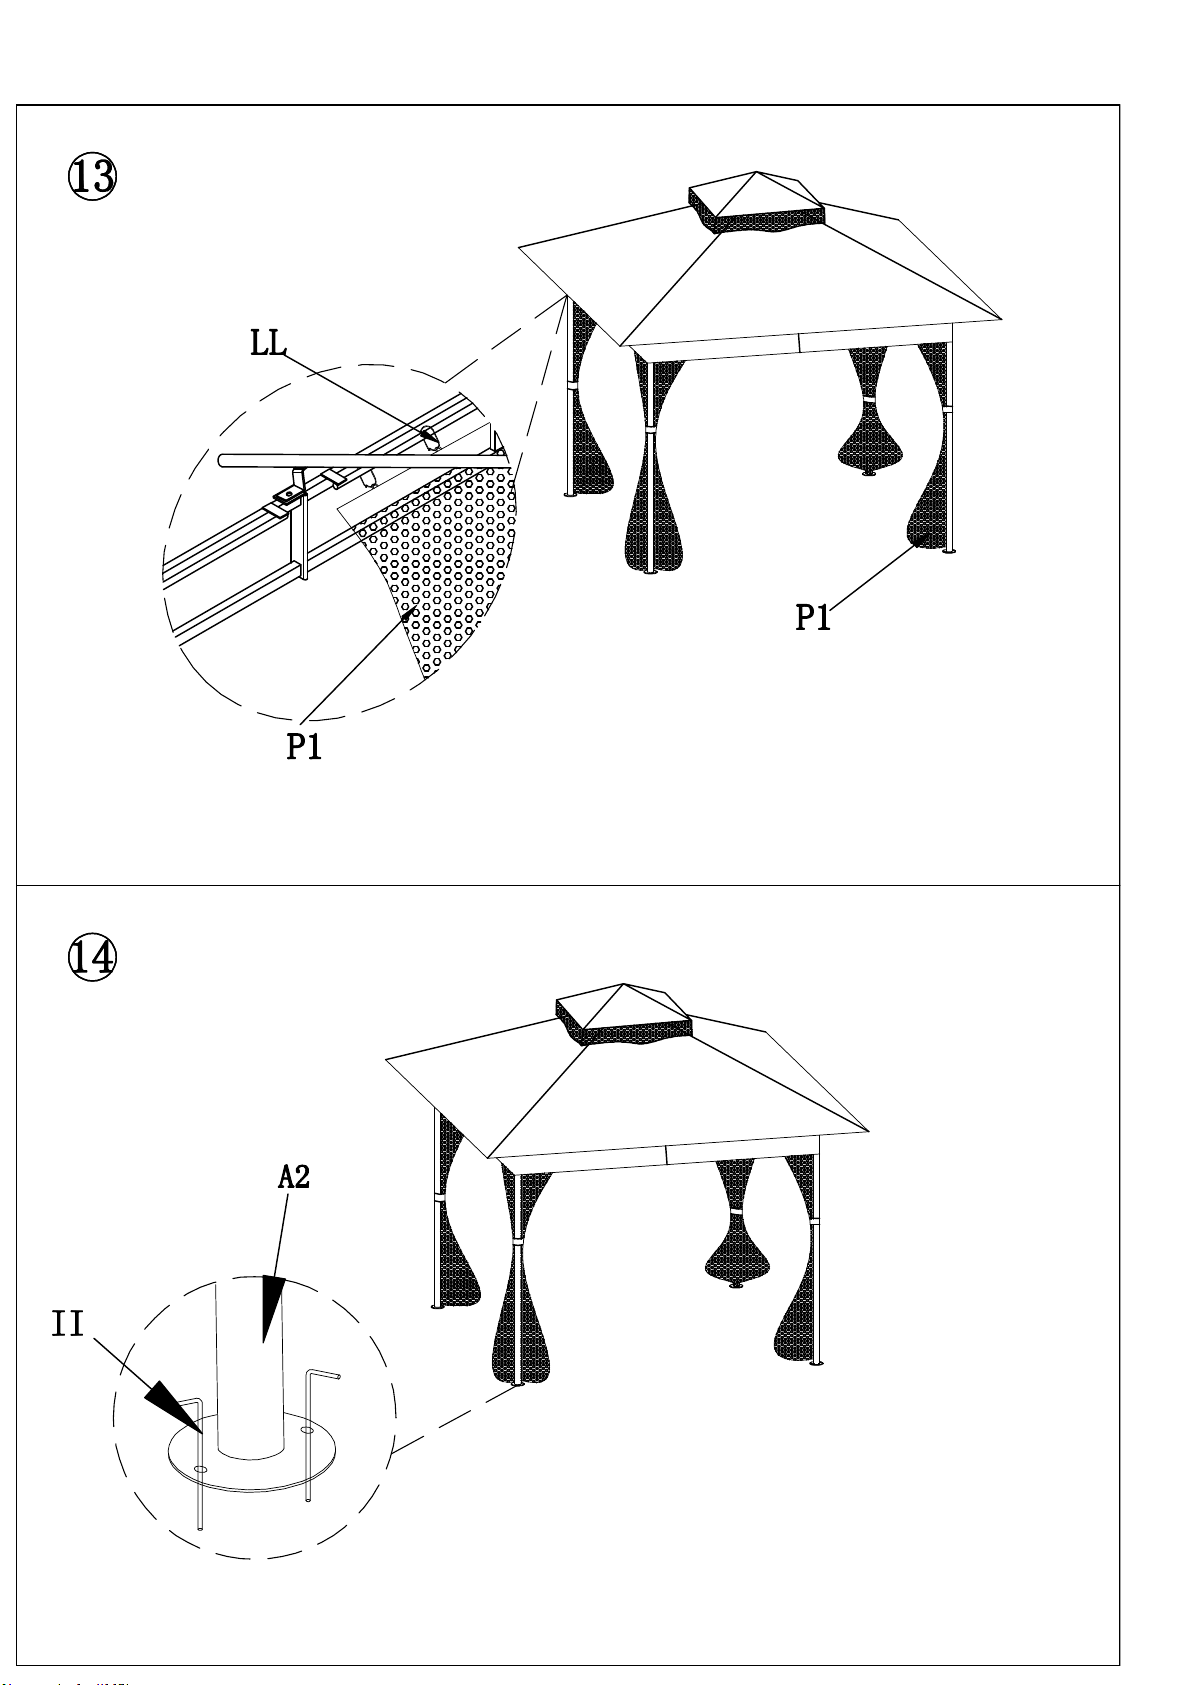
Step 13: Hang Netting (P1) on netting rod by Ring (LL).
Step 14: Fix Gazebo Lower Leg Post (A2) on the ground by Stake (II).

Step 15: Connect the Hook to the Top Connector (J).
Attention: the hook should be under the Top Connector
(J).

CARE AND MAINTENANCE
Our steel components for garden accessories and furniture are treated with rust
inhibiting paint that protects it from rusting. However, due to the nature of steel,
surface oxidation (rusting) will occur once these protective coatings are
scratched. This is not a defect and thus not covered by the warranty.
To minimize this condition, we recommend care when assembling & handling the
product to prevent scratching the paint. Should any scratching or damage
occur, we recommend immediate touch‐up with rust inhibiting paint.
Surface rust can also be easily removed with a very light application of common
cooking oil. If surface oxidation (rusting) occurs and if no measure is taken to prevent
this, the oxidation may start dripping on to deck or patio and caused damaging stains
which may be difficult to remove.
This can be prevented if the above-mentioned measures are taken to keep the product
from oxidizing.
Use damp cloth to wipe off the stains as quickly as possible.
If necessary, wash with a mild solution of soap and water; rinse thoroughly and dry
completely.
Periodically check and ensure that all bolts are well‐tighten during use.
LIMITED MANUFACTURER’S WARRANTY:
The item is warranted to be free from defects in workmanship and materials for a period of
(1) year from the date of purchase, provided the item was factory-sealed at the time of
purchase and is maintained with care and used only for personal, residential purposes.
Should any manufacturing defect arise within this warranty period, StarEcho will replace (at
our option) any defective merchandise or parts upon proof of purchase; however,
transportation and delivery costs, as well as payments to athird party for assembly or
disassembly of the item, remain the responsibility of the purchaser. Apurchaser of an
"open box," previously-returned, or "clearance" item, as well as original purchasers outside
of the warranty period, may obtain replacement parts from StarEcho for products in current
production, at nominal cost.
EXCLUSIONS:Items used for commercial, contract, or other non-residential purposes, or
items damaged due to acts of nature, vandalism, misuse, or improper assembly are not
covered. Corrosion or rusting of hardware is not covered. Proof of purchase (dated register
receipt) is required for warranty claims. Warranty is to the original purchaser and is non-
transferable. Any replacement of warranted items will be in the original style and color, or a
similar style and color ifthe original is unavailable or has been discontinued. As some
states do not allow exclusions or limitations on an implied warranty, the above exclusions
and limitations may not apply. This warranty gives you specific rights, and you may also
have other rights, which vary from state to state.
Table of contents
Other StarEcho Tent manuals


