Stark 71038 Original instruction manual

5HP SHALLOW WELL JET WATER PUMP
SAVE THIS MANUAL: KEEP THIS MANUAL FOR SAFETY WARNINGS, PRECAUTIONS, ASSEMBLY,
OPERATING, INSPECTION, MAINTENANCE AND CLEANING PROCEDURES. WRITE THE PRODUCT’S
SERIAL NUMBER ON THE BACK OF THE MANUAL NEAR THE ASSEMBLY DIAGRAM (OR MONTH
AND YEAR OF PURCHASE IF PRODUCT HAS NO NUMBER).
OWNER’S MANUAL AND SAFETY INSTRUCTIONS
ITEM: 71038
FOR QUESTIONS PLEASE CALL OUR CUSTOMER SUPPORT: (909) 628 0880 MON-FRI 9AM TO 3PM PST

IMPORTANT SAFETY INFORMATION
GENERAL SAFETY WARNINGS
Read all safety warnings and instructions. Failure to follow the warnings and instructions
may result in electric shock, re and/or serious injury. Save all warnings and instructions
for future reference.
SAFETY
The warnings, precautions, and instructions discussed in this instruction manual cannot cover
all possible conditions and situations that may occur. It must be understood by the operator
that common sense and caution are factors which cannot be built into this product, but must be
supplied by the operator.
IMPORTANT: For your own safety before starting to run the pump, please have the
following items checked by an expert:
RISK OF ELECTRIC SHOCK: This pump is supplied with a grounding conductor and
grounding-type attachment plug. To reduce the risk of electric shock, connect only to a properly
grounded, grounding-type receptacle.
Risk of electric shock: This pump has not been investigated for use in swimming pool areas.
Electrical connections must beprotected from moisture.
If there is danger of ooding, the electrical connections must be taken to higher ground.
Circulation of caustic uids, as well as the circulation of abrasive materials, must be avoided at all
costs.
The pump must be protected from frost.
The pump must be protected from running dry
Keep children away from the unit at all times
WARNING: Handling the Power Cord on this product will expose you to lead, a chemical known
to the State of California to cause cancer, and birth defects or other reproductive harm. Wash
hands after handling. (California Health & Safety Code § 25249.5, et seq.)
1

GROUNDING INSTRUCTIONS
To prevent electric shock and death from incorrect grounding
wire connection read and follow these instructions:
Check with a qualied electrician if you are in doubt as to whether the outlet is properly grounded.
Do not modify the power cord plug provided with the tool. Never remove the grounding prong from
the plug. Do not use the tool if the power cord or plug is damaged. If damaged, have it repaired by a
service facility before use. If the plug will not t the outlet, have a proper outlet installed by a qualied
electrician.
The tool must be plugged into an appropriate outlet, properly installed and grounded in accordance
with all codes and ordinances.
The outlet must be properly installed and grounded in accordance with all codes and ordinances.
Do not use extension cords with this pump.
Do not use an adapter to connect this pump to a different outlet.
The fuse must be a residual current circuit-breaker with a measured residual current of no more than
30 mA.
Make sure the power supply corresponds with the connection specications of the device before it is
connected.
This pump may only be used within the specied limitations for voltage and power, see the type plate.
Check the plug and cable before each use.
If the power cable is damaged, immediately disconnect the plug. Never use this device if the power
cord is damaged.
Unplug the power cord when the device is not in use or when transporting.
SAFETY INSTRUCTIONS
CAUTION: This pump has been evaluated for use with water only.
Fluid Type: The Pump is designed for use with water with a maximum temperature of 77° F (25° C).
Do not use the pump for other uids, especially not fuels, cleaning uids, or other chemical products.
NOT FOR POTABLE WATER
This device is not intended to be used for providing drinking water nor for food items.
Exposive, combustable, fecal matter or aggressive materials or substances which are hazardous
must not be conveyed by the device.
This device is not to be used for commercial or industrial use.
Improper use or modications to this device or the use of components not included with this device or
use of components that are not tested and approved by the manufacturer may result in damage and/
or serious injury.
2

SAFETY INSTRUCTIONS
Keep this device away from children and unauthorized individuals.
Do not overload this device by using it for unintended purposes.
Exercise caution when using this device. Never operate this device if you are over tired or under the
inuence of mind altering substances.
Always comply with all applicable domestic and international safety, health and working regulations.
Do not allow this device to get wet.
Do not leave this device unattended, unplug the device when not in use.
Repairs should only be made by a qualied technician and/or electrician.
Read and observe all safety instructions and warnings prior to using the device.
Never use this device near explosives or ammable materials.
COMPONENTS
Install indoors or in weather-proof well house only. This pump is
non-submersible. Do not plug in the power cord when wet
or standing on damp or wet ground.
3

TECHNICAL SPECIFICATIONS
SETUP AND INSTALLATION
This device must be placed on a horizontal, rigid and level surface that is capable of supporting the
total weight of this device when lled with water. To prevent vibration or movement, place the device
on an elastic base support like a rubber mat. For stationary use, this device can be screwed down
rmly to the base with four screws.
When being used on garden ponds or swimming pools, this device must be set up to guard against
overowing and protected from being submerged.
the installation site must be well ventilated and protected against the effects of weather. If operating
this device indoors, you must ensure there is a drain in the ooring or a leak detection mechanism.
Before starting, check that the suction hose is sealed. Bubbles in the hose is an indication that there
may be leaks and may lead to device malfunction.
The suction line must be installed so that it does not exert any mechanical force
or tension on the pump. If the conveying medium is contaminated, a suction
lter must be used to pump from sand and dirt.
NOTE: A check valve is recommended so that the water does not run off when the pump is shut off.
All connections must be sealed with fermit paste or thread sealing tape to prevent leaks that cause
air exhaust and reduce or prevent water exhaust.
Hemp should be used in case of pipe threads from metal; synthetic thread must be sealed with
thread sealing tape.
All components of the suction line must be installed by a qualied technician.
The suction pipe should have an internal diameter of 25 mm and must be kink resistant and suitable
for vacuum use.
The suction line should be as short as possible, since the conveying capacity decreases as the
length of the line increases.
4

SETUP AND INSTALLATION
The suction line should ascend steadily toward the pump to prevent air pockets.
Sufcient water supply must be assured; the end of the suction line should always be in water.
All components of the pressure line must be compression-proof.
All components of the pressure line must be professionally installed.
DANGER: Avoid damage to the device. The suction line must be installed so
that it does not exert any mechanical force or tension on the pump.
The device can also be connected rmly to a pipe system (domestic water supply in the interior). In this
case, the device should be connected to the pipe sytem with elastic high pressure exible hose lines in
order to prevent vibrations.
DANGER: If components are not compression-proof or if they are improperly
installed, the pressure line can burst causing serious injury. Seek professional help if
you are unsure.
OPERATING THE DEVICE
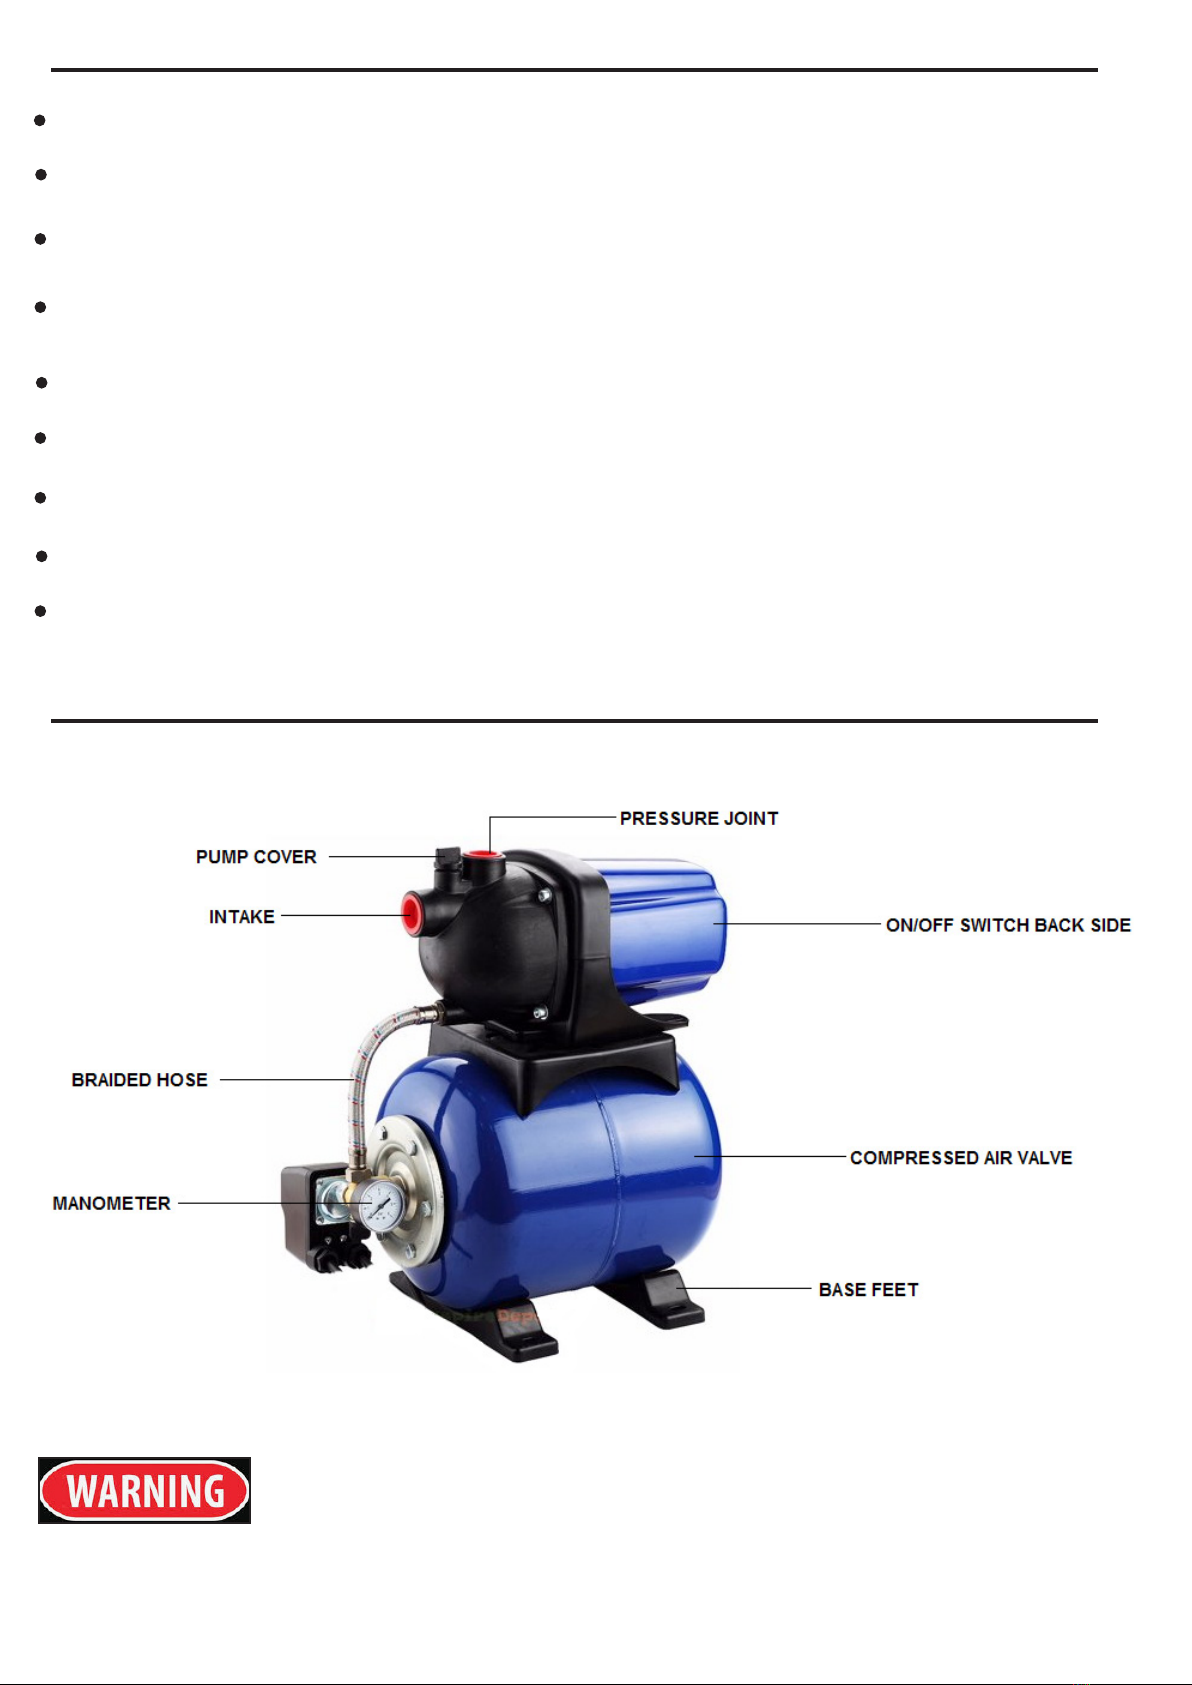
1. Unscrew the pump cover
2. Fill completely with water
3. Reinstall the lter and screw on the pump cover and seal back on
4. To shorten the intake time, ll the suction line as well
5. Open the pressure line so the air can escape during intake
6. Switch the device on
7. When the water runs out evenly, switch the device off
For better performance, installing a check line valve between the pump and suction line is
recommended so that the water column remains in the suction line.
If Domestic Water Works is installed directly in the water distribution network, it is important that the
water pressure from this network is added to the pump pressure. A total pressure of 6 bar must not
be exceeded.
NOTE: The boiler includes rubber bellows, which is under air pressure from the manufacturer. This
enables small amounts of water to be removed without starting up the pump. Check the pressure
before operating the pump and increase if necessary. The pump must not be placed in direct sunlight
as this could result in too high pressure.
1. Plug in the mains plug
2. Open the pressure line (turn on the spigot or nozzle)
3. Turn on the pump at the ON/OFF switch
4. Check to be sure water is coming out.
If the motor does not start up or the pump does not build up any pressure or if similar faults occur, turn
the device off and try to remedy the error.
The pump is equipped with a pressure switch. This turns the pump on if the water pressure in the
boiler drops below the start-up pressure due to water removal. The pressure switch turns the pump
off when the shutoff pressure is reached.
NOTE: The pressure switch is preset to the correct start-up and shutoff pressure by the manufacturer.
5

OPERATING THE DEVICE
MAINTENANCE
NOTE: All gaskets must be renewed after each assembly. Make sure the device and connected
accessories are depressurized before carrying out any work on the device.
If over time, the pump starts up after a slight removal of water, approximately 0.5L, the preliminary lling
pressure in the boiler must be re-established.
1. Disconnect the mains plug
2. Open the pressure line (turn on the water spigot or nozzle), allow water to completely run off
3. Unscrew the plastic buttery valve on the front side of the boiler; the air-control valve is located
behind it.
4. Attach the air pump or compressor hose to the air-control valve with a “tire valve” connection and
pressure gauge.
4. Pump up, or inate to the designated preliminary lling pressure. Preliminary lling pressure: 1.8 ~
2.0 bar
Unscrew lter housing (A) and take out the lter cartidge
If necessary, soak the cartridge in warm water
Rinse the lter cartidge with clean water, brush out stubborn dirt from inside
the cartridge using a soft brush.
DANGER: If the conveyed water is highly contaminated, clean the water after
each use. A clogged lter may damage the device.
6
STORAGE
If there is danger of frost, dismantle the device and accessories, clean and store them in a place
protected from frost.
1. Turn off the device and unplug the mains plug
2. Open pressure line, allow water to completely run off
3. Completely empty the pump and boiler
4. Dismantle the suction and pressure lines from the device
5. Store the device in a frost free room, at least 5 °C
Dismantling

TROUBLESHOOTING
7

8
THE MANUFACTURER AND/OR DISTRIBUTOR HAS PROVIDED THE PARTS LIST AND ASSEMBLY
DIAGRAM IN THIS MANUAL AS A REFERENCE TOOL ONLY. NEITHER THE MANUFACTURER OR
DISTRIBUTOR MAKES ANY REPRESENTATION OR WARRANTY OF ANY KIND TO THE BUYER THAT
HE OR SHE IS QUALIFIED TO MAKE ANY REPAIRS TO THE PRODUCT, OR THAT HE OR SHE IS
QUALIFIED TO REPLACE ANY PARTS OF THE PRODUCT. IN FACT, THE MANUFACTURER AND/OR
DISTRIBUTOR EXPRESSLY STATES THAT ALL REPAIRS AND PARTS REPLACEMENTS SHOULD BE
UNDERTAKEN BY CERTIFIED AND LICENSED TECHNICIANS,AND NOT BY THE BUYER. THE BUYER
ASSUMES ALL RISK AND LIABILITY ARISING OUT OF HIS OR HER REPAIRS TO THE ORIGINAL
PRODUCT OR REPLACEMENT PARTS THERETO, OR ARISING OUT OF HIS OR HER INSTALLATION
OF REPLACEMENT PARTS THERETO.
Record Product’s Serial Number Here:
Note: If product has no serial number, record month and year of purchase instead.
Note: Some parts are listed and shown for illustration purposes only and are not available individually
as replacement parts.
PLEASE READ THE FOLLOWING CAREFULLY
Table of contents
Other Stark Water Pump manuals
Popular Water Pump manuals by other brands

Simplex
Simplex G5 Air Torque Series manual

Simer
Simer ACE IN THE HOLE Series owner's manual

ProMinent
ProMinent vonTaine 1010 PP Assembly and operating instructions

Varian
Varian TV 141 Navigator RS485 instruction manual

Whale
Whale UF2025 Installation & user's instructions

GYS
GYS 052321 Instructions of use

FläktGroup
FläktGroup Semco NEUTON owner's manual

Little Giant
Little Giant WSV50HM owner's manual

Weq
Weq CFW700 Series Applications manual

Gardena
Gardena 1476 Operator's manual

Ashland
Ashland EPH30 OPERATION, PERFORMANCE, SPECIFICATIONS and PARTS MANUAL

Grundfos
Grundfos LSV Installation and operating instructions