starlight Xperience User manual

User Manual

Table of Contents
1) Introduction ..................................................... 4
2)Using Starlight Xperience ............................... 5
2.1 Turning on the Headset........................... 6
2.2 Putting on the Headset............................ 6
2.3 Using the Controller ................................ 7
2.4 Connecting the Controller ....................... 8
2.5 Recalibrating the Controller..................... 8
2.6 Launching a VR Experience.................... 9
2.7 Exiting a VR Experience ......................... 9
2.8 Connecting to Wi-Fi............................... 10
2.9 Turning off the Headset......................... 10
2.10 Cleaning the Headset.......................... 11
2.11 Charging the Hardware ....................... 12
2.12 VR Lying Down/Without a Controller... 13
2.13 Playing Left Handed............................ 14
2.14 Motion Sickness in VR ........................ 15
2.15 Tips ..................................................... 16
2.16 Admin Usage....................................... 18
!
!
3) Content..........................................................19
3.1 Preloaded Content ...................................20
4) FAQs .............................................................30
5) Additional Support .........................................31
4
1) Introduction
Thank you for piloting Starlight Xperience!
Starlight Xperience is a groundbreaking new
program from Starlight Children’s Foundation. With
your help, this program will transform the hospital
experience for kids by virtually transporting them out
of the hospital to anywhere in the world — or the
galaxy — they dream to go. Starlight Xperience
offers hospitalized kids a variety of fun, age-
appropriate and fantastic virtual reality experiences
geared toward entertainment and distraction.
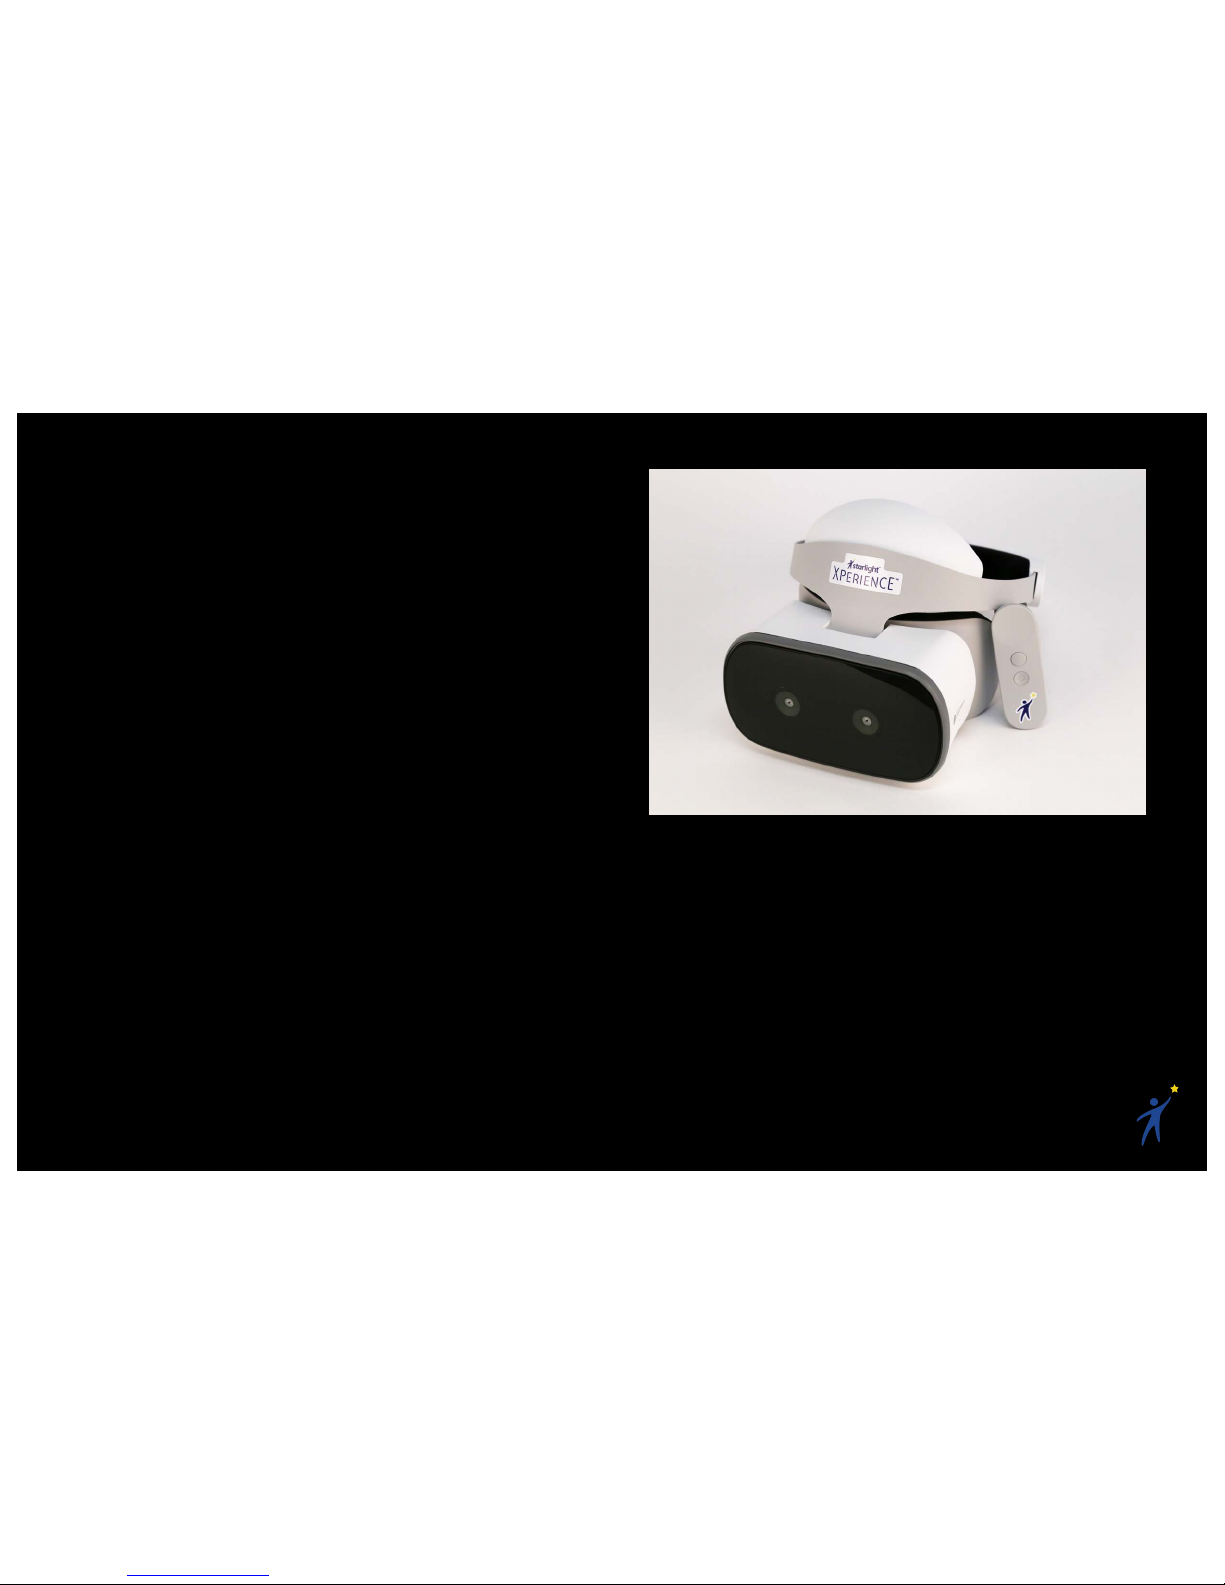
Starlight Xperience features a suite of state-of-the-art equipment, including a wireless VR headset
that is easy to transport, quick to wipe clean and does not require Internet access for daily use,
making it highly accessible and easy-to-use in the healthcare environment.
The Starlight Xperience program is currently being piloted by a small number of forward-thinking
hospitals. Thank you for helping us evaluate this program so that it can be used to improve the life
and health of kids and families around the world.
!
5
2) Using Starlight Xperience
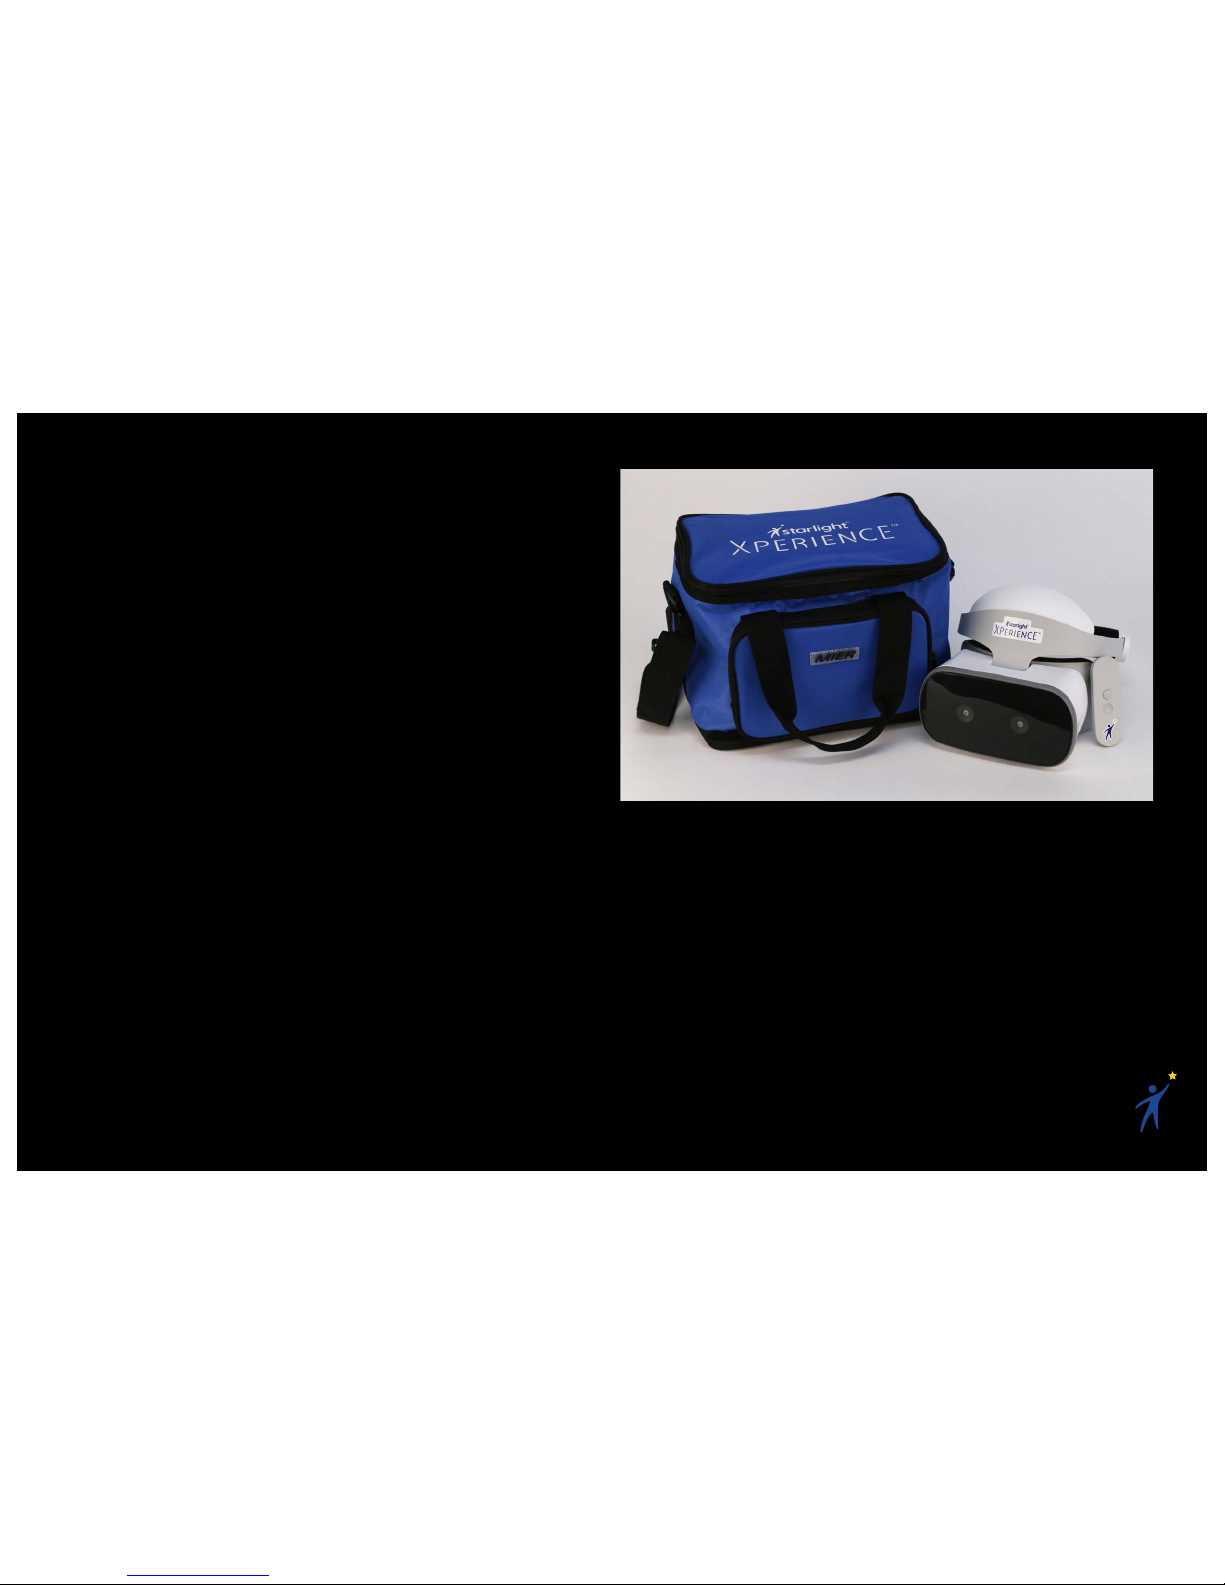
The Starlight Xperience kit includes:
•A Starlight customized Lenovo Mirage Solo
headset and controller
•20+ preloaded VR experiences
•Headset mounted, wipeable VR
headphones
•2 charging cables
•A carrying case
6
2.1 Turning on the Headset
1. Press and hold the power button
•A white indicator light will flash, then
remain steady
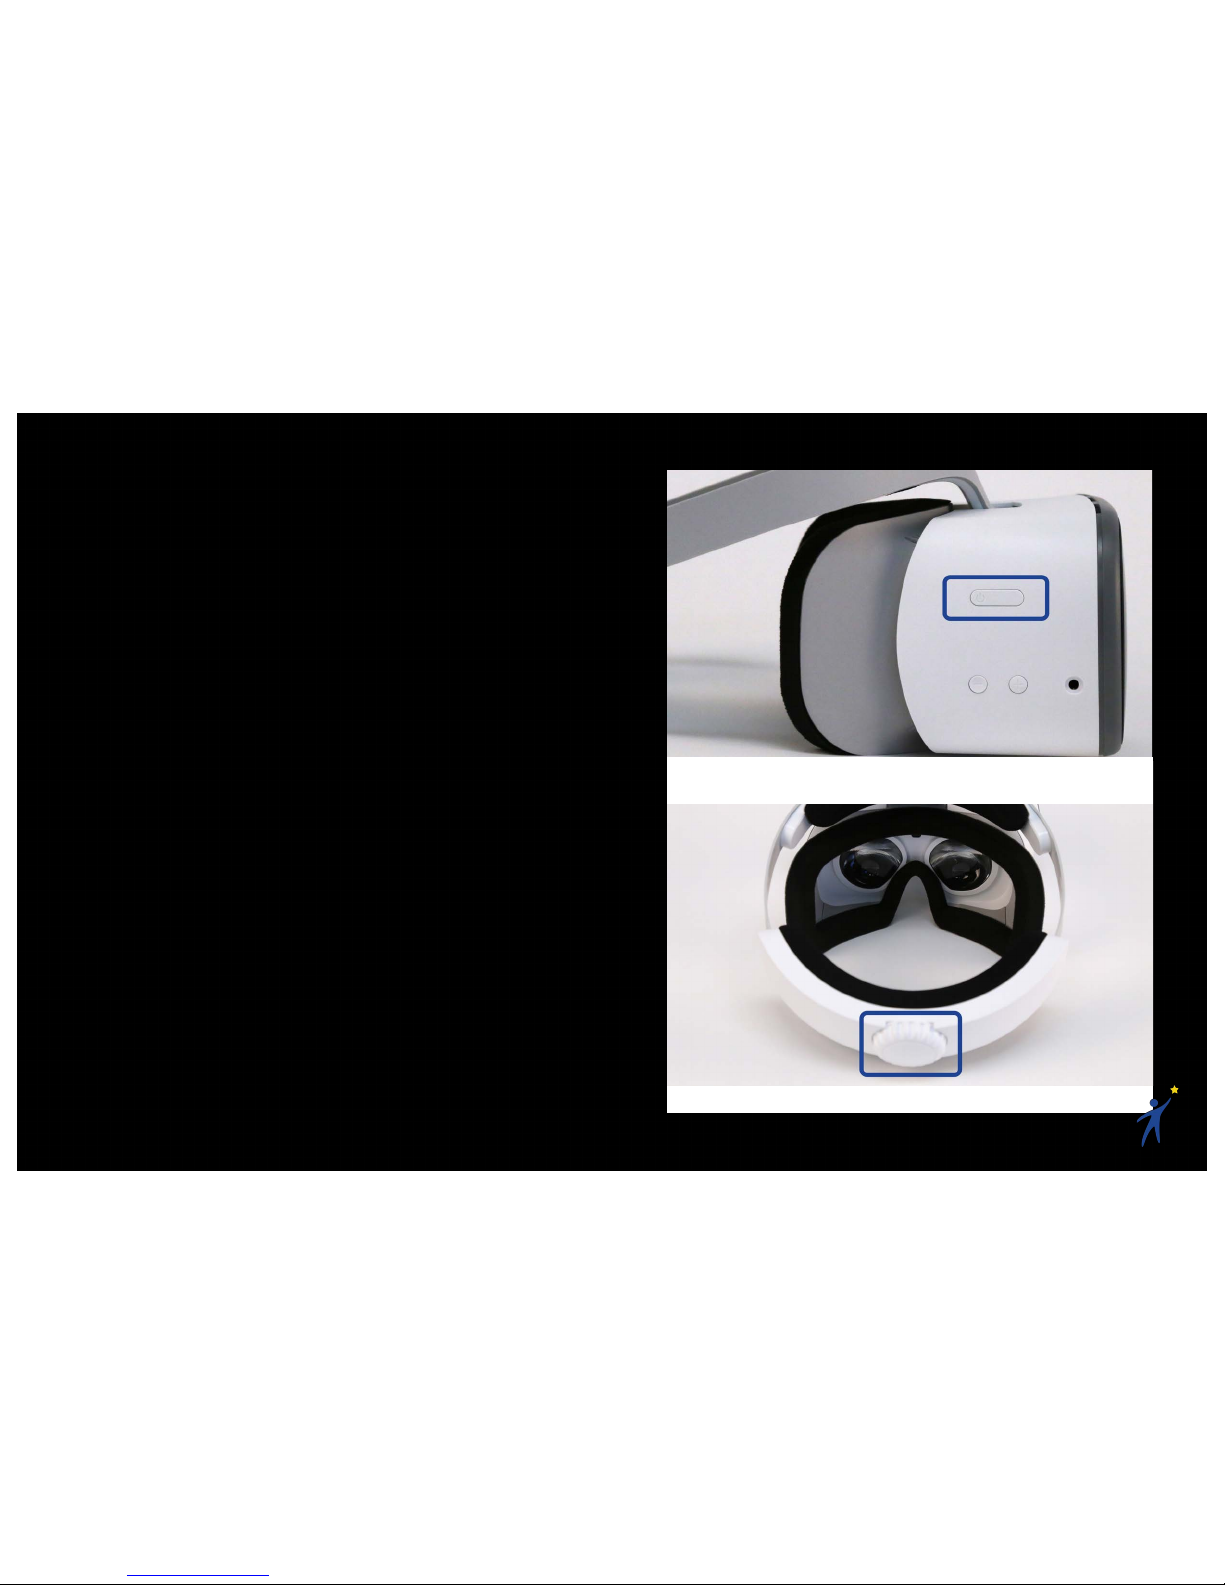
2.2 Putting on the Headset
1. Loosen the ratchet wheel on the back of
the headset
2. Put the headset to your face like a pair of
goggles, ensuring you can see the screen
clearly
3. Tighten the ratchet wheel so that the
headset is snugly resting on your forehead
Note: If the screen is not clear, hold down the
Headset Release Button on the bottom of the
headset and slide to adjust the screen’s distance
from your eyes.
Ratchet Wheel
Power Button
7
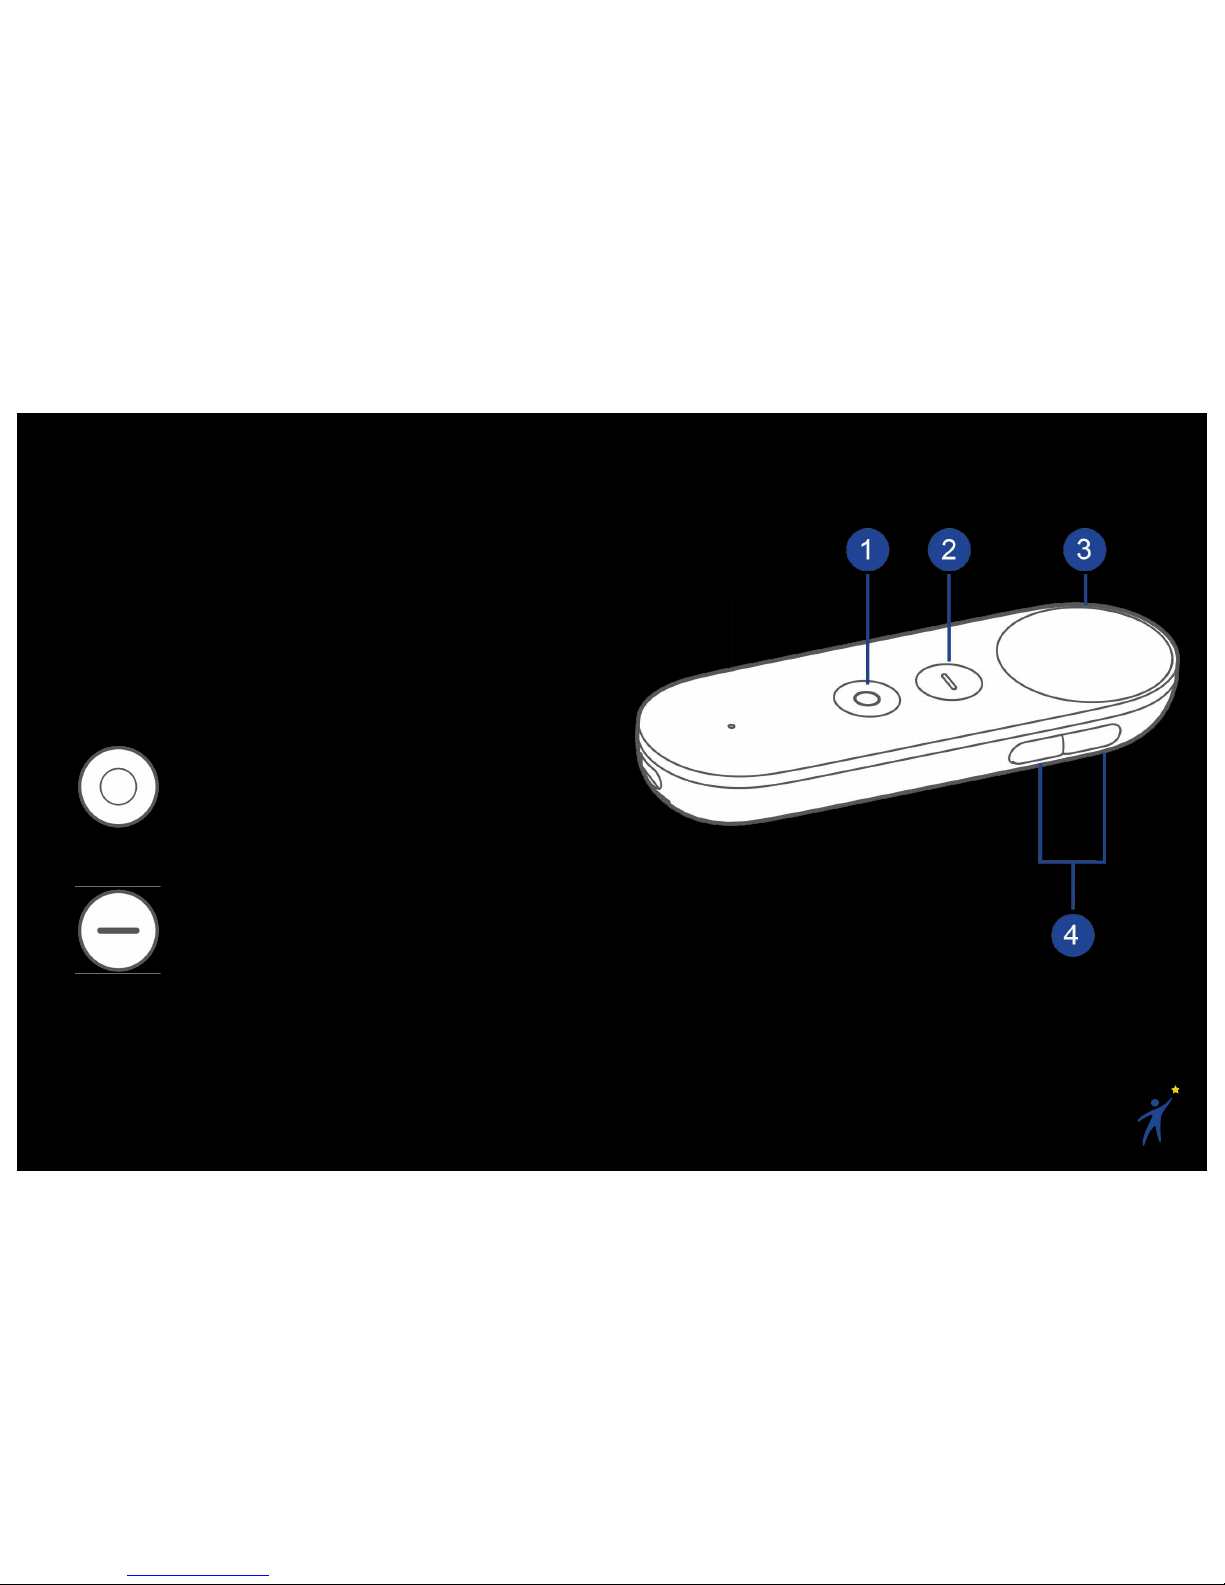
2.3 Using the Controller
For most applications, you will use the VR
controller to interact with the virtual world.
Becoming comfortable with pointing the controller
and using its buttons is important to have an
enjoyable VR experience.
1. Daydream Button
•Press to open the Daydream
Dashboard
•Press and hold to re-center your
headset and controller
2. App Button
•This button depends on the app you
are using. It is usually used to open
menus, pause, or go back
3. Touchpad
•Click or scroll the touchpad to
interact with your virtual world
4. Volume Buttons
Note: A virtual representation of your controller
will usually be visible while in the headset. This
can help you get your bearings.
8
2.4 Connecting the Controller
If your controller is not awake and connected, a
screen will appear in VR. Follow the on-screen
instructions to wake up and connect your
controller to the headset.
Note: Your controller and headset have been
paired ahead of time and marked with matching
numbers. Make sure you use the correct
controller and headset.
2.5 Recalibrating the Controller
If your controller and the virtual pointer ever feel
out of sync:
1. Point the controller forward
2. Click and hold the Daydream Button
Note: This will also re-center your view, so
ensure you are facing forward.

9
2.6 Launching a VR Experience
To launch an app from the Daydream Home:
1. Point at the “Library” button below the
white screen and click the Touchpad
2. In the Library, you can swipe through
pages of app icons. Point and click the app
you want to launch.
3. Have fun!
2.7 Exiting a VR Experience
1. Press the Daydream Button on
the controller to open the
Dashboard
2. From the Dashboard, you can click the
“Home” button to return to the Daydream
Home, or click the “Library” button to select
a new VR experience.
Daydream Home −Library Button
Dashboard −Home and Library Buttons

10
2.8 Connecting to Wi-Fi
Wi-Fi is not necessary to enjoy the majority of the
Starlight Xperience content, but it does allow you
to have access to new content and get automatic
updates. To connect to your Wi-Fi network:
1. Press the Daydream Button on the
controller to open the Dashboard
2. Click the Wi-Fi icon in the top right
3. Find and connect to your Wi-Fi network
2.9 Turning off the Headset
1. Press and hold the power button
•A white indicator light will flash, then
turn off
Power Button
Dashboard −Wi-Fi Button
11
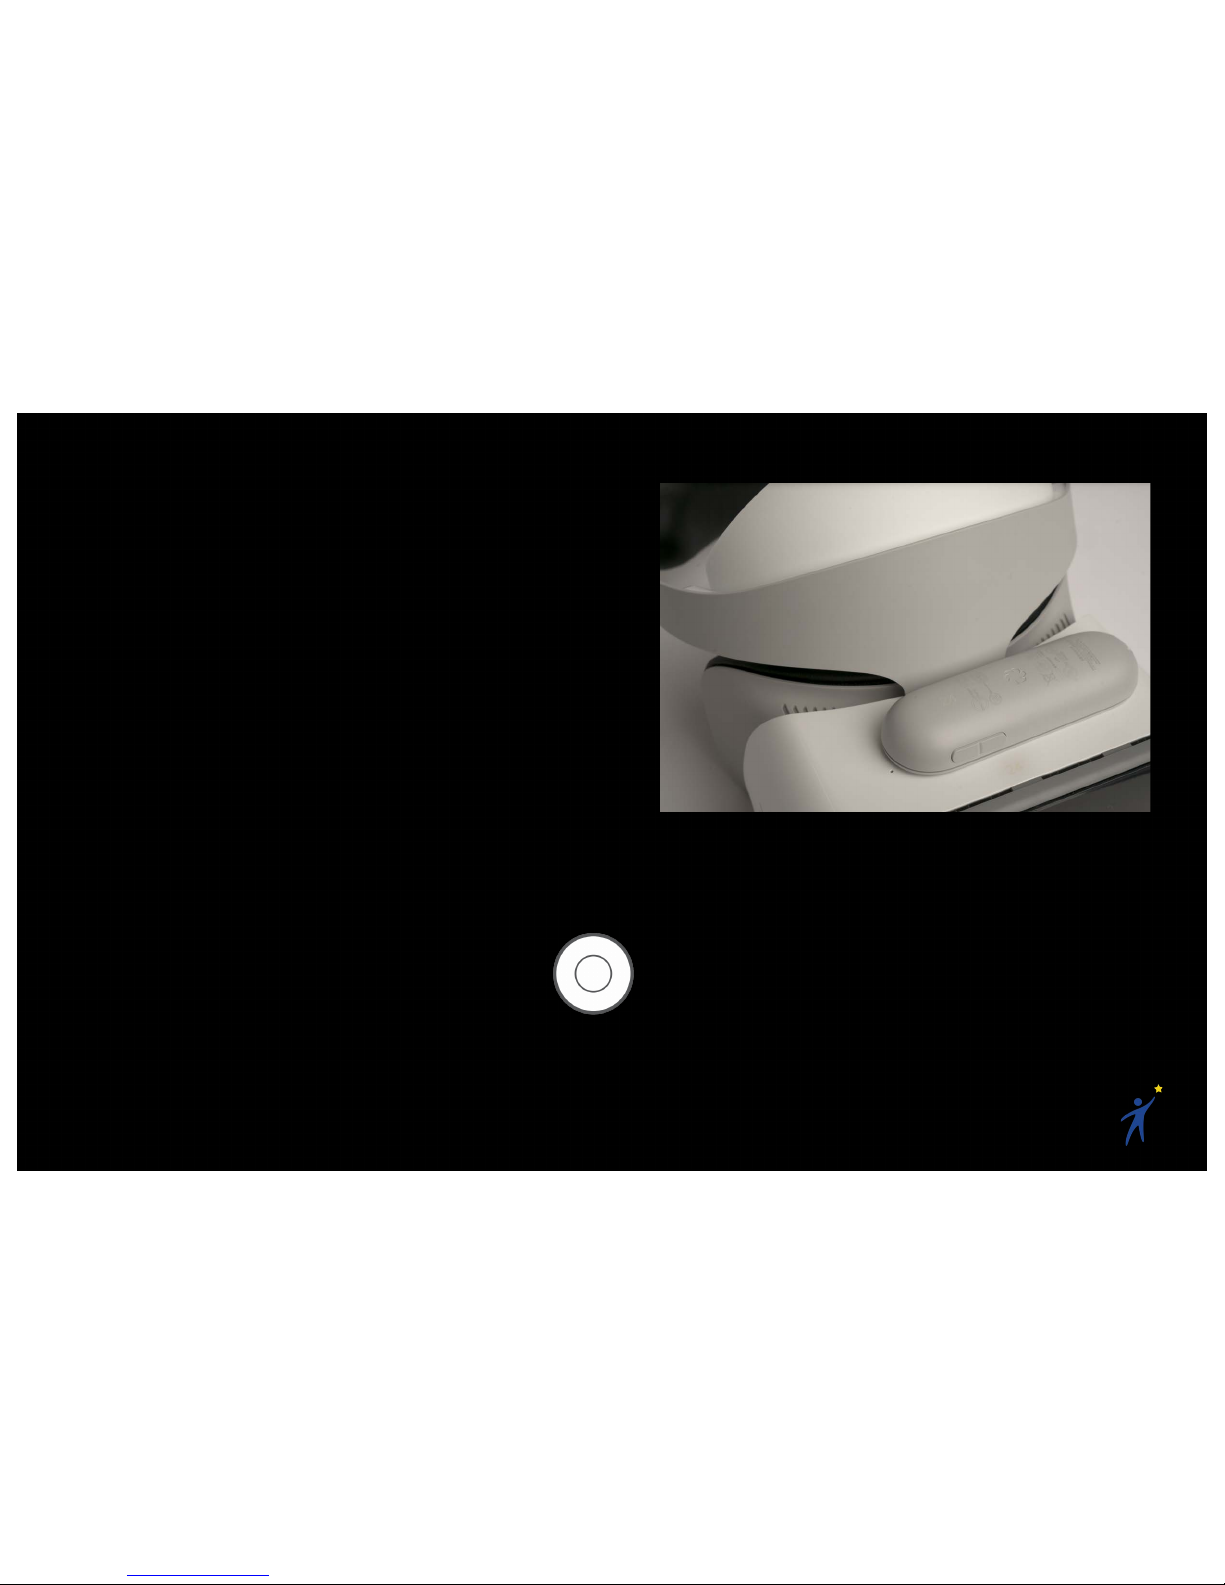
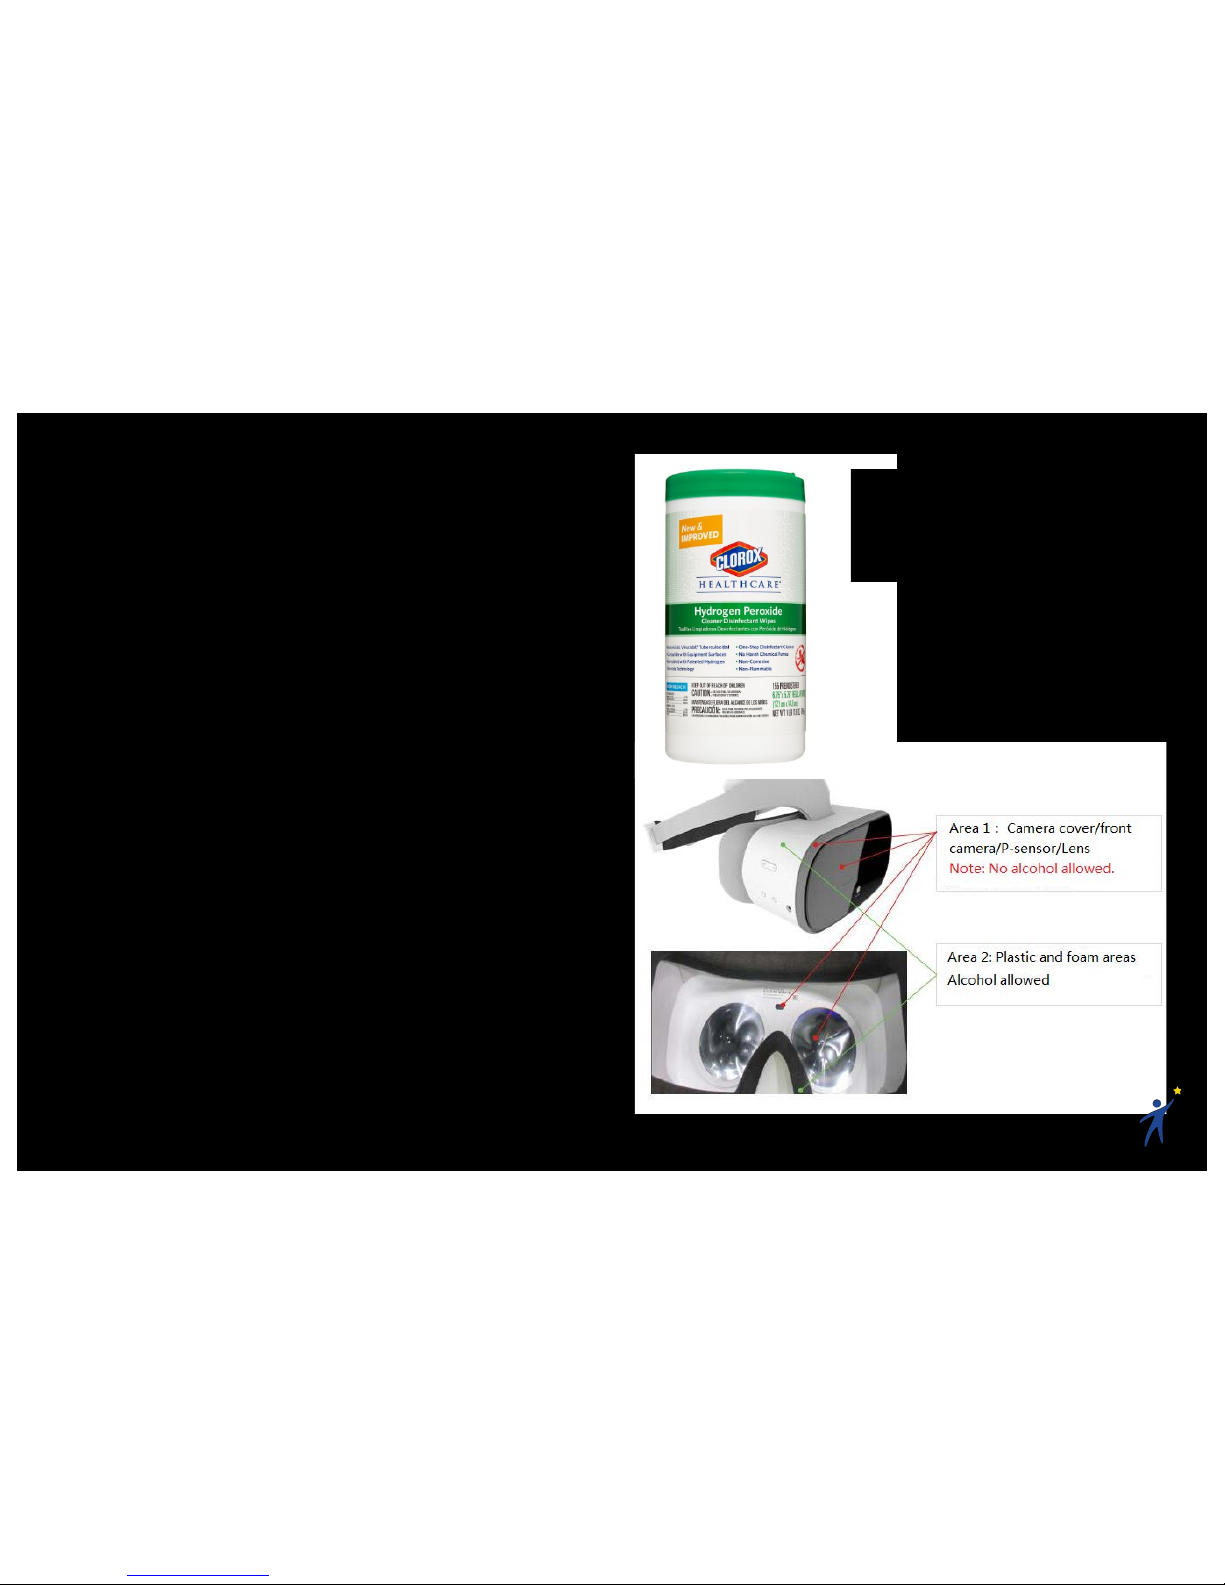
2.10 Cleaning the Headset
When cleaning your Starlight Xperience kit, make
sure to refer to your facility’s policy for cleaning
electronic equipment.
See the following cleaning recommendations:
•Use sanitizing wipes to clean the
hardware; all parts of the Starlight
Xperience kit are wipeable.
•To prevent damage to any parts of the
hardware, use Hydrogen Peroxide based
sanitizing wipes.
•Alcohol-based wipes may be used on the
plastic and foam parts of the headset, but
not on the glass lenses or front cameras.
•When using wipes, wring out any excess
liquid before using them to prevent any
liquid from going inside the hardware.
•Do not spray liquid or aerosol cleaners
directly onto any hardware.
Hydrogen Peroxide based wipes,
like the Clorox Healthcare
Hydrogen Peroxide Wipe, are the
preferred method of sanitization.

12
2.11 Charging the Hardware
You will want to keep the headset and controller
charged when they are not being used. To charge
the hardware:!
1. Plug the power adapter into a wall socket
with the two provided USB-C charging
cables connected to it
2. Plug one of the provided USB-C cables
into the VR headset’s charging port
•An orange indicator light inside the
power button will turn on
3. Plug the other provided USB-C cable into
the controller’s charging port
•A white indicator light will pulse
Headset Battery Life: ≈3 hours
Controller Battery Life: ≈12 hours
Note: The provided charging cables are the same
— both will work for the headset and controller.
13
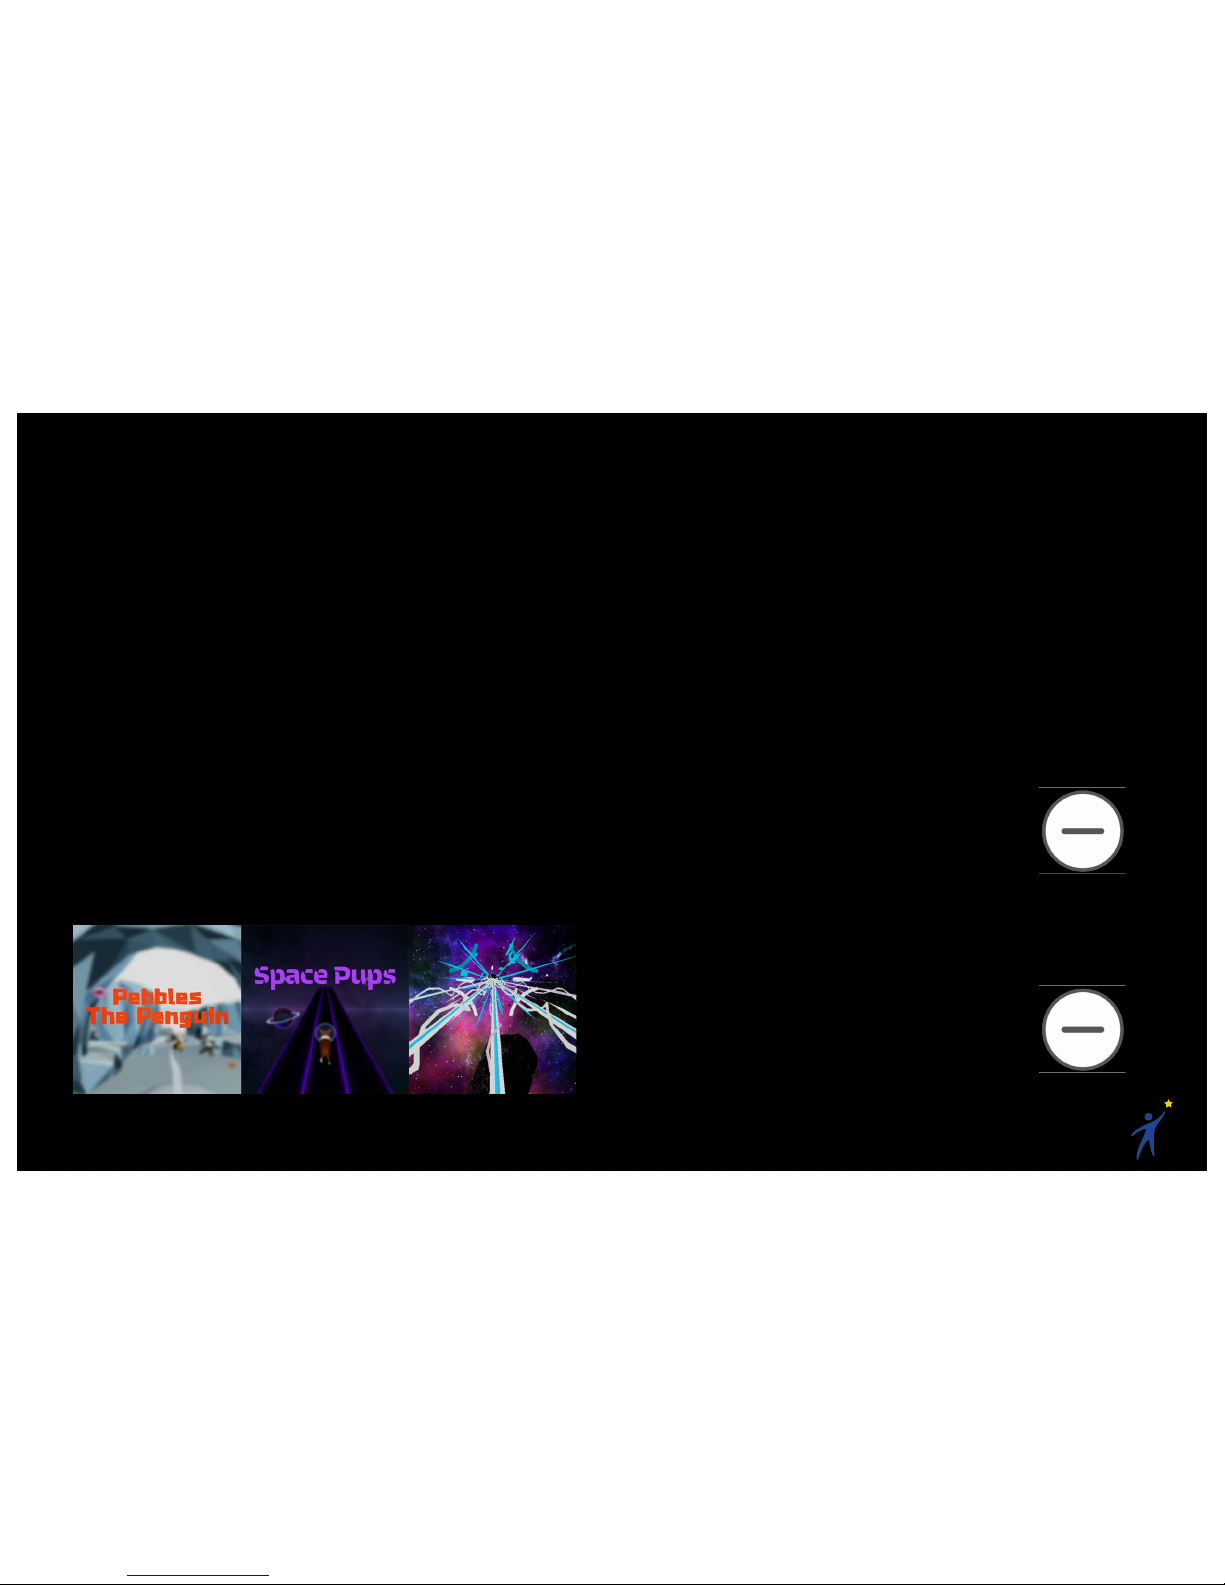
2.12 VR Lying Down/Without a
Controller
Most VR content is designed to be played in a
seated position with a controller in hand. In order
to make VR more accessible, Starlight Xperience
includes a few pieces of content that were
designed for the healthcare setting and include
options to play in any orientation, with or without a
controller. These VR applications are:
•Pebbles the Penguin
•Space Pups
•Asteroid Miner
To play these games without a controller:
1. Use your head to steer/jump/aim
To play these games with a controller:
1. Click the touchpad to activate controller
mode. Each game has its own controls.
To reorient these games so that they can be
played in any orientation:
1. Get into the preferred playing orientation
(ex: lying down)
2. Click and hold the App Button
on the controller for 2 seconds
These games also include the ability to increase
the cognitive load of the VR experience. This can
be a useful distraction tool. To increase the
cognitive load for 15 seconds:
1. Triple-click the App Button on
the controller
!

14
2.13 Playing Left Handed
To switch to between left/right handedness:
1. Click the Daydream Button on the
controller to open the dashboard
2. Click the Settings Button in the
top- right
3. Click “Switch to Left/Right Handed”
Note: Matching left/right handedness to the user
will improve the VR controller experience, but it is
not necessary to enjoy VR.
2. Click the Settings Button
3. Click “Switch to Left/Right Handed”

15
2.14 Motion Sickness in VR
Virtual Reality (VR) is an exceptional form of
entertainment and distraction that is sure to
inspire and delight your patients. While most
people are enthralled by their experiences in VR,
the immersive technology can be uncomfortable
to some users — particularly those who are prone
to motion sickness.
These are the most common factors that lead to
an uncomfortable VR experience:
•History of motion sickness, nausea, or
increased risk for nausea/vomiting
•History or increased risk of
headaches/migraines
•History or increased risk of seizures
•Claustrophobia or previous intolerance of
virtual reality
•Visual problems
•Facial trauma
Kids tend to have a much greater tolerance for
motion sickness than adults, but it is still
important to assess for the risks of VR. If at any
point your patient is feeling any kind of
discomfort, instruct them to close their eyes and
take off the headset.

16
2.15 Tips
Holding the Controller The Right Way
It’s most people’s natural instinct to hold the
controller with their thumb resting on the raised
App Button. Before helping a patient put on the
VR headset, ensure they know to rest their
thumb on the touchpad, as that is the main way
they’ll be interacting with the virtual world.
Helping Others into the Headset
When helping others into the headset, have
them first hold the goggles to their face, then
help them tighten the ratchet wheel.
You may see your patient holding the headset
up with one hand while using it (particularly
young patients). This is usually due to the
headset being blurry, rather than too heavy.
Help them readjust the headset so they can
see clearly. This may require adjusting the
headset’s distance from the patient’s face:
1. Take the headset off
2. Press and hold the Headset Release
Button on the bottom of the headset
3. Slide the goggles as needed (usually
closer to where your face would be)
Reset the Headset Orientation
The VR headset orients itself based on its
position when you first put it on. If you feel like
you’re off center, you can either:
(a) Click and hold the Daydream
Button on the controller, or
(b) Take off the headset, wait for a
second, and put it back on

17
Avoid Direct Sunlight
The VR headset's lenses are like magnifying
glasses. When exposed to direct sunlight, they
will magnify the sun and quickly burn the
headset’s screen. Avoid direct sunlight when
using or storing the Starlight Xperience
headset.
18
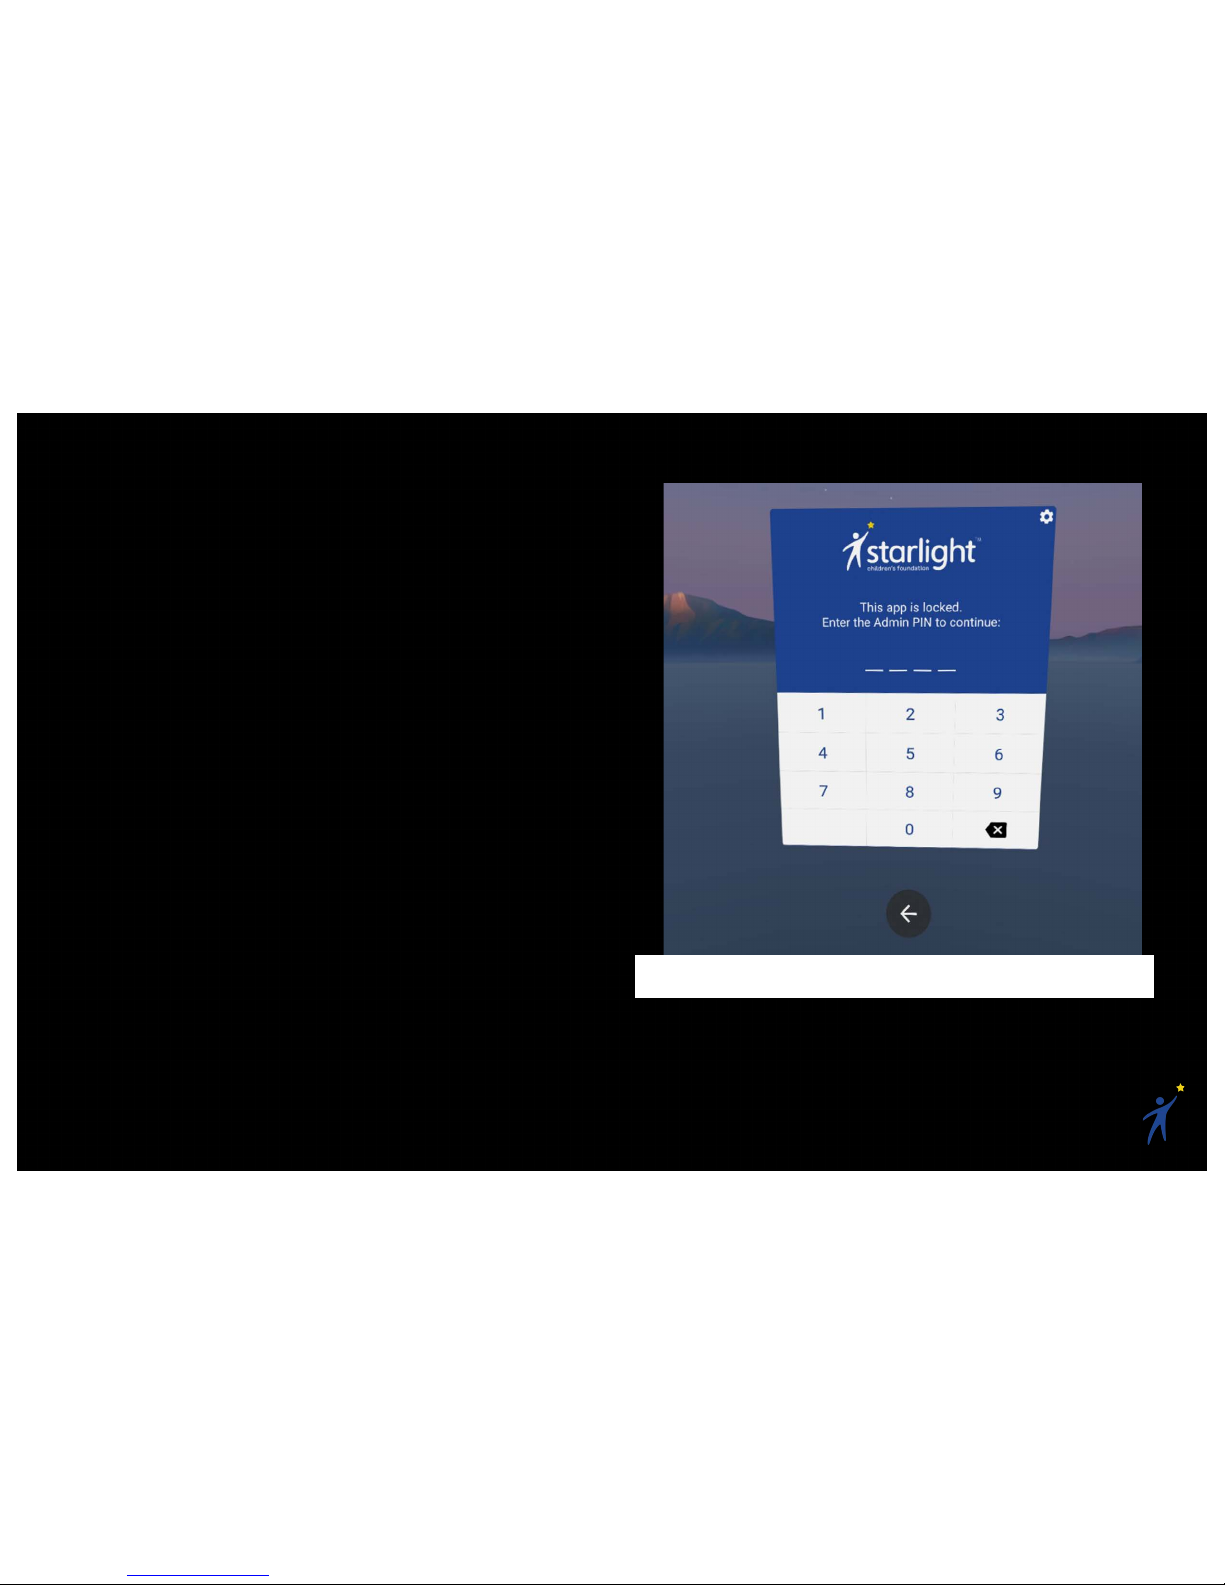
2.16Admin Usage
The Starlight Xperience kit has locked a few apps
to prevent unauthorized users from downloading
inappropriate content, uninstalling existing
content, or changing the device’s settings.
If you try to access the Google Play Store or the
Device Settings, you will hit a lock screen
requesting a PIN code to continue.
Device Admin PIN: 5112
After you’ve entered the Device Admin PIN, all
locked apps will be unlocked for 5 minutes.
Admin Lock Screen

19
3) Content
The Starlight Xperience preloaded content can be
separated into a few different categories. Each
category loosely targets specific age groups and
usage scenarios.
Passive Experience
Experience: Sit back and watch a story
unfold.
Use Case: Passive VR experiences are great
for kids of all ages; specifically those who
want to use VR without using a lot of energy.
Quick, Casual Play
Experience: Interactive, arcade-style games
that you can jump into and out of quickly.
Use Case: Quick, casual games are good for
kids of all ages because they’re easy to
understand and play. They’re a great intro-to-
VR experience and are a good opportunity to
share the VR headset around the room.
Narrative/Puzzle Game
Experience: A longer-form, interactive game
that takes some time to learn, but offers
engaging stories and/or puzzles that you can
keep coming back to.
Use Case: These games are great for
patients who may use the VR headset several
times throughout their stay.
Educational
Experience: Interesting and educational
environments to engage with.
Use Case: These experiences are a great
way for kids to escape to new worlds and
learn new things.
Relaxation/Meditation
Experience: Serene environments for
relaxation and guided meditation.
Use Case: These experiences allow patients
to relax in a comfortable, new environment.
20
3.1Preloaded Content
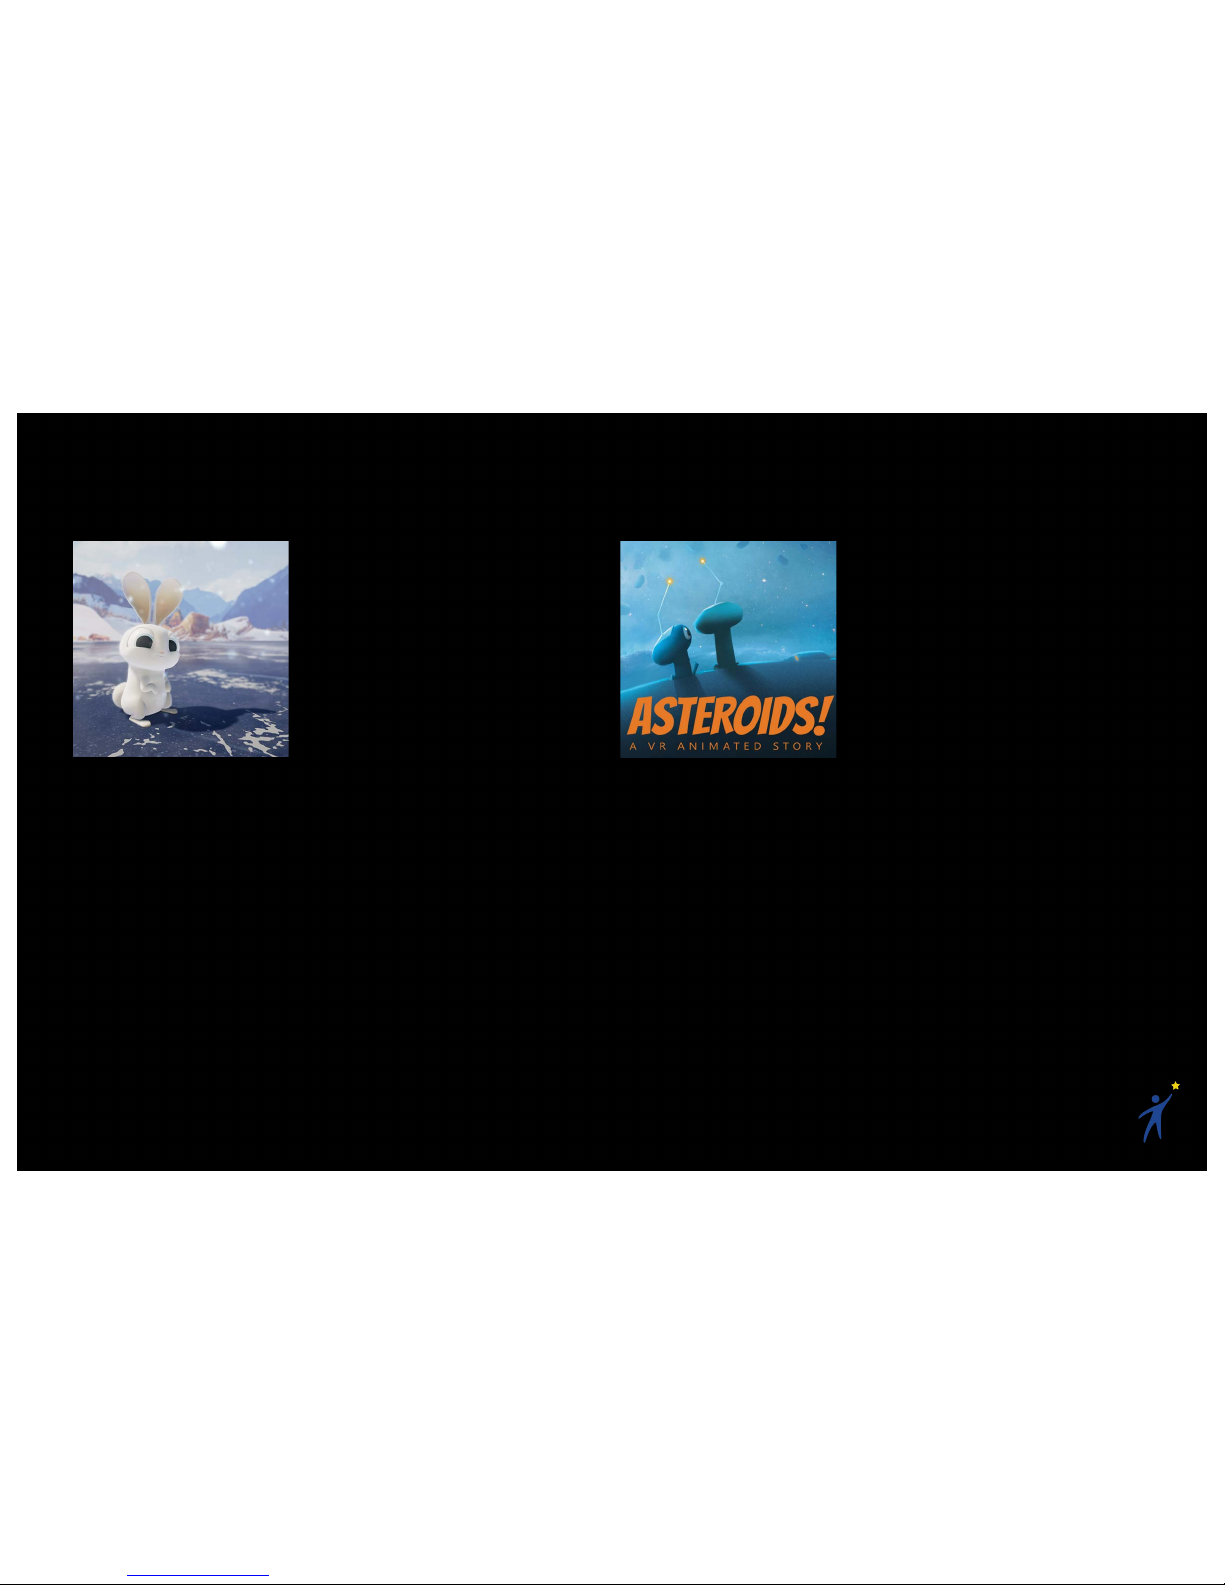
INVASION!
Category: Passive
Experience
Summary: A well-made
and colorful VR animated
short about a pair of aliens
with grand ambitions to
take over the world.
Instead, when they arrive on the planet, they are
greeted by a cute, cuddly bunny who manages to
save the day.
Use Case/Notes: This is a fun VR animated short
story. It requires no interaction, and it is a great
way to spend a few minutes in VR.
Duration: ≈6 minutes
Comfort: Comfortable
ASTEROIDS!
Category: Passive
Experience
Summary: A well-made
and colorful VR animated
short about a quirky pair of
aliens in outer space.
Use Case/Notes: This is a
fun VR animated short story. It has opportunities
for interaction but does not require it. It is a great
way to spend a few minutes in VR.
Duration: ≈11 minutes
Comfort: Comfortable

21
Ocean Rift
Category: Passive
Experience
Summary: Explore a vivid
underwater world full of life
including dolphins, sharks,
turtles, sea snakes, rays,
manatees, sea lions, orcas,
humpback whales, and dinosaurs. The
environments range from coral reefs and
shipwrecks to lagoons, the Arctic and Atlantis.
Use Case/Notes: This is a relatively passive
experience that will be enjoyable to anyone
looking to explore a nice underwater world. Some
of the scenes can be scary to certain kids
(specifically the shark and dinosaur scenes).
Duration: N/A
Comfort: Comfortable/Moderate. No required
movement, though the player can move in any
direction. Movement brings with it a risk of
nausea for those who get motion sick easily.
Hello Mars
Category: Passive
Experience & Quick/Casual
Game
Summary: There are a
number of space-related
activities in this well
produced, NASA
researched, space simulation experience. You
can passively enjoy a 7-minute Mars landing
sequence, control a rover on the surface of Mars,
or practice shuttle landing in a lab environment.
Use Case/Notes: This is a great VR app for any
space lover. The landing practice is the most fun
for the majority of users.
Duration: 15+ minutes of entertainment
Comfort: Comfortable/Moderate. A little bit of
very slow movement. Can cause nausea in
people with high risk of motion sickness.
Table of contents
Popular Other manuals by other brands


berlinger
berlinger Fridge-tag 2 E user guide

BD Diesel Performance
BD Diesel Performance FlowMAX Lift Pump V3 installation instructions

EMG
EMG MMTW Dual Mode Installation information

DURKOPP ADLER
DURKOPP ADLER 745-21 manual

Aquadistri
Aquadistri IQ40 Reef Warranty and manual

EAGO
EAGO DZ959F8 installation instructions

MadgeTech
MadgeTech UltraShock-5 Product user guide

Toshiba
Toshiba IK-TF7 instruction manual

STEER SMARTS
STEER SMARTS Yeti JK Extreme installation instructions

Lectrosonics
Lectrosonics R185 Operating instructions and troubleshooting guide

Alutech
Alutech ProPlus Series operating manual

dataTaker
dataTaker DT80 user manual