Starway SOLAR 1050 User manual

USER MANUAL
www.star-way.com version 22102021 V1.15.8
LAR
S
1050

Page 2 Page 3
Table of contents
Technical specications................................................................. 3
Dimensions ................................................................................. 3
Regulation / Safety ...................................................................... 4
Spectrometry .............................................................................. 6
Menu ......................................................................................... 8
DMX Chart ................................................................................. 14

Page 2 Page 3
TECHNICAL SPECIFICATIONS :
• Source: 10 x COB LED 50W warm white + Amber
• Opening angle: 55 ° (beam)
• DMX / RDM modes: 1/2/5/9/10/17/18/20/25/27
channels
• Mode: Auto, DMX
• RDM
• XLR 5 Pins In / Out
• Power supply: AC100 ~ 240V - 50 / 60Hz
• PowerCon® In / Out
• Max consumption: 560W (@ 240V)
• Dimensions: 1000 x 87 x 136 mm
• Weight: 6.5 kg

Page 4 Page 5
WARNING! Before carrying out any operations with the unit,
carefully read this instruction manual and keep it with cure
for future reference. It contains important about the installation,
usage and maintenance of the unit.
SAFETY
General InstructIon
• The products referred to in this manual conform to the European Community
Directives and are there-fore marked with CE:.
• The unit is supplied with hazardous network voltage (230V~). Leave servicing
to skilled personnel only. Never make any modications on the unit not de-
scribed in this instruction manual, otherwise you will risk an electric shock.
• Connection must be made to a power supply system tted with efcient earth-
ing (Class I appliance ac-cording to standard EN 60598-1 ). It is, moreover,
recommended to protect the supply lines of the units from indirect contact
and/or shorting to earth by using appropriately sized residual current devices.
• The connection to the main network of electric distribution must be carried out
by a qualied electrical installer. Check that the main frequency and voltage
correspond to those for which the unit is designed as given on the electrical
data label.
• Never use the xture under the following conditions:
- in places wet;
- in places subject to vibrations or bumps;
- in places with an ambient temperature of over 45° C.
• Make certain that no inammable liquids, water or metal objects enter the
xture.
• Do not dismantle or modify the xture.
• All work must always be carried out by qualied technical personnel. Contact
the nearest sales point for an inspection or contact the manufacturer directly.
• If the unit is to be put out of operation denitively, take it to a local recycling plant
for a disposal which is not harmful to the environment.
WarnInGs and InstallatIon precautIons
• Never let the power cord come into contact with other cables! Handle the power
cord and all connections with the mains with particular caution!
• Never modify, bend, mechanically strain, put pressure on, pull or heat up the
power cord.
• Never strain the cable. There must always be sufcient cable going to the device.
Otherwise, the cable will be damaged, which can cause serious damage.
• Never remove warning or informative labels from the unit.
• Never use anything to cover the ground contact.
• Never lift the device holding it by the projector-head, as the mechanics may be
damaged
• Do not shake the device. Avoid brute force when installing or operating the device.
• Only operate the device after having checked if the housing is rmly closed and all
screws are tightly fastened.
• Only operate the device after having familiarized with its functions.
• Avoid ames and do not put close to ammable liquids or gases.
• Always allow a free air space of at least 0.8 m around the unit for ventilation.
• Always disconnect power from the mains, when device is not used or before
cleaning! Only handle the power cord holding it by the plug. Never pull out the plug
by tugging the power cord.

Page 4 Page 5
• Make sure that the device is not exposed to extreme heat or dust.
• Make sure that the available voltage is not higher than stated on the rear panel.
• Make sure that the power cord is never crimped or damaged. Check the device
and the power cord from time to time.
• Make sure that the core diameter of extension cords and power cords is suf-
cient for the required power consumption of the device.
• Always hold the device by the transport handles.
• Never place any material over the LEDs or lens.
• Never look directly into the light source.
• Never leave any cables lying around.
• Never use the device during thunderstorms, unplug the device immediately.
• Never leave various parts of the packaging (plastic bags, polystyrene foam, nails,
etc within children’s reach, as they potential sources of danger.
• Do not insert objects into air vents.
• Do not open the device and do not modify the device.
• Do not connect this device to a dimmer pack.
• Do not switch the device on and off in short intervals, as this will reduce the
device’s life.
• Do not touch the device’s housing bare-handed during its operation (housing be-
comes very hot). Allow the device to cool for at least 5 minutes before handling.
• If the lens or LEDs are obviously damaged, they need to be replaced to prevent
their functions from being impaired, due to cracks or deep scratches.
• If the external cable is damaged, it has to be replaced by a qualied technician.
• If device was dropped or struck, disconnect mains power supply immediately.
Have a qualied engineer inspect for safety before operating.
• If the device has been exposed to drastic temperature uctuation (e.g. after
transportation), do not switch it on immediately. The arising condensation water
might damage your device. Leave the device switched off until it has reached
room temperature.
• If your device fails to work properly, discontinue the use immediately. Pack the unit
securely (preferably in the original packing material), and return it to your dealer
for service.
• For adult use only. The device must be installed beyond the reach of children.
Never leave the unit running unattended.
• Never attempt to bypass the thermostatic switch or fuses.
• For replacement use fuses of same type and rating only.
• This device is heavy. When handling, use a two-person lift to prevent injury.
• The user is responsible for correct positioning and operating of the device. The
manufacturer will not accept liability for damages caused by the misuse or incor-
rect installation of this device.
• This device falls under protection class I. Therefore it is essential to connect the
yellow/green conductor to earth.
• Repairs, servicing and electric connection must be carried out by a qualied
technician.
Rigging
This device is heavy. When handling, use a two-person lift to prevent injury.
Please follow the European and national guidelines concerning rigging, truss-
ing and all other safety issues.

Page 6 Page 7
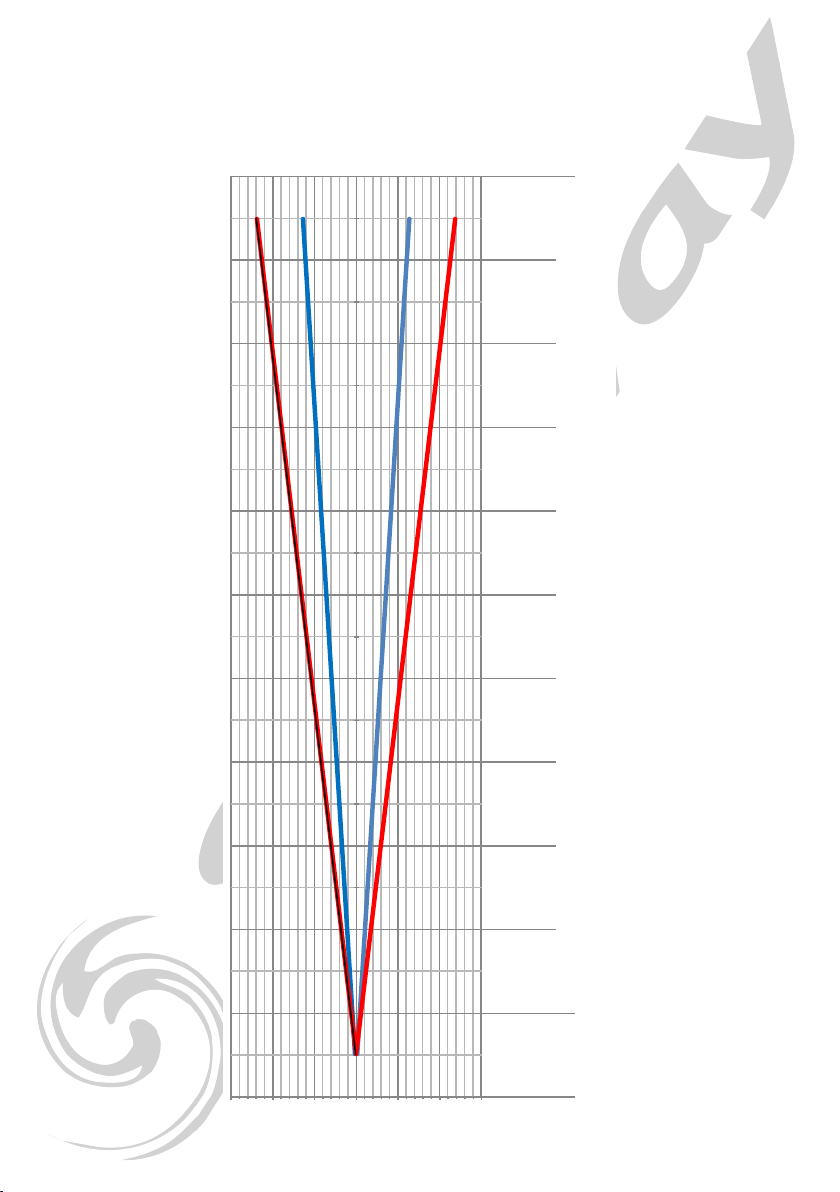
SPECTROMETRY
White LED
Amber LEDs
White +Amber LEDs
Page 6 Page 7
eam: ####
ield: ####
Eclaire ##### 31019 13786 7755 4963 3447 2532 1939 1532 1241 10258 62 7346 33 5514 85 4293 83 344 310
e en 0,51 1,52 2,53 3,54 4,55 5,56 6,57 7,58 8,59 9,51 0
D Be 0,52 1,04 1,56 2,08 2,63 ,123 ,644 ,164 ,685 ,2 5,72 6,24 6,76 7,28 7,88 ,328 ,849 ,369 ,88 10,4
D Fie0 ,961 ,922 ,883 ,844 ,8 5,76 6,72 7,68 8,64 9,6 10,6 11,5 12,5 13,4 14,4 15,4 16,3 17,3 18,2 19,2
00 ,260 ,520 ,781 ,041 ,3 1,56 1,82 2,08 2,34 2,62 ,863 ,123 ,383 ,643 ,9 4,16 4,42 4,68 4,94 5,2
00 ,480 ,961 ,441 ,922 ,4 2,88 3,36 3,84 4,32 4,85 ,285 ,766 ,246 ,727 ,2 7,68 8,16 8,64 9,12 9,6
0 -0,3 -0,5 -0,8- 1 -1,3 -1,6 -1,8 -2,1 -2,3 -2,6 -2,9 -3,1 -3,4 -3,6 -3,9 -4,2- 4,4- 4,7 -4,9- 5,2
0 -0,5- 1 -1,4 -1,9 -2,4 -2,9 -3,4 -3,8 -4,3 -4,8 -5,3 -5,8 -6,2 -6,7 -7,2 -7,7 -8,2- 8,6 -9,1- 9,6
-6
-4
-2
0
2
4
6
D Field en metres0 ,961 ,922 ,883 ,844 ,8 5,76 6,72 7,68 8,64 9,6
D Beam en metres0 ,521 ,041 ,562 ,082 ,6 3,12 3,64 4,16 4,68 5,2
Distance en metres 0,51 1,52 2,53 3,54 4,55
Eclairement Lux 124075 310191 3786 7755 4963 3447 2532 1939 1532 1241
° Field: 87,66
° Beam: 54,95
Angle Field
Angle Beam

Page 8 Page 9
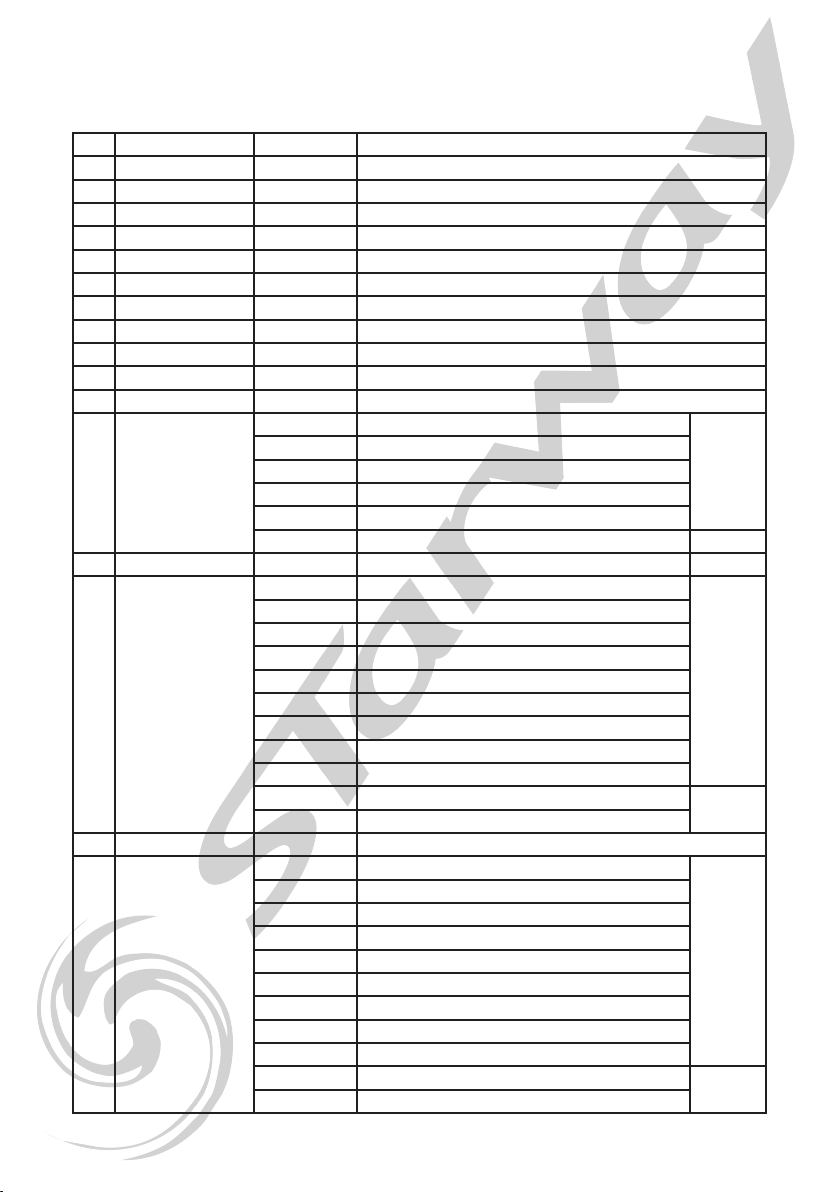
MENU
DMX ADDRESS
001-512
CONFIG MODE
CHANNEL MODE
2CH
5CH ST
5CH PIX
9CH
10CH
KEEP SCREEN ON
ENABLE
DISABLE
KEEP DMX DATA
ENABLE
DISABLE
FAN SPEED
ULTRA LOW
LOW
STANDARD
FAST DIMMER
ENABLE
DISABLE
DEFAULT HALOGEN
CURVE
CURVE 1
CURVE 2
17CH
18CH
20CH
25CH
27CH
1CH
HIGH
CURVE 3
CURVE 4
WHITE
AMBER
CURVE 5
DEFAULT DIMMER
SPEED
DIM 0
DIM 1
DIM 2
DIM 3
DIM 4

Page 8 Page 9
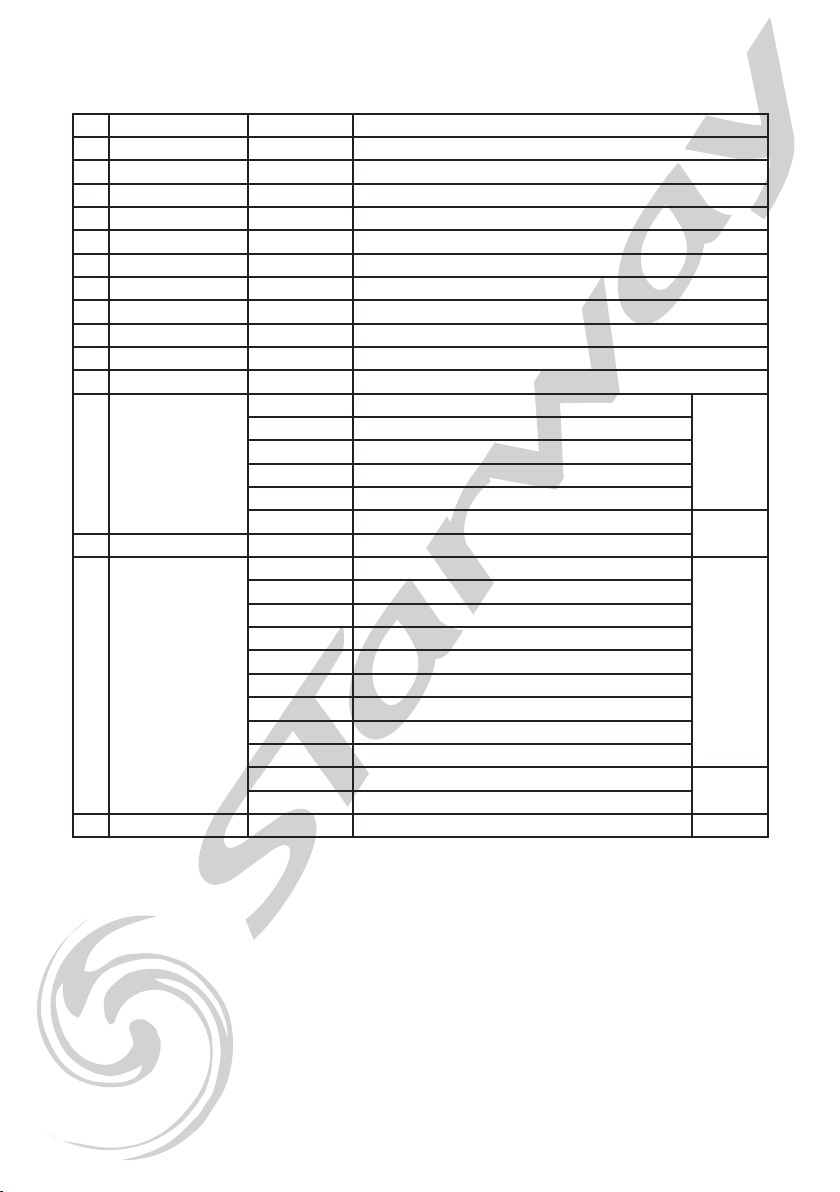
SYSTEM INFO
LED ALL ON
ENABLE
DISABLE
AUTO MODE
AUTO 1
AUTO 2
AUTO 3
RDM
RDM STATUS
ENABLE
DISABLE
RDM UID
XXXXXXXXX
RMD ID
XXXXX
RMD LABEL
SOLAR 1050
HEAD XX°C
BODY XX°C
CONFIG MODE
AUTO 4
FAN TEST
ON
OFF
LED LOAD DEFAULT
FALSE
TRUE
THE VALUES IN RED ARE DEFINED BY DEFAULT IN THE MENU
AND RELOADED AS IN THE CASE OF
«LOAD DEFAULT»

Page 10 Page 11
MENU
1 - DMX ADDRESS
Press Enter then use the Up and Down buttons to modify the DMX
address then validate with Enter or press ESC to cancel.
2 - CONFIG MODE
Channel Mode
SOLAR 1050 operating mode.
Use the Up and Down buttons to access the “Cong Mode” menu. Press
Enter to enter this submenu then use the Up and Down buttons to access the
“Channel Mode” submenu. Press Enter to modify the number of channels using
the UP and Down buttons then validate with Enter or press ESC to Cancel.
Keep Screen ON
SOLAR 1050 display operating mode (display constantly on or off
after a few seconds after modication).
Use the Up and Down buttons to access the “Cong Mode” menu. Press
Enter to enter this submenu then use the Up and Down buttons to access the
“Keep Screen On” submenu. Press Enter to modify the display behavior using the
UP and Down buttons then validate with Enter or press ESC to Cancel.
Keep DMX Data
Maintain last received DMX value in case of signal loss.
Use the Up and Down buttons to access the “Cong Mode” menu. Press
Enter to enter this submenu then use the Up and Down buttons to access the
“Keep DMX Data” submenu. Press Enter to modify the SOLAR 1050 behavior
in the event of loss of DMX signal using the UP and Down buttons then validate
with Enter or press ESC to Cancel.
FAN Speed
Fan operating mode
UUse the Up and Down buttons to access the “Cong Mode” menu.
Press Enter to enter this submenu then use the Up and Down buttons to access
the «FAN Speed» submenu. Press Enter to modify the behavior of the ventilation
using the UP and Down buttons then validate with Enter or press ESC to Cancel.

Page 10 Page 11
Default Halogen Curve
Halogen curve selection
UUse the Up and Down buttons to access the “Cong Mode” menu.
Press Enter to enter this submenu then use the Up and Down buttons to ac-
cess the “Default Halogen Curve” submenu. Press Enter to select one of the 5
dynamic curves, only white or only amber, using the UP and Down buttons then
validate with Enter or press ESC to Cancel.
Default Dimmer Speed
Dimmer speed curve selection
Use the Up and Down buttons to access the “Cong Mode” menu. Press
Enter to enter this submenu then use the Up and Down buttons to access the
“Default Dimmer Speed” submenu. Press Enter to select one of the 5 curves
(from 0 to 1 Second), using the UP and Down buttons then validate with Enter or
press ESC to Cancel.
Fast Dimmer
This option makes it possible to bypass the “Dimmer Speed” in the
event of a rapid change of the channel from Dimmer to 0.
Use the Up and Down buttons to access the “Cong Mode” menu. Press
Enter to enter this submenu then use the Up and Down buttons to access the
“Fast dimmer” submenu. Press Enter to modify the dimmer behavior using the
UP and Down buttons then validate with Enter or press ESC to Cancel.
3 - SYSTEM INFO
DISPLAY OF SOLAR 1050 INFORMATION
Use the Up and Down buttons to access the “System Info” menu. A
Press Enter to display the temperature information. Press ESC to Exit.
4 - RDM
Use the Up and Down buttons to access the “RDM” menu. A Press
Enter to Enable or Disable RDM and to display the information. Press ESC to Exit.
5 - LED ALL ON
Use the Up and Down buttons to access the “LED ALL ON” menu. Press
Enter to turn on all the leds. Press ESC to turn off the LEDs and exit the submenuEnter to turn on all the leds. Press ESC to turn off the LEDs and exit the submenu.

Page 12 Page 13
6 - AUTO TEST
Use the Up and Down buttons to access the “Auto Test” menu. Press
Enter to enter this submenu then use the Up and Down buttons to select the
desired automatic program between Auto 1 and Auto 4. Conrm with Enter or
press ESC to cancel.
7 - FAN TEST
Use the Up and Down buttons to access the “FAN TEST” menu. Press
Enter then select enable (ON) or disable (OFF) the fan test by pressing ENTER.
Press ESC to exit the submenu.
8 - LED LOAD DEFAULT
Use the Up and Down buttons to access the “LED LOAD DEFAULT”
menu. Press Enter then select enable (TRUE) or disable (FALSE) the reloading of
default values by pressing ENTER. Press ESC to exit the submenu.

Page 12 Page 13
DMX Chart
Basic denitions
Master Dimmer
Channel
General intensity adjustment acting on all LEDs.
Dimmer Led XX
Channel
Intensity adjustment of each led or group of leds.
White and Amber are affected together or separately
depending on the mode.
Duration Channel In strobe mode the duration of the ashes is adjusted
by this channel.
Pattern Channel This channel selects combinations of LEDs forming
graphic patterns.
Flow Effect Channel
Animation of different combinations of patterns. Each
animation is offered either in instant mode or Tung-
sten mode.
Effect Speed Channel Flow Effect speed adjustment.
Leds Mode Channel
Choice of led behavior according to Tungsten mode or
White or Amber selection. This mode can vary accord-
ing to the DMX mode chosen.
For DMX modes which do not offer this setting, it can
also be selected in the Solar menu.
Dimmer Speed
Channel
Assigns a ramp-down time from 0 to 4 to the LEDs.
Not available in all DMX modes but is selectable in the
Solar 1050 menu.
Fast Dimmer Function
This function can be activated in the menu of the Solar
1050. When using a Dimmer Speed between 0 and 1
second, Fast Dimmer will allow a dry black by detec-
tion of the lowering speed of the dimmer up to 000.
Fast dimmer can be momentarily inhibited by selecting
255 on the strobe channel.
Note 1:
Since version V1.11 when the Fast Dimmer is activat-
ed in the menu it is possible to deactivate it by select-
ing 251-255 on the strobe channel. This allows you to
choose at any time if the LEDs are dry black or with a
ramp-down time on a Blackout.
Note 2:
Two instant and fade random pixel modes have
replaced the random of the various programs since
V1.11.
Note 3:
Since V1.15 the dimmer speed channel has been
modied by a possibility to precisely adjust the fade
dimmer from 0 to 10sec,
Note 4:
Since V1.15.7 the Led direction function has been
added to the menu as well as access to this function
in dmx from the Led mode channel.

Page 14 Page 15
1 CHANNEL MODE
the Tungsten curve and the speed of the dimmer are dened by the menu
1Master Dimmer 000-255 0 - 100%
2 CHANNELS MODE
the Tungsten curve and the speed of the dimmer are dened by the menu
1Dimmer Led 1-5 000 - 255 0 - 100%
2Dimmer Led 6-7 000 - 255 0 - 100%
5 CHANNELS STROBE MODE
the Tungsten curve and the speed of the dimmer are dened by the menu
1Master Dimmer 000 - 255 0 - 100%
2Duration 000 - 255 0 - 100%
3
Strobe
000 - 005 Shutter Open
(Note 1)
006-010 Shutter Close
011 - 092 Regular from slow to fast
093 - 174 Random from slow to fast
175 -250 Random synchronized from slow to fast
251-255 Shutter open Fast dimmer disabled
4Pattern 000-255 Pattern 1-81
5Flow Effect 000 - 255 Effect 1- 5
5 CHANNELS PIXEL MODE
the Tungsten curve and the speed of the dimmer are dened by the menu
1Dimmer Led 1-2 000 - 255 0 - 100%
2Dimmer Led 3-4 000 - 255 0 - 100%
3Dimmer Led 5-6 000 - 255 0 - 100%
4Dimmer Led 7-8 000 - 255 0 - 100%
5Dimmer Led 9-10 000 - 255 0 - 100%

Page 14 Page 15
9 CHANNELS MODE
the Tungsten curve and the speed of the dimmer are dened by the menu
1 Master Dimmer 000 - 255 0 - 100%
2 ALL White 000 - 255 0 - 100%
3 All Amber 000 - 255 0 - 100%
4 Duration 000 - 255 0 - 100%
5
Strobe
000 - 005 Shutter open
006-010 Shutter close
011 - 092 Regular from slow to fast
093 - 174 Random from slow to fast
175 -250 Random synchronized from slow to fast
251-255 Shutter open Fast dimmer disabled (Note 1)
6 Pattern 000-255 Pattern 1-81
7
Flow Effect
000-010 Effect Off
011 -014 P1 with fade
015 - 017 P1 Instant
018 - 021 P2 with fade
022 - 024 P2 Instant
025 - 028 P3 with fade
029 - 031 P3 Instant
032 - 035 P4 with fade
.../... etc….....
249-252 P37 Random Pixel fade (Note 2)
253-255 P37 Random Pixel instant
8 Effect Speed 001 - 255 From slow to fast
9
Leds mode
001 - 030 Separate White / Amber Control
031 - 060 Tungsten 1
061 - 090 Tungsten 2
091 - 120 Tungsten 3
121 - 150 Tungsten 4
151 - 180 Tungsten 5
181 - 234 No effect
235 - 244 Led direction 1 < 10 (hold 3sec) (note 4)
245 - 255 Led direction 10 > 1 (hold 3sec) (note 4)

Page 16 Page 17
10 CHANNELS MODE
the Tungsten curve and the speed of the dimmer are dened by the menu
1Dimmer Led-1 000 - 255 0 - 100%
2Dimmer Led-2 000 - 255 0 - 100%
3Dimmer Led-3 000 - 255 0 - 100%
4Dimmer Led-4 000 - 255 0 - 100%
5Dimmer Led-5 000 - 255 0 - 100%
6Dimmer Led-6 000 - 255 0 - 100%
7Dimmer Led-7 000 - 255 0 - 100%
8Dimmer Led-8 000 - 255 0 - 100%
9Dimmer Led-9 000 - 255 0 - 100%
10 Dimmer Led-10 000 - 255 0 - 100%
Page 16 Page 17
17 CHANNELS MODE
the Tungsten curve and the speed of the dimmer are dened by the menu
1Master Dimmer 000 - 255 0 - 100%
2Dimmer Led-1 000 - 255 0 - 100%
3Dimmer Led-2 000 - 255 0 - 100%
4Dimmer Led-3 000 - 255 0 - 100%
5Dimmer Led-4 000 - 255 0 - 100%
6Dimmer Led-5 000 - 255 0 - 100%
7Dimmer Led-6 000 - 255 0 - 100%
8Dimmer Led-7 000 - 255 0 - 100%
9Dimmer Led-8 000 - 255 0 - 100%
10 Dimmer Led-9 000 - 255 0 - 100%
11 Dimmer Led-10 000 - 255 0 - 100%
12 Duration 000 - 255 0 - 100%
13 Strobe
000 - 005 Shutter open
006-010 Shutter close
011 - 092 Regular from slow to fast
093 - 174 Random from slow to fast
175 -250 Random synchronized from slow to fast
251-255 Shutter open Fast dimmer disabled (Note 1)
14 Pattern 000-255 Pattern 1-81
15 Flow Effect
000-010 idle
011 -014 P1 with fade
015 - 017 P1 Instant
018 - 021 P2 with fade
022 - 024 P2 Instant
025 - 028 P3 with fade
029 - 031 P3 Instant
032 - 035 P4 with fade
.../... etc….....
249-252 P37 Random Pixel fade (Note 2)
253-255 P37 Random Pixel instant
16 Effect Speed 000-255 From slow to fast
17 Leds mode
000 - 009 Dened by menu
010 - 034 Tungsten 1
035 - 059 Tungsten 2
060 - 084 Tungsten 3
085 - 109 Tungsten 4
110 - 134 Tungsten 5
135 - 159 Only White LEDs
160 - 184 Only Amber LEDs
185 - 234 Idle
235 - 244 Led direction 1 < 10 (hold 3sec) (note 4)
245 - 255 Led direction 10 > 1 (hold 3sec)
Page 18 Page 19
18 CHANNELS MODE
1 Master Dimmer 000 - 255 0 - 100%
2 Dimmer Led-1 000 - 255 0 - 100%
3 Dimmer Led-2 000 - 255 0 - 100%
4 Dimmer Led-3 000 - 255 0 - 100%
5 Dimmer Led-4 000 - 255 0 - 100%
6 Dimmer Led-5 000 - 255 0 - 100%
7 Dimmer Led-6 000 - 255 0 - 100%
8 Dimmer Led-7 000 - 255 0 - 100%
9 Dimmer Led-8 000 - 255 0 - 100%
10 Dimmer Led-9 000 - 255 0 - 100%
11 Dimmer Led-10 000 - 255 0 - 100%
12 Duration 000 - 255 0 - 100%
13 Strobe
000 - 005 Shutter open
006-010 Shutter close
011 - 092 Regular from slow to fast
093 - 174 Random from slow to fast
175 -250 Random synchronized from slow to fast
251-255 Shutter open Fast dimmer disabled (Note 1)
14 Pattern 000-255 Pattern 1-81
15 Flow Effect
000-010 Idle
011 -014 P1 with fade
015 - 017 P1 Instant
018 - 021 P2 with fade
022 - 024 P2 Instant
025 - 028 P3 with fade
029 - 031 P3 Instant
032 - 035 P4 with fade
.../... etc….....
249-252 P37 Random Pixel with fade (Note 2)
253-255 P37 Random Pixel instant
16 Effect Speed 000-255 From slow to fast

Page 18 Page 19
17 Leds mode
000 - 009 Dened by menu
010 - 034 Tungsten 1
035 - 059 Tungsten 2
060 - 084 Tungsten 3
085 - 109 Tungsten 4
110 - 134 Tungsten 5
135 - 159 Only White LEDs
160 - 184 Only Amber LEDs
185 - 234 Idle
235 - 244 Led direction 1 < 10 (hold 3sec) (note 4)
245 - 255 Led direction 10 > 1 (hold 3sec)
18 Dimmer speed
000-009 Dened by menu
010 - 019 Dim 0
020-029 Dim 1
030-039 Dim 2
040-049 Dim 3
050-059 Dim 4
060-255 Fade 0 to 10sec (Note 3) (Note 3)
Page 20 Page 21
20 CHANNELS PIXEL MODE
the Tungsten curve and the speed of the dimmer are dened by the menu
1Dimmer Led-1 White 000 - 255 0 - 100%
2Dimmer Led-1 Amber 000 - 255 0 - 100%
3Dimmer Led-2 White 000 - 255 0 - 100%
4Dimmer Led-2 Amber 000 - 255 0 - 100%
5Dimmer Led-3 White 000 - 255 0 - 100%
6Dimmer Led-3 Amber 000 - 255 0 - 100%
7Dimmer Led-4 White 000 - 255 0 - 100%
8Dimmer Led-4 Amber 000 - 255 0 - 100%
9Dimmer Led-5 White 000 - 255 0 - 100%
10 Dimmer Led-5 Amber 000 - 255 0 - 100%
11 Dimmer Led-6 White 000 - 255 0 - 100%
12 Dimmer Led-6 Amber 000 - 255 0 - 100%
13 Dimmer Led-7 White 000 - 255 0 - 100%
14 Dimmer Led-7 Amber 000 - 255 0 - 100%
15 Dimmer Led-8 White 000 - 255 0 - 100%
16 Dimmer Led-8 Amber 000 - 255 0 - 100%
17 Dimmer Led-9 White 000 - 255 0 - 100%
18 Dimmer Led-9 Amber 000 - 255 0 - 100%
19 Dimmer Led-10 White 000 - 255 0 - 100%
20 Dimmer Led-10 Amber 000 - 255 0 - 100%
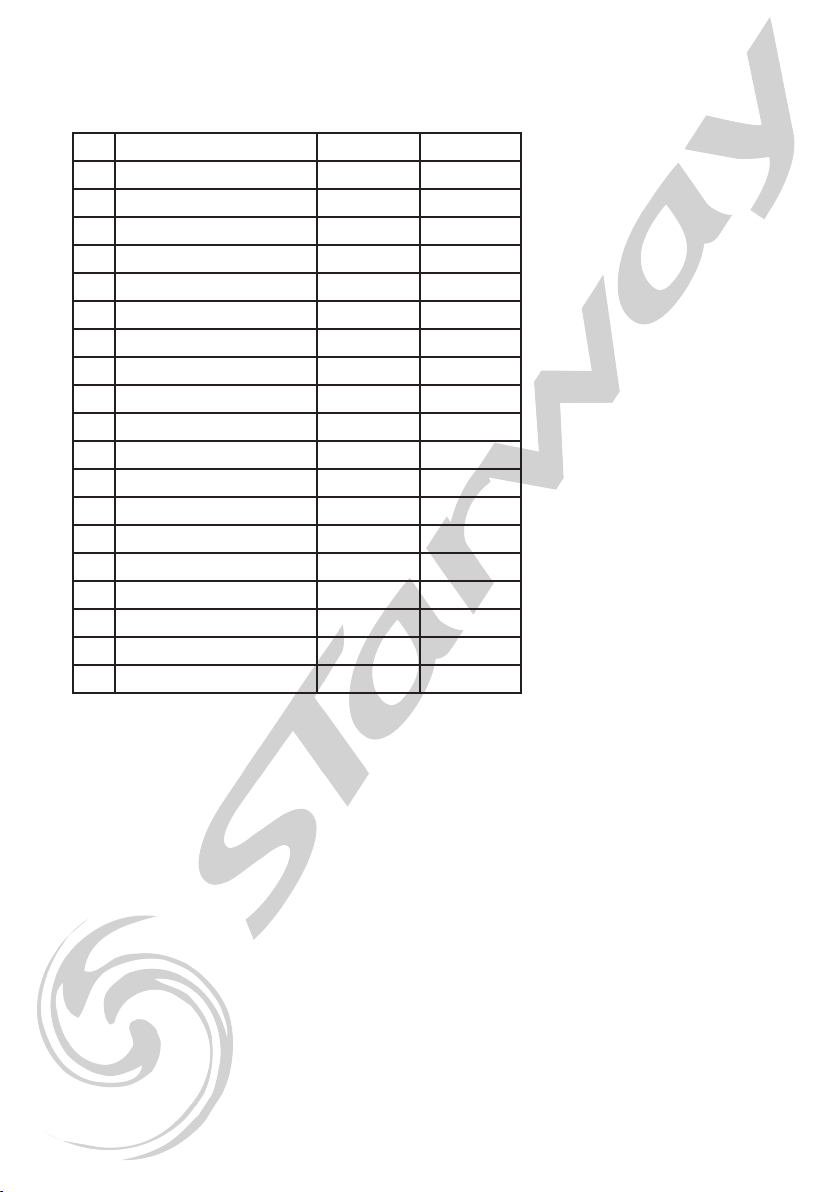
Other manuals for SOLAR 1050
1
Table of contents
Other Starway Spotlight manuals


Popular Spotlight manuals by other brands

Foscam
Foscam S41/SPC user manual

EuroLite
EuroLite LED SLS-144 UV Floor Spot user manual

Guangzhou Yinhe Lighting&Sound Equipment Factory
Guangzhou Yinhe Lighting&Sound Equipment Factory NE-204 user manual

LIVARNO home
LIVARNO home 375304 2101 Installation, operating and safety information

Leviton
Leviton Ellipsoid 5/50 user guide

Vector
Vector SL3AKV instruction manual

Quantum
Quantum Q262 Product data sheet

EUROSPOT
EUROSPOT C51 instruction manual

DTS
DTS MINI BRICK ARC user manual

Federal Signal Corporation
Federal Signal Corporation VISIBEAM II Installation, operation and maintenance instructions

ACME
ACME LED-MS350B user manual

EuroLite
EuroLite Akku flat light 1 user manual


