STATESMAN BSM60SS User manual
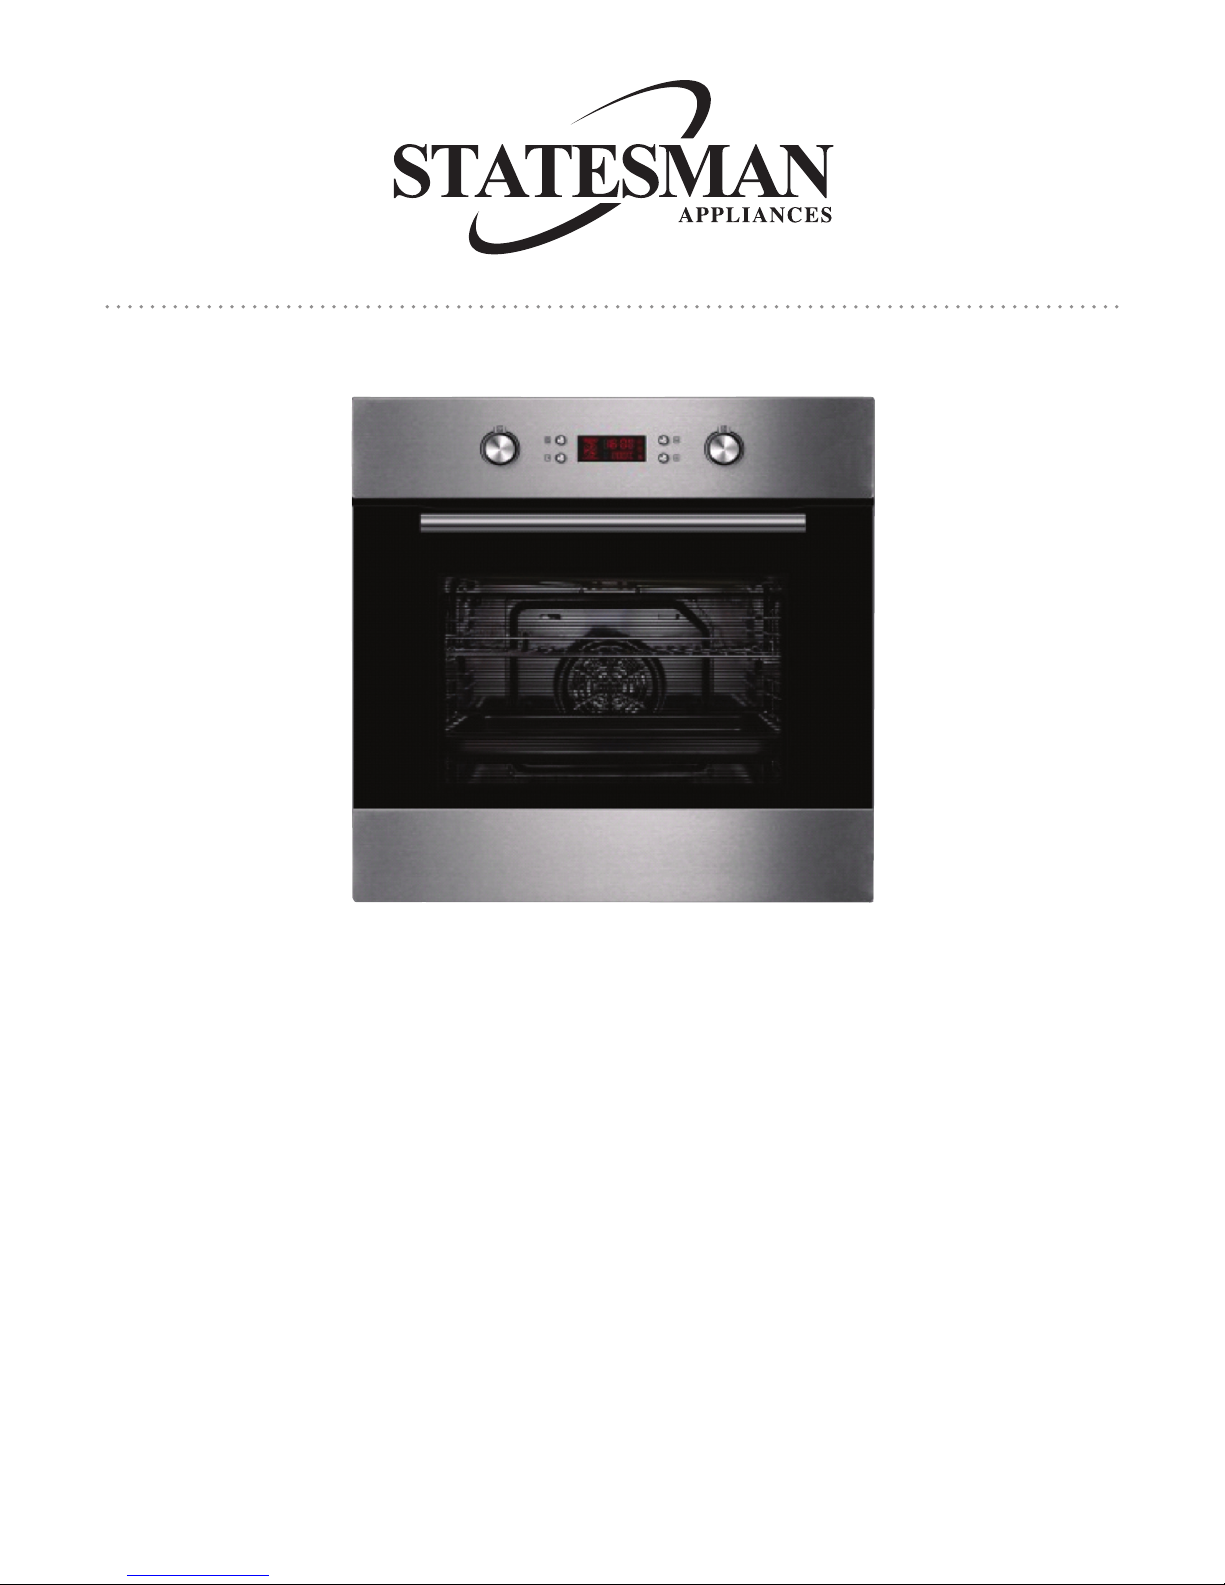
BSM60SS / BSM60WH
BUILT IN MULTI-FUNCTION ELECTRIC FAN OVEN
Instruction Manual
Please read these instructions carefully before use and retain for future reference

CONTENTS
Safety Instructions 2
Specications 3
Installation 3 - 5
Control Panel 6
Symbol Functions 7
Operating Instructions 8 - 11
Timer Functions 8
Safety Lock 9
Cooking Guidelines 10
Bulb Replacement 11
Removing Oven Door 11
Cleaning and Maintenance 12
Disposal 12
Service and Spare Parts 12

SAFETY INSTRUCTIONS
Important: This appliance is not intended for use by persons including children with physical,
sensory or mental impairment, or lack of experience and knowledge, unless they have been
given supervision or instruction concerning use of the appliances by a person responsible for
their safety.
• This product must be installed by the manufacturers authorised service agent or an equally
qualied person. Failure to use a qualied person will result your warraty being void.
• Before starting any work on electrical installation please turn off the electricity supply at
the mains.
• Ensure that the fuse rating is correct.
• This appliance must be earthed.
• The supply cable must not come into contact with any hot surfaces.
• The appliance and its accessible parts become hot during use.
• Do not touch the heating elements when the appliance is in use or when the elements are
still hot. Heating elements should only be changed by an authorised service agent or
a similarly qualied person.
• Do not allow children to play with the appliance.
• Do not allow children to go near the oven when it’s operating, especially when the grill is on.
• Do not use harsh abrasive cleaners or sharp metal scrapers to clean the glass of the oven.
This can scratch the surface and may result in permanent damage to the glass.
• During use, the appliance becomes very hot.
• Use heat resistant gloves when removing hot items from the oven.
• Ensure that the appliance is switched off before replacing the oven lamp to avoid
the possibility of electric shock.
• The means for disconnection must be incorporated in the xed wiring in accordance with
the wiring specications.
• Do not touch the oven with wet or damp hands or feet.
• Do not place any items on the oven door. It may damage the door and/or hinges and
may unbalance the oven.
• Some parts of the appliance may keep its heat for a long time; please allow the oven to
cool down before touching any parts of the cavity or accessories.
• If the appliance will remain unused for long periods of time you are advised to turn the
oven off at the mains supply.
• If the supply cord is damaged, it must be replaced by the manufacturer, its service
agent similarly qualied persons in order to avoid a hazard.
• Only use utensils / oven trays which have been deemed oven safe by the manufacturer.
• A pressurised steam cleaner should not be used.
• The appliance should not be used for space heating.
• Take care when cooking dishes which contain alcohol. Alcohol evaporates at high
temperatures and can cause a re. Please follow the recipe guidelines carefully.
• Do not use sealed food containers or glass jars. Heat will build pressure inside of the
containers which could cause the container to shatter.
2
SPECIFICATIONS
Voltage 220-240V
Total Power Consumption 2100W
Grill Power Consumption 2000W
Fuse Protection 13 Amps
Cable Length 1m
Cable Type 3G1.5 mm² H05vv-F
Energy Rating A
Interior Lamp Wattage 25W
Installation
This product must be installed by the manufacturers authorised service agent or an
equally qualied person.
• Ensure that a safe distance is left between the appliance and the ktichen units / furniture.
• Surfaces must be heat resistant to a minimum of of 120°C
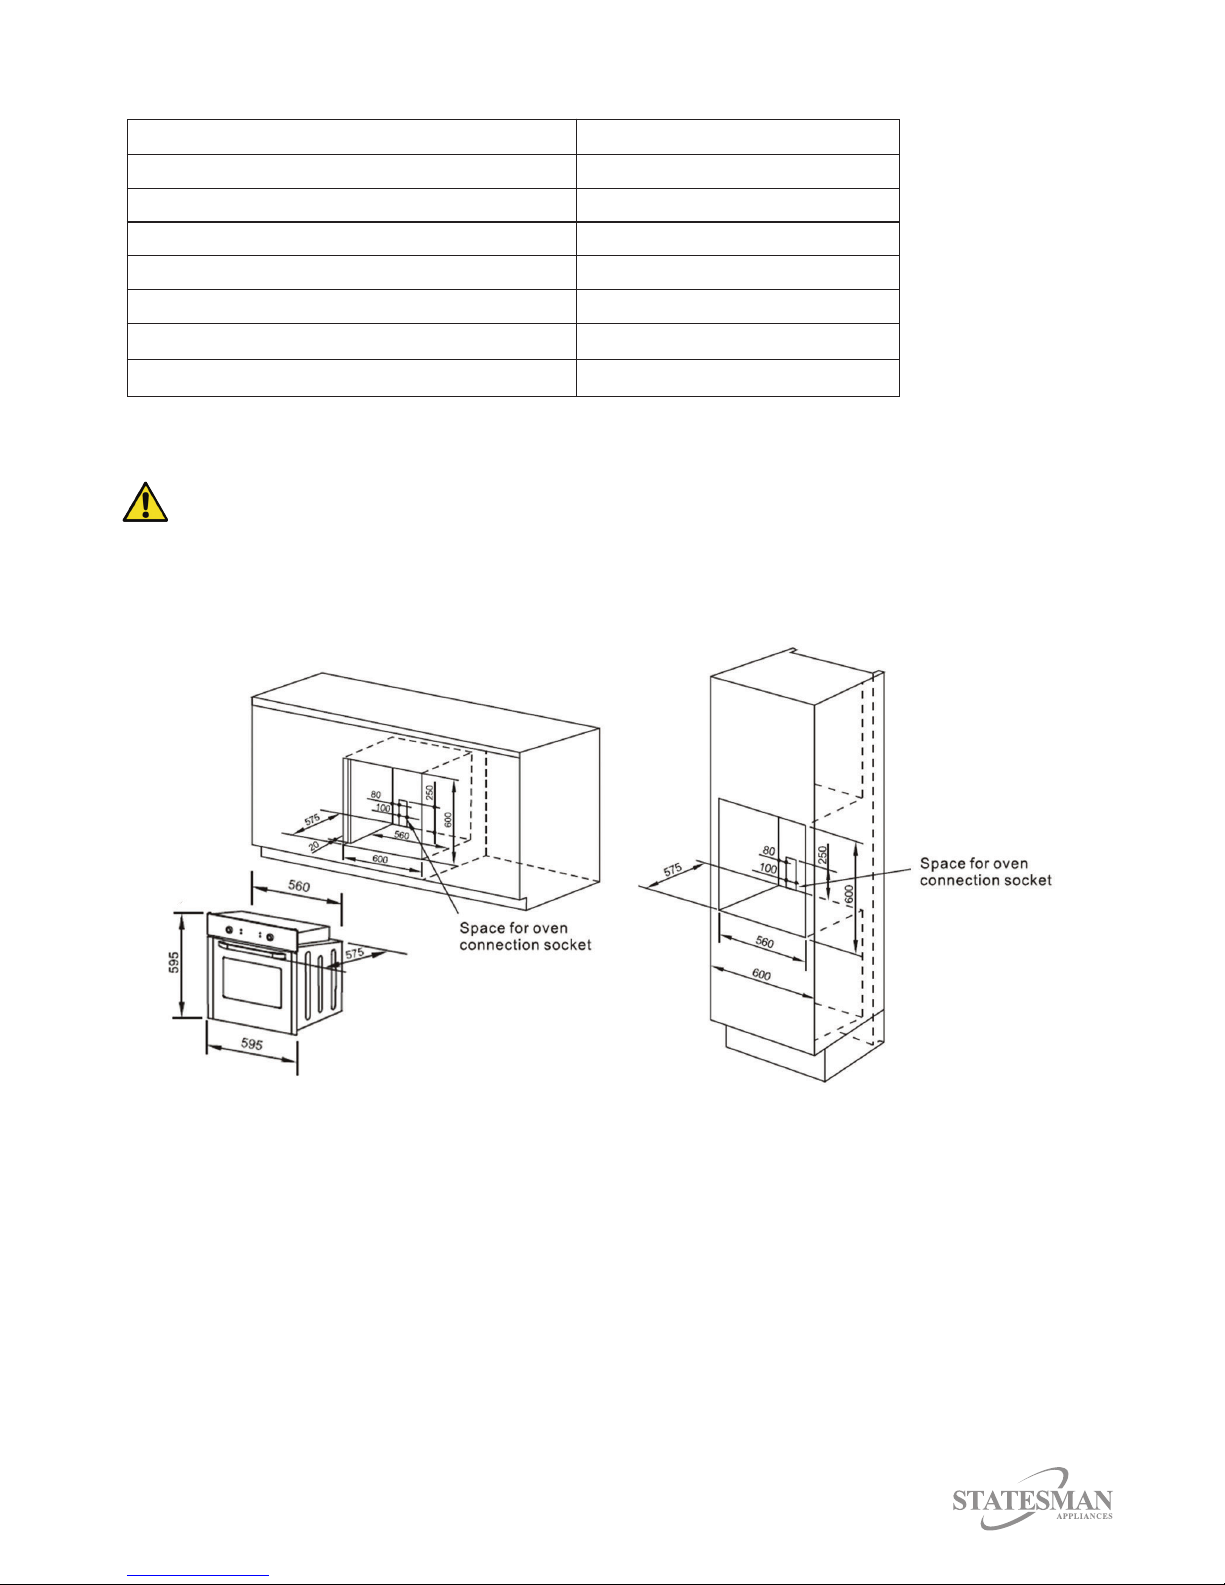
Fitting the Oven into the Kitchen Unit
1. The oven must be lifted by a minimum of 2 persons.
2. Do not use the oven door handle to lift the appliance. Use the slots / handles at the
side of the unit.
3. Fit the oven into the space provided in the kitchen unit; it may be tted underneath a work
top or into an upright cupboard. Fix the oven in position by screwing into place, using the
two xing holes in the frame. To locate the xing holes, open the oven door and look inside.
To allow adequate ventilation, the measurements and distances must be adhered to
when xing the oven
3
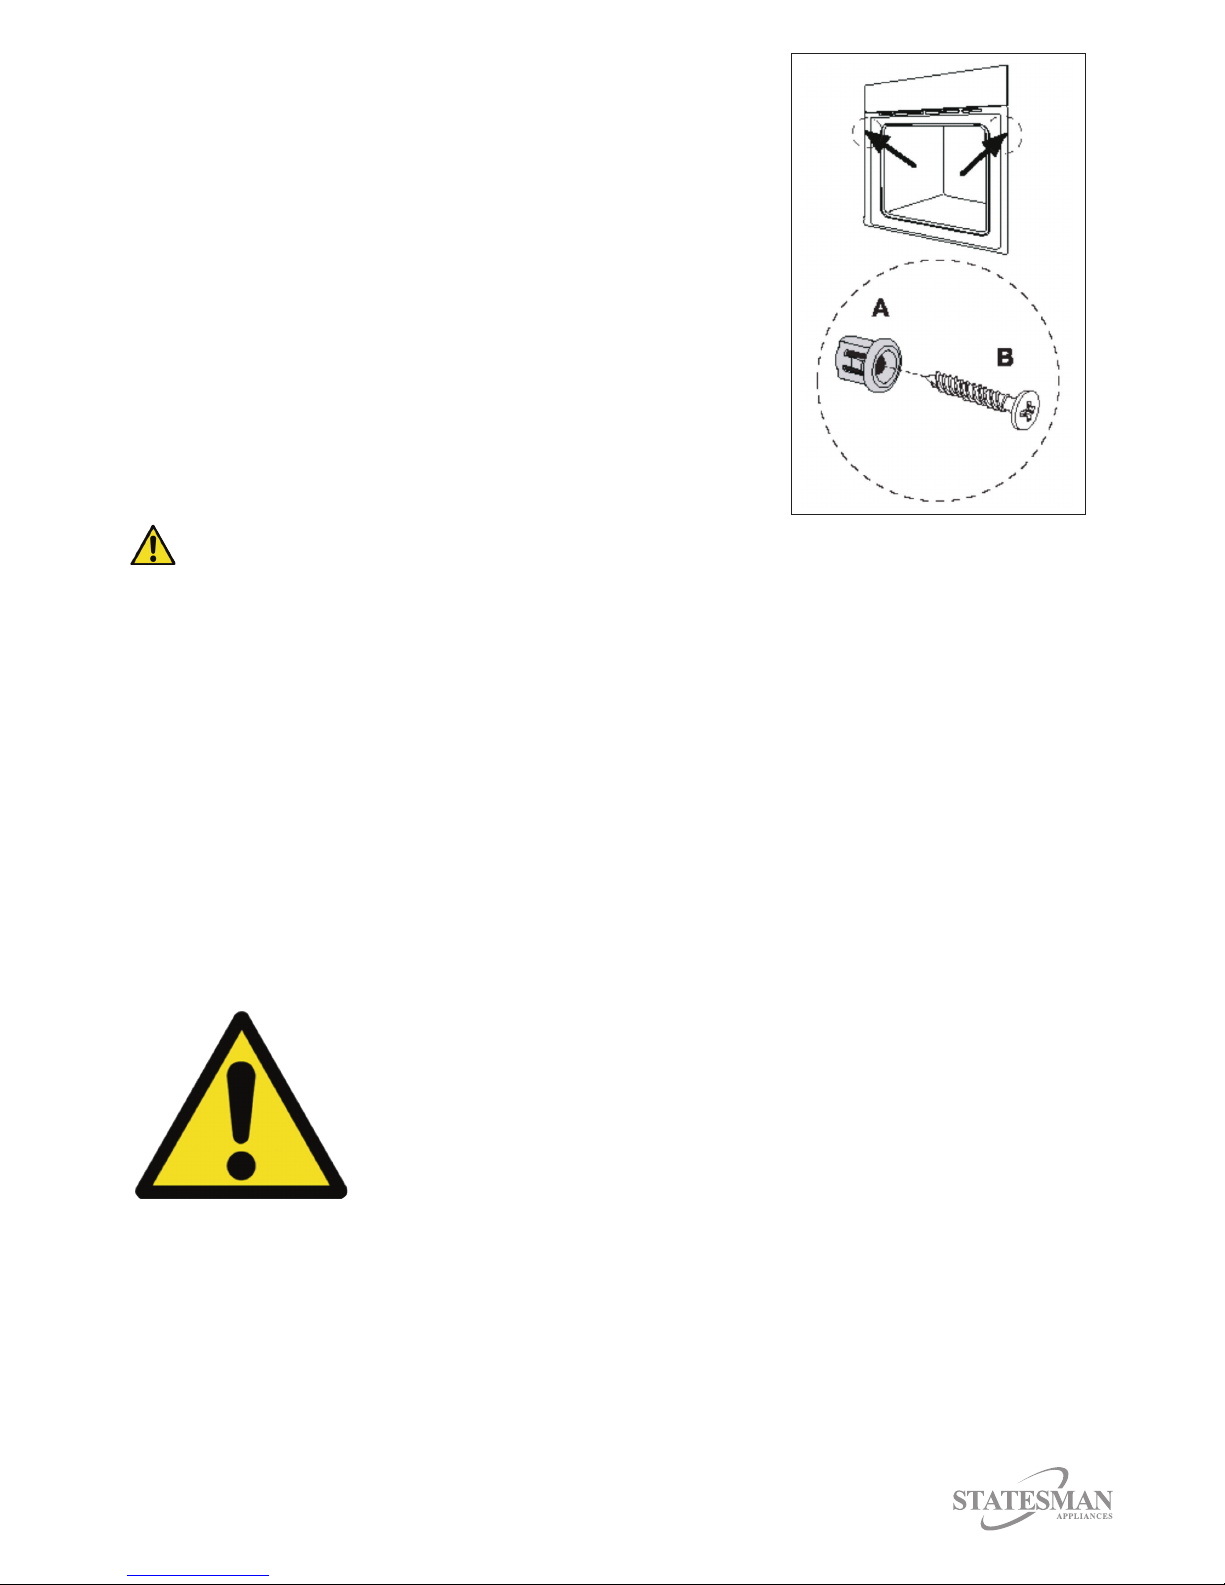
Securing the Oven to the Cabinet
1. Fit oven into cabinet recess
2. Open the oven door
3. Secure the oven to the kitchen cabinet with 2
distance holders ‘A’ which t the holes in the oven
frame and t the 2 wood screws ‘B’.
Electrical Connection - The appliance is supplied with a 13 amp cable pre-tted.
• This product must be installed by the manufacturers authorised
service agent or an equally qualied person. Before starting any
work on electrical installation please turn off the electricity supply
at the mains. Ensure that the fuse rating is correct.
• This appliance must be earthed.
• The supply cable must not come into contact with any
hot surfaces.
• If the supply cable is found to be damaged do not install the product.
This lead must be changed by a qualied electrician only.
• The supply cable should not be trapped between the appliance and the wall.
If the oven is to work properly, the kitchen housing must be suitable. The panels of the kitchen
unit next to the oven must be made of a heat resistant material.
Ensure that the glues of the units are made of veneered wood can withstand temperatures of
at least 120°C. Plastics or glues that cannot withstand such temperatures will melt and deform
the unit. Once the oven has been lodged inside the units, electrical parts must be completely
insulated. This is a legal safety requirement.
All guards must be rmly xed into place, so that it is impossible to remove them without
using special tools. Remove the back of the kitchen unit to ensure an adequate current of air
circulates around the oven. The hob must have a rear gap of at least 45mm.
IMPORTANT
4

Changing the Supply Cable
• The supply cable must correspond to the to the correct specication and power consumption
(See Technical Specication on page 3)
• Open the terminal block cover with a screwdriver.
• Pass the supply cable through the cable clamp under the terminal and x the supply cable
using the screw provided.
• Correctly connect the cable according to the diagram below.
• Close the terminal black cover once complete.
Accessories
2 Wire Shelves:
For roasting and grilling.
1 Universal Pan:
For cooking large quantities of food, also
for collecting fat/spillage and meat juices
Before First Use
When you have unpacked the oven, make sure that is has not been damaged in anyway.
If you have any doubts at all, do not use it: contact a professionally qualied person.
Keep packing materials such as plastic bags or polystyrene of the reach of children because
these are dangerous.
To remove any residue from the oven which may have been left from the manufacturing process
you should select the convection and fan oven function and set the thermostat to the maximum
temperature setting. Leave the oven on for a maximum of 40 minutes.
5

The oven may emit an odour and /or smoke when rst heated.
Please ensure that the room is well ventilated and wait for the smell inside the cavity to
clear before cooking any food.
Once the oven cavity has cooled wipe the surfaces of the appliance with a clean damp cloth /
sponge and dry with a cloth. Wash all oven accessories in water with a mild detergent before
use. Do not use any abrasive cleaners on the oven cavity or accessories as this may damage
the surface.
Control Panel Key
Fig. 1 – Selector dial
Fig. 2 – Minute minder button
Fig. 3 – Clock button
Fig. 4 – LED display
Fig. 5 – Start cooking button
Fig. 6 – Pause / stop button
Fig. 7 – Adjustment dial
FUNCTION GUIDE
LED Display
8. Oven function symbols
9. Oven temperature
10. Safety lock symbol
11. Time of day / minute minder time
12. Alarm / timer symbol
13. Oven light indicator
Fig. 1 Fig. 4
Fig. 2 Fig. 5
Fig. 3 Fig. 6
Fig. 7
6
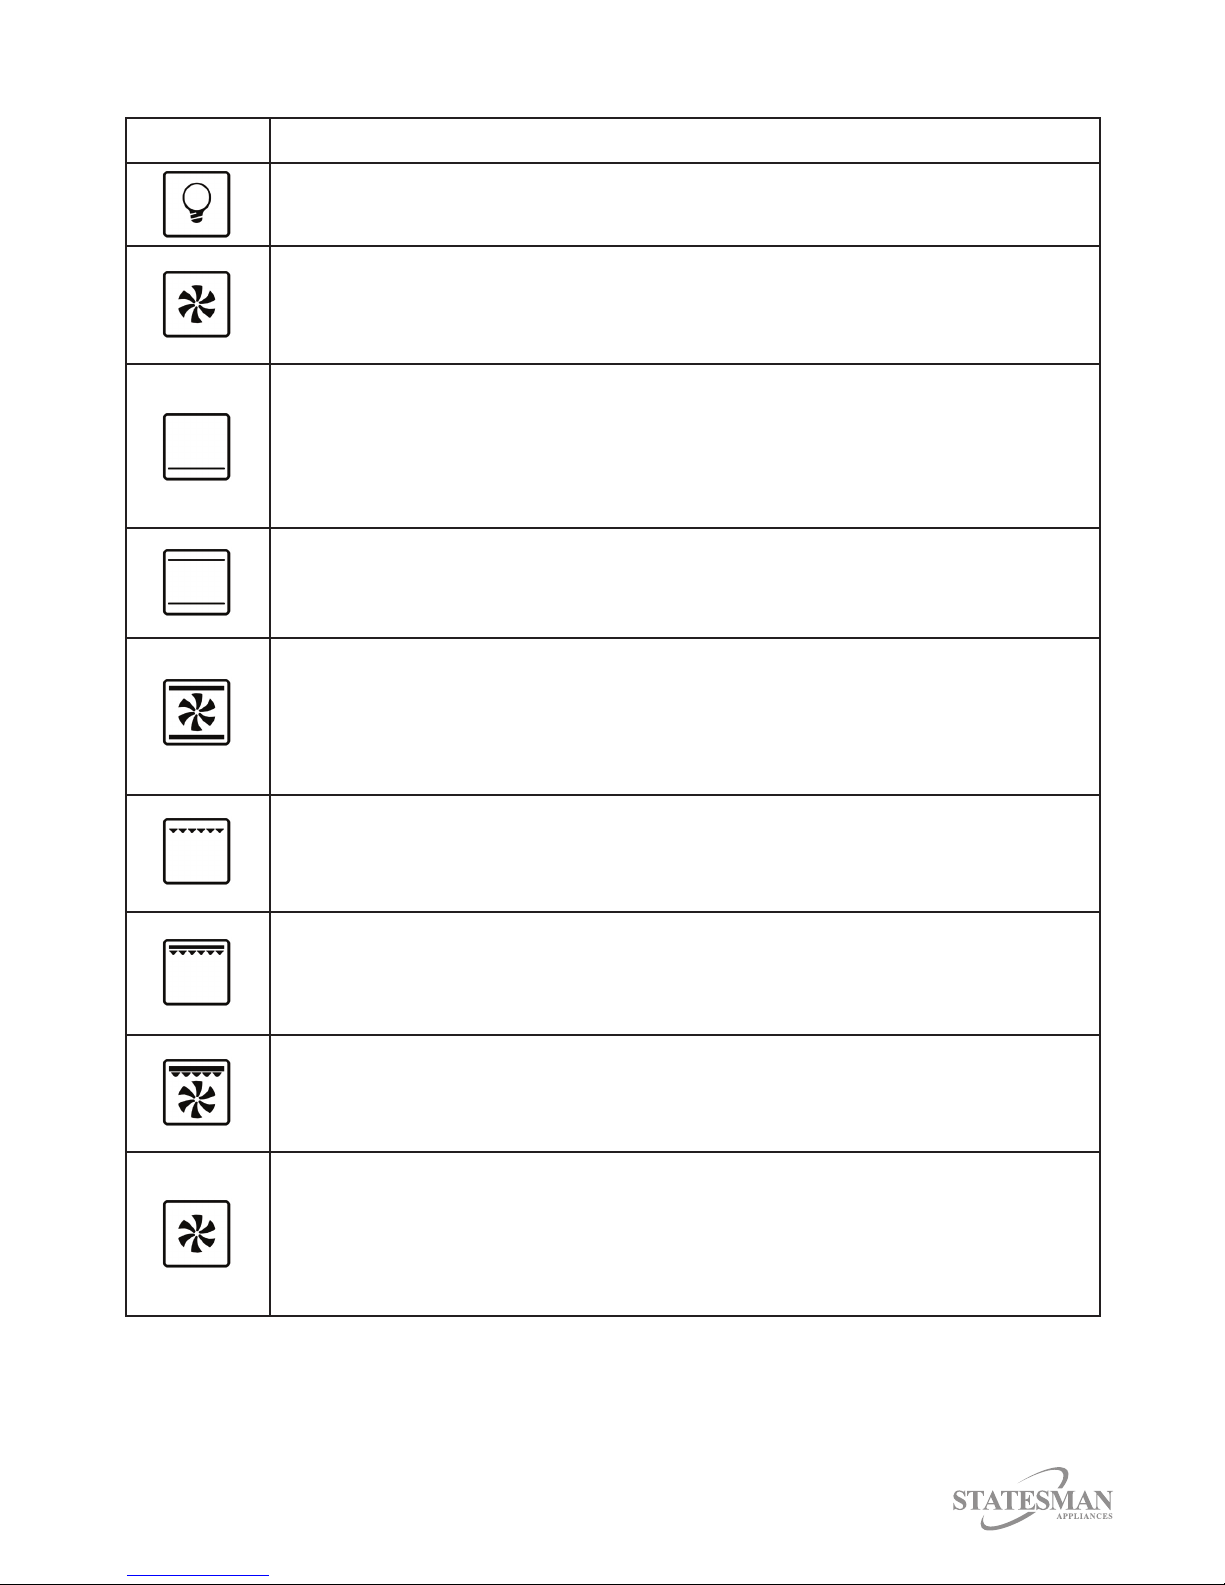
Symbol
Oven Lamp: Enables the user to observe the progress of cooking without opening the door.
Function description
Defrost: The circulation of air at room temperature enables quicker thawing of frozen food
(without the use of any heat). It’s a gentle but quick way to speed up the defrosting time and
thawing of ready-made dishes and cream lled produce etc.
Bottom heat: A concealed element is the bottom of the oven provides a more concentrated
heat to the base of food without browning. This is ideal for slow cooking dishes such as
casseroles, stews. pastries and pizzas where a crispy base desired. The temperature can be
set within the range of 60-120°C.
The default temperature is 60°C.
Conventional cooking: The top and bottom work together to provide conventional cooking.
The temperature can be set within the range of 50-250°C. The default temperature is 220°C.
This is an optional function which can work with a rotisserie motor.
Convention with fan: Combination of the fan and both heating elements provide more even
heat penetration, saving up to 30-40% energy. Dishes are lightly browned on the outside and
still moist on the inside. Note: This function is suitable for grilling or roasting big oieces of
meat at a higher temperature. The temperature can be set within the range of 50-250°C.
The default temperature is 210°C
Radiant grilling: The inner grill element switches on and off to maintain temperature.
The temperature can be set within the range of 180° – 240°C.
The default temperature is 210°C.
SYMBOLS FUNCTION GUIDE
Double grill: The radiant heating element and top heating element are working.
The temperature can be set within the range of 180° – 240°C.
The default temperature is 210°C.
Double grill with fan: The radiant heating element and top heating element are working with
the fan. The temperature can be set within the range of 180° – 240°C.
The default temperature is 210°C.
Convection: An element around the convection fan provides an additional source of heat for
convection style cooking. In convection mode the fan automatically comes on to improve air
circulation within the oven and creates an even heat for cooking.
The temperature can be set within the range of 50° – 240°C.
The default temperature is 180°C.
7

OPERATING INSTRUCTIONS
Timer Functions
Clock Setting
After connecting the unit to the power, the symbols 0:00 will be visible on the display.
• Press the clock button (g. 3) and the hour gures will ash.
• Rotate the adjustment dial (g. 7) to change hour gures; the input time should be within 0-23.
• Press the clock button (g. 3) and the minute gures will ash.
• Rotate the adjustment dial (g. 7) to adjust the minute gures; the input time will be within 0-59.
• Press the clock button (g. 3) to nish the clock setting “:” will ash.
Note: The clock is 24 hours. If the clock is not set, it will not function when turned on.
Minute Minder
The minute minder is a countdown timer which is independent from the oven functions.
When the countdown time has nished, an audible signal will sound. The minute minder must be
set prior to selecting an oven functions. The minute minder can be used without an oven function
being selected.
• Press the minute minder button (Fig.2) and the hour digits will ash.
• Rotate the adjustment dial (Fig.7) to change the hour time. This can be set between 0 and 9.
• Press the minute minder button (Fig.2) to conrm and the minute digits will ash.
• Rotate the adjustment dial (Fig.7) to change the minutes between 0 and 59.
• Press the start button (Fig.5) to conrm the countdown time and the timer will be
active immediately.
• You can now select a cooking function. Please note that the minute minder will have no
effect on the cooking function once the timer has ended.
• An alarm will sound 10 times once the timer has ended.
Please Note:
• When adjusting the time the timer will scroll through in 1 minute increments between 0:00
and 0:30 minutes. When scrolling between 0:30 minutes and 9:00 hours the timer will scroll
in 5 minute units.
• You cannot amend the minute minder after a cooking function has been started.
• To do this you must cancel the current cooking operation and re-program the minute
minder and cooking function.
Duration Timer
The duration timer is a countdown timer which is linked to your oven. When the countdown has
nished and audible signal will sound and the oven will switch off.
• After you have selected an oven function and pressed start, the oven will start to heat at
the default temperature setting and 9:00 hours will appear on the LED display.
• 9:00 hours is the default duration time and after 9:00 hours the oven will automatically
switch off. This is a safety feature.
• During cooking it is possible to adjust the cooking time by turning the selector dial (Fig.1).
• Press the start cooking button (Fig.5) to conrm the oven cooking duration selected and
the oven will start.
• At the end of the cooking time and audible signal will sound and the oven
will switch off.
8

Oven Function, Temperature and Duration
The selector dial (Fig.1) should be used to select the cooking function you require. The appliance
will utilise different elements within the cavity depending on the function selected.
• Turn the selector dial (Fig.1) to select the cooking function you require. The function symbols
will light on the display to show which is currently selected. Please refer to the function guide
on the previous page.
• Turn the adjustment dial (Fig.7) to select the cooking temperature.
Please Note: The oven temperature will change in units of 5°C. The grill temperature will change
in units of 30°C.
• Press the start cooking button (Fig.5) to conrm the cooking function and temperature
you have chosen and the oven will start cooking. The default cooking time 9:00 hours will
be displayed.
• During cooking it is possible to adjust the cooking time by turning the selector dial (Fig.1).
• Press the start cooking button (Fig.5) to conrm the oven cooking duration selected and
the oven will start.
• During cooking you can adjust the cooking temperature by turning the adjustment dial (Fig.7).
The oven temperature (Fig.9) will appear on the LED display as you turn the dial. When the
correct temperature is displayed press the start cooking button (Fig.5).
Please Note: If the start button is not pressed within 3 second of the cooking time or
temperature being selected then the oven will revert to the previous settings.
• At the end of the cooking time an audible signal will sound and the oven will switch off.
Pausing a Cooking Function
• During cooking if you wish to pause the cooking function, you should press the pause / stop
button (Fig.6) once. The oven will stop heating and the cooking time will pause.
• To continue cooking after the pausing you should press the start cooking button (Fig.5).
• The oven will resume cooking using the same settings as before. The time will continue
counting down from the point it was stopped.
Cancelling a Cooking Function
• During cooking if you wish to cancel the cooking function, you should press the pause / stop
button (Fig.6) twice. The oven will stop heating and return to stand-by mode.
Checking the Time
• During cooking you can check the time of day by pressing the clock button (Fig.3) once.
• When a countdown timer is set you can check the remaining cooking time by pressing the
clock button once.
Safety Lock
When the safety lock is switched on it disables the control panel so that it is not possible to alter
any settings.
• To activate the safety lock, press the start cooking button and the stop cooking button
simultaneously for 3 seconds.
• There will be a long audible signal and a symbol will appear on the LED display.
This conrms that the safety lock has been activated.
9

Safety Lock (continued)
• To switch off the safety lock, press the start cooking button and the stop cooking button
simultaneously for 3 seconds.
• There will be a long audible signal and the symbol will disappear from the LED display.
This conrms that the safety lock has been de-activated.
Please Note: You must unlock the control panel as outlined above if you want to stop or make
any changes to the cooking functions.
Energy Saving Function
The energy saving function can only be set when the oven function and temperature have
not been.
• Press the start cooking button (Fig.5) for 3 seconds and the oven will enter energy saving
mode and the LED display will switch off.
• Energy saving mode will be entered automatically if a button or control dial have not been
touched for 10 minutes.
• To exit energy saving mode you should touch any button or adjust a control dial.
Internal Light
The oven light will switch on automatically when the oven is in use. If you want to turn the oven
light on without using an oven function please follow the instructions below.
• Using the selector dial (Fig.1) select the oven light function.
• Press the start button (Fig.5) and the interior light will switch on.
• With the oven light function still selected press the stop button (Fig.6) to switch the light off.
Cooking Guidelines
• Please refer to the information given on the food packaging from guidance on cooking
temperatures and times.
• You should always pre-heat the oven and do not place food inside the cavity until the
operating indicator light has switched off. If you choose not to pre-heat the oven then cooking
times should be extended by at least 10 minutes.
• You should always pre-heat the oven if you are baking.
• Make sure that frozen foods have thawed thoroughly unless the food packaging states that
the item can be cooked from frozen.
• Any accessories that are not required should be removed from the oven before cooking.
• Place cooking trays ion the centre of the oven and leave gaps between the shelves to allow
air to circulate.
• Do not open the oven door if not necessary. The internal light will allow you to monitor
the progress without opening the door.
• Keep the oven door during all cooking functions including grilling.
• Do not use aluminium baking foil when using the grill. The high reectivity of the of the foil
could potentially damage the grill element.
• You should never line the base of the oven will aluminium foil.
• During cooking never place pans or cookware on the base of the oven. They should be
placed on to the wire shelves.
• The grill element and other internal components become extremely hot during operation.
Avoid touching them inadvertently when handling the food which you are grilling.
10
Cooking Guidelines (continued)
• Take care when opening the oven door to avoid contact with hot parts of the oven and steam.
• Always use an oven glove when removing cookware from the oven.
• Keep children away from the oven when in use.
• Do not allow children to play with the oven.
Shelf Positions
• Insert the oven shelf and baking tray between the side rails on both sides at any level.
• The oven shelf has a safety stop for accidental withdrawal. After placing the oven shelf into the
side rails, as you push the oven shelf into the oven lift the oven shelf slightly to bypass the
stops and allow the oven shelf to slide fully into the rails.
• To remove the oven shelf, gently pull the oven shelf outwards. When the shelf stops, lift the
front slightly to bypass the safety stops and then completely withdraw the shelf from the oven.
Ventilation
• When cooking is nished, if the cavity temperature is above 70°C the cooking fan will continue
to work for 15 minutes after the oven stops cooking. This is normal operation and does not
indicate a fault.
Bulb Replacement
The lamp in the light has a high temperature resistance (240V~25W)
For replacement, proceed as follows:
1. Disconnect power from the mains outlet or switch off the
circuit breaker of the mains outlet.
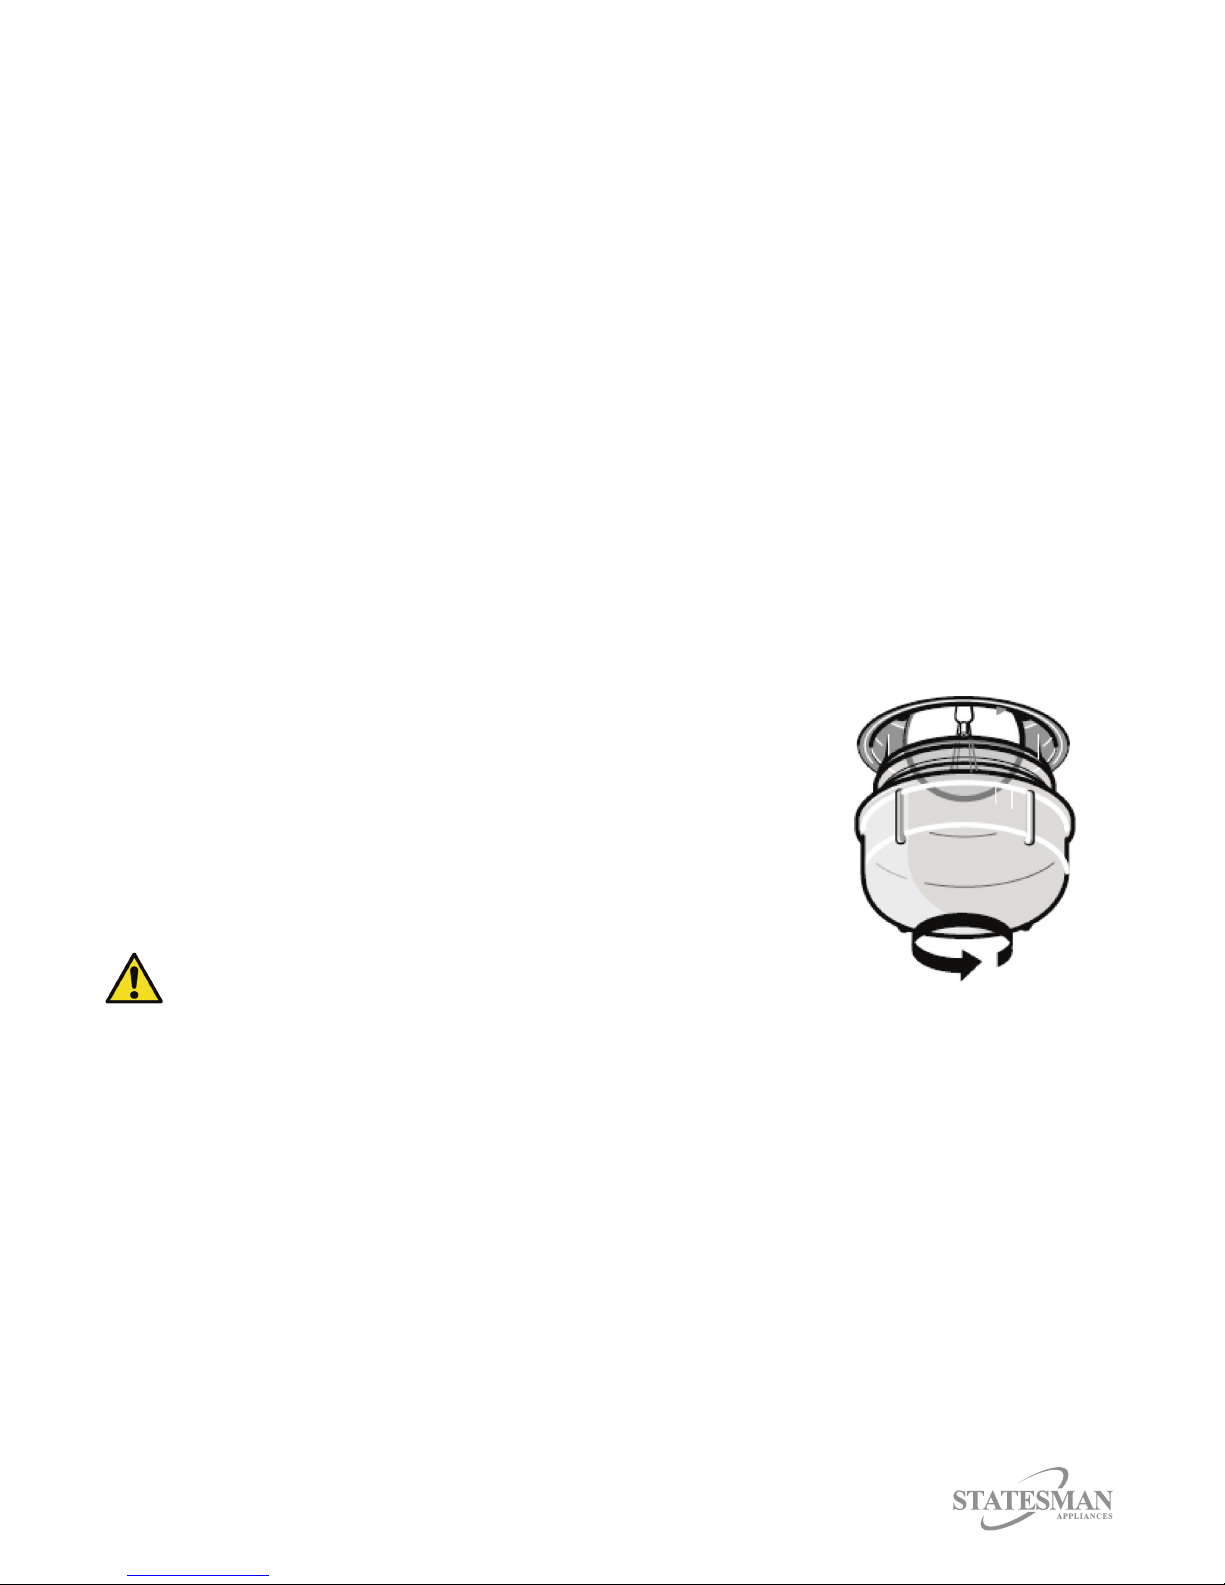
2. Unscrew the covering glass and replace the bulb with a
new one of the same specication.
3. Screw the covering glass back in place.
This appliance must be removed from the mains power supply
before you attempt to remove or replace the appliance lamp.
11

Removing the Side Racks
To thoroughly clean the oven it may be necessary to remove the side racks.
• Remove the oven shelves and enamel baking tray from the cavity.
• Unscrew the bolt on the bottom of each rack with a screwdriver
and then unhook each side rack at the top.
Pull them away from the cavity.
• To reassemble the side racks, hook the upper struts into the
relevant holes in the cavity and then secure the lower bolts.
Cleaning and Maintenance
• Before any maintenance and cleaning, disconnect the appliance from the mains power supply.
• Set all controls in the OFF position.
• Wait until the inside of the unit has cooled.
• Clean the surface of the unit with a damp cloth, soft brush or ne sponge and wipe dry.
In case of heavy soiling, use hot water with non-abrasive cleaning product.
• For cleaning the glass of the oven door, do not use abrasive cleaners or sharp metal
scrapers, these can scratch the surface or lead to glass being damaged.
• Never leave acidic substances (lemon juice, vinegar) on stainless steel parts.
• Do not use a high pressure cleaner for cleaning the unit. The baking pans may be washed
in mild detergent.
12
Removing the Oven Door
• Do not attempt to disengage the hinge locks on the door whilst it
is removed from the oven.
• The hinge springs could release, causing personal injury
• Do not lift or carry the oven door by the door handle
For easy cleaning the oven door can be removed
as follows:
• The hinges (A) have two bolts on them.
If you raise both of the movable bolts (B) then the
hinges (A) will be released from the oven housing.
• You should grip the sides of the door at the centre
and then incline it slightly at a 15° angle then pull
the door gently away from the oven cavity.
• To replace the door, slide the hinges back into
their slots and open the door fully.
Please Note: You should make sure that the oven door is supported at all times
and that you place the door on soft padded material when cleaning.

SERVICE AND SPARE PARTS
Should you experience any difculty in using your Statesman appliance at any time,
you may contact your Statesman Retailer or call our Customer Service Department on:
0844 848 5861
Disclaimer: Updates to hardware components are made regularly. Therefore some of the instructions, specications and
pictures in this documentation may differ slightly from your particular situation.
All items described in this guide are for illustration purposes only and may not apply to your particular situation.
No legal right or entitlements may be obtained from the description made in this manual.
Spare Parts information
can be obtained by
calling our Spare Parts
Department on:
0844 848 5862
Please have the following details ready;
• Model Name / Model Number
• Serial Number
• Date of Purchase
• Where Purchased
• Customer Name and Address including Post Code
• Contact Telephone Number
• Accurate description of the fault
Disposal of Old Electrical Appliances
The European Directive 2002/96/EC on Waste Electrical and Electronic Equipment (WEEE),
requires that old household electrical appliances must not be disposed of in normal unsorted
municipal waste. Old appliances must be collected separately in order to optimise the recovery
and recycling of the materials they contain and reduce the impact on human health and the
environment. The crossed out “wheeled bin” symbol on the product reminds you
of your obligation, that when you dispose of the appliance it must be separately
collected. Consumers should contact their local authority or retailer for information
concerning the correct disposal of their old appliance.
13
This manual suits for next models
1
Table of contents
Other STATESMAN Oven manuals


Popular Oven manuals by other brands


Waring
Waring PRO TCO650 owner's manual

Wood Stone
Wood Stone CS-REC-11 Installation and operation manual

Miele
Miele H 237 ET operating instructions

Esse
Esse Plus2 Installation and operating instructions

Indesit
Indesit FID20 Mk2 Instructions for installation and use

Ariston
Ariston FM 51 IX GB Instructions for installation and use