LG LB 651078S User manual

Operating Instructions
Buint In Oven
Please read this instruction manual carefully before using the oven.
This will ensure that you know the important safety information and
the correct operation of the oven.
Please keep this manual in a easily accessible place and refer to them
anytime. Please transfer this manual to new owner if you sell the oven.
LB 651078
P/No.: 3828W5A4222 www.lg.com

2
Contents
Safety ............................................................................... 4~8
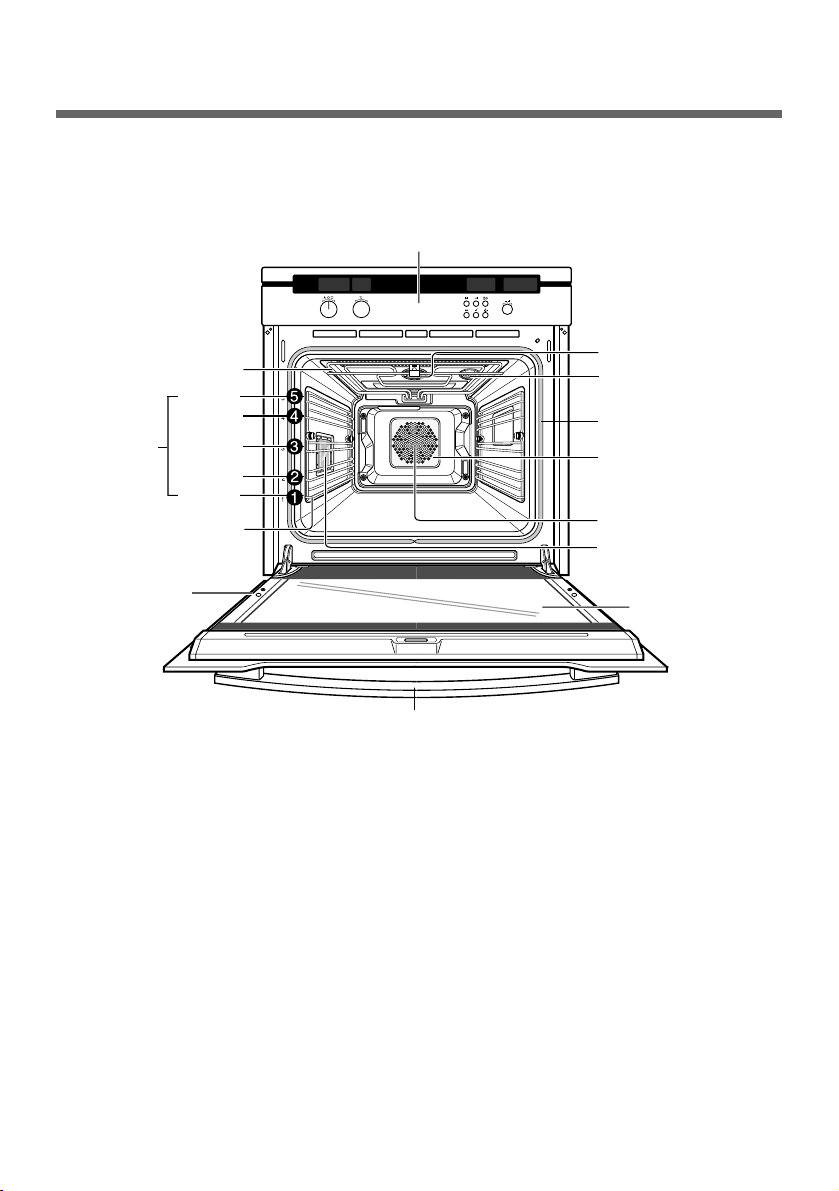
Description of t e feature ............................................... 9
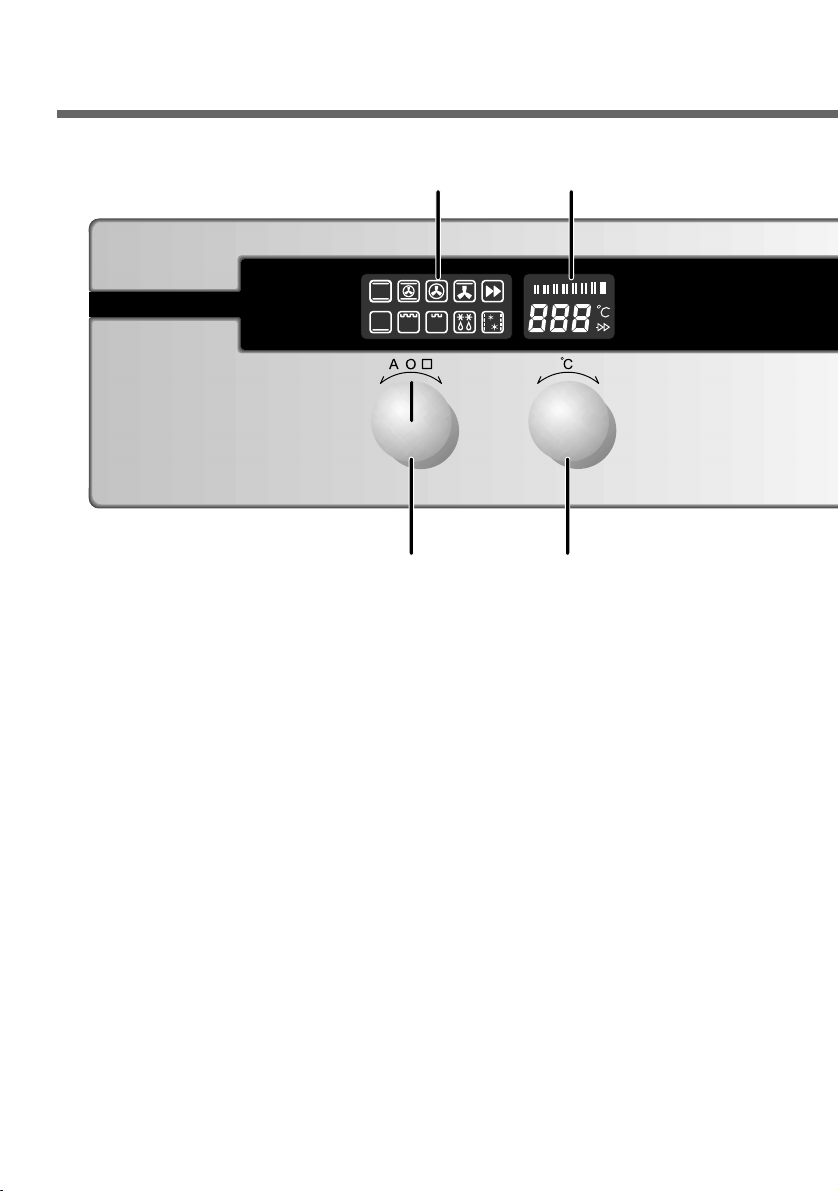
Control panel ................................................................... 10~11
Accessories ..................................................................... 12~13
Telescopic runners (optional) ........................................ 14~15
Setting t e clock ............................................................. 16
Prior cleaning ................................................................... 17
Operating t e oven ......................................................... 18
Oven functions ................................................................ 19~21
Operation ......................................................................... 22~41
Changing the oven function ............................................ 22
Changing the oven temperature ..................................... 2
Switching off the oven ..................................................... 24
Cookware and their usages ............................................ 24
Maximum operation times for safety .............................. 25
Cooling fan operation / Energy Label Directive .............. 25
Clock functions ............................................................... 26
Kitchen timer .................................................................. 27
Cook time ....................................................................... 28~29
End time ......................................................................... 0~ 1
Combining the cook time and end time functions ........... 2~
Adjusting the clock time .................................................. 4
Child safety function ....................................................... 5
Memory cook .................................................................. 6~ 7
Speed cook function ....................................................... 8
Changing the language .................................................. 9
Auto cook (Speed cook) .................................................. 40~41
Auto cooking table (Speedcook) .................................... 42~59
Fish ................................................................................. 42~4

3
Meat ............................................................................... 44~47
Pastry ............................................................................. 48~49
Potato products .............................................................. 50~51
Poultry and game ........................................................... 52~55
Snacks ............................................................................ 56~57
Vegetables ...................................................................... 58~59
Baking .............................................................................. 60~61
Baking table ..................................................................... 62~65
Roasting............................................................................ 66
Roasting table .................................................................. 67
Grilling............................................................................... 68
Grilling table ..................................................................... 69
Defrosting ......................................................................... 70
Yogurt ............................................................................... 71
Test dis es........................................................................ 72~73
Cleaning and care ........................................................... 74~77
Using t e self cleaning function .................................... 78~79
Oven lig t ......................................................................... 80~82
Oven door ........................................................................ 83~89
W at s ould I do if… ...................................................... 90~93
Warranty ........................................................................... 94

• This oven must only be installed by a licensed electrician.
• The installer is responsible for the correct electrical connection of
the appliances and the observance of the relative safety
recommendations.
Electrical Safety
If the oven has been damaged in transport, do not connect it.
• This appliance must be connected to the mains power supply by a
specially licensed electrician only.
• In the event of a fault or damage to the appliance, and do not
attempt to operate it.
• Repairs of the appliance should be carried out by a licensed
tec nician only. Wrong repairs may result in considerable danger.
If you need repairs, contact an LG Service Center or your dealer.
• If the supply cord is defective, it must be replaced by a special
cord or assembly available from manufacturer or substance or its
service agent.
• Electrical leads and cables should not be allowed to touch the
oven.
• The oven should be connected to the electricity supply by means
of an approved circuit breaker or fuse.
Never use multiple plug adapters or extension leads.
4
Safety

5
• Rating plate is located on the left side of door and the cover-back.
• The power supply of the appliance should be turned off when it is
being repaired or cleaned.
• Be careful in connecting electrical appliances to sockets near to
this appliance.
• This connection may be achieved by having the plug accessible or
by incorporation a switch in the fixed wiring in accordance with the
wiring rules.
• Do not use harsh abrasive cleaners or sharp metal scrapers to
clean the oven door glass since they can scratch the surface
which may result in shattering of the glass.
Warning: The appliance should be powered down before replacing
the lamp to avoid the possibility of electric shock.
Warning: When the oven operates the interior parts will be very
hot.

6
Safety
Safety during Operation
• This oven has been designed only for the cooking of household
foods.
• When in use, the oven interior surfaces become very hot!
Care should be taken to avoid touching heating elements inside
the oven.
• Never store flammable or easily deformable materials in the oven.
• The oven surfaces will become hot when the appliance is
operated at a high temperature for a long period of time.
• Excess spillage should be removed before self cleaning and all
utensils should not be left in the oven during pyrolytic self-
cleaning.
• During self cleaning the surfaces get hotter than usual and
children should be kept a safe distance.
• When cooking, take care when openning the oven door as hot air
and steam will escape rapidly.
• When cooking dishes that contain alcohol, the alcohol can
evaporate due to the high temperatures. The vapour can catch fire
if it comes into contact with a hot oven part.
• Do not use high-pressure water cleaners or steam jet cleaners for
safety reasons.

7
• Children should be kept at a safe distance when the oven
operates.
• Frozen foods such as pizzas should be cooked on the wire grill.
If the Baking tray is used, it may become deformed due to the
great difference in temperature.
• on’t pour water into the oven bottom when it is hot.
This could cause damage to the enamel surfaces.
• The oven door must be closed when the cooking is performing.
• on’t spread aluminium foil on the bottom of the oven and do not
place any baking trays or tins on it.
The aluminium foil blocks the heat, which may result in damage to
the enamel surfaces and cause poor cooking results.
• ripping fruit juices from the baking tray will leave stains, which
become indelible. When cooking very moist cakes, use the deep
pan.
• o not use the oven door as a rest table for hot or cold
cookwares.
• This appliance is not intended for use by young children or infirm
persons unless they have been adequately supervised by a
responsible person to ensure that they can use the appliance
safety.
• Young children should be supervised to ensure that they do not
play with the appliance.
• o not use harsh abrasive cleaners or sharp metal scrapers to
clean the oven door glass since they can scratch the surface,
which may result in shattering of the glass.
Warning!
• Accessible parts may become hot during use. Young children
should be kept away.
• Accessible parts may become hot when the grill is in use.
Children should be kept away.

8
Safety
Disposing of packaging material
• The appliance’s packaging is recyclable.
• Dispose of the packaging materials in the appropriate container at
your local waste disposal facilities.
Disposal of old appliances
Warning: Before disposing of old appliances please make them
inoperable so that they cannot be the source of danger.
To do t is, disconnect t e appliance from t e main supply and
remove t e main lead.
To protect the environment, it is important that worn-out appliances
are disposed of in the correct manner.
• The appliance must not be disposed of with household rubbish.
• You can obtain information about collection dates or public refuse
disposal sites from your local refuse department or council.

Structure
9
Description of the Feature
Top heating elements
Oven levels
Control panel
Door handle
Full glass
door
Oven light
Air outlet filter
Door seal
Rear wall heating
element
Fat Filter
Oven light
Level 5
Level 4
Level
Level 2
Level 1
Oven levels are numbered from the bottom up.
The 4 and 5 levels are mainly used for grill functions.
The cooking tables throughout this operating instructions give you
suggested oven level (shelf positions), however you can change
these to suit yourself.
Side runner
Rating plate

10
Control Panel
34
12
1. Function display
2. Temperature display
. Function selector
4. Temperature selector

11
5
10 11 12
9
67 8 13
5. Time display
6. Cook time button
7. End time button
8. Timer/Clock button
9. Speed cook button
10. Enter button
11. Oven light button
12. Control dial knob
1 . Main display for cooking information

Wire grill
For dishes, cake tins, roasting and grilling
trays.
Baking tray
For cakes and biscuits.
Deep pan
For roasting or collecting meat juices
or fat.
Grill tray
For fatty meat (for positioning in the
Deep pan). For grilling and/or roasting, we
recommend using the grill/roast system
provided. The Grill tray sits inside the
Deep pan so they can be placed in the oven together.
Grill rack (Optional)
You can use Grill rack instead of
Grill tray, if necessary, for effective
cooking performance.
Fat filter (Optional)
For protecting the fan against fat building up. The filter may be in
place when
*Fan functions are being used for roasting.
*Fan Function: D Hot Air, Convection Heat,
Convection Grill, Speed Roast
Note:
To install the fat filter, insert the two hooks into the holes on the fan
cover. The fat filter must cover the fan venting holes completely.
Do not use the fat filter in baking mode, as it restricts the air flow.
12
Accessories

13
The baking tray,deep pan and wire grill should be inserted correctly
into side runners.
When taking out the
cooked foods from the
oven, be careful of the
hot utensil and cooking.
Example:
Level 1: Deep pan
Level 4: Baking tray
Note:
The deep pan or baking tray which is used to receive the dropping
juices or grease from the cooked foods should be porperly placed in
the side runners. If they are placed directly on the bottom surface of
the oven, the enamel surface will be damged by the intensive heat
which is concentrated to the contact area. That is, all utensils
should be away from the bottom of oven at least 2 cm.
When using the wire grill, make the most of its stoppers to prevent it
from sliding down out of the side runners.
5
4
3
2
1
Baking tray
Deep pan
gap 2cm
5
4
3
2
1

14
Telescopic Runners (Optional)
Attac ing t e telescopic runners
W en purc asing for t e first time, attac t e telescopic
runners as following procedures.
1. Insert two screws into
the both side screw
holes clockwise, and
turn them only 2~
turns.
2. Insert and push the
back U-form of two
telescopic runners to
the body of two screws.
. Position the front
U-form of telescopic
runners to the front
screw holes, and fasten
the two screws.

15
4. Baking tray and Wire grill
should be positioned
accurately on the hook of
telescopic runners.
The bad coupling between
the baking tray and the
telescopic runners may take
place dropping of utensils or
cooking foods on the floor.
If the dropping foods are hot,
you may get burnt
by them.
Warning: If you should not do self-cleaning with these telescopic
runners and other all accessories in the oven.
Because this self-cleaning is performed in high
temperature (about 500°C), the telescopic runners and
utensils may be a useless thing.

16
The oven only operates when the clock has been set.
<0> and <Turn dial> flash on the time display when the appliance is
first connected, or after a power cut.
Setting the Clock
Turn the control dial knob to
set hour of current time.
(example: To set 1: 0)
1Press the timer/clock( )
button.
The <00> and <Turn dial>
will blink.
2
Turn the control dial knob to
set minute of current time.
<Touch clock key> will blink.
3Press the timer/clock( )
button to finish setting the
clock.
The appliance is now ready
to use.
The <READY> will appear
in the main display.
4

17
You should clean the oven thoroughly before using for the first time.
Important: Do not use sharp or abrasive cleaning materials!
These could damage the oven surface.
For ovens with metal fronts, use commercially available cleaning
agents.
To clean t e oven
1. Open the door. The oven light comes on.
2. Clean all oven trays, accessories and the side runners with warm
water or washing-up liquid and polish dry with a soft clean cloth.
. Wash the oven interior in the same way.
4. Wipe the front of the appliance with a damp cloth.
Check that the clock is set correctly. Remove accessories and
operate the oven with D Hot Air or Convection Grill, 200°C for 1
hour before using. There will be a distinctive smell, this is normal
but make sure your kitchen is well ventilated during the conditioning
period.
Prior Cleaning

18
T e Electronic Oven Control
Display Field
Useful Guide
• After setting a function, the oven automatically starts after 8
seconds.
• After starting the oven, the oven light is on for first 20 seconds only
for energy saving.
• To see while the oven is operating, press the oven light button at
any time.
* Large Grill: Actually “Radiant Grill Large Area” appears in the
display.
* Small Grill: Actually “Radiant Small Large Area” appears in the
display.
Operating the Oven
Conventional
Heat
Convection
Heat
Convection
Grill
Speed
Function
Bottom *Small
Grill
Self
Cleaning
*Large
Grill
Defrost
D Hot Air

19
Oven Functions
The following functions are available for this oven:
Conventional Heat
Suggested temperature: 190°C
For baking and roasting on one level.
The top and bottom heaters are in operation.
3D Hot Air
Suggested temperature: 150°C
For baking on up to two levels at the same time.
Set the oven temperature 20-40°C lower than with the
top/bottom function.The top, bottom and rear heaters
are in operation and in addition the fan is turned on.
Convection Heat
Suggested temperature: 200°C
The back wall heater is in operating and in addition
the fan is turned on.
Convection Grill
Suggested temperature: 190°C
For cooking cakes on one level and for biscuits that
must be well browned or crispy underneath. For
example, pizza, quiche lorraine, cheese cakes, etc.
Set the oven temperature 20-40°C lower than with the
top/bottom function.
The top heaters are in operation and in addition the fan is turned on.

20
Oven Functions
Speed Function
This has two subordinate functions,
Speed grill and Speed roast function.
This function enables you perform the
speed cooking by the aid of the upper
halogen heater. A speed roast or
speed grill function is chosen by speed cook button.
Bottom
Suggested temperature: 170°C
Because the heat only comes from below, this setting
is ideal for baking items that require a crispy bottom,
such as pies.
Large Grill (1, 2, 3) (Radiant Grill Large Area)
For grilling flat food in large quantities, such as
steaks, schnitzel, fish or for toasting.
Both top heaters and grill are in operation.
Small Grill (1, 2, 3) (Radiant Grill Small Area)
For grilling flat food in the middle of the tray, such as
steaks, schnitzel, fish or toast.
Only one top heater is in operation.
Speed roast Speed grill
This manual suits for next models
1
Table of contents
Other LG Oven manuals

LG
LG LSWS305ST User manual

LG
LG LRE3012S User manual

LG
LG SolarDOM MA3884VQS User manual

LG
LG LWS3081ST User manual

LG
LG LWS3081ST - 30in Single Electric Wall Oven User manual

LG
LG MZBZ1715 Series User manual

LG
LG MFL51224550 User manual

LG
LG LWS3063ST User manual

LG
LG LWS3010ST User manual

LG
LG SolarDOM MP-9482SR User manual

LG
LG LRE3027ST User manual

LG
LG WSES4728F.BRSLSTD User manual

LG
LG LWD3010ST User manual

LG
LG LSWD306ST User manual

LG
LG WCEP6423 User manual

LG
LG SolarDOM MA3884NAR User manual

LG
LG LWS3063BD/00 User manual

LG
LG LWS3081ST - 30in Single Electric Wall Oven User manual

LG
LG LRE3083SB User manual

LG
LG WDEP9423 Series User manual