STATESMAN BSF60WH User manual

BSF60WH / BSF60SS
BUILT IN ELECTRIC FAN OVEN
Instruction Manual
Please read these instructions carefully before use and retain for future reference

SAFETY INSTRUCTIONS
Important: This appliance is not intended for use by persons including children with reduced
physical, sensory or mental capabilities, or lack of experience and knowledge, unless they have
been given supervision or instruction concerning use of the appliances by a person responsible
for their safety.
• Thisproductmustbeinstalledbythemanufacturersauthorisedserviceagentoranequally
qualiedperson.Failuretouseaqualiedpersonwillresultyourwarratybeingvoid.
• Beforestartinganyworkonelectricalinstallationpleaseturnofftheelectricitysupply
at the mains.
• Ensurethatthefuseratingiscorrect.
• Thisappliancemustbeearthed.
• Thesupplycablemustnotcomeintocontactwithanyhotsurfaces.
• Theapplianceanditsaccessiblepartsbecomehotduringuse.
• Donottouchtheheatingelementswhentheapplianceisinuseorwhentheelementsare
still hot. Heating elements should only be changed by an authorised service agent or a
similarlyqualiedperson.
• Donotallowchildrentoplaywiththeappliance.
• Donotallowchildrentogoneartheovenwhenit’soperating,especiallywhenthegrillison.
• Donotuseharshabrasivecleanersorsharpmetalscraperstocleantheglassoftheoven.
This can scratch the surface and may result in permanent damage to the glass.
• Duringuse,theappliancebecomesveryhot.
• Useheatresistantgloveswhenremovinghotitemsfromtheoven.
• Ensurethattheapplianceisswitchedoffbeforereplacingtheovenlamptoavoidthe
possibility of electric shock.
• Themeansfordisconnectionmustbeincorporatedinthexedwiringinaccordancewith
thewiringspecications.
• Donottouchtheovenwithwetordamphandsorfeet.
• Donotplaceanyitemsontheovendoor.Itmaydamagethedoorand/orhingesand
may unbalance the oven.
• Somepartsoftheappliancemaykeepitsheatforalongtime;pleaseallowtheovento
cool down before touching any parts of the cavity or accessories.
• Iftheappliancewillremainunusedforlongperiodsoftimeyouareadvisedtoturnthe
oven off at the mains supply.
• Ifthesupplycordisdamaged,itmustbereplacedbythemanufacturer,itsserviceagent
similarlyqualiedpersonsinordertoavoidahazard.
• Onlyuseutensils/oventrayswhichhavebeendeemedovensafebythemanufacturer.
• Apressurisedsteamcleanershouldnotbeused.
• Theapplianceshouldnotbeusedforspaceheating.
• Takecarewhencookingdisheswhichcontainalcohol.Alcoholevaporatesathigh
temperaturesandcancauseare.Pleasefollowtherecipeguidelinescarefully.
• Donotusesealedfoodcontainersorglassjars.Heatwillbuildpressureinsideof
the containers which could cause the container to shatter.
SPECIFICATIONS
Voltage 220-240V
TotalPowerConsumption 2100W
GrillPowerConsumption 2000W
FuseProtection 13Amps
CableLength 1m
CableType 3G1.5mm²H05vv-F
EnergyRating A
InteriorLampWattage 25W
This product must be installed by the manufacturers authorised service agent or an
equallyqualiedperson.
• Ensurethatasafedistanceisleftbetweentheapplianceandthektichenunits/furniture
• Surfacesmustbeheatresistanttoaminimumofof120°C
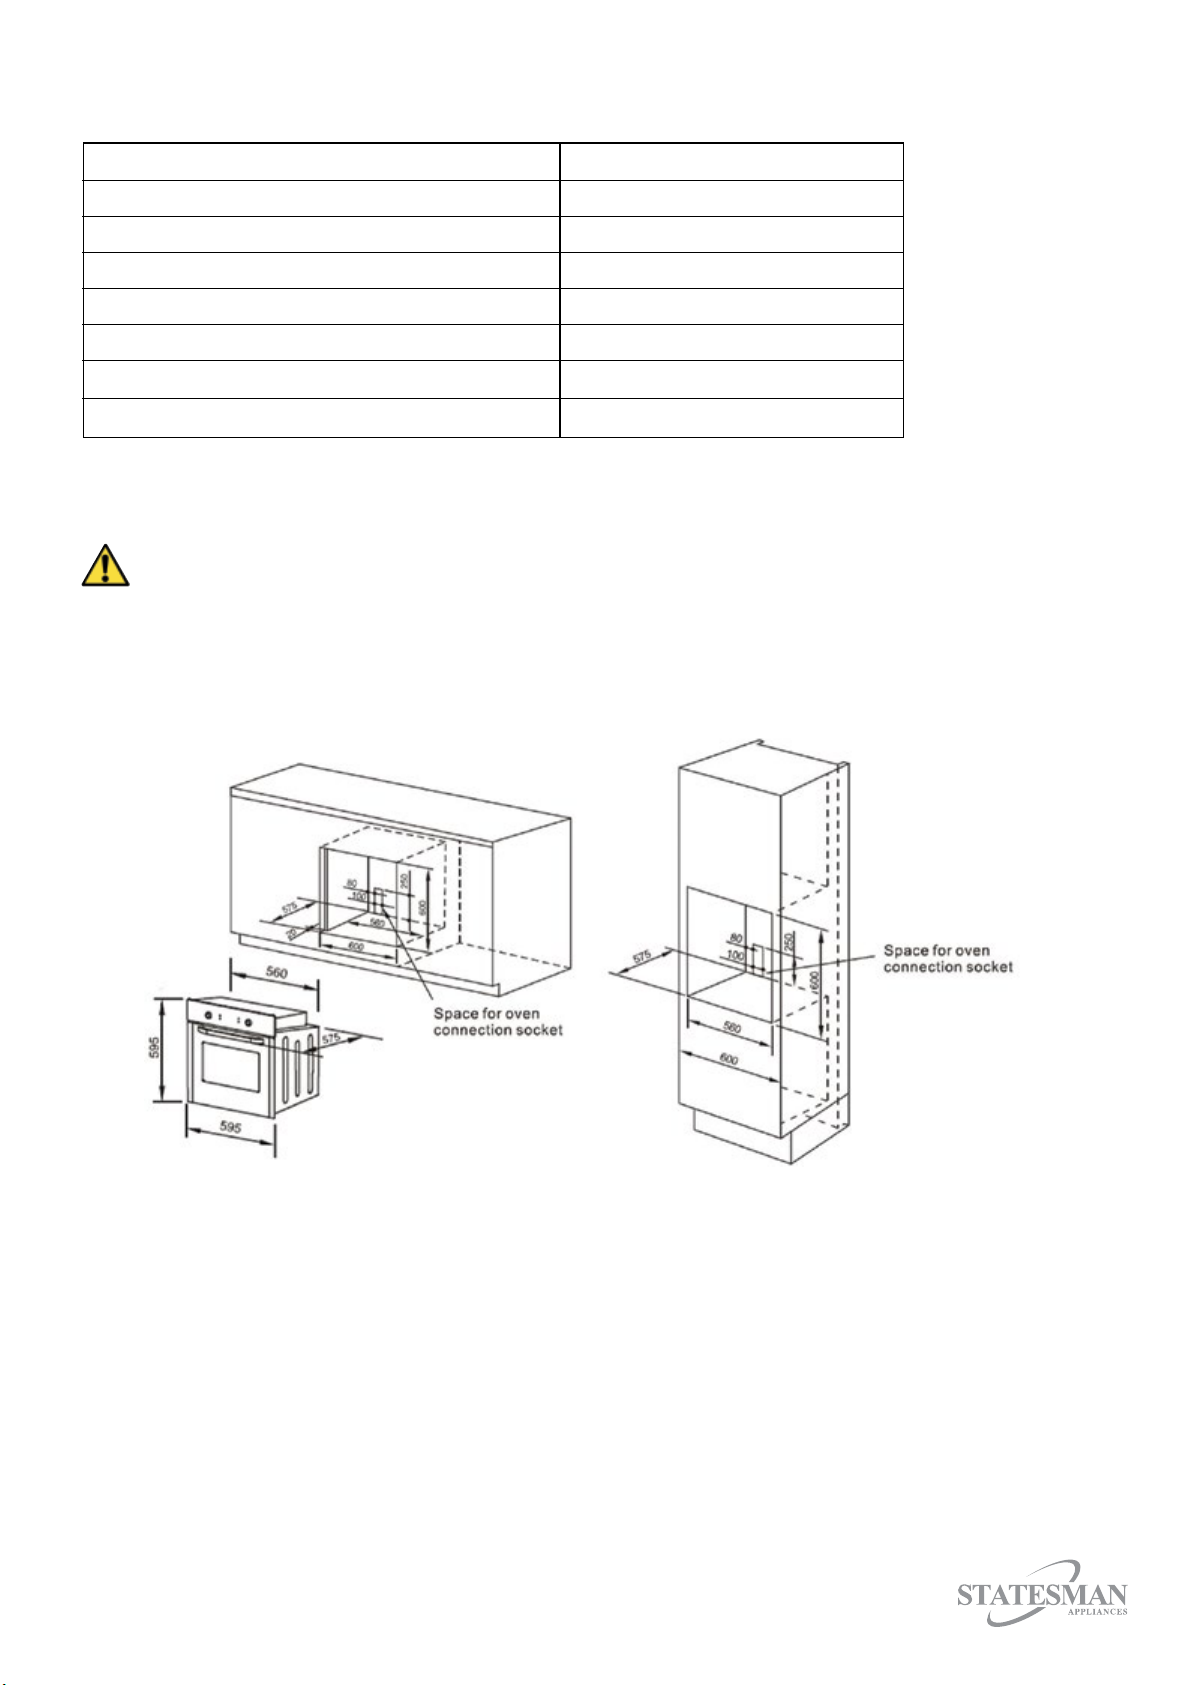
INSTALLATION
Fitting the Oven into the Kitchen Unit
1.Theovenmustbeliftedbyaminimumof2persons.
2.Donotusetheovendoorhandletolifttheappliance.Usetheslots/handlesatthe
side of the unit.
3.Fittheovenintothespaceprovidedinthekitchenunit;itmaybettedunderneathawork
toporintoanuprightcupboard.Fixtheoveninpositionbyscrewingintoplace,usingthe
twoxingholesintheframe.Tolocatethexingholes,opentheovendoorandlookinside.
Toallowadequateventilation,themeasurementsanddistancesmustbeadheredto
whenxingtheoven
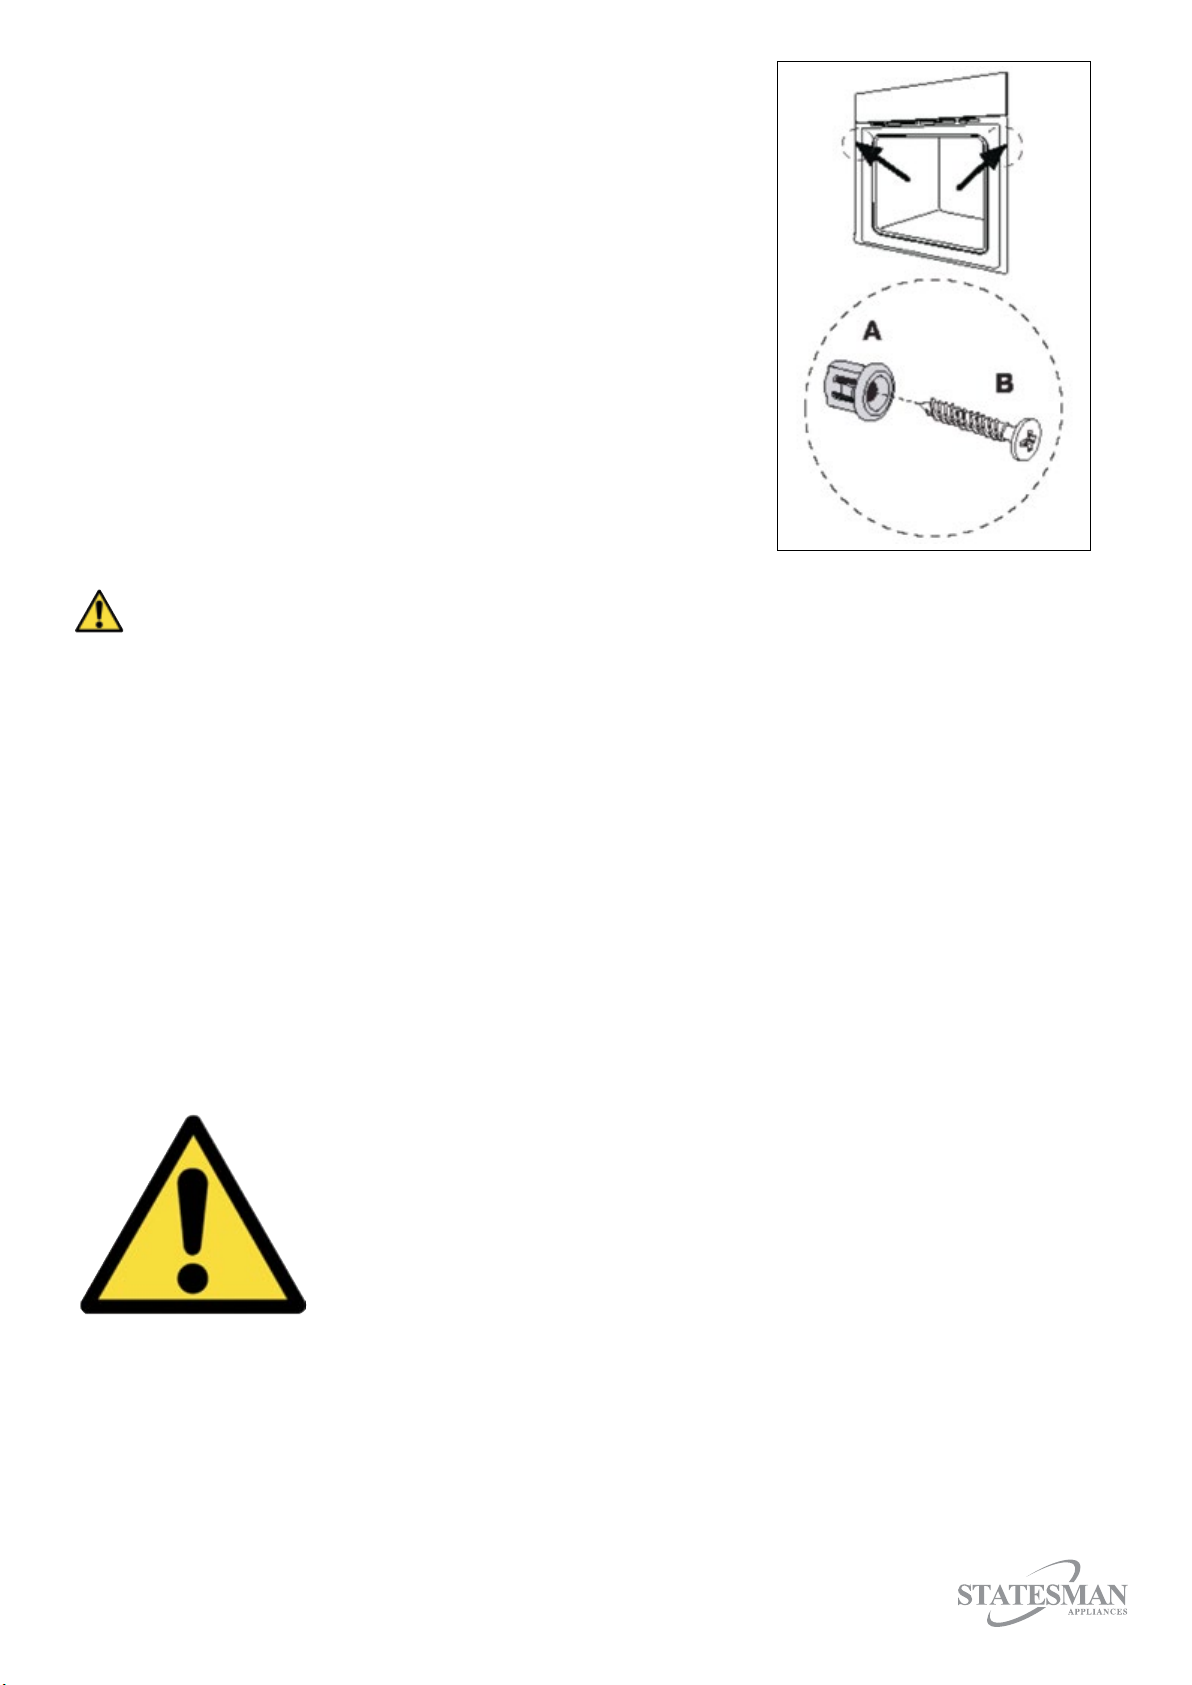
Securing the oven to the cabinet
1.Fitovenintocabinetrecess
2.Opentheovendoor
3.Securetheoventothekitchencabinetwith2
distanceholders‘A’whichttheholesintheoven
frameandtthe2woodscrews‘B’.
Electrical Connection-Theapplianceissuppliedwitha13ampcablepre-tted.
• Thisproductmustbeinstalledbythemanufacturersauthorised
serviceagentoranequallyqualiedperson.Beforestartingany
work on electrical installation please turn off the electricity supply
atthemains.Ensurethatthefuseratingiscorrect.
• Thisappliancemustbeearthed.
• Thesupplycablemustnotcomeintocontactwithany
hot surfaces.
• Ifthesupplycableisfoundtobedamageddonotinstalltheproduct.Thisleadmust
bechangedbyaqualiedelectricianonly.
• Thesupplycableshouldnotbetrappedbetweentheapplianceandthewall
Iftheovenistoworkproperly,thekitchenhousingmustbesuitable.Thepanelsofthekitchen
unit next to the oven must be made of a heat resistant material.
Ensurethatthegluesoftheunitsaremadeofveneeredwoodcanwithstandtemperaturesof
atleast120°C.Plasticsorgluesthatcannotwithstandsuchtemperatureswillmeltanddeform
theunit.Oncetheovenhasbeenlodgedinsidetheunits,electricalpartsmustbecompletely
insulated.Thisisalegalsafetyrequirement.
Allguardsmustbermlyxedintoplace,sothatitisimpossibletoremovethemwithout
usingspecialtools.Removethebackofthekitchenunittoensureanadequatecurrentofair
circulatesaroundtheoven.Thehobmusthaveareargapofatleast45mm.
IMPORTANT
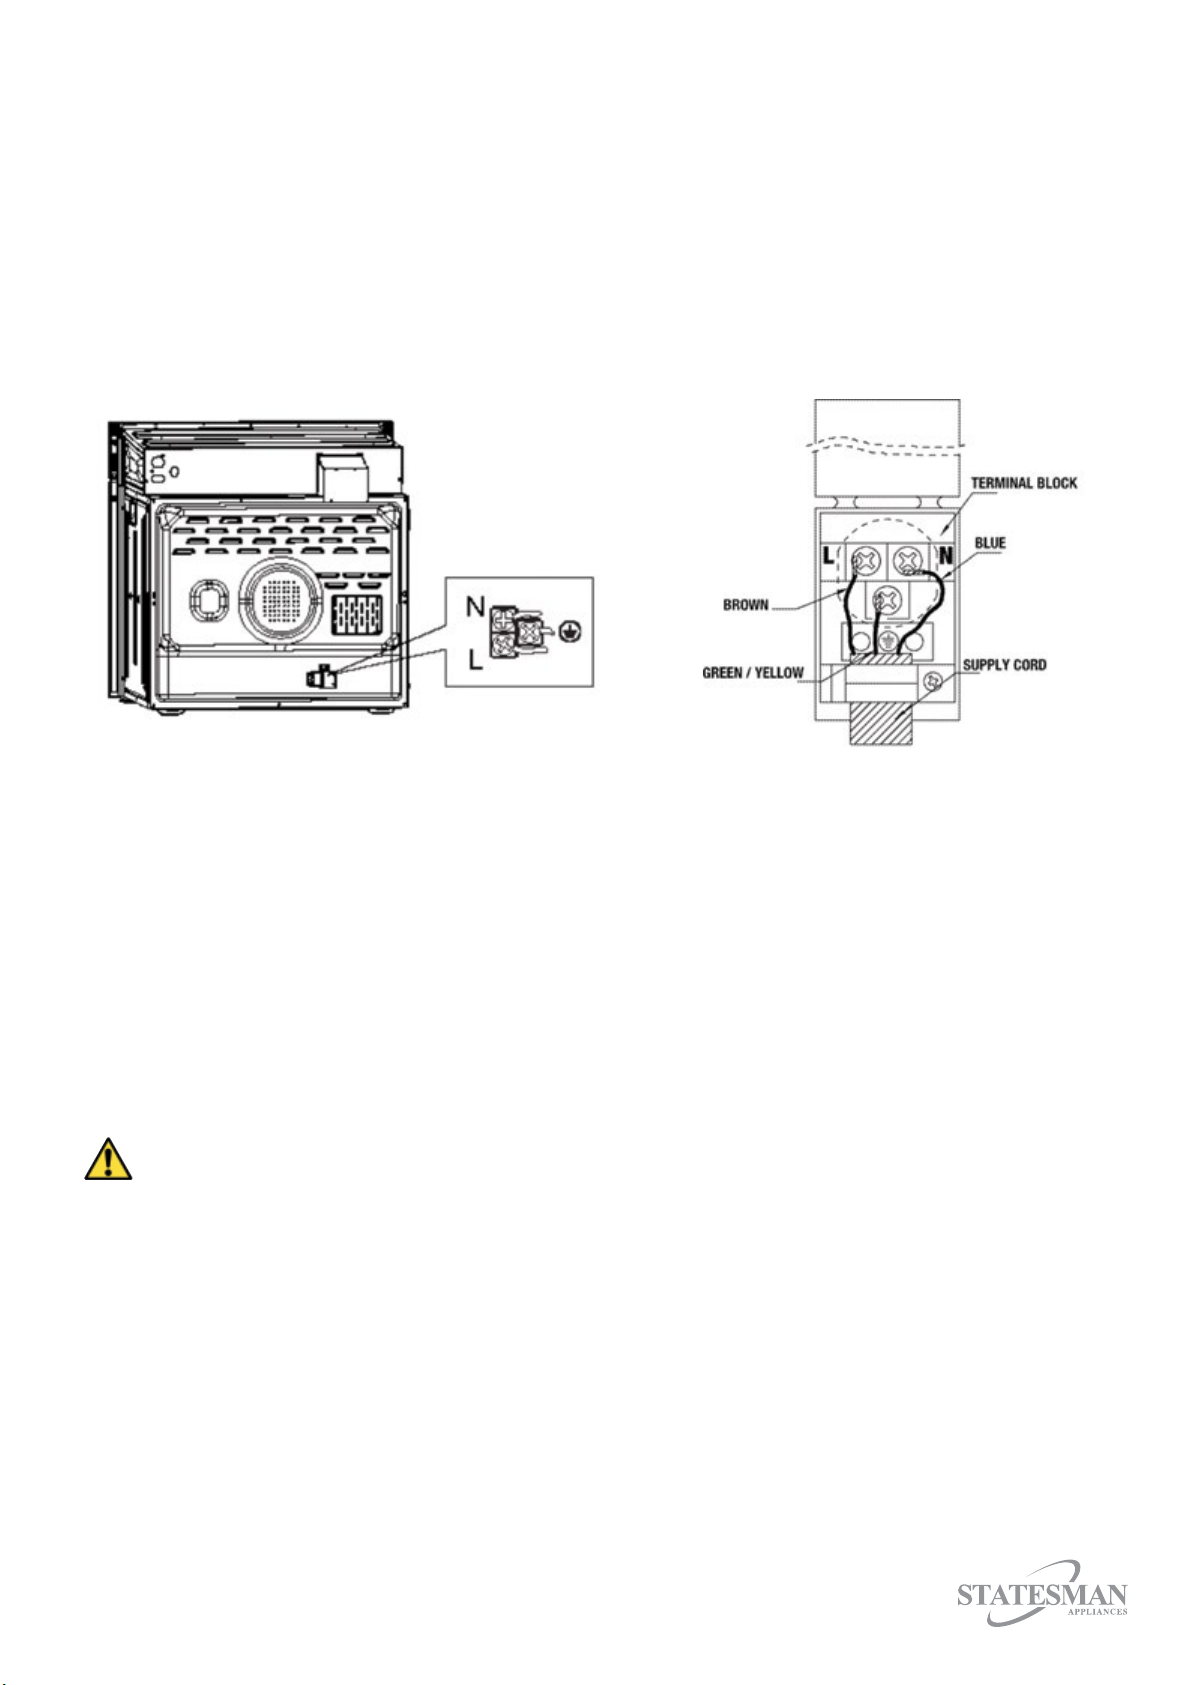
Changing the Supply Cable
• Thesupplycablemustcorrespondtothetothecorrectspecicationandpower
consumption(SeeTechnicalSpecicationonpage2)
• Opentheterminalblockcoverwithascrewdriver.
• Passthesupplycablethroughthecableclampundertheterminalandxthesupply
cable using the screw provided.
• Correctlyconnectthecableaccordingtothediagrambelow.
• Closetheterminalblackcoveroncecomplete.
Before First Use
Whenyouhaveunpackedtheoven,makesurethatishasnotbeendamagedinanyway.Ifyou
haveanydoubtsatall,donotuseit:contactaprofessionallyqualiedperson.Keeppacking
materials such as plastic bags or polystyrene of the reach of children because these are
dangerous.
To remove any residue from the oven which may have been left from the manufacturing process
you should select the convection and fan oven function and set the thermostat to the maximum
temperaturesetting.Leavetheovenonforamaximumof40minutes.
Theovenmayemitanodourand/orsmokewhenrstheated.Pleaseensurethattheroom
is well ventilated and wait for the smell inside the cavity to clear before cooking any food.
Oncetheovencavityhascooledwipethesurfacesoftheappliancewithacleandampcloth/
spongeanddrywithacloth.Washallovenaccessoriesinwaterwithamilddetergentbefore
use.Donotuseanyabrasivecleanersontheovencavityoraccessoriesasthismaydamage
the surface.

Function Control
Mechanical Timer
To set the time of cooking by turning the
timer knob to desired time per your food
cookingguide.Afterthecookingtimeis
up, the timer will go off.
Thermostat Control
Setthetemperaturebyturningthe
temperaturecontrol.Iftheunitisnotinuse,
always set the control to “0”.
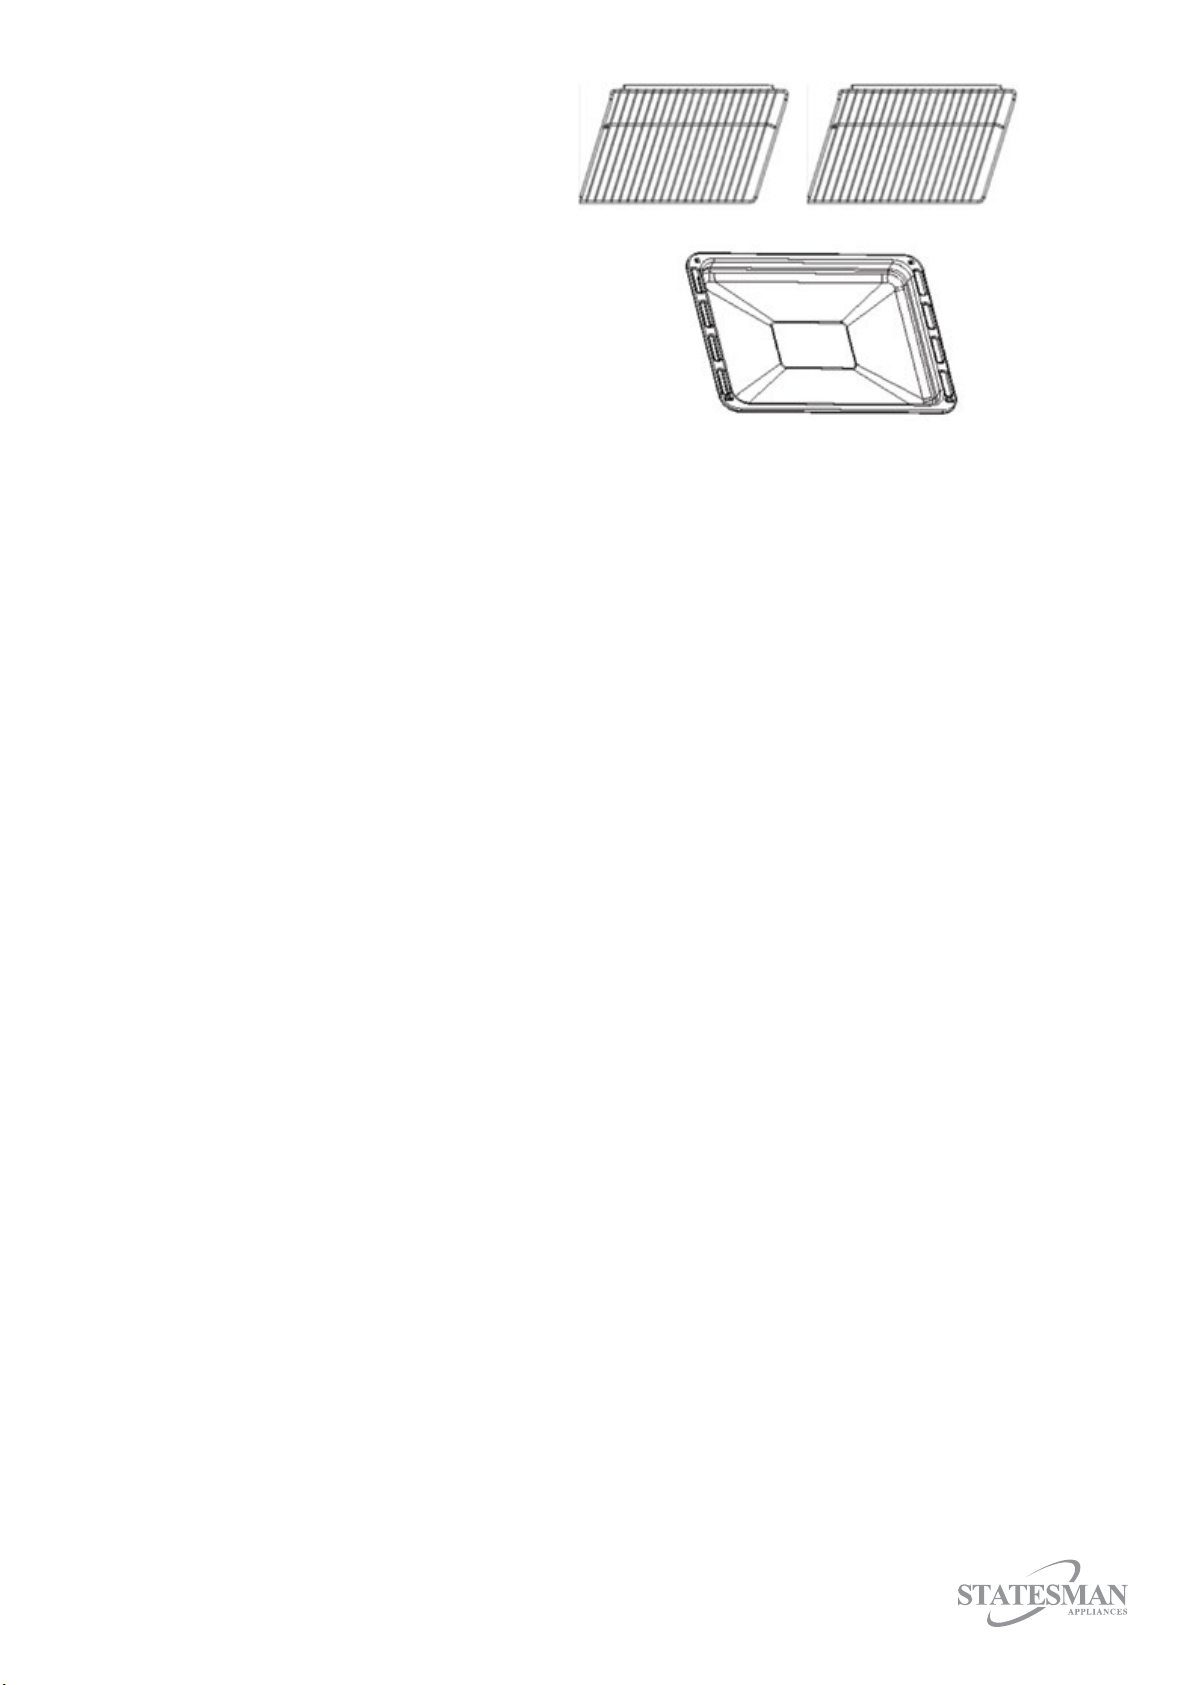
Accessories
2 Wire shelves:
Forroastingandgrilling.
1 Universal Pan:
Forcookinglargequantitiesoffood,also
forcollectingfat/spillageandmeatjuices
Cooking Guidelines
• Pleaserefertotheinformationgivenonthefoodpackagingfromguidanceoncooking
temperatures and times.
• Youshouldalwayspre-heattheovenanddonotplacefoodinsidethecavityuntilthe
operatingindicatorlighthasswitchedoff.Ifyouchoosenottopre-heattheoventhen
cookingtimesshouldbeextendedbyatleast10minutes.
• Youshouldalwayspre-heattheovenifyouarebaking.
• Makesurethatfrozenfoodshavethawedthoroughlyunlessthefoodpackagingstates
thattheitemcanbecookedfromfrozen.
• Anyaccessoriesthatarenotrequiredshouldberemovedfromtheovenbeforecooking.
• Placecookingtraysionthecentreoftheovenandleavegapsbetweentheshelvestoallow
air to circulate.
• Donotopentheovendoorifnotnecessary.Theinternallightwillallowyoutomonitor
the progress without opening the door.
• Keeptheovendoorduringallcookingfunctionsincludinggrilling.
• Donotusealuminiumbakingfoilwhenusingthegrill.Thehighreectivityoftheofthe
foil could potentially damage the grill element.
• Youshouldneverlinethebaseoftheovenwillaluminiumfoil.
• Duringcookingneverplacepansorcookwareonthebaseoftheoven.Theyshouldbe
placed on to the wire shelves.
• Thegrillelementandotherinternalcomponentsbecomeextremelyhotduringoperation.
Avoidtouchingtheminadvertentlywhenhandlingthefoodwhichyouaregrilling.
• Takecarewhenopeningtheovendoortoavoidcontactwithhotpartsoftheovenandsteam.
• Alwaysuseanovenglovewhenremovingcookwarefromtheoven.
• Keepchildrenawayfromtheovenwheninuse.
• Donotallowchildrentoplaywiththeoven.
Shelf Positions
• Inserttheovenshelfandbakingtraybetweenthesiderailsonbothsidesatanylevel.
• Theovenshelfhasasafetystopforaccidentalwithdrawal.Afterplacingtheovenshelfinto
the side rails, as you push the oven shelf into the oven lift the oven shelf slightly to bypass
the stops and allow the oven shelf to slide fully into the rails.
• Toremovetheovenshelf,gentlypulltheovenshelfoutwards.Whentheshelfstops,
lift the front slightly to bypass the safety stops and then completely withdraw the shelf
from the oven.

Ventilation
Whencookingisnished,ifthecavitytemperatureisabove70°Cthecookingfanwillcontinue
toworkfor15minutesaftertheovenstopscooking.Thisisnormaloperationanddoesnot
indicate a fault.
Bulb replacement
The lamp in the light has a high temperature resistance
(240V~25W)
Forreplacement,proceedasfollows:
1.Disconnectpowerfromthemainsoutletorswitchoff
the circuit breaker of the mains outlet.
2.Unscrewthecoveringglassandreplacethebulbwith
anewoneofthesamespecication.
3.Screwthecoveringglassbackinplace.
This appliance must be removed from the mains power supply before
you attempt to remove or replace the appliance lamp.
Removing the Oven Door
• Donotattempttodisengagethehingelocksonthedoorwhilstit
is removed from the oven.
• Thehingespringscouldrelease,causingpersonalinjury
• Donotliftorcarrytheovendoorbythedoorhandle
Foreasycleaningtheovendoorcanberemoved
as follows:
• Thehinges(A)havetwoboltsonthem.Ifyou
raisebothofthemovablebolts(B)thenthe
hinges(A)willbereleasedfromtheovenhousing.
• Youshouldgripthesidesofthedooratthecentre
andtheninclineitslightlyata15°anglethenpull
the door gently away from the oven cavity.
• Toreplacethedoor,slidethehingesbackinto
their clots and open the door fully.
Please Note: Youshouldmakesurethattheovendoorissupportedatalltimesandthat
you place the door on soft padded material when cleaning.

Removing the Side Racks
To thoroughly clean the oven it may be necessary to remove the side racks.
• Removetheovenshelvesandtheenamelbakingtray
from the cavity.
• Unscrewtheboltonthebottomofeachrackwitha
screwdriver and then unhook each side rack at the top.
Pullthemawayfromthecavity.
• Toreassemblethesideracks,hooktheupperstrutsinto
the relevant holes in the cavity and then secure the lower
bolts.
Cleaning and Maintenance
• Beforeanymaintenanceandcleaning,disconnecttheappliancefromthemains
power supply.
• SetallcontrolsintheOFFposition.
• Waituntiltheinsideoftheunithascooled.
• Cleanthesurfaceoftheunitwithadampcloth,softbrushornespongeandwipedry.
Incaseofheavysoiling,usehotwaterwithnon-abrasivecleaningproduct.
• Forcleaningtheglassoftheovendoor,donotuseabrasivecleanersorsharpmetal
scrapers, these can scratch the surface or lead to glass being damaged.
• Neverleaveacidicsubstances(lemonjuice,vinegar)onstainlesssteelparts.
• Donotuseahighpressurecleanerforcleaningtheunit.Thebakingpansmaybewashed
in mild detergent.
Disposal of Old Electrical Appliances
TheEuropeanDirective2002/96/EConWasteElectricalandElectronicEquipment(WEEE),
requiresthatoldhouseholdelectricalappliancesmustnotbedisposedofinnormalunsorted
municipalwaste.Oldappliancesmustbecollectedseparatelyinordertooptimisetherecovery
and recycling of the materials they contain and reduce the impact on human
health and the environment. The crossed out “wheeled bin” symbol on the product
reminds you of your obligation, that when you dispose of the appliance it must be
separatelycollected.Consumersshouldcontacttheirlocalauthorityorretailerfor
information concerning the correct disposal of their old appliance.

SERVICE AND SPARE PARTS
ShouldyouexperienceanydifcultyinusingyourStatesmanapplianceatanytime,youmay
contactyourStatesmanRetailerorcallourCustomerServiceDepartmenton:
0844 848 5861
Pleasehavethefollowingdetailsready;
• ModelName/ModelNumber
• SerialNumber
• DateofPurchase
• WherePurchased
• CustomerNameandaddressincludingpostcode
• ContactTelephoneNumber
• Accuratedescriptionofthefault
SparePartsinformationcanbeobtainedbycallingourSparePartsDepartmenton:
0844 848 5862
Disclaimer
Updatestohardwarecomponentsaremaderegularly.Thereforesomeoftheinstructions,
specicationsandpicturesinthisdocumentationmaydifferslightlyfromyourparticular
situation.Allitemsdescribedinthisguideareforillustrationpurposesonlyandmaynotapply
toyourparticularsituation.Nolegalrightorentitlementsmaybeobtainedfromthedescription
made in this manual.
This manual suits for next models
1
Table of contents
Other STATESMAN Oven manuals


