stayer HDBL181K User manual

es
it
gb
de
p
fr
cz
Manual de instrucciones
www.grupostayer.com
Istruzioni d’uso
Operating instructions
Bedienungsanleitung
Manual de instruções
Instructions d’emploi
Návod k použití
– překlad z originálu
HDBL22
HDBL222
HDBL224
HDB L20
HDBL264K
HDBL265K
HDBL181K
HDBL1820K
HDBL182K
HDBL184K

HDBL181 HDBL1820 HDBL182 HDBL184
Li-ion Li-ion Li-ion Li-ion
V18 18 18 18
Ah 1.5 2.0 2.6 4
min 60 75 60 75
n0
min-1 0-1100 0-1100 0-1100 0-1100
min-1 0-5000 0-5000 0-5000 0-5000
LPA dB(A) 85 85 85 85
LWA dB(A) 96 96 96 96
J1.2 1.2 1.2 1.2
max mm 20 20 20 20
max mm 13 13 13 13
max mm 4-12 4-12 4-12 4-12
kg 2.2 2.7 2.5 2.7
m/s25 5 5 5
HDBL22 / 222 / 224
HDB L20 HDBL264 HDBL265
Li-ion Li-ion Li-ion
V18 26 26
Ah 2.0 - 4.0 - 5.0 4.0 5.0
min 60 60 60
n0
min-1 0-1200 0-1000 0-1000
min-1 0-5300 0-4600 0-4600
LPA dB(A) 91 90 90
LWA dB(A) 102 101 101
J2.8 2.4 2.4
max mm 30 30 30
max mm 13 13 13
max mm 26 22 22
kg 2.6 5.4 5.4
m/s211 11 11
EN60745, K = 3dB (L , L ) K = 1,5 m/s2 (a )
rpm
rpm
DATOS TÉCNICOS
/ DATA SHEET
ipm
ipm

1
3 4 5
6
7
11
9
2
10
8
PLUS
SDS

ANEXO INSTRUCCIONES - INSTRUCTIONS ANEX
BATERÍA / CARGADOR - BATTERY / BATTERY CHARGER
HDBL264K - HDBL265K
HDBL 181 - HDBL 1820
HDBL 182 - HDBL 184
HDBL 22 - HDBL 222 - HDBL 224

INSTRUCCIONES DE CARGA PARA:
LOADING INSTRUCTIONS FOR:
HDBL181 - HDBL1820 - HDBL182 - HDBL184 - HDBL22
Paso 1: / Step 1:
Presentar batería por el carril del cargador, tal y
como se indica en la imagen adjunta./ Place the
battery through the rail of the battery charger, as it
is shown on the picture.
Paso 2: / Step 2:
Empujar la batería sobre el carril hasta el nal
del carril.
Push the battery, through the rail until the end of it.
Paso 3: / Step 3:
En el momento que enchufa a la red eléctrica el
cargador, se encenderá el led verde, indicando
que está habilitado para que inserte la batería
y se comience a cargar. En cuanto inserte la
batería como se le indica en los pasos 1-2 se
encenderá el led rojo, el cual comenzara a par-
padear, indicando que la batería está cargando
correctamente, también se mantendrá encendi-
do el led verde indicando conexión a la red.
As you plug into the mains charger, The green LED
will light, indicating that it is enabled to insert the
battery and begin charging. in As you insert the ba-
ttery as instructed in steps 1-2, the red LED, will
ash indicating that the battery is charging properly
nd also maintaining on the green LED indicating
connection to the network.
Paso 4: / Step 4:
Una vez cargada la batería el led rojo queda jo:
puede proceder a la desconexión de la misma
mediante los pasos que indicamos (proceso
inverso).
After charging the battery the red led is always
on, you can proceed with the disconnection by the
steps we said (reverse process).

INSTRUCCIONES DE CARGA PARA:
LOADING INSTRUCTIONS FOR:
HDBL264K / 265K
Paso 1: / Step 1:
Insertar batería por el carril del cargador, tal y
como se indica en la imagen adjunta./ Insert the
battery through the rail of the battery charger, as it
is shown on the picture.
Paso 2: / Step 2:
Pulsar sobre los botones laterales de la batería,
a la vez que se empuja la batería sobre el carril
hasta el nal del carril./ Push the lateral buttons
of the battery, at the same time that pass the bat-
tery through the rail until the end of it
Paso 3: / Step 3:
Mantener pulsado el botón “set” hasta que la luz
verde del botón central se ilumine. En el momen-
to que se ilumine la luz verde se comenzará la
carga de la batería. Una vez cargada la batería la
luz verde se apagará automáticamente. / Keep the
“set” button pressed until the green line of the middle
button lights. At this time battery will start to charge.
Once that the battery is charged the green light will
turn o automatically.
Paso 4: / Step 4:
Una vez cargada la batería mediante el indica-
dor verde apagado, proceder a la desconexión
de la misma mediante los pasos que indicamos
(procedimiento inverso). / Once that the green
light is o proceed to disconnect it through the fo-
llowing steps (reverse procedure)

- 7 -
es
it
gb
fr
p
de
cz
Este manual es acorde con la fecha de fabricación de
su máquina, información que encontrará en la tabla de
datos técnicos de la maquina adquirida, buscar actua-
lizaciones de manuales de nuestras maquinas en la
página web: www.grupostayer.com
1_INSTRUCCIONES ESPECIFICAS DE
SEGURIDAD
Solamente puede trabajar sin peligro con
el aparato si lee íntegramente las instruc-
ciones de manejo y las indicaciones de
seguridad, ateniéndose estrictamente a
las recomendaciones allí comprendidas.
Adicionalmente deberán respetarse las instruccio-
nes de seguridad generales comprendidas en el
folleto adjunto. Déjese instruir prácticamente en el
manejo antes de la primera aplicación.
Llevar gafas de protección y protectores auditivos.
Si tiene el pelo largo, recójaselo bajo una protección
adecuada. Trabajar únicamente con vestimenta ceñi-
da al cuerpo.
Antes de cada utilización controlar el aparato y el
acumulador. En caso de detectar algun daño, no con-
tinuar usando el aparato. Hacerlo reparar solamente
por personal técnico especializado. No abrir jamás el
aparato por su propia cuenta.
Solamente utilice los acumuladores previstos para
la herramienta eléctrica. El uso de acumuladores
diferentes de los previstos puede causar lesiones y
provocar incluso un incendio.
Su utilización indebida puede provocar en el acu-
mulador fugas de líquido. Evite su contacto con
él. Enjuague el área afectada con abundante agua
en caso de un contacto accidental. Si el líquido
llegase a penetrarle en los ojos recurra además
a un médico. El líquido fugado puede provocar una
irritación de la piel o quemaduras.
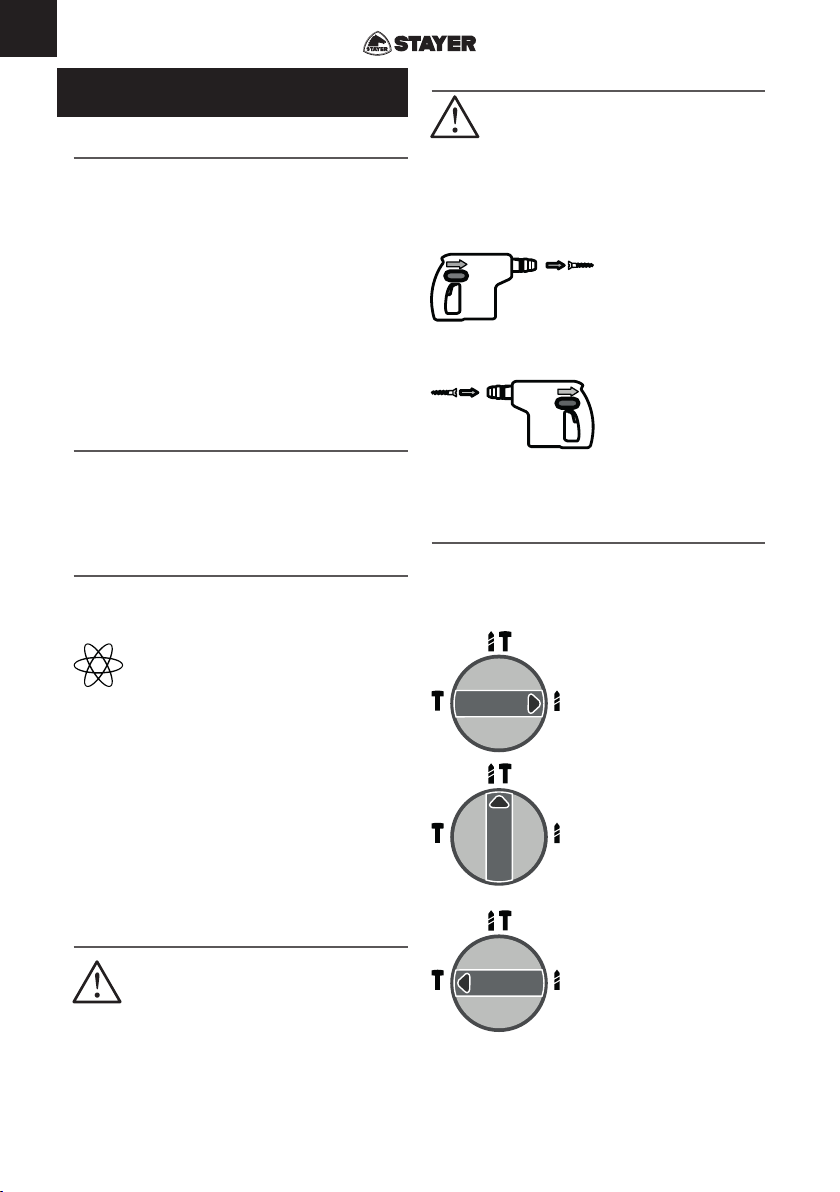
Siempre colocar en posición central el selector del
sentido de giro antes de cualquier manipulación
en el aparato (p. ej. mantenimiento, cambio de útil,
etc.) así como al transportarlo y guardarlo. En caso
contrario existe el riesgo de lesión al accionar acci-
dentalmente el interruptor de conexión/desconexión.
Cerciórese de que el aparato esté desconectado
antes de montar el acumulador. El montaje de un
acumulador en una herramienta eléctrica conectada
puede provocar un accidente.
Asegúrese antes de su utilización que el acumulador
esté rmemente sujeto en el aparato.
No solicite el aparato de manera tal que llegue a
detenerse.
Trabajar siempre con el aparato sujetándolo rme-
mente con ambas manos y manteniendo una posición
estable.
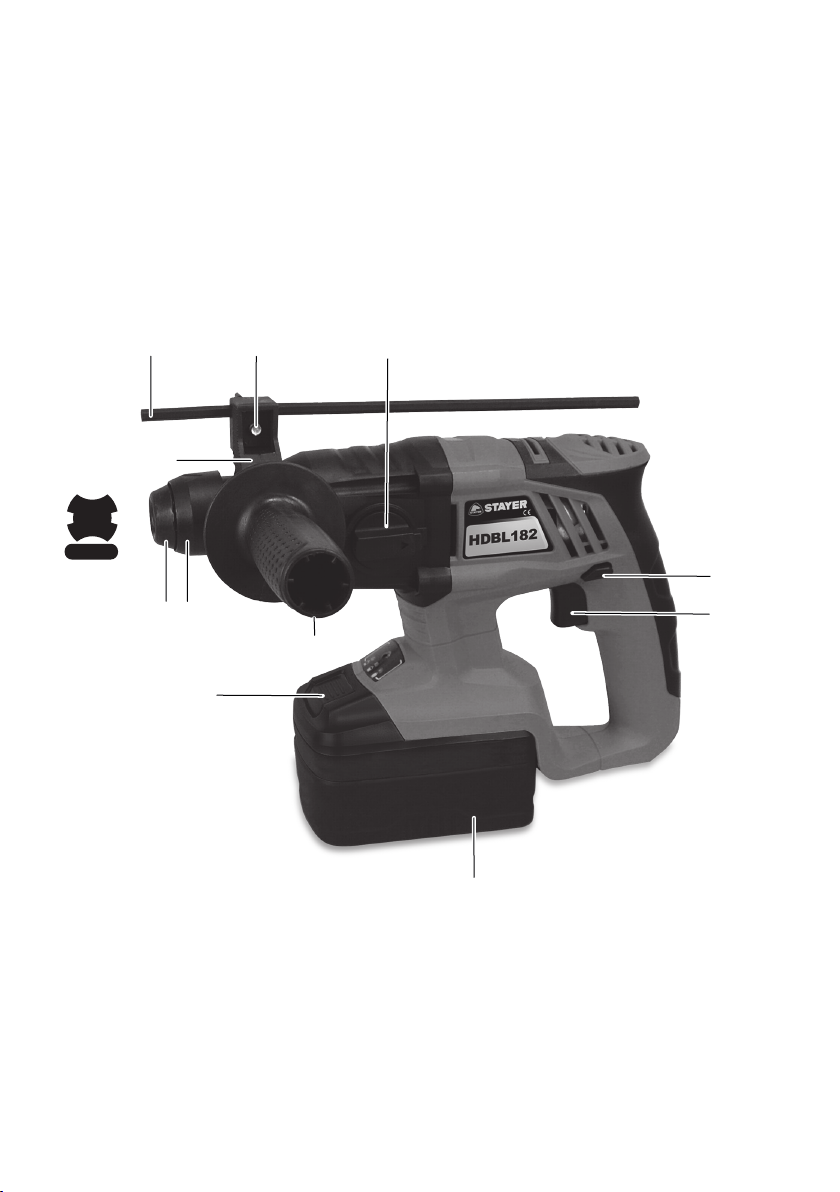
Solamente emplee el aparato con la empuñadura adi-
cional 10.
Sujetar la herramienta eléctrica solamente por las
empuñaduras aisladas si existe el peligro de que
el útil pueda tocar un conductor oculto.
El contacto con un conductor puede someter bajo ten-
sión las partes metálicas del aparato y provocar una
descarga eléctrica.
Utilice unos instrumentos de exploración adecua-
dos para detectar tuberías y cables ocultos, o con-
sulte a su compañía abastecedora local.
El contacto con cables eléctricos puede provocar un
incendio o sacudida eléctrica. El deterioro de tube-
rías de gas puede producir una explosión. La perfo-
ración de una tubería de agua puede causar daños
materiales.
Cuidado al atornillar tornillos largos: peligro de
resbalar.
Aplicar el aparato, solamente estando desconectado,
sobre la tuerca o tornillo.
Al atornillar trabajar en la 1a velocidad o con bajas
revoluciones.
Siempre desconectar y esperar a que se detenga el
aparato, antes de depositarlo.
Jamás permita que los niños utilicen el aparato.
Stayer solamente puede garantizar el funcionamiento
correcto del aparato si se utilizan los accesorios origi-
nales previstos.
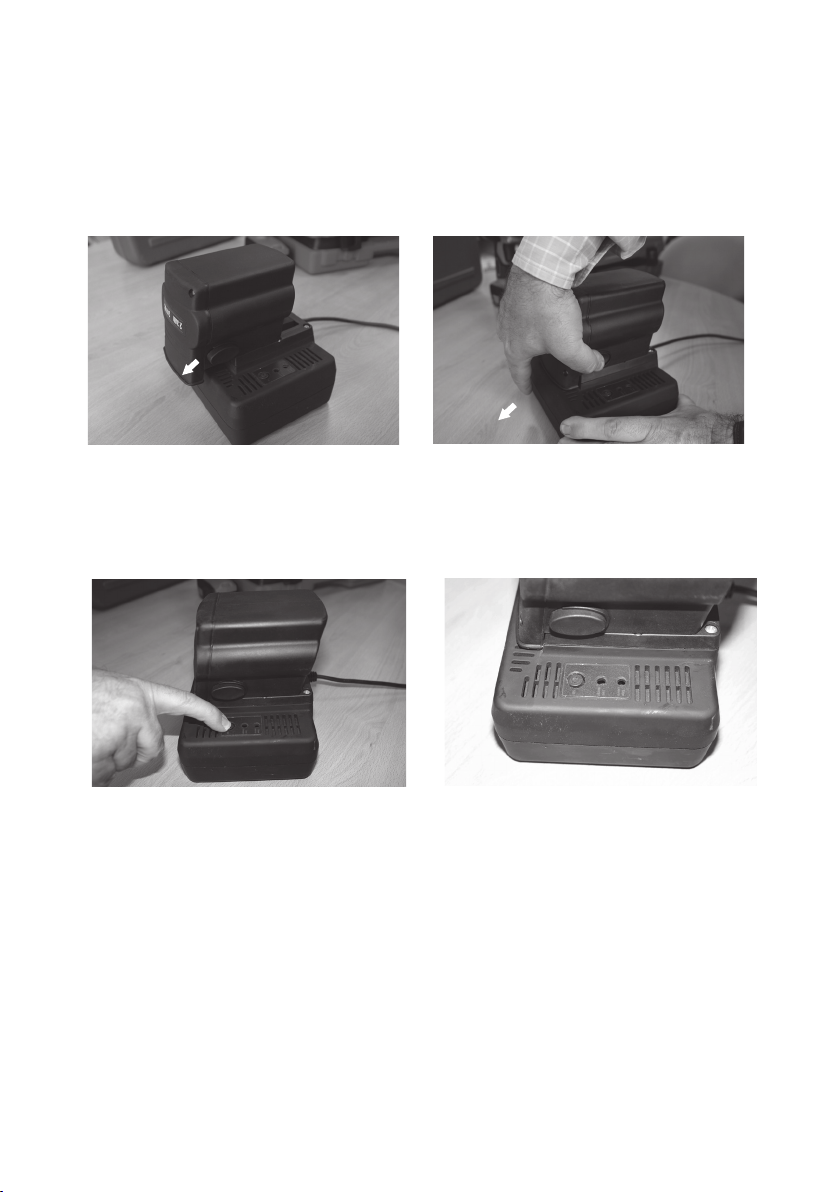
Acumulador y cargador
¡Es imprescindible leer las instrucciones de ma-
nejo del cargador que se adjuntan! Únicamente
cargue los acumuladores en los cargadores que el
fabricante recomienda.
Los cargadores previstos para cierto tipo de acumu-
lador pueden provocar un incendio al intentar cargar
acumuladores de otro tipo.
Dejar enfriar un acumulador caliente antes de cargarlo.
Proteger el acumulador del calor y del fuego: ¡Peligro
de explosión! No depositar el acumulador sobre ra-
diadores ni exponerlo durante tiempo prolongado al
sol; las temperaturas por encima de los 50 °C pueden
dañarlo.
No abrir el acumulador, y protegerlo contra golpes.
Guardarlo en un lugar seco y libre de heladas.
Guarde los acumuladores manteniéndo los aleja-
dos de clips, monedas, llaves, clavos, tornillos u
otros objetos metálicos pequeños que pudieran
puentear sus contactos.
En caso de cortocircuitar los contactos del acumu-
lador, ello puede originar quemaduras o incluso un
incendio.
No tirar el acumulador a la basura.

- 8 -
es
2_INSTRUCCIONES DE PUESTA EN
SERVICIO
DESCRIPCIÓN ILUSTRADA
1 Caperuza antipolvo
2 Casquillo de enclavamiento
3 Tope de profundidad
4 Botón de ajuste del tope de profundidad
5 Mando de desconexión del percutor
6 Interruptor de conexión/desconexión
7 Selector de sentido de giro
8 Batería
9 Tecla de desenclavamiento del acumulador
10 Empuñadora adicional
11 Sujección de empuñadura
MONTAJE DEL ACUMULADOR
Colocar el selector de sentido de giro 7 en el
centro (bloqueador de conexión). Insertar la bateria
cargada 8 en la empuñadura de forma que enclave
perceptiblemente y quede enrasado con el aparato.
CONEXIÓN Y DESCONEXIÓN
Para la puesta en marcha del aparato presionar
y mantener accionado el interruptor de conexión/
desconexión 6.
La máquina funciona con un número de
revoluciones variable entre 0 y máximo
según la presión ejercida sobre el interruptor
de conexión/desconexión 6. Presionando
ligeramente sobre el interruptor de conexión/
desconexión 6 se consigue un régimen de giro
reducido, lo que permite una puesta en marcha suave
y controlada. Aumentando la presión se incrementa el
número de revoluciones.
Para desconectar el aparato soltar el interruptor de
conexión/desconexión 6.
No solicitar el aparato de manera que llegue a
detenerse.
El aparato no es adecuado para utilizarse
estacionariamente, p. ej. en un soporte de taladrar.
EMBRAGUE LIMITADOR
En caso de que el útil de taladrar se agarrote
o quede enganchado, se interrumpe el ac-
cionamiento del husillo de taladrar.
Debido a las fuerzas de reacción resultantes en estos
casos, sujetar siempre rmemente el aparato con
ambas manos y trabajar sobre una base rme.
Antes de sacar un útil de taladrar atascado desmontar
éste del aparato.
CONMUTACIÓN DEL SENTIDO DE GIRO
Accionar el selector de sentido de giro 7
solamente con el aparato detenido.
El selector de sentido de giro 7 sirve para invertir el
sentido de giro de la máquina. Ello no es posible, sin
embargo, si se mantiene presionado el interruptor de
conexión/desconexión 6.
Dirección de giro a
derechas
Girar a la izquierda has-
ta el tope el selector de
sentido de giro (modo de
operación normal: taladrar,
atornillar, etc.).
Dirección de giro a
izquierdas
Presionar a tope hacia
la derecha el selector de
sentido de giro (para ao-
jar o desenroscar tornillos
y tuercas).
MANDO DE DESCONEXIÓN DEL PERCUTOR
Accionar el mando de desconexión del percutor 5
solamente con el aparato detenido.
Colocar el mando de desconexión de la percusión 5
en la posición deseada:
Taladrar
Taladrar con percusión
Percusión

- 9 -
es
it
gb
fr
p
de
cz
CARGA DE LA BATERÍA
Un acumulador nuevo o que no haya sido usado du-
rante largo tiempo alcanza su plena potencia después
de aprox. 5 ciclos de carga y descarga.
Para desmontar el acumulador 8 presionar las teclas
de desenclavamiento 9 y sacarlo, tirando de él hacia
abajo sin brusquedad.
El acumulador está equipado con un sensor de tem-
peratura que solamente permite la carga a temperatu-
ras entre 0 °C y 45 °C. Con esto se consigue una larga
duración de la batería.
Si después de cargar los acumuladores el tiempo de
funcionamiento fuese muy reducido, ello es señal de
que están agotados y deben sustituirse.
Ténganse en cuenta las instrucciones para protección
del medio ambiente.
3_OPERACIÓN
UTILIZACIÓN REGLAMENTARIA
El aparato ha sido proyectado para taladrar con per-
cusión en hormigón, ladrillo y piedra. Además es ade-
cuado también para taladrar sin percutir en madera,
metal, cerámica y materiales sintéticos. Los aparatos
regulados electrónicamente, con inversión del sentido
de giro, son adecuados además para atornillar y para
tallar roscas.
PUESTA EN MARCHA
Empuñadura adicional/tope de profundidad
Solamente emplee el aparato con la em-
puñadura adicional 10.
Aojar la empuñadura girándola a izquierdas.Abatir
la empuñadura adicional 10, y adaptarla a la posición
de trabajo. Al realizar esto, deberá observarse que la
sujección 11 de la empuñadura adicional quede alo-
jada en la ranura rmemente, girando el mango a la
derecha.
Seguidamente apretar rmemente girando el man-
go a derechas.
Con el tope de profundidad 3 puede ajustarse la pro-
fundidad de taladrado.
Para ello, presionar el botón de ajuste del tope de pro-
fundidad 4, ajustar la profundidad de taladrado desea-
da, y soltar entonces el botón de ajuste del tope de
profundidad 4.
El estriado en el tope de profundidad 3 debe de seña-
lar hacia arriba.
CAMBIO DE ÚTIL
Antes de cualquier manipulación en el aparato ex-
traer el acumulador.
Con el portaútiles SDS-plus, el cambio de útil es sen-
cillo y cómodo, y no requiere además de herramientas
auxiliares.
Engrasar periódicamente el extremo de inserción.
La caperuza antipolvo 1 evita en gran medida la pene-
tración del polvo producido al trabajar. Al insertar el útil
prestar atención a no dañar la caperuza antipolvo 1.
Es imprescindible sustituir inmediatamente una
caperuza antipolvo dañada. Se recomienda dejar
hacer esto por un servicio técnico.
Condicionado por el sistema de funcionamiento, la he-
rramienta SDS-plus debe de poder moverse libremen-
te. Debido a ello, se presenta un error de redondez a
la velocidad en vacío.
Esto no tiene ninguna repercusión en la precisión del
taladro, ya que la broca se autocentra durante el pro-
ceso de taladrado.
INSERCIÓN
Limpiar y engrasar el extremo de inserción del útil.
Insertar el útil en el portaútiles, girándolo al mismo
tiempo, hasta que quede enclavado automáticamente.
Vericar su enclavamiento correcto tirando del útil.
EXTRACCIÓN
Empujar hacia atrás el casquillo de enclavamiento 2
del portaútiles, y sacar la broca.
ATORNILLADO
El aparato es adecuado para realizar ocasionalmente
trabajos de atornillado ligeros, pero no para aquellos
trabajos que provoquen una fuerte reducción de
las revoluciones, activándose frecuentemente el
embrague contra sobrecarga.
Para enroscar tornillos debe emplearse el soporte
universal de bits con vástago SDS-plus (accesorio
especial).
– Colocar el mando de desconexión del percutor 5 en
la posición “Taladrar”.
– Ajustar el sentido de giro a derechas.
– Regular las revoluciones con el interruptor de cone-
xión/desconexión 6.
4_MANTENIMIENTO Y SERVICIO
MANTENIMIENTO Y LIMPIEZA
Antes de cualquier manipulación en el aparato ex-
traer el acumulador.
Mantener siempre limpios el aparato y las rejillas de
refrigeración para poder trabajar con seguridad.
Mantener el portaútiles siempre limpio.
Cambio de la caperuza antipolvo
Es imprescindible sustituir inmediatamente una
caperuza antipolvo dañada. Se recomienda dejar
hacer esto por un servicio técnico.
Si a pesar de los esmerados procesos de fabricación
y control, el aparato llegase a averiarse, la reparación
deberá encargarse a un taller de servicio autorizado
para herramientas eléctricas Stayer.

-10 -
es
SERVICIO DE REPARACIÓN
El servicio técnico le asesorará en las consultas que
pueda Ud. tener sobre la reparación y mantenimiento
de su producto, así como sobre piezas de recambio.
Los dibujos de despiece e informaciones sobre las
piezas de recambio las podrá obtener también en in-
ternet bajo: info@grupostayer.com
Nuestro equipo de asesores técnicos le orientará gus-
tosamente en cuanto a la adquisición, aplicación y
ajuste de los productos y accesorios.
GARANTÍA
Tarjeta de Garantía
Entre los documentos que forman parte de la herra-
mienta eléctrica encontrara la tarjeta de garantía.
Deberá rellenar completamente la tarjeta de garantía
aplicando a esta copia del ticket de compra o factura
y entregarla a su revendedor a cambio del correspon-
diente acuse de recibo.
¡NOTA! Si faltara esta tarjeta pídasela de inmediato a
su revendedor.
La garantía se limita únicamente a los defectos de fa-
bricación o de mecanización y cesa cuando las piezas
hayan sido desmontadas, manipuladas o reparadas
fuera de la fábrica.
ELIMINACIÓN
Recomendamos que las herramientas eléctricas, ac-
cesorios y embalajes sean sometidos a un proceso de
recuperación que respete el medio ambiente.
Sólo para los países de la UE:
¡No arroje las herramientas eléctricas a la basura!
Conforme a la Directriz Europea 2012/19/
UE sobre aparatos eléctricos y electrónicos
inservibles, tras su transposición en ley na-
cional, deberán acumularse por separado
las herramientas eléctricas para ser someti-
das a un reciclaje ecológico.
Acumuladores/pilas:
Iones de Litio:
Observe las indicaciones comprendidas
en el apartado “Transporte”
No arroje los acumuladores/pilas a la basura, ni al fue-
go, ni al agua. Los acumuladores/pilas deberán guar-
darse y reciclarse o eliminarse de manera ecológica.
Sólo para los países de la UE:
Conforme a la directriz 2013/56/UE deberán reciclarse
los acumuladores/pilas defectuosos o agotados.
CARACTERÍSTICAS TÉCNICAS
rpm
ipm
kg
V= Tensión Batería
= Revoluciones en vacío
= Percusiones
= Energía de percusión
= Capacidad de perforación, acero
= Capacidad de perforación, piedra
= Capacidad de perforación, madera
= Peso
= Capacidad Batería
= Tiempo de carga batería
LWA = Nivel de potencia acústica
LpA= Nivel de presión acústica
= Vibración
Estos datos son válidos para tensiones nominales de
[U] 230/240 V ~ 50/60 Hz - 110/120 V ~ 60 Hz. Los
valores pueden variar si la tensión fuese inferior, y en
las ejecuciones especícas para ciertos países.
Información sobre ruidos y vibraciones
Determinación de los valores de medición según nor-
ma EN 50 144.
El nivel de ruido típico del aparato corresponde a:
nivel de presión acústica 89 dB (A); nivel de potencia
acústica 101 dB (A).
¡Usar protectores auditivos!
El nivel de vibraciones típico es de 11 m/s2.
DECLARACIÓN DE CONFORMIDAD CE
Declaramos bajo nuestra responsabilidad, que el pro-
ducto descrito bajo “Datos técnicos” está en confor-
midad con las normas o documentos normalizados
siguientes: EN 60745 de acuerdo con las regulaciones
2004/108/CE, 2006/42/CE.
Ramiro de la Fuente
Director Manager
Enero 2020

es
it
gb
fr
p
de
- 11 -
cz
Questo manuale è coerente con la data di fabbricazione
del vostro computer, potrete trovare informazioni
sui dati tecnici della macchina acquistata controllo
manuale degli aggiornamenti delle nostremacchine
sul sito: www.grupostayer.com
1_DI SICUREZZA SPECIFICHE
È possibile lavorare con la macchina
senza incorrere in pericoli soltanto dopo
aver letto completamente le istruzioni per
l’uso e l’opuscolo avvertenze per la
sicurezza e seguendo rigorosamente le
istruzioni in essi contenute. Inoltre vanno
rispettate anche le generali istruzioni di sicurezza
riportate nell’opuscolo allegato.
Fatevi istruire praticamente prima di passare
all’operazione pratica.
Portare occhiali e cue di protezione. In caso di capelli
lunghi è necessario portare un’adatta protezione per i
capelli. Lavorare soltanto con abiti adatti ed aderenti
al corpo.
Controllare la macchina e la batteria prima di
ogni impiego. Qualora venissero riscontrati dei
difetti, non continuare ad utilizzare la macchina. Le
riparazioni possono essere eseguite esclusivamente
da personale qualicato. Mai aprire la macchina
personalmente.
Avere cura d’impiegare negli elettroutensili
solo ed esclusivamente le batterie ricaricabili
esplicitamente previste. L’impiego di batterie diverse
da quelle consigliate potrà comportare il pericolo di
lesione o d’incendio.
In caso d’impiego errato si provoca il pericolo di
fuoriuscita di liquido dalla batteria ricaricabile.
Evitarne assolutamente il contatto. In caso di
contatto accidentale, sciacquare accuratamente
con acqua. Rivolgersi immediatamente al medico,
qualora il liquido dovesse entrare in contatto con
gli occhi. Il liquido fuoriuscito dalla batteria ricaricabile
potrà causare irritazioni cutanee o ustioni.
Prima di eettuare lavori alla macchina (ad es.
lavori di manutenzione, cambio d’utensile, ecc.),
nonché in caso di trasporto e di conservazione
della medesima, avere sempre cura di portare
in posizione media il commutatore del senso di
rotazione. In difetto, sussisterà il pericolo di lesioni
in caso di azionamento accidentale dell’interruttore di
avvio/di arresto.
Prima di inserire la batteria ricaricabile, assicurarsi
che la macchina sia spenta. Inserendo una batteria
ricaricabile in un elettroutensile acceso si può
provocare il pericolo di incidenti.
Prima di utilizzare la macchina, assicurarsi che la
batteria sia ben inserita nell’apposito vano.
Non sottoporre la macchina a carico tanto elevato da
farla fermare.
Durante le operazioni di lavoro è necessario tenere la
macchina sempre con entrambe le mani ed adottare
una posizione di lavoro sicura.
Impiegare la macchina soltanto con l’impugnatura
supplementare 10.
Quando vi è il pericolo che l’utensile ad innesto
possa incontrare una linea nascosta, aerrare
l’elettroutensile tenendolo esclusivamente con le mani
su impugnature isolate.
Un contatto con una linea portatrice di tensione
può mettere sotto tensione le parti in metallo della
macchina e provocare quindi una scossa elettrica.
Al ne di rilevare linee di alimentazione nascoste,
utilizzare adatte apparecchiature di ricerca oppure
rivolgersi alla locale società erogatrice.
Un contatto con linee elettriche può provocare lo
sviluppo di incendi e di scosse elettriche.
Danneggiando linee del gas si può creare il pericolo
di esplosioni. Penetrando una tubazione dell’acqua si
provocano seri danni materiali.
Attenzione durante l’avvitamento di viti lunghe,
pericolo di slittamento.
Applicare la macchina sul dado/vite soltanto quando la
macchina è disinserita.
Per l’operazione di avvitamento impostare la prima
marcia, oppure lavorare a basso numero di giri.
Prima di poggiare la macchina, è necessario
spegnerla ed attendere no a quando la macchina si
sarà fermata completamente.
Mai permettere a bambini di utilizzare la macchina.
La Stayer può garantire un perfetto funzionamento
della macchina soltanto se vengono utilizzati
accessori originali specicatamente previsti per
questa macchina.
Batteria e stazione di ricarica
È estremamente indispensabile leggere le allegate
istruzioni per l’uso relative alla stazione di ricarica!
Ricaricare le batterie solo ed esclusivamente
servendosi delle stazioni di ricarica esplicitamente
consigliate dalla casa costruttrice. Per una stazione
di ricarica prevista per l’impiego con un determinato
tipo di batteria ricaricabile, sussisterà pericolo
d’incendio se utilizzata con batterie di tipo diverso.
Prima di procedere all’operazione di ricarica, far
rareddare le batterie surriscaldate.
Proteggere la batteria da surriscaldamento e da
amme: Pericolo di esplosione! Non poggiare le
batterie su termosifoni, né esporle a lungo all’azione
diretta dei raggi solari: temperature superiori a 50 °C
provocano danni.
Non aprire la batteria e proteggerla contro gli urti.
Conservarla in luogo asciutto e protetto contro il gelo.

it
- 12 -
2_DESCRIZIONE DEL FUNZIONAMENTO
DESCRIZIONE ILLUSTRATA
1 Protezione antipolvere
2 Bussola di bloccaggio
3 Asta di profondità
4 Pulsante per regolazione della battuta di profondità
5 Commutatore per impiego battente
6 Interruttore di avvio/arresto
7 Commutatore per la reversibilità
8 Batteria
9 Tasto di sbloccaggio batteria
10 Impugnatura supplementare
11 Bloccaggio Manico
INSERIMENTO DELLA BATTERIA
Mettere il commutatore del senso di rotazione 7 sulla
posizione centrale (pulsante di sicurezza). Inserire la
batteria ricaricata 8 nell’impugnatura no a percepirne
lo scatto d’innesto ed assicurandosi che sia a lo con
la macchina.
AVVIO/ARRESTO
Per avviare la macchina, premere l’interruttore avvio/
arresto 6 e tenerlo premuto.
A seconda della pressione esercitata
sull’interruttore di avvio/arresto 6, l’utensile
gira ad una velocità variabile che va dallo 0
no al massimo possibile.
Una leggera pressione sull’interruttore di avvio/
arresto 6 provoca un piccolo numero di giri e rende
così possibile l’avviamento dolce e controllato.
Aumentando la pressione il numero di giri aumenta.
Per arrestare la macchina, rilasciare l’interruttore
avvio/arresto 6.
Non sottoporre la macchina a carico tanto elevato da
farla fermare.
L’apparecchio non è idoneo per l’impiego stazionario,
ad es. in un montante di trapano.
FRIZIONE A STACCO
Se il trapano si blocca oppure rimane
agganciato, si interrompe la trasmissione
all’alberino lettato.
Per poter far fronte alle forze sviluppate in una
situazione del genere, è necessario mantenere la
macchina sempre con entrambe le mani ed assicurarsi
una buona posizione di lavoro.
Prima di cercare di estrarre una punta utensile rimasta
bloccata in una foratura è necessario Commutazione
del senso di rotazione estrarla dalla macchina.
COMMUTAZIONE DEL SENSO DI ROTAZIONE
Attivare il commutatore per la reversibilità
7 solo quando la macchina è ferma.
Tramite il commutatore del senso di rotazione 7 si
cambia il senso di rotazione della macchina. Ciò non
è possibile quando l’interruttore di avvio/arresto 6 è
attivato.
Senso di rotazione
destra
Premere completamente
il commutatore del senso
di rotazione verso sinistra
no alla battuta (modo
operativo normale: forare,
avvitare viti, ecc.).
Senso di rotazione
sinistra
Premere completamente
verso destra no alla
battuta il commutatore
del senso di rotazione
(allentare oppure svitare
viti e dadi).
COMMUTATORE PER IMPIEGO BATTENTE
Regolare il commutatore per impiego battente 5
soltanto a macchina ferma.
Posizionare il commutatore per impiego battente 5 alla
posizione che si desidera:
Foratura
Foratura a martello
Martello

es
it
gb
fr
p
de
- 13 -
cz
CARICARE LA BATTERIA
Una batteria che non sia stata utilizzata per un
lungo periodo di tempo arriva a portare la sua piena
prestazione solo dopo ca. 5 cicli di ricarica e scarica.
Per togliere le batterie ricaricabili 8, premere i tasti
di sbloccaggio 9 ed estrarre la batteria ricaricabile
tirandola verso il basso. Non forzare.
La batteria è equipaggiata con un dispositivo di
controllo della temperatura , che permette l’operazione
di ricarica soltanto entro valori di temperatura compresi
tra 0 °C e 45 °C. In questo modo si raggiunge
un’elevata durata della batteria.
Una durata di funzionamento della batteria che con
ogni operazione di ricarica diventa sempre più breve
sta ad indicare che le batterie sono usurate e che
devono essere sostituite.
Osservare le istruzioni relative alla protezione
dell’ambiente.
3_USO
USO CONFORME ALLE NORME
La macchina è ideale per forature battenti nel
calcestruzzo, nella muratura e sulla roccia naturale.
Inoltre è adatta per forature non battenti nel legno,
nel metallo, nella ceramica e su materiali sintetici.
Macchine con regolazione elettronica e funzionamento
reversibile sono adatte anche per avvitare e tagliare
lettature.
MESSA IN FUNZIONE
Impugnatura supplementare/asta di profondità
Impiegare la macchina soltanto con
l’impugnatura supplementare 10.
Allentare l’impugnatura ruotandola in senso antiorario.
Regolare l’impugnatura supplementare 10 adattandola
alla posizione di lavoro. Così facendo, il nastro tensore
11 dell’impugnatura supplementare deve restare nella
scanalatura, quindi serrare la maniglia in censo orario.
Con l’asta di profondità 3, si può regolare la profondità
di trapanatura. A tal ne, premere il pulsante per la
regolazione della battuta di profondità 4, regolare la
profondità della foratura che si desidera e rilasciare
nuovamente il pulsante per la regolazione della
battuta di profondità 4.
La striatura sull’asta di profondità 3 deve essere rivolta
in alto.
CAMBIO DEGLI UTENSILI
Prima di eseguire qualsiasi lavoro alla macchina,
estrarre la batteria.
Tramite il portautensili SDS-plus è possibile cambiare
gli utensili in maniera facile e comoda senza necessità
di ricorrere ad ulteriori attrezzi.
Lubricare regolarmente il gambo degli utensili.
La protezione antipolvere 1 impedisce in buona parte
la penetrazione di polvere da foratura prodotta durante
l’esercizio. Applicando l’utensile, avere cura di non
danneggiare la protezione antipolvere 1.
Sostituire immediatamente la protezione
antipolvere danneggiata. Si consiglia di adare
l’operazione ad un Centro di Assistenza Clienti.
Il sistema richiede che l’utensile SDS-plus possa
muoversi liberamente. Ciò implica un errore di
oscillazione radiale durante la rotazione folle.
Questo non ha conseguenze sulla precisione del foro,
poiché la punta si centra automaticamente durante la
trapanatura.
INSERIRE
Pulire e lubricare il gambo dell’utensile.
Inserire l’utensile nel portautensile ruotandolo no
a farlo bloccare autonomamente. Controllare il
bloccaggio tirando l’utensile.
ESTRARRE
Spostare la bussola di bloccaggio 2 dell’alloggiamento
dell’utensile all’indietro ed estrarre l’utensile.
AVVITATURA
La macchina è adatta anche per l’esecuzione
occasionale di avvitature e comunque non in caso
di tipi di avvitamenti che richiedono una riduzione
del numero di giri tale da far scattare spesso la
frizione di sovraccarico.
Per avvitare viti è necessario impiegare il portabit
universale con gambo SDS-plus (accessorio
opzionale).
– Posizionare il commutatore per impiego battente 5
su «Foratura».
– Regolare il senso di rotazione sulla rotazione
destrorsa.
– Regolare la velocità operando con l’interruttore di
avvio/arresto 6.
4_MANUTENZIONE ED ASSISTENZA
MANUTENZIONE E PULIZIA
Prima di eseguire qualsiasi lavoro alla macchina,
estrarre la batteria.
Per poter garantire buone e sicure operazioni di
lavoro, tenere sempre pulite la macchina e le fessure
di ventilazione.
Avere cura di mantenere sempre pulito
l’alloggiamento utensili.
Sostituzione della protezione antipolvere
Sostituire immediatamente la protezione
antipolvere danneggiata. Si consiglia di adare
l’operazione ad un Centro di Assistenza Clienti.

it
-14 -
Se nonostante gli accurati procedimenti di produzione
e di controllo la macchina dovesse guastarsi,
la riparazione va fatta eettuare da un punto di
assistenza autorizzato per gli elettroutensili Stayer.
SERVIZIO DI RIPARAZIONE
Il servizio di assistenza risponde alle Vostre domande
relative alla riparazione ed alla manutenzione del
Vostro prodotto nonché concernenti le parti di ricambio.
Disegni in vista esplosa ed informazioni relative alle
parti di ricambio sono consultabili anche sul sito:
info@grupostayer.com
Il nostro team di consulenti tecnici saranno lieti
di guidare per l'attuazione di acquisizione, e la
regolazione di prodotti e accessori.
GARANZIA
Carta di garanzia
Tra i documenti che formano parte della presente
attrezzatura troverà la carta della garanzia.
Dovrà riempire completamente la carta della garanzia
applicando alla medesima la copia del ticket d'acquisto
o la fattura e consegnarla al suo rivenditore a cambio
della corrispondente ricevuta di ritorno.
¡Nota! Se mancasse questa tessera, la chieda
immediatamente al suo rivenditore.
La garanzia si limita unicamente ai difetti di
fabbricazione o di meccanizzato e cessa quando i
pezzi siano stati smontati, manipolati o riparati fuori
dalla fabbrica.
SMALTIMENTO
Avviare ad un riciclaggio rispettoso dell’ambiente gli
imballaggi, gli elettroutensili e gli accessori dismessi.
Solo per i Paesi della CE:
Non gettare elettroutensili dismessi tra i riuti
domestici!
Conformemente alla norma della direttiva
UE 2012/19 sui riuti di apparecchiature
elettriche ed elettroniche (RAEE) ed
all’attuazione del recepimento nel diritto
nazionale, gli elettroutensili diventati
inservibili devono essere raccolti separatamente ed
essere inviati ad una riutilizzazione ecologica.
Batterie ricaricabili/Batterie:
Li-Ion:
Si prega di tener presente le indicazioni
riportare nel paragrafo «Trasporto»,
Qualunque sia il tipo di batteria esaurita, essa non
deve essere gettata tra i riuti domestici, nel fuoco o
nell’acqua. Ogni tipo di batteria esaurita deve essere,
riciclata oppure smaltita rispettando rigorosamente la
protezione dell’ambiente.
Solo per i Paesi della CE:
Ogni tipo di batteria difettosa oppure esaurita deve
essere riciclata secondo la direttiva 2013/56/EU.
DATI TECNICI
rpm
ipm
kg
V= Potenza nominale di ingresso
= Velocità di carico
= Percussion
= Energia a percussione
= Massimo di foratura, acciaio
= Massimo di foratura, pietra
= Massimo di foratura, legno
= Peso
= Capacità della batteria
= Tempo di ricarica batteria
LWA = Livello di potenza sonora
LpA= Livello di pressione sonora
= Vibration
Le caratteristiche si riferiscono a tensioni nominali
[U] 230/240 V ~ 50/60 Hz - 110/120 V ~ 60 Hz. In
caso di tensioni minori ed in caso di modelli speciali
a seconda dei Paesi, le caratteristiche riportate pos
sono essere divergenti.Si prega di tenere presente il
codice prodotto applicato sulla targhetta di costruzione
del Vostro elettroutensile. Le descrizioni commerciali
di singoli elettroutensili possono variare.
Informazioni sulla rumorosità e sulla vibrazione
Valori misurati conformemente alla norma EN 50 144.
La misurazione A del livello di pressione acustica
dell’utensile è di solito di: Livello di rumorosità 89 dB
(A). Potenza della rumorosità 101 dB (A).
Utilizzare le cue di protezione!
L’accelerazione misurata raggiunge di solito il valore
di 11 m/s2.
DICHIARAZIONE DI CONFORMITÀ
Assumendone la piena responsabilità, dichiariamo che
il prodotto descritto nei «Dati tecnici» è conforme alle
seguenti normative ed ai relativi documenti: EN 6074
5 in base alle prescrizioni delle direttive 2004/108/CE,
2006/42/CE.
Ramiro de la Fuente
Direttore Generale
Gennaio 2020

es
it
gb
fr
p
de
- 15 -
cz
This manual is consistent with the date of manufacture
of your machine, you will nd information on the
technical data of the machine acquired manual check
for updates of our machines on the website:
www.grupostayer.com
1_MACHINE-SPECIFIC SAFETY
WARNINGS
Working safely with this machine is
possible only when the operating and
safety information are read completely
and the instructions contained therein are
strictly followed. In addition, the general
safety notes in the enclosed booklet must be
observed. Before using for the rst time, ask for a
practical demonstration.
Wear protective glasses and hearing protection. For
long hair, wear hair protection. Work only with closely
tting clothes. Before each use, check the machine
and battery. If damage is detected, do not use the
machine. Have repairs performed only by a qualied
technician. Never open the machine yourself.
Use power tools only with specically designated
battery packs. Use of any other battery packs may
create a risk of injury and re.
Under abusive conditions, liquid may be ejected
from the battery; avoid contact. If contact
accidentally occurs, ush with water. If liquid
contacts eyes, additionally seek medical help.
Liquid ejected from the battery may cause irritation or
burns.
Before any work on the machine itself (e. g.
maintenance, tool change, etc.) as well as when
transporting and storing, always set the rotational
direction switch to the centre position. Otherwise
danger of injury is given when unintentionally actuating
the On/O switch.
Ensure the switch is in the o position before
inserting battery pack. Inserting the battery pack into
power tools that have the switch on invites accidents.
Convince yourself before using that the battery is
securely seated in the machine.
Do not strain the machine so heavily that it comes to
a standstill.
When working with the machine, always hold it rmly
with both hands and provide for a secure stance.
Operate the machine only with the auxiliary handle 10.
Hold the power tool only by the insulated gripping
surfaces, when performing an operation where the
cutting tool may run into hidden wiring.
Contact with a “live” wire will make exposed metal
parts of the tool “live” and shock the operator.
Use appropriate detectors to determine if utility
lines are hidden in the work area or call the local
utility company for assistance.
Contact with electric lines can lead to re and electric
shock. Damaging a gas line can lead to explosion.
Penetrating a water line causes property damage.
Be careful when screwing in long screws; danger of
sliding o.
Set the machine against the screw/nut only when
switched o.
When screwdriving, operate in rst gear as well as with
a low speed.
Always switch the machine o and wait until it has
come to a standstill before placing it down.
Never allow children to use the machine.
Stayer is only able to ensure perfect operation of the
machine if the original accessories intended for it are
used.
Battery and Battery Charger
The enclosed operating instructions for the battery
charger must be read carefully!
Recharge only with the charger specied by the
manufacturer. A charger that is suitable for one type
of battery pack may create a risk of re when used with
another battery pack.
Allow a heated battery to cool before charging.
Protect the battery from heat and re: Danger of
explosion! Do not place the battery on radiators
or expose to strong sun rays for a longer time;
temperatures over 50 °C cause damage.
Do not open the battery, and protect it from impact.
Store in a dry and frost-free place.
When battery pack is not in use, keep it away from
other metal objects like paper clips, coins, keys,
nails, screws, or other small metal objects that can
make a connection from one terminal to another.
Shorting the battery terminals together may cause
burns or a re.
Do not dispose of the battery in household waste or
discard into re or water.
2_FUNCTIONAL DESCRIPTION
PRODUCT FEATURES
1 Dust protection cap
2 Locking sleeve
3 Depth stop
4 Push-button for depth-stop adjustment
5 Impact stop switch
6 On/O switch
7 Rotational direction switch
8 Battery
9 Battery unlocking button
10 Auxiliary handle
11 Clamping handle

gb
- 16 -
INSERTING THE BATTERY
Set the rotational direction switch 7 to the centre
position (lock-o). Insert the charged battery 8 into the
handle until it can be felt to engage and is seated ush
on the machine.
SWITCHING ON AND OFF
To start the machine, press the On/O switch 6 and
keep it depressed.
The machine runs with variable speed
between 0 and maximum, depending on the
pressure applied to the On/O switch 6. Light
pressure on the On/O switch 6 results in low
rotational speed, thus allowing drilling to begin in a
smooth, controlled manner. Further pressure on the
switch results in an increase in speed.
To switch o the machine, release the On/O switch
6.
Do not strain the machine so heavily that it comes to
a standstill.
The machine is not suitable for stationary operation,
e.g., in a drill stand.
OVERLOAD CLUTCH
If the drill bit jams or edges, the drive to the
drill spindle is interrupted.
Due to the arising forces always hold the
machine rmly with both hands and provide for a
secure stance.
Before pulling out a stuck tool insert, rst remove the
machine from it.
REVERSING THE ROTATIONAL DIRECTION
Operate the rotational direction switch 7
only at a standstill.
The rotational direction switch 7 is used to reverse the
rotational direction of the machine. However, this is not
possible with the On/O switch 6 actuated.
Right Rotation
Turn the rotational direction
switch through to the left
stop (normal operation:
drilling, screwdriving, etc.).
Left Rotation
Press the rotational
direction switch through
to the right stop (for
loosening and unscrewing
screws and nuts).
IMPACT STOP SWITCH
Operate the impact stop switch 5 only when at a
standstill.
Set the impact stop switch 5 to the desired position:
Drilling
Hammer drilling
Hammer
BATTERY CHARGING
A battery that is new or has not been used for a longer
period does not develop its full capacity until after
approximately 5 charging/discharging cycles.
To remove the battery 8, press the unlocking buttons
9 and pull out the battery downwards. Do not exert
any force.
The battery is equipped with an temperature control
which allows charging only within a temperature range
of between 0 °C and 45 °C.
A long battery service life is achieved in this manner.
A signicantly reduced working period after charging
indicates that the batteries are used and must be
replaced.
Observe the notes on environmental protection.
3_ASSEMBLY
INTENDED USE
The machine is intended for hammer drilling in
concrete, brick and stone. It is also suitable for drilling
without impact in wood, metal, ceramic and plastic.
Machines with electronic control and right/left rotation
are also suitable for screwdriving and thread cutting.

es
it
gb
fr
p
de
- 17 -
cz
WORKING ADVICE
Auxiliary Handle/Depth Stop
Operate the machine only with the
auxiliary handle 10.
Loosen the handle by turning to the left. Rotate the
auxiliary handle 10 and adapt to the working position.
Make sure that the clamping handle 11 of the auxiliary
handle remains in the groove.
Then tighten the handle clockwise The drilling depth
can be set with the depth stop 3.
For this, press the push-button for the depth-stop
adjustment 4, adjust the required drilling depth and
release the push-button for the depth-stop adjustment
4 again. The ribbing on depth stop 3 must point
upwards.
CHANGING THE TOOL
Before any work on the machine itself, remove the
battery.
With the SDS-plus tool holder, simpler and easier tool
changing is possible without additional aids.
Grease the shank end of the tool regularly.
The dust protection cap 1 largely prevents the entry
of drilling dust during operation. When inserting the
tool, take care that the dust protection cap 1 is not
damaged.
A damaged dust protection cap should be changed
immediately. We recommend having this carried
out by an after-sales service.
As a requirement of the system, the SDS-plus tool
must rotate freely. At no-load speed, this leads to a
certain amount of radial run-out.
This does not aect the accuracy of the drill hole, as
the bit is automatically centred during drilling.
INSERTING
Clean and grease the shank end of the tool.
Insert the tool in a twisting manner into the tool holder
until it locks. Check if it has locked by pulling the tool.
REMOVING
Push back the locking sleeve 2 of the tool holder and
remove the tool.
SCREWDRIVING
The machine is also suitable for occasional
screwdriving applications, however, not for
screwdriving applications with extreme reductions
of speed at which the overload clutch frequently
responds.
For screwdriving, the universal bit holder with SDS-
plus shank (accessory) must be used.
– Set the impact stop switch 5 to “Drill”.
– Set the direction of rotation to right-hand rotation.
– Regulate the speed with the On/O switc h 6.
4_MAINTENANCE AND SERVICE
MANUTENZIONE E PULIZIA
Before any work on the machine itself, remove the
battery.
For safe and proper working, always keep the machine
and the ventilation slots clean.
Keep the tool holder clean at all times.
Changing the Dust Protection Cap
A damaged dust protection cap should be changed
immediately. We recommend having this carried
out by an after-sales service.
If the machine should fail despite the care taken in
manufacturing and testing procedures, repair should
be carried out by an after-sales service centre for
Stayer power tools.
In all correspondence and spare parts orders, please
always include order number given on the nameplate
of the machine.
REPAIR SERVICE
Our after-sales service responds to your questions
concerning maintenance and repair of your product as
well as spare parts. Exploded views and information
on spare parts can also be found under:
info@grupostayer.com
Our customer consultants answer your questions
concerning best buy, application and adjustment of
products and accessories.
WARRANTY
Warranty card
Included in the documentation that accompanies this
equipment, you should nd the warranty card. You
should ll out the card completely and return to vendor
with a copy of purchasing receipt or invoice and you
should receive a receipt.
Note: If you cannot nd the warranty card within
the documentation, you must ask for it through
your supplier.
The warranty is limited only to manufacturing
defects and expire if pieces have been removed or
manipulated or repaired other than the manufacturer.

gb
-18 -
DISPOSAL
The machine, accessories and packaging should be
sorted for environmental-friendly recycling.
Only for EC countries:
Do not dispose of power tools into house-
hold waste!
According the European Guideline 2012/19/
EU for Waste Electrical and Electronic
Equipment and its impl e m e ntati o n
into national right, power tools that are no longer usa-
ble must be collected separately and disposed of in an
environmentally correct manner.
Battery packs/batteries:
Li-Ion:
Please observe the instructions in sec-
tion “Transport”,
Do not dispose of battery packs/batteries into
household waste, re or water. Battery packs/batteries
should be collected, recycled or disposed of in an
environmental-friendly manner.
Only for EC countries:
Defective or dead out battery packs/batteries must be
recycled according the guideline 2013/56/EU.
TECHNICAL SPECIFICATIONS
rpm
ipm
kg
V= Rated power input
= Load speed
= Percussion
= Percussive energy
= Maximum drilling, steel
= Maximum drilling, stone
= Maximum drilling, wood
= Weight
= Battery Capacity
= Battery charging time
LWA = Sound power level
LpA= Sound pressure level
= Vibration
The values given are valid for nominal voltages
[U] 230/240 V ~ 50/60 Hz - 110/120 V ~ 60Hz. For
lower voltage and models for specic countries, these
values can vary. Please observe the article number on
the type plate of your machine. The trade names of the
individual machines may vary.
Noise/Vibration Information
Measured values determined according to EN 50 144.
Typically the A-weighted noise levels of the product
are: sound pressure level: 89 dB (A); sound power
level: 101 dB (A).
Wear hearing protection!
The typically weighted acceleration is 11 m/s2.
DECLARATION OF CONFORMITY
We declare under our sole responsibility that the product
described under “Technical Data” is in conformity with
the following standards or standardization documents:
EN 60745 according to the provisions of the directives
2004/108/EC, 2006/42/EC.
Ramiro de la Fuente
Manager Director
January, 2020

es
it
gb
fr
p
de
- 19 -
cz
Das Handbuch steht im Einklang mit dem
Herstellungsdatum Ihrer Maschine, werden Sie
Informationen über die technischen Daten der
Maschine erworben manuelle Prüfung auf Updates
unserer Maschinen auf der Website zu nden:
www.grupostayer.com
1_SICHERHEITSHINWEISE FÜR
BOHRMASCHINEN UND SCHRAUBER
Gefahrloses Arbeiten mit dem Gerät ist
nur möglich, wenn Sie die
Bedienungsanleitung und die
Sicherheitshinweise vollständig lesen
und die darin enthaltenen Anweisungen
strikt befolgen. Zusätzlich müssen die allgemeinen
Sicherheitshinweise im beigefügten Heft befolgt
werden. Lassen Sie sich vor dem ersten Gebrauch
praktisch einweisen.
Schutzbrille und Gehörschutz tragen.
Bei langen Haaren Haarschutz tragen. Nur mit eng
anliegender Kleidung arbeiten.
Vor jeder Benutzung Gerät und Akku überprüfen.
Werden Schäden festgestellt, Gerät nicht weiter
benutzen. Reparatur nur von einem Fachmann
durchführen lassen. Gerät nie selbst önen.
Geräteelemente Zu Ihrer Sicherheit Verwenden
Sie nur die dafür vorgesehenen Akkus in den
Elektrowerkzeugen. Der Gebrauch von anderen
Akkus kann zu Verletzungen und Brandgefahr führen.
Bei falscher Anwendung kann Flüssigkeit aus dem
Akku austreten. Vermeiden Sie den Kontakt damit.
Bei zufälligem Kontakt mit Wasser abspülen.
Wenn die Flüssigkeit in die Augen kommt,
nehmen Sie zusätzlich ärztliche Hilfe in Anspruch.
Austretende Akkuüssigkeit kann zu Hautreizungen
oder Verbrennungen führen.
Vor allen Arbeiten am Gerät (z. B. Wartung,
Werkzeugwechsel, usw.) sowie bei
dessen Transport und Aufbewahrung den
Drehrichtungsumschalter stets in Mittelstellung
bringen. Sonst besteht Verletzungsgefahr bei
unbeabsichtigtem Betätigen des Ein-/Ausschalters.
Stellen Sie sicher, dass das Gerät ausgeschaltet
ist, bevor Sie den Akku einsetzen. Das Einsetzen
eines Akkus in ein Elektrowerkzeug, das eingeschaltet
ist, kann zu Unfällen führen.
Überzeugen Sie sich vor der Benutzung vom sicheren
Sitz des Akkus im Gerät.
Das Gerät nicht so weit belasten, dass es zum
Stillstand kommt.
Beim Arbeiten das Gerät immer fest mit beiden
Händen halten und für einen sicheren Stand sorgen.
Verwenden Sie Ihr Gerät nur mit dem Zusatzgri 10.
Das Elektrowerkzeug nur an isolierten Handgrien
anfassen, wenn das Einsatzwerkzeug eine
verborgene Leitung treen kann.
Kontakt mit einer spannungsführenden Leitung kann
Metallteile des Gerätes unter Spannung setzen und zu
einem elektrischen Schlag führen.
Verwenden Sie geeignete Suchgeräte, um verborgene
Versorgungsleitungen aufzuspüren, oder ziehen Sie
die örtliche Versorgungsgesellschaft hinzu.
Kontakt mit Elektroleitungen kann zu Feuer und
elektrischem Schlag führen.
Beschädigung einer Gasleitung kann zur Explosion
führen. Eindringen in eine Wasserleitung verursacht
Sachbeschädigung.
Vorsicht beim Eindrehen langer Schrauben,
Abrutschgefahr.
Gerät nur ausgeschaltet auf die Mutter/ Schraube
aufsetzen.
Beim Schrauben im 1. Gang bzw. mit kleiner Drehzahl
arbeiten.
Das Gerät vor dem Ablegen immer ausschalten und
warten bis das Gerät zum Stillstand gekommen ist.
Niemals Kindern die Benutzung des Gerätes gestatten.
Stayer kann nur dann eine einwandfreie Funktion
des Gerätes zusichern, wenn das für dieses Gerät
vorgesehene Original-Zubehör verwendet wird.
Akku und Ladegerät
Unbedingt die beiliegende Bedienungsanleitung
des Ladegerätes lesen!
Laden Sie die Akkus nur in Ladegeräten auf,
die vom Hersteller empfohlen werden. Für ein
Ladegerät, das für eine bestimmte Art von Akkus
geeignet ist, besteht Brandgefahr, wenn es mit
anderen Akkus verwendet wird.
Erwärmten Akku vor dem Laden abkühlen lassen.
Akku vor Hitze und Feuer schützen: Explosionsgefahr!
Akku nicht auf Heizkörper ablegen oder längere Zeit
starker Sonneneinstrahlung aussetzen, Temperaturen
über 50 °C schaden.
Akku nicht önen sowie vor Stoß schützen. Trocken
und frostsicher aufbewahren.
Halten Sie den nicht benutzten Akku fern
von Büroklammern, Münzen, Schlüsseln,
Nägeln, Schrauben oder anderen kleinen
Metallgegenständen, die eine Überbrückung der
Kontakte verursachen könnten.
Ein Kurzschluss zwischen den Akkukontakten kann
Verbrennungen oder Feuer zur Folge haben.
Den Akku nicht in den Hausmüll, ins Feuer oder ins
Wasser werfen.
2_ FUNKTIONSBESCHREIBUNG
ABGEBILDETE KOMPONENTEN
1 Staubschutzkappe
2 Verriegelungshülse
3 Tiefenanschlag

de
- 20 -
4 Knopf für Tiefenanschlagverstellung
5 Schlagstoppschalter
6 Ein-/Ausschalter
7 Drehrichtungsumschalter
8 Akku
9 Akku-Entriegelungstaste
10 Zusatzgri
11 Spannband
12 Klemmgri
AKKU EINSETZEN
Den Drehrichtungsumschalter 7 auf Mitte stellen
(Einschaltsperre). Den geladenen Akku 8 in den Gri
einschieben bis dieser spürbar einrastet und bündig
am Gerät sitzt.
EIN-/AUSSCHALTEN
Zur inbetriebnahme des Gerätes den Ein-/Ausschalter
6 drücken und gedrückt halten.
Die Maschine läuft je nach Druck auf den
Ein-/Ausschalter 6 mit variabler Drehzahl
zwischen 0 und Maximum. Leichter Druck auf
den Ein-/Ausschalter 6 bewirkt eine kleine
Drehzahl und macht somit einen kontrollierten Anlauf
möglich. Mit zunehmendem Druck wird die Drehzahl
erhöht.
Zum Ausschalten des Gerätes den Ein-/Ausschalter
6 loslassen.
Das Gerät nicht so stark belasten, dass es zum
Stillstand kommt.
Das Gerät ist nicht für den Stationäreinsatz geeignet,
z. B. in einem Bohrständer.
ÜBERLASTKUPPLUNG
Klemmt oder hakt das Bohrwerkzeug, wird
der Antrieb zur Bohrspindel unterbrochen.
Wegen der dabei auftretenden Kräfte das
Gerät immer mit beiden Händen sicher halten und
einen festen Stand einnehmen.
Vor dem Herausziehen eines steckengebliebenen
Bohrwerkzeugs dieses vorher aus dem Gerät
entnehmen.
UMSCHALTEN DER DREHRICHTUNG
Den Drehrichtungsumschalter 7 nur bei
Stillstand betätigen.
Mit dem Drehrichtungsumschalter 7 wird die
Drehrichtung der Maschine umgeschaltet. Bei
betätigtem Ein-/Ausschalter 6 ist dies jedoch nicht
möglich.
Drehrichtung rechts
Den
Drehrichtungsumschalter
nach links bis zum
Anschlag durchdrücken
(Normalbetrieb: Bohren,
Eindrehen von Schrauben
etc.).
Drehrichtung links
Den
Drehrichtungsumschalter
nach rechts bis zum
Anschlag durchdrücken
(Lösen bzw. Herausdrehen
von Schrauben und
Muttern).
SCHLAGSTOPPSCHALTER
Den Schlagstoppschalter 5 nur im Stillstand
betätigen.
Den Schlagstoppschalter 5 in die gewünschte Position
bringen:
Bohren
Hammerbohren
Hammer
AKKU LADEN
Ein neuer oder längere Zeit nicht verwendeter Akku
bringt erst nach ca. 5 Lade- und Entladezyklen seine
volle Leistung.
Zur Entnahme des Akkus 8 die Entriegelungstasten
9 drücken und den Akku nach unten herausziehen.
Keine Gewalt anwenden.
Der Akku ist mit einer NTC-Temperaturüberwachung
ausgestattet, welche Ladung nur im Temperaturbereich
zwischen 0 °C und 45 °C zulässt.
Dadurch wird eine hohe Akku-Lebensdauer erreicht.
This manual suits for next models
9
Table of contents
Languages: