SteelFlex spinbike User manual

SPINBIKE
USER MANUAL-V2

1
TABLE OF CONTENTS
TABLE OF CONTENTS
INTRODUCTION/SAFETY GUIDELINE................................... 2
MAINTENANCE......................................................................... 5
STRETCHING............................................................................. 12

INTRODUCTION / SAFETY GUIDELINE
INTRODUCTION / SAFETY GUIDELINE
Thank you very much for choosing CS series(CS1 / CS2) and
X series( X5/X-velocity/X-momentum) spin bike.To ensure
your safety, please read the manual and all suggestions carefully
before using this product. While you get everything ready, believe
that you could enjoy the pleasure of exercise and healthy.
Before you start to operate the exercise bike, please read all
details of the safety guideline and assembly manual carefully.
Inspect the exercise bike for worn or loose components prior
to use. Tighten/replace any loose or worn components prior to
using.
Please ensure to set up and operate the exercise bike on the
solid level surface. Please adjust level to ensure the machine
stand stablely prior to using.
Ensure that adjustment knobs (seat height, seat fore-and-aft,
and handlebar) are properly secured and do not interfere with
range of motion during exercise.
Prior to operating the exercise bike, please remove all jewelries,
such as rings, ear rings, and necklaces..etc.
Do not wear loose or dangling clothing while using the exercise
bike.
2
INTRODUCTION
SAFETY GUIDELINE

3
SAFETY GUIDELINE
SAFETY GUIDELINE
Warm up 5~10 minutes before exercise, and execute cool-down
5~10 minutes after using the bike in order to avoid any injury.
User should take a break between each exercise cycle.
The training requires a professional assistance. Inappropriate
length of training time and position may cause injury.
Maximum weight for individuals riding the exercise bike:
CS1/CS2/ X-Velocity: should not exceed 330 pounds.
X-Momentum:should not exceed 275 pounds.
X5: should not exceed 250 pounds.
CS1, CS2, X-Velocity and X-Momentum have a weighted flywheel
and a fixed gear. This means that in order to stop,user must
gradually slow your pedal strokes rather than stopping abruptly.
If you do need to stop immediately, push down on the resistance
knob. Do not dismount the bike or remove your feet from the
pedals until both the pedals and the flywheel have stopped
completely. Failure to comply may lead to loss of control and
serious injury.
Do not insert any object, hands or feet into any openings, or
expose hands, arms or feet to the drive mechanism or other
potentially moving part of the bike. After exercising, turn the
Push Brake System knob to increase resistance so the pedals
will not rotate freely and potentially injure someone. If at any
time you feel dizzy or have difficulty breathing, gradually stop
pedaling and carefully dismount the bike. Listen to your body,
ride at your own pace and set your bike’s resistance at the
level that feels right for you.
Keep children and pets away from the bike whenever it's in use.
CS1, CS2, X-Velocity and X-Momentum cycle mechanism and
4
SAFETY GUIDELINE
SAFETY GUIDELINE
ergonomics are designed for adult use only. Children under the
age of 14 should not operate this exercise bike. X5 cycle
mechanism and ergonomics is designed for elememtary school
children.
Never turn the pedal crank arms by hand.
Stay hydrated. Drink water throughout your ride as needed.
Stay in control by executing all core movements and hand
positions at a slow pace before attempting to increase your
speed. Do not attempt to ride the bike in a standing position
at a high RPM until you have practiced at slower speeds.
Focus on form, posture and making smooth transitions
between movements.
Do not use the bike without proper footwear. Never operate
the bike with bare feet.
Never remove your feet from the pedals while still in motion.
Prevent your feet from coming out of the toe clip or shoe cage
by keeping shoe laces tucked in and foot straps pulled snug
around your shoe. If your foot does become disengaged, push
down on the resistance knob to stop the flywheel’s motion.
Safety operation space:
50cm fore and back of the bike
30cm left and right side of the bike

5
MAINTENANCE
MAINTENANCE
Maintenance:
Change the Brake Pad for CS1, CS2,
X-Velocity and X-Momentum
1).Use the hex wrench to loosen holder’s
2 hex screws, and remove the brake.
2).Use cross screwdriver to loose 4 screws,
and remove the brake pad.
3).Install the brake pad on the brake, and
then tighten 4 screws to fix the pad.
4).Install the brake back and secure by
tightening 2 hex screws.
Change the Brake Pad for X5.
1).Loosen resistance knob by turning
counterclockwise to the end.
2).Use the hex wrench to loosen the hex
screw which is circled.
3a).Pull the resistance knob up.
3b).Take off the resistance pad from
side.
4).Loosen two screws of the brake by
screwdriver, and remove the brake pad.
5).Install the brake pad on the brake, and then tighten two screws
to fix the pad.
6).Install the brake back and secure by tightening the hex screw.
Note:
The brake pad is consumtable. Please check and replace the brake pad
regularly to ensure safety.

MAINTENANCE
MAINTENANCE
6
Adjusting Driving Belt for CS1/CS2.
1).Loosen both belt housing secured screws.
2).Use 19mm wrench to loose 3 bolts which
are fixed the flywheel. (2 on the left side,
and one on right side)
3).Use 12mm wrench to adjust
tension of the driving belt. Turn
clockwise to tighten the belt and
counterclockwise to loosen the
belt.
Note: Please adjust the belt on both side
at the same time in order to make
sure the flywheel will stay at the right position.
4).Reverse step 3~1 to install parts back.
5).Testing the bike to ensure the balance of the flywheel.
Adjusting Driving Belt for X-Velocity:
1).Loosen front nut first by using spanner.
2).Loosen rear nut by using spanner.
3).Adjust driving belt tension by using
spanner. Turn clockwise to tighten the
belt and counterclockwise to loosen
the belt.
Note:Please adjust the belt on both sides at
the same time in order to make sure
the flywheel will stay at the right position.
4).Reverse step 3~1 to install parts back.
5).Testing the bike to ensure the balance
of the flywheel.
7
MAINTENANCE
MAINTENANCE
Adjusting Driving Belt for X-Momentum:
1).Loosen nut by using spanner.
2).Adjust driving belt tension by
using Allen wrench. Turn clockwise
to tighten the belt and
counterclockwise to loosen the belt.
Note:Please adjust the belt on both sides at
the same time in order to make sure
the flywheel will stay at the right
position.
3).Reverse step 2~1 to install parts back.
4).Testing the bike to ensure the balance
of the flywheel.
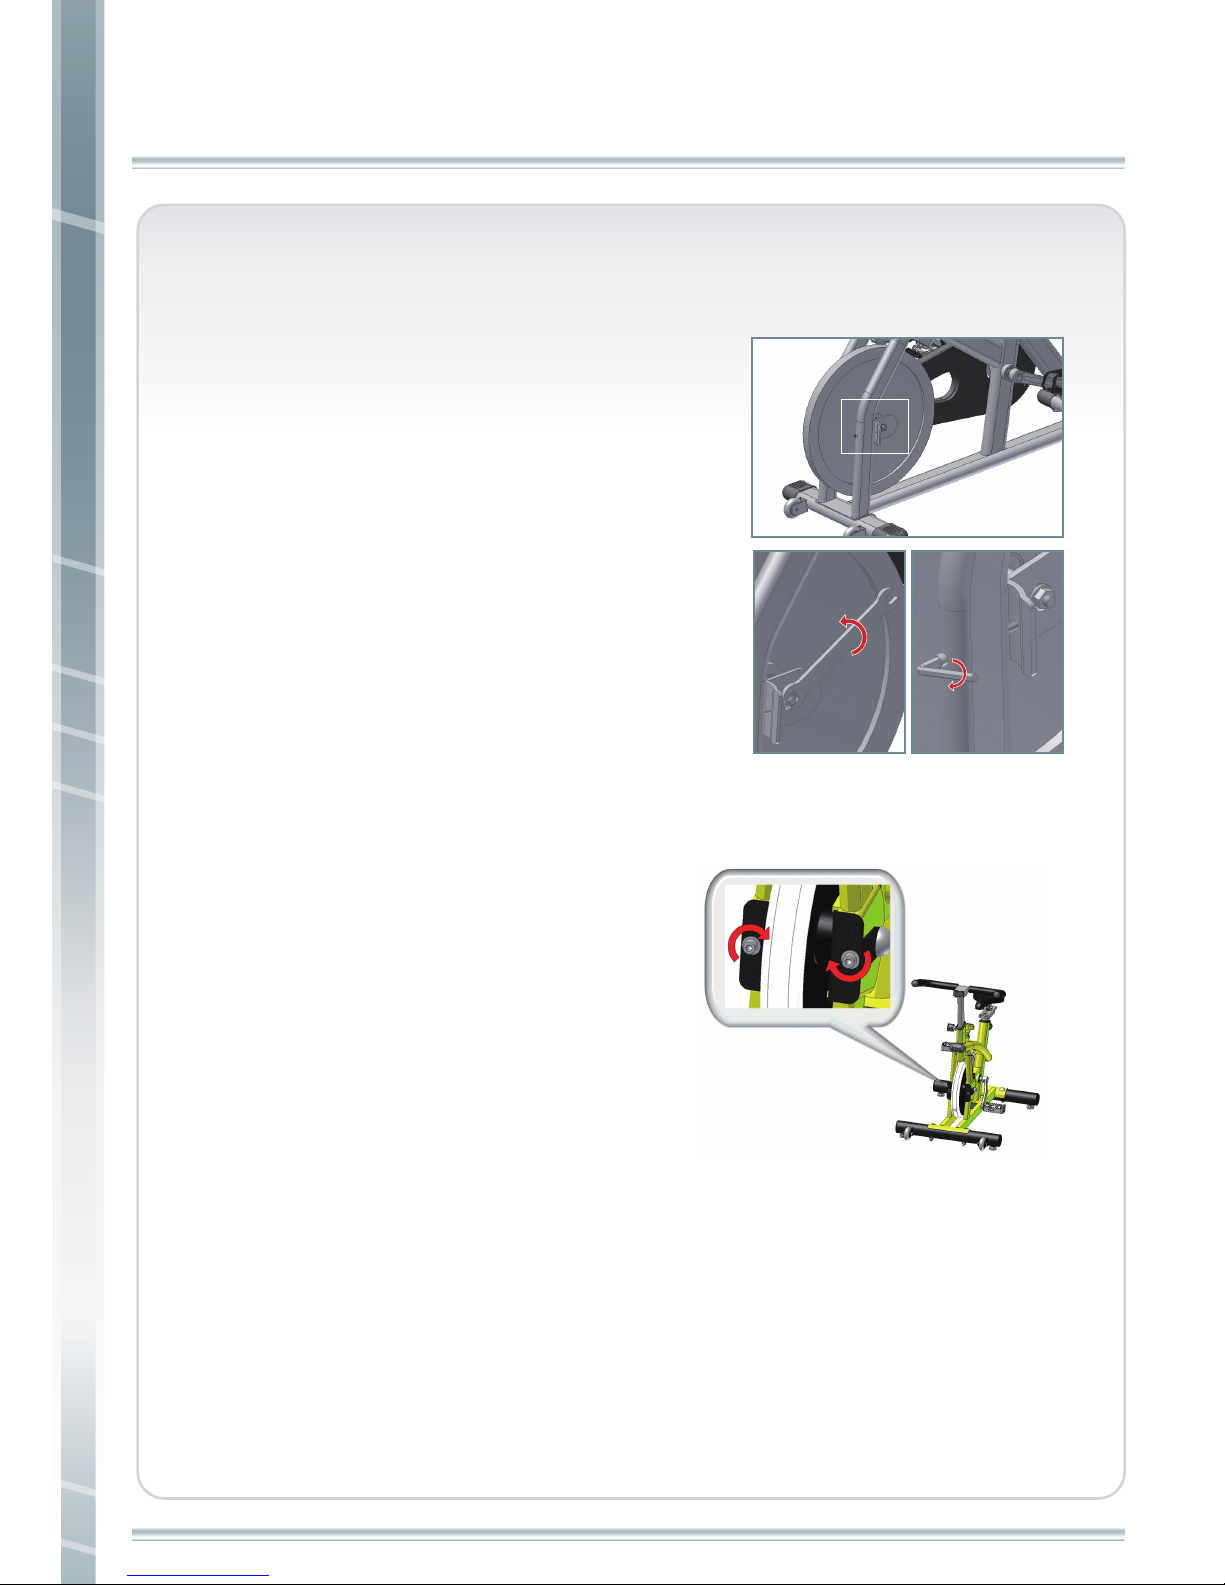
Adjusting Driving Belt for X5.
1).Adjusting two hex screws by hex
wrench. Turing clockwise is for
tightening the belt. Turning
counterclockwise is for loosing
the belt.
2).When adjusting, you may adjust one
side first, and then adjust the other side.
Note:Both hex screws need to be adjusted in same direction and same
range. Only adjust one side might cause the belt un-balance.

8
MAINTENANCE
MAINTENANCE
Resistance Control:
Pedaling resistance is controlled by the
resistance brake system knob located below
the handlebar. Resistance adjustments can be
made while riding to vary the intensity of your
workout. Proper resistance adjustment can
help practice more efficiently.
To increase resistance, turn the brake knob clockwise (+)
To decrease resistance, turn the brake knob counterclockwise (-)
To stop flywheel abruptly, push down the brake knob directly.
Warning :
The flywheel momentum of the cycle will keep the pedals turning
even after the user stops pedaling, or in the event the user’s feet
slip off the pedals. DO NOT DISMOUNT THE CYCLE OR
REMOVE YOUR FEET FROM THE PEDALS UNTIL BOTH
THE PEDALS AND THE FLYWHEEL HAVE STOPPED
COMPLETELY. Failure to comply may lead to loss of control and
serious personal injury.
You may stop the cycle using any of the following methods:
Pedal more slowly until the pedals come to a complete stop.
Increase the resistance by turning the Push Brake System knob
clockwise (+) until the pedals come to a complete stop.
Push down on the Push Brake System knob until the pedals
come to a complete stop.

9
MAINTENANCE
MAINTENANCE
Assembly Bike:
Please refer to the separately enclosed manual for the assembly
of your BIKE.
Leveling the Bike:
If you place your bike on an uneven surface, you may adjust how
the bike sits by adjusting
one or all of the four
levelers located on the
bottom of each corner
of the bike.
Adjusting the Seat and Handle Bar:
Proper bike setup gives you more comfortable ride, ensure the
best practice
outcome, and
reduce your risk
of injury.
Note:
Please make sure all knobs are tightened after each time
adjustment.
Other SteelFlex Exercise Bike manuals


 Service manual")


