stellar labs 2011 Kayak User manual

Stellar Kayaks Manual –2011
Serial Number ____________________________________________
Date of Purchase __________________________________________
Location of Purchase _______________________________________
Kayaking can be very dangerous and physically demanding activity. The paddler of this boat should
understand the inherent risks of kayaking, which may involve injury or even death. The paddler of
this boat acknowledges the risk involved in kayaking and that Stellar Kayaks Ltd. is not liable for any
injury or harm inflicted upon the paddler while using this product. Please reference the following
guidelines for a safer kayaking experience.
Always wear an approved PFD (personal flotation device). Please refer to local regulations.
Always carry first aid, safety and rescue equipment.
Never paddle alone, no matter how experienced you are.
Tell someone your itinerary and expected duration of your paddle.
Check the weather and water conditions before paddling.
Get instructions as to the operation of this specific boat and never exceed your paddling
ability.
Practice rolling the boat and making a wet entry.
Never use alcohol or drugs prior or during paddling.
Thoroughly check over the boat before paddling –look for signs of wear or broken equipment.
Dress appropriately for weather conditions:
oCold weather or water can result in hypothermia
oHot weather and strong sun can result in sun stroke and dehydration.
Dress appropriately for cold waters, even if the air temperature is warm, cold water can give
you hypothermia.
Always carry supplies lasting longer than the expected duration of your journey.
Scout unfamiliar waters to understand tidal currents, river currents, obstructions and where
to portage.
Consult your physician before paddling.

Hatches:
The oval bow and stern hatches provide a water-tight seal in the bow and stern compartments, but it is
necessary that the hatches are put on correctly. Start by lining up the ends of the hatch and then push
one end down and work your way up towards the other until the hatch is fully engaged. The rim of the
hatch should not bump out anywhere along the outside.
Each season it is good to use a silicone or a UV protecting spray on the inside of the hatch cover to keep
the surface lubricated. If this area dries out, it can become tougher to remove and replace the hatch, so a
yearly application can be helpful
The hatches have stiff Plastic in the middle, but if you store or transport the boat on the middle of the
hatch when it is hot out, the hatch can dent. If possible, store or transport the boat on the composite
decking or hull. If the hatch does dent, remove the hatch and place the hatch on the ground with the lip
on the ground in full sun. After a couple hours, the plastic should rebound to the original shape.
Deck Fittings:
All the deck fittings are screwed into a recession on the deck where a nut is bonded to the underside of
the laminate. Overtime these fittings can become loose and by using a Philips-head screw driver, can be
retightened.
If a particular screw loosens frequently, use a thread locking liquid from the hardware store on the
threads of the screw to keep it in place.
Footbrace:
All Stellar Kayaks use the Smart Track footbraces, which are attached to the hull with bonded stud plates.
To adjust the footbrace fore and aft, simply grab the stern end of the adjustment arm, lift and either pull
or push to adjust the footbrace peg to the desired position. Once at the correct spot, lightly push the
handle back down to engage the teeth on the plastic arm.

Back-brace:
The back-brace can be adjusted by tightening or loosening the straps on the side and back of the back
brace. By tightening the side straps, the back-brace will wrap around your body better. The straps on the
back adjust the location of the back-brace fore and aft.
Steering:
For boats with rudders, we are using the smart track Hybrid-foil rudder, which uses their bayonet
mounting system. To remove the rudder from the boat, you will need to loosen or remove the steering
line from the rudder yoke and then rotate the rudder towards the bow until it is almost parallel with the
hull. At this point you will lift up to remove it from the rudder post tube. When replacing the rudder, you
will start with the stern end of the rudder facing the bow and push it fully into the hole and then twist it
back to the normal position. Simply pull up on the rudder to see if it is locked in place –if not, try again.
For more information on the Smart Track Rudders, please visit our website for the Smart track Man
To adjust the tension on the steering line, there is a plastic fitting at the bow end of the footbrace where
the steering line runs through. This threaded rod can be tightened or loosened to adjust the tension or to
move the rudder to the port or starboard.
All boats with steering use a dyneema line, which is more convenient to use compared to stainless steel
wire. Dyneema has similar strength properties to steel, but it will not rust, it can be tied in knots and will
not chafe the boat. If you need to replace the steering line, it is easier to have 2 people on hand.
oFirstly, move the footbrace pegs to the shortest setting.
oSecondly, remove the existing steering line from the boat.

oThen, run the new line through the tubing, through the steering toe piece and secure it through
the adjustment screw on the bow end of the track.
oWhen tying off to the rudder, you want the back face of the foot peg and back face of the toe
piece to be inline. One person can hold the toe piece at the correct angle, while the second ties
off the steering line on the rudder while the rudder is straight. This can be accomplished solo,
but it can take a few tries.
For removing the rudder blade from the steering housing, you want the rudder to be retracted on the
deck. Simply remove the pin from the side of the rudder and then pull out the locking plug. Then pull the
knot from the rudder blade to complete removal.
To replace the rudder blade, you will put the knot into the hole and run the retraction line around the
bottom of the rudder blade rope guide. Then insert the rudder into the housing horizontally, with the
leading edge of the blade facing upwards. Then simply insert the plastic locking knob through the housing
and rudder blade and insert the pin to lock in place.
Skeg:
If you want to remove the skeg, you simply loosen the screw in the handle on the deck and then rotate
the blade out of the housing in the hull. There is a pin at the bow end of the skeg box holding the skeg in
the boat, so you will need to rotate the skeg about 90 degrees to remove it.

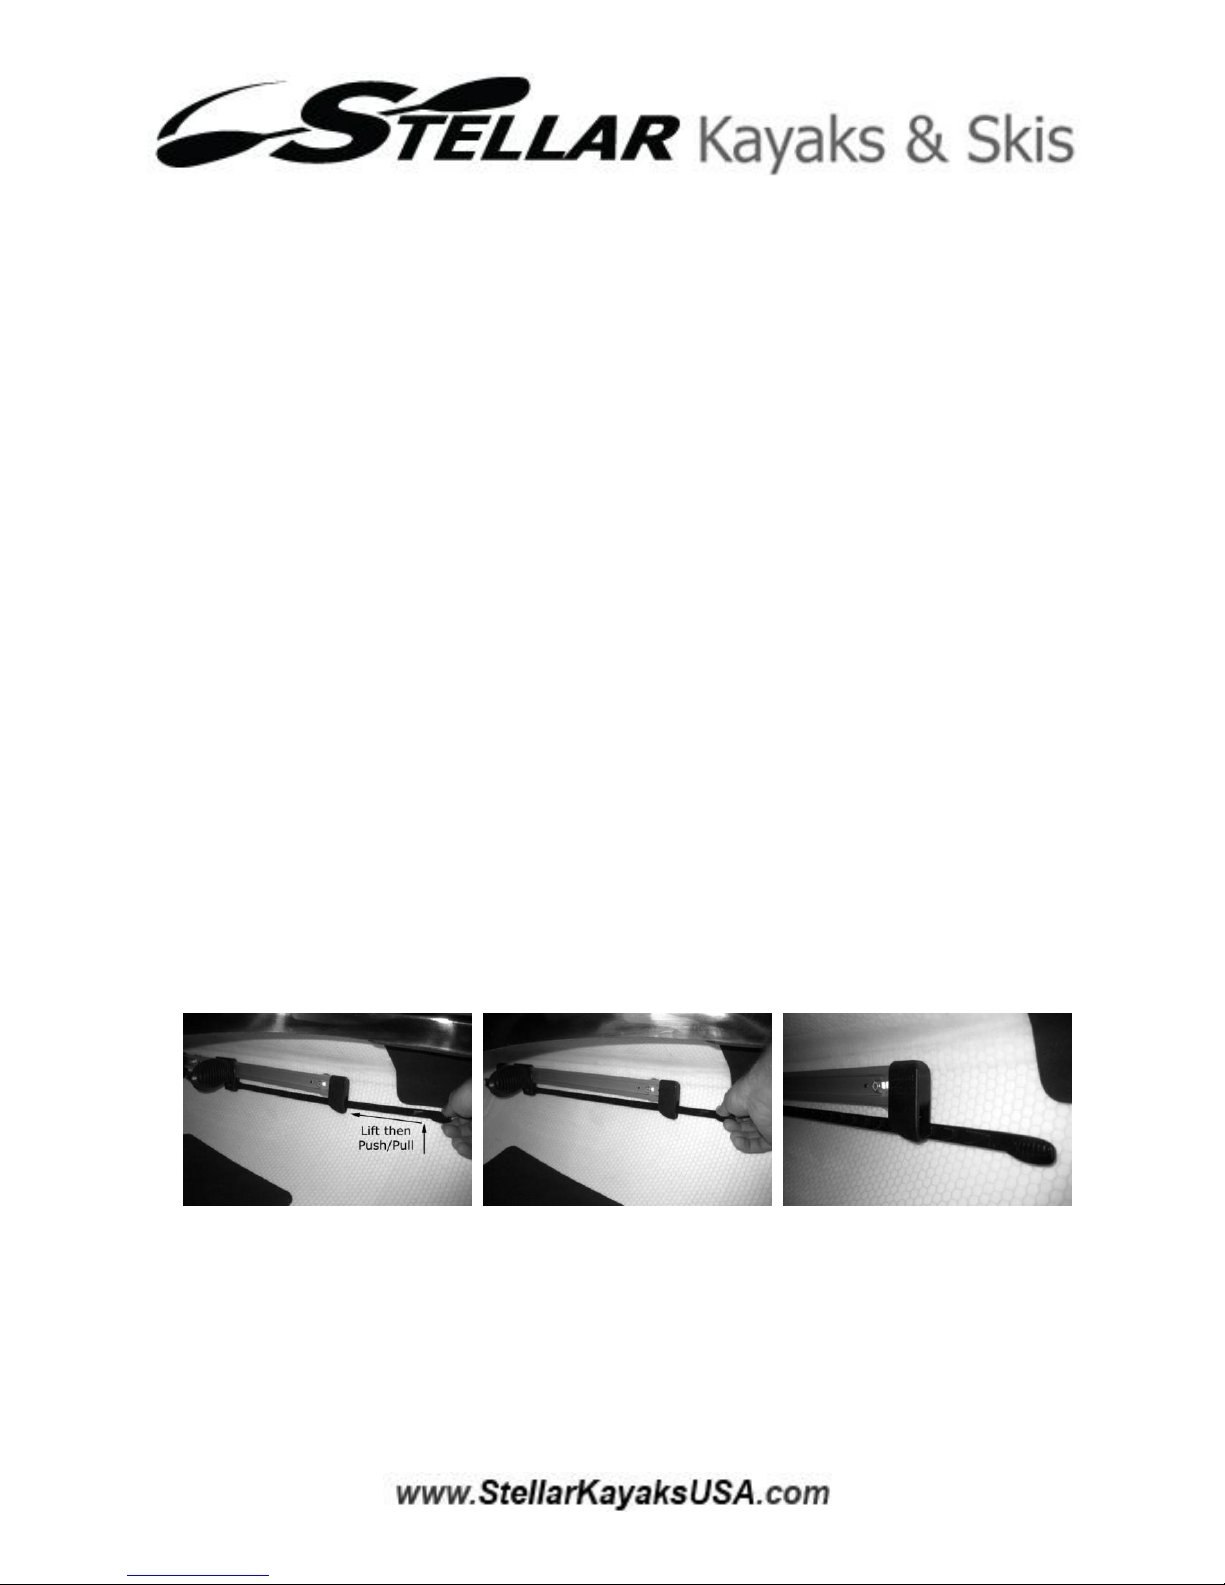
For replacing the skeg, you will run the wire that is attached to the skeg back into the skeg box and then
with the bottom edge of the skeg at 90 degrees to the boat, put the tip into the locking bar. Slowly feed
the wire into the skeg box making sure not to kink the wire. The wire will exit into the handle housing on
the deck where you will need to feed it through the handle and back into the tubing on the bow side of
the box. Once the skeg is fully retracted, move the handle to the bow end of the slider box and tighten
the screw fully
If the skeg becomes sticky or tough to operate, this may be due to debris getting stuck in the skeg box or
the tubing. Sometimes this can be flushed out with a hose, but sometimes, the skeg may need to be
removed and then flushed out. You can use air or water to flush out the tubing, which should be applied
from the slider box to flush any debris back through the hull.
Transportation:
When transporting your boats, it is best that your rack or cradle has some sort of padding. If you are
using a straight bar, you can use pipe insulation to wrap around the cross bar or buy a U-shaped foam pad
which conforms to the shape of the deck. The padding will help reduce any stress points on the boat
when strapping it down.
When strapping the boat down, you can strap it hull or deck down, but realize that if it is hull down and
your cockpit is open, it can collect rain inside, which with enough weight can hurt the boat. You also want
to avoid strapping the boat down to a bar on the hatches –in summer heat, this can distort the hatches.
Never use a boat strap that is frayed or brittle, a broken $5 boat strap can cause thousands of dollars in
damage.
Boat straps usually come with each boat, but can also be purchased at a store. These straps are flat
webbing, with a cam buckle to reduce the stress on the boat. Never use the ratcheting kind of straps as
they can tighten to such a degree that they will crush the boat. The level of tension that you want to
place on the strap is one where you do not bend the boat from the pressure, but also not so loose that
the boat has any lateral movement. Simply grab the bow or stern and push to the side to see how secure
it is.
It is generally recommended that a bow and stern line be used to add additional stability to any boat that
is car topped.
If you have a large overhang, a red or orange flag may be required in your state or province to alert other
drivers of the protrusion coming from your car
The rudder should be secured to the boat or removed during transportation to keep it from moving to the
side when you are driving. This will prevent wear and tear on the steering system as well as improving
your gas mileage.
Cockpit covers are also a great investment for traveling,
because it keeps your cockpit clean and dry, but more
importantly will greatly reduce the noise of the boat and
also increase your gas mileage.
Once underway, it is a good habit to stop in about 15-20
minutes after starting your trip to check on the boats to
see how your strapping is working. Also, most straps will
loosen in the rain as well, so check them if they get wet.

Boat Storage:
If possible, when storing the boat, it should be out of the sun and always hull up so water does not collect
inside. It is also good for the boat to be off the ground.
The boat should also be strapped to something secure as not to blow around during storms.
After paddling it is always good to remove the excess debris from the cockpit as it can accelerate the
wearing of the laminate in the cockpit. It is also good practice to open the hatches to dry out the storage
compartments, or else mildew can grow inside during the off season.
For long term storage it is good practice to close the hatches and use a cockpit cover over the cockpit
opening. This will prevent any critters and bugs from taking up residence inside while the boat is idle.
Launching/Landing:
With composite laminates it is best to launch from a sandy area. The laminates are very tough, but they
can puncture from sharp rocks, so it is best to avoid them. If you are launching or landing in a rocky area,
try and wade out to an area that is around 5-6 inches deep to avoid any rocks.
Gelcoat Maintenance:
Gelcoat is used on Sport, Advantage and Excel grade boats.
If you drag your boat or land on beaches, you may want to add a sacrificial keel stripe along the wear
points. This will allow you to seasonally replace the tape instead of fixing Gelcoat.
If you boat does get scratched during usage, you can polish the boat with a buffing compound from an
auto body shop or a Gelcoat polish from a marine supply company.
If there is a deep scratch or chip, you can fill in the Gelcoat with a polyester Gelcoat repair kit from a
marine supply store.
For precise color matching refer to the chart below:
Color
RAL Code
RAL Name
White
----
Pure White
Red
3020
Traffic Red
Orange
2004
Pure Orange
Yellow
1018
Zinc Yellow
Blue
5017
Traffic Blue
Black
9005
Jet Black
Repair:
Depending on the size and severity of the damage, it may be necessary to take the boat to a Marine or
Auto Repair shop that deals in composites.

The materials used to make each boat will dictate the materials used to repair it. The Sport grade uses
Polyester Resin, where the Advantage, Excel and Ultra use Epoxy Resin. Sport and Advantage laminates
are built with fiberglass, Excel uses Kevlar with Nomex Core and Ultra uses Carbon with Nomex Core.
For large cracks or holes you can repair the boat from the inside on sport grade. For Advantage, Excel and
Ultra repair will have to be made on both the inside and outside depending on whether the damage goes
through both sides of the laminate.
oBefore starting a repair, the laminate should be dry or else the resin will not bond properly nor
will it cure properly.
oMake sure that all loose fibers are removed before repairing and that the damaged area has
been sanded down to the laminate.
oFill the void with a filled resin (use a silicate powder from a marine or auto supply store) at
peanut butter thickness.
oWith unfilled resin use a chip brush to apply resin to the repair area and then apply one thin layer
of cloth which matches the boat grade.
oLet cure and sand the repair smooth to the surrounding part of the boat.
oClean thoroughly with a solvent such as isopropyl alcohol before applying Gelcoat and then apply
Gelcoat in thin layers to prevent the material from sagging.
oOnce cured, wet sand the Gelcoat smooth and buff back to a shine
For advice on a repair or possible locations of repair shops, please do not hesitate to contact us.
Stellar Kayaks Warranty:
2 yr limited warranty against defects in the materials and workmanship in the hull and assembly of Stellar
Kayaks and Surf Skis.
1 yr limited warranty against defects and assembly to parts and accessories.
The warranty is only valid to the original customer.
It is up to Stellar Kayaks to determine whether to repair or replace any defective parts.
1 yr limited warranty against delamination of honeycomb cored boats.
Not covered under the Warranty:
Normal wear and discoloration
Damage from misuse or abuse from hitting objects and improper maintenance
Damage from extreme weather or environmental conditions
Damage caused from storing the boat outside
Damage from improper support of the kayak during transportation or storage
Damage caused by any alterations to the boat and or original parts
Damage caused to the boats in “surf”
Any boat designated as “demo”
Kayaks used for commercial or rental purposes
Original invoice is the proof of purchase for your warranty claim –without it, Stellar Kayaks reserves the right to
determine whether the boat is covered under warranty.
Table of contents