- If red and yellow LEDs keeps on: the device founds a good
Wi-Fi signal. The are is favorable for accessing a wireless
Internet connection.
- If red, yellow and green indicators keeps on: it means the
device founds a strong wireless signal. The are is ideal for
accessing a wireless Internet connection.
4.- Once you have pressed the search button, the finder will search
for a signal for around one minute. After this, the search automatically will
stop.
Note:
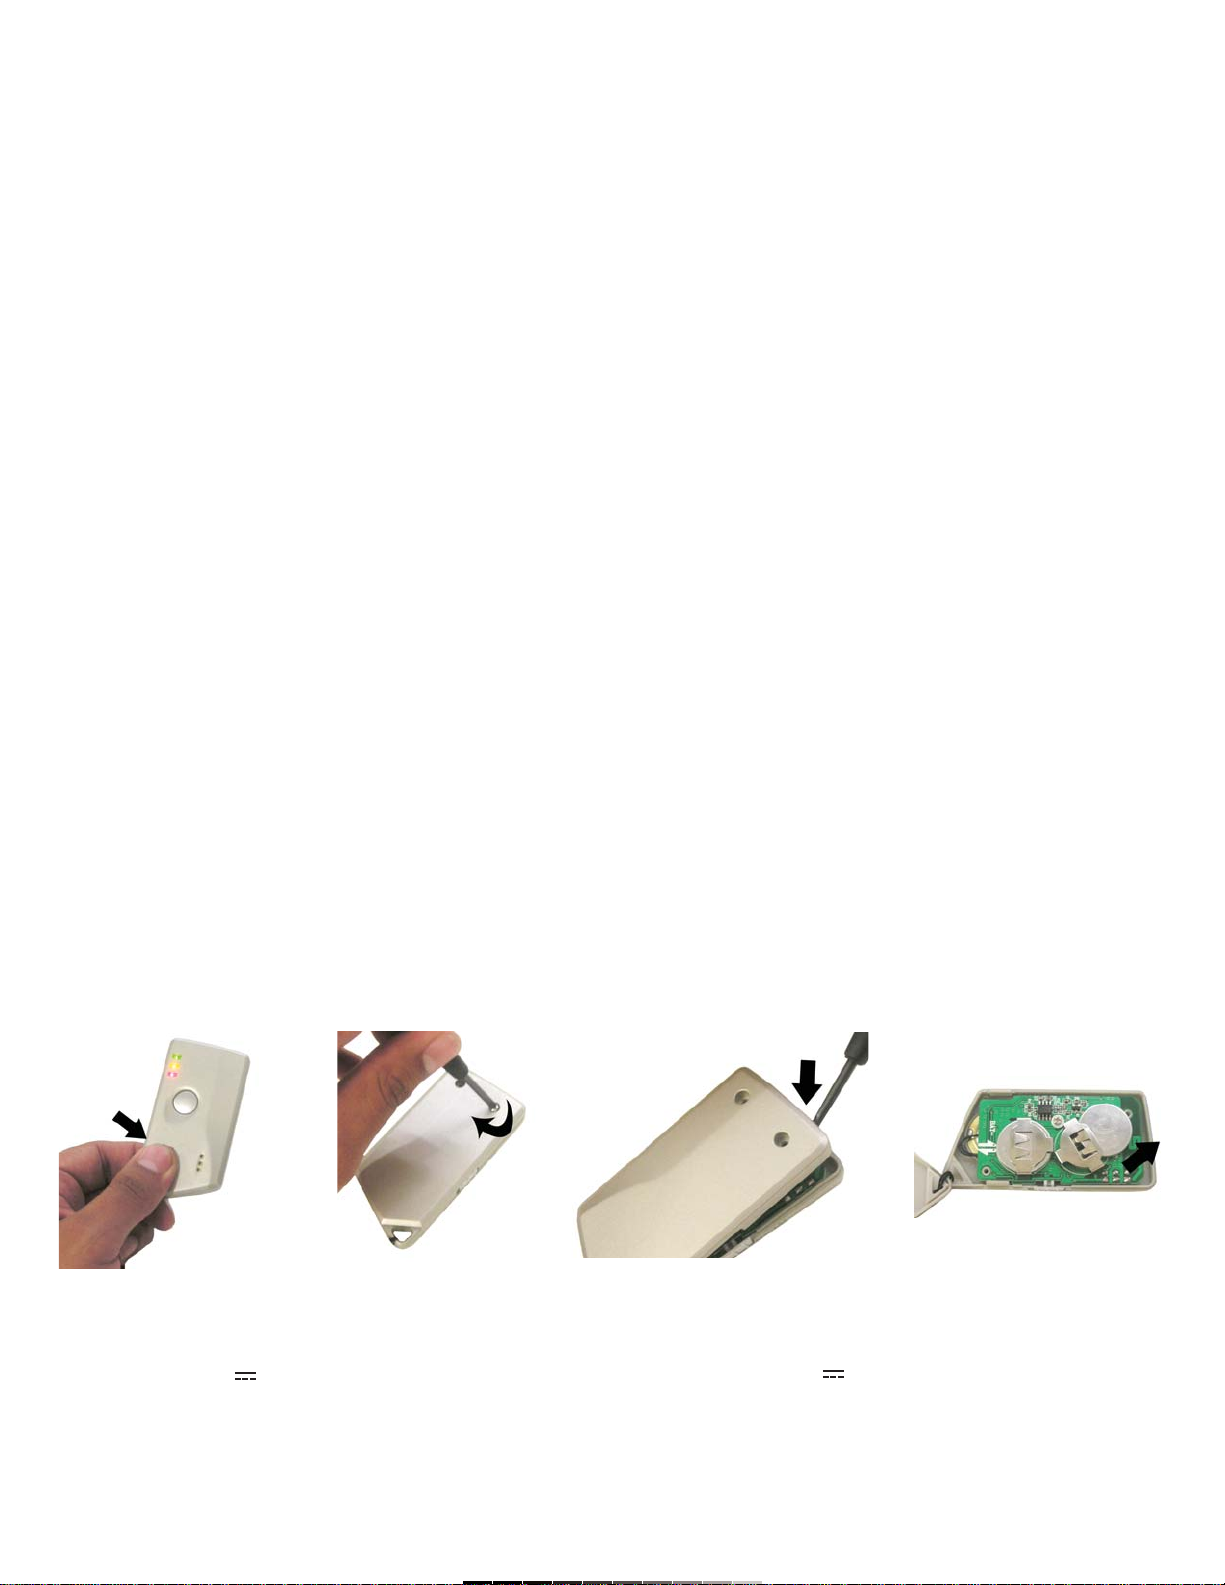
For a better performance, hold the equipment from one corner. This will
allow the internal antenna work normally (Fig. 1).
HOW TO USE THE SPY DETECTOR
1.- Make sure the batteries have charge enough.
2.- Slide the function selector switch to SPY.
3.- Press Search button once, red LED lights on. After a few seconds:
- If red LED flashes: it means no wireless surveillance / camera
signals are detected.
- If red LED keeps on and hear a long beep: a weak wireless
surveillance / camera signal is detected.
- If red and yellow LEDs keeps on and hear short-interval beep:
a good wireless surveillance / camera signal has been detected.
- If red, yellow and green indicators keeps on and hear short
beeps: a strong wireless surveillance / camera signal has been
detected.
4.- Once you have pressed the search button, the finder will search for
a signal for around 45 seconds. After this, the search automatically will
stop.
Note:
For a better performance, hold the equipment from one corner. This will
allow the internal antenna work normally (Fig. 1).
HOW TO REPLACE THE BATTERIES
If you note the detecting distance diminish, may be a warning to change
the batteries.
1.- Locates the battery compartment and use a screwdriver to remove the
screws (Fig. 2).
2.- Insert a flat object to pull the cover out (Fig. 3).
3.- Remove the batteries and place two new CR2032 lithium batteries,
paying attention to polarity (FIg. 4).
4.- Replace the battery compartment cover and fasten it using the
screws.
SPECIFICATIONS
Input: 6 V (2 x CR2032)
Dimensions: 77 x 40 x 11mm
Weight: 24,8g
Note:
Product design and specifications are subject to change, without notice.
- Si los LEDs rojo y amarillo se encienden: significa que la señal
detectada es buena. El área es favorable para realizar una
conexión inalámbrica.
- Si los tres LEDs se encienden (rojo, amarillo y verde): significa
que existe una señal de Wi-Fi fuerte. El área es ideal para
acceder a una conexión de Internet inalámbrica.
4.- Una vez que el botón de búsqueda ha sido presionado, el localizador
buscará señal por un minuto. Después de este tiempo, la búsqueda se
detendrá automáticamente.
Nota:
Para un mejor funcionamiento, sostenga el equipo de una de las esquinas
a fin de permitir que la antena interna trabaje de forma normal (FIg. 1).
CÓMO UTILIZAR EL LOCALIZADOR DE CÁMARAS
1.- Asegúrese de que las baterías tienen suficiente carga.
2.- Deslice el selector de función a la posición SPY.
3.- Presione el botón de búsqueda una vez, el LED rojo se enciende,
después de unos segundos:
- Si el LED rojo parpadea: significa que no se han detectado
señales de cámaras de vigilancia inalámbricas.
- Si el LED rojo se mantiene encendido y escucha un bip largo:
se ha detectado una señal débil de cámaras inalámbricas.
- Si el rojo y amarillo se encienden y escucha bip cortos: una
señal fuerte de cámaras inalámbricas se ha detectado.
- Si los tres LEDs se encienden (rojo, amarillo y verde) y
escucha bips cortos: el localizador encontró una señal fuerte
debido a cámaras inalámbricas en el área.
4.- Una vez que el botón de búsqueda ha sido presionado, el localizador
buscará señal por 45 segundos. Después de este tiempo, la búsqueda se
detendrá automáticamente.
Nota:
Para un mejor funcionamiento, sostenga el equipo de una de las esquinas
a fin de permitir que la antena interna trabaje de forma normal (Fig. 1).
CÓMO REEMPLAZAR LAS BATERÍAS
Si nota que la distancia de detección disminuye, podría indicar que es
necesario reemplazar las baterías.
1.- Localice el compartimiento de baterías y utilice un desarmador para
retirar los tornillos (Fig. 2).
2.- Introduzca un objeto plano para retirar la tapa con cuidado (Fig. 3).
3.- Retire las baterías y coloque dos baterías de litio nuevas CR2032,
poniendo atención a la polaridad (Fig. 4).
4.- Vuelva a colocar la tapa de las baterías y asegúrela atornillando
firmemente.
ESPECIFICACIONES
Entrada: 6 V (2 x CR2032)
Dimensiones: 77 x 40 x 11mm
Peso: 24,8g
Nota:
El diseño del producto y las especificaciones pueden cambiar sin previo
aviso.
Fig. 1 Fig. 2 Fig. 3 FIg. 4