manuals.online logo
Brands
  1. Home
  2. •
  3. Brands
  4. •
  5. Steren
  6. •
  7. Smoke Alarm
  8. •
  9. Steren CCTV-115 User manual

Steren CCTV-115 User manual

Product / Producto: SMOKE
DETECTOR CCTV COLOR
CAMERA / CÁMARA CCTV A
COLOR OCULTA COMO SENSOR
DE HUMO
Model / Modelo: CCTV-115
Brand / Marca: Steren
CONDICIONES
1. Para hacer efectiva esta garantía se requiere: La presentación de esta póliza y del producto, en el lugar en donde fue adquirido o en ELECTRONICA STEREN S.A. DE C.V.
2. ELECTRONICA STEREN S.A. DE C.V. se compromete a reparar el producto en caso de estar defectuoso sin ningún cargo al consumidor.
3. El tiempo de reparación en ningún caso será mayor a 30 días contados a partir de la recepción del producto en cualquiera de los sitios en donde pueda hacerse efectiva la
garantía.
4. El lugar donde puede adquirir partes, componentes, consumibles y accesorios, así como hacer válida esta garantía es: En cualquiera de las direcciones arriba mencionadas.
ESTA GARANTIA NO ES VALIDA EN LOS SIGUIENTES CASOS:
1. Cuando el producto ha sido utilizado en condiciones distintas a las normales.
2. Cuando el producto no ha sido operado de acuerdo con el instructivo de uso.
3. Cuando el producto ha sido alterado o reparado por personas no autorizadas por ELECTRONICA STEREN S.A. DE C.V.
Nota: El consumidor podrá solicitar que se haga efectiva la garantía ante la propia casa comercial, donde adquirió el producto. Si la presente garantía se extraviara, el
consumidor puede recurrir a su proovedor para que le expida otra póliza de garantía, previa presentación de la nota de compra o factura respectiva.
DATOS DEL DISTRIBUIDOR
DISTRIBUTION / NOMBRE / DISTRIBUIDOR:
ADDRESS / DOMICILIO:
PRODUCT / PRODUCTO: BRAND / MARCA:
MODEL / MODELO: SERIAL NUMBER / No. DE SERIE:
DATE OF DELIVERY / FECHA DE ENTREGA:
Call Center / Centro de Atención a Clientes
del Interior 01 800 500 9000
Mexico City / Cd. de México: 53 54 22 90
CONDITIONS:
1. This warranty card with all the required information, the invoice or purchase ticket, the product box or package, and the product, must be presented with the product
when warranty service is required.
2. If the product stills on the warranty time, the company will repair it free of charge even the transportation charges.
3. The repairing time will not exceed 30 natural days, from the day the claim was received.
4. Steren sells parts, components, consumables and accessories to customer, as well as warranty service, at any of the following addresses:
THIS WARRANTY IS VOID ON THE NEXT CASES:
If the product has been damage by an accident, acts of God, mishandling, leaky batteries, failure to follow enclosed instructions, improper repair by unauthorized
personal, improper safe keeping or otherwise.
Notes:
a) The customer can also claim the warranty service on the purchase establishment.
b) If you lose the warranty card, we can reissue it just showing the invoice or purchase ticket.
Warranty
Póliza de Garantía
This Steren product is warranted under
normal usage against defects in
workmanship and materials to the original
purchaser for one year from the date of
purchase.
Garantiza este producto por el término de
un año en todas sus partes y mano de
obra contra cualquier defecto de fabricación
y funcionamiento, a partir de la fecha de
entrega.
INSTRUCTION MANUAL FOR SMOKE DETECTOR CCTV COLOR
CAMERA
Model: CCTV-115
Brand: Steren
Before using your new CCTV Color Camera, please read this
instruction manual to prevent any damage. Put them away in a safe
place for future references.
A conventional smoke detector built with color CCTV camera for discreet
surveillance through a monitor. It comes with one color CCD camera that
delivers a clear and sharp picture for side viewing. Easy to install. Great
for ceiling mount viewing. The CCTV cameras can also tilt for best
angle.
IMPORTANT
The equipment must be placed in a ventilated location, to prevent damp,
dust or direct sunlight.
Clean only with a soft, dry cloth. Do not use solvents.
BASIC INSTALLATION
1.- Locate the place where you want to put the cam and make two
drillings.
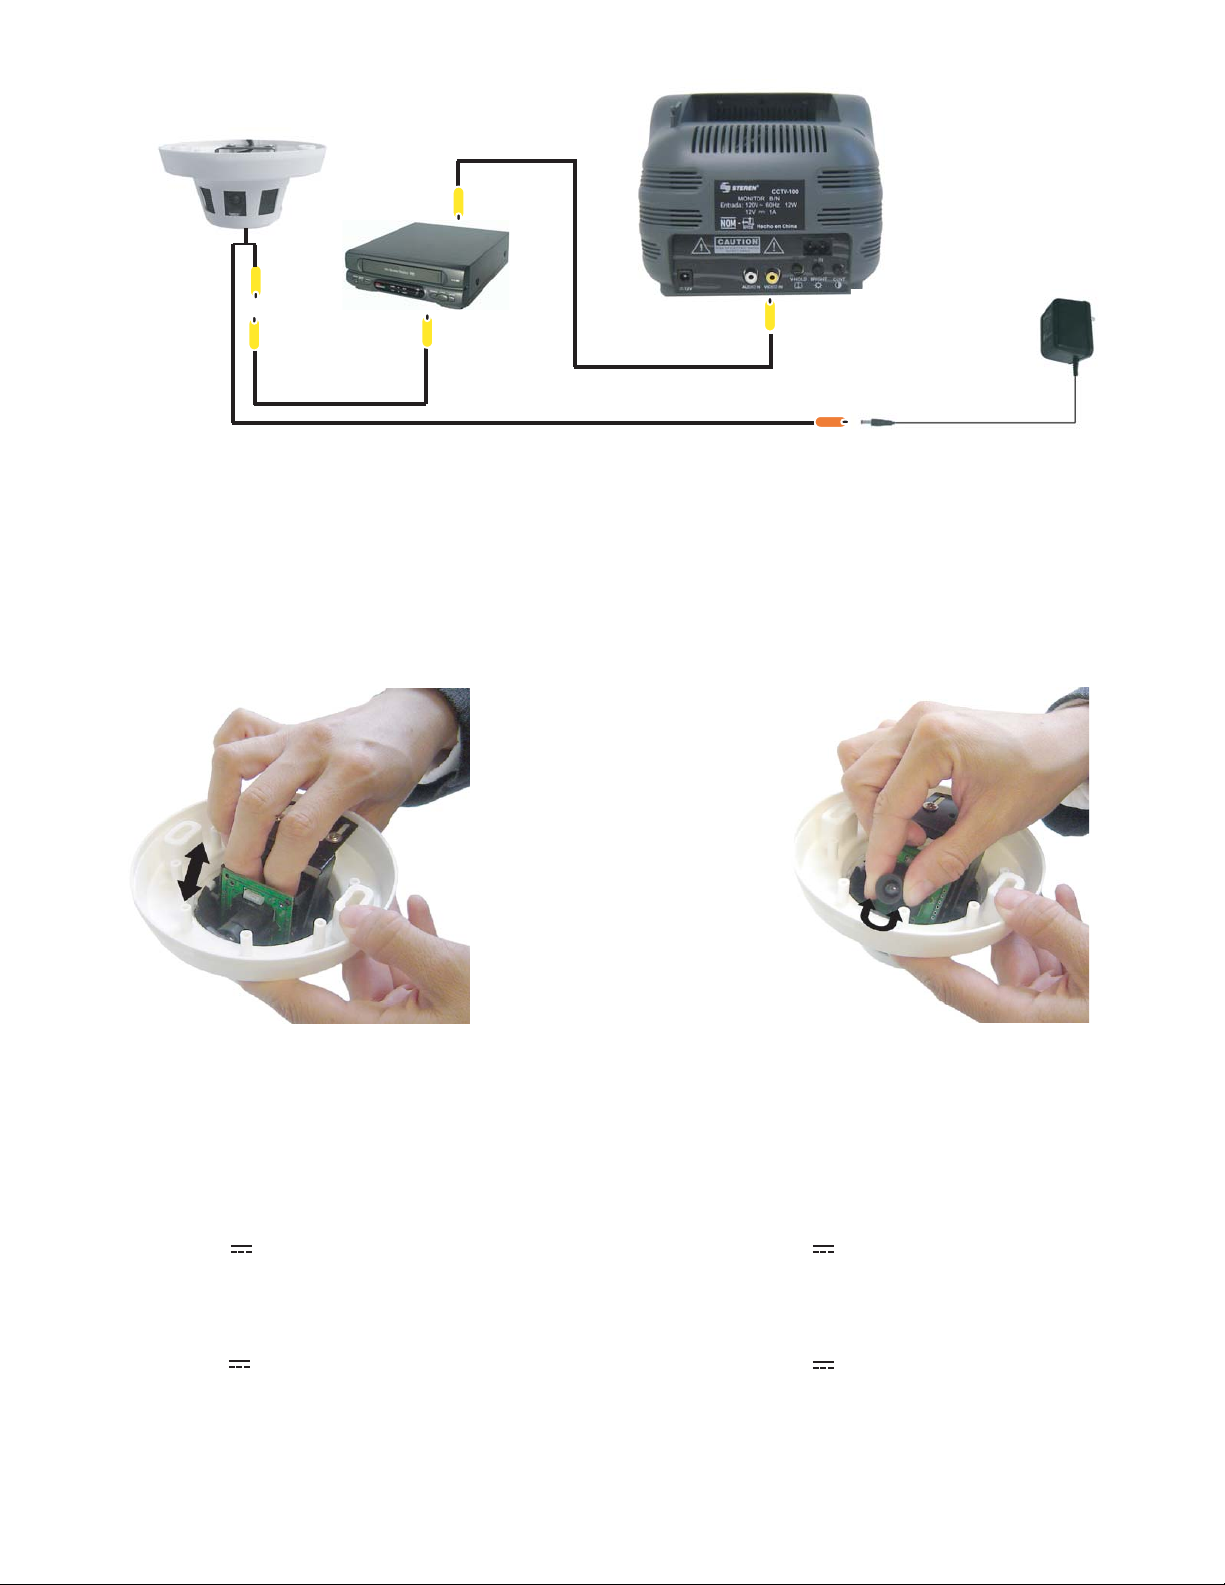
2.- Use a RCA male cable (not supplied) to connect the video output from
the CCTV camera (yellow connector) to video input on the monitor.
3.- Plug the AC power adaptor to the red connector on the camera and
connect it into an AC household outlet.
4.- Turn the monitor on to review the image and focus.
5.- When you finish the installation, put the camera on the desired place
and hold it firmly, using the supplied screws.
Notes:
Camera only transmit video signal.
Smoke detector is not available for use.
HOW TO INSTALL A VCR
1.- Plug a RCA male cable (not supplied) to the yellow connector on the
CCTV camera.
2.- Plug the other end to the video input on the VCR. Connect the red
cable to the supplied AC power adaptor.
3.- Plug a RCA cable (not supplied) to the VCR's video output jack and the
other end plug into the Monitor's video input.
INSTRUCTIVO DE USO DE CÁMARA CCTV A COLOR OCULTA COMO
SENSOR DE HUMO
Modelo: CCTV-115
Marca: Steren
Antes de utilizar su nueva Cámara CCTV a color lea este instructivo
para evitar cualquier mal funcionamiento. Guárdelo para futuras
referencias.
Su nueva cámara CCTV está colocada dentro de un detector de humo
convencional para lograr una discreta vigilancia a través de un monitor.
Cuenta con una cámara CCD a color, ofreciéndole una clara y nítida
imagen. Fácil de instalar. Ideal para colocar en el techo para vistas
aéreas. La cámara puede moverse verticalmente para un mejor ángulo.
IMPORTANTE
El equipo debe ser colocado en un lugar con ventilación adecuada, para
prevenir humedad, polvo o la luz directa del sol.
Siempre utilice un paño suave, limpio y seco para limpiar.
INSTALACIÓN BÁSICA
1.- Ubique el lugar donde desea colocar la cámara, y realice dos
perforaciones.
2.- Utilice un cable RCA macho (no suministrado) para conectar la salida
de vídeo de la cámara CCTV (conector amarillo) a la entrada de vídeo del
monitor.
3.- Inserte el adaptador de corriente suministrado en el conector rojo de la
cámara CCTV y conéctelo a un enchufe de pared.
4.- Encienda el monitor para comprobar la imagen y el enfoque.
5.- Una vez que la instalación esté correcta, coloque la cámara en el lugar
deseado y sujétela firmemente utilizando los tornillos suministrados.
Notas:
La cámara únicamente transmite vídeo.
El equipo no cuenta con detector de humo.
INSTALACIÓN DE UNA VIDEOCASSETTERA
1.- Conecte un cable RCA macho (no suministrado) al conector de color
amarillo de la cámara CCTV.
2.- El extremo contrario del cable amarillo conéctelo a la entrada (IN) de
vídeo de la videocassettera. El cable rojo conéctelo al adaptador de
corriente suministrado.
3.- Conecte un cable RCA (no suministrado) a la salida de vídeo de la
videocassettera (OUT) y el extremo contrario conéctelo a la entrada de
vídeo del monitor.
Vídeo
(Amarillo / Yellow)
Adaptador de corriente
AC adaptor
Rojo / Red
Vídeo
(Amarillo / Yellow)
CAMERA FOCUS
If you want to modify the camera focus or the camera angle, just introduce
your fingers into the camera as displays on the picture (Fig. 1) and lift the
camera lens up.
To adjust the focus, turn the camera lens to the left or to the right until you
get a clear and sharp image (Fig. 2).
If you want to modify the camera angle, move the lens vertically and place
it in the desired position (Fig. 1).
Note:
You must to plug the camera to a Monitor in order to check the correct
focus.
SPECIFICATIONS
Camera
Input: 8V 200mA
Dimensions: 4,7in (diameter)
Weight: 0,23lb
AC power adaptor
Input: 120V ~ 60Hz 4w
Output: 8V 200mA
Note:
Product design and specifications are subject to change, without notice.
ENFOQUE DE LA CÁMARA
Si desea modificar el enfoque de la cámara o la posición de ésta,
simplemente introduzca su mano como muestra la figura (Fig. 1) y levante
el lente de la cámara.
Para ajustar el enfoque, gire hacia la derecha o la izquierda el lente de la
cámara hasta que obtenga una imagen clara y nítida (Fig. 2).
Si desea modificar el ángulo de la cámara, mueva verticalmente el lente y
colóquelo en la posición deseada (Fig. 1).
Nota:
Debe tener conectada la cámara a un monitor para comprobar que está
enfocada correctamente.
ESPECIFICACIONES
Cámara
Entrada: 8V 200mA
Dimensiones: 120mm (diámetro)
Peso: 108g
Adaptador de corriente
Entrada: 120V ~ 60Hz 4w
Salida: 8V 200mA
Nota:
El diseño del producto y las especificaciones pueden cambiar sin previo
aviso.
Vídeo IN
(Amarillo / Yellow)
Rojo / Red
Vídeo
(Amarillo / Yellow)
Adaptador de corriente
AC/ DC adapter
Vídeo OUT
(Amarillo / Yellow)
Fig. 1 Fig. 2

Other Steren Smoke Alarm manuals

Steren ALA-HUM User manual

Steren

Steren ALA-HUM User manual

Steren CCTV-2123 User manual

Steren

Steren CCTV-2123 User manual

Popular Smoke Alarm manuals by other brands

Ness 106-040 Installation & maintenance

Ness

Ness 106-040 Installation & maintenance

Eurofyre ProFyre C8 User manual, maintenance guide & log book

Eurofyre

Eurofyre ProFyre C8 User manual, maintenance guide & log book

Panasonic 4300 Specification sheet

Panasonic

Panasonic 4300 Specification sheet

Siterwell GS508C user manual

Siterwell

Siterwell GS508C user manual

Firex FADCQ manual

Firex

Firex FADCQ manual

Simplex 2098-9207 installation instructions

Simplex

Simplex 2098-9207 installation instructions

Draper SA1 instructions

Draper

Draper SA1 instructions

System Sensor 1112/24B Installation and maintenance instructions

System Sensor

System Sensor 1112/24B Installation and maintenance instructions

MSA FL500 UV/IR operating manual

MSA

MSA FL500 UV/IR operating manual

Siemens FDOOT241-9 Technical manual

Siemens

Siemens FDOOT241-9 Technical manual

System Sensor Innovair DH100LP quick start guide

System Sensor

System Sensor Innovair DH100LP quick start guide

Zerio-Plus EDA-R6000 installation instructions

Zerio-Plus

Zerio-Plus EDA-R6000 installation instructions

System Sensor 2412 Installation and maintenance instructions

System Sensor

System Sensor 2412 Installation and maintenance instructions

Firex 110-1011E owner's manual

Firex

Firex 110-1011E owner's manual

Chemetronics 601 user manual

Chemetronics

Chemetronics 601 user manual

System Sensor B401B Installation and maintenance instructions

System Sensor

System Sensor B401B Installation and maintenance instructions

diagral DD355 manual

diagral

diagral DD355 manual

Cavius 2103 manual

Cavius

Cavius 2103 manual

manuals.online logo
manuals.online logoBrands
  • About & Mission
  • Contact us
  • Privacy Policy
  • Terms and Conditions

Copyright 2025 Manuals.Online. All Rights Reserved.