Stewart Audio APEX User manual

1
POWER . UNLEASHED
USER MANUAL
2
CERTIFICATION:
This machine has been tested and
conforms to:
EN 61000-6-3:2007+A1:2011
FCC Part 15 Class B
EN 61000-6-1:2019
IMPORTANT NOTICES:
This red box is used from time to
time in this manual to indicate a
potentially hazardous situation
which, if not avoided, could result
in damage to the product, serious
injury or death.
IMPORTANT INFORMATION
This machine is designed solely for the
transportation of golf equipment on a golf course.
Warnings and important safety instructions
appearing in this manual are not meant to cover all
possible conditions and situations that may occur.
Common sense, caution and care must be exercised
when operating or cleaning this equipment.
Always contact Stewart Golf Customer Care Team
(details on page 20) or your local distributor/dealer
about problems or conditions that you do not
understand.
INTELLECTUAL PROPERTY
The design and technology within the APEX, as well
as the Stewart Golf brand is protected by numerous
trademarks, design registrations and patents. For
a full register of Stewart Golf intellectual property
please visit stewartgolf.com/ip
BAG TYPE & WEIGHT
The APEX has been optimised for use with a cart
or tour style bag weighing 14kg (31lbs). This is the
optimum weight for stability when on the course.
Using a light and often ‘top heavy’ stand bag reduces
the load on the front wheels, and the machine will
spend more time on the stabiliser than is desirable.
The new Cortex chip will adjust steering automatically
to match your bag weight.
Using a golf bag heavier than advised increases the
strain and wear on the structure of the APEX, reduce
your battery life and increase the risk of overloading
the electronics and motors.

3
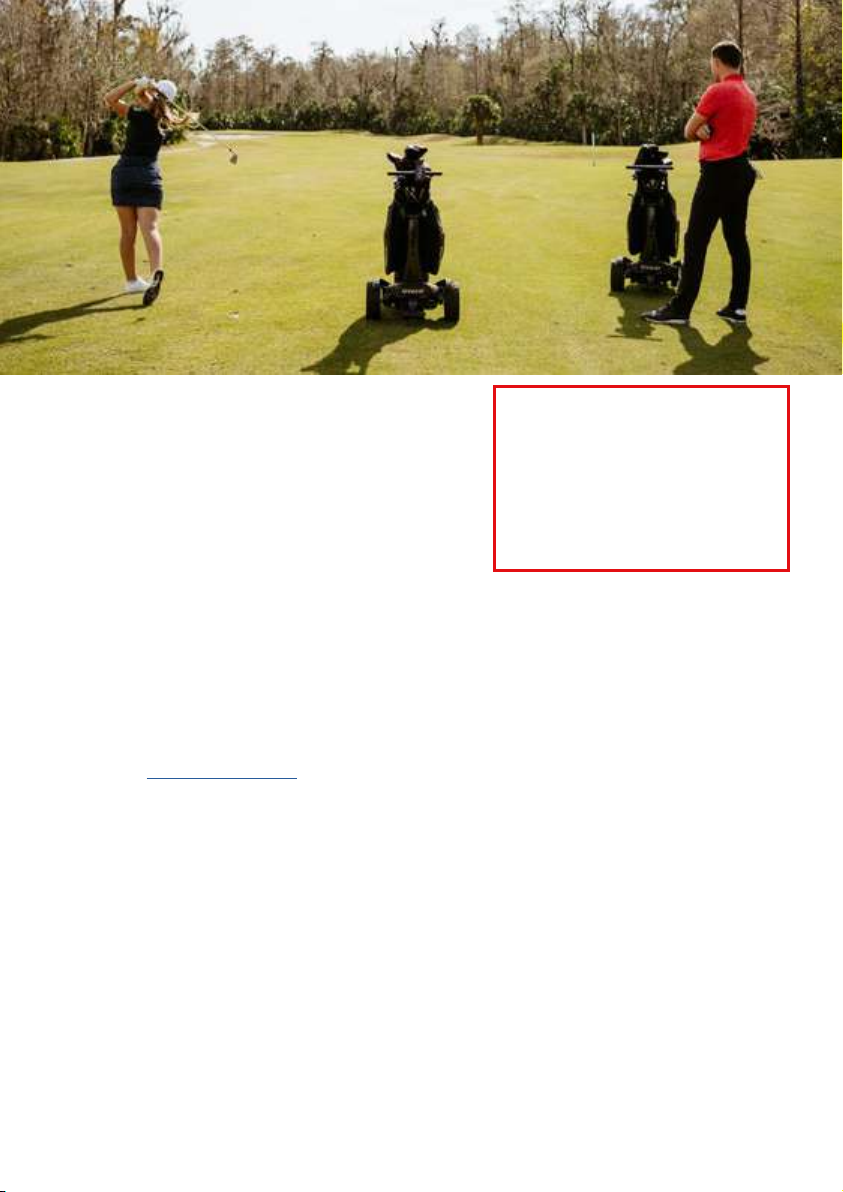
Congratulations on buying a Stewart Golf APEX: The
most advanced remote golf trolley in the world.
First things rst: resist the temptation to take your
APEX straight out for a round immediately – Read
this manual fully as it contains important safety
information, but more importantly tips and advice
on how to get the very best experience when
using the machine.
BEFORE YOU GET TOO EXCITED:
The rst thing that you should do is give both the
main battery and handset a full charge, (instructions
are found on pages 10 and 13.)
Next, practice with it. Find an area of open grass
with your normal golf bag on the machine, with all
your clubs and everything else in it: we recommend
a weight of 14kg or 31lbs. Using it on grass is
important: speed and steering are both affected
by the surface the APEX is on, and it’s obviously
designed to be used on grass.
Remember to practice with both modes of
operation: manual and remote. Even though the
word “Remote” is used in the name, manual steering
(holding the handle), is recommended on occasion.
You should steer the machine manually from the
handle when on paths or in a car park (for example)
or by using remote control when you’re on the open
golf course, in the rough or around tees and greens.
Please see pages 14-17 for more on this.
There are lots of videos available at:
www.stewartgolf.com and on our YouTube channel
(youtube.com/stewartgolf): they’ll help you get the
most from your APEX.
CONTENTS
Important Information
Welcome
APEX Anatomy
Unfolding
Fitting Golf Bag
Folding
Carrying
SmartPower Battery
SmartPower Charging
Battery Care
Handset Guide
Handset Charging & Care
Manual Operation
Remote Operation
Other Features
FAQ
Warranty Information
Trouble-Shooting Guide
WELCOME
2
3
4
5
6
7
8
9
10
11
12
13
14
16-17
18
19
20
21

4
1
4
7
8
9
10
12
3
11
The APEX Remote is built from a unique micro-cellular composite structure and
precision injection mouldings. Get to know its main features here as we’ll be referring to
them in this manual:
2
APEX REMOTE ANATOMY
1. Scorecard holder
2. Dual Handle
3. Bag cradle
4. Silicone bag strap
5. Handle release button
6. LED indicator
7. On/Off button for trolley
8. SmartPower Battery
9. On/Off button SmartPower Battery
10. Lower bag strap
11. Rear stabiliser wheels
12. Main support release button
13. Handset storage
14. Accessory points
15. Handset cradle
16. Umbrella holder mount
17. Front chassis
15
4
1
13
17
16 14
5
3
6

5
UNFOLDING YOUR APEX
Stand the machine vertically:
1. Squeeze the slider on the front chassis (between the
front wheels) to release.
2. Rotate the front chassis 180° until it clicks in to place.
3. Grabbing the front chassis, put the machine on all four
wheels.
4. Unfold the bag cradle all the way out. This
automatically releases a hidden lock that secures the
main support to the chassis.
5. Now press the handle release button and
simultaneously lift the handle and main support. Until
they both click in to place. As the main support is
lifted, the stabiliser wheels automatically deploy.
Note: Lifting the main support without rst pressing the handle release button may
damage internal components.
1. 2.
3.
5.
4.

6
FITTING YOUR GOLF BAG
1. Stand the base of your golf bag on the front chassis.
2. Ensure the bag cradle is fully lowered and straps are to the side, lean the golf bag
back until it rests on the silicone bag pads.
3. Pull the dual bag strap around the bag evenly and x.
4. Note the strap does not have to be pulled tight as the silicone material will gently
grip the bag surface. Pull the lower bag strap over the bottom of the bag using the
handle.
Note: The APEX has been optimised for use with a cart or tour style bag weighing 14kg
(31lbs.)
SCAN THE QR CODE BELOW TO WATCH
OUR UNFOLDING VIDEO
OR FOLLOW THE LINK:
http://bit.ly/3Gz1b4A
1. 2.
3. 4.

7
FOLDING YOUR APEX
Prior to folding, clear any debris from the trolley using compressed air or a soft brush or
cloth (never use water). Pay particular attention to the battery tray and gear at the base of
the main support. See the FAQ for a cleaning guide.
1. With your golf bag removed, turn your APEX battery OFF and trolley switch (see page 8
and 10 for the battery) and press the main support release button, then press the handle
release button
2. You can now lower the handle and main support to rest on the chassis. You will see that
the stabiliser has automatically retracted.
3. Close the bag cradle. This automatically locks the handle and main support to the
chassis so that it won’t fall open during transportation.
4. Now stand the APEX up so it is standing vertically.
5. Squeeze the slider on the front chassis, then fold the front chassis 180° to its stowed
position. Once it clicks in to place, the trolley is completely folded.
You can store your handset on the main support. Be sure to keep the handset in its
silicone case to avoid marking the main support and prevent water damage (presented in
image 6.)
1. 2.
3. 5.
4.
6.

8
You can pick up your APEX vertically or
horizontally.
Vertical: When folded, the carry handle
is in the centre of the trolley and clearly
visible.
Horizontal: When folded, lay the APEX
at onto the oor. Lift from the rear of the
trolley, above the stabilizer (shown in image
3) and front, shown in image 4. (You can
lift from points A and B.)
WARNING:
Always ensure that your APEX battery is turned OFF when not in use (see page 10) .
Leaving it ON will drain the SmartPower battery totally and risk irrecoverably damaging it.
This will ensure that the trolley is not accidentally activated in transit.
You may choose to remove the SmartPower battery prior to folding to enable you to
charge it.
CARRYING YOUR APEX
2.
3. 4.
AB
1.
Never pick up the APEX by any points other than those described, doing so may cause
damage. DO NOT lift by wheel arches.

9
Bluetooth Connectivity
Simply connect your phone via the
Stewart Golf app and check the
battery.
Free Of Charge
No hidden charges. Just scan the QR
codes to download.
Power Updates
Never be caught out on the course.
Use the app to receive real-time
battery usage.
SMARTPOWER BATTERY
Your APEX has a purpose designed SmartPower battery that slots seamlessly into the
chassis, connecting automatically.
Removal: Press the release button at the end of the case, just behind the battery ON/
OFF button. Press the release button in and simultaneously pivot the battery around
the front edge, pulling the battery towards you if necessary. Once the battery is partially
out, take it with your other hand and lift away.
Insertion: Place the front of the battery under the small front battery clip and slowly
pivot into place with your ngers on the release button. If it does not click in to its
secured position automatically, press gently on the top of the battery until you hear a
‘click’.
DO NOT drop the battery in to the chassis as this may damage the connections.
SMARTPHONE APP
Developed specically for use with the SmartPower technology in the APEX, the free
app lets you monitor both on and off the course.
To download the app, please scan the codes below with your smartphone.
9

10
CHARGING THE SMARTPOWER BATTERY
Always start a charging cycle by following these steps:
1. Turn the SmartPower battery ON
2. Connect the charger to the battery
3. Connect the charger to the wall
4. Switch the wall socket on
The charger has an indicator light on it:
RED: Indicates the battery is charging.
GREEN: Indicates that the charge cycle has nished or connected to the battery.
*Green can also mean the battery is OFF and not charging, if SmartPower button is not
pressed before connected to charger.
The charge cycle time varies depending on how much power has been used: the
average charge should take 3-4 hours, but can be up to 10 hours. You can accurately
check the power level of the battery with the free smartphone app, even while it is
charging.
BEST PRACTICE
If the battery is being used regularly (once a week for example), it is OK to leave it
connected to the charger, with the charger turned on. The Battery Management System
(BMS) within the battery will prevent any damage.
However it is good practice to disconnect the battery from the charger once the green
light shows.
TECHNICAL INFORMATION
• Operating temperature: -10°C to 50°C (14°F to 122°F)
• Charging & storage temperature: 15°C to 25°C (59°F to 77°F)
• Battery lifespan: >1000 charge cycles
• Nominal voltage: 12.8V
• Charge current: 2~5A
10

11
BATTERY LIFE & BATTERY LIFESPAN
“
Battery life
” is the amount of time your
machine will run for before the battery needs
to be recharged. “
Battery lifespan
” is the
amount of time a battery lasts until it needs
to be replaced. The mix of things you do with
your APEX affects battery life and lifespan
but no matter how you use it, there are ways
to help.
A battery’s lifespan is related to its “chemical
age,” which is more than just the passage
of time. It includes different factors, such as
the number of charge cycles and how it was
cared for.
To help maximise battery performance
and help extend battery lifespan, avoid
charging or leaving the battery in very hot
environments (including direct sun exposure)
for extended periods of time. Please read and
follow the advice in this manual.
LONG TERM STORAGE
If you are not going to use the APEX for more
than one month, the battery should be fully
charged after its last game then disconnected
from the charger and stored in a dry
environment between 15°C and 25°C (59°F
and 77°F). Ensure your battery is switched
OFF during any storage.
Once a month you should put the battery
through a full charge cycle. Before using
it again, the battery should be given a full
charge cycle.
Batteries are a complex technology and a
number of variables contribute to battery
performance and thus the performance of
your APEX.
All rechargeable batteries are consumables
and have a limited lifespan: eventually their
capacity and performance decline so that
they need to be replaced. As batteries
age, it can contribute to changes in their
performance.
CARING FOR YOUR BATTERY
• DO follow these instructions
exactly.
• DO only use the charger
supplied to charge the battery.
• DO charge the battery
immediately after each use,
certainly within 48 hours.
• DO check the battery charge
level with the app prior to use
to ensure you have sufcient
power to complete your round.
• DO charge in a well ventilated
area.
• DO store & charge the battery
in a dry environment between
15°C and 25°C (59°F and 77°F).
• DO fully disconnect and unplug
the charger from the mains and
battery between charges.
• DO NOT drop, throw, puncture
or crush the battery.
• DO NOT immerse in water or
any liquid.
• DO NOT clean with any
abrasives or solvents; a damp
cloth is ne.
• DO NOT leave the battery in a
discharged state.
• DO NOT open or disassemble
the battery or charger. This is
dangerous and will void the
warranty.
• DO NOT cover during use or
charging.
• DO NOT expose the battery
extreme temperatures (never
store in a car in winter or
summer.)
• DO NOT solder or connect
anything to the terminals other
than as guided in this manual.

12
HANDSET GUIDE
Your APEX is supplied with a rechargeable Bluetooth handset. (The handset supplied
will pair to your machine and can be repaired using the instructions below.)
1. Forward/speed up.
2. Indicator light.
3. Left & right turn.
4. STOP. Use as primary stopping function.
5. Slow down/reverse.
6. Glide stop.
7. Cruise control speeds.
8. Bluetooth ON/OFF. Press & hold for one second to turn on. When turning off, a red
light shows momentarily.
In normal use, the indicator light will be blue:
LIGHT OFF: Handset is switched off.
BLUE LIGHT FLASHING: Handset is on, but not connected to the machine.
BLUE LIGHT ON: Handset is on and connection has been established.
RED FLASHING LIGHT: Battery Low.
1
2
3
3
4
5
6
7
7
7
8
IF REQUIRED TO PAIR
THE HANDSET FOR ANY
REASON, PLEASE SCAN
THE QR CODE BELOW TO
WATCH HOW TO PAIR
YOUR HANDSET
OR FOLLOW THE LINK:
https://bit.ly/3KUwRnJ

13
HANDSET CHARGING GUIDE
The lithium battery inside the handset is large enough for two rounds of golf, but it
should be charged after every round to ensure sufcient power.
Always charge the handset indoors and at room temperature, observing the same ‘DO
and DO NOT’ advice shown on page 11. The charging process can take up to six hours.
1. Ensure the handset is switched off and the indicator light is off.
2. Remove the protective silicone skin.
3. Expose the charging port on the side of the handset by pulling out (one) side black
plug.
4. Connect the supplied USB power cable to any 5V USB power outlet.
5. Connect the supplied USB power cable to the handset & switch on power (if
applicable).
6. The indicator light on the handset will show RED while charging, and GREEN when
fully charged.
7. Once the indicator light is GREEN, disconnect the power cable from the handset.
8. Return the black plug to the charging port on the side of the handset, then ret the
protective silicone skin.
HANDSET CARE
Using the handset skin and charging port plug means that the handset will be shower
proof (it is not waterproof). Water and electronics are natural enemies and you must
take care to make sure no water ever gets inside the handset.
• Never allow the handset to be immersed in water and don’t wash it.
• If you want to wash the silicone skin, remove it from the handset before washing it,
then dry it thoroughly before replacing it.
• If you use the handset in the rain or other wet conditions, remove the silicone skin
as soon as you have nished playing and wipe both handset and silicone skin dry to
remove any moisture that may have found its way down the edges of the silicone
skin. Allow both to dry fully before retting the silicone skin.
• Don’t store the handset anywhere that water or moisture might get into it.
• Refer to the DO and DO NOT guide on page 11 for further advice on how to care for
the handset and lithium battery contained within.
LONG TERM STORAGE
If you are not going to use your APEX for more than one month, the handset should be
put through a charge cycle at least once every month.
This will avoid the handset battery being completely discharged.
Prior to using the handset again it should be fully charged.
WARNING
The handset should only be charged with the supplied USB power cable. Using
any other cable or power source can damage internal components: this will not
be covered under warranty.

14
MODES OF OPERATION
Your APEX has TWO modes of operation: manual and remote control.
Both make use of the remote control handset, but manual requires you as the user to
hold the handle to control the direction of the trolley. It is your responsibility to choose
the correct steering mode for each situation, please read more for tips on how to make
these decisions.
The APEX Remote, features Active Terrain Control (ATC) which is active at all times.
This technology will ensure the machine maintains speed up and down slopes. These
processes are automatic and don’t require user input.
1. MANUAL OPERATION
Good for: Tight spaces, car parks, bridges, paths.
Before you do anything, make sure you know where the STOP button is and always use
this as the main command to bring the machine to a halt.
If you wish to bring the machine to a more gentle halt then use the Glide Stop button.
When in a car park, crossing a road or negotiating a tight path, you should steer
manually from the handle. You can control the speed of the machine using the speed
up & slow down buttons, or program the cruise control speeds to your walking pace
(see page 18).
BEST PRACTICE:
When in tight areas you should physically keep control of the APEX by steering from
the handle.
The dual handle allows you to steer with either hand. Either clip the handset to the
handle, or hold it with your other hand.
11 WARNING
Ensure you practice in an
open area away from other
people or objects.
This will allow you to
familiarise yourself with the
remote functions without
risk of damage or injury. Be
aware of your surroundings.
Ensure that you know
the whereabouts of other
players, carts, trees, lakes,
bunkers, streams etc.
14


16
2. REMOTE CONTROL
Good for: On fairways, around the greens or when you are in the rough.
Not for: Car parks, bridges, paths.
To start the machine moving forwards, press the forward button. Once the machine is in
motion, continually pressing the “speed up” or “slow down” buttons will either speed up
or slow down the machine respectively. You can also use the cruise control buttons to
start the machine.
To reverse the machine, press ‘stop’ and then select the “reverse” button. When
reversing, the speed is xed and cannot be increased or decreased.
To steer the machine, press and release either the left or right buttons. When in motion
this will change the direction slightly and continue moving. A prolonged press will
tighten the turn. If you press either button with the APEX stationary, the machine will
turn on the spot.
BEST PRACTICE:
• The remote has a nominal 100 yard range. However it is recommended that you
keep the machine within 25 yards so that you can see obstacles in its way.
• Hold the handset in your hand
and position the machine
approximately 15 yards in front
of you and on the line of your
ball. Make small adjustments to
direction and speed as you see
t. Do not place the handset in
your pocket.
• When you get to your ball, park
the machine to the right of your
ball (or to the left if you are left
handed). Place the handset on
the cradle when taking a shot.
• If you are going to walk any distance away from the machine (such as on the green),
keep your handset with you so you can drive it to your next position rather than
walking back to it.
The advanced Bluetooth connectivity built use Apex can give a pairing range of well
over 100 yards but this is excessive for normal use, as a result we have added a further
safety protocol to ensure your trolley always remains fully under your control.
Once the signal strength drops below a certain level, indicating that the trolley is
approximately 25 yards from the handset, if no button has been pressed on the handset
for more than three seconds, the trolley will stop immediately.
The trolley and handset will remain paired and pressing any button will then give you
back full control but buttons will continue to need to be pressed every three seconds
until the signal strength indicates the trolley is back within 25 yards of the handset.
The three-second protocol will remain in place whenever the trolley is more than 25
yards away from the handset but closer than its maximum Bluetooth pairing range.
Should the trolley ever exceed its Bluetooth pairing range it will disconnect from the
handset and the trolley will stop as a safety measure. Walking the handset back into the
pairing range will initiate re-pairing.

IMPORTANT INFORMATION
SPEED:
The APEX can travel at speeds of up to 6mph but performing delicate manoeuvres,
such as negotiating bridges or steering between obstacles, should not be performed
at top speed and any damage caused will NOT be covered by warranty. The machine
will perform best when being driven at walking speed and this is what is strongly
recommended.
18
OTHER APEX FEATURES
HANDLE FEATURES
As standard the APEX has:
• Built in scorecard and pencil holder.
• Handset storage.
• Umbrella holder mount.
• Dual handset cradle.
CRUISE CONTROL SPEEDS
Your APEX has three Cruise Control speeds, on buttons 1, 2 and 3. You can program these for
your own walking speeds as follows:
1. Use the speed up and slow down buttons to nd your desired walking speed.
2. Press and hold either button 1, 2 or 3 for three seconds. The machine will stop to show
that the instruction has been received. Now release the button and the machine will
restart. Your new speed is now stored.
3. To activate the new speed press button 1, 2 or 3 and release the button as normal.
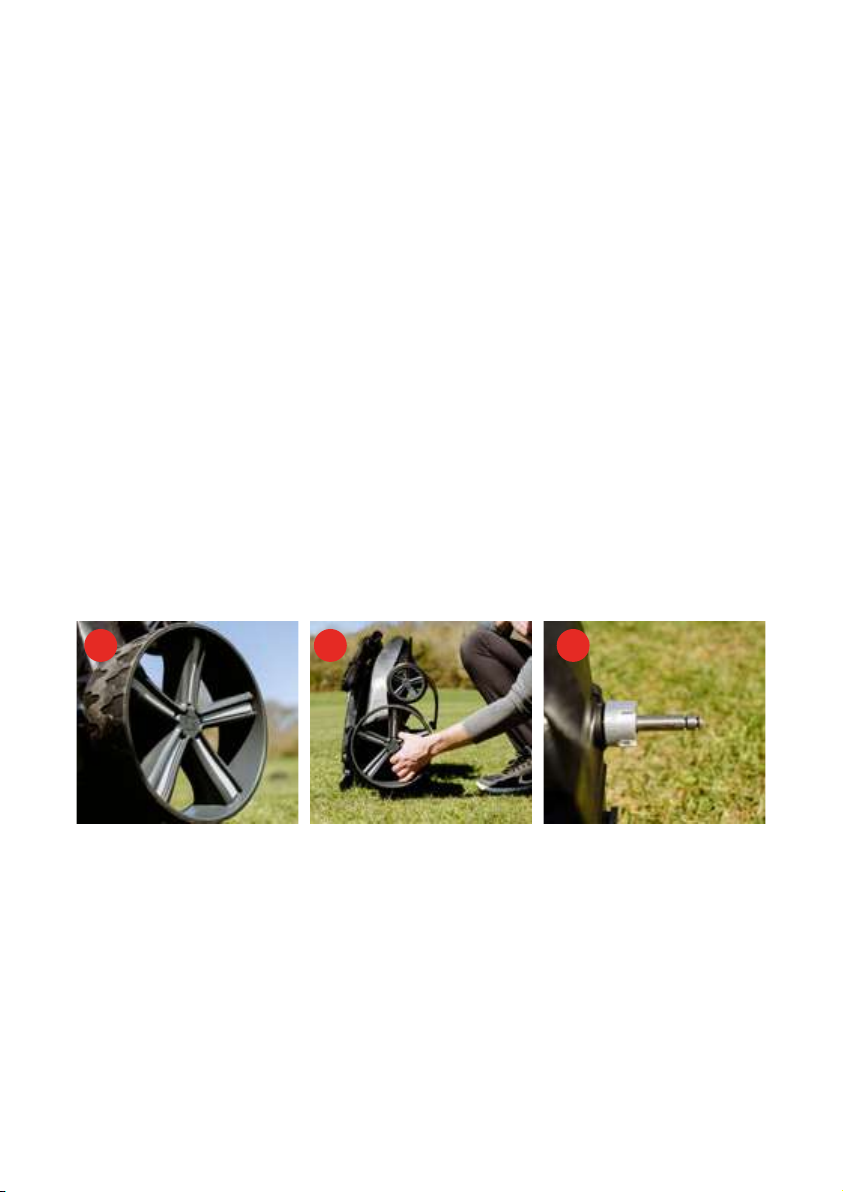
QUICK-RELEASE REAR WHEELS
To remove a wheel:
1. Tilt the machine (holding the main support) so that one wheel is off the oor.
2. Hold the centre of the wheel and press the metallic
button with your thumb, and pull the wheel away.
FREE-WHEEL
The APEX has a free-wheel setting which allows you to complete your round even in the
unlikely event of a fault. To engage this mode:
1. Tilt the machine so that one wheel is off the oor (hold the main support).
2. Press down on the metallic button in the wheel centre and slide the wheel 25mm (1”)
away from the motor, but still on the axle.
3. Rotate the wheel 45 degrees and push it towards the motor until it stops, engaging the
wheel on the outer ring of the axle.
4. Release the metallic button and the wheel should now be locked on to the shaft, but not
engaged onto the drive dog. You may nd it easier to pull the APEX than push it when in
free-wheel.
1. 2. 3.

19
FAQ
How should I clean the APEX?
After your round, clear grass, leaves and dust etc from the machine using a soft cloth/brush or
compressed air. Clean your APEX using standard furniture polish and a soft cloth.
NEVER use a hose or pressure washer to clean the APEX: faults caused by water ingress will not
be covered by the warranty. Water cannot enter the motors or electronics in normal use.
Is the APEX OK to use in the rain?
Yes. The APEX is designed for use in all conditions appropriate for golf. The design of the APEX
protects the major components from rain, so water ingress cannot occur during normal use. You
should avoid any situation where moisture or water could reach the electronics or motors. Some
examples of this are:
• Driving through puddles or standing water.
• Submerging the machine in a river or lake.
Faults caused by water ingress will not be covered under the warranty.
How do I get the APEX up a step or kerb?
First, exert downward pressure on the handle, to then lift the front wheels onto the higher level.
If the natural traction of the rear wheels do not carry the rear of the machine onto the higher
level, lift from the top of the main support.
How many holes will the battery last for?
We expect the new SmartPower battery to last 27 holes (or 45 with our extended capacity
option) on a ‘normal’ course, with a ‘normal’ weight bag and in ‘normal’ conditions.
However
... A hole of golf can be anywhere between 100 and 700 yards long, so is not a reliable
unit of measurement. Terrain, ground condition, bag weight and a number of other factors can
make a difference. How you play will also affect power consumption; you’ll cover less ground
shooting 65 than you will shooting 120.
Can I improve the battery life?
Yes, there are a number of things you can do:
• Don’t overload your golf bag.
• Steering is a big source of power consumption, so use try to minimise turning inputs.
• Accelerate slowly, in the same way you would in a car if you were trying to be efcient.
Be sure to download the free battery app which will allow you to measure exactly how much
power you use on your round, and try different variables to see how much difference it makes
(see page 9 to download the app.)
Can I use the APEX without the handset?
No. The APEX can only be operated via the handset (unless the wheels are in free-wheel).
Can the APEX cope on hills?
Yes. The APEX chassis has been designed with stability in mind. The machine may tip onto the
rear stabiliser wheels, but if this happens don’t worry as that’s what they are designed to do.
Bag weight and weight distribution makes a big difference here, a light and/or top heavy bag
will not put enough weight on the front wheels and therefore it may tip easily. You will nd out
which hills work with your particular setup through experience.
With ATC, the APEX Remote is the most capable machine on hills we have ever produced.

20
WARRANTY INFORMATION
Your Stewart Golf APEX is guaranteed to be free from defects in materials or
workmanship for a standard period of two (2) years from delivery.
If you think there may be a problem with your APEX, please contact our customer care
team or your local distributor for further advice.
Conditions of warranty:
If notice is received of any breach of this warranty during the relevant period, then we
shall at our own expense and within reasonable time, repair, or at our option, replace the
goods or such parts as are defective or otherwise remedy such defect. If your address is
in the UK we will arrange and pay for collection.
Outside the UK, please contact your place of purchase or your local distributor. If your
address is outside the UK but you do not have a local distributor, we are still be able to
arrange collection but you shall bear the associated costs.
Stewart Golf will authorise the repair, or at our option, replacement of any part found
to be defective due to faulty workmanship or materials. We reserve the right to inspect
these parts. We will not bear any costs incurred (including carriage) due to an item
being returned with a suspected fault, and after inspection no fault can be found, or it is
found that the customer has not fully understood all of the functions of the APEX or the
part in question.
Exclusions to the warranty include, but are not limited to: damage during shipment if
not packed in a Stewart Golf designated box or according to Stewart Golf instructions;
wear & tear; results of neglect, misuse or accidents; damage howsoever caused; or
utilisation for any purpose other than carrying a golf bag on a golf course. APEX units,
which have been tted with non-genuine Stewart Golf parts, or have been modied
from the manufacturers specications, are excluded. Stewart Golf products used for
commercial or rental purposes are excluded. The warranty is transferable between
owners.
Both the handset battery and SmartPower battery is covered by a two (2) year
warranty against faulty workmanship and materials. Loss of battery performance owing
to external damage (howsoever caused), misuse and/or abuse, incorrect charging or
other failures not attributable to a manufacturing defect are specically excluded from
this warranty. The handset and SmartPower batteries must be charged only with the
equipment supplied by Stewart Golf, and the instructions must be followed exactly.
Register your warranty:
stewartgolf.com/warranty
Stewart Golf Ltd
Edison Close, Waterwells Business Park, Quedgeley, Gloucestershire GL2 2FN
Great Britain
+44 (0) 333 800 18 18 | info@stewartgolf.com | www.STEWARTGOLF.com
Stewart Golf LLC
18021 Longenbaugh Rd, Ste 1B, Cypress, TX 77433
United States of America
+1 (888) 814-9862 | info@stewartgolfusa.com | www.STEWARTGOLFUSA.com
This manual suits for next models
1
Table of contents


