StewMac OFFSET TREM User manual

making guitars better
Sheet #i-6267 Updated 01/22
Assembly Instructions
Welcome to guitar building! If you’re a first-time
builder, this kit is a great way to start. You’ll have fun
and learn a lot.
This simple kit is an excellent entry into electric guitar
building and can be made with basic tools. You’ll learn
to cut the peghead shape, attach the neck, and apply a
nish. After you build it, we’ll show you how to set it up
to play tip-top.
OFFSET TREM GUITAR KIT

stewmac.com
2
Tools and supplies..................................... 2
Getting started ....................................... 3
Parts list .............................................. 4
Create your peghead shape ........................... 5
Prep the neck ......................................... 6
Prep for nish ......................................... 8
Spray the nish ....................................... 9
Assemble your guitar .................................12
Final setup ............................................15
These are the tools and supplies we recommend for
assembling this kit. Stewmac item numbers are included
where applicable.
Tools
Electric hand drill
Foam sanding block (#3701 or 3699)
Fretting hammer (#4895)
Phillips screwdrivers, size #1 & #2 (#3000)
Center punch or awl (#3000)
Drill bits:
1/16" (#1710)
5/64" (#1712)
3/32" (#1714)
1/8" aircraft extension bit (#4840)
10mm nut driver (#5890) or wrench (#3691)
Nut-slotting les:
0.013" width (#0823)
0.020" width (#0828)
0.035" width (#0832)
Saw for peghead: bandsaw, jigsaw, or coping saw
14" radius sanding block (#0407)
Fret dressing le (#1602)
Ruler (#4905)
Straightedge (#3849)
Feeler gauges (#1811)
Soldering iron (#0502 or #0507)
Tremolo spring installer (#0579)
Supplies
Sandpaper: 150, 220, 320, 400 grits (#5562)
Light Duty 3M Scotch-Brite Pad (#7445)
or 0000 steel wool
Naphtha solvent (#0775)
Gloves
Blue permanent marker
Masking tape (#0692)
Double-stick tape (#2711)
Solder (#0505)
Finishing supplies
There are many nishes and application methods to choose
from. We use ColorTone Aerosol Guitar Lacquers because
they’re easy to use and you can get a beautiful nitrocellulose
nish without investing in spray equipment.
Here's a suggested list of the basic aerosol nishing
products you will need to nish your kit:
ColorTone Powdered Grain Filler, Neutral (#0269-N)
ColorTone Aerosol Guitar Lacquers:
1 can Sanding Sealer (#3883)
1 can Aged Clear (#5887)
1 can of the color coat of your choice (optional)
2-3 cans of Clear Satin (#3882)
Tools and supplies
Table of contents

stewmac.com 3
Getting started
While you’re probably excited to get started, you need to
take a little time to acclimate your kit. Wood can be extremely
sensitive to changes in humidity and temperature. The ideal
building environment is 70-80° Fahrenheit (21-26° Celsius),
with a controlled relative humidity of 45-50%. The woods in
your kit should be laid out and allowed to acclimate in your
shop for at least a few days before you start your build. Flip
the wood daily to neutralize excessive warping.
Depending upon your location and the season, you may
need to humidify or dehumidify your shop to maintain
the desired relative humidity. We advise you to purchase a
decent quality thermometer/hygrometer to monitor your
shop’s climate. Radical changes in humidity, especially
during season changes, can cause warping, splitting, and
other serious complications. If you’re unable to control the
relative humidity in your shop, we discourage building the
guitar during the transition from dry to wet seasons, or vice
versa.
You’re going to put a lot of love into this build, and paying
attention to the climate conditions while doing so is well
worth it.
Always use eye protection, and wear gloves while
working with glues and chemicals.
We wish you all the best on your build. If you get stuck or
have any questions along the way, contact us. We’re here
to help.
The oset-body guitar has been a staple of indie music since
its introduction in 1958. This oset kit breaks the mold by
adding P-90 pickups and a vintage-style six-screw tremolo
to those unmistakable curves. Tonally, it’s warm and thick,
with a tempered bite that shows up when you need it.
Countless famous names have reached for this body style to
craft their sound, including Elvis Costello, Nels Cline, Ric Oc-
asek, Robert Smith, Marcus Mumford, Jim Root, Thom Yorke,
Samantha Fish, Troy Van Leeuwen, and Chris Stapleton.
This kit makes creating your own oset-body guitar easier
than ever. You don't need production tools for shaping
the body, fretting the neck, or machining the neck joint.
The control pots and input jack are even pre-soldered! The
complicated steps are done, which allows you to focus on
the handwork of building.
The kit is made for the small shop builder with a modest tool
budget. With the exception of a few essential guitar-making
tools, you probably already own most of what you’ll need
to build this guitar.
Before you start
We strongly recommend you read all of this book before you
start building your kit. Understanding the later steps now
will be helpful to you as you start to build.
Also note that some photos in these instructions may
depict guitars with dierent woods or appointments, but the
building techniques shown are the same for your kit.
stewmac.com
4
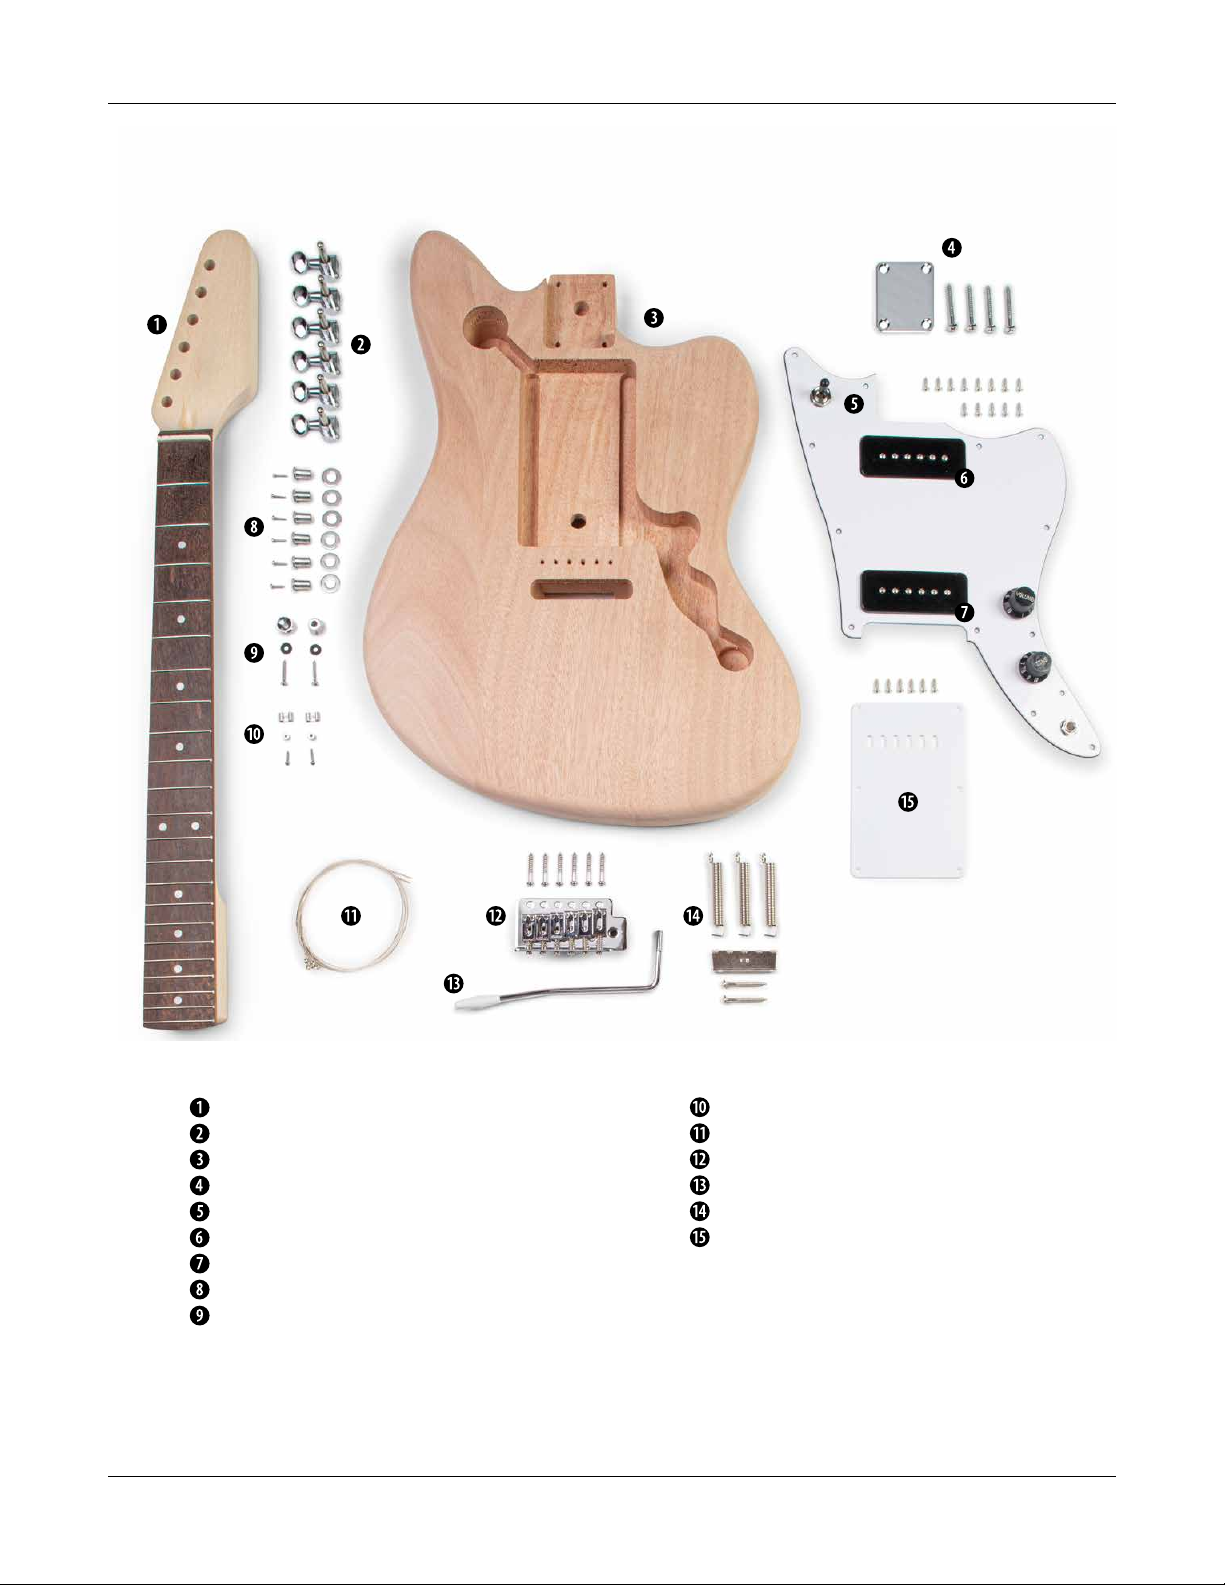
Parts List
Neck
Tuners
Body
Neck plate and attachment screws (4)
Pickguard with switch, pots, and mounting screws
Neck pickup
Bridge pickup
Tuner bushings, washers, and screws (set of 6)
Strap buttons with screws and protective washers (2)
String retainers with screws (2)
Strings
Bridge with mounting screws
Tremolo arm
Tremolo springs, claw, and screws (2)
Tremolo cavity cover plate and screws (6)
Parts and materials may vary.
stewmac.com 5
Some kits may ship partially assembled. If your kit arrived
with the neck and any hardware attached, remove it before
getting started.
You can leave the peghead shape as-is, trace a favorite
peghead, or come up with a look all your own. You’ll be
cutting your design from the blank peghead on the kit’s
neck.
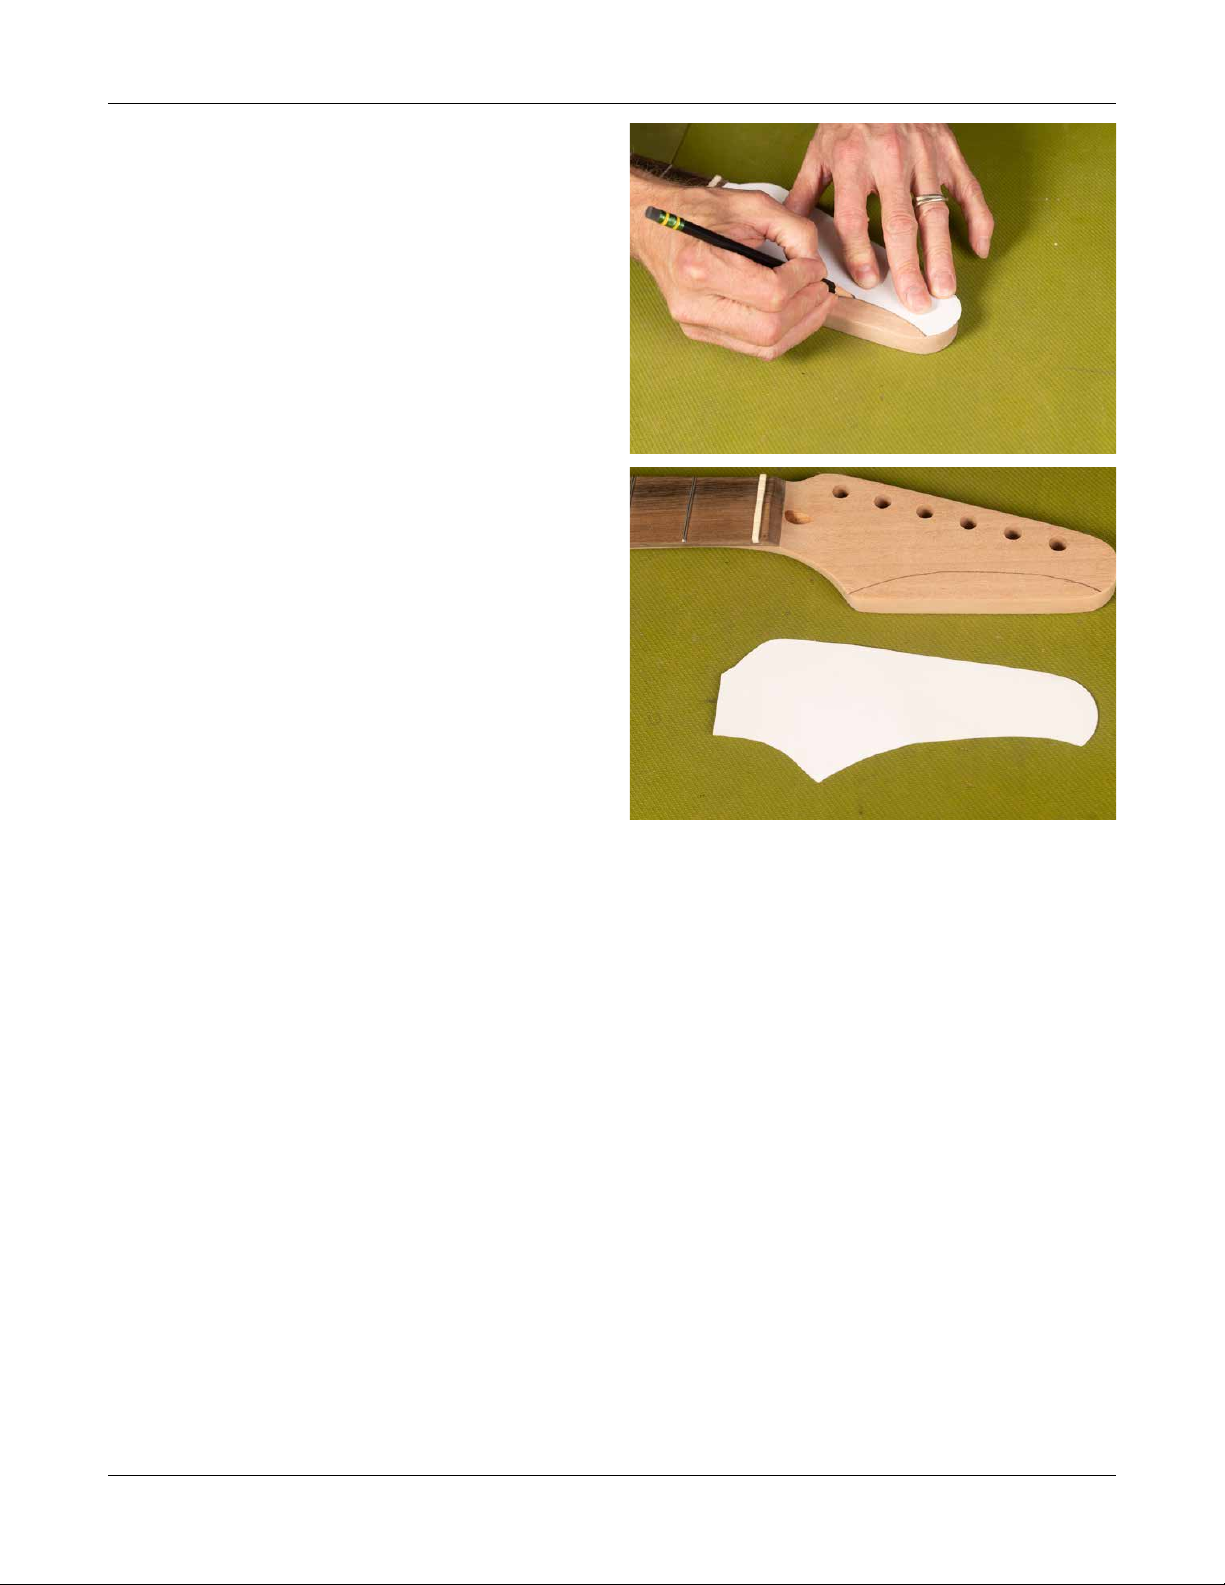
Make a paper template
Sketch out your peghead design on a piece of heavy paper
and cut it to shape with scissors. Using a pencil, trace the
shape onto the peghead. Use a light touch that doesn’t
dent or compress the wood which could make sanding
out any unwanted lines dicult. Don’t use ink, because it
leaves permanent stains that can bleed up even through
an opaque guitar nish.
Cut the peghead to shape
It’s important that your saw stays square to the face of the
peghead while you cut. If it tilts to an angle, you’ll get a
sloppy result that takes a lot of sanding to correct. Use a
bandsaw if you have one; a jigsaw is also good. A hand-held
coping saw can also be used, but it’s tough to hand-saw
smooth clean curves.
Never cut on the line
Always cut just outside the line, so you can sand to the line
afterward. Smooth your saw cuts to create your peghead
shape using rasps, les, and sandpaper. Don’t rush; rough
patches will disappear into a good nal shape if you take
your time.
When you’re happy with your peghead shape, sand it
smooth using 150-grit sandpaper followed by 220-grit,
then 320-grit.
Create the peghead shape

stewmac.com
6
Prep the neck
Note: If your kit has a maple fretboard, skip to the Prep
for Finish and Finishing sections on pages 8 and 9. After
nishing, return to this Prep the Neck section and proceed
as shown.
Straighten the neck
Use the 4mm hex wrench to adjust the truss rod. With a
straightedge on the frets, adjust the truss rod until the
straightedge touches all of the fret tops without rocking.
Turn the truss rod nut counterclockwise (viewed from the
peghead end) to loosen the truss rod, allowing the neck to
bow upward. Turning it right tightens the rod, pulling the
neck back.
For more information, see our Trade Secrets article “Don't
be nervous about adjusting that truss rod!” at stewmac.com.
Seat the frets
The frets come installed in the fretboard, but they’ll need
a little work to achieve the best playability. Use a fretting
hammer to make sure the frets are all seated properly. The
more even your frets are, the less leveling there is to do later.
After seating with the hammer, check for any high spots
across the frets—a short straightedge or a Fret Rocker work
well for this. Spanning three frets at a time, work down the
neck. If the tool rocks, you have a high fret. Knock down the
high frets you encounter with a le or Fret Kisser. Taking care
of these high spots now will prevent your leveling tool from
hanging up on them when sanding and will give you a more
even overall leveling job.
With the hammer handle running parallel to the frets, start at
one end of a fret and work your way across using light taps
that are square to the face of the hammer. Use care not to
edge of the hammer head as it can cause a bend in the fret,
making it dicult to seat properly.
The idea is to use light taps, just enough to seat the frets
ush to the fretboard. Hitting too hard can make a slight
kink in the fret that can cause the ends to spring and be
dicult to reseat. Using a heavy hand can also damage the
fretboard by driving the fret down into it. A drop of super
glue works well for keeping stubborn frets in place.
stewmac.com search: ts0033
Turn the truss rod nut
counterclockwise to bring
the neck up, adding relief.
Measure string relief
at the 12th fret.
Turn clockwise to pull the
neck back, reducing relief.
Go slow: a little does a lot!
stewmac.com 7
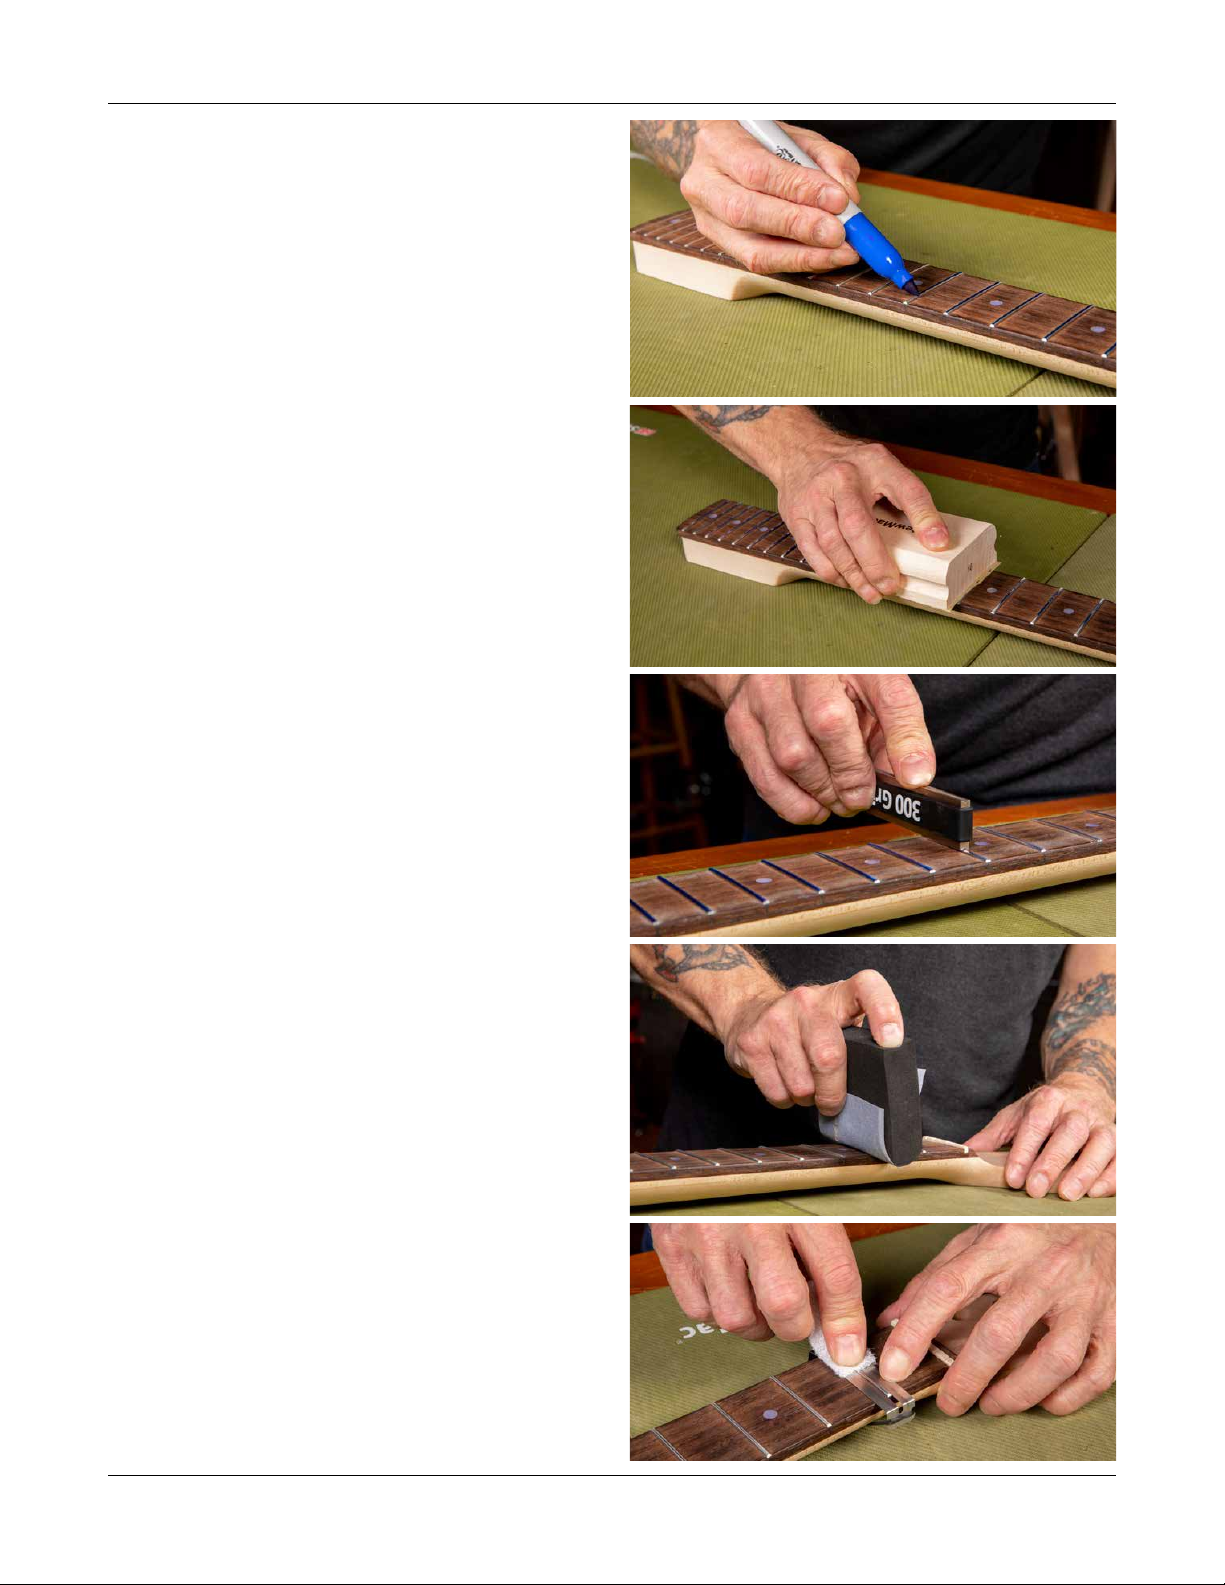
Level the frets
Color the fret tops with a blue permanent marker to
prepare them for leveling. The blue ink will show your
sanding progress.
Use double-stick tape to attach 320-grit sandpaper to the
14" radius sanding block. With this, level the frets by using
full-length strokes down the fretboard. Work slowly and
check every few strokes to monitor progress.
The frets are level when the blue ink is removed from the
fret tops. The idea is to remove as little material as possible
while still achieving a completely level fretboard.
Recrown the frets
Leveling will leave at tops on the frets. Using a fret crowning
le will restore the rounded look of the frets and improve
your guitar’s intonation.
Reapply blue marker to the fret tops. Using the crowning
le of your choice, work the le side to side to re-round the
top of the crown until the remaining atted top is a very
thin line. Don’t remove this line entirely; ling the fret tops
would undo your leveling job.
Sand the frets with 400-grit, then 600-grit sandpaper
wrapped around a foam block, running up and down the
entire length of the fretboard. Follow up with Light Duty
Scotch-Brite Pads or 0000 steel wool for a nal nish. This
will remove any of the remaining lacquer from the frets and
polish them to a smooth nish.

stewmac.com
8
Prep for nish
Preparing the neck and body for nish is just as important, if
not more important, than the nal spray. The key to a great
looking nish is patience and lots of it. Be thorough with
your sanding and follow the nishing schedule on page 9
for best results.
Inspect the body and neck for any dents, chips, or other
imperfections and repair them. Small dents can be steamed
out by placing a damp cloth over the dent and applying heat
with a soldering iron. To learn more, see our Trade Secrets
video #0317 “Fixing a guitar dent by steaming it out” at
stewmac.com.
Chips and knotholes will need to be lled. Remove the bridge
if you haven’t already and set it aside.
Fill the grain
If your kit has an open grained wood, such as mahogany or
ash, the grain will need to be lled before nishing in order
to achieve a at surface. As a general rule, if you can see the
pores of the wood with the naked eye, you should use grain
ller before nishing.
WesuggestusingourNeutralColorTonePowdered GrainFiller
following the instructions below. Three applications are
recommended to get a nice at surface to build nish coats
over. Tight grained woods such as alder and poplar do not
need to be lled.
ColorTone Powdered Grain Filler is supplied as a ne powder,
ready to mix with water (a 1:2 ratio of water to ller works
well). Mix thoroughly until you have a smooth consistency,
without any lumps.
Prepare surface by sanding to 220-grit. Remove all dust, oil,
and solvents from the surface.
Apply the ller liberally in the direction of the grain, then
against it. Allow to dry for 5 to 10 minutes depending on
thickness of the ller.
Use a grain ller spreader or plastic card to squeegee o any
excess. Wipe at a 45° angle to the grain.
When dry, wipe o remaining residue with a clean dry cloth.
Sand the surface with 320-grit sandpaper. Clean up with
warm water.
Sand the body and neck
Run your ngers lightly along the edges of the fretboard
and feel for sharp fret ends. If the frets feel sharp where they
meet the edge of the neck, gently sand them back with long
strokes down the length of the neck. Use care not to sand
the top of the frets and fretboard or change the bevel of the
frets in the process.
After a complete sanding, wipe down the body and neck
with a damp cloth to raise the grain to reveal bers that need
more sanding. Let the wood dry, then sand the raised grain
with 220- grit sandpaper. After sanding, raise the grain again
and sand a third time, using 320-grit sandpaper.
Slightly break and soften any sharp edges on the fretboard,
peghead, and body around the neck pocket. Softening hard
edges promotes even nish coverage. Later, when you’re
lightly sanding between coats of nish, these edges are less
likely to sand through to bare nish.
Wipe the neck with a damp cloth to raise the grain. After it’s
dry, sand it again with 320-grit.
Degrease with naphtha
When you’ve nished sanding, wipe the body and neck with
a naphtha-dampened rag to remove any oils or grease. From
this point on, wear clean gloves when handling so you won’t
contaminate the wood.
For rosewood or dark wood fretboards, tape o the string
nut and the fretboard face before spraying so it remains
free of nish.
stewmac.com search: ts0317

stewmac.com 9
Spray schedule with ColorTone Aerosol Lacquer
This nishing process can be completed in as little as three
days, followed by a week of curing. Remember that patience
is the key to a successful nish job. Don’t rush it! Spray the
lacquer using light passes to prevent runs.
Day 1
Body: Spray 1-3 coats of aerosol Sanding Sealer on the body,
waiting 1-2 hours between coats.
Neck: Spray 1-2 coats of Clear Satin lacquer, allowing 1 hour
between coats. Follow this with 1-2 coats of our Aged Clear
lacquer for a warm maple color. Wait 1 hour between coats.
Note: If your fretboard is maple, you will be spraying over
the entire neck, including the frets. Finish will be removed
from the frets during the leveling and dressing process after
it has cured. The nut will be taped o to keep it unnished.
Any excess overspray can be scraped away after nishing.
Allow the body and neck to dry overnight.
Day 2
Body: Spray 2-3 coats of color (optional), allowing 1 hour
between coats.
Body and neck: Spray 3-4 additional coats of Clear Satin, 1
hour apart.
Allow to dry overnight.
Day 3
Body and neck: Lightly sand the body and neck with 400-grit
paper to remove any nish spatter or dust.
Spray 3-4 additional coats of Clear Satin, 1-2 hours apart.
Allow the nish to cure for a week in a cool, dry room. Around
70° at 50% humidity is recommended.
After the nish has dried for 1 week, go over the entire
instrument lightly with Light Duty 3M Scotch-Brite Pads or
0000 steel wool for a nice satin appearance.
There are many nishes and application methods to choose
from. In creating these instructions, we’re using ColorTone
Aerosol Guitar Lacquers. These aerosols are a fast way to
build a quality nish.
Using a clear satin topcoat is recommended, because satin
doesn’t require much sanding or bung the way gloss does.
If you choose to spray a glossy nish, it will involve more steps.
For help with that or any kind of nish, see our book, Guitar
Finishing Step-By-Step (#5095).
Use scrap wood to make a spray handle. Mark and drill holes
in the handle that align with the holes in neck pocket of
the body. Use two bolts and nuts to temporarily attach the
handle to the body. Drill a hole in the other end of handle
and bend a thin metal rod into an S-shape to hang the body
and neck during spraying or while drying.
A brushed-on nish like tung oil, waterbase lacquer, or
shellac works great too. Any of these nishes will seal and
protect the wood from dirt and moisture.
The best advice for nishing: practice on scrap!
Test your nish of choice on scrap wood rst, so you can see
what you’ll get before applying it to your guitar.
Use warm lacquer, not cold. Professional nishers spray
heated lacquer because cold lacquer spatters, requiring extra
sanding. Warm up your aerosols before spraying by placing
the cans in a sink of warm tap water.
When spraying, keep the spray parallel to the surface of the
guitar for even coverage as shown below.
Spray the nish
The right way to spray: Move in a straight line, so the distance
from the work stays the same. This gives you even coverage.
Keep your
wrist exible
Sti wrist
The wrong way: Swinging in an arc moves the spray closer and
farther from the work. Center coverage is heavy, edges are light.

FRET KISSER
Locate and spot level high frets in an instant. What was a several hour job can be done in no time at all,
you only file exactly where it’s needed.
GAUGED NUT SLOTTING FILES
Precisely sized files for round-bottom string slots
on the nut and bridge saddles.
GUITAR TECH WRENCHES
Fit jacks, pots, switches, bridge studs…just about
every wrench you need for guitars and amps.
BY DAN ERLEWINE
From basic maintenance to advanced
repairs, this is the leading step-by-step
manual for every guitar owner.
RADIUS SANDING BLOCKS
For fingerboard prep and leveling frets too. Just
add sandpaper.
GUITAR BENCH PAD
Supple and dense non-slip surface for your guitar.
GUITAR TECH SCREWDRIVER SET
36-bit set specifically for guitar hardware, all in a
compact no-spill case.
TOOLS FOR A BETTER BUILD
MICRO-MESH FOAM SANDING BLOCK
Dense yet flexible, a great all around backer for
sanding, polishing, and fretwork, too.

A FINISH YOU CAN DO AT HOME
FREE
FREE
STEP-BY-STEP COURSE
stewmac.com/aerosol-guitar-finishing
COLORTONE AEROSOL GUITAR LACQUER
Whether it’s a vintage sunburst you’re after, or a faded gold-
top, ColorTone’s line is filled with tints, solids, and metallics
that are formulated to the iconic guitar finishes we love.
You really can
get a pro quality
guitar finish
from a can!
Get a pro-quality finish (or refinish) on your next guitar! In this 3-part series we show you exactly what you need to do to get a professional-quality
guitar finish at home using aerosol lacquers. The results are pretty amazing!! This series covers every aspect, all using nitro aerosol finishes. It’s perfect
for anyone—no experience necessary! You really CAN get a pro-quality result (even on your first try) if you follow these steps.

stewmac.com
12
Assemble your guitar
Use a padded surface during assembly to protect the nish
from scratches and dents.
Install the tremolo spring claw
The spring claw must be attached to the body before the
bridge can be installed. Center the claw in the spring cavity
so it sits 1/16" below the surface of the body. Mark out the
mounting screw holes with a scribe or punch. Drill the screw
holes approximately 1-1/2" deep, with a 1/8" drill bit.
A long aircraft style bit works best for drilling these holes.
Place a shim of plastic or wood between the body and drill
bit to prevent damaging the nish.
For now, don’t tighten these screws against the cavity wall;
leave a gap of about 1/4". A small amount of thread lubricant
or bar soap on the ends of your screws will help them go
in more easily.
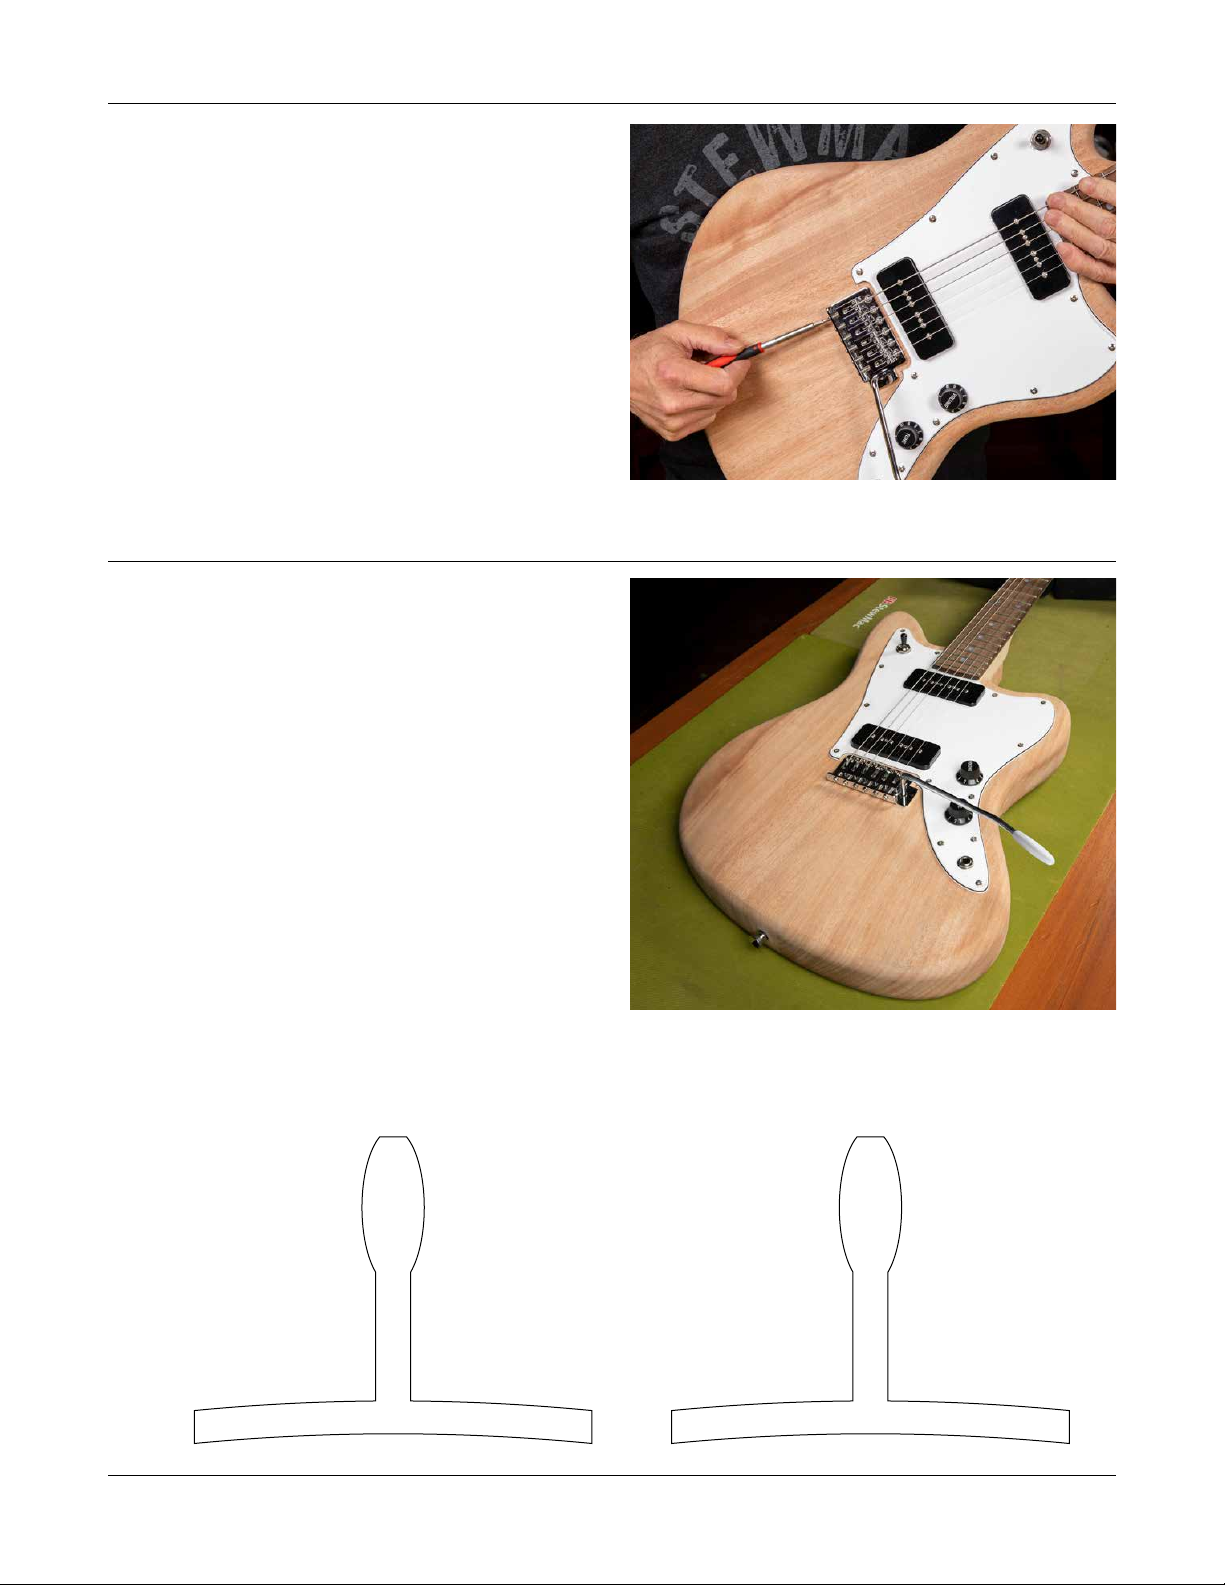
Install the bridge and tremolo springs
With a #2 Phillips screwdriver, install the bridge using the
six pivot screws. Don’t tighten them all the way down, just
enough so they sit just above the top of the baseplate, al-
lowing the plate to sit at on the body.
Connect the tremolo springs between the tremolo block
and the claw.
Attach the neck
The neck's fretboard extension overlaps the pickguard, so
the pickguard needs to be held in place—but not screwed
down—while the neck is installed.
Hold the pickguard in place temporarily with a rubber band
around the waist of the body (no screwing yet!).
Pilot holes in the neck and body are pre-drilled. Align the
neck plate to the back, and the neck in the pocket. Use a #2
Phillips screwdriver to insert the neck attachment screws.
Mark out the pickguard
Lay out the pickguard using the neck and bridge for refer-
ence. Once positioned, mark out the mounting screw holes
with a scribe or punch. Drill pilot holes for the screws using
a 1/16" drill bit.

stewmac.com 13
Install the pickups
Temporarily attach the pickguard to the body with a few
screws and place one of the pickups upside down into the
routs on the pickguard. The neck pickup has the letter “N”
stamped on the bottom. The bridge pickup is stamped “B”.
Run one of the mounting screws through the holes in the
pickup using light pressure to mark out the proper location
in the body. Note: you may need to press through the inner
wax coating to get the screws through the pickup.
Remove the pickguard and pickups. Drill pilot holes 1/4"
deep using a 1/16" drill bit.
Mount the pickups to the body. The springs packaged with
the screws are meant to go between the pickups and the
bottom of the pickup routs.
Wire the pickups
If the switch has lead wires attached, detach and discard
them. You'll connect the pickup leads directly to the switch
instead.
Trim the neck pickup lead to 7" long. (The neck pickup has
the letter "N" stamped on the bottom.)
Twist the strands of the braided shield together; this is the
pickup's ground lead. Heat this braid with your soldering iron
and melt a little solder into it. This is called "tinning" the lead.
Strip 1/8" of insulation from the white (hot) and tin it also.
Solder this hot lead to the switch's neck position lug—the
lug that's closer to the neck when the pickguard is installed.
Solder the braided ground wire to the side of the switch
body as shown.
Trim the bridge pickup lead to 9" long. (The bridge pickup
is stamped "B".) Tin the ground and hot leads as you did for
the neck pickup. Solder the hot lead to the switch's bridge
position lug, and solder the braided ground to the body of
the switch.
Feed the ground wire through the hole leading into the
spring cavity and install the pickguard.
For tips on soldering, see our Trade Secrets video #0186 “How
to get a good clean solder joint!” at stewmac.com.
stewmac.com search: ts0186
Neck
Lug
Bridge
Lug

stewmac.com
14
Install the strap buttons
Mark the locations of your strap buttons. At the tail of the
guitar, position the button in line with the center of the neck
and bridge. The other button is typically located on the tip
of the upper horn.
Drill 1/2" deep holes with a 3/32" bit, and install the strap
buttons with their protective washers.
Install the tuners
Lay out the tuners, using a ruler to make sure they’re in line
with one another and square to the edge of the peghead.
Mark out your mounting holes with a scribe or punch.
Tuner mounting screws are very delicate and will break o
if forced into the wood. Use a 5/64" drill bit to make pilot
holes for the screws; if these holes are any smaller you risk
shearing o the screw heads. Hold a screw up to the drill bit
and wrap tape around the bit to mark your depth. Lubricate
the screw threads by dragging them across soap or wax for
smooth installation.
With the tuners in place, install the screws in the pilot holes
with a #1 Phillips screwdriver. On the tuner string post, add
a washer then the threaded bushing. Tighten with a 10mm
nut driver or wrench.
Install the string retainers
Install the included generic strings or your own preferred
brand of strings and mark the locations for the string
retainers on the peghead. These retainers maintain the
proper string angle over the nut for the D, G, B, and E strings.
Install the D/G string retainer between the E and A string
posts (approximately 2" from the nut).
Install the B/E string retainer between the A and D string
posts (approximately 3" from the nut).
Tune the guitar to pitch, and adjust the neck using the
included 4mm hex wrench.
Solder the string ground
The remaining black lead wire is for the string ground. Feed
this wire through the hole from the pickup cavity to the
spring cavity. Solder this ground wire to the spring claw.
Make sure to heat the claw well enough to get a good, solid
solder joint.

stewmac.com 15
Final setup
Turn the truss rod nut
counterclockwise to bring
the neck up, adding relief.
Measure string relief
at the 12th fret.
Turn clockwise to pull the
neck back, reducing relief.
Go slow: a little does a lot!
Set the action at the nut
Lower your string nut slots for better playability, using
gauged nut les. Measure string height over the 1st fret,
between the bottom of the string and the top of the fret.
A comfortable medium action is:
Unwound strings (G, B, E): 0.012" at the 1st fret
Wound strings (E, A, D): 0.020" at the 1st fret
Use feeler gauges to measure the gap. If you don’t have feeler
gauges, you can use a guitar string that closely matches the
size of the gap you are shooting for. Stop when the string
sits on your feeler gauge. Go slow and check your work fre-
quently—it’s easy to go too far in this step and ruin the nut.
Straight neck or a little relief?
Neck relief refers to adjusting a neck so that it has a very slight
upbow, rather than being perfectly straight. This relief allows
a little more room for string vibration, reducing the chance
of hitting the lower frets and causing fret buzz.
Depending on your playing style, and how perfectly level
your fret tops are, a neck should be anywhere from perfectly
straight to having 0.012" of relief. This measurement refers
to additional string height over the 12th fret, compared to
a perfectly straight neck.
A straight neck tends to play and sound better, but very few
guitars end up with no relief at all, and several thousandths
of an inch or more is perfectly normal.

stewmac.com
16
Installing spring cover plate
Mark out screw locations for the spring cover plate and drill
pilot holes 1/2" deep using a 1/16" drill bit.
Install spring cover plate using the six provided screws.
Hand tighten.
Set the action at the bridge
Adjust the action at the bridge by raising or lowering the
string saddles. Measure string height over the 12th fret,
between the bottom of the string and the top of the fret.
A good starting point is:
High (unwound) E string: 1/16" at the 12th fret
Low (wound) E string: 5/64" at the 12th fret
You can always go lower or higher depending on your play-
ing style. After setting the two E strings, dial in the remaining
strings to match the curve of the fretboard’s 14" radius using
the cut-out gauge included on page 17.
Adjust the pickup height
You can adjust the height of the poles on the pickups for the
best response by turning the two mounting screws.
Holding down the low E and high E strings at the 22nd
fret, adjust the bass side of the pickups to 5/64" from the
top of the pickup pole to the bottom of the low E string.
Adjust the treble side to 1/16". Feel free to experiment with
other heights, but the measurements here serve as a good
starting point.
Bridge set up
The vintage-style bridge can be set up a couple of dierent
ways.
A “oating” set-up allows for both raising and lowering the
pitch of the strings with the tremolo bar. To achieve a oating
set-up, tune the guitar to pitch and evenly adjust the tremolo
spring claw so the back of the bridge sits 1/16" - 3/32" o of
the body. Tightening the screws will bring the back end of
the bridge closer to the body, loosening them results in the
back end of the bridge raising up o of the body slightly,
allowing it to oat.
The bridge can also be set up to only lower the pitch. With
the guitar tuned up, adjust the springs so the back of the
bridge just starts to lift when you pull a hard bend on the
low E string. This is a good starting point; you can further
adjust the spring tension to suit your playing.
To immobilize the tremolo unit completely, simply tighten
the spring claw all of the way down.
stewmac.com 17
Set the intonation
The nal step is intonating the guitar by adjusting the string
lengths at the bridge saddles so the guitar plays in tune all
the way up the neck.
Using a high-precision tuner, rst tune the strings to pitch.
Then, press the high E string lightly at the 12th fret using just
enough pressure to sound the note. Check it with your tuner.
If the note reads at, the saddle needs to be adjusted forward
toward the nut, shortening the length of the string.
If the note reads sharp, the saddle needs to be adjusted back
away from the nut, increasing the string length.
Screw the tremolo arm into the bridge.
You’re done!
Congratulations! Your guitar is ready to play.
We hope this guitar will be the rst of many that you enjoy
building. Visit Stewmac.com to view our full lineup of electric
and acoustic guitar kits.
Cut-out radius gauge
Carefully cut out this radius gauge to check your saddle
heights as shown on page 16. We’ve included two, so you
have a backup.
14" RADIUS
14" RADIUS

WHAT’S NEXT?
YOU CAN’T STOP NOW
PERFECT YOUR SETUP
STRING ACTION GAUGE
PRECISION STRAIGHTEDGE
UNDERSTRING RADIUS GAUGE
Every great playing
guitar begins here.
Buy these tools once
and they’ll last you a
lifetime.
Basic Setup Kit
stewmac.com

BUILD YOUR SIGNAL CHAIN
BUILD SOMETHING NEW
Pickups Pedal Kits Amp Kits
Electric Guitar Kits
Our promise to you is simple and uncomplicated:
If any of our products ever break, wear out, or fail to exceed
your every expectation simply return it for a replacement.
That’s quality you can trust. For life.
Looking for your next weekend project? “The kit is superb and produces one of the best sounding
amps I have ever heard. Tommy at StewMac was looking out for me and replaced my parts that I ruined at no
charge. Superb documentation, fantastic experience, and a LOT of fun to assemble. I’m thrilled!”—HB from Michigan
Speaker Cabinet KitAcoustic Guitar Kits
335-Style • Offset • LP-Style
S-Style • T-Style • Modern • Vintage
Dreadnought • OM • Triple-O
Pre-war • Jumbo-45 • Limited Edition
For 10 or 12-inch Speaker
Solid Mahogany
What will you build next?

21 N. Shafer St • Athens, Ohio 45701 • USA
USA & Canada call toll-free: 800-848-2273
9am-6pm weekdays Eastern time
How can we help?
stewmac.com/contactus
making guitars better
Table of contents
Other StewMac Musical Instrument manuals


