Stihl AMK 082 User manual

STIHL AMK 082
Gebrauchsanleitung
Instruction manual
Manuel d’utilisation
Gebruiksaanwijzing
Istruzioni per l'uso
Manual de instrucciones
Manual de utilização
Bruksanvisning
Bruksanvisning
Käyttöopas
Betjeningsvejledning
Instrukcja obsługi
Kullanım kılavuzu
Használati útmutató
Upute za uporabu
Návod k použití
Lietošanas pamācība
Naudojimo instrukcija
Instrucţiuni de utilizare
DE
EN
FR
NL
IT
ES
PT
NO
SV
FI
DA
PL
TR
HU
HR
CS
LV
LT
RO
Οδηγίες χρήσης
Инструкция по эксплуатации
Инструкция за експлоатация
Посібник зексплуатації
Kasutusjuhend
EL
RU
BG
UK
ET
AMK 082.2
A

0478 907 9925 A. I18. Eco. DS-2018-03 © 2018 STIHL Tirol GmbH

1
0478 907 9925 A
1
2

0478 907 9925 A
2
3
4

3
0478 907 9925 A
5
6
7

0478 907 9925 A
4

DEEN
5
FRNLITESPTNOSVFIDAPLTRHUHR
0478 907 9925 A - DE
AMK 082
Mit einem Mulch-Kit kann der
Aufsitzmäher zu einem Mulch-Mäher
umgebaut werden.
Dazu wird die Auswurföffnung des
Mähwerks mit einem Mulcheinsatz
verschlossen, die serienmäßig montierten
Mähmesser verbleiben am Gerät.
0.1Allgemein
Diese Gebrauchsanleitung ist eine
Originalbetriebsanleitung des
Herstellers im Sinne der EG-Richtlinie
2006/42/EC.
STIHL arbeitet ständig an der
Weiterentwicklung seiner Produktpalette;
Änderungen des Lieferumfanges in Form,
Technik und Ausstattung müssen wir uns
deshalb vorbehalten.
Aus den Angaben und Abbildungen dieses
Heftes können aus diesem Grund keine
Ansprüche abgeleitet werden.
In dieser Gebrauchsanleitung sind
eventuell Modelle beschrieben, welche
nicht in jedem Land verfügbar sind.
Diese Gebrauchsanleitung ist
urheberrechtlich geschützt. Alle Rechte
bleiben vorbehalten, besonders das Recht
der Vervielfältigung, Übersetzung und der
Verarbeitung mit elektronischen
Systemen.
Vor jedem Gebrauch durch Sichtkontrolle
den einwandfreien Zustand des
Mulcheinsatzes und des Mulchmessers
überprüfen.
Zusätzlich sind alle Sicherheitshinweise in
der Gebrauchsanleitung des Gerätes zu
beachten. Diese sind für den sicheren
Betrieb unbedingt einzuhalten.
Das Gerät nicht ohne montiertem
Auswurfkanal in Betrieb nehmen.
Der Mulcheinsatz darf nur zusammen mit
dem Mulchmesser eingesetzt werden.
Andere Kombinationen sind nicht zulässig.
Gedruckt auf chlorfrei gebleichtem Papier. Papier ist recycelbar. Schutzumschlag ist halogenfrei.
1. Inhaltsverzeichnis
Zu Ihrer Sicherheit 5
Lieferumfang 5
Montage 6
Mähwerk demontieren 6
Mähmesser demontieren 6
Mulchmesser montieren 6
Mähwerk montieren 6
Mulcheinsatz aufklappen 6
Mulcheinsatz montieren 6
Mulcheinsatz befestigen 7
Grasfangkorb einhängen 7
Demontage 7
Mulcheinsatz demontieren 7
Mähwerk demontieren 8
Mulchmesser demontieren 8
Mähmesser montieren 8
Anleitung für das Mulchen 8
Allgemeine Informationen zum
Mulchen 8
Wann darf gemulcht werden? 8
Wie oft sollte gemulcht werden? 8
Wie sollte gemulcht werden? 8
Wartung 9
Verschleißgrenzen am
Mulchmesser 9
Übliche Ersatzteile 9
2. Zu Ihrer Sicherheit
Lebensgefahr durch Erstickung!
Erstickungsgefahr für Kinder beim
Spielen mit Verpackungsmaterial.
Verpackungsmaterial unbedingt
von Kindern fernhalten.
3. Lieferumfang
Pos. Bezeichnung Stk.
AMulcheinsatz 1
BMulchmesser 1
CMesserschraube 1
DSicherscheibe 1
ESchraube 1
FRingmutter 1
Gebrauchsanleitung 1
1

0478 907 9925 A - DE
6
Mit der Montage des AMK 082
(Mulcheinsatz und Mulchmesser) wird das
Gerät für das Mulchen umgebaut.
4.1Mähwerk demontieren
Siehe Gebrauchsanleitung RT 4082.
4.2 Mähmesser demontieren
Siehe Gebrauchsanleitung RT 4082
(Kapitel "Mähmesser warten").
4.3 Mulchmesser montieren
●Mulchmesser (B) mit den
hochgebogenen Windflügeln zum
Mähwerk zeigend aufstecken und
halten.
Messerschraube (C) mit Sicherscheibe
(D) (Wölbung der Sicherscheibe
beachten) eindrehen und mit
65 -70 Nm festziehen.
4.4 Mähwerk montieren
Siehe Gebrauchsanleitung RT 4082.
4.5 Mulcheinsatz aufklappen
●Mulchkeil (1) nach vorne klappen, bis
dieser einrastet.
4.6 Mulcheinsatz montieren
●Grasfangkorb abnehmen (siehe
Gebrauchsanleitung RT 4082).
●Mulcheinsatz aufklappen. (Ö4.5)
●Mulcheinsatz (A) in der abgebildeten
Position (90° gegen den Uhrzeigersinn
gedreht) am
Auswurfkanal (1)ansetzen.
●Mulcheinsatz (A) in den Auswurfkanal
einführen, bis die Biegung (2) an der
Mulcheinsatzstange mit der Öffnung
des Auswurfkanals (1) bündig ist.
4. Montage
Mit montiertem Mulcheinsatz kann
das Mähwerk nicht demontiert
werden.
Vor der Demontage des Mähwerks
immer den Mulcheinsatz
entnehmen.
Verletzungsgefahr!
Mulchmesser vor dem Einbau auf
Beschädigungen (Kerben oder
Risse) und Verschleiß kontrollieren.
Verschlissene oder beschädigte
Mulchmesser müssen erneuert
werden.
Messerschraube und
Sicherscheibe bei jeder
Messermontage erneuern.
Messerschraube (C) und
Sicherscheibe (D) sind für die
Erstmontage des Mulchmessers im
Lieferumfang enthalten.
Messerschraube zusätzlich mit
Loctite 243 sichern.
Vorgeschriebenes Anziehmoment
der Messerschraube von
65 -70 Nm ist genau einzuhalten,
da die sichere Befestigung des
Schneidwerkzeuges davon
abhängt.
2
Vor der Montage des
Mulcheinsatzes (A) muss der
Mulchkeil (1) nach vorne geklappt
werden.
Verletzungsgefahr!
Mulcheinsatz nur bei montiertem
Mähwerk und Auswurfkanal
montieren!
Die Montage des Mulcheinsatzes
nur mit festen Handschuhen
durchführen.
Vor der Montage des
Mulcheinsatzes das Mähwerk
gründlich reinigen.
Zur Erleichterung der Montage vor
dem Einsetzen des Mulchkeils die
niederste Schnittstufe des
Mähwerks auswählen.
3
4

DEEN
7
FRNLITESPTNOSVFIDAPLTRHUHR
0478 907 9925 A - DE
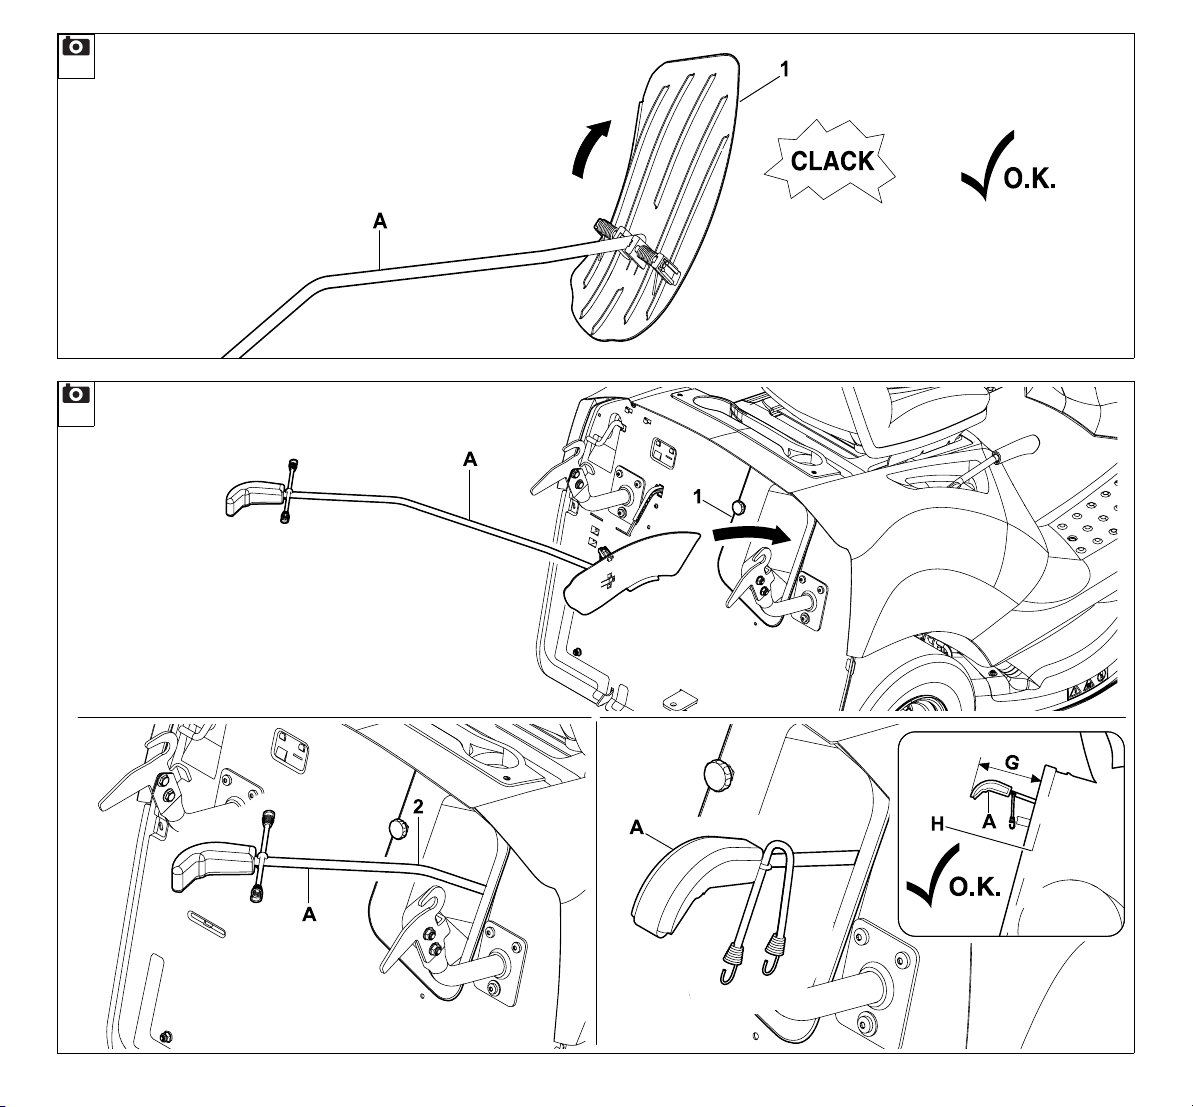
●Mulcheinsatz (A) zusätzlich um 90° im
Uhrzeigersinn drehen. Der
Mulcheinsatz (A) dreht sich in die
Endposition und kann so vollständig
eingeführt werden.
●Der Abstand Gzwischen der
schwarzen Rückwand (H) und dem
Griffende des Mulcheinsatzes (A)
beträgt bei einem vollständig
eingeschobenen Mulcheinsatz ca.
26 cm.
●Mulcheinsatz befestigen. (Ö4.7)
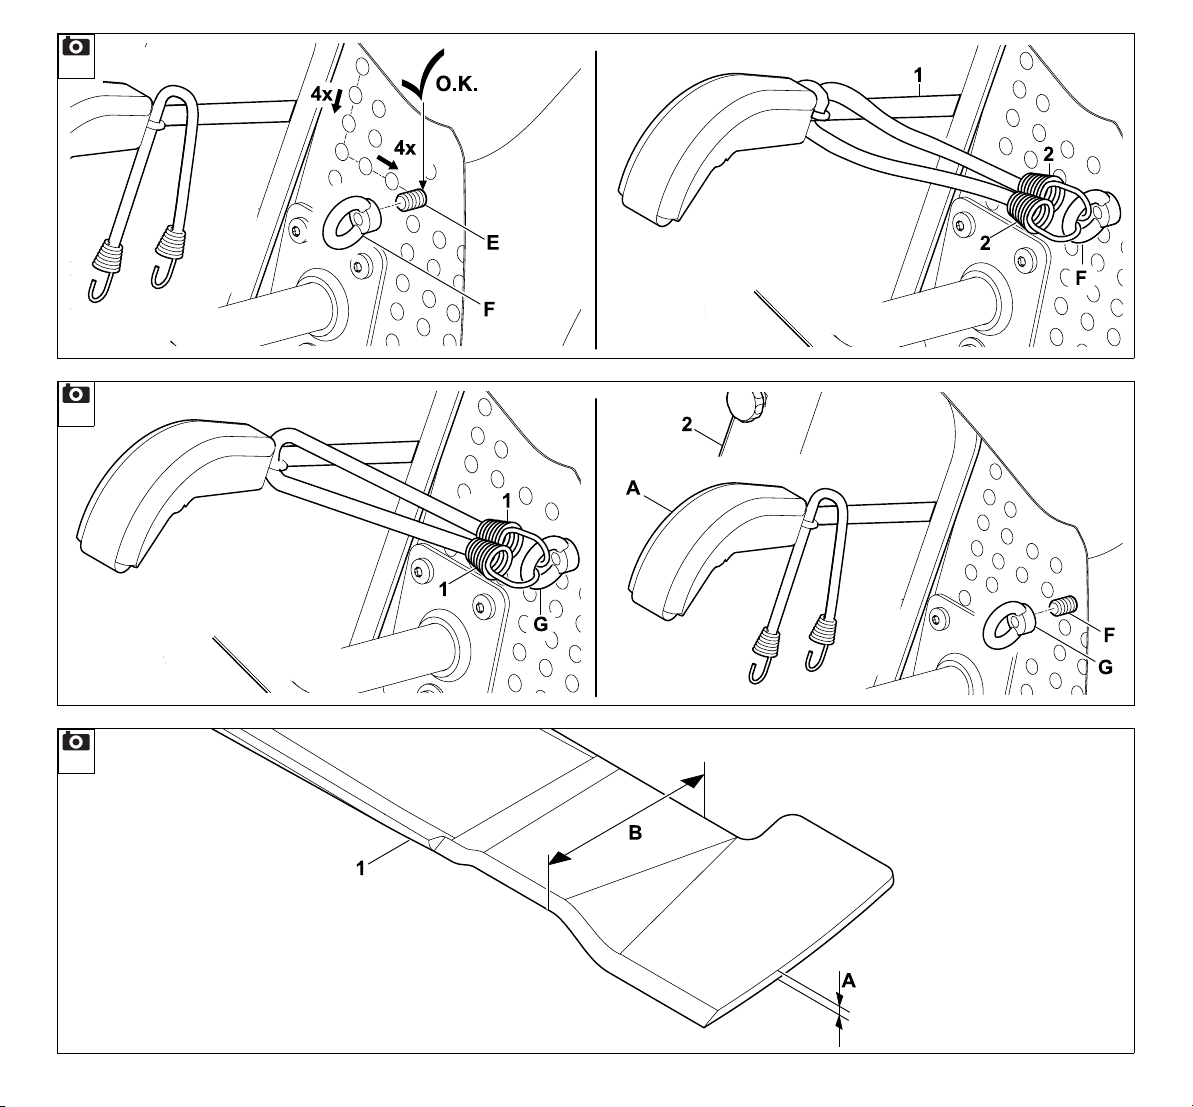
4.7 Mulcheinsatz befestigen
●Mulcheinsatz montieren. (Ö4.6)
●Schraube (E) von hinten durch die im
Hinweis beschriebene Bohrung
stecken.
●Ringmutter (F) auf die Schraube (E)
aufschrauben und festziehen.
●Beide Gummispanner einmal um die
Stange (1) wickeln. Anschließend
beide Haken (2) an der Ringmutter (F)
einhängen.
●Grasfangkorb einhängen. (Ö4.8)
4.8 Grasfangkorb einhängen
●Siehe Gebrauchsanleitung RT 4082.
Mit der Demontage des Mulcheinsatzes
wird das Gerät für das Grassammeln im
Grasfangkorb vorbereitet.
●Grasfangkorb aushängen (siehe
Gebrauchsanleitung RT 4082).
●Beide Haken an der Ringmutter
aushängen.
●Mulcheinsatz vorsichtig aus dem
Auswurfkanal herausziehen.
●Grasfangkorb einhängen. (Ö4.8)
5.1Mulcheinsatz demontieren
●Grasfangkorb aushängen (siehe
Gebrauchsanleitung RT 4082).
●Beide Haken (1) an der Ringmutter (G)
aushängen.
●Mulcheinsatz (A) vorsichtig aus dem
Auswurfkanal (2) herausziehen.
●Ringmutter (G) abschrauben und
zusammen mit der Schraube (F)
entnehmen.
●Mähwerk demontieren. (Ö4.1)
●Mulchmesser demontieren. (Ö5.3)
●Mähmesser montieren. (Ö5.4)
●Mähwerk montieren. (Ö4.4)
●Grasfangkorb einhängen. (Ö4.8)
Achtung!
Zusätzlich durch Sichtkontrolle
(Blick in den Auswurfkanal) prüfen,
ob die Auswurföffnung am
Mähwerk durch den Mulchkeil
vollständig verschlossen ist.
Nach der Montage des
Mulcheinsatzes kann das Mähwerk
nicht mehr demontiert werden. Vor
der Demontage des Mähwerks
immer den Mulcheinsatz
entnehmen.
Damit der Mulcheinsatz optimal
festgespannt wird, müssen die
Schraube (E) und die
Ringmutter (F) an folgender
Bohrung an der Rückwand montiert
werden:
4. Bohrung von oben
4. Bohrung von links
5
Nach dem Befestigen des
Mulchkeils den festen Sitz
überprüfen.
Verletzungsgefahr!
Der Grasfangkorb muss aufgrund
der am Gerät installierten
Sicherheitseinrichtungen auch bei
montiertem Mulcheinsatz am Gerät
montiert werden. Ohne montierten
Grasfangkorb kann das Gerät nicht
gestartet werden bzw. stirbt der
Motor ab.
5. Demontage
6

0478 907 9925 A - DE
8
5.2 Mähwerk demontieren
Siehe Gebrauchsanleitung RT 4082.
5.3 Mulchmesser demontieren
Siehe Gebrauchsanleitung RT 4082
(Kapitel "Mähmesser warten").
5.4 Mähmesser montieren
Siehe Gebrauchsanleitung RT 4082
(Kapitel "Mähmesser warten").
6.1Allgemeine Informationen zum
Mulchen
Beim Mulchen werden die Grashalme
nach dem Abschneiden im
Mähwerksgehäuse weiter zerkleinert und
anschließend in die Grasnarbe
zurückgeblasen, wo sie liegen bleiben und
verrotten.
Nutzen:
Fein zerkleinertes Schnittgut, das in der
Grasnarbe gut verrotten kann, gibt dem
Rasen organische Nährstoffe zurück und
dient dadurch als natürlicher Dünger.
Vorteil:
Mulchen ist eine zeitsparende (das
Ausleeren des Grasfangkorbes entfällt)
und eine bequeme Rasenpflege.
6.2 Wann darf gemulcht werden?
Es wird empfohlen, nur bei trockenem
Rasen und bei nicht zu hohem Grasstand
zu mulchen.
Ist der Grasstand zu hoch, sollte der
Rasen in zwei Arbeitsgängen mit
unterschiedlichen Schnitthöhen gemäht
werden.
6.3 Wie oft sollte gemulcht werden?
Einen schönen und dichten Rasen erhält
man durch häufiges Mulchen und
Kurzhalten des Rasens.
Hauptwachstumsperiode:
Frühling:
min. 2-mal pro Woche mulchen.
Sommer und Herbst:
min. 1-mal pro Woche mulchen.
6.4 Wie sollte gemulcht werden?
Für ein gutes Mulchergebnis sind folgende
Punkte zu beachten:
1. Scharfes Mulchmesser verwenden:
Beim Mulchen sollten nur ein scharfes
Mulchmesser verwendet werden.
2. Richtige Schnitthöhe wählen:
Die Schnitthöhe sollte so gewählt werden,
dass ein Drittel der Grashöhe
abgeschnitten wird und zwei Drittel stehen
bleiben.
Damit das Schnittgut sauber gehäckselt
und zerkleinert werden kann, wird
empfohlen, nicht mit einer kleineren
Schnittstufe als 3 zu mulchen.
3. Grasstand zu hoch:
Bei hohem Grasstand muss der Rasen in
zwei Arbeitsgängen bearbeitet werden.
Erster Arbeitsgang:
Der Rasen wird mit der Schnitthöhe 5 - 6
vorgeschnitten.
Zweiter Arbeitsgang:
12 bis 24 Stunden nach dem ersten
Arbeitsgang den Rasen im rechten Winkel
zur ersten Mährichtung auf die
gewünschte Grashöhe (siehe Punkt "2.
Richtige Schnitthöhe wählen") mulchen.
Mit montiertem Mulcheinsatz kann
das Mähwerk nicht demontiert
werden.
Vor der Demontage des Mähwerks
immer den Mulcheinsatz
entnehmen.
Die Demontage des Mulchmessers
ist identisch der Demontage des
Mähmessers.
6. Anleitung für das Mulchen
Niemals bei feuchtem oder nassem
Rasen mulchen, da das Mähwerk
verstopfen kann und dadurch das
Schnittgut nicht mehr fein
gehäckselt wird.
Das Schnittergebnis wird
unansehnlich.

DEEN
9
FRNLITESPTNOSVFIDAPLTRHUHR
0478 907 9925 A - DE
4. Richtige Fahrgeschwindigkeit
wählen:
Beim Mulchen immer eine kleine
Fahrgeschwindigkeit wählen. Dadurch
wird das Schnittgut ganz fein gehäckselt
und in die Grasnarbe zurückgeblasen.
5. Richtige Motordrehzahl wählen:
Beim Mulchen immer die maximale
Motordrehzahl einstellen.
7.1Verschleißgrenzen am
Mulchmesser
●Mulcheinsatz demontieren. (Ö5.1)
●Mähwerk demontieren (siehe
Gebrauchsanleitung RT 4082).
●Mähwerk und Mulchmesser sorgfältig
reinigen.
Messerstärke A:
Das Mulchmesser (1) muss an jeder Stelle
mindestens 2,5 mm dick sein.
Mit Hilfe eines Messschiebers das
Mulchmesser (1) an mehreren Stellen
überprüfen.
Ist an einer Stelle die Messerstärke von
2,5 mm nicht mehr gegeben, dann muss
das Mulchmesser ersetzt werden.
Messerbreite B:
Mit Hilfe eines Messschiebers den
Abstand (B) prüfen.
Der Abstand (B) muss aus
Sicherheitsgründen mindestens 65 mm
betragen.
Ist der Abstand nicht mehr gegeben, dann
muss das Mulchmesser ersetzt werden.
Mulchmesser:
6907 702 0131
Messerschraube:
9010 345 2431
Spannscheibe:
0000 702 6600
7. Wartung
STIHL empfiehlt das Mähwerk
auszubauen, wenn die
Verschleißgrenzen kontrolliert
werden.
Falls Ihnen eine geeignete
Hebebühne zur Verfügung steht,
können die Verschleißgrenzen am
Mulchmesser auch bei montiertem
Mähwerk geprüft werden.
7
8. Übliche Ersatzteile

0478 907 9925 A - DE
10

11
DEFRNLITESPTNOSVFIDAPLTRHUHR EN
0478 907 9925 A - EN
AMK 082
With a mulching kit, the ride-on mower can
be converted into a mulching mower.
For this purpose, the discharge opening of
the mowing deck is closed using a mulch
insert. The mowing blades installed as
standard remain on the machine.
0.1General
This instruction manual constitutes
original manufacturer’s instructions in
the sense of EC Directive 2006/42/EC.
STIHL is continually striving to further
develop its range of products; we therefore
reserve the right to make alterations to the
form, technical specifications and
equipment level of our standard
equipment.
For this reason, the information and
illustrations in this manual are subject to
alterations.
This instruction manual may describe
models that are not available in all
countries.
This instruction manual is protected by
copyright. All rights reserved, especially
the right of reproduction, translation and
processing using electronic systems.
Before each use, perform a visual check to
ensure that the mulch insert and mulching
blade are in good condition.
In addition, observe all safety instructions
in the instruction manual of the machine. It
imperative that these be observed to
ensure safe operation.
Do not operate the machine without the
discharge chute installed.
The mulch insert may only be used in
conjunction with the mulching blade. Other
combinations are not permitted.
Printed on chlorine-free bleached paper. Paper is recyclable. Cover is halogen free.
1. Table of contents
For your safety 11
Standard equipment 11
Assembly 12
Removing the mowing deck 12
Removing mowing blade 12
Installing the mulching blade 12
Installing the mowing deck 12
Folding the mulch insert upwards 12
Installing the mulch insert 12
Fastening mulch insert 13
Attaching the grass catcher box 13
Removing 13
Removing the mulch insert 13
Removing the mowing deck 13
Removing the mulching blade 14
Installing the mowing blade 14
Mulching instructions 14
General information on mulching 14
When is mulching permissible? 14
How often should mulching be
performed? 14
How should mulching be
performed? 14
Maintenance 15
Mulching blade wear limits 15
Standard spare parts 15
2. For your safety
Risk of death from suffocation!
Packaging material is not a toy -
danger of suffocation! Keep
packaging material away from
children.
3. Standard equipment
Item Designation Qty.
AMulch insert 1
BMulching blade 1
CBlade fastening screw 1
DRetaining washer 1
EScrew 1
FRing nut 1
Instruction manual 1
1

0478 907 9925 A - EN
12
The machine is converted for mulching by
installing AMK 082 (mulch insert and
mulching blade).
4.1Removing the mowing deck
See instruction manual RT 4082.
4.2 Removing mowing blade
See instruction manual RT 4082 (section
"Mowing blade maintenance").
4.3 Installing the mulching blade
●Fit and hold the mulching blade (B) with
the vanes pointing upwards towards the
mowing deck.
Screw in the blade fastening screw (C)
with retaining washer (D) (observe
convexity of retaining washer) and
tighten to a torque of 65 -70 Nm.
4.4 Installing the mowing deck
See instruction manual RT 4082.
4.5 Folding the mulch insert
upwards
●Fold the mulching key (1) forwards until
it latches into place.
4.6 Installing the mulch insert
●Remove the grass catcher box (see
instruction manual RT 4082).
●Fold the mulch insert upwards. (Ö4.5)
●Place the mulch insert (A) in the
position shown (turned 90° anti-
clockwise) on the discharge chute (1).
●Guide the mulch insert (A) into the
discharge chute until the bent
section (2) on the mulch insert rod is
flush with the opening of the discharge
chute (1).
●Turn the mulch insert (A) an additional
90° clockwise. The mulch insert (A)
rotates into the final position and can
then be fully inserted.
●The distance Gbetween the black rear
panel (H) and the end of the mulch
insert handle (A) is approx. 26 cm
when the mulch insert is fully inserted.
●Secure the mulch insert. (Ö4.7)
4. Assembly
The mowing deck cannot be
removed with the mulch insert
installed.
Always remove the mulch insert
before removing the mowing deck.
Risk of injury!
Before installing, check the
mulching blade for damage
(notches or cracks) and wear.
Worn or damaged mulching blades
must be replaced.
Renew the blade fastening screw
and retaining washer each time the
blade is installed. The blade
fastening screw (C) and retaining
washer (D) are included in the
standard equipment for initial
installation of the mulching blade.
Additionally secure the blade
fastening screw with Loctite 243.
Observe the specified tightening
torque of 65 -70 Nm when
tightening the blade fastening
screw, as the secure attachment of
the cutting tool depends on this.
The mulching key (1) must be
folded forwards before the mulch
insert (A) is installed.
2
3
Risk of injury!
Only install the mulch insert with the
mowing deck and discharge chute
installed.
Always wear thick gloves when
installing the mulch insert.
Clean the mowing deck thoroughly
before installing the mulch insert.
To facilitate assembly, set the
mowing deck to the lowest cutting
level before inserting the mulching
key.
4

13
DEFRNLITESPTNOSVFIDAPLTRHUHR EN
0478 907 9925 A - EN
4.7 Fastening mulch insert
●Install mulch insert. (Ö4.6)
●Insert screw (E) through the described
bore from behind.
●Screw the ring nut (F) onto the
screw (E) and tighten.
●Wind both rubber tensioners around
rod (1) once. Then attach both
hooks (2) to ring nut (F).
●Attach the grass catcher box. (Ö4.8)
4.8 Attaching the grass catcher box
●See instruction manual RT 4082.
The machine is prepared for collecting
grass in the grass catcher box by removing
the mulch insert.
●Remove the grass catcher box (see
instruction manual RT 4082).
●Detach both hooks at the ring nut.
●Pull the mulch insert carefully out of the
discharge chute.
●Attach the grass catcher box. (Ö4.8)
5.1Removing the mulch insert
●Remove the grass catcher box
(see instruction manual
RT 4082).
●Detach both hooks (1) at the ring
nut (G).
●Pull the mulch insert (A) carefully out of
the discharge chute (2).
●Unscrew the ring nut (G) and remove
together with the screw (F).
●Remove the mowing deck. (Ö4.1)
●Remove the mulching blade. (Ö5.3)
●Install the mowing blade. (Ö5.4)
●Install the mowing deck. (Ö4.4)
●Attach the grass catcher box. (Ö4.8)
5.2 Removing the mowing deck
Caution!
Also check visually (by looking into
the discharge chute) whether the
discharge opening on the mowing
deck is completely closed by the
mulching key.
The mowing deck can no longer be
removed once the mulch insert is
installed. Always remove the mulch
insert before removing the mowing
deck.
To ensure that the mulch insert is
fastened securely, the screw (E)
and the ring nut (F) must be
installed in the following bores on
the rear panel:
4th bore from the top
4th bore from the left
After tightening the mulching key,
check that it is securely seated.
5
Risk of injury!
Owing to the safety devices
installed on the machine, the grass
catcher box must be fitted even
when the mulch insert is installed.
The machine cannot be started, or
the engine cuts out if the grass
catcher box is not fitted.
5. Removing
The mowing deck cannot be
removed with the mulch insert
installed.
Always remove the mulch insert
before removing the mowing deck.
6

0478 907 9925 A - EN
14
See instruction manual RT 4082.
5.3 Removing the mulching blade
See instruction manual RT 4082 (section
"Mowing blade maintenance").
5.4 Installing the mowing blade
See instruction manual RT 4082 (section
"Mowing blade maintenance").
6.1General information on mulching
When mulching, the grass clippings are
further shredded in the mowing deck
housing before being blown back into the
lawn, where they decompose.
Benefits:
Finely shredded cuttings decompose
readily in the turf and return organic
nutrients to the lawn, serving as a natural
fertiliser.
Advantage:
Mulching is a time-saving (no emptying of
the grass catcher box) and convenient
lawn care method.
6.2 When is mulching permissible?
It is recommendable only to carry out
mulching when the lawn is dry and the
grass is not too high.
If the grass is too high, the lawn should be
mowed in two stages at different cutting
heights.
6.3 How often should mulching be
performed?
To ensure a perfect, thick lawn, mulch
regularly and keep the grass short.
Main growth period:
Spring:
mulch at least twice per week.
Summer and autumn:
mulch at least once per week.
6.4 How should mulching be
performed?
The following points must be observed to
achieve good mulching results:
1. Use well sharpened mulching blades:
Only a sharp mulching blade should be
used when mulching.
2. Select the correct cutting height:
The cutting height should be selected so
that one third of the grass height is
removed and two thirds are left standing.
To ensure that the clippings are cleanly
shredded, it is recommended that cutting
levels below 3 should not be used when
mulching.
3. Grass too high:
In high grass, the lawn must be mowed in
two stages.
First stage:
The lawn is mowed at a cutting height
of 5 - 6.
Second stage:
12 to 24 hours following the first stage,
mulch the lawn to the desired grass height
at right angles to the first mulching
direction (see point "2. Selecting correct
cutting height").
4. Select the correct driving speed:
A low driving speed must always be
selected during mulching. This ensures
that the grass cuttings are shredded very
finely and blown back into the lawn.
Removal of the mulching blade is
identical to removal of the mowing
blade.
6. Mulching instructions
Never mulch a damp or wet lawn,
as the mowing deck can become
blocked and the grass clippings are
no longer finely shredded.
An inferior cutting performance
results.

15
DEFRNLITESPTNOSVFIDAPLTRHUHR EN
0478 907 9925 A - EN
5. Select the correct engine speed:
Always select the maximum engine speed
when mulching.
7.1Mulching blade wear limits
●Remove the mulch insert. (Ö5.1)
●Remove the mowing deck (see
instruction manual RT 4082).
●Carefully clean the mulching blade and
mowing deck.
Blade thickness A:
The mulching blade (1) must be at least
2.5 mm thick at all points.
Check the thickness of the mulching
blade (1) at several points using a slide
calliper.
If the blade thickness is less than 2.5 mm
at any point, the mulching blade must be
replaced.
Blade width B:
Measure the distance (B) using a slide
calliper.
For safety reasons, distance (B) must be
at least 65 mm.
If this distance is no longer given, the
mulching blade must be replaced.
Mulching blade:
6907 702 0131
Blade fastening screw:
9010 345 2431
Spring washer:
0000 702 6600
7. Maintenance
STIHL recommends removing the
mowing deck if the wear limits need
to be checked.
If a suitable lifting platform is
available, the mulching blade wear
limits can also be checked with the
mowing deck installed.
8. Standard spare parts
7

0478 907 9925 A - EN
16

17
DEENNLITESPTNOSVFIDAPLTRHUHR FR
0478 907 9925 A - FR
AMK 082
Un kit mulching permet de transformer le
tracteur de pelouse en une tondeuse
mulching.
Pour ce faire, l'ouverture du canal
d'éjection du plateau de coupe est fermée
avec un obturateur mulching, les lames de
coupe montées en série restent sur
l'appareil.
0.1Généralités
Le présent manuel d’utilisation est une
notice originale du fabricant
conformément à la directive de l’Union
Européenne 2006/42/EC.
La philosophie de STIHL consiste à
poursuivre le développement de tous ses
produits. Ceux-ci sont donc susceptibles
de faire l’objet de modifications et de
perfectionnements techniques.
Les représentations graphiques, les
photos ou les données techniques du
présent document peuvent être modifiées.
C’est pourquoi elles n’ont aucun caractère
contractuel.
Ce manuel d’utilisation décrit
éventuellement des modèles qui ne sont
pas disponibles dans tous les pays.
Le présent manuel d’utilisation est protégé
par la loi sur les droits d’auteur. Tous droits
réservés, notamment le droit de
reproduction, de traduction et de
traitement à l’aide de systèmes
électroniques.
Contrôler l’état de fonctionnement de
l’obturateur mulching et de la lame
mulching avant chaque utilisation.
De plus, respecter impérativement toutes
les consignes de sécurité figurant dans le
manuel d'utilisation de l'appareil. Il est
impératif de les observer pour garantir un
fonctionnement en toute sécurité.
Ne pas mettre l’appareil en marche si le
canal d’éjection n'est pas monté.
L’obturateur mulching doit exclusivement
être utilisé avec la lame mulching. Toute
autre utilisation est interdite.
Imprimé sur du papier non blanchi au chlore. Le papier est recyclable. L’enveloppe de protection ne contient pas
d’halogène.
1. Sommaire
Consignes de sécurité 17
Contenu de l’emballage 17
Montage 18
Démontage du plateau de coupe 18
Démontage de la lame de coupe 18
Montage de la lame mulching 18
Montage du plateau de coupe 18
Dépliage de l’obturateur mulching 18
Montage de l'obturateur mulching 18
Fixation de l'obturateur mulching 19
Accrochage du bac de ramassage 19
Démontage 19
Démontage de l'obturateur
mulching 19
Démontage du plateau de coupe 20
Démontage de la lame mulching 20
Montage de la lame de coupe 20
Instructions pour le mulching 20
Informations générales sur le
mulching 20
Quand le mulching est-il possible ? 20
À quelle fréquence procéder au
mulching ? 20
Comment doit-on procéder pour le
mulching ? 20
Entretien 21
Limites d'usure de la lame
mulching 21
Pièces de rechange courantes 21
2. Consignes de sécurité
Danger de mort par étouffement !
Risque d'étouffement pour les
enfants en jouant avec les
emballages. Tenir impérativement
les emballages hors de portée des
enfants.
3. Contenu de l’emballage
Rep. Désignation Qté
AObturateur mulching 1
BLame mulching 1
CVis de fixation de la lame 1
DRondelle d’arrêt 1
EVis 1
FÉcrou à anneau 1
Manuel d’utilisation 1
1

0478 907 9925 A - FR
18
Le montage du kit AMK 082 (obturateur
mulching et lame mulching) permet de
transformer l'appareil en tondeuse
mulching.
4.1Démontage du plateau de coupe
Voir le manuel d'utilisation RT 4082.
4.2 Démontage de la lame de coupe
Voir le manuel d'utilisation RT 4082
(chapitre « Entretien de la lame de
coupe »).
4.3 Montage de la lame mulching
●Monter et tenir la lame mulching (B)
avec les ailettes relevées orientées
vers le haut en direction du plateau de
coupe.
Visser la vis de fixation de la lame (C)
avec la rondelle d’arrêt (D) (faire
attention au côté bombé de la rondelle
d’arrêt) et les serrer à un couple de
65 -70 Nm.
4.4 Montage du plateau de coupe
Voir le manuel d'utilisation RT 4082.
4.5 Dépliage de l’obturateur
mulching
●Rabattre la clavette mulching (1) vers
l’avant jusqu’à ce qu’elle s’enclenche.
4.6 Montage de l'obturateur
mulching
●Déposer le bac de ramassage (voir le
manuel d'utilisation RT 4082).
●Ouvrir l'obturateur mulching. (Ö4.5)
●Placer l'obturateur mulching (A) sur le
canal d'éjection (1), dans la position
indiquée sur la figure (pivoté à 90° dans
le sens inverse des aiguilles d'une
montre).
4. Montage
Le plateau de coupe ne peut pas
être démonté si l'obturateur
mulching est en place.
Avant de démonter le plateau de
coupe, retirer systématiquement
l'obturateur mulching.
Risque de blessures !
Avant le montage, vérifier que la
lame mulching ne présente aucun
dommage (fissures ou entailles) et
contrôler son usure.
Les lames mulching endommagées
ou usées doivent être remplacées.
Remplacer la vis de fixation de la
lame et la rondelle d’arrêt à chaque
montage de la lame. La vis de
fixation de la lame (C) et la rondelle
d’arrêt (D) sont fournies pour le
montage initial de la lame mulching.
Fixer de plus la vis de fixation de la
lame avec du Loctite 243.
Respecter impérativement le
couple de serrage prescrit
65 -70 Nm de la vis de fixation de
la lame car il est d’une importance
primordiale pour une fixation
correcte de l’outil de coupe.
2
Avant de monter l’obturateur
mulching (A), la clavette
mulching (1) doit être rabattue vers
l’avant.
Risque de blessures !
Ne monter l'obturateur mulching
que si le plateau de coupe et le
canal d'éjection sont en place !
Porter impérativement des gants
robustes pour le montage de
l'obturateur mulching.
Avant de monter l'obturateur
mulching, nettoyer soigneusement
le plateau de coupe.
Avant de poser l'obturateur
mulching, sélectionner la hauteur
de coupe la plus basse du plateau
de coupe afin de faciliter le
montage.
3
4
Table of contents
Languages:
Other Stihl Lawn Mower Accessories manuals

Stihl
Stihl AMK 039 User manual

Stihl
Stihl AMK 065.0 User manual

Stihl
Stihl AMK 056 User manual

Stihl
Stihl AMK 443.0 User manual

Stihl
Stihl AMK 065 User manual

Stihl
Stihl MF-MM User manual

Stihl
Stihl FS 230 User manual

Stihl
Stihl AMK 043.1 User manual

Stihl
Stihl FixCut 25-2 User manual

Stihl
Stihl AMK 043 User manual