Toro 31212 User manual

FormNo.3405-720RevA
60inand72inBlowerKit
Groundsmaster®360and7200SeriesTripleBaggerHopper
ModelNo.31212—SerialNo.316000001andUp
ModelNo.31213—SerialNo.316000001andUp
InstallationInstructions
WARNING
CALIFORNIA
Proposition65Warning
ThisproductcontainsachemicalorchemicalsknowntotheStateofCaliforniato
causecancer,birthdefects,orreproductiveharm.
Note:Determinetheleftandrightsidesofthemachinefromthenormaloperatingposition.
LooseParts
Usethechartbelowtoverifythatallpartshavebeenshipped.
ProcedureDescriptionQty.Use
1Nopartsrequired–Preparethemachine.
2Doublepulleyassembly1Installthepulleyassembly.
3Nopartsrequired–Removetheexistinganti-scalproller
andbracket(for60-inchdecksonly).
Blowerhinge1
Metaltemplate1
Bolt(3/8x1inch)3or4
4Locknut(3/8inch)3or4
Installtheblowerhinge.
Blowerbelt1
5Spring1
Routetheblowerbeltintotheblower
assembly.
6Blowerassembly1Installtheblowerassembly.
Beltcover1
Bolt(1/2x2-1/2inches)1
7Nut(1/2inch)1
Installthebeltcoverandbolt.
Frontguard1
Backguard1
Bolt(1/4x5/8inch)6
8Nut(1/4inch)1
Installtheblowerguards.
Latchbracketassembly1
Bolt(3/8x2-1/2inches)2
Nut(3/8inch)2
Latchbracketstrap1
Screw(#10x1/2inch)2
9
Nut(#10)2
Installthetubelatch.
©2016—TheToro®Company
8111LyndaleAvenueSouth
Bloomington,MN55420
Registeratwww.T oro.com.OriginalInstructions(EN)
PrintedintheUSA
AllRightsReserved*3405-720*A

ProcedureDescriptionQty.Use
Beltcoverbracket1
Carriagebolt(1/4x3/4inch)2
10Locknut(1/4inch)2
Installthenewbeltcoverbracketupon
removalofthekit(formodel31212
only).
11Throttlestop1Installthethrottlestop.
1
PreparingtheMachine
NoPartsRequired
Procedure
Performthefollowingproceduretopreparethemowerfor
attachingtheblowerandnishingkit.
1.Parkthemachineonalevelsurface,disengagethePTO,
movethemotion-controlleverstotheNEUTRAL-LOCK
position,andsettheparkingbrake.
2.TurnthekeyintheignitionswitchtotheOFFposition,
removethekey,andwaitforallmovingpartstostop
beforeleavingtheoperatingposition.
3.Repairallbentordamagedareasonthemowerdeck
andreplaceanymissingparts.
4.Cleananydebrisoffthedeckorrearpartofthemower
toeaseinstallation.
2
InstallingthePulleyAssembly
Partsneededforthisprocedure:
1Doublepulleyassembly
Procedure
1.Lowerthemowerdecktothelowestheight-of-cut
position.
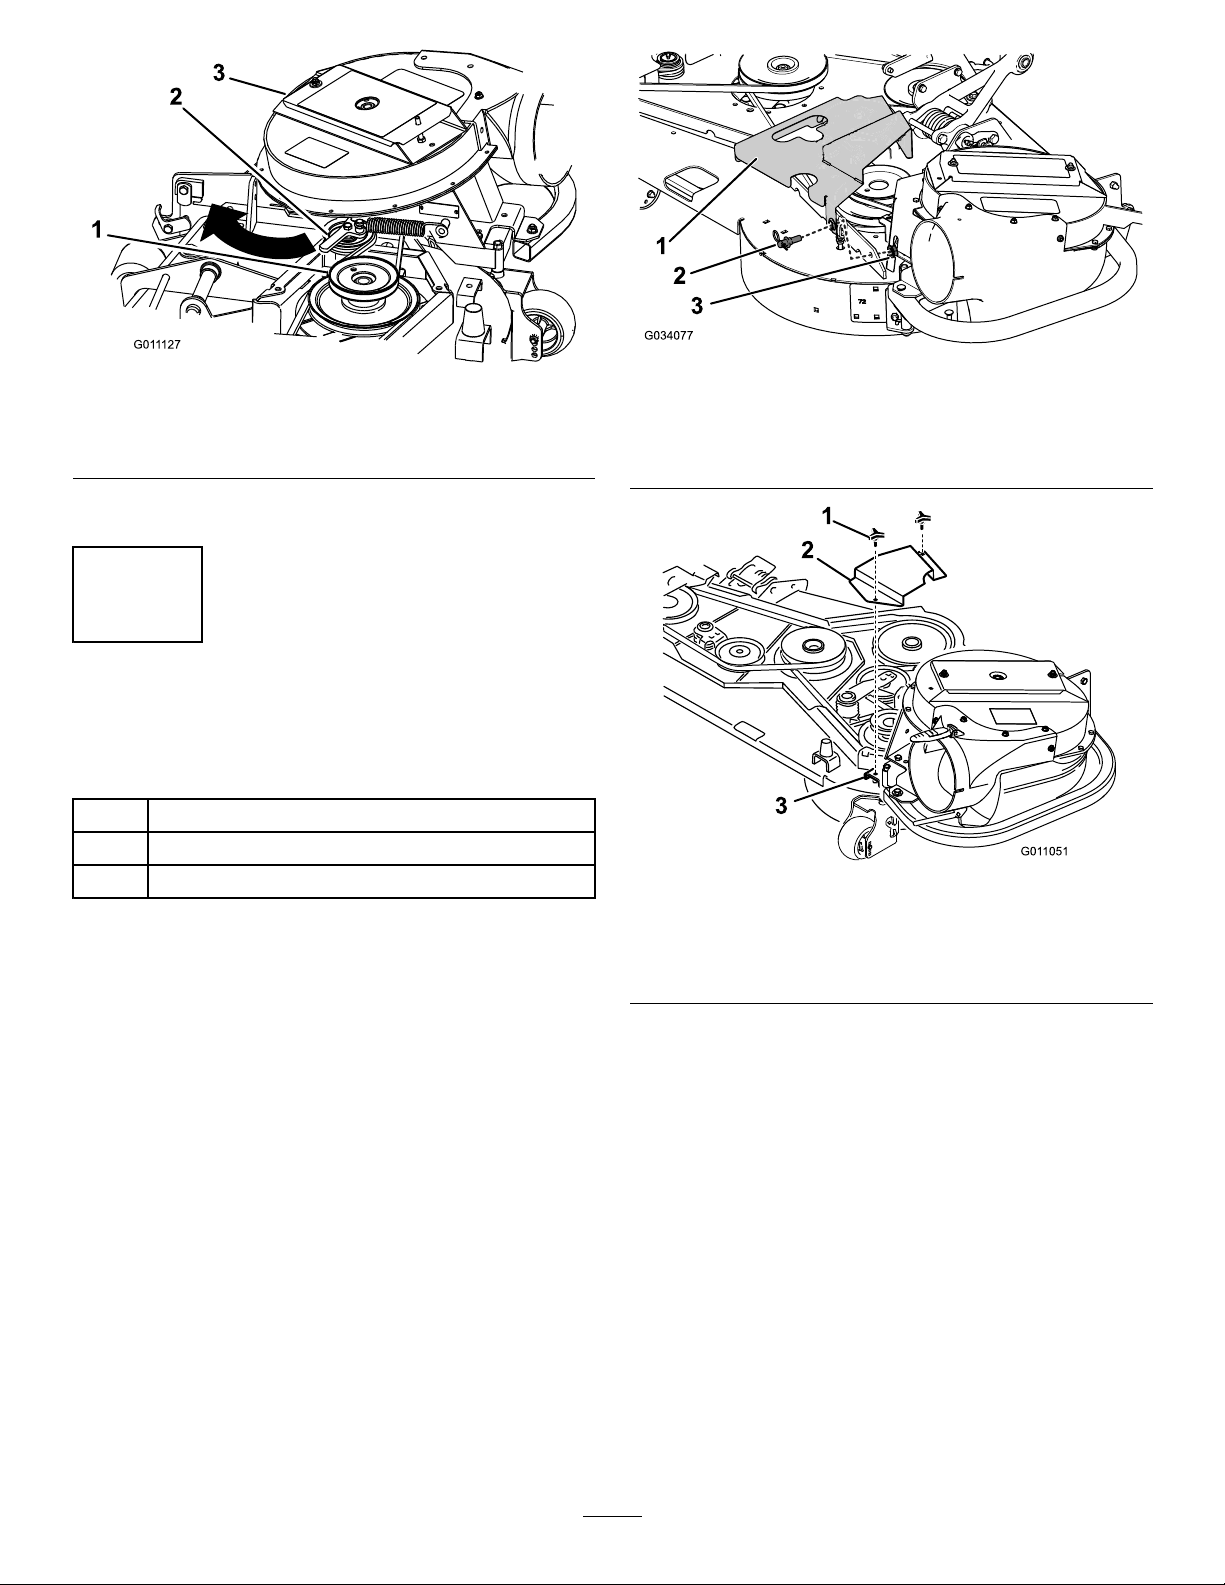
2.Removetherightbeltcover(Figure1).
Figure1
1.Knob2.Rightbeltcover
3.Removethemower-deckbeltfromtherightpulley.
Note:Retaintherightbeltcover,knob,andbeltfor
lateruseifyouremovethebaggerblowerandpulley.
4.Placeablockundertherightbladespindle,located
underthemowerdeck,beforeremovingtheright
mowerdeckpulley(Figure2).
Note:Thispreventsthespindlecomponentsfrom
droppingdownwhenyouremovethepulleynut.
5.Removetheexistingpulleynut,washer,andpulley
(Figure2).Savethesecomponentsforlateruse.
6.Installthenewdoublepulleyontothespindleand
secureitwiththepreviouslyremovedwasherand
pulleynut(Figure2).Torquethenutto176to203
N∙m(130to150ft-lb).
2

7.Afterthenewpulleyassemblyisinposition,installthe
mowerdeckbeltontothelowerpulley.
Figure2
1.Pulleynut3.Doublepulleyassembly
2.Washer4.Mowerdeck
3
RemovingtheExisting
Anti-ScalpRollerandBracket
(For60-inchDecksOnly)
NoPartsRequired
Procedure
1.Cleantheareaaroundtheright,rearanti-scalpwheel.
2.Removetheanti-scalprollerfromthebracketby
looseningandremovingtheangenut(3/8inch)and
axlebolt(3/8x4-1/2inch)asshowninFigure3.
3.Removethe3carriagebolts(3/8x3/4inch)andange
nuts(3/8inch)securingthebrackettothemower
(Figure3).
Note:Saveallhardwareforlateruse.
Figure3
1.Anti-scalproller4.Carriagebolt(3/8x3/4
inch)
2.Anti-scalpbracket5.Flangenut(3/8inch)
3.Bolt(3/8x4-1/2inch)6.Mowerdeck
3

4
InstallingtheBlowerHinge
Partsneededforthisprocedure:
1Blowerhinge
1Metaltemplate
3or4Bolt(3/8x1inch)
3or4Locknut(3/8inch)
Procedure
Model31212
1.Installthemetaltemplatetothemowerdeckwiththe
previouslyremovedcarriageboltsandnutsusingthe
existingholesinthemowerdeck(Figure4).
Note:Makesurethatthecarriageboltsandnutsare
tightandthatthetemplateistightagainstthemower
deck.
2.Centerpunchthenewmowerdeckholelocationsusing
the4holesinthetemplate(Figure4).
3.Removethemetaltemplateanddrill4pilotholes(1/8
inch)withasharpdrillbit(Figure4).
4.Drill4holes(13/32inch)intothepilotholeswitha
sharpdrillbit(Figure4).
Figure4
1.Mowerdeck4.Templatelocationon
mowerdeck
2.Drillthe4holes(13/32
inch)here.
5.Nuts
3.Templatewiththenumber
72init
6.Carriagebolt
5.Installthenewblowerhingewith4bolts(3/8x1
inch)and4locknuts(3/8inch)usingthedrilledholes
(Figure5).
Figure5
1.Mowerdeck4.Blowerhinge
2.Bolt(3/8x1inch)5.Drilledholes
3.Locknut(3/8inch)
Model31213
1.Installthemetaltemplatetothemowerdeckwiththe
previouslyremovedcarriageboltsandnutsusingthe
existingholesinthemowerdeck(Figure6).
Note:Makesurethatthecarriageboltsandnutsare
tightandthatthetemplateistightagainstthemower
deck.
4

2.Centerpunchthenewmowerdeckholelocationsusing
the3holesinthetemplate(Figure6).
3.Removethemetaltemplateanddrill3pilotholes(1/8
inch)withasharpdrillbit(Figure6).
4.Drill3holes(13/32inch)holesintothepilotholes
withasharpdrillbit(Figure6).
Figure6
1.Mowerdeck4.Templatelocationon
mowerdeck
2.Drill3pilotholes(1/8inch)
here.
5.Nut
3.Templatewiththenumber
60init
6.Carriagebolt
5.Installthenewblowerhingewith3bolts(3/8x1
inch)and3locknuts(3/8inch)usingthedrilledholes
(Figure7).
6.Installtheanti-scalprollertotheblowerhingewith
thepreviouslyremovedaxlebolt(3/8x4-1/2inches),
spacer,bushing,andangenut(3/8inch);referto
Figure7.
Figure7
1.Mowerdeck4.Bolt(3/8x4-1/2
inch)
7.Bushing
2.Bolt(3/8x1
inch)
5.Spacer8.Blowerhinge
assembly
3.Locknut(3/8
inch)
6.Anti-scalproller9.Drilledholes
5

5
RoutingtheBlowerBeltinto
theBlowerAssembly
Partsneededforthisprocedure:
1Blowerbelt
1Spring
Procedure
1.Ifpresent,cuttheexistingbeltcoverbracketsothatit
isushwiththeedgeofthetopdeckassembly;refer
toFigure8.
Note:Removeanysharpedges.
Note:Uponremovalofthiskit,installthenewcover
bracket;referto10InstallingtheNewBeltCover
BracketUponRemovaloftheKit(page11).
Figure8
1.Existingbracket2.Edgeoftopdeckassembly
(cutexistingbracketush
withthis)
2.Installthebeltaroundtheblowerpulley(Figure9).
3.Installthespringtotheidlerarmandthepegonthe
blowerassembly(Figure9).
Figure9
1.Idlerpulley4.Peg
2.Mowerdeckpulley5.Belt
3.Spring6.Blowerpulley
6
InstallingtheBlowerAssembly
Partsneededforthisprocedure:
1Blowerassembly
Procedure
WARNING
Anuncovereddischargeopeningcouldallowthe
mowertothrowobjectstowardyouorbystanders,
resultinginseriousinjury.Also,contactwiththe
bladecouldoccur.
•Neveroperatethelawnmowerunlessyouinstall
acoverplate,amulchplate,oragrasschuteand
catcher.
•Makesurethatthegrassdeectorisinstalled
whenyouremovethegrasschuteandcatcher.
1.Removethesidedischargechutefromthemowerdeck
(Figure10).
6

Figure10
1.Bolt5.Springinstalled
2.Spacer6.Grassdeector
3.Locknut7.L-endofspring;place
itbehindthedeckedge
beforeinstallingthebolt.
4.Spring8.J-hookendofspring
2.Slidetheblowerassemblypegintothepivothole
(Figure11).
Figure11
Model31213shown
1.Blowerassembly3.Pivothole
2.Mowerdeck4.Blowerassemblypeg
3.Closetheblowerassemblytoseeifthelatchesare
adjustedcorrectly.Loosenortightentheboltsothat
thelatchesrmlyholdtheblowerassemblyagainstthe
mowerdeckbutcanbereleasedbyhand(Figure12).
Figure12
Model31213shown
1.Latch3.Blowerassembly
2.Bolt
4.InstallthespringasshowninFigure13.
Note:Makesurethatthehooksareinthecorrect
position.
Figure13
1.Spring-loadedidlerpulley3.Longhookend
2.Shorthookend
5.Pullthespring-loadedidlerpulleybackandroutethe
beltaroundthemowerdeckpulley.Ensurethatthe
beltisroutedaroundtheblowerpulleyscorrectly
(Figure14).
7

Figure14
1.Mowerdeckpulley3.Blower
2.Spring-loadedIdlerpulley
6.Tightenthelatchbolts.
7
InstallingtheBeltCoverand
Bolt
Partsneededforthisprocedure:
1Beltcover
1Bolt(1/2x2-1/2inches)
1Nut(1/2inch)
Procedure
1.Lowerthemowerdecktothelowestheight-of-cut
position.
2.Installthenewbeltcoversothenotchesonbothsides
gooverthebeltcoversupports(Figure15andFigure
16).
Figure15
Model31212
1.Beltcover3.Nut
2.Hairpinassembly
Figure16
Model31213
1.Knob3.Mowerdeck
2.Beltcover
3.Lowerthemowerdeckandinstallabolt(1/2x2-1/2
inches)andnut(1/2inch)intothe152mm(6inch)
height-of-cuthole(Figure17).
Note:Thispreventsdamagetothedoublepulley
whenraisingthemowerdeckup.
8

Figure17
1.152mm(6inch)
height-of-cuthole
3.Bolt(1/2x2-1/2inches)
2.Nut(1/2inch)
8
InstallingtheBlowerGuards
Partsneededforthisprocedure:
1Frontguard
1Backguard
6Bolt(1/4x5/8inch)
1Nut(1/4inch)
Procedure
1.Installthefrontguardusing3boltsandanut(1/4
inch);referFigure18.
2.Installthebackguardusing3bolts(Figure18).
Figure18
1.Nut(1/4inch)3.Bolt(1/4x5/8inch)
2.Frontguard4.Backguard
9

9
InstallingtheTubeLatch
Partsneededforthisprocedure:
1Latchbracketassembly
2Bolt(3/8x2-1/2inches)
2Nut(3/8inch)
1Latchbracketstrap
2Screw(#10x1/2inch)
2Nut(#10)
Procedure
1.Installthelatchbracketassemblyontotheblowerwith
2boltsand2nuts(Figure19).
Figure19
1.Bolt(3/8x2–1/2inches)3.Nut(3/8inch)
2.Latchbracketassembly
2.Attachthelatch-bracketstraptothebracketassembly
with2screws(#10x1/2inch)and2nuts(#10);refer
toFigure20.
Figure20
1.Screw(#10x1/2inch)3.Nut(#10)
2.Latch-bracketstrap
10

10
InstallingtheNewBeltCover
BracketUponRemovalofthe
Kit
(ForModel31212Only)
Partsneededforthisprocedure:
1Beltcoverbracket
2Carriagebolt(1/4x3/4inch)
2Locknut(1/4inch)
Procedure
1.Drill2holes(0.266inchordrillsizeH)intothetop
deckassemblywithasharpdrillbit;refertoFigure21
forthecorrectpositioning.
Figure21
1.9.5cm(3.75inches)3.1.9cm(0.75inch)
2.4.5cm(1.75inches)
2.Installthenewbeltcoverbracketwith2carriagebolts
(1/4x3/4inch)and2locknuts(1/4inch)asshown
inFigure22.
Figure22
1.Locknut(1/4inch)3.Newbeltcoverbracket
2.Drilledhole4.Carriagebolt(1/4x3/4
inch)
11
InstallingtheThrottleStop
ForCECompliantGM7200orGM7210
InternationalMachineswithKubota
Engines
Partsneededforthisprocedure:
1Throttlestop
Procedure
Note:ThisprocedureisonlyforCEcompliantGM7200or
GM7210internationalmachineswithaKubota®engine.
1.Removethenutandwashersecuringthespeedcontrol
levertothegovernorshaft(Figure23).
Figure23
1.Throttlestop3.Speed-controllever
2.Nutandwasher
2.Insertthethrottlestopontothegovernorshaftsothe
tabrestsagainsttheatonthespeed-controllever
(Figure23).
3.Installthewasherandnutontotheshaftandtorqueto
9.7to12.0N∙m(86to106ft-lb).
11

Notes:
12

Notes:
13

Notes:
14

InternationalDistributorList
Distributor:Country:PhoneNumber:Distributor:Country:PhoneNumber:
AgrolancKftHungary3627539640MaquiverS.A.Colombia5712364079
AsianAmericanIndustrial(AAI)HongKong85224977804MaruyamaMfg.Co.Inc.Japan81332522285
B-RayCorporationKorea82325512076Mountelda.s.CzechRepublic420255704220
BrisaGoodsLLCMexico12104952417Mountelda.s.Slovakia420255704220
CascoSalesCompanyPuertoRico7877888383MunditolS.A.Argentina541148219999
CeresS.A.CostaRica5062391138NormaGardenRussia74954116120
CSSCTurfEquipment(pvt)Ltd.SriLanka94112746100OslingerTurfEquipmentSAEcuador59342396970
CyrilJohnston&Co.NorthernIreland442890813121OyHakoGroundandGardenAbFinland35898700733
CyrilJohnston&Co.RepublicofIreland442890813121ParklandProductsLtd.NewZealand6433493760
FatDragonChina8861080841322PerfettoPoland48618208416
FemcoS.A.Guatemala5024423277PratoverdeSRL.Italy390499128128
FIVEMANSNew-T echCo.,LtdChina86-10-63816136Prochaska&CieAustria4312785100
ForGarderOUEstonia3723846060RTCohen2004Ltd.Israel97298617979
G.Y .K.CompanyLtd.Japan81726325861RiversaSpain34952837500
GeomechanikiofAthensGreece30109350054LelyTurfcareDenmark4566109200
GolfinternationalTurizmTurkey902163365993Lely(U.K.)LimitedUnitedKingdom441480226800
HakoGroundandGardenSweden4635100000SolvertS.A.S.France33130817700
HakoGroundandGardenNorway4722907760SpyprosStavrinidesLimitedCyprus35722434131
HayterLimited(U.K.)UnitedKingdom441279723444SurgeSystemsIndiaLimitedIndia911292299901
HydroturfInt.CoDubaiUnitedArabEmirates97143479479T-MarktLogisticsLtd.Hungary3626525500
HydroturfEgyptLLCEgypt2025194308ToroAustraliaAustralia61395807355
IrrimacPortugal351212388260ToroEuropeNVBelgium3214562960
IrrigationProductsInt'lPvtLtd.India00914424494387ValtechMorocco212537663636
JeanHeybroekb.v.Netherlands31306394611VictusEmakPoland48618238369
EuropeanPrivacyNotice
TheInformationToroCollects
ToroWarrantyCompany(T oro)respectsyourprivacy.Inordertoprocessyourwarrantyclaimandcontactyouintheeventofaproductrecall,weaskyou
tosharecertainpersonalinformationwithus,eitherdirectlyorthroughyourlocalTorocompanyordealer.
TheTorowarrantysystemishostedonserverslocatedwithintheUnitedStateswhereprivacylawmaynotprovidethesameprotectionasapplies
inyourcountry.
BYSHARINGYOURPERSONALINFORMATIONWITHUS,YOUARECONSENTINGTOTHEPROCESSINGOFYOURPERSONALINFORMATION
ASDESCRIBEDINTHISPRIVACYNOTICE.
TheWayT oroUsesInformation
Toromayuseyourpersonalinformationtoprocesswarrantyclaims,tocontactyouintheeventofaproductrecallandforanyotherpurposewhichwetell
youabout.T oromayshareyourinformationwithToro'safliates,dealersorotherbusinesspartnersinconnectionwithanyoftheseactivities.Wewillnot
sellyourpersonalinformationtoanyothercompany.Wereservetherighttodisclosepersonalinformationinordertocomplywithapplicablelawsand
withrequestsbytheappropriateauthorities,tooperateoursystemsproperlyorforourownprotectionorthatofotherusers.
RetentionofyourPersonalInformation
Wewillkeepyourpersonalinformationaslongasweneeditforthepurposesforwhichitwasoriginallycollectedorforotherlegitimatepurposes
(suchasregulatorycompliance),orasrequiredbyapplicablelaw.
Toro'sCommitmenttoSecurityofY ourPersonalInformation
Wetakereasonableprecautionsinordertoprotectthesecurityofyourpersonalinformation.Wealsotakestepstomaintaintheaccuracyandcurrent
statusofpersonalinformation.
AccessandCorrectionofyourPersonalInformation
Ifyouwouldliketorevieworcorrectyourpersonalinformation,pleasecontactusbyemailat[email protected].
AustralianConsumerLaw
AustraliancustomerswillnddetailsrelatingtotheAustralianConsumerLaweitherinsidetheboxoratyourlocalT oroDealer.
374-0269RevK

TheToroWarranty
ATwo-YearLimitedWarranty
ConditionsandProductsCovered
TheToroCompanyanditsafliate,T oroWarrantyCompany,pursuant
toanagreementbetweenthem,jointlywarrantyourToroCommercial
product(“Product”)tobefreefromdefectsinmaterialsorworkmanship
fortwoyearsor1500operationalhours*,whicheveroccursrst.This
warrantyisapplicabletoallproductswiththeexceptionofAerators
(refertoseparatewarrantystatementsfortheseproducts).Wherea
warrantableconditionexists,wewillrepairtheProductatnocosttoyou
includingdiagnostics,labor,parts,andtransportation.Thiswarranty
beginsonthedatetheProductisdeliveredtotheoriginalretailpurchaser.
*Productequippedwithanhourmeter.
InstructionsforObtainingWarrantyService
YouareresponsiblefornotifyingtheCommercialProductsDistributoror
AuthorizedCommercialProductsDealerfromwhomyoupurchasedthe
Productassoonasyoubelieveawarrantableconditionexists.Ifyouneed
helplocatingaCommercialProductsDistributororAuthorizedDealer,or
ifyouhavequestionsregardingyourwarrantyrightsorresponsibilities,
youmaycontactusat:
ToroCommercialProductsServiceDepartment
ToroWarrantyCompany
8111LyndaleAvenueSouth
Bloomington,MN55420-1196
952–888–8801or800–952–2740
E-mail:[email protected]
OwnerResponsibilities
AstheProductowner,youareresponsibleforrequiredmaintenanceand
adjustmentsstatedinyourOperator'sManual.Failuretoperformrequired
maintenanceandadjustmentscanbegroundsfordisallowingawarranty
claim.
ItemsandConditionsNotCovered
Notallproductfailuresormalfunctionsthatoccurduringthewarranty
periodaredefectsinmaterialsorworkmanship.Thiswarrantydoesnot
coverthefollowing:
•Productfailureswhichresultfromtheuseofnon-Tororeplacement
parts,orfrominstallationanduseofadd-on,ormodiednon-Toro
brandedaccessoriesandproducts.Aseparatewarrantymaybe
providedbythemanufactureroftheseitems.
•Productfailureswhichresultfromfailuretoperformrecommended
maintenanceand/oradjustments.Failuretoproperlymaintainyour
ToroproductpertheRecommendedMaintenancelistedinthe
Operator’sManualcanresultinclaimsforwarrantybeingdenied.
•ProductfailureswhichresultfromoperatingtheProductinanabusive,
negligent,orrecklessmanner.
•Partssubjecttoconsumptionthroughuseunlessfoundtobedefective.
Examplesofpartswhichareconsumed,orusedup,duringnormal
Productoperationinclude,butarenotlimitedto,brakepadsand
linings,clutchlinings,blades,reels,rollersandbearings(sealedor
greasable),bedknives,sparkplugs,castorwheelsandbearings,tires,
lters,belts,andcertainsprayercomponentssuchasdiaphragms,
nozzles,andcheckvalves,etc.
•Failurescausedbyoutsideinuence.Conditionsconsideredtobe
outsideinuenceinclude,butarenotlimitedto,weather,storage
practices,contamination,useofunapprovedfuels,coolants,lubricants,
additives,fertilizers,water,orchemicals,etc.
•Failureorperformanceissuesduetotheuseoffuels(e.g.gasoline,
diesel,orbiodiesel)thatdonotconformtotheirrespectiveindustry
standards.
•Normalnoise,vibration,wearandtear,anddeterioration.
•Normal“wearandtear”includes,butisnotlimitedto,damagetoseats
duetowearorabrasion,wornpaintedsurfaces,scratcheddecalsor
windows,etc.
Parts
Partsscheduledforreplacementasrequiredmaintenancearewarranted
fortheperiodoftimeuptothescheduledreplacementtimeforthatpart.
Partsreplacedunderthiswarrantyarecoveredforthedurationofthe
originalproductwarrantyandbecomethepropertyofToro.Torowillmake
thenaldecisionwhethertorepairanyexistingpartorassemblyorreplace
it.T oromayuseremanufacturedpartsforwarrantyrepairs.
DeepCycleandLithium-IonBatteryWarranty:
DeepcycleandLithium-Ionbatterieshaveaspeciedtotalnumberof
kilowatt-hourstheycandeliverduringtheirlifetime.Operating,recharging,
andmaintenancetechniquescanextendorreducetotalbatterylife.Asthe
batteriesinthisproductareconsumed,theamountofusefulworkbetween
chargingintervalswillslowlydecreaseuntilthebatteryiscompletelyworn
out.Replacementofwornoutbatteries,duetonormalconsumption,
istheresponsibilityoftheproductowner.Batteryreplacementmaybe
requiredduringthenormalproductwarrantyperiodatowner’sexpense.
Note:(Lithium-Ionbatteryonly):ALithium-Ionbatteryhasapartonly
proratedwarrantybeginningyear3throughyear5basedonthetime
inserviceandkilowatthoursused.RefertotheOperator'sManualfor
additionalinformation.
MaintenanceisatOwner’sExpense
Enginetune-up,lubrication,cleaningandpolishing,replacementoflters,
coolant,andcompletingrecommendedmaintenancearesomeofthe
normalservicesT oroproductsrequirethatareattheowner’sexpense.
GeneralConditions
RepairbyanAuthorizedToroDistributororDealerisyoursoleremedy
underthiswarranty.
NeitherTheToroCompanynorToroWarrantyCompanyisliablefor
indirect,incidentalorconsequentialdamagesinconnectionwiththe
useoftheToroProductscoveredbythiswarranty,includingany
costorexpenseofprovidingsubstituteequipmentorserviceduring
reasonableperiodsofmalfunctionornon-usependingcompletion
ofrepairsunderthiswarranty.ExceptfortheEmissionswarranty
referencedbelow,ifapplicable,thereisnootherexpresswarranty.All
impliedwarrantiesofmerchantabilityandtnessforusearelimitedto
thedurationofthisexpresswarranty.
Somestatesdonotallowexclusionsofincidentalorconsequential
damages,orlimitationsonhowlonganimpliedwarrantylasts,sotheabove
exclusionsandlimitationsmaynotapplytoyou.Thiswarrantygivesyou
speciclegalrights,andyoumayalsohaveotherrightswhichvaryfrom
statetostate.
Noteregardingenginewarranty:
TheEmissionsControlSystemonyourProductmaybecoveredby
aseparatewarrantymeetingrequirementsestablishedbytheU.S.
EnvironmentalProtectionAgency(EPA)and/ortheCaliforniaAirResources
Board(CARB).Thehourlimitationssetforthabovedonotapplytothe
EmissionsControlSystemWarranty.RefertotheEngineEmissionControl
WarrantyStatementsuppliedwithyourproductorcontainedintheengine
manufacturer’sdocumentationfordetails
CountriesOtherthantheUnitedStatesorCanada
CustomerswhohavepurchasedT oroproductsexportedfromtheUnitedStatesorCanadashouldcontacttheirT oroDistributor(Dealer)toobtain
guaranteepoliciesforyourcountry,province,orstate.IfforanyreasonyouaredissatisedwithyourDistributor'sserviceorhavedifcultyobtaining
guaranteeinformation,contacttheToroimporter.374-0253RevD
This manual suits for next models
1
Table of contents
Other Toro Lawn Mower Accessories manuals

Toro
Toro 132-6114 User manual

Toro
Toro 78593 User manual

Toro
Toro E-Z Vac DFS 78556 User manual

Toro
Toro 136-1830 User manual

Toro
Toro 121-8032 User manual

Toro
Toro 134-3722 User manual

Toro
Toro 136-9125 User manual

Toro
Toro TITAN ZX Series User manual

Toro
Toro REELMASTER 6000 Series User manual

Toro
Toro 108-3160 User manual
Popular Lawn Mower Accessories manuals by other brands

Simplicity
Simplicity 1600395 Operator's manual

Scag Power Equipment
Scag Power Equipment GC-STT Operator's manual

Echo
Echo 99944200553 Operator's manual

Peco
Peco SPARTAN RZ Series Operator's manual

Simplicity
Simplicity 211 Operator's manual

Scag Power Equipment
Scag Power Equipment 7630001 Operator's manual