Stihl HTA 135 User manual

Contents
1 Introduction................................................. 2
2 Guide to Using this Manual.........................2
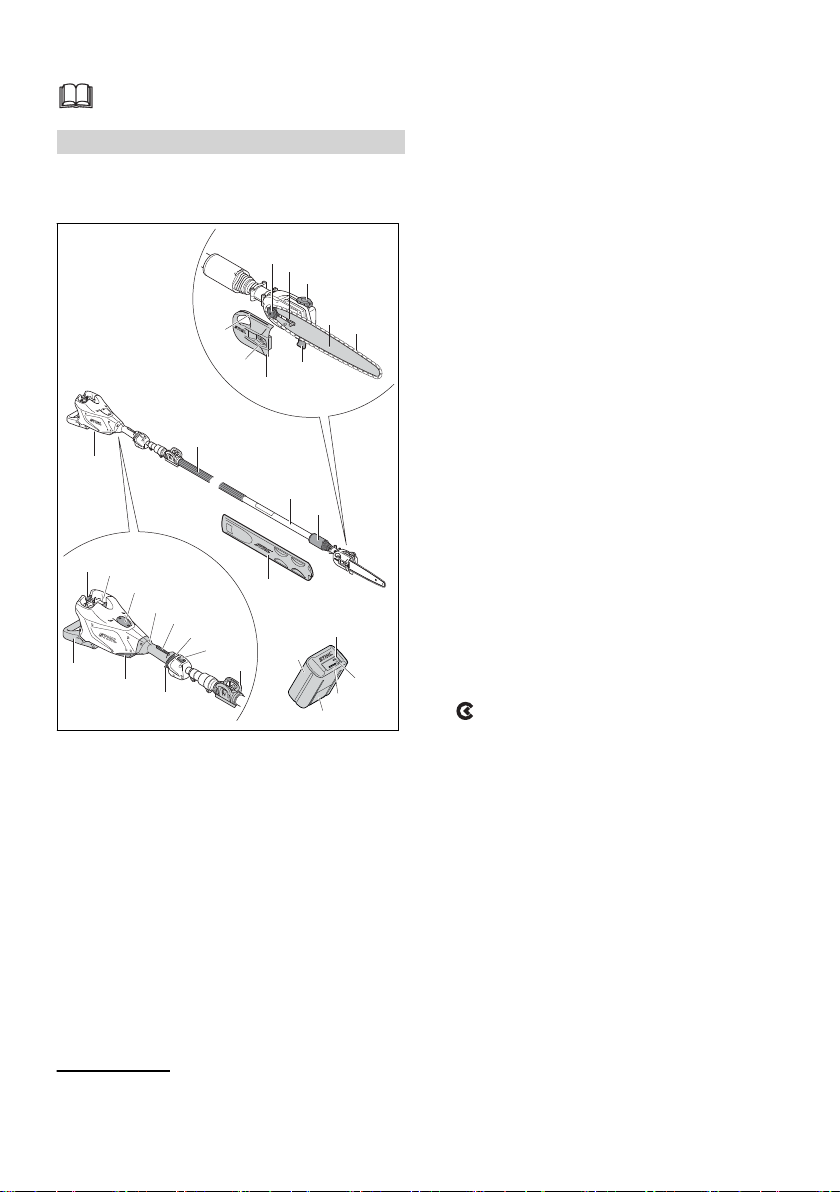
3 Overview..................................................... 3
4 Safety Precautions......................................4
5 Preparing Pole Pruner for Operation........ 11
6 Charging the Battery, LEDs...................... 11
7 Activating and Deactivating Bluetooth®
Radio Interface..........................................12
8 Assembling the Pole Pruner..................... 12
9 Removing and Fitting the Battery..............15
10 Switching Pole Pruning On and Off.......... 15
11 Checking Pole Pruner and Battery............16
12 Using the Pole Pruner...............................17
13 After Finishing Work..................................19
14 Transporting..............................................19
15 Storing.......................................................19
16 Cleaning....................................................20
17 Maintenance............................................. 20
18 Repairing...................................................21
19 Troubleshooting........................................ 21
20 Specifications............................................23
21 Bar and Chain Combinations.................... 24
22 Combinations of Carrying Systems...........24
23 Spare Parts and Accessories....................24
24 Disposal.................................................... 24
25 EC Declaration of Conformity................... 25
26 UKCA Declaration of Conformity.............. 25
27 General Power Tool Safety Warnings.......26
1 Introduction
Dear Customer,
Thank you for choosing STIHL. We develop and
manufacture our quality products to meet our
customers’ requirements. The products are
designed for reliability even under extreme con‐
ditions.
STIHL also stands for premium service quality.
Our dealers guarantee competent advice and
instruction as well as comprehensive service
support.
STIHL expressly commit themselves to a sus‐
tainable and responsible handling of natural
resources. This user manual is intended to help
you use your STIHL product safely and in an
environmentally friendly manner over a long
service life.
We thank you for your confidence in us and hope
you will enjoy working with your STIHL product.
Dr. Nikolas Stihl
IMPORTANT! READ BEFORE USING AND
KEEP IN A SAFE PLACE FOR REFERENCE.
2 Guide to Using this Manual
2.1 Applicable Documents
The local safety regulations apply.
► In addition to this user manual, you should
also read, understand and retain the following
documents:
–User manual of the carrying system you are
using
–User Manual for STIHL AR battery
–User Manual for "AP belt bag with connect‐
ing cable"
–Safety notices and precautions for
STIHL AP battery
–User Manual for STIHL AL 101, 300, 301-4,
500 chargers
–Safety information for STIHL batteries and
products with built-in battery:
www.stihl.com/safety-data-sheets
For further information on STIHL connected,
compatible products and FAQs, please visit
www.connect.stihl.com or available from a STIHL
servicing dealer.
The Bluetooth® word mark and logos are regis‐
tered trademarks owned by Bluetooth SIG, Inc.
These word mark/logos are used by STIHL
under license.
Batteries with are equipped with a Bluetooth®
radio interface. Local operating restrictions (in
aircraft or hospitals, for example) must be
observed.
2.2 Symbols used with warnings in
the text
WARNING
■ This symbol indicates dangers that can cause
serious injuries or death.
► The measures indicated can avoid serious
injuries or death.
NOTICE
■ This symbol indicates dangers that can cause
damage to property.
► The measures indicated can avoid damage
to property.
English
2 0458-698-0121-B
© ANDREAS STIHL AG & Co. KG 2022
0458-698-0121-B. VA0.B22.
Printed on chlorine-free paper
Printing inks contain vegetable oils, paper can be recycled.
Translation of Original Instruction Manual
0000009169_009_GB

2.3 Symbols in Text
This symbol refers to a chapter in this
instruction manual.
3 Overview
3.1 STIHL HTA 135 Pole Pruner
and Battery
0000097168_005
17
#
16
15
14
13
28
27
26
#
1
18
25
19
21
20
22
23
24
456
2
3
10
9
78
11
12
1 Handle hose
For holding and controlling the pole pruner.
2 Shaft
The shaft connects all components.
3 Clamp nut
Serves to adjust the length of shaft.
4 Chain sprocket
The chain sprocket drives the saw chain.
5 Tensioning screw
The tensioning screw is used to adjust the
chain tension.
6 Oil filler cap
The oil tank cap closes the oil tank.
7 Guide bar
The guide bar supports and guides the saw
chain.
8 Saw chain
The saw chain cuts the wood.
9 Limit stop
Holds the pole pruner against the wood while
cutting.
10 Chain sprocket cover
Covers the chain sprocket and secures the
guide bar to the pole pruner.
11 Nut
Secures the chain sprocket cover to the pole
pruner.
12 Gauge bar
The saw chain can be positioned precisely
using the gauge bar.
13 Chain scabbard
The chain scabbard protects against contact
with the saw chain.
14 Battery
Supplies power to the pole pruner.
15 LEDs
The LEDs indicate the state of charge of the
battery and any faults.
16 Pushbutton
The pushbutton activates the LEDs on the
battery. The pushbutton activates and deacti‐
vates Bluetooth® radio interface (if available).
17 "BLUETOOTH®" LED (only for batteries with
)
The LED indicates the activation and deacti‐
vation of the Bluetooth® interface.
18 Locking lever
The locking lever holds the battery in the bat‐
tery compartment.
19 Battery compartment
The battery compartment holds the battery.
20 Cover1
The cover is the placeholder for a Smart Con‐
nector 2 A.
21 Control handle
For holding and controlling the pole pruner.
22 Trigger lockout
The trigger lockout unlocks the trigger.
1The cover is part of the motor housing. Only remove the cover to install a Smart Connector 2 A and
store it safely for later re-installation. Always use the pole pruner with the cover or Smart Connector 2
A installed.
3 Overview English
0458-698-0121-B 3

23 Release slide
The release slide is used to switch on the
pole pruner.
24 LED
The LED indicates the status of the pole pru‐
ner.
25 Clip
The clip is used to attach the carrying system.
26 Trigger
Switches the pole pruner on and off.
27 Air filter
The air filter filters the air entering the engine.
28 Base
The machine support is used to deposit the
pole pruner on the ground.
# Rating plate with the machine number
3.2 Symbols
Meanings of the symbols that may be on the pole
pruner and battery:
The clamp nut is unscrewed in this posi‐
tion. The shaft can be extended.
The clamp nut is locked in this position.
The shaft cannot be extended.
This symbol marks the saw chain oil tank.
This symbol shows the direction of
rotation of the saw chain.
Rotate in this direction to increase the saw
chain tension
1 LED lights up red. The battery is too
warm or too cold.
This icon marks the release slide.
4 LEDs flashing red. There is a fault in
the battery.
The battery is equipped with a Bluetooth®
radio interface and can be linked up to the
STIHL app.
The information next to the symbol indi‐
cates the energy content of the battery
according to the cell manufacturer’s specifi‐
cation. The energy content available in
operation is lower.
Do not dispose of the product with domes‐
tic waste.
4 Safety Precautions
4.1 Warning Symbols
Meanings of warning symbols on the pole pruner
or battery:
Observe safety notices and take the
necessary precautions.
Read, understand and keep the User
Manual.
Wear safety glasses, hearing protec‐
tion and a hard hat.
Wear safety boots.
Wear work gloves.
Maintain a safety distance.
Remove the battery during work stop‐
pages, transport, storage, maintenance
or repair.
Protect battery from heat and fire.
Do not immerse battery in fluids.
Observe the permitted battery temper‐
ature range.
4.2 Intended Use
The STIHL HTA 135 pole pruner is used to
delimb tall trees or prune the branches of tall
trees.
The pole pruner must not be used for felling
operations.
The pole pruner may be used in the rain.
English 4 Safety Precautions
4 0458-698-0121-B

The pole pruner is powered by a STIHL AP bat‐
tery or a STIHL AR battery.
Combined with the STIHL app, the battery with
allows the personalization and transmission of
information to the battery using Bluetooth® tech‐
nology.
WARNING
■ Batteries not explicitly approved for the pole
pruner by STIHL may cause a fire or explo‐
sion. Persons may be seriously or fatally
injured, and property may be damaged.
►Use the pole pruner with a STIHL AP bat‐
tery or a STIHL AR battery.
■ Using the pole pruner or the battery for purpo‐
ses for which they were not designed may
result in serious or fatal injuries and damage
to property.
►Use the pole pruner as described in this
User Manual.
► Use the battery as described in this User
Manual, the STIHL app and on www.con‐
nect.stihl.com.
4.3 The Operator
WARNING
■Users without adequate training or instruction
cannot recognize or assess the risks involved
in using the pole pruner and battery. The user
or other persons may sustain serious or fatal
injuries.
► Read, understand and save the
instruction manual.
► If you pass the pole pruner or battery on to
another person: Always give them the
instruction manual.
►Make sure the user meets the following
requirements:
–The user must be rested.
–The user must be in good physical con‐
dition and mental health to operate and
work with the pole pruner and battery. If
the user’s physical, sensory or mental
ability is restricted, he or she may work
only under the supervision of or as
instructed by a responsible person.
–The user is able to recognize and
assess the risks involved in using the
pole pruner and battery.
–The user must be of legal age or is
being trained in a trade under supervi‐
sion in accordance with national rules
and regulations.
–The user has received instruction from a
STIHL servicing dealer or other experi‐
enced user before working with the pole
pruner for the first time.
–The user must not be under the influ‐
ence of alcohol, medication or drugs.
► If you have any queries: Contact a STIHL
servicing dealer for assistance.
4.4 Clothing and equipment
WARNING
■ Long hair may be pulled into the pole pruner
during operation. This may result in serious
injury to the user.
►Tie up and confine long hair above your
shoulders.
■ Objects can be thrown at high speed during
operation. This may result in injury to the user.
► Wear close-fitting safety glasses.
Suitable safety glasses are tested in
accordance with EN 166 or national
regulations and available commer‐
cially with the corresponding mark‐
ing.
■Noise is generated during operation. Noise
can damage your hearing.
► Wear ear protection.
■ Falling objects can cause head injuries.
► wear a hard hat.
■ Dust can be whipped up during operation.
Whipped up dust can damage the respiratory
passages and cause allergic reactions.
►If dust is generated: Wear a dust respirator
mask.
■ Unsuitable clothing can snag on wood, brush
or the pole pruner. Not wearing suitable cloth‐
ing may result in serious injury.
►Wear close-fitting clothing.
► Remove scarves and jewelry.
■ The user may cut himself or herself on wood
while working. The user may come into con‐
tact with the saw chain during cleaning or
servicing. This may result in injury to the user.
► Wear work gloves made from resist‐
ant material.
4 Safety Precautions English
0458-698-0121-B 5

■ Wearing unsuitable footwear may cause the
user to slip. This may result in injury to the
user.
► Wear sturdy, closed-toed footwear
with high-grip soles.
4.5 Work Area and Surroundings
4.5.1 Pole Pruner
WARNING
■ Bystanders, children and animals cannot rec‐
ognize or assess the dangers of the pole pru‐
ner or flying debris. This may result in serious
injury to bystanders, children and animals and
damage to property.
► Do not allow bystanders,
children or animals within 15
meters of the work area.
► Maintain a clearance of 15 meters from
objects.
► Never leave the pole pruner unattended.
► Make sure that children cannot play with
the pole pruner.
■ Electrical components of the pole pruner may
produce sparks. Sparks may cause fires and
explosions in highly flammable or explosive
environments. Persons may be seriously or
fatally injured and property may be damaged.
►Do not work in a highly flammable or explo‐
sive environment.
4.5.2 Battery
WARNING
■Bystanders, children and animals cannot rec‐
ognize or assess the dangers of the battery.
Bystanders, children and animals may be seri‐
ously injured.
►Keep bystanders, children and animals
away from the work area.
► Do not leave the battery unattended.
► Make sure that children cannot play with
the battery.
■ The battery is not protected against all ambi‐
ent conditions. If the battery is exposed to cer‐
tain ambient conditions, the battery may catch
fire, explode or be irreparably damaged. This
may result in serious injury to people and
damage to property.
► Protect battery from heat and fire.
► Do not throw the battery into a fire.
► Use and store the battery at temper‐
atures between ‑ 10 °C and + 50 °C.
► Do not immerse the battery in fluids.
► Keep battery away from small metal parts.
► Do not expose the battery to high pressure.
► Do not expose the battery to microwaves.
► Protect the battery from chemicals and
salts.
4.6 Safe Condition
4.6.1 Pole Pruner
The pole pruner is in a safe condition if the fol‐
lowing points are observed:
–The pole pruner is not damaged.
–The pole pruner is in a clean condition.
–The controls function properly and have not
been modified.
–The chain lubrication is operating properly.
–Wear marks on the chain sprocket are not
deeper than 0.5 mm.
–A combination of guide bar and saw chain rec‐
ommended in this User Manual is mounted.
–The guide bar and saw chain are properly
mounted.
–The saw chain is properly tensioned.
–Only original STIHL accessories designed for
this pole pruner model are fitted.
–The accessories are correctly attached.
–The oil tank cap is closed.
WARNING
■If not in safe condition, components may no
longer operate correctly and safety devices
may be disabled. This may result in serious or
fatal injury to people.
►Work only with an undamaged pole pruner.
► If the pole pruner is dirty: Clean the pole
pruner.
► Do not modify the pole pruner. Exception:
Mounting a combination of guide bar and
saw chain recommended in this User Man‐
ual.
►If the controls do not function properly: Do
not use the pole pruner.
► Only fit original STIHL accessories
designed for this pole pruner model.
English 4 Safety Precautions
6 0458-698-0121-B

► Mount the guide bar and saw chain as
described in this User Manual.
► Attach accessories as described in this
User Manual or in the User Manual for the
accessories.
►Never insert objects in the openings of the
pole pruner.
► Close the oil tank cap.
► Replace worn or damaged labels.
► If you have any doubts, be sure to consult a
STIHL dealer.
4.6.2 Guide Bar
The guide bar is in a safe condition if the follow‐
ing points are observed:
–Guide bar is not damaged.
–Guide bar is not deformed.
–The minimum groove depth is maintained,
20.3.
–Bar rails are free from burrs.
–Bar groove is not pinched or splayed.
WARNING
■ If the guide bar is not in a safe condition, it can
no longer support and guide the saw chain
properly. The rotating saw chain can jump off
the guide bar. This can result in serious or
fatal injuries.
►Work only with an undamaged guide bar.
► If the groove depth is less than the mini‐
mum depth: Mount a new guide bar.
► Deburr the guide bar every week.
► If you have any queries: Contact your
STIHL servicing dealer.
4.6.3 Saw Chain
The saw chain is in a safe condition if the follow‐
ing points are observed:
–Chain is not damaged.
–Chain is properly sharpened.
–The service marks on the cutters are still visi‐
ble.
WARNING
■If components do not comply with safety
requirements, they will no longer function
properly and safety devices may be rendered
inoperative. This can result in serious or fatal
injuries.
►Work only with an undamaged saw chain.
► Sharpen the chain properly.
► If you have any queries: Contact your
STIHL servicing dealer for assistance.
4.6.4 Battery
The battery is in safe condition when the follow‐
ing conditions are met:
–The battery is not damaged.
–The battery is clean and dry.
–The battery is working and has not been modi‐
fied.
WARNING
■ The battery cannot function safely if it is not in
safe condition. There is a risk of serious injury
to persons.
►Use an undamaged and functioning battery.
► Do not charge a damaged or defective bat‐
tery.
► If the battery is dirty or wet: clean the bat‐
tery and allow it to dry.
► Do not modify the battery.
► Do not insert objects into the apertures in
the battery.
► Never connect the battery terminals to met‐
allic objects and cause a short circuit.
► Do not open the battery.
► Replace worn or damaged warning signs.
■ Fluid may leak from a damaged battery. If the
fluid contacts the skin or eyes, this may cause
irritation.
►Avoid contact with the fluid.
► In the event of contact with the skin: wash
the affected areas with plenty of soap and
water.
►In the event of contact with the eyes: rinse
the eyes with plenty of water for at least 15
minutes and seek medical attention.
■A damaged or defective battery may emit an
unusual odour, smoke or catch fire. This may
result in serious or fatal injury to people and
damage to property.
►If the battery emits an unusual odour or
smoke: do not use the battery and keep it
away from flammable materials.
►If the battery catches fire: try to extinguish
the battery using a fire extinguisher or
water.
4.7 Working
4.7.1 Sawing
WARNING
■Always work within calling distance of others
so that you can summon help in an emer‐
gency.
►Make sure that people are within earshot
outside the working area.
4 Safety Precautions English
0458-698-0121-B 7

■ In certain situations, the user may no longer
be able to concentrate on their work. The user
may lose control of the pole pruner, stumble or
fall and be seriously injured.
►Keep calm and plan your work.
► If light and visibility are poor: Do not use the
pole pruner.
► Use the pole pruner without assistance.
► Watch out for obstacles.
► Work standing on the ground and keep your
balance. If you have to work at a height:
Use a mobile elevating work platform or
secure scaffolding.
►If you start feeling fatigue: Take a break.
■ The moving saw chain can cut the user. This
may result in serious injury to the user.
► Do not touch the rotating saw chain.
► If the saw chain is blocked by an object:
Switch off the pole pruner and remove the
battery. before clearing the jam.
■The moving saw chain warms up and
expands. If the saw chain is not sufficiently
lubricated and retensioned, the saw chain may
jump off the guide bar or it may break. This
may result in serious injury to people and
damage to property.
►Use saw chain lubricant.
► Check the saw chain tension regularly while
working. If saw chain tension is insufficient:
Tension the saw chain.
■If the behavior of the pole pruner changes dur‐
ing operation or feels unusual, it may no lon‐
ger be in a safe condition. This may result in
serious injury to people and damage to prop‐
erty.
►Stop working, remove the battery and con‐
sult a STIHL servicing dealer.
■ Vibrations may occur while using the pole pru‐
ner.
► Wear gloves.
► Take breaks.
► If signs of a circulatory disturbance occur:
Consult a doctor.
■ If the moving saw chain hits a hard object,
sparks may occur. Sparks can cause fires in a
flammable environment. Persons may be seri‐
ously or fatally injured and property may be
damaged.
►Do not use the chain saw in a flammable
environment.
■ The saw chain runs on for a short period after
you release the trigger. People may be cut by
the moving saw chain. They may cause seri‐
ous injury to persons.
► Hold the pole pruner firmly with both hands
and wait until the saw chain comes to a
standstill.
■In an emergency, the user may start to panic
and forget to take off the carrying system. This
may result in serious injury to the user.
►Practice taking off the carrying system.
WARNING
B
2
1
0000-GXX-8685-A0
A
■If you saw wood which is under tension, the
guide bar may become jammed. The user may
lose control of the pole pruner and be seri‐
ously injured.
►First make a relief cut (1) on the compres‐
sion side (A), then a separating cut (2), off‐
set in the direction of the trunk, on the ten‐
sion side (B).
DANGER
■Working near live electric cables may result in
accidental contact with the saw chain and
damage the cables. This may result in serious
or fatal injury to the user.
► Maintain a clearance of 15 meters
from live cables.
4.7.2 Limbing
max 60°
0000097294_001
English 4 Safety Precautions
8 0458-698-0121-B

WARNING
■ During delimbing the sawn-off branch may fall
to the ground. This may result in serious injury
to the user.
►Do not stand under the branch which you
are sawing.
► Maintain an angle of no more than 60° to
the horizontal.
4.8 Reactive Forces
4.8.1 Kickback
0000-GXX-4802-A0
Kickback can be caused for the following rea‐
sons:
–The rotating saw chain in the upper quadrant
of the bar nose makes contact with a hard
object and is suddenly braked.
–The rotating saw chain is pinched at the bar
nose.
WARNING
0000-GXX-4803-A0
■If kickback occurs, the pole pruner can be
thrown upwards and backwards. The user can
lose control of the pole pruner and be seri‐
ously injured.
►Always hold your pole pruner firmly with
both hands.
► Always keep your body out of the plane of
the cutting attachment.
► Use the working techniques described in
this instruction manual.
► Do not cut with the upper quadrant of the
bar nose.
► Always cut with a properly sharpened and
tensioned saw chain.
► Use a reduced kickback saw chain.
► Use a guide bar with a narrow radius nose.
► Always cut with the chain running at full
speed.
4.8.2 Pull-In
0000-GXX-1348-A0
The pole pruner is pulled away from the operator
when the bottom of the bar is used for cutting.
WARNING
■ If the rotating chain makes contact with a hard
object and is suddenly pinched, the pole pru‐
ner is abruptly jerked away from the operator.
The user can lose control of the pole pruner
and be seriously injured.
►Always hold your pole pruner firmly with
both hands.
► Use the working techniques described in
this instruction manual.
► Keep the guide bar straight in the cut.
► Apply the stop properly.
► Always cut with the chain running at full
speed.
4.8.3 Pushback
0000-GXX-1349-A0
The pole pruner is pushed back toward the oper‐
ator when the top of the bar is used for cutting.
WARNING
■If the rotating chain makes contact with a hard
object and is suddenly pinched, the pole pru‐
ner is abruptly pushed back toward the opera‐
tor. The user can lose control of the pole pru‐
ner and be seriously injured.
►Always hold your pole pruner firmly with
both hands.
4 Safety Precautions English
0458-698-0121-B 9

► Use the working techniques described in
this instruction manual.
► Keep the guide bar straight in the cut.
► Always cut with the chain running at full
speed.
4.9 Transporting
4.9.1 Pole Pruner
WARNING
■ The pole pruner may turn over or shift during
transport. Persons may be injured or property
damaged.
► Remove the battery.
► Fit the chain scabbard so that it completely
covers the guide bar.
► Secure the pole pruner with lashing straps
or a net to prevent it from turning over and
moving.
4.9.2 Battery
WARNING
■ The battery is not protected against all ambi‐
ent conditions. The battery may be damaged if
it is exposed to certain ambient conditions,
and damage to property may occur.
►Never transport a damaged battery.
■ The battery may turn over or shift during trans‐
port. This may result in injury to people and
damage to property.
►Pack the battery in packaging in such a way
that it cannot move.
► Secure the packaging so that it cannot
move.
4.10 Storing
4.10.1 Pole Pruner
WARNING
■Children are not aware of and cannot assess
the dangers of the pole pruner and can be
seriously injured.
► Remove the battery.
► Fit the chain scabbard so that it completely
covers the guide bar.
► Store the pole pruner out of the reach of
children.
■ Dampness may corrode the electrical contacts
on the pole pruner and metal components.
This can damage the pole pruner.
► Remove the battery.
► Store the pole pruner in a clean and dry
condition.
4.10.2 Battery
WARNING
■ Children are not aware of and cannot assess
the dangers of the battery Children may be
seriously injured.
►Store the battery out of the reach of chil‐
dren.
■ The battery is not protected against all ambi‐
ent conditions. If the battery is exposed to cer‐
tain ambient conditions, the battery may be
irreparably damaged.
►Store the battery in a clean and dry condi‐
tion.
► Store the battery in an enclosed space.
► Store the battery separately from the pole
pruner.
► If the battery is stored in the charger, dis‐
connect the mains plug and store the
rechargeable battery at a battery charge
status between 40% and 60% (2 lit green
LEDs).
►Store the battery at a temperature range
between - 10 °C and + 50 °C.
4.11 Cleaning, Maintenance and
Repair
WARNING
■The pole pruner may start unintentionally if the
battery is left in place during cleaning, mainte‐
nance or repair operations. This may result in
serious injury to people and damage to prop‐
erty.
► Remove the battery.
■ Aggressive cleaning agents, cleaning with a
jet of water or pointed objects may damage
the pole pruner, guide bar, saw chain and bat‐
tery. If the pole pruner, guide bar, saw chain or
battery are not cleaned correctly, components
may no longer function properly or safety devi‐
ces may be rendered inoperative. They may
cause serious injury to persons.
English 4 Safety Precautions
10 0458-698-0121-B

► Clean the pole pruner, guide bar, saw chain
and battery as described in this User Man‐
ual.
■If the pole pruner, guide bar, saw chain or bat‐
tery are not serviced or repaired correctly,
components may no longer function properly
or safety devices may be rendered inopera‐
tive. This may result in serous or fatal injury to
people.
►Do not attempt to service or repair the pole
pruner or battery.
► If the pole pruner or the battery require
servicing or repairs: Contact your STIHL
dealer for assistance.
►Service or repair the guide bar and saw
chain as described in this User Manual.
■ The user may be cut by the sharp cutters
while cleaning or servicing the saw chain. This
may result in injury to the user.
► Wear work gloves made from resist‐
ant material.
5 Preparing Pole Pruner for
Operation
5.1 Preparing the Pole Pruner for
Operation
The following steps must be performed before
commencing work:
► Ensure that the following components are in a
safe condition:
–Pole Pruner, 4.6.1.
–Guide bar, 4.6.2.
–Saw chain, 4.6.3.
–Battery, 4.6.4.
►Check the battery, 11.6.
► Fully charge battery as described in the User
Manual for the STIHL AL 101, 300, 301-4, 500
chargers.
►Clean the pole pruner, 16.1.
►Assemble the pole pruner, 8.1.
►Attach the clip, 8.2.
►Mount the machine support, 8.3.
►Mount the guide bar and saw chain, 8.4.1.
►Tension the saw chain, 8.5.
►Fill up with saw chain oil, 8.6.
►Adjust length of shaft, 12.1.
►Align the clip, 12.2.
►Fit and adjust the carrying system, 12.3.
►Check the controls, 11.4.
►Check the chain lubrication, 11.5.
► If you cannot carry out this work: Do not use
your pole pruner and contact your STIHL
dealer for assistance.
5.2 Connecting the Battery with the
STIHL App by means of a
Bluetooth® Radio Interface
►Activate the Bluetooth® radio interface on the
mobile device.
►Activating the Bluetooth® radio interface on
the battery, 7.1.
► Download STIHL App from the app store of
your mobile device and create an account.
► Open and sign in on the STIHL App.
► Add the battery in the STIHL App and follow
the instructions on the screen.
For contacts and other information, please visit
https://support.stihl.com or the app.
The STIHL connected feature is available in the
STIHL App in certain markets.
6 Charging the Battery, LEDs
6.1 Charging the Battery
The charging time depends on various factors,
e.g. the battery temperature or the ambient tem‐
perature. The actual charging time may vary
from the charging time indicated. The charging
time is indicated at www.stihl.com/charging-
times.
► Recharge the battery as described in the User
Manual for the STIHL AL 101, 300, 301-4, 500
chargers.
6.2 Displaying the charge level
0000079877_002
20-40%
40-60%
60-80%
80-100%
0-20%
1
► Press the button (1).
The LEDs light up green for about 5 seconds
and indicate the state of charge.
► If the LED on the right flashes green: Charge
the battery.
5 Preparing Pole Pruner for Operation English
0458-698-0121-B 11

6.3 LEDs on Battery
The LEDs can show the state of charge or mal‐
functions. The LEDs can glow or flash green or
red.
The state of charge is indicated when the LEDs
glow or flash green.
► If the LEDs glow or flash red: Troubleshooting,
19.
There is a malfunction in the pole pruner or
battery.
7 Activating and Deactivating
Bluetooth® Radio Interface
7.1 Activating the Bluetooth® Radio
Interface
►If the battery is equipped with a Bluetooth®
radio interface: press the button and hold it
depressed for about 3 seconds.
The "BLUETOOTH®" LED next to the sym‐
bol lights up blue for about 3 seconds. The
Bluetooth® radio interface on the battery is
activated.
7.2 Deactivating the Bluetooth®
Radio Interface
►If the battery is equipped with a Bluetooth®
radio interface: press the button and hold it
depressed for about 3 seconds.
The "BLUETOOTH®" LED next to the sym‐
bol flashes blue for six times. The Blue‐
tooth® radio interface on the battery is deacti‐
vated.
8 Assembling the Pole Pru‐
ner
8.1 Assembling the Pole Pruner
► Switch off the pole pruner and remove the bat‐
tery.
b
1
2
3
a
0000097972_001
► Remove the protective cap (1).
► Adjust the shaft length to a = 10 cm.
► Mark b = 6 cm on the shaft (2).
90°
4
3
90°
5
0000098531_001
► Align the collet (4) and transmission (3) as
shown.
► Slide the transmission (3) onto the shaft (2) up
to mark b.
► Tighten down the screws (5) firmly.
7
6
8
0000098623_001
► If you cannot push the transmission (3) onto
the shaft (2) up to mark b:
► Rotate the nut (7) counterclockwise until the
chain sprocket cover (6) can be removed.
► Remove the chain sprocket cover (6).
► Turn the chain sprocket (8) and push the
transmission (3) onto shaft (2) up to mark b.
► Fit the chain sprocket cover (6) so that it is
flush with the pole pruner.
► Fit the nut (7) and tighten it down firmly.
10
9
0000097324_001
► Undo the screws (9).
► Pull out the protective tube (10).
English 7 Activating and Deactivating Bluetooth® Radio Interface
12 0458-698-0121-B

11
12 2
0000097973_001
c
► Remove the protective cap (11).
► Turn the shaft (2) and press it in the direction
of the control handle (12) until the distance
c = 2 cm.
13
c
3
90°
90°
0000098532_001
► Align the housing (13) and transmission (3) as
shown.
► Tighten down the screws (9) firmly.
The pole pruner does not need to dismantled
again.
8.2 Attaching the clip
► Switch off the pole pruner and remove the bat‐
tery.
1
2
0000097169_001
► Press clip (1) together and place on the han‐
dle hose (2).
It is not necessary to remove the clip again.
8.3 Mounting the machine support
► Switch off the pole pruner and remove the bat‐
tery.
5
2
1
4
3
0000097173_001
► Position the left half of the machine support (1)
against the side of the cover.
► Fit the screw (2).
► Position the right half of the machine sup‐
port (3) against the side of the cover.
► Fit the screw (5).
► Insert screws (4) and tighten.
► Tighten screw (2) and screw (5) firmly.
It is not necessary to remove the machine sup‐
port again.
8.4 Mounting and Removing the
Bar and Chain
8.4.1 Mounting the Guide Bar and Saw
Chain
The guide bar and saw chain combinations that
can be used with the chain sprocket are listed in
the specifications, 21.1.
► Switch off the pole pruner and remove the bat‐
tery.
1
23
4
0000097170_001
► Rotate the nut (1) counterclockwise until the
chain sprocket cover (2) can be removed.
► Remove the chain sprocket cover (2).
► Turn the tensioning screw (3) counterclock‐
wise until the tensioner slide (4) butts against
the left end of the housing.
8 Assembling the Pole Pruner English
0458-698-0121-B 13

0000-GXX-2954-A0
► Fit the saw chain in the guide bar groove so
that the arrows on the tie straps on the top of
the bar point in the direction of rotation.
6
7
5
8
0000097171_001
► Fit the guide bar and saw chain on the pole
pruner and check the following points:
–The drive links of the saw chain are seated
in teeth of the chain sprocket (7).
–The collar stud (5) is located in the slot in
the tail of the guide bar (6).
–The peg of tensioner slide (4) engages the
hole (8) in guide bar (6).
The guide bar (6) may be fitted either way round.
The logo on the guide bar (6) may also be upside
down.
0000097172_001
6
3
► Turn the tensioning screw (3) clockwise until
the saw chain fits snugly against the guide
bar. Make sure the drive links engage the
guide bar groove.
The guide bar (6) and saw chain fit snugly
against the pole pruner.
► Fit the chain sprocket cover (2) so that it is
flush with the pole pruner.
► Fit the nut (1) and tighten it down firmly.
8.4.2 Removing the Guide Bar and Saw
Chain
► Switch off the pole pruner and remove the bat‐
tery.
► Rotate the nut counterclockwise until the chain
sprocket cover can be removed.
► Remove the chain sprocket cover.
► Turn the tensioning screw counterclockwise as
far as it will go.
The saw chain is now slack.
► Remove the guide bar and saw chain.
8.5 Tensioning the Saw Chain
The saw chain expands or contracts during cut‐
ting work. The saw chain tension changes as a
result. Check the saw chain tension regularly
during operation and readjust if necessary.
► Switch off the pole pruner and remove the bat‐
tery.
0000-GXX-4761-A1
a
2
1
► Loosen the nut (1).
► Hold the guide bar nose up and turn the ten‐
sioning screw (2) clockwise until the following
points apply:
–The chain sag ‘a’ in the center of the guide
bar is 1 - 2 mm.
–The saw chain can still be pulled easily
along the guide bar with two fingers.
► Hold the guide bar nose up and tighten down
the nut (1) firmly.
► If the chain sag ‘a’ in the center of the guide
bar is not 1 - 2 mm: Readjust the saw chain
tension.
8.6 Filling Up with Saw Chain Oil
The saw chain oil lubricates and cools the rotat‐
ing chain.
► Switch off the pole pruner and remove the bat‐
tery.
► Place the pole pruner on a level surface so
that the oil tank cap faces up.
► Use a damp cloth to clean the oil tank cap and
the area around it.
English 8 Assembling the Pole Pruner
14 0458-698-0121-B

0000-GXX-2930-A0
► Swing the grip on the oil tank cap to the verti‐
cal position.
► Turn the oil tank cap counterclockwise as far
as it will go.
► Remove the oil tank cap.
► Fill up with saw chain oil, taking care not to
spill any oil and not to overfill the tank.
► If the grip on the oil tank cap has dropped into
the closed position: Raise the grip until it is
vertical.
23
1
0000-GXX-2931-A0
1
► Place the oil tank cap in the filler opening so
that mark (1) lines up with mark (2).
► Press the oil tank cap down and rotate it clock‐
wise as far as it will go.
The oil tank cap snaps into place. The mark
(1) points to mark (3).
► Check to see if the oil tank cap can be pulled
upwards and off.
► If the oil tank cap cannot be pulled upwards
and off: Fold down the grip on the oil tank cap.
The oil tank is closed.
If the oil tank cap can be pulled upwards and off,
perform the following steps:
► Place the oil tank cap in the filler opening – in
any position.
1
0000-GXX-3135-A0
2
► Press the oil tank cap down and rotate it clock‐
wise as far as it will go.
► Press the oil tank cap down and rotate it coun‐
terclockwise until mark (1) points to mark (2).
► Now try again to close the oil tank.
► If the oil tank still cannot be closed properly:
Do not use your pole pruner and contact a
STIHL dealer for assistance.
The pole pruner is not in a safe condition.
9 Removing and Fitting the
Battery
9.1 Inserting the Battery
1
2
0000097033-001
► Insert the battery (1) up to the limit stop into
the battery compartment (2).
The battery (1) engages with a click and is
now locked.
9.2 Removing the Battery
► Place the pole pruner on a level surface.
2
1
0000097034-001
► Press both locking levers (1).
The battery (2) is released and can be
removed.
10 Switching Pole Pruning On
and Off
10.1 Switching on the Pole Pruner
► Hold the pole pruner with one hand by the
control handle – wrap your thumb around the
control handle.
► Hold the pole pruner firmly with your other
hand by the handle hose - wrap your thumb
around the handle hose.
9 Removing and Fitting the Battery English
0458-698-0121-B 15

3
1
2
0000097175_001
► Press the trigger lockout (1) with your hand
and keep it pressed.
► Push the release slide (2) in the direction of
the loop handle with your thumb and hold it
there.
LED is lit.
► Press the trigger (3) with your index finger and
keep depressed.
The motor is accelerated and the saw chain
rotates.
The more you depress the trigger (3), the faster
the saw chain rotates.
The pole pruner can also be switched on by first
pressing the release slide (2) and pressing the
trigger lockout (1) within 5 seconds (as long as
the LED is flashing). The trigger (3) is now
unlocked and the pole pruner is ready for use.
If the trigger (3) and the trigger lockout (1) are
released after switch-on, the LED flashes for
another 5 seconds. As long as the LED is flash‐
ing, the pole pruner can be switched on again
without having to actuate the release slide (2)
again.
10.2 Switching the Pole Pruner Off
► Release the trigger and trigger lockout.
► Wait until the saw chain comes to a complete
standstill after about 1 second.
► If the saw chain continues to run after about 1
second: Remove the battery and contact your
STIHL dealer for assistance.
The pole pruner has a malfunction.
11 Checking Pole Pruner and
Battery
11.1 Checking the Chain Sprocket
► Switch off the pole pruner and remove the bat‐
tery.
► Remove the chain sprocket cover.
► Remove the guide bar and saw chain.
a
0000097176_001
► Use a STIHL gauge to check the wear marks
on the chain sprocket.
► If the wear marks are deeper than a = 0.5 mm:
Do not use your pole pruner and contact your
STIHL dealer for assistance.
The chain sprocket must be replaced.
11.2 Checking the Guide Bar
► Switch off the pole pruner and remove the bat‐
tery.
► Remove the saw chain and guide bar.
0000-GXX-1217-A0
► Measure the depth of the guide bar with the
scale on a STIHL filing gauge.
► Install a new guide bar if one of the following
points applies:
–The guide bar is damaged.
–The measured guide bar groove depth is
less than specified minimum depth, 20.3.
–The guide bar groove is pinched or splayed.
► If you have any doubts, be sure to consult a
STIHL dealer.
11.3 Checking the Saw Chain
► Switch off the pole pruner and remove the bat‐
tery.
1
0000-GXX-1218-A0
2
English 11 Checking Pole Pruner and Battery
16 0458-698-0121-B

► Measure the height of the depth limiters (1)
with a STIHL filing gauge (2). The STIHL filing
gauge must match the pitch of the saw chain.
► If a depth gauge (1) projects from the filing
gauge (2): Lower the depth gauge (1) with a
file, 17.3.
0000-GXX-1372-A0
1
23
4
► Make sure the service marks (1 to 4) on the
cutters are visible.
► If one of the service marks is not visible on a
cutter: Do not use your saw chain and contact
your STIHL dealer for assistance.
► Use a STIHL filing gauge to check that the fil‐
ing angle is 30° on all cutters. The STIHL filing
gauge must match the pitch of the saw chain.
► If the filing angle of 30° has not been main‐
tained: Resharpen the saw chain.
► If you have any doubts, be sure to consult a
STIHL dealer.
11.4 Checking the controls
Trigger lockout and trigger
► Remove the battery.
► Try pressing the trigger without pressing the
trigger lockout.
► If the trigger can be pressed: Do not use the
pole pruner and contact a STIHL specialist
dealer.
The trigger lockout is faulty.
► Press and hold the trigger lockout.
► Squeeze and release the trigger.
► If the trigger or trigger lockout is stiff or does
not spring back to the initial position: Do not
use the pole pruner and contact a STIHL spe‐
cialist dealer.
The trigger or the trigger lockout is defective.
Switching on the Pole Pruner
► Insert battery.
► Press and hold the trigger lockout.
► Push the release slide with your thumb in the
direction of the saw chain.
► Press and hold the trigger.
The saw chain runs.
► If 3 LEDs on the battery flash red: Remove the
battery and contact your STIHL dealer for
assistance.
There is a malfunction in the pole pruner.
► Release the trigger.
The saw chain stops running after about 1
second.
► If the saw chain continues to run after about 1
second: Remove the battery and contact your
STIHL dealer for assistance.
The pole pruner has a malfunction.
11.5 Checking Chain Lubrication
► Fit the battery.
► Hold the guide bar over a light surface.
► Switch on the pole pruner.
Chain oil is thrown off the chain and is visible
on the light surface. Chain lubrication is oper‐
ating properly.
► If no chain oil can be seen:
► Fill up with chain oil.
► Check chain lubrication again.
► If chain oil is still not visible on the light sur‐
face: Do not use your pole pruner and con‐
tact your STIHL servicing dealer for assis‐
tance. Chain lubrication is defective.
11.6 Testing the Battery
► Press button on battery.
The LEDs glow or flash.
► If the LEDs do not glow or flash: Do not use
the battery and contact your STIHL servicing
dealer.
There is a malfunction in the battery.
12 Using the Pole Pruner
12.1 Adjusting the shaft length
The shaft can be adjusted to different lengths to
suit the application as well as the user's height
and reach.
► Switch off the pole pruner and remove the bat‐
tery.
2
1
0000097146_001
► Turn the clamp nut (1) a half-rotation
towards .
► Adjust the shaft (2) to the required length.
12 Using the Pole Pruner English
0458-698-0121-B 17

►Turn the clamp nut (1) in direction as far as it
will go.
► Check that the shaft (2) cannot be shifted any
more ant that the clamp nut (1) is twisted tight
in direction as far as it will go.
The shaft length is properly adjusted if the shaft
(2) cannot be pushed in or pulled out and the
clamping unit is twisted tight in direction of as
far as it will go.
12.2 Aligning the clip
The clip can be moved to different positions
depending on the shaft length.
► Switch off the pole pruner and remove the bat‐
tery.
a
b
2
1
0000097174_001
► Press clip (1) together and move on the han‐
dle hose (2), ensuring that the following condi‐
tions are met:
–If the shaft has been retracted: a = 15 cm
–If the shaft has been fully extended:
b = 50 cm
12.3 Fitting and Adjusting the Shoul‐
der Strap
2
1
0000-GXX-2990-A0
► Put on the shoulder strap (1).
► Adjust the shoulder strap (1) so that the cara‐
biner (2) is about a hand’s width below your
right hip.
Other approved carrying systems are listed in
this User Manual, 22.1.
12.4 Holding and Controlling the
Pole Pruner
1
2
0000097177_001
► Connect the carrying ring (2) to the carabi‐
ner (1).
0000097178_001
► Hold the pole pruner with one hand by the
control handle – wrap your thumb around the
control handle.
► Hold the pole pruner firmly with your other
hand by the handle hose - wrap your thumb
around the handle hose.
12.5 Delimbing
Cross-cut
1
0000085007_003
► Position the limit stop (1) against the branch.
The saw chain can be positioned precisely
using the gauge bar.
► With the chain running at full speed, press the
guide bar downward against the limb with a
leveraging movement.
► Cut through the limb with the bottom of the
guide bar.
English 12 Using the Pole Pruner
18 0458-698-0121-B

1
2
0000-GXX-4765-A1
► If the limb is under tension: Make the relieving
cut (1) into the compression side and then per‐
form the bucking cut (2) from the tension side.
Cutting thick branches
a
1 2
0000-GXX-4766-A0
► Perform a relieving cut (2) at cutting point (2)
at a distance a = 20 cm from the final cross cut
(1).
► Perform a relieving cut and then a cross-cut at
the desired cutting point (1).
13 After Finishing Work
13.1 When Work is Finished
► Switch off the pole pruner and remove the bat‐
tery.
► If the pole pruner is wet: Allow the pole pruner
to dry.
► If the battery is wet: Allow the battery to dry.
► Clean the pole pruner.
► Clean the guide bar and saw chain.
► Loosen the nut on the chain sprocket cover.
► Back off the tensioning screw 2 turns counter‐
clockwise.
The saw chain is now slack.
► Tighten down the nut on the chain sprocket
cover.
► Fit the chain scabbard so that it completely
covers the guide bar.
► Clean the battery.
14 Transporting
14.1 Transporting the Pole Pruner
► Switch off the pole pruner and remove the bat‐
tery.
► Fit the chain scabbard so that it completely
covers the guide bar.
► Push in shaft completely.
Carrying the pole pruner
► Carry the pole pruner in one hand by the shaft
with the guide bar behind you.
Transporting the pole pruner in the car
► Secure the pole pruner to prevent turnover
and movement.
14.2 Transporting the Battery
► Switch off the pole pruner and remove the bat‐
tery.
► Check that the battery is in a safe condition.
► Pack the battery so that it cannot move in the
packaging.
► Secure the packaging so that it cannot move.
The battery is subject to the Carriage of Danger‐
ous Goods regulations. The battery is classified
as UN 3480 (lithium ion batteries) and has been
tested pursuant to UN Manual Tests and Criteria
Part III, Subsection 38.3.
The transport regulations can be found at
www.stihl.com/safety-data-sheets.
15 Storing
15.1 Storing the Pole Pruner
► Switch off the pole pruner and remove the bat‐
tery.
► Fit the chain scabbard so that it completely
covers the guide bar.
► Check the following points when storing the
pole pruner:
–The pole pruner is out of the reach of chil‐
dren.
–The pole pruner is clean and dry.
► If you store the pole pruner for more than 30
days: Remove the guide bar and saw chain.
15.2 Storing the Battery
STIHL recommends keeping the battery in a
charging state between 40% and 60 % (2 green
LEDs lit).
13 After Finishing Work English
0458-698-0121-B 19

► The battery should be stored in such a way
that the following conditions are fulfilled:
–The battery is out of the reach of children.
–The battery is clean and dry.
–The battery is in an enclosed space.
–Battery is separated from the pole pruner.
–If the battery is stored in the charger, dis‐
connect the mains plug and store the bat‐
tery at a state of charge between 40% and
60% (2 lit green LEDs).
–The battery is in a temperature range
between - 10 °C and + 50 °C.
NOTICE
■ If the battery is not stored as described in this
User Manual, the battery may become deeply
discharged and irreparably damaged.
►Charge a discharged battery before storing
it. STIHL recommends keeping the battery
in a charging state between 40% and 60%
(2 lit green LEDs).
►Store the battery separately from the pole
pruner.
16 Cleaning
16.1 Cleaning the Pole Pruner
► Switch off the pole pruner and remove the bat‐
tery.
► Clean the pole pruner with a damp cloth or
STIHL resin solvent.
► Clean vents with a paintbrush.
► Remove foreign objects from the battery com‐
partment and clean the battery compartment
with a damp cloth.
► Clean the electrical contacts in the battery
compartment with a paintbrush or soft brush.
► Remove the chain sprocket cover.
► Clean the area around the chain sprocket with
a damp cloth or STIHL resin solvent.
► Fit the chain sprocket cover.
16.2 Cleaning the Guide Bar and
Saw Chain
► Switch off the pole pruner and remove the bat‐
tery.
► Remove the guide bar and saw chain.
3
1
2
3
0000097208_001
► Clean the oil port (1), oil inlet hole (2) and bar
groove (3) with a soft brush or STIHL resin
solvent.
► Clean the saw chain with a soft brush or
STIHL resin solvent.
► Mount the guide bar and saw chain.
16.3 Cleaning the Air Filter
► Switch off the pole pruner and remove the bat‐
tery.
0000097125-001
1
2
► Clean the area around the air filter (2) with a
damp cloth or a soft brush.
► Turn the screw (1) counterclockwise until the
air filter (2) can be removed.
► Swing the air filter (2) upwards and pull it off.
► Pass the air filter (2) under running water to
rinse off coarse dirt from the outside.
► If the air filter (2) is damaged: Install a new air
filter (2).
► Allow the air filter (2) to dry in the air.
► Install the air filter (2) in the housing and fold it
down.
The air filter (2) must sit flush in the housing at
all sides.
► Insert and tighten down the screw (1) firmly.
16.4 Cleaning the Battery
► Clean the battery with a damp cloth.
17 Maintenance
17.1 Maintenance intervals
Maintenance intervals depend on the ambient
conditions and the operating conditions. STIHL
recommends the following maintenance inter‐
vals:
English 16 Cleaning
20 0458-698-0121-B
Other manuals for HTA 135
2
Table of contents
Other Stihl Pole Saw manuals

Stihl
Stihl HTE 60 User manual

Stihl
Stihl HT 105 User manual

Stihl
Stihl HT-KM User manual

Stihl
Stihl HTA 65 User manual

Stihl
Stihl FS 100 RX User manual

Stihl
Stihl HTA 66 User manual

Stihl
Stihl KombiTool HT-KM 4182 User manual

Stihl
Stihl HTA 135 Setup guide

Stihl
Stihl HTE 60 User manual

Stihl
Stihl HT 102 User manual
Popular Pole Saw manuals by other brands

Pattfield Ergo Tools
Pattfield Ergo Tools BASIC PE-AHE 18 Li Translation of the original instructions

Husqvarna
Husqvarna PA 1100 Operator's manual

Greenlee
Greenlee 48520 Service manual

Ryobi
Ryobi Expand-It RXPR01 Original instructions

Scotts
Scotts LPR020S owner's manual

Bahco
Bahco Cut & Hold Secateur PX-Rose brochure