Stirling SUC54EEW User manual
54cm Freestanding Electric Cooker
INSTRUCTION MANUAL
Issue Date: 11/2018IM Version No.: V1.4
Model Number SUC54EEW
MODEL: SUC54EEW | PRODUCT CODE: 62878 | 11/2018

2
MODEL: SUC54EEW | PRODUCT CODE: 62878 | 11/2018
Congratulations on choosing to buy a STIRLING® product.
All products brought to you by STIRLING® are manufactured to the highest standards
of performance and safety and, as part of our philosophy of customer service and
satisfaction, are backed by our comprehensive 3 Year In Home Warranty. We hope you
will enjoy using your purchase for many years to come.
Welcome

3
MODEL: SUC54EEW | PRODUCT CODE: 62878 | 11/2018
Contents
2 Welcome
4 Warranty Details
5 General Safety Instructions
8 Product Overview
10 Operating Instructions
11 Getting Started
14 Installation
16 Cleaning and Maintenance
18 Technical Specification
20 FAQs
21 Repair and Refurbished Goods or Parts Notice
22 Warranty Returns
4
MODEL: SUC54EEW | PRODUCT CODE: 62878 | 11/2018
The product is guaranteed to be free from defects in workmanship and parts for a period
of 36 months from the date of purchase. Defects that occur within this warranty period,
under normal use and care, will be repaired, replaced or refunded at our discretion. The
benets conferred by this warranty are in addition to all rights and remedies in respect of
the product that the consumer has under the Competition and Consumer Act 2010 and
similar state and territory laws.
Our goods come with guarantees that cannot be excluded under the Australian Consumer
Law. You are entitled to a replacement or refund for a major failure and for compensation
for any other reasonably foreseeable loss or damage. You are also entitled to have the
goods repaired or replaced if the goods fail to be of acceptable quality and the failure does
not amount to a major failure.
54cm Freestanding Electric Cooker

5
MODEL: SUC54EEW | PRODUCT CODE: 62878 | 11/2018
IMPORTANT SAFETY INSTRUCTIONS
READ CAREFULLY AND KEEP FOR FUTURE REFERENCE
Read this manual thoroughly before rst use, even if you are familiar with this type of product. The safety
precautions enclosed herein reduce the risk of re, electric shock and injury when correctly adhered to. Make
sure you understand all instructions and warnings.
Keep the manual in a safe place for future reference, along with the completed warranty card and purchase
receipt. If you sell or transfer ownership of this product, pass on these instructions to the new owner.
Always follow basic safety precautions and accident prevention measures when using an electrical appliance,
including the following:
WARNING!
Installation Electrical Shock Hazard
WARNING: All electrical work associated with the installation of this appliance must be carried out by a
licensed electrician.
WARNING: This appliance must be installed by a suitably qualied person in strict accordance with all
instructions in this manual.
Disconnect the appliance from the mains electricity supply before carrying out any work or maintenance on it.
Failure to follow this advice may result in electrical shock or death.
Important installation advice
• Adjacent furniture: When having the appliance installed, make sure that the adjacent furniture or housing,
and all installation materials, are able to withstand a minimum temperature of 85° C above the ambient
room temperature while the oven is in use.
• Certain types of vinyl or laminate kitchen furniture are particularly prone to heat damage or discolouration
at temperatures below the guidelines given above. We assume no liability for any damage caused by the
appliance being installed in contravention of this temperature limit, or by placing adjacent cabinet materials
closer than 4mm near the appliance.
• Ventilation: Heat, steam and moisture will be created during use of the appliance. Take care to avoid
injury and ensure that the room is adequately ventilated. If the appliance is going to be used for prolonged
periods of time, additional ventilation may be required. If in doubt about your ventilation requirements,
consult your qualied installer.
• Cables: Do not allow electrical ttings or cables to come into contact with areas on the appliance that gets
hot.
• Curtains: Do not install the oven next to curtains or soft furnishings.
• Damaged cord: If the power cord is damaged, it must be replaced by the manufacturer or a qualied
service engineer in order to avoid a hazard.
General usage conditions and restrictions
• Domestic use only: This appliance is designed for indoor domestic use only, it is not intended for
commercial use and this will void the warranty.
•Intended purpose: Only use this appliance for its intended purpose, in its intended environment and
as described in this manual. Any other use may cause re, electric shock or injury. It is not intended for
commercial, trade or industrial use.
• Follow instructions: Make sure to observe all rules and provisions in this instruction manual. Do not allow
anybody who is not familiar with the contents of this manual to operate the appliance.
• Use common sense: These instructions are not intended to cover every possible condition and
situation. As with any electrical household appliance, common sense and caution are therefore always
recommended when installing, operating and maintaining the oven.
• Usage restriction: This appliance is not intended for use by persons (including children) with reduced
physical, sensory or mental capabilities, or lack of experience and knowledge, unless they have been given
supervision or instruction concerning use of the appliance by a person responsible for their safety.
General Safety Instructions

6
MODEL: SUC54EEW | PRODUCT CODE: 62878 | 11/2018
General Safety Instructions Cont.
• Supervise children: Young children do not recognise the risks involved when using electrical appliances.
Make sure children younger than 8 years of age are kept away from the appliance during use and after
use. If it is necessary for younger family members to be in the kitchen, ensure that they are kept under
close supervision at all times.
• Unattended: Never leave the appliance unattended during use, as this is a re risk. Oils and fats in
roasting dishes may catch re due to overheating.
• No heater: Do not use the appliance for heating a room or drying clothes. This appliance must not be
used as a space heater.
• No timer: The appliance is not intended to be operated by means of an external timer or separate remote
control system.
• After use: Make sure to switch off the oven after use and before cleaning.
• Damage: Do not use the appliance if any part has been damaged or does not work properly. Only have it
repaired by an authorised service centre. Incorrect repair could expose you to the risk of electric shock, re
or injury. Prolonged use of the unit in such conditions could cause re or electrocution. In case of damage,
contact our after sales support centre using the details at the bottom of this page.
• Liability: We assume no liability for any eventual damages caused by misuse of the product or
noncompliance with these instructions.
• Do not use when faulty: Do not use the appliance in the event of a technical fault. Any faults must be
xed by an appropriately qualied and authorised person. Contact our after sales support line for advice.
• No storage: Do not store ammable materials in the appliance or near this appliance.
• No Aerosols: Do not spray aerosols in the vicinity of this appliance while it is in operation.
• Cleaning: Clean the oven and cooktop on a regular basis so oils and fats do not accumulate and cause
a re risk. Make sure the appliance is switched off before cleaning. Do not use harsh abrasive cleaners
or metal scrapers to clean the oven door glass as this can scratch the surface, which may result in the
oven glass shattering. Do not use steam cleaning equipment for cleaning any part of the appliance. When
cleaning the appliance, ensure that no part is immersed in water or other liquid.
Oven-specific safety advice
• Oven door: Do not place heavy objects on the oven door. Do not lean on the oven door when it is open, as
this can damage the door hinges.
• Grill: Keep the oven door closed when using the grill function.
• Oven cavity: During cooking, never place pans or cookware directly onto the bottom of your oven. Always
place them on the shelves provided.
• Oven accessories: When removing the baking/drip tray or oven rack from the hot oven, always use an
oven mitt.
• Aluminium foil: Do not use aluminium foil to cover the grill pan or heat items wrapped in aluminium foil
under the grill. The high reectivity of the foil could potentially damage the grill element. You should also
never line the base of your oven with aluminium foil.
• Do not line the oven with foil or place anything on the bottom of the oven while baking to avoid permanent
damage, as trapped heat will crack or damage the enamel oor of the oven cavity.
• Lifting/moving: Do not attempt to lift or move the oven by using the oven door or handle, as this may
cause damage to the appliance or result in injury to the person lifting the appliance.
• Fan guard: The oven must be switched off before removing the guard and that, after cleaning, the guard
must be replaced in accordance with the instructions.

7
MODEL: SUC54EEW | PRODUCT CODE: 62878 | 11/2018
General Safety Instructions Cont.
Cooktop-specific safety advice
• Do not allow pots to boil dry, as damage to heating elements or the hob itself may result.
• Do not operate cooktop heating elements without a pot, fry pan, etc.
• Do not allow cookware to overhang the hob onto adjacent bench tops as this may cause scorching
to the bench top surface.
• Danger of fire: Do not store items on the cooking surfaces.
• CAUTION: The cooking process has to be supervised. A short term cooking process has to be
supervised continuously.
• WARNING: Unattended cooking on a hob with fat and oil can be dangerous and may result in a re.
CAUTION: Hot!
• Do not touch hot surfaces: The heating elements and other accessible parts
including inside the oven cavity and on the cooktop become extremely hot
during operation and can cause burns on contact. Take care when handling
the food you are cooking to avoid touching hot parts inadvertently. Keep young
children well away when using the appliance.
• Opening the door: Be careful when opening the oven door to avoid contact with
hot parts of the oven and steam.

8
MODEL: SUC54EEW | PRODUCT CODE: 62878 | 11/2018
Freestanding Electric Cooker Layout
KEY
1. Hob
2. Hotplate Burner
3. Control Panel
4. Guide bracket
5. Shelf
6. Baking tray
7. Hinge
8. Oven Door
9. Grill Element
10. Drawer panel
11. Anti slip feet
Also included but not visible:
1 × Quick Start Guide
1 × Warranty Card
1 × Anti-tilt Plate
2 × Screws
Product Overview
.1
.2
.3
.4
.5
.6
.7
.8
.9
.10
.11
120
110
100
90
80 70
60
50
40
30
20
10

9
MODEL: SUC54EEW | PRODUCT CODE: 62878 | 11/2018
Product Overview Cont.
Control Panel Layout
Cooking Functions
Symbol Description
Oven Lamp: Which enables the user to observe the progress of cooking without opening
the door. Oven lamp will light for all cooking functions.
Grill - Suitable for grilling and browning food
Grill with Fan - The upper heating element and the fan operate together. Suitable for Grilling
food without turning over and using two shelves. Do not use lowest shelf position.
Defrosting: Only the fan operates. It is located on the back of the oven, causing the air to
circulate at room temperature around the food. This is recommended for the defrosting of
all types of food, but in particular for delicate types of food which do not require subsequent
cooking. By using the fan the defrosting time is approximately halved.
Fan Forced - The rear circular heating element and the fan operate together to assist in
evenly cooking foods. This mode is ideal for general purpose cooking on 3 shelves at the
same time.
2
45 6
31 .1.2.3
.4.5.6
KEY 1. Hotplate indicator lamp
(indicates when a cooktop
element is turned on)
2. Oven Indicator Lamp (indicates
when the oven is heating up to
temperature or cycling on).
3. Minute Minder Timer
4. Oven cooking function
selection knob
5. Temperature selection knob
6. Hotplate (or cooktop heating
element) control knob (which
can be rotated in either
direction and adjusts the
temperature of the hotplate)

10
MODEL: SUC54EEW | PRODUCT CODE: 62878 | 11/2018
Operating Instructions
Using your oven
To start using your oven, simply select a Cooking Function (using your oven cooking function selection knob),
then set your desired oven temperature by using the Oven Temperature control knob and then set your desired
cooking time using the Minute Minder Timer. If you’d prefer not to set a dened cooking time, you can also
select the manual mode by switching the Minute Minder Timer knob to the Manual Mode (as dened by in
“Minute Minder” image below.
Note: The oven indicator light will switch on to indicate the oven is heating up.
Oven Temperature Control Knob
• Selection of cooking temperature is carried out by turning the knob clockwise to the required temperature,
between 60ºC to MAX .
• The “oven indicator lamp” will come on when the oven is heating up. When this indicator light goes out it
means that the oven has reached the required temperature. It is normal for this indicator light to alternate
between on and off during use as this means that the oven temperature is being constantly maintained at
the selected level.
Using your hotplates (cooktop heating elements)
To use your hotplates, simply turn on the corresponding Hotplate control knob (which can be rotated in either
direction) to your desired temperature. The Hotplate indicator light will switch on to indicate the hotplate is
heating up.
First Time Operation
Before using your appliance:
• Please wipe out the oven interior prior to operation with warm soapy water and polish dry with a soft clean
cloth.
• New appliances can have an odour during their rst operation. It is recommended to ‘run in’ your appliance
before you cook for the rst time. Run the oven at 180°C for 2-4 hours and ensure that the room is well
ventilated.
• Please install oven furniture as outlined in the “Getting Started” section.
• Turn each hotplate temperature setting to high for 3 minutes to fully harden the coating. When cooled, apply
a thin coating of cooking oil to seal the surface of the heating elements.
• The gas grill element may have oils left on the grill during manufacture. Before you cook on the grill for the
rst time, turn on for 15 minutes with 10mm of water in the bottom of the grill dish.
Oven Function Minute Minder Timer
11
MODEL: SUC54EEW | PRODUCT CODE: 62878 | 11/2018
Getting Started
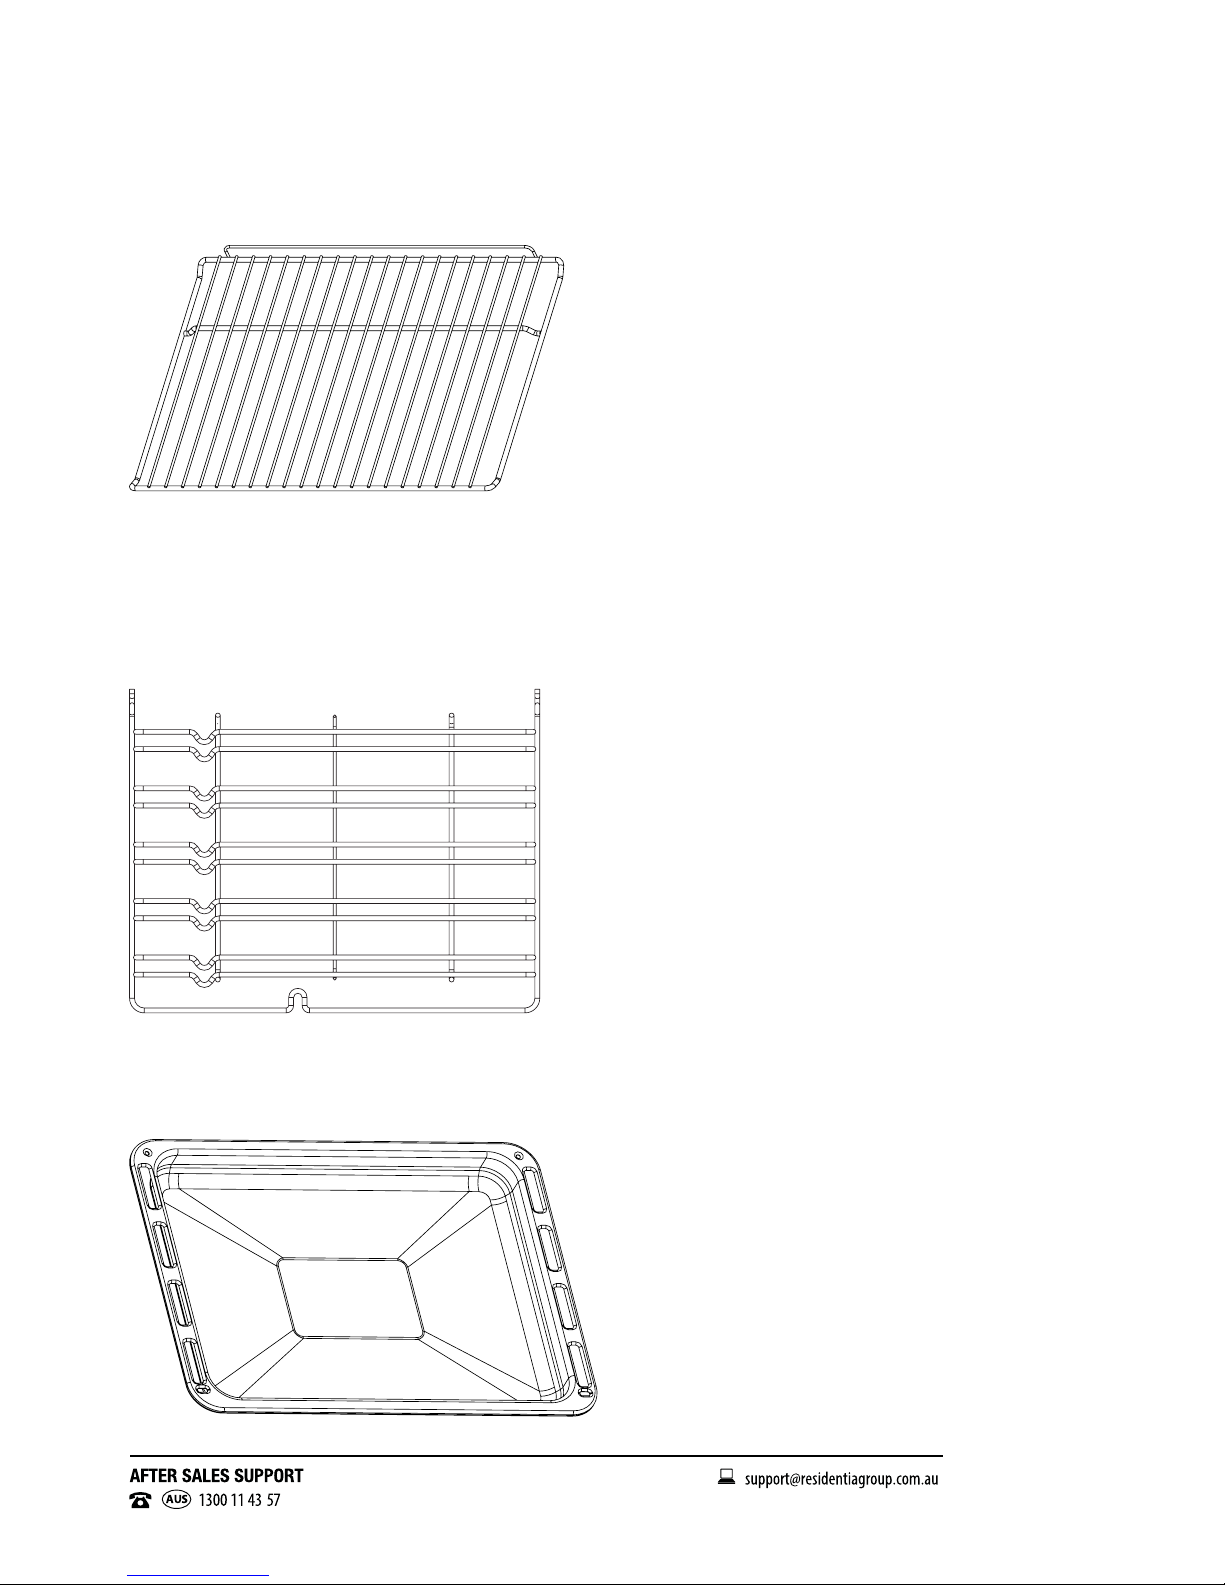
Accessories
Chrome Rack: Used for grilling dishes, cake pans or items for roasting and grilling. (Fig. 1)
Chromed Rack Support: Used for cooking larger sized food, the shelf support rails on the right and
left sides of the oven can be removed, dishes and trays can be put directly on the oor of the oven. Use
functions such as grill, grill with fan. (Fig. 2)
IMPORTANT: When placing dishes on the oven oor, DO NOT use functions with the bottom element to
prevent heat gathering at the bottom.
Roasting Tray: Used for cooking large quantities of food such as moist cakes, pastries, frozen food etc., or
for collecting spillage (I.e. meat juices or crumbs). (Fig. 3)
Fig. 1
x 2 QTY
x 1 QTY
Fig. 2
Fig. 3

12
MODEL: SUC54EEW | PRODUCT CODE: 62878 | 11/2018
Getting Started Cont.
Shelf Placement
To ensure the oven shelves operate safely, correct placement of the shelves between the rack supports
is imperative. The shelves should be tted facing the right direction. This will ensure that during careful
removal of the shelf or tray, hot items should not slide out. (Fig. 4)
Note: The wire shelves and the roasting tray only can be used between the rst and fth layers.
Fig. 4
Oven cooking guide
The following is intended as a rough guide. It is often required to set oven 10-20 degrees above or below
this guide to get the result you want. Also adjustments are needed for the cooking time to suit personal
expectations. For best results when baking, preheat your oven for 15-20 minutes. (Note: Shelf position is
counted from the bottom upwards, where the bottom shelf is position 1.
Food
Conventional Oven Fan forced oven Time in
minutes
Temperature
(ºC)
Oven shelf
position
Temperature
(ºC)
Oven shelf
position
Plain or fruit scones 220 2210 Any 10-15
Rolled biscuits 170 2150 Any 10-15
Spooned biscuits 190 2180 Any 12-15
Shortbread biscuits 160 1150 Any 30-35
Hard individual meringues 110 2100 Any 90
Soft individual meringues 180 2165 Any 15-20
Pavlova 110 1100 Any 75
Patty cakes 190 2180 Any 15-20
Sponge 180 2170 Any 20-30
Plain butter cake 180 2170 Any 25-40
Rich fruit cake 140 2130 Any 180
Shortcrust cornish pasty 180-200 2160 Any 40-45
Shortcrust custard tart 180-220 1170-200 Any 20-30
Cream puffs 210 2200 Any 25-30
Yeast bread 210 1200 Any 25-30
Pizza 200 2220 Any 15-25

13
MODEL: SUC54EEW | PRODUCT CODE: 62878 | 11/2018
Oven Cooking Guide Cont.
Meat/Poultry/Fish Recommended
temperature (ºC) Minutes per kilogram
Beef
Rare 200 35-40
Medium 200 45-50
Well done 200 55-60
Lamb Medium 200 40
Well done 60
Veal 180 60
Pork 200 60
Chicken 180-200 45-60
Duck 180-200 60-70
Turkey 180
40–45 (less than 10kg)
35–40 (more than 10kg)
Fish 180 20
Using the hotplates (cooktop elements) of your appliance
GENERAL WARNINGS:
• Do not use pots and pans which are unsteady as these could easily tip over and cause injury.
• Do not use mats, heat diffusers and/or wok stands. These will cause a temperature build-up which can
damage the cooktop.
• Do not allow cooking pots and pans to overhang the sides or front of the hob, or get to close to the
appliance control knobs.
Choosing Cooking Pots
Look at this diagram below which shows you which cookware to use on the hotplates and which cookware
should not be used.
• Always use pots and pans with at bottoms. Uneven or thin bottom pots/pans will waste energy and cook
slowly.
• Always use pots and pans which are slightly larger than the hotplate. Small pans waste energy.
• Always use dry pots and pans on the hotplates.
• Do not use pots and pans which are too large. Pans which overhang the hotplate more than 50mm can
damage the hob.
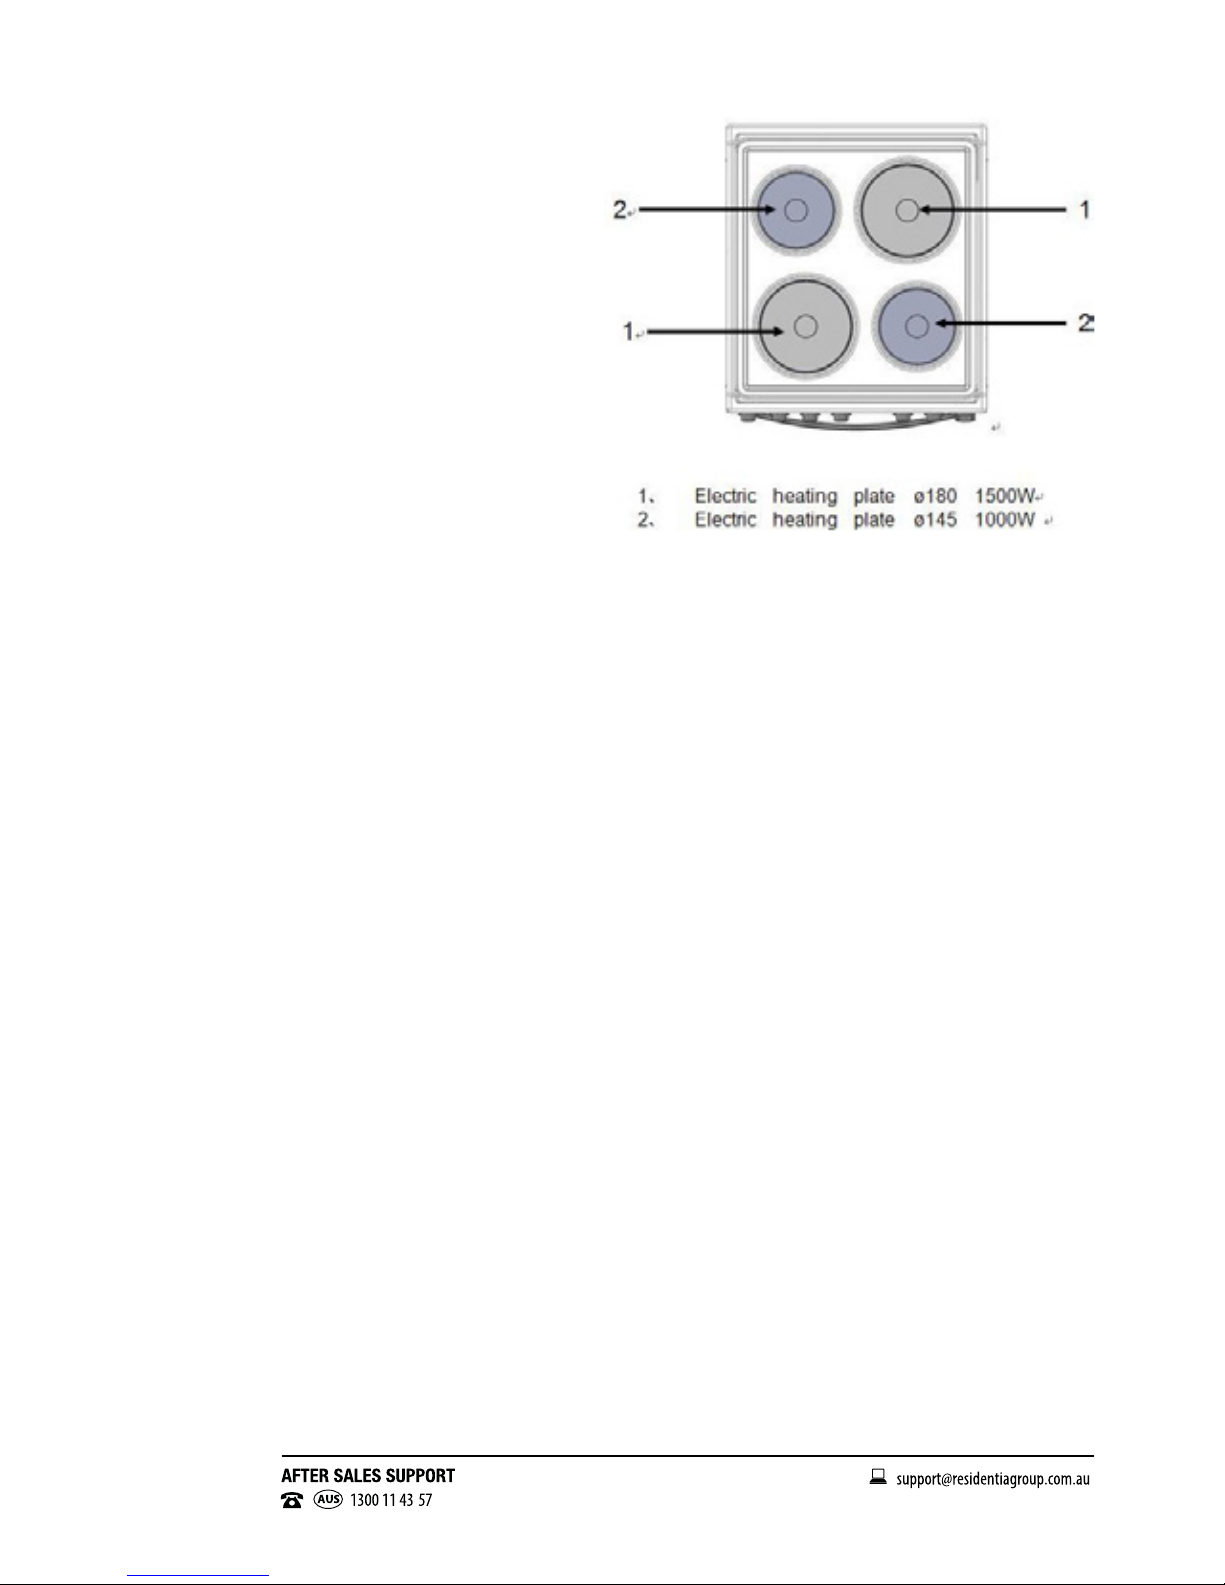
Solid hotplates
• The strong solid-cast hotplates give wide contact for fast, efcient cooking.
• The hotplates are sealed all around which means that spilt liquids can not go under the hotplates.
14
MODEL: SUC54EEW | PRODUCT CODE: 62878 | 11/2018
Oven Cooking Guide Cont.
Before first use
• The top surface of the hotplates are sealed with
a heat resistant coating. Before using for the rst
time the hotplates should be heated for a short
period without a pan to harden the protective
coating.
• Turn the heat setting to high for approx. 3 minutes
to fully harden the coating. When the hotplates
have cooled apply a thin coating of cooking oil to
the hotplate to seal and protect the surface.
• When a hotplate is on, the hot surface warning
light will come on.
• After switching off, this light will continue to glow
until the temperature of the hotplate drops below
60ºC.
Installation
General Installation Warnings:
• The appliance must be installed by a licensed electrician.
• Please never try to modify or repair the appliance by yourself.
• The appliance should be installed with adequate ventilation.
• A certicate of compliance must be supplied by the Installer and is to be kept by the customer.
• The packing materials must be removed before you install the cooker.
• You must follow the installation instructions in this booklet.
• The surrounding kitchen cabinets must be able to withstand 85ºC.
• The appliance must not be installed in a corner. It must be installed at least 100mm from the side wall.
• Do not obstruct the vents, openings and air spaces on the appliance.
• The anti-tilt plate must be installed to avoid accidental tipping.
• The stabilising bolt must be installed to avoid accidental moving.
• You must not pull or lift the appliance by the door handles.
• A suitable isolating switch providing full disconnection from the mains power supply must be incorporated
in the permanent wiring. The switch must be mounted and positioned to comply with the local wiring rules
and regulations. The isolating switch must be of an approved type and provide a 3 mm air gap contact
separation in all poles (or in all active [phase] conductors if the local wiring rules allow for this variation of
the requirements). The isolating switch will be easily accessible to the customer with the oven installed.
• If the supply cord or cable is damaged, it must be replaced by an approved service agent or a similarly
qualied person in order to avoid a hazard.
• According to the electrical safety regulations, the appliance must be properly earthed.
Connection of the Appliance
Connecting the appropriate power supply (terminal board/connector block):
• Using a screwdriver, prize open tabs of the Terminal board cover.
• Remove the wire clamp screw.
• Fasten the wires beneath the corresponding screw heads, using brass ‘bridge’ for single phase supply.
• Fasten cable clamp and close the cover of the terminal board.
• The AC power supply should be 220-240 V, 50/60 Hz. The minimum 45A fuse, or at least 45A a distribution
circuit breaker.
Solid Hotplates

15
MODEL: SUC54EEW | PRODUCT CODE: 62878 | 11/2018
Warning! Connect the power cord must be in accordance with the instructions listed in the table below.
Wire cross-sectional
area (mm2)
Connection Mode
L1 L2 L3 N E
1N~ Min 4 - - Min 4 Min 4
2N~ Min 2.5 Min 2.5 -Min 4 Min 4
3N~ Min 1.5 Min 2.5 Min 2.5 Min 4 Min 4
Connecting the supply cable to the mains
Install an approved circuit breaker with a minimum contact opening of 3 mm, between the appliance and the
mains fuse box. The circuit breaker should be sized according to the load and should comply with current
regulations (the earth wire should not be interrupted by the circuit breaker).
The supply cable should be positioned so that it does not reach a temperature of more than 50ºC above
ambient temperature (or room temperature), anywhere along its length.
Before switching the fuse ON within the meter-box, please check:
• Earth continuity. The electrical safety of this appliance can only be guaranteed if the cooker is correctly
installed and earthed, in compliance with regulations on electrical installations.
• The electrical capacity of the system and sockets will support the maximum power of the appliance, as
indicated on the data plate.
Locating the cooker
Study the diagrams below to be sure of the dimensions required to locate the cooker safely. Make sure
that the top of the cooker is at least 10mm higher than the level of the bench tops. The appliance has been
designed to t in a 550mm wide gap in kitchen cabinets. The cooker may also be installed at the end of a line
of benches or with a free space on either side.
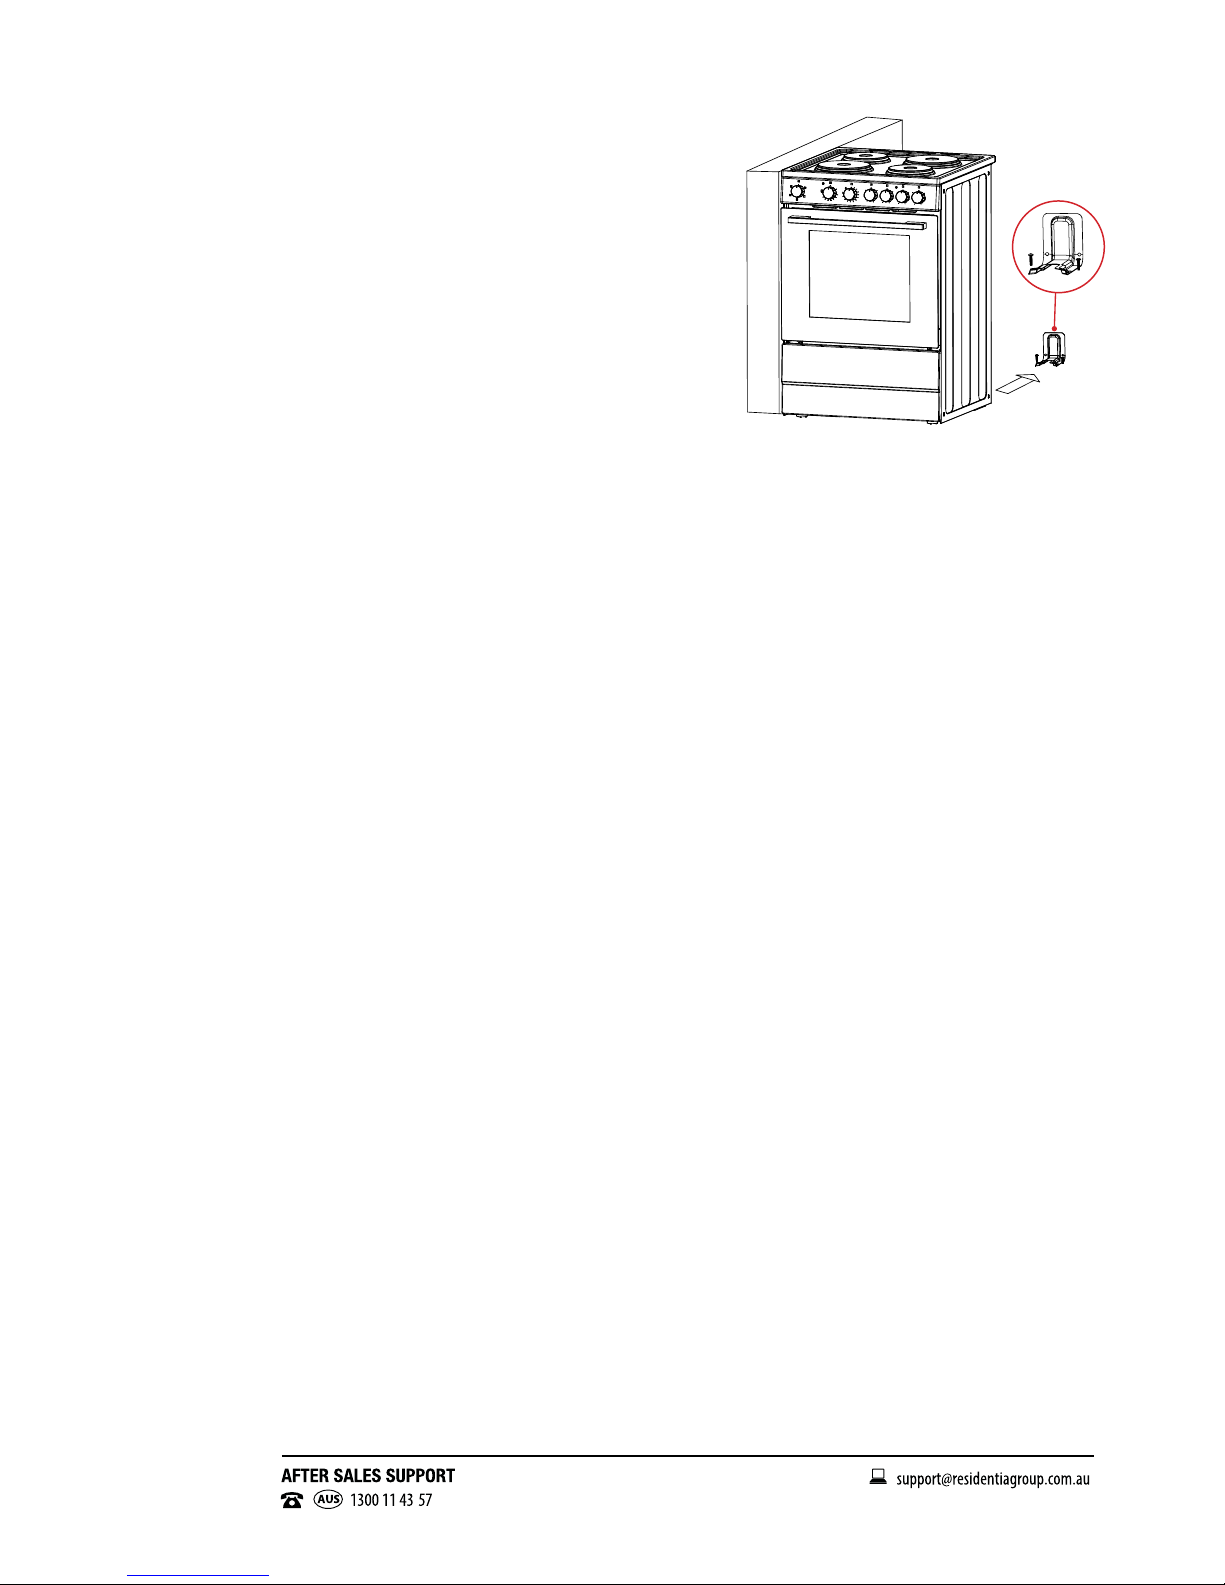
Securing the Appliance to the Floor
Please ensure the appliance is secured to the oor to prevent accidental tilting. This should be done using the
Anti-tilt plate provided and the following steps in (Fig. 5):
1. Determine position of cooker and anti-tilt plate.
2. Securely x the anti-tilt plate to the oor with appropriate fasteners.
3. Fasten the stability bolt bracket to the front frame with the 2 screws supplied.
4. Reposition the cooker back into the anti-tilt plate and then mark the position of the stability bolt hole.
5. Pull the cooker back out and drill the bolt location hole. Use a 10mm masonry or wood drill. When drilling
into concrete ensure a minimum hole depth of 30mm.
Installation Cont.
16
MODEL: SUC54EEW | PRODUCT CODE: 62878 | 11/2018
6. Reposition the cooker back into the anti-tilt plate, aligning the
stability bolt bracket with the 10mm drilled hole. Then slide the
bolt through the bracket and into the hole.
7. Connect Electricity supply but do not turn on until installation is
completed.
8. Slide the cooker back into the anti-tilt plate so that rear cover
rests against the rear wall. Then check the height and level of
the cooker. If required, pull the cooker back out and adjust the
leveling feet as required.
Note: Anti-tilt bracket must be securely mounted to oor or wall.
The thickness of ooring may require longer screws to anchor
bracket to oor.
Installation Cont.
Cleaning and Maintenance
CAUTION
• Before cleaning any part of the appliance, make sure that all oven and cooktop controls are switched off
and that the appliance has cooled down sufciently.
• Never use a steam cleaner to clean any part of the appliance.
Frequency: After each use, make sure to clean the appliance thoroughly. This will prevent residual food stuffs
becoming baked on the oven chamber surfaces, which will make the residues more difcult to remove. To
avoid such stains, make sure to select a cooking temperature and function that is appropriate for the food
you are cooking. Also make sure to place the food in an adequately sized dish and to use the drip tray where
appropriate.
• Appliance exterior: Clean the oven exterior with a wrung out soft cloth or sponge, dampened with warm
soapy water. Do not use any abrasive cleaners.
• Oven door: If the glass oven door is splattered with fat or other food residues, remove them with a cloth
dampened in warm, soapy water. Then use a dry, lint-free cloth to remove any streaks. You can remove the
door for thorough cleaning, as per the instructions on page 17.
• Oven cleaners: If you use any form of oven cleaner on your appliance, you must check with the
manufacturer of the cleaner that it is suitable for use on your appliance. Any damage caused to the
appliance by a cleaning product will not be covered under your warranty.
Inside surfaces: Remove the oven rack and baking/drip tray from the oven before cleaning. Clean the oven
cavity only with warm, soapy water, using either a sponge or soft cloth, then dry with a dry cloth. Do not use
any abrasive cleaners, harsh detergents and hard or metal brushes on any oven surface. The oven rack and
baking/drip tray should be cleaned separately in warm, soapy water and dried thoroughly before being put
back into the oven.
Bottom of the oven: Any stains that may appear on the bottom of the oven are probably due to spilled
food or food splashes, which will have occurred during the cooking process. These spills and splashes
could possibly be a result of the food being cooked at an excessively high temperature, or being placed in
cookware that is too small.
Hob (Cooktop) surface: Clean the hob surface only with warm, soapy water, using either a sponge or
soft cloth, then dry with a dry cloth. Do not use any abrasive cleaners, harsh detergents and hard or metal
brushes on any appliance surface.
Fig. 5

17
MODEL: SUC54EEW | PRODUCT CODE: 62878 | 11/2018
Cleaning and Maintenance Cont.
Solid hotplates
• For normal cleaning use a moist cloth.
• For very dirty hotplates use any commercial cleanser.
• After cleaning, remove any cleanser remaining and dry
the hotplate completely by running the element for a short
period.
• Oil the hotplate after cleaning with a thin coating of
cooking oil to prevent rust or corrosion.
• Permanent heat-discolouration of the trim ring is normal.
Note: Do not use abrasive sponges or scourers, oven sprays or stain removers on hotplates. These may
damage, scratch or stain the cooktop. Any pitting, staining or scratching will not be covered by warranty.
Bulb Replacement
For replacement of bulbs, please follow these instructions:
1. Disconnect the power from the mains power outlet or switch
off the circuit breaker of the units mains outlet.
2. Unscrew the glass lamp cover by turning it anti-clockwise
(Note: it may be stiff) and replace the bulb with a new one of
the same type.
3. Screw the glass lamp cover back in place.
4. Reconnect to power.
Note: Only use 25W/220V-240V, T300° C halogen lamps. Type
E14.
Removing the oven door
To remove the oven door and subsequently the glass as well, please follow the following steps.
• Open the door to the full extent (g.1);
• Open the lever A completely on the left and right hinges (g.2);
• Hold the door as shown in g.3
• Gently close the door (g.3) until left and right hinge levers A are hooked to part B of the door (g.4).
• Withdraw the hinge hooks from their location following arrow C (g.4);
• Rest the door on a soft surface;
• To replace the door, repeat the above steps in reverse order.
18
MODEL: SUC54EEW | PRODUCT CODE: 62878 | 11/2018
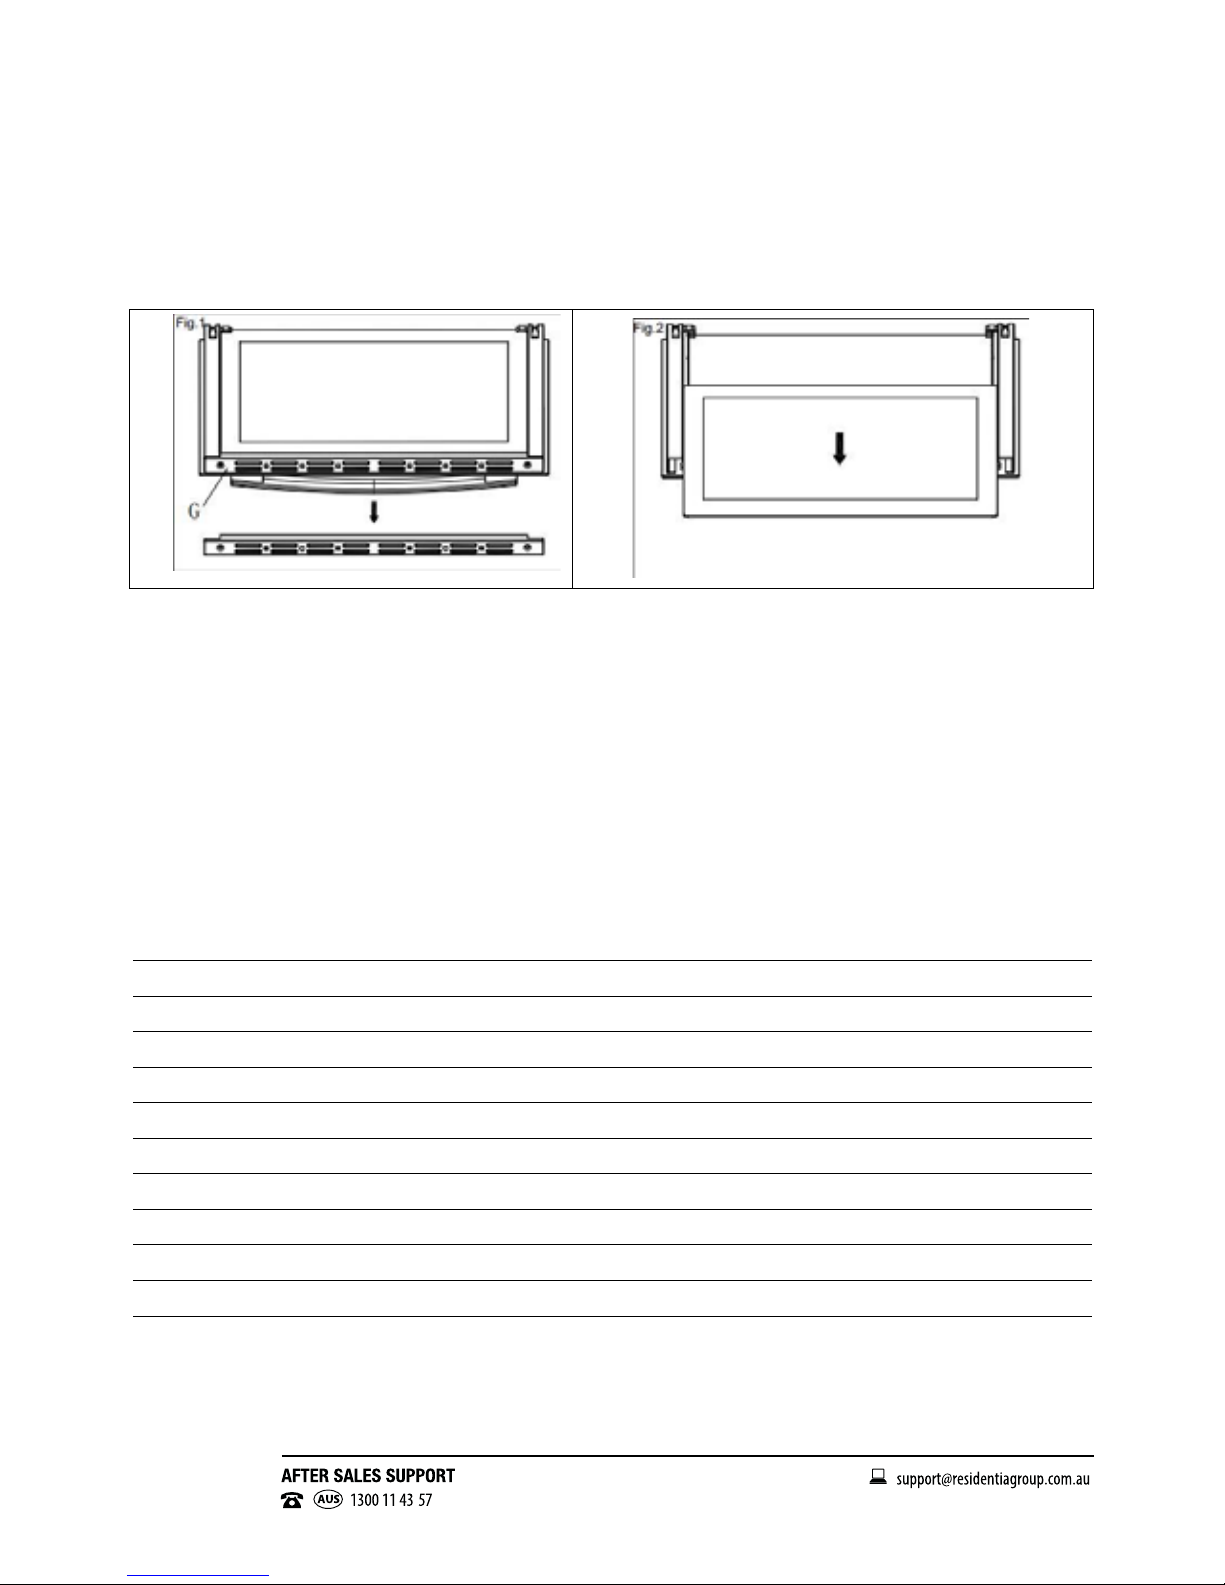
Removing the Inner Pane of Glass
• Oven door: Remove the seal G by unscrewing the no.2 bolts (g.1)
• Gently pull out the inner pane of glass (g.2)
• Clean the glass with an appropriate cleaner. Dry thoroughly, and place on a soft surface.
• Now you can also clean the inside of the outer glass.
• To re-install the glass, simply follow the above instructions in reverse.
Cleaning the door glass
• Clean the glass door using non-abrasive products or sponges and dry it with a soft cloth.
• Do not use the oven without the inner door glass tted.
• Do not use harsh abrasive cleaners or sharp metal scrapers to clean the oven door glass since they can
scratch the surface, which may result in shattering of the glass.
Cleaning and Maintenance Cont.
Technical Specification
Specification
Oven Capacity 83L gross capacity
Dimensions 540mm wide x 600mm deep x 915-935mm high
Weight 48kg Net / 52.5kg Gross
Oven Door Triple glazed, removable
Accessories 1 × baking tray, 2 × chrome shelfs
Chrome side racks
Oven Functions 5
Timer Minute Minder Timer
Rated Voltage / Frequency 220–240V, 50–60Hz
Total Rated Mains Power Oven 1998-2375W / Cooktop 4575-5445W

19
MODEL: SUC54EEW | PRODUCT CODE: 62878 | 11/2018
Technical Specification Cont.
Rating Label
80mm
50mm
W
2
YEAR IN HOME
WARRANTY
3
support@residentiagroup.com.au
AUS
1300 11 4357
11/2018Barcode: 2635 1131PLU: 62878
V1.4Residentia Group PTY LTD
Voltage/Frequency: 220-240V, 50-60Hz
Total Power: 6570–7820W
Approval Certificate:
Serial No.:
54cm Freestanding
Upright Cooker
Model: SUC54EEW
Made in: China
Declaration of conformity
This appliance complies with the following Australian/European Directives:
• 2006/95/CE General regulations / Low tension
• 1935/2004/CE 90/128/EEC This appliance is suitable to come in contact with food
• 2004/108/CE Electromagnetic compatibility
• Low voltage – 73/23
• Safety standards AS/NZS 60335.2.6:2014+A1 with AS/NZS 60335.1:2011+A1+A2+A3+A4
The manufacturer declares that the oven is built using certied materials and requires the appliance to be
installed in accordance with the standards currently in force. This oven should only be used by a trained
person and for domestic purposes only.
Other repairs or service inspections
Besides keeping the appliance clean, regularly inspect the control dials and heating elements. In case of
damage, or if you experience any problems with the appliance, contact our after sales support line to arrange
a technical inspection of the oven and x any operational faults.
Warning! Do not attempt to carry out any repairs yourself!
Responsible disposal
At the end of their working life, do not throw the appliance out with your household rubbish. Electrical and
electronic products contain substances that can have a detrimental effect on the environment and human
health if disposed of inappropriately. Observe any local regulations regarding the disposal of electrical
consumer goods and dispose of it appropriately for recycling. Contact your local authorities for advice on
recycling facilities in your area.

20
MODEL: SUC54EEW | PRODUCT CODE: 62878 | 11/2018
FAQs
If you experience problems with your oven, or it appears not to be operating correctly, check on the following
pages for solutions to common problems. If none of the solutions offered help you solve your problem, please
contact our after sales support centre for advice; contact details are printed at the bottom of the page.
Do not attempt to repair the appliance yourself.
Problem Causes What to do
No spark obtained when
gas burner knob is
pushed / turned
Power not turned on Switch on electricity
Household fuse blown Check fuses
Circuit breaker tripped Check circuit breaker
Spark plug is wet or dirty Dry or clean spark plug
Oven or grill not working
Timer not set properly Refer to timer instructions
120min timer not in “Manual” position Refer to 120 min timer instructions
Power not turned on Switch on electricity
Household fuse blown Check fuses
Controls incorrectly set Reset controls
Circuit breaker tripped Check circuit breaker
Oven light not working
Power not turned on Switch on electricity
Household fuse blown Check fuses
Circuit breaker tripped Check circuit breaker
Lamp blown or loose in socket Replace or tighten globe
Oven not hot enough
Heat escaping through incorrectly
sealed door
Check shelves or dishes are not
preventing door closing properly,
Check that door is tted properly
after door removal for cleaning
Door seal is worn or has moved Replace seal or ret it
Unit smoking when rst
used
Protective oils being removed This is normal
Allow 2–4 hours for odour to
dissipate (open all windows)
120 minute timer buzzer
not audible Timer not wound sufciently
Turn timer knob past 15 minute
mark, Then turn to the required
number of minutes
Oven shelf tight Oven shelf not inserted correctly, may
be upside down or back to front
Remove shelf and insert as per
diagram
Table of contents
Other Stirling Cooker manuals


Popular Cooker manuals by other brands


M-system
M-system MFTD-106 Series Instructions for use - installation advice

Gorenje
Gorenje K 7708 E Instructions for use, installation, and connection

AEG
AEG 10369MN-MN user manual

Hotpoint
Hotpoint HW170EK Instructions for installation and use

Morris
Morris MKV-64335 instruction manual

AGA
AGA RAYBURN XT User instructions

Tricity Bendix
Tricity Bendix RE50GC Operating and installation instructions

THERMEx
THERMEx VERTICAL 805 quick start guide

Indesit
Indesit KP100CX Instructions for installation and use

Frigomat
Frigomat Mix 8 Series Manual of use and maintenance

Buffalo
Buffalo GF239 instruction manual

Redfox
Redfox SPB 70/04 G Installation and use instruction