VEVOR K3002 User manual

KNOB INDUCTION COOKER
Instruction Manual

01
NEED HELP? CONTACTUS!
Have product questions? Need technical suppo? Please feel free to contact us:
CustomerSe[email protected]
KNOB INDUCTION COOKER
K3002
K3002

02
The information in this hand book is correct at the time of printing. Our company is responsible for
recising and updating this handbook.
However, we resee the right to modify and update our products and handbook without notice this
handbook contains sketches which are to be used as a reference only. Please use common sense if
these sketches are not exactly your situation or products.
Schematic Diagram Of The Control Panel
UPON/OFFDOWN
TIMER LOCK
Control Panel
The above is only the schematic diagram of the structure, please refer to the actual object.
Supply cordcontrol panel
Glass plate

Instruction
03
2. Power button: each furnace area has an independent power button. When you want to sta
one of the burners, press the power button to turn on the power and enter the standby state.
5. Firepower adjustment: in heating mode, push the regulator, the digital gear from 1 to 9 is a normal
4. Heating: for example, if you want to use the furnace area for heating, push the regulator in the
standby state. When the digital display 0 turns into a number, the furnace area enters the heating
mode. As shown in gure 9:
• Power distribution: upper left 220V/1800W; lower left 220V/1200W. (+ / - 10%).
3. Standby state: Press the power button as described in the second operation and enter the standby
mode, which displays 0 (0 is not heated). The standby mode automatically exits and returns to the
shutdown state without any operation for a long time.
The standby state is shown as follows: 0 is the standby state in both furnace areas.
Product voltage :220V Rated power:1800 watts and 1200watts
1.Power on: open the power supply knife of the machine cable. After power on, all display units will
light up once and the buzzer will drop once.

04
8.Timing: This function is to set the shutdown time. In heating mode, press the timing button to enter
the preset timing. The default time is 00 minutes. Button adjusting time (progressive 1 minute, 99
minutes at most), stop operation after adjustment, digital ashing several times into the steady setting
success. Continuously press the timing button to set the time of multiple furnace areas. After the
setting is completed, the small dot ashes at the lower right corner of the display digital number in the
furnace area. The time display in dierent furnace areas automatically switches to about 5 seconds,
with the small dot as a mark.
As shown in the picture, timing left upper furnace area: 99 minutes
9. Panel high temperature warning: there is still residual temperature on the furnace panel after use,
warning display H, be careful of scalding hands.
6.Shutdown: In heating mode, long press the power button (long press for two seconds) to exit
heating and return to shutdown state.
heating gear, and the P gear is rapid heating. After 3 minutes, it will return to the 9 gear. Turn to 0 to
stop heating.
7.Child lock: Press and hold the child lock button for 2-3 seconds, and the child lock can be locked or
unlocked with a beep. After the lock is successful, the child lock number will display Lo, and the child
lock can be operated in the power-o or standby heating state. After the lock is successful, do not
operate any steps except the child lock.
Locked successfully as shown in gure:

05
Usable Pans
All at bottom pots.
Please use iron pot, containing magnetic pot.
Please limit your food within 4kg.
Please limit your food within 4 kg
Product dimensions and precautions:
• Product size 288*510*82 (11.3*20.08*3.07 inches) If not including the foot of the fuselage thickness is
65MM/2.55 inches.
• Roar size 270*490*150mm (10.6*19.29*5.9 inches)
Note: if the product is used on the table, because
the bottom will produce temperature during the
use process, please use high temperature resistant
ame retardant material for the table such as
marble....... And so on.
10. The corresponding temperature of each section of re (set the numerical value for the program),
the measured data obtained by dierent working ring mirrors will have deviation.Range 1--2--3--4--5
--6--7--8--9--P ten stages.
INSTALL ATION EASILY

06
Trouble Code And Troubleshooting
Heat Dissipation Structure Installation Drawing
When the machine is embedded, to ensure the normal use of the machine and better heat
dissipation.
Requirements:
1. 30-50mm heat dissipation should be left on the left and right sides and behind.
2. The counter interior should be as large as possible to ensure that enough cold air is sucked into the
machine.
3. Inlet air (cold air) must be separated from outlet air (hot air) space.
4. The air inlet and outlet space of the counter leave air roar.
Front view
Induction cooker
The cold air
Counter space
Heat ow Heat ow
Exhaust roar Exhaust roar
left
30.00mm
right
30.00mm
Side view
Induction cooker
The cold air
Counter space
Heat ow
Exhaust roar
after
30.00mm
Air inlet
Cupboard door
E0------- no pot
E1------- The voltage is lower than 90.
E2------- Excessive voltage (voltage higher than 270)
E3------- Furnace suace oveemperature or sensor damage sho circuit
E4------- Furnace suace sensor open
E5-------IGBT oveemperature or fan damage does not work
E6------- The IGBT sensor is open
E8------- The control board is connected to the main power supply board
Voltage adaptation range: 90--270 VOLTS

07
As shown in Figure 2
Installation
Owing to the high temperature inside the infrared cooker, make sure good ventiation is provided to
assure its normal operation.
Attention:
1. The electric hob is recommended to be
installed by professional. Please never
conduct the operation by yourself.
2. The wall and heating area above the
table suace shall withstand heat.
3. To avoid danger the ceramic cooker
hob must be installed into the cabinet
before use.
4. Applicable cabinet material : wood,
marble resin etc.
Safety Reminding
Because the hob can
generate ve high
temprature , please use a
pot resistant to a
temperature of over 200.
After being used the
corresponding heating
zone of the ceramic
cooker is still hot . Never
touch the ceramic cooker
suace to avoid burn.
If the power supply is
damaged, it must be
replaced by the
manufacturer, its seice
agent or similarly qualied
person to avoid a hazard.

08
Do not place rough or
uneven appliances ,
which may damage the
ceramic suace.
If the suace is cracked,
pull out the plug to avoid
the possibility of electric
shock.
Do not put any detergents
or ammable materials in
the equipment installed
under the ceramic cooker
hob.
Never have the cooker
to work without food in
the pot , otherwise its
operational peormance
may be aected and
danger may happen.
For sealed foods such
as canned goods , please
do not heat them before
opening their covers so
as to avoid any dangers
of explosion due to
heating expansion.
The appliance is not
intended to be used by
children or handicapped
persons , unless they have
been supeised by a
responsible person to
ensure they can use it
safely.
A dedicated power
protection air swith must
be incorporated in the
xed wiring in accordance
with the wiring rules.
Never use the ceramic
cooker hob in high
temperature environment.
Never wash the ceramic
cooker hob with water
directly . Steam cleaner is
not to be used.

09
Use of equipment by unattended young children and disabled children's play equipment.
This product should consider the following:
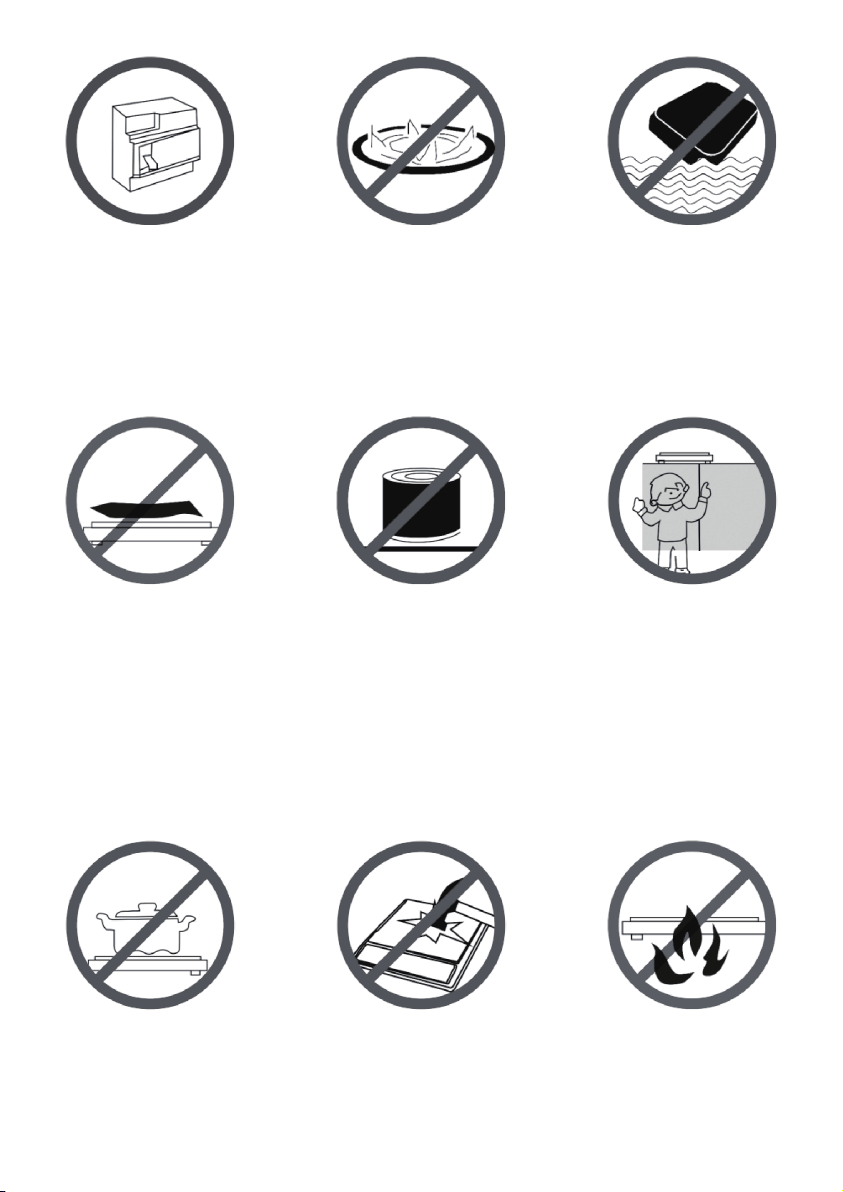
Warning: If the suace is cracked, turn o the appliance to avoid possible electric shock.
22. Do not ush with water directly to prevent the internal electronic components from water failure.
21. Do not place the infrared cooker on the iron, stainless steel, aluminum and other metal panel,
because The action of magnetic eld line will cause its heating suace to burn out the bottom of
induction cooker.
20. The induction cooker cannot be operated by external timer or independent remote control system.
19. Do not heat food directly on the panel, especially high fat food, overheating oil will Be lit.
18. Do not use the infrared cooker on the carpet or tablecloth, so as not to block the exhaust po or
suction po, shadow Heat dissipation.
17. Do not hit the black cstal panel with hard objects or touch the black cstal panel with sharp
instruments to avoid black cstal Plate cracking and other damage.
16. Do not heat plastic containers and paper on panels to prevent burning.
15. Do not use POTS and pans with painted bottom on the induction cooker to avoid high temperature
To burn.
14. If the cord is damaged, it must be repaired by the manufacturer's maintenance depament or
Similar depaments of professional personnel to repair and replace.
13. After cooking, there is still residual heat on the panel generated by the high temperature of the
pot. Do not touch it immediately.
12. Unplug the power cord plug from the socket to avoid electronic devices caused by long time
electricity Pieces of aging damage, even re.
11. This product is a household kitchen utensil and should not be used in industrial, medical and other
places to avoid accidents.
10. Do not heat the aluminum foil directly or indirectly.
9. Do not directly add canned and other sealed containers, otherwise the container will be heated and
expanded, resulting in an explosion.
8. Do not use paper, cloth and other aicles on the panel to heat indirectly, so as to avoid the high
temperature of the bottom of the pot Cause combustion.
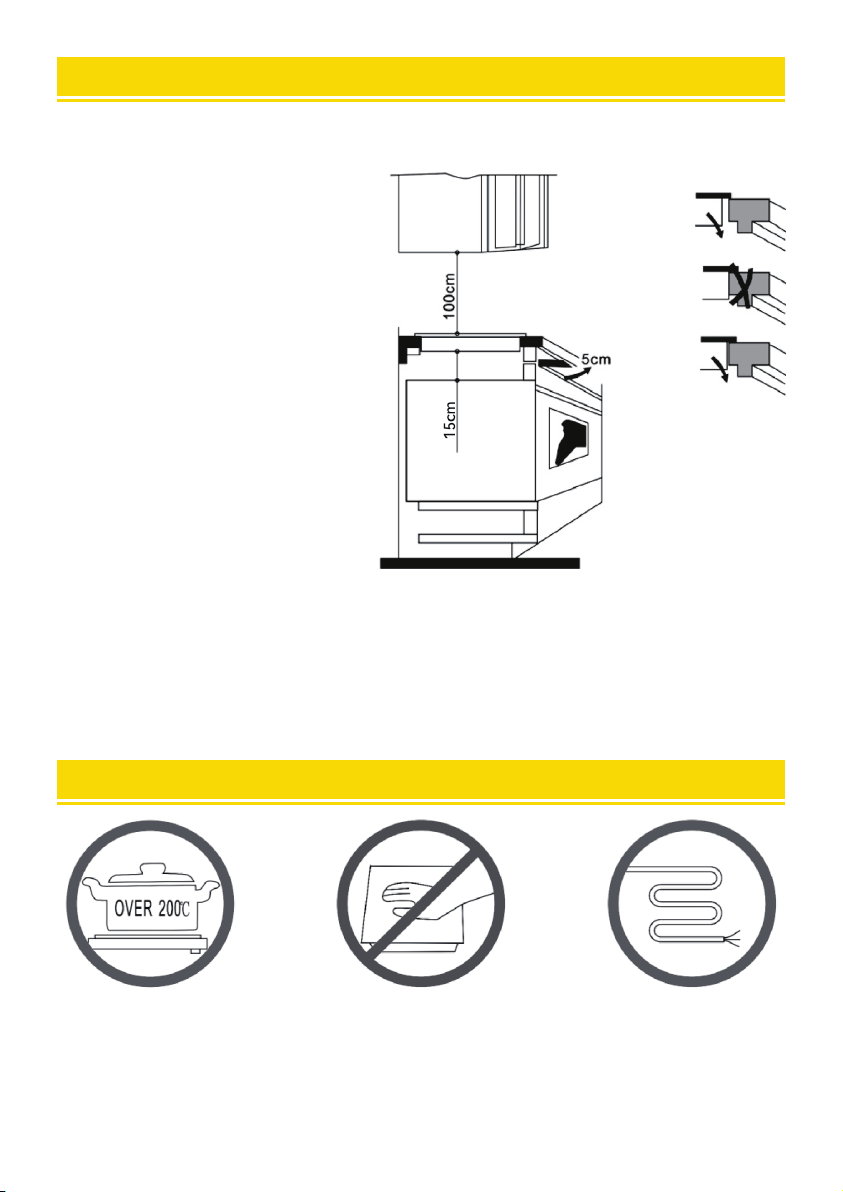
7. When using the equipment, it should be placed horizontally, not close to the wall or objects, with at
least a clearance around it More than 30 cm.
6. Metal Objects Knives, forks, spoons and LIDS should not be placed on the suace of the cooking
area to prevent them from getting hot.
5. Do not use it in the bathroom, gas stove and other damp places or near inammable and explosive
objects.
4. During the operation of the appliance, the temperature of the black cstal plate and the suace of
the appliance is ve high, so please do not touch it.
3. Do not let children operate alone to avoid scalding and other risks.
2. Do not car the infrared cooker with the appliance loaded.
1. Do not overheat an empty pan.

10
Cleaning And Maintenance
1 . Please shut o the power and pull out the plug before cleaning of the appliance.
2 . Clean the appliance until It cools down completely.
3 . To remove di , please select litmusless detergent.
4. After removing di , please use a neat wet cloth to clean the unit.
5. Do not clean by water directly , water gets Inside may cause malfunction.
6. Keep the ceramic plate and pan clean before cook, otherwise, di after charring is ve dicult to
clean and the plate may get discoloration.
7. You may clean alr vent / alr ant's di by vacuum cleaner to suck up , If there is di with oil, add a
little litmusless detergent with toothbrush to clean.
8. Don't use caustic Impregnates to clean. It may damage the cooker by chemical reaction . Do not use
benzine , scrubbing brush or polishing powder to clean the Induction cooker.
Trouble Shooting
1.If there is anything wrong wlth the stove , please check it as following before sendingto repair .
2 . Please do not open and repair the unit yourself avoid getting hu and other risks.
3 . If you fall to Identify the problem , contact the after-sales seice without delay .
No. Problem Posslble causes
1No indicator light when
power “on”
1 . Cable / terminal block is loose
2 . Broken circuit or blown fuse
3 . Power supply stopped
2
If there Is " buzz " noise, and
theon / o " light ash, no
heating.
1 . Please check If the pot ls avallable2
2 . If the pot ls In the centre of the ceramic plate
3Appllance suddenly stops
heating during operation
1. Air entrance or outlet blocked.
2. Over-heating protectlon activated.
3. Please check If the temperature around Is too high.
4. If the working time over defaulted working time, or
the timer nish.
4No response for the key Please check the plug ls in rlght place .

E-mail: CustomerSeice@vevor.com
Table of contents
Other VEVOR Cooker manuals
Popular Cooker manuals by other brands

Swizer
Swizer 208 Operation manual

Tricity Bendix
Tricity Bendix SIE 225 Operating and installation instructions

Euromaid
Euromaid EGE9TS user manual

Garwoods
Garwoods EC-2966 Installation & operating instructions

Tricity Bendix
Tricity Bendix SI320 OPERATING AND INSTALLATION Manual

Bosch
Bosch HGV595123Q instruction manual