STK Professional Audio VQ-15N User manual
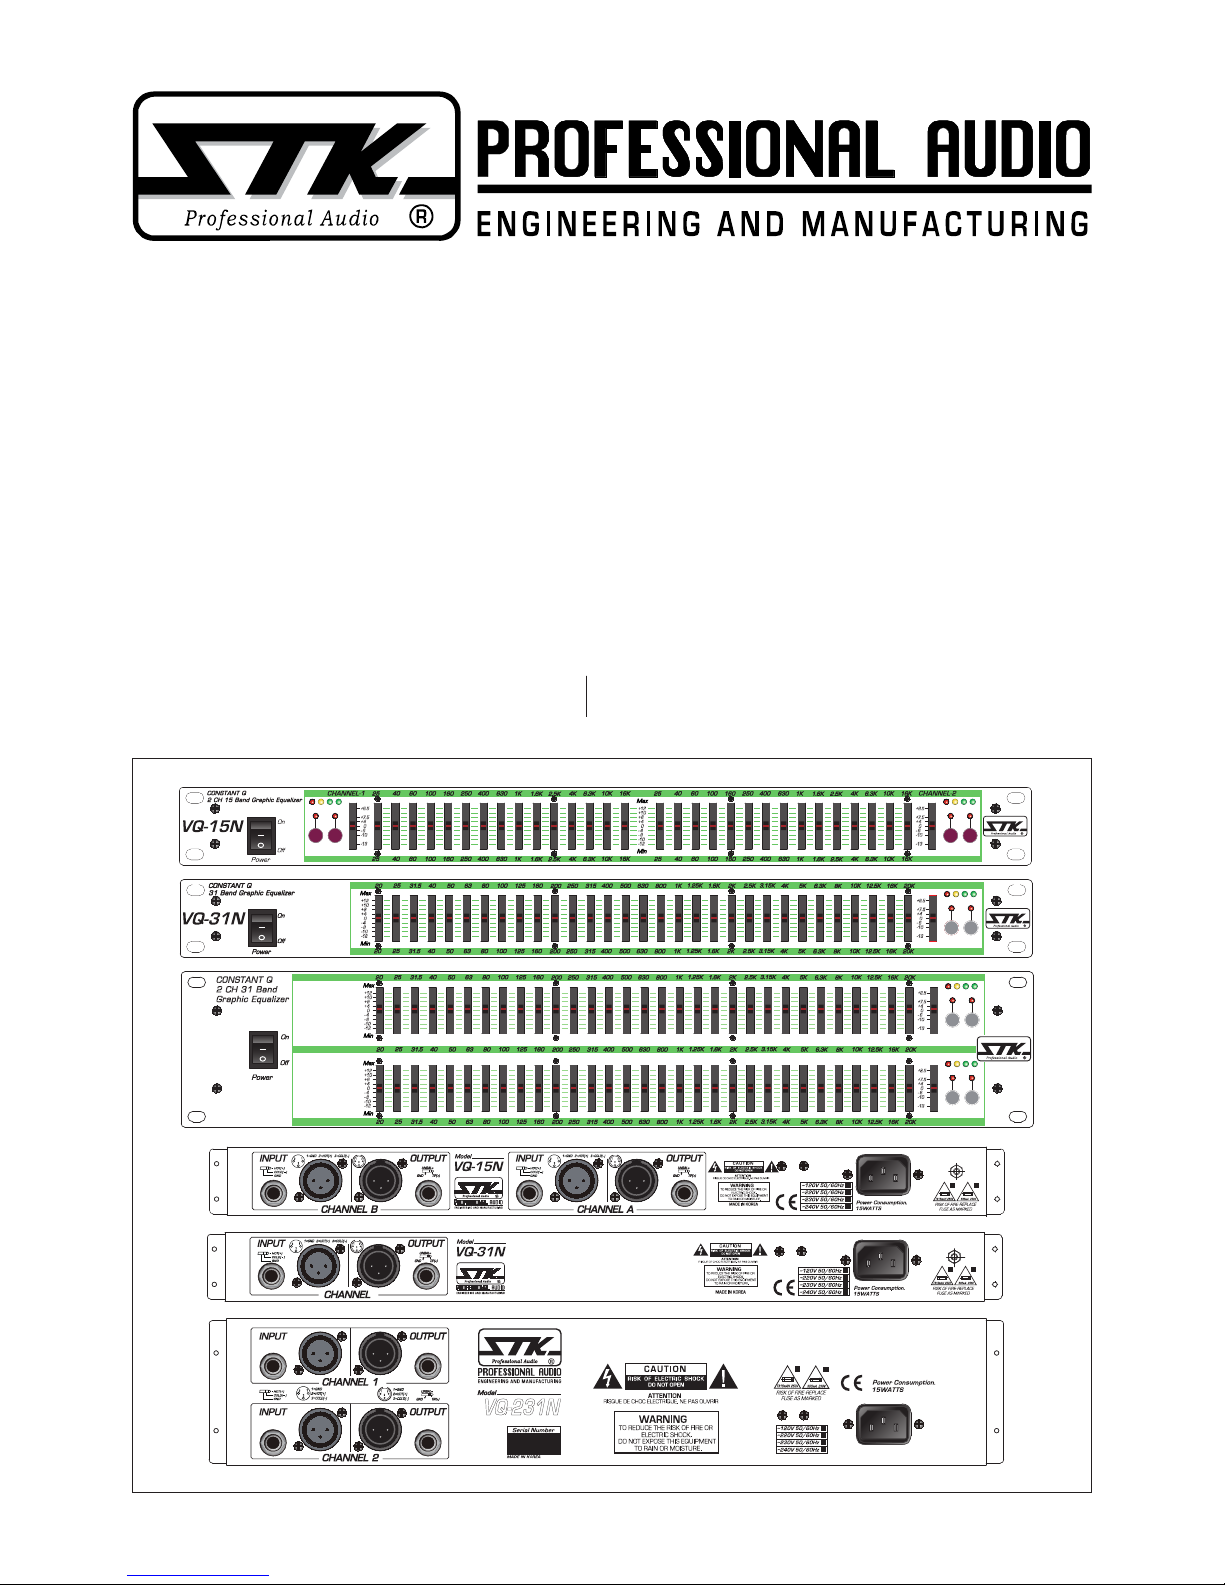
VQ-15N, VQ-31N And VQ-231N
그래픽 이퀄라이저
사용설명서
Graphic Equalizer
OWNER'S MANUAL
INPUT OUTPUT INPUT OUTPUT
CHANNEL B CHANNEL A
Gain Gain
+12
+10
+8
+4
0
-4
-8
-10
-12
LOW
CUT
IN
OUT
+18 +10 0-10dBu
LOW
CUT
IN
OUT
+18 +10 0-10dBu
dB
+8.5
+7.5
+4
0
-6
-10
-13
dB
+8.5
+7.5
+4
0
-6
-10
-13
CHANNEL
INPUT OUTPUT
Gain
+12
+10
+8
+4
0
-4
-8
-10
-12
dB
+8.5
+7.5
+4
0
-6
-10
-13
LOW
CUT
IN
OUT
+18 +10 0-10dBu
OUTPUT
CHANNEL 2
INPUT OUTPUT
CHANNEL 1
INPUT OUTPUT
VQ-231N
CONSTANT Q
2 CH 31 Band
Graphic Equalizer
VQ-231N
LOW
CUT
IN
OUT
LOW
CUT
IN
OUT
+18 +10 0-10dBu
+18 +10 0-10dBu
Gain
OUTPUT
OUTPUT
dB
Gain
CHANNEL- 1
CHANNEL- 2
CH 1
CH 2
+12
+10
+8
+4
0
-4
-8
-10
-12
+8.5
+7.5
+4
0
-6
-10
-13
+12
+10
+8
+4
0
-4
-8
-10
-12
dB
+8.5
+7.5
+4
0
-6
-10
-13

2
VQ-15N, VQ-31N And VQ-231N
그래픽 이퀄라이저
Graphic Equalizer
Table of Contents
l
목 차
1. Introduction l 제품 소개.......................................................................................................................................
3
2. Important Safety Instructions l 안전을 위한 주의 사항 .................................................................
4-5
3. Panel Description l 각 부의 명칭 ..................................................................................................................
6-7
4. Block Diagram l 회로의 구성도.......................................................................................................................
8
5. Specications l 제품 규격 .................................................................................................................................
9
6. Warranty Information l 제품 보증에 대해서 ...........................................................................................
10-11

3
1. Introduction
l
제품 소개
STK 프로페셔널 오디오의 VQ-15N, VQ-31N, VQ-
231N 그래픽 이퀄라이저는 콤팩트하고 경제적인 포맷에
서 프로페셔널한 성능을 특징으로 합니다.
VQ-15N은 스테레오, 2/3 옥타브, 15밴드 이퀄라이저
이며 VQ-31N과 VQ-231N은 1/3옥타브, 31밴드 이퀄
라이저입니다.
본 제품 들은 밸런스드 XLR 입, 출력과 언밸런스드
1/4인치 잭 입, 출력 단자를 사용합니다. 클립 표시등
과 입력 레벨 조절기, 입, 출력 선택 스위치는 STK VQ-
15N, VQ-31N 그리고 VQ-231N을 다른 모든 프로 오
디오 기기들과 호환되게 해줍니다. 더욱 강력하고 정확하
며 믿을 만한 성능을 제공하기 위해서 STK 그래픽 이퀄
라이저는 수년간의 연구를 거듭하여 설계 되었습니다.
제품을 동작시키기 전에 이 사용설명서를 꼭 읽어보시
고 이해하시어 올바르게 제품을 사용해 주시길 바랍니다.
The STK-Professional Audio VQ-15N, VQ-31N
and VQ-231N graphic equalizers offer feature-packed,
professional performance in a compact and economical
format. The VQ-15N is a stereo, 2/3octave, 15 band
equalizer and the VQ-31N and VQ-231N are 1/3 octave,
31 band equalizer. These are balanced XLR inputs and
outputs as well as unbalanced 1/4 inch jack inputs and
outputs. Input level controls with clip indicators and
switch selectable input and output levels make the STK
VQ-15N, VQ-31N and VQ-231N compatible with all
other professional audio equipment. While providing
powerful, accurate and reliable performance along with
outstanding value, your STK graphic equalizer has been
designed for many years of dependable service.
Please take the time to read this manual before
operation so that you fully understand the features and
correct use of this ne product.

4
1. 사용 설명서를 꼭 읽어주세요
제품을 사용하기 전에 본 설명서의 안전과 작동에 관한 모든 기능
설명들을 반드시 읽어 보십시오.
2. 사용 설명서를 잘 보관하세요
안전과 작동에 관한 설명은 나중에 참고하게 될 경우가 있으므로
잘 보관해서 유용하게 사용하십시오.
3. 주의 및 경고사항
사용 설명서에 나타나 있는 모든 주의사항들은 반드시 지켜야 합니
다.
4. 사용법을 지켜주세요
본 설명서의 사용법에 관한 모든 내용들은 반드시 지켜야 합니다.
5. 수분과 습기주의
제품은 물기 또는 습기가 많은 곳에 설치하면 감전의 원인이 됩니
다. (욕조, 세면기, 부엌, 세탁기, 젖은 바닥, 수영장의 풀 근처, 습
지 등)
6. 열주의
제품은 전열기구 혹은 열을 발생하는 그 밖의 기구들로부터 떨어진
곳에 설치되어야 합니다. 설치 전 반드시 주변을 확인하시어 건조
한 장소에 제품을 설치해 주십시오.
7. 전원주의
이 제품은 반드시 사용 설명서에 정해진 타입의 전원 또는 본체에
표시된 전원에 연결되어야 합니다. 만약 사용하려는 전원이 확실치
않을 때는 전원 기구 판매자나 전원 공급자에게 문의하세요. 공급
되는 전원이 축전지 형태이거나 다른 방식이라면 제품 사용을 피해
주세요.
8. 분극 플러그에 대한 주의
만약 전원기구가 극성이 있는 교류전원이라면(플러그 중 한 블레이
드가 다른 것에 비해 넓게 되어 있습니다.) 이 플러그는 오직 한 가
지 방법으로 전원 아울렛에 끼워져야 합니다. 이것이 안전한 모습
입니다. 만약 플러그를 올바르게 끼울 수 없다면 플러그를 빼고 다
시 시도해 보세요. 만약 그래도 안 된다면 전원 아울렛을 교체하도
록 전기 기사에게 문의하세요. 분극 플러그에 대한 주의사항을 반
드시 지켜주세요.
9. 접지 플러그에 대한 주의
만약 전원기구가 3선 접지 타입의 플러그라면 세번째핀(접지핀)을
가지고 있을 것입니다. 이 플러그는 반드시 접지 타입 전원 아울렛
에 맞게 끼워져야 합니다. 이것이 안전한 모습입니다. 만약 이 플러
그를 전원아울렛에 올바르게 끼울 수 없다면 전원 아울렛을 교체하
도록 전기기사에게 문의하세요. 접지 플러그에 대한 주의사항을 반
드시 지켜주세요.
10. 전원 코드의 보호
전원 공급 코드는 플러그, 콘센트, 그리고 본 제품과 연결되는 지점
들에 특별한 주의를 기울이면서 정확한 방향으로 꽂혀야 합니다.
그렇지 못한 경우에는 화재 및 제품 손상의 원인이 될 수 있습니다.
2. Important Safety Instructions
l
안전을 위한 주의 사항
1. Read Instructions
All the safety and operating instructions should be read before
the appliance is operated.
2. Retain Instructions
The safety and operating instructions should be retained for
future reference.
3. Heed Warnings
All warnings on this appliance and in the operating
instructions should be adhered to.
4. Follow Instructions
All instructions should be followed.
5. Water and Moisture
This appliance should not be used near water- for example,
near a bathtub, sink, laundry tub, in a wet basement, near a
swimming pool, etc.
6. Heat
This appliance should be situated away from heat sources such
as radiators, heat registers, stoves, or other appliances (including
ampliers) that produce heat.
7. Power Sources
This appliance should be connected to a power supply only
of the type described in the operating instructions or as
marked on the appliance. If you are not sure of the type of
power supply to your home, consult your appliance dealer
or local power company. For appliances intended to operate
from battery power, or other sources, refer to the operating
instructions.
8. Polarization
If the appliance is equipped with a polarized alternating-
current line plug (a plug having one blade wider than the
other), this plug will t into the power outlet only one way.
This is a safety feature. If you are unable to insert the plug
fully into the outlet, try reversing the plug. If the plug should
still fail to t, contact your electrician to replace your obsolete
outlet. Do not defeat the safety purpose of the polarized plug.
9. Grounding
If the appliance is equipped with a 3-wire grounding-type
plug, a plug having a third (grounding) pin, this plug will only
t into a grounding-type power outlet. This is safety feature.
If you are unable to insert the plug into the outlet, contact
your electrician to replace your obsolete outlet. Do not defeat
the safety purpose of the grounding-type plug.
10. Power Cord Protection
Power supply cords should be routed so that they are not
likely to be walked on or pinched by items placed upon or
against them, paying particular attention to cords at plugs,
convenience receptacles, and the point where they exit from
the appliance.

11. Damage Requiring Service
Unplug this appliance from the wall outlet and refer servicing
to qualied service personnel under the following conditions:
a. When the power-supply cord or plug is damaged.
b. If liquid has been spilled, or objects have fallen into the
appliance.
c. If the appliance has been exposed to rain or water.
d. If the appliance does not operate normally by following
the operating Instructions. Adjust only those controls
that are covered by the operating instructions as an
improper adjustment of other controls may result in
damage and will often require extensive work by a
qualied technician to restore the appliance to its normal
operation.
e. If the appliance has been dropped or the cabinet has
been damaged.
f. When the appliance exhibits a distinct change in
performance-this indicates a need for service.
12. Servicing
Do not attempt to service this appliance yourself as opening
or removing covers may expose you to dangerous voltage
or other hazards. Refer all servicing to qualied service
personnel.
11. 제품 손상 수리 서비스
본 제품에 다음과 같은 경우가 발생했을 때, 전문가에 의해서만 수
리를 받을 수 있습니다.
가. 전원공급 코드 혹은 플러그가 손상되었을 경우.
나. 제품 안으로 이 물질이 떨어졌거나 액체가 스며들었을 경우.
다. 제품이 빗물이나 물에 젖었을 경우.
라. 제품이 정상적으로 작동하지 않을 경우 사용설명서에 나와
있는 내용들을 조정해 보세요. 사용 설명서 외의 내용을 조
정할 경우 더 큰 고장의 원인이 될 수 있습니다.
마. 제품이 바닥에 떨어졌을 경우나 본체에 손상이 갔을 경우.
바. 제품이 작동 시 서비스를 필요로 하는 두드러진 변화를 보일
경우.
12. 서비스
직접 제품을 분해하거나 커버를 벗겨낼 경우 감전 등 여러 위험을
초래할 수 있습니다. 반드시 모든 서비스는 본사의 직원에게 문의
해 주세요.
2. Important Safety Instructions
l
안전을 위한 주의 사항
5
This manual suits for next models
2
Table of contents
Other STK Professional Audio Recording Equipment manuals


