Stonegate FP10-27-11-50-OLOAKS Installation and operating instructions
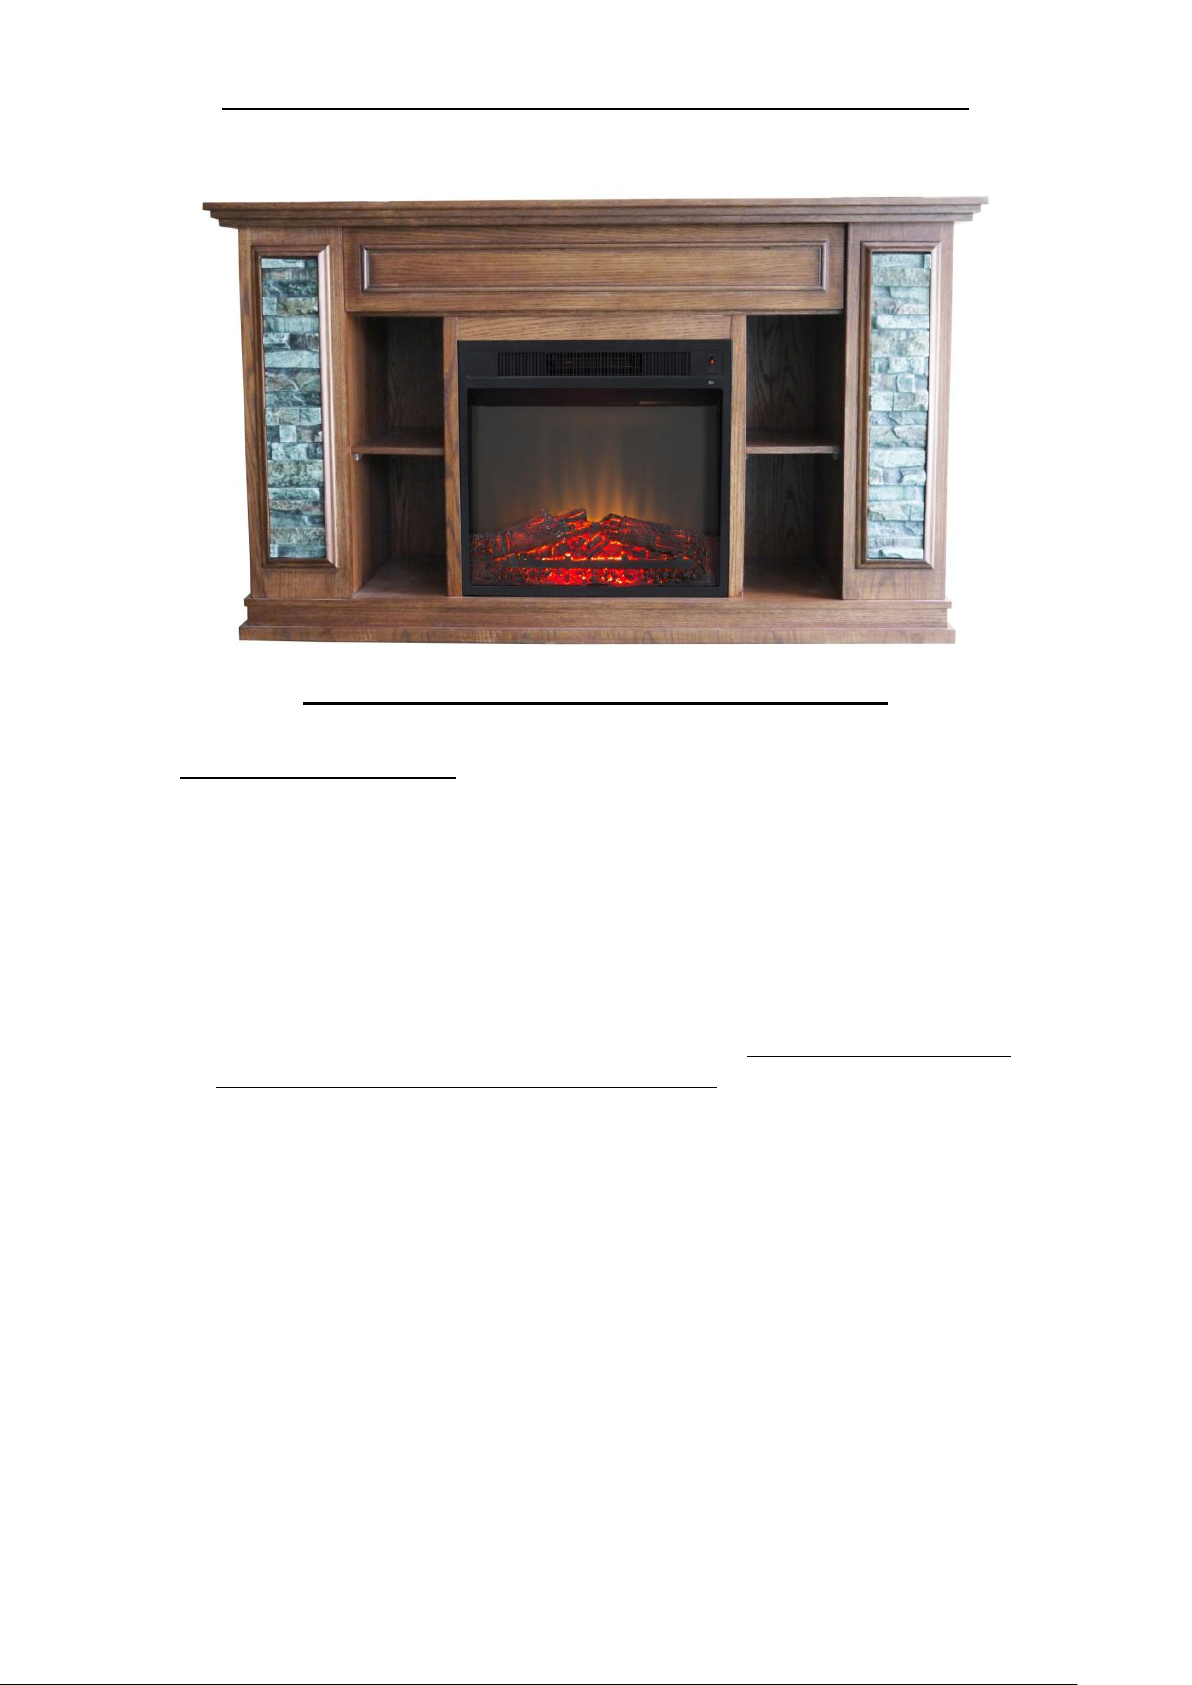
FP10-27-11-50-OLOAKS ELECTRIC FIREPLACE HEATER
ASSEMBLYAND OPERATION MANUAL
IMPORTANT SAFETY INSTRUCTIONS
CAUTION / ATTENTION -- DO NOT PLUG THE HEATER INTO ANY
POWER OUTLET OR OPERATE BEFORE READING ALL
INSTRUCTIONS!
SAVE THESE INSTRUCTIONS FOR FUTURE REFERENCE
When using electrical appliances, basic precautions should always be followed to reduce the
risk of fire, electric shock, and injury to persons, including the following:
1. Read all instructions before using this fireplace. Failure to follow these important safety
instructions may cause fire, electric shock or damage. Following proper safety and
operating instructions is the responsibility of the owner.
2. WARNING: This fireplace heater is hot when in use. To avoid burns, do not let bare skin
touch hot surfaces. The grill directly in front of the heater outlet becomes hot during
heater operation.
3. CAUTION –High Temperature. Keep any materials, such as upholstered furniture,
pillows, bedding, papers, plastic, clothes, curtains and other furnishings at least 3 feet
away from the front, sides and rear of the heater element.
4. WARNING: This appliance gets hot and it contains internal parts that could arc or spark.
Do not use it in areas where gasoline, paint, or flammable liquids are used or stored or
where the unit will be exposed to flammable vapors. Do not use near propane tanks.
5. WARNING: This fireplace should not be used as a drying rack for clothing. Do not
hang Christmas stocking or any decoration on the fireplace heater or mantle.
6. Extreme caution is necessary when any heater is used by or near children or those with
disabilities.
7. Do not operate the heater unattended or while sleeping. Stay alert and monitor operation
at all times.
8. Always unplug fireplace when not in use.

9. Do not operate any fireplace heater with a damaged cord or plug, or if the heater has
malfunctioned, or if the fireplace has been dropped or damaged in any manner. Take
fireplace to authorized service facility for examination, electrical or mechanical
adjustment or repair.
10. Check your heater cord and plug connections. A loose fitting outlet can cause the plug to
overheat and/or cause a fire. Be sure plug fits tight in the outlet. Check frequently during
use to make sure plug and outlet are not hot. If so, discontinue using heater immediately
and have outlet replaced by a qualified electrician. CAUTION: Heaters draw more
current than small appliances, overheating of the outlet may occur even if it has not
occurred with the other appliances.
11. Under no circumstance should this electric fireplace be modified. Parts having to be
removed for servicing must be replaced by a certified repair center prior to operating this
electric fireplace again.
12. Do not use outdoors or anywhere that it can get wet.
13. This fireplace is not intended for use in bathrooms, laundry areas and similar indoor
locations. Never use this appliance near a bathtub or in the vicinity of water.
14. Do not place or operate the fireplace insert directly on carpet or a similar surface, which
may restrict air circulation beneath the unit. The fireplace insert must be installed in the
mantle before use.
15. To prevent a possible fire, do not block air intake or exhaust in any manner. Do not use on
soft surfaces, like a bed, where openings may become blocked.
16. Do not run cord under carpeting, furniture or appliances. Do not cover cord with
carpeting, throw rugs, runners, or the like. Arrange cord away from traffic area and where
it will not be tripped over.
17. To disconnect fireplace, turn all controls to off, then remove plug from outlet.
18. Grounding –this heater is for use on 120 volts. The cord has a plug with three blades
for proper grounding. DO NOT attempt to modify the plug in any way or use adaptors
to defeat the purpose of the grounding feature. Plug ONLY into a receptacle that accepts
three-blade plugs. CAUTION: To Prevent Electric Shock Match Wide Blade of Plug to
Wide Slot of Outlet, Fully Inserted.
19. When this appliance is installed, it must be electrically grounded in accordance with local
codes with the current CSA C22.1 Canadian local codes for USA installation. Follow
local codes and National Electrical Code, ANSI/NFPA NO. 70 and Canadian Code, CZ
22.2 No. 0.
20. Do not insert or allow foreign objects to enter any ventilation or exhaust opening as this
may cause an electric shock or fire, or damage the heater.
21. Do not modify this fireplace. Use it only as described in this manual. Any other use not
recommended by the manufacturer may cause fire, electric shock or injury to persons.
22. WARNING: NEVER USE WITH AN EXTENSION CORD OR RE-LOCATABLE
POWER STRIP. An extension cord may overheat and cause a risk of fire.
23. Do not burn wood or other materials in this fireplace.
24. Do not strike fireplace glass.
25. If the heater unit has been dropped or damaged, do not operate unless fully checked out
by a certified repair center.
26. Always use a certified electrician should new circuits or outlets be required.
27. Always use properly grounded, fused and polarized outlets.
28. Always use ground fault protection where required by electrical code.
29. WARNING –Always disconnect the unit from the power supply before performing any
cleaning, light bulb replacement, maintenance or relocation of the electric fireplace.

30. When transporting or storing the fireplace and cord, keep in a dry place, free from
excessive vibration and store so as to avoid damage.
NOTE: Procedures and techniques that are considered important enough to emphasize.
CAUTION: Procedures and techniques, which, if not carefully followed, will result in
damage to the equipment or personal property or may cause personal injury.
WARNING: Procedures and techniques, which, if not carefully followed, will expose the
user to the risk of serious injury, illness or death.
WARNING:
This heater and parts become hot when in use. The area directly around and under the heater
element must be clear and free of any obstructions.
DO NOT ALLOW CHILDREN TO OPERATE. KEEP CHILDREN AND PETS
AWAY FROM HEATER AND CONTROLS.
CHOOSING LOCATION FOR YOUR FIREPLACE:
When choosing a location in your home, ensure that the general safety instructions are
followed. For best results, install out of direct sunlight.
NOTE: A complete electric fireplace heater may consist of two parts, the wooden mantle
and the fireplace heater insert. DO NOT use the fireplace heater insert without first
installing it in the wooden mantle. Unpack the fireplace heater and mantle. Remove all
packing materials.
MANTELASSEMBLY:
A -Top Panel
1pc
B - Upper Back Panel
1pc
C - Middle Panel
1pc
D - Front Door Panel
1pc
E - Upper Front Panel
1pc
F - Front Shelf
2pcs
G - Base
1pc
H –Small Back Panel
2pcs
I –Side Shelf
4pcs
J –Left Front Panel
1pc
K –Right Front Panel
1pc
L –Left Back Panel
1pc
M –Right Back Panel
1pc
N –Left Side Panel
1pc
O –Right Side Panel
1pc
P –Left Inner Panel
4pcs
Q –Right Inner Panel
1pc
Part #
DESCRIPTION
QTY
U1
40PCS
U2
40 PCS
U3
1 PC
U4
6 PCS
U5
1 PC
U6
4 PCS
U7
24 PCS
U8
3 PCS
U9
2 PCS
U10
2 PCS

**RECOMMEND 2 PEOPLE FOR ASSEMBLY!
Step 1: Attach 3 Cam Lock Screws (U1) to the Left Front Panel (J).
Attach 3 Cam Lock Screws (U1) to the Left Back Panel (L).
Insert 6 Cam Lock Nuts (U2) into Left Side Panel (N).
Attach the Left Front Panel (J) and the Left Back Panel (L) to the Left Side Panel (N). Turn the Cam Lock Nuts
(U2) clockwise with a Philips Screwdriver.
Repeat Step for Right Side using parts Right Front Panel (K), Right Back Panel (M), and Right Side Panel (O).
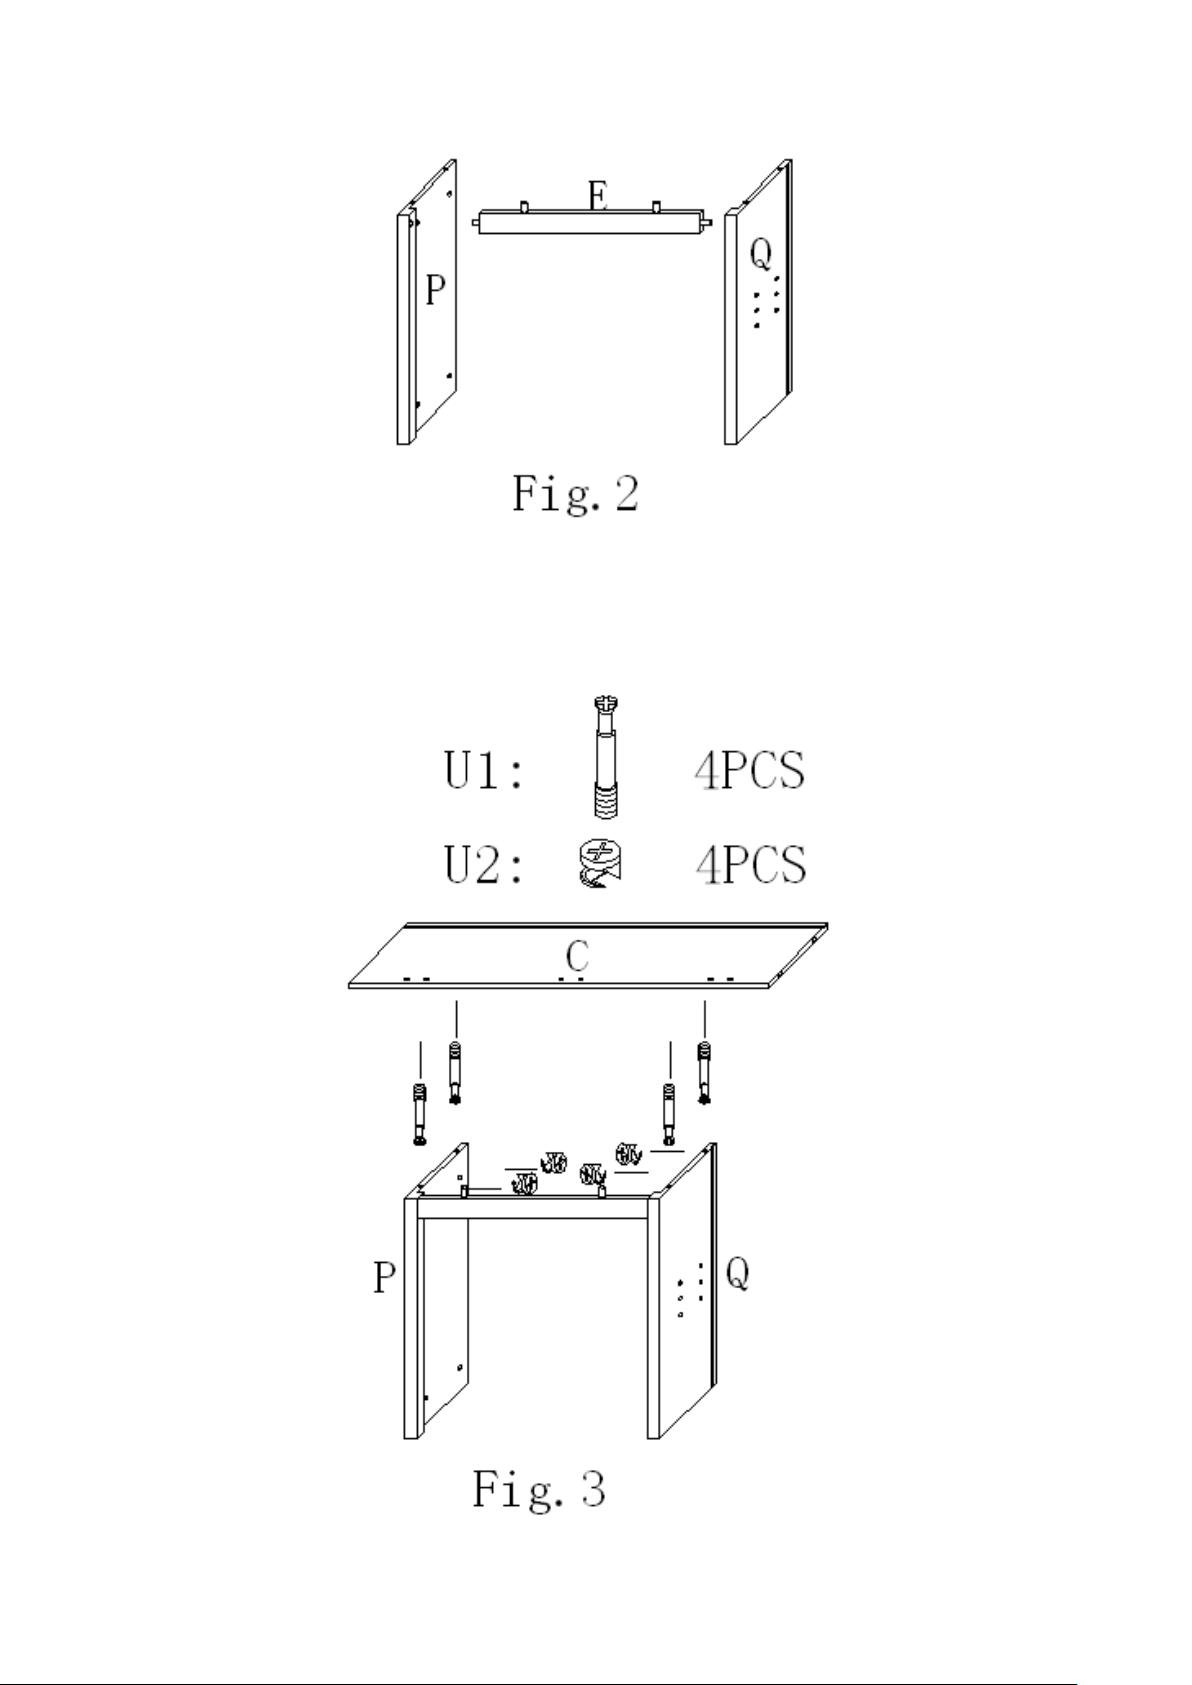
Step 2: Attach the Upper Front Panel (E) to the Left and Right Inner Panels (P & Q), by inserting the pre-attached Wooden
Dowels into the holes in the Inner Panels.
Step 3: Attach 4 Cam Lock Screws (U1) into the bottom of Middle Panel (C).
Insert 2 Cam Lock Nuts (U2) into the Left Inner Panel (P) and 2 Cam Lock Nuts (U2) into Right Inner Panel (Q).
Attach the Middle Panel (C) to the Inner Panels. Turn the Cam Lock Nuts (U2) clockwise with a Philips Screwdriver.

Step 4: Attach 2 Cam Lock Screws (U1) to the Left Side Panel (N). Attach 2 Cam Lock Screws (U1) to the Right Side Panel
(O). Insert 4 Cam Lock Nuts (U2) under the Middle Panel (C). Attach the Middle Panel (C) to the Side Panels (N & O). Tighten
the Cam Lock Nuts (U2).
Step 5: Slide the Upper Back Panel (B) into the Groove on the Left and Right Side Panels (N & O) and into the Middle Panel
(C). Push the Black Plastic Hole Cover (U3) into the hole on the Upper Back Panel (B) as shown below.

Step 6: Attach 8 Cam Lock Screws (U1) to the underside of the Top Panel (A). Insert a total of 8 Cam Lock Nuts (U2) to the
Left and Right Front Panels (J & K) and to the Left and Right Back Panels (L & M). Attach the Top Panel (A) to the top of the
assembled unit. Tighten the Cam Lock Nuts (U2).
Step 7: Turn the assembled unit upside down. Slide in the Small Back Panels (H) into the grooves between the Inner Panels and
Side Panels.

Step 8: Attach 12 Cam Lock Screws (U1) to the Base (G).Attach a total of 12 Cam Lock Nuts to the Left and Right Front
Panels (J & K), to the Left and Right Back Panels (L & M) and to the Left and Right Inner Panels (P & Q).Attach the Base (G)
to the assembled unit. Tighten the Cam Lock Nuts (U2).
Step 9: Turn the Fireplace back over to its Base. Attach the Door Magnet (U5) to the Left Side Panel (N) using 4 Screws (U6).
Attach the Front Door Panel (D) to the Middle Panel (C) using the pre-assembled hinge and 6 Screws (U4).
K

Step 10: Attach 24 Shelf Pegs (U7) to your desired heights in the storage areas.
Step 11: Set the Side Shelves (I) on the Shelf Pegs (U7) on the ends of the mantle. Set the Front Shelves (F) on the Shelf Pegs
(U7) in the front of the mantle.

Step 12: Carefully place the Insert Heater through the opening in the center of the Mantle. Secure the Insert to the Mantle using
3 Screws (U8) at the top of the Insert and 2 Brackets (U9) with 2 Screws (U10) at the bottom of the Insert.
After assembly is complete, check the fireplace insert controls and make sure they are all in the OFF position. Plug the
fireplace into a 15AMP/120Volt outlet. Once the fireplace insert has been properly connected to a grounded, electrical
outlet, it is ready to operate. Do not use an extension cord or power strip.

Heater Operating Instructions:
The heater On/Off switch is located on the top right corner of the insert.
Remote Control
O/I Switch: Press this button ON. The indicator light on the switch will turn on. It means you have power and your
remote is ready to operate your unit.
Remote Control:
: Press this button to turn on the fireplace. The unit will beep. Press again to turn off the fireplace and the fan will
continue to work for 5 seconds without heat.
The fireplace is present to start with high heat (1500W) and the highest flame intensity.
:Press this button once for flame effect. The unit will beep. Press again to increase the flame intensity. There are 6
light intensities for your selection. The flame optics will go higher under the sequence of 1, 2, 3, 4, 5 and 6.
Pressing the button again will stop the flame effect.
750W: Press this button for low heat level. The indicator light will be ON. The fireplace heater will give
low heat level. Pressing once again will stop the low heat level function.
1500W: Press this button for high heat level. The unit will beep. The fireplace heater will give high low
heat level. Pressing once again will stop the low heat level function.
Note: When the O/I switch is turned OFF, the heater functions will stop.
Remote Control Battery Replacement:
Replace with a CR2025 battery and follow the diagram at the back of remote handset to install the new battery.

Maintenance:
WARNING: Completely disconnect power before attempting any maintenance or cleaning, to reduce the risk of fire or
electric shock. Maintenance should only be performed by a certified technician.
The bulbs in your unit are LED, have a long life and are not replaceable.
Cleaning:
Before cleaning any parts of the fireplace make sure to first turn off the controls and then unplug the unit from power
source.
CAUTION: Wait until the unit has completely cooled before attempting any cleaning.
Cleaning Glass Panel: Remove dust with clean dry cloth. Remove fingerprints and other marks from glass door by
using a clean damp cloth. Do not use abrasive cleaners or spray liquids on glass door surfaces.
Metal and metal painted parts should be cleaned with clean damp cloth only. Do not use abrasive cleaners or spray
liquids on these surfaces.
Table of contents
Other Stonegate Indoor Fireplace manuals


Popular Indoor Fireplace manuals by other brands

RealFlame
RealFlame 5099 user guide

Napoleon
Napoleon GD82PT-PAE Installation and operating instructions

Regency
Regency Greenfire GF900L Problem Finding Chart

Superior
Superior VFST-CMN-2 Installation and operating instructions

Travis Industries
Travis Industries 31 DVI GSB2 owner's manual

WANDERS
WANDERS Tali User guide and installation manual

Alpine
Alpine TAMARRON TR42 Installation and operating instructions

MPC
MPC CORNICE-CAMINO-LIPARI instruction manual

Valor
Valor LEGEND G3.5 installation manual

Astria
Astria Sentinel36TEN Installation and operation instructions

Travis Industries
Travis Industries Shadowbox Black instructions

Hearth & Home
Hearth & Home DV3732-B owner's manual


