Storchenmühle Twin 0+ Parts list manual

TÜV Rheinland
B
a
u
a
r
t
g
e
p
r
ü
f
t
T
y
p
e
a
p
p
r
o
v
e
d
Twin 0+
Competence Center Child Safety, Guttenbergstr. 2, 95352 Marktleugast-Mannsflur
sto4394-4-07/1 disk Storchenmühle Twin 0+, Vorderseite Montageanleitung
erst. 15.05.2007 ps / geänd. am 22.05.07 ps / 08.11.07 ps / 13.03.08 ps / 02.10.08 ps / 21.07.10
ps / 24.03.11 ps / 05.04.11 ps
sto4394-4-07/1 - Version 050411
Storchenmühle
STM
Twin 0+
universal
–13 kg
04301187
Gruppe 0+
E1
Storchenmühle
STM
Montage- und Gebrauchsanleitung
Gruppe 0+ (-13 kg)
Diese Montage- und Gebrauchsanleitung unbedingt dem Kunden aushändigen.
Druckfehler, Irrtümer und technische Änderungen vorbehalten.
ACHTUNG – für späteres Nachlesen unbedingt aufbewahren.
D
Assembly and Usage Instructions
Group 0+ (-13 kg)
These Assembly and Usage Instructions must be given to the client.
Subject to printing errors, mistakes and technical changes.
WARNING – keep for future reference.
GB
Notice de montage et d'utilisation
Groupe 0+ (-13 kg)
Remettre impérativement cette notice de montage et d’utilisation au client.
Sous réserve de fautes d’impression, d’erreurs et de modifications techniques.
ATTENTION - à conserver impérativement pour un usage ultérieur.
F
Navodilo za sestavo in uporabo
Skupina 0+ (-13 kg)
Ta navodila za sestavo in uporabo je potrebno obvezno izročiti stranki.
Tiskarske in druge napake ter tehnične spremembe pridržane.
POZOR - navodila obvezno shranite za kasnejšo uporabo!
SLO
Instrukcja montażu i użytkowania
Grupa 0+ (-13 kg)
Niniejszą instrukcje˛ montażu i użytkowania należy bezwzgle˛ dnie wre˛ czyć klientowi.
Zastrzega sie˛ możliwość wystąpienia błe˛ dów drukarskich, pomyłek i zmian technicznych.
UWAGA - Zachować w celu późniejszego zasięgania informacji.
PL
Montage- en gebruikshandleiding
Groep 0+ (-13 kg)
Deze montage- en gebruikshandleiding absoluut aan de klant overhandigen.
Drukfouten, vergissingen en technische veranderingen voorbehouden.
LET OP – Voor latere raadpleging bewaren.
NL
5678-4-00/1
D GB
Liebe Eltern,
für Ihr Kind nur das Beste! Herzlichen Glückwunsch! Sie haben
sich für ein hochwertiges Markenprodukt aus dem Hause
Storchenmühle entschieden.
Ein Kind aufzuziehen ist eine der schönsten Aufgaben, die das
Leben stellt - und zugleich eine große Verantwortung. Gut zu
wissen, dass Sie damit nicht alleine stehen, sondern einen
kompetenten Partner an Ihrer Seite haben, der die Sicherheit Ihres
Kindes im PKW von Anfang an optimiert: Storchenmühle.
Storchenmühle wünscht Ihnen allzeit gute Fahrt.
Dear Parents,
Only the best for your child! Congratulations! You have chosen
a high-grade quality product from Storchenmühle.
Bringing up a child is one of the most fulfilling tasks that life can
bring and, at the same time, is a huge responsibility. It’s good to
know that you are not alone, and that you are supported by a
competent partner who has optimized the safety of your child in
a car from the outset: Storchenmühle.
Storchenmühle wishes you a safe journey at all times.
sto5678-4-00/1 disk STM Recaro Young Profi 0+, Begrüßungstext
erst. 02.10.2008 ps / geänd. am
4369-4-01/1
Babyschale von Geburt bis
13 kg, die sowohl mit dem
Dreipunktgurt, als auch auf
der passenden Isofixplatt-
form ins Fahrzeug eingebaut
werden kann. Das Isofixsy-
stem entspricht der Isofix-
größenklasse E. Geprüft
nach ECE 44/04, XPS54.040
& XPS54.046. Wenn Sie das
Isofix nutzen wollen, prüfen
Sie in Ihrem Fahrzeughand-
buch, ob diese Größenklasse
für Ihr Fahrzeug freigegeben
ist.
Infant carrier from birth until
a maximum weight of 13 kg
for installation in a vehicle
either with a three-point belt
or on the matching Isofix
base. The Isofix system
corresponds with Isofix Size
Class E. Tested according to
ECE 44/04, XPS54.040 &
XPS54.046. If you intend
using the Isofix system then
please check beforehand in
your vehicle manual whether
this size class is approved
for your vehicle.
D GB
15060-4-00/1
sto4369-4-01/1 disk STM Recaro Twin 0+, Bild 1 Montageanleitung
erst. 14.05.2007 ps / geänd. am 08.11.07 ps
4370-4-01/1
D GB
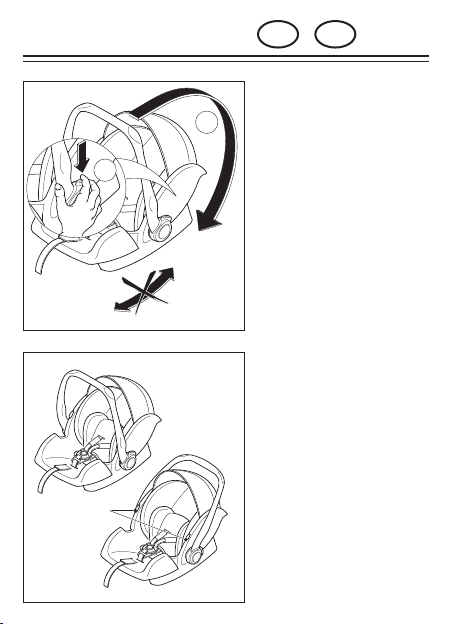
Schaukelfunktion:
Die Babyschale kann auf Grund
Ihrer Form als Wippe benutzt
werden. Um die Schaukelfunk-
tion außer Kraft zu setzen, le-
gen Sie den Tragebügel über
den Kopfbereich bis zur Einra-
stung um.
Rocking-seat function:
The shape of the infant carrier
allows it to be rocked. To eli-
minate the rocking function
fold the carrying handle over
the head area until it locks in
place. When the child is in the
infant carrier the harness
should be fastened at all times!
Verschiedene Tragebügels-
tellungen.
Anbindung an Kinder- und
Sportwagen möglich (A). Dies
gilt nur, wenn der Hersteller
der Wagen einen entsprechen-
den Adapter anbietet.
Diverse carrying frame posi-
tions.
Can be fitted in a pushchair
and sports car (A). This is only
possible if the manufacturer
has provided the car with an
appropriate adapter.
25061-4-00/1
2
1
35062-4-00/1
A
sto4370-4-01/1 disk STM Twin 0+, Bild 2+3
Montageanleitung
erst. 14.05.07 ps / geänd. am 08.11.07 ps
4371-4-00/1
D GB
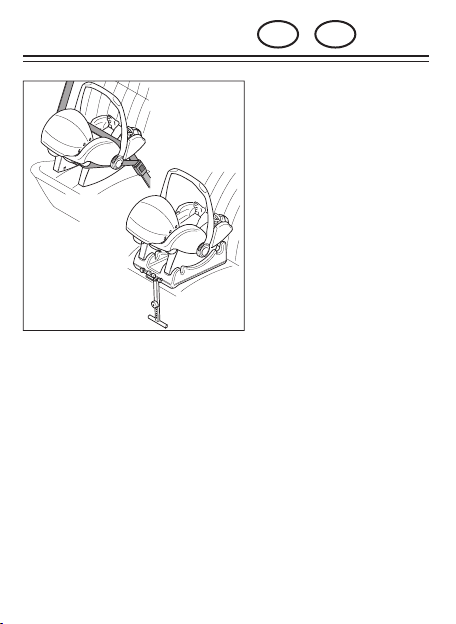
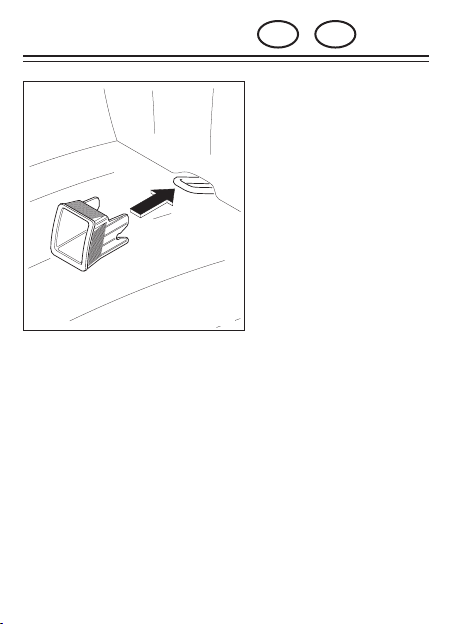
Einbau mit Isofix
Stecken Sie die Einführhilfen
durch den Polsterschlitz von
Rückenlehne und Sitzfläche
auf die Isofixbügel, nicht er-
forderlich bei bereits fest
installierten Einführhilfen,
z.B. BMW. Achten Sie darauf,
dass die offene Seitenfläche
oben ist.
Installing with Isofix
Insert the guides through
the upholstery slot between
the back rest and seat and
on to the Isofix bracket. This
is not necessary when such
guides have already been
installed, e.g. BMW. Ensure
that the open side area faces
upwards. In some vehicles,
the isofix brackets are
located behind the seat fabric
and are not visable; in this
situation please contact your
vehicle manufacturer or
dealer.
42205-4-01/1
sto4371-4-07/1 disk STM Twin 0+, Bild 3.1 Montageanleitung
erst. 14.05.2007 ps / geänd. am
Table of contents


