STREET WISE SWWPC User manual

WIRELESS PHONE CHARGER WI-FI DVR
(MODEL # SWWPC)
INSTRUCTION MANUAL
Revised 9/16/2020

2
Contents
1. Download the app - minicam............................................. 5
2. Setup Instructions ............................................................. 5
STEP 1. Charge the camera ......................................... 5
STEP 2. Insert a micro SD card..................................... 5
STEP 3. Turn on the camera......................................... 5
STEP 4. Connect your phone to this Camera's Wi-Fi.... 6
STEP 5. Set local connections ...................................... 6
STEP 6. Set remote connections................................... 6
3 .Live Feed.......................................................................... 8
4. Camera Settings ............................................................. 10
4.1 Device Name ......................................................... 10
4.2 Password............................................................... 11
4.3 Share..................................................................... 11
4.4 Motion Detection Alarm Configuration ................... 11
4.5 SD Card Record Configuration .............................. 13
5. How to share with another phone ................................... 14
6. Resetting the camera...................................................... 14
7. Q&A ................................................................................ 15
8. Warranty Service ............................................................ 16

3
Ⅰ. PRODUCT DIAGRAM
Ⅱ.WIRELESS CHARGER
IMPORTANT: Use the attached charging cord and adapter.
Do not use other cords or adapters.
Please wait for 3-5 seconds to check the charging indicator
light after you put your phone.
1 Clock display switch & - 8 Micro SD card slot
2 12/24 system switch & + 9 Reset hole
3 Time set button 10 Camera indicator light
4 Microphone 11 Time display screen
5 Heat emission hole 12 Camera lens
6 Camera switch 13 Charger indicator light
7 Micro USB input 14&15 Induction coils

4
CHARGER INDICATOR LIGHT STATUS:
Blue & Red light solid
Standby mode
Blue light solid
Charging mode
Blue & Red-light blink
No detect the phone’s
wireless charging receiver
Please remove all metal cases and metal or magnetic objects from the back of
your phone prior to wireless charging, as these may overheat and damage
your device, next put your phone on the correct location, wait for 3-5
seconds, the Blue light will solid, it means the phone is charging now.
Note: iPhone has wireless charging temperature protection, it cannot be
charged if the temperature exceeds 37°.
Ⅲ.TIME DISPLAY
After you plug in, the clock
time will default display on
the screen, simply press
the ON / OFF button to turn the display screen on or off, click the 12/24
button to switch hours system.
HOW TO SET THE CORRECT TIME:
- Long press the SET button for about 5 seconds to active the time setting;
- Press the "+" and "–" button to adjust;
- Click the SET button to switch between hour and minute setting.
Note: The instructions outlined in this manual are specifically for the
Android, but iPhone setup instructions are similar.

5
1. DOWNLOAD THE APP - MINICAM
Open the camera function on your smart phone to scan the
QR code. Follow the URL link to download the application
called Minicam to the phone. If the QR code is
unreadable, search the app store for the Minicam
application.
2. SETUP INSTRUCTIONS
STEP 1. CHARGE THE CAMERA
Initially, charge device for 4-6 hours before using.
We recommend that you plug the device into an auxiliary outlet for all day
use.
STEP 2. INSERT A MICRO SD CARD
Please insert the micro SD card into the slot on the side of the device for
recording. It supports up to 128Gb (not included in the package).
STEP 3. TURN ON THE CAMERA
Push ON/OFF button to the ON position, wait 20 seconds, then the indicator
will light up.
Note: Device will work for 4 hours once full charged when not connected to
an auxiliary outlet.

6
STEP 4. CONNECT YOUR PHONE TO THIS CAMERA'S WI-FI
Access your smart phone's Wi-Fi settings menu. Search and connect camera's
Wi-Fi signal starting with "CAM888".
Note: Some Android phones such as Samsung will notice that your camera's
Wi-Fi cannot access the Internet. Please ignore this alarm and continue to
connect to the camera's Wi-Fi.
If after 1 minutes, the camera’s Wi-Fi does not appear, Reset the device (see
Page 12) and try again.
It may take about 1 minute if using iPhone, please be patient.
STEP 5. SET LOCAL CONNECTIONS
Open the minicam app on your phone. The Minicam app will confirm
permissions with the following: location, notifications, and microphone, the
camera will be searched automatically, click "Confirm" to add it. If the device
does not appear, check if your phone is connected to the camera’s Wi-Fi, then
try again.
STEP 6. SET REMOTE
CONNECTIONS
Click the "Settings" icon (noted to the
right in red)>>> "Wi-Fi Config" >>> Select
your router’s Wi-Fi name >>> Enter your
Wi-Fi password >>> Click “Confirm” >>>
Wait 1-2 minute for configuration.

7
After the configuration is complete, the
setup will show online. Then, you will have
access to view the live footage from the
smart phone.
Note:If after 2 minutes, the camera is still
offline, please check for the following:the
Wi-fi connected to the 5Ghz access point or
the entered password was incorrect.
Locate your router’s Wi-Fi name
and input the password, then
click "
√
".
Note:Choose the 2.4Ghz Wi-Fi
access point signal. Do not use
the 5Ghz. It is not supported.

8
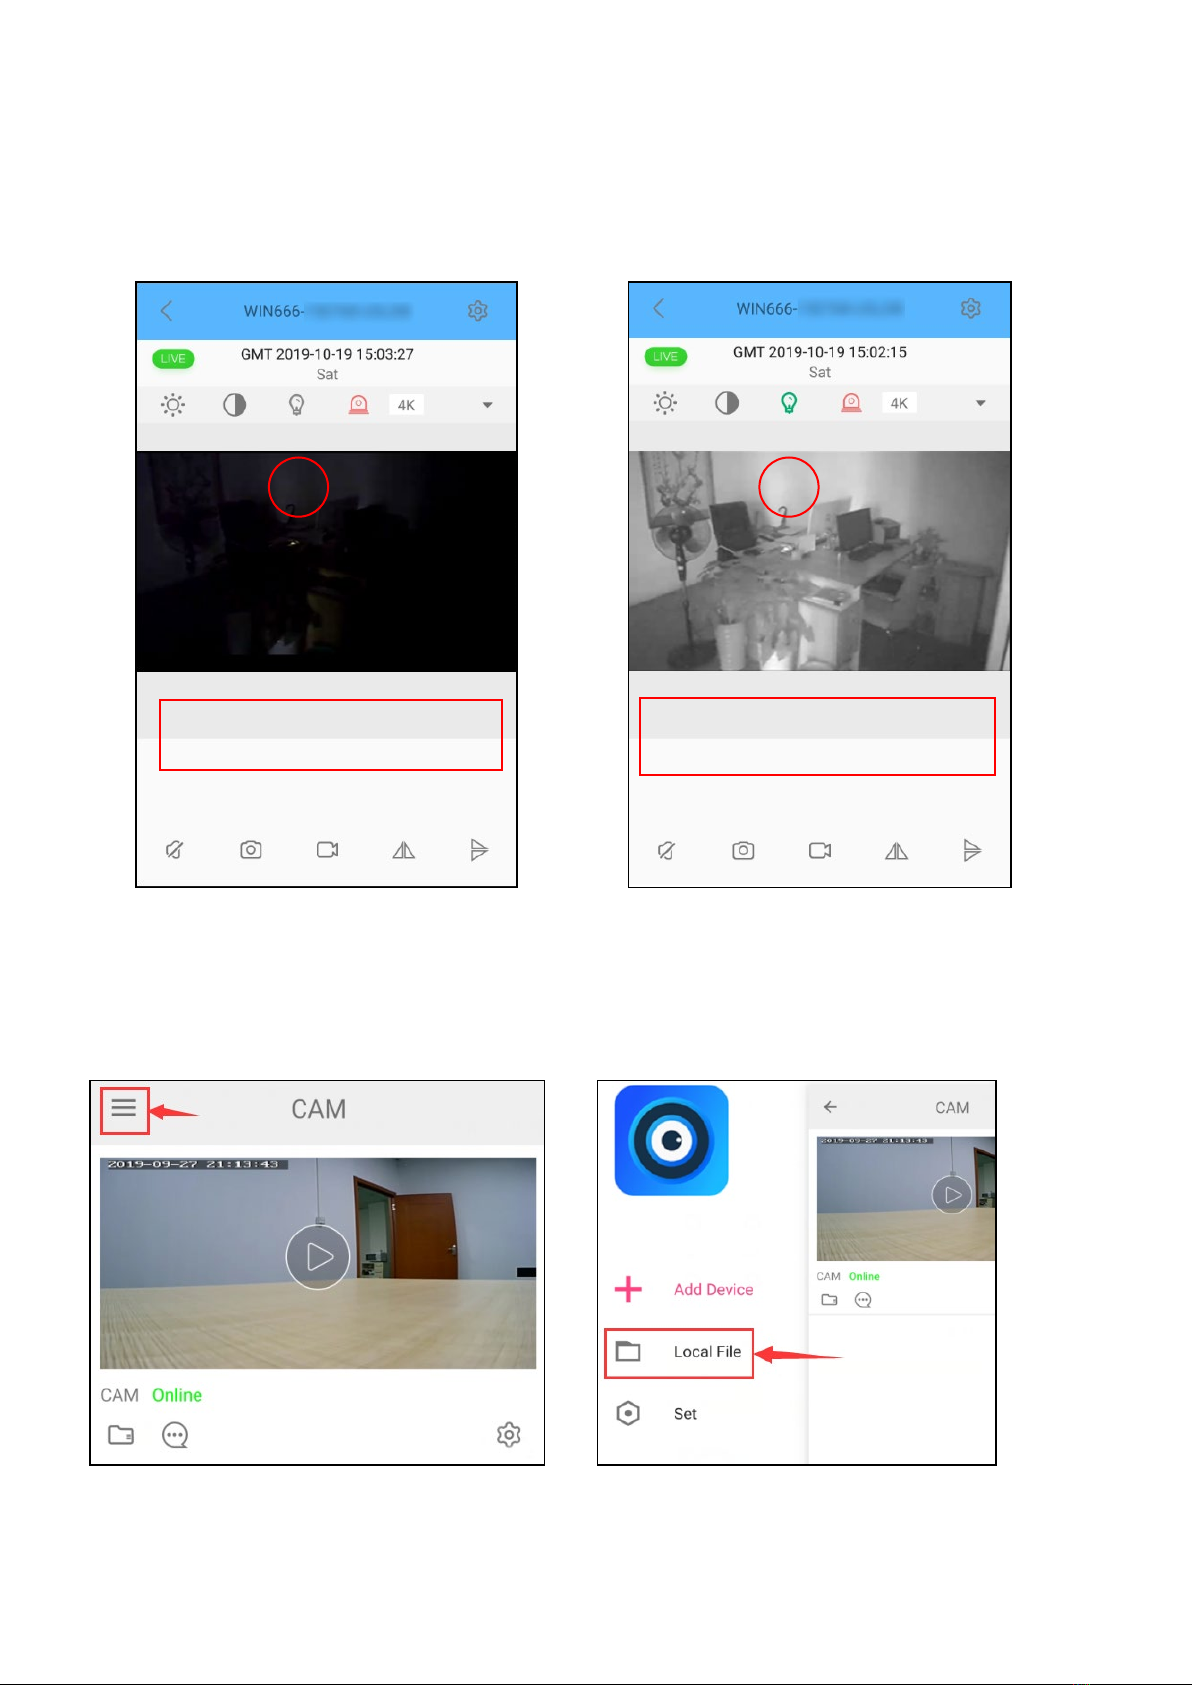
3. LIVE FEED
Click on the play button on the preferred video
to view the live feed.
TERMS & DEFINITIONS OF BUTTONS
1. Brightness: click to adjust brightness
2. Contrast: click to adjust contrast
3. Night Vision: click to turn ON/OFF Night
Vision Mode for use in low light
4. LED Indicator Light: click to turn LED
lights ON/OFF
5. Resolution: adjust resolution for video
quality
6. Audio: Click to turn ON/OFF the audio.
Note: this function is not available for
products sold in US.
7. Snapshot: click to take a picture and save
it on your phone
8. Record: click to begin recording video on your phone
9. Horizontal Flip: Flip the camera’s view horizontally
10. Vertical Flip: Flip the camera’s view vertically
9
NIGHT VISION MODE
Turn night vision ON and OFF manually. It captures sharp images even with
limited or no light is present.
HOW TO VIEW THE RECORDINGS SAVED ON THE PHONE
You can preview videos and photos saved on your phone.
NIGHT VISION ON
NIGHT VISION OFF

10
4.CAMERA SETTINGS
To manage device settings, click the settings icon in the bottom right corner
(noted in red).
DEVICE SETTINGS
In the Settings field you can modify,
delete, or share the device. In the
advanced settings you can manage
the device password, alarm
notifications, motion detection
settings, micro SD card recording
settings, and much more.
4.1 DEVICE NAME
You can rename the device by its
location, so it is easy to tell where you
have an uninvited guest. Or, just name
the device how you see fit.

11
4.2 PASSWORD
The password is for the security of the camera access. The startup password is
set to 8888. To protect your privacy and security, it is highly recommended
you change the access password. Click the "Settings" icons >>> "High level
Configuration" >>> "User set" >>> enter a more secure password.
4.3 SHARE
If it is showing the RC code of the camera, used by share with other phones.
The details about how to share with another phone, please see the Page 14.
4.4 MOTION DETECTION ALARM CONFIGURATION
Settings contain the most important and helpful features of the camera.
These settings allow you to manage your push notifications and activity alerts
from your camera.
See following pages for detailed alarm settings.
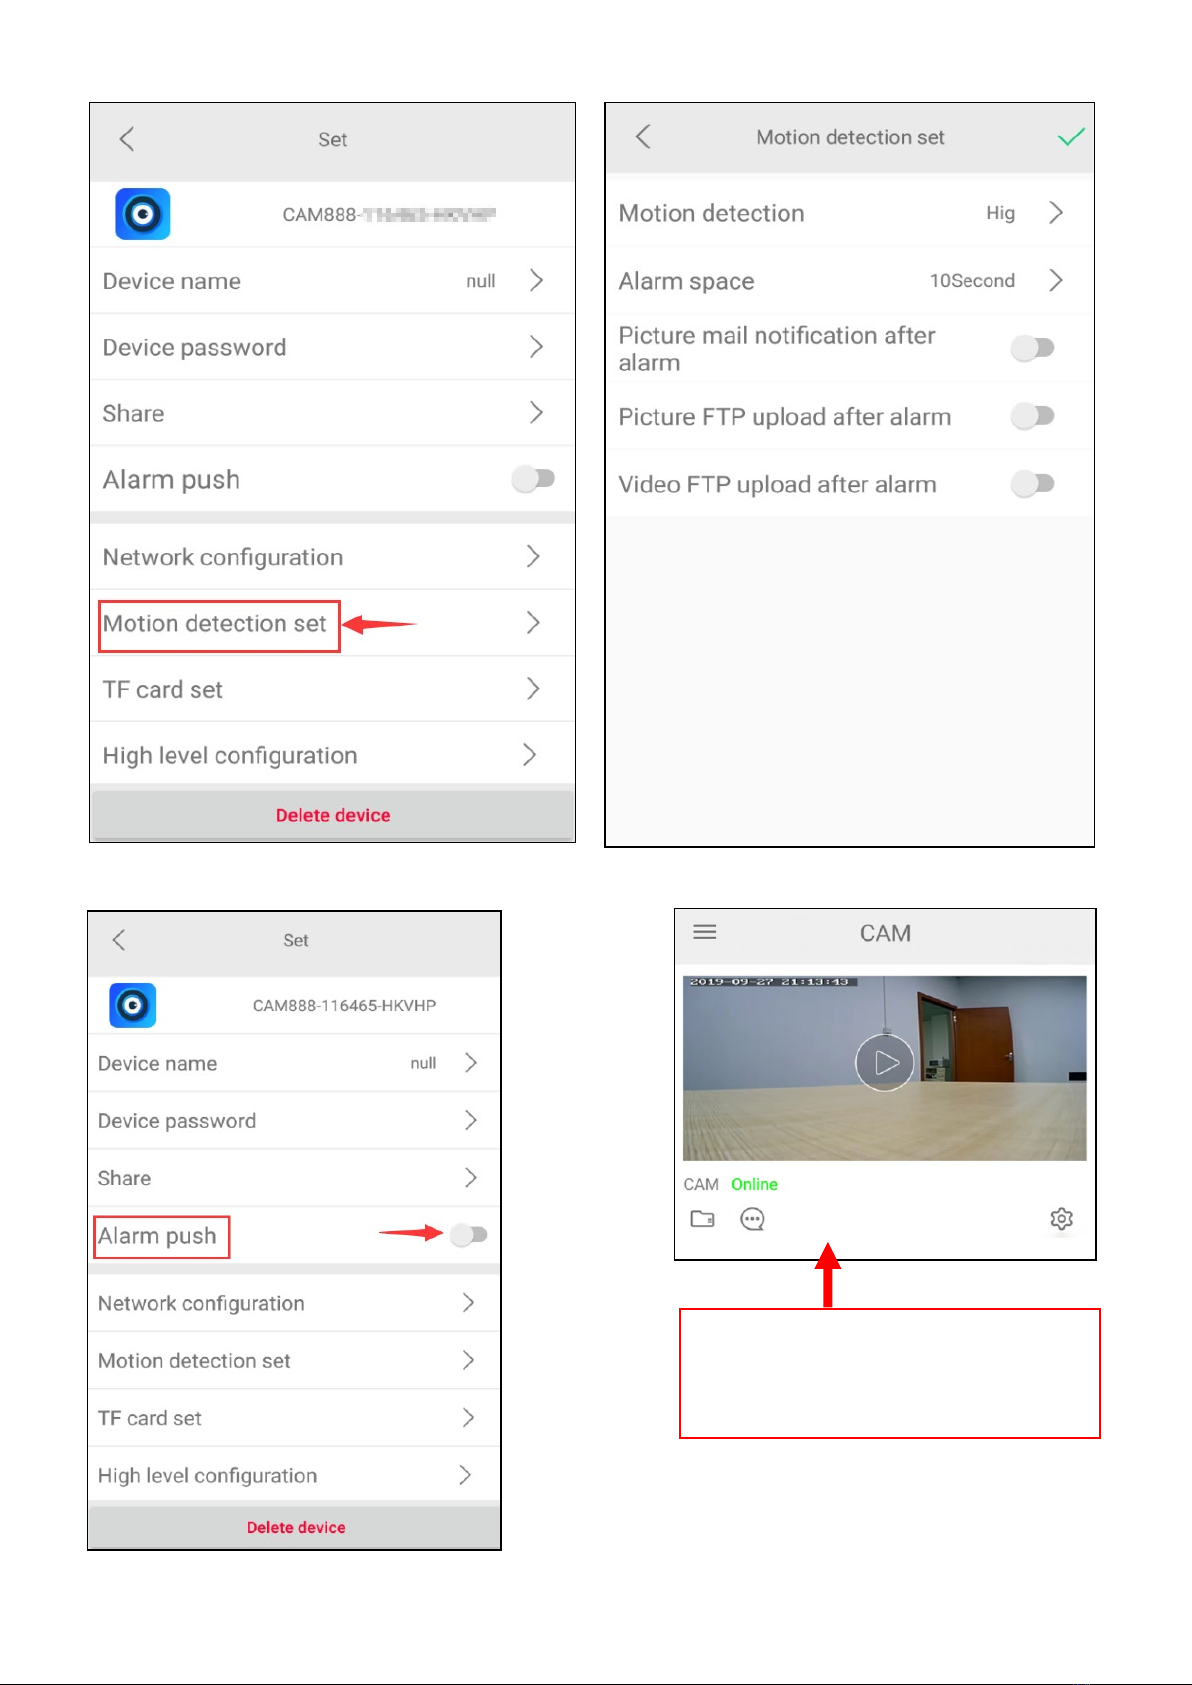
12
To trigger the Alarm push, please open the alarm notification.
The alarms with pictures will
be shown here.

13
4.5 SD CARD RECORD CONFIGURATION
Manage your micro SD card recording settings by adjusting the record mode
and set a length of time you want the camera to record. Make sure the micro
SD card is formatted before using.
Play online and download files
from memory card. will be
shown here.

14
5. HOW TO SHARE WITH ANOTHER PHONE
1) Change the device to remote
connections before sharing.
2) Download and install the
Minicam app on the smart phone
you wish to share with.
3) On the shared smart phone,
open the Minicam app, click
"Add Device" >>> "Add device by
hand" >>> enter the Device ID beginning with
“CAM888” and enter the Device password you created
when you connected your device initially to your smart
phone. You can also click the "Scan QR code" button to
add the device by scanning the QR code on the back of
camera.
If the smart phone and the device are on the same router’s Wi-Fi, please click
the "LAN Search Device" to add it.
6. RESETTING THE CAMERA
Locate the RESET button as referenced on
the Product Diagram. Then do as follow:
Step 1. Make sure the camera is turned on;
Step 2. Hold down the Reset button 5 seconds;
Step 3. Wait for 1 minutes for it reboot, done.

15
7. TROUBLE SHOOTING
Q: Why can't I find my device listed or connect to the Wi-Fi?
1. Confirm that the device is powered on.
2. Confirm that the device and the router are close in proximity to each
other, and there is no interference causing disruption of the wireless
signal strength.
3. Confirm that the Wi-Fi password is entered correctly in the Minicam
app.
4. Confirm that the selected access point Wi-Fi is 2.4Ghz.
5. Reset the device and follow the instructions for installation.
Q: Why does the camera show "device not online"?
1. When you connect it to the router, it may display "device not online".
During rebooting, please wait 1-2mins, then it will display "Online".
2. Please check to make sure the connected router is plugged in and
powered on. Check the device connection for the Wi-Fi access point of
2.4Ghz.
3. Reset the device.
Q: Micro SD card cannot save files.
Before inserting the card, reformat the micro SD card in your computer.
Q: The passwords was forgotten
Reset the device.
Q: How to connect device to app when the Wi-Fi network is changed?
After changing the Wi-Fi network, the device will be offline. Open the
Minicam app on the smart phone. Remove the device first. Then, press the
RESET button on the device for 5 seconds to reset it. Once reset,
reconnect the device the to the Minicam app.
Q: How to turn off the smoke detector camera indicator light?
Open the Minicam app, enter the main interface of the app, you will see
the camera, click to enter the operation interface, click to turn OFF the
indicator.

16
8.WARRANTY SERVICE
There is a warranty period of one year that covers defects in materials or
workmanship, with the following exceptions:
•The warranty does not cover damage resulting from accident, misuse or
abuse, lack of reasonable care, or loss of parts.
•The warranty will be voided if the unit has been opened or tampered
with in any way (unless by an authorized dealer) or if any unauthorized
replacement parts have been used.
•The warranty does not cover corrosion in the battery compartment
caused by long term battery storage.
CONDITIONS OF SALE
Purchase of this product is an agreement by the purchaser/user to hold all
sellers and manufacturers harmless of all liabilities and damages. Purchaser
also agrees to use product only in a lawful manner. Consult your state and
local laws.
TO OBTAIN SERVICE
Contact the Authorized Dealer from whom you purchased this unit for a
Return Merchandise Authorization. The return unit must be sent postage
prepaid and proof of purchase is required. Damage or loss occurring during
shipment is not covered by this warranty.
Table of contents
Other STREET WISE Batteries Charger manuals


