StreetCam Vehicle recorder User manual

1

2
StreetCam Digital Video Recorder
Contact Information
StreetCam
7560 Central Parke Boulevard
Mason, OH 45040 USA
Web site: www.mystreetcam.com
Local Phone: 513.770.0550 Local Fax: 513.770.0176
Technical Support: 877.237.3100 x203 Email: technical_support@mystreetcam.com
LEGAL NOTICE
Copyright ©2010 StreetCam. All rights reserved.
Acrobat is a registered trademark of Adobe Systems Incorporated.
Microsoft and Microsoft Windows registered trademarks of Microsoft Corporation.
The information contained in this guide is subject to change without notice. This manual was
last modified on 06-7-2010
As our products are subject to continuous improvement, we and our subsidiaries reserve the
right to modify product design, specifications, and prices without notice and without incurring
any obligation.

3
Table of Contents
WARNINGS.......................................................................................................................... 4
FEATURES .......................................................................................................................... 6
PRODUCT CONTENTS ....................................................................................................... 7
BEFORE YOU BEGIN .......................................................................................................... 8
PRODUCT KEY.................................................................................................................. 10
SPECIFICATIONS.............................................................................................................. 11
BASIC INSTALLATION ...................................................................................................... 12
MOUNTING BRACKET ...................................................................................................... 13
MOUNTING STREETCAM ................................................................................................. 14
INSTALLING AN EMERGENCY BUTTON ......................................................................... 15
RECORDING WITH STREETCAM..................................................................................... 16
STREETCAM VIEWER INSTALLATION ............................................................................ 17
STREETCAM VIEWER MAIN SCREEN............................................................................. 18
PLAY MODES .................................................................................................................... 20
ENABLING GOOGLE MAPS VIEW.................................................................................... 22
OTHER SCREEN OPTIONS .............................................................................................. 23
STREETCAM CONFIGURATION....................................................................................... 23
SETTINGS.......................................................................................................................... 30
USER‟S DIRECTION.......................................................................................................... 31
TROUBLESHOOTING........................................................................................................ 34
HELPFUL HINTS................................................................................................................ 35
TIPS FOR USING GPS ...................................................................................................... 36
TIPS FOR USING SD MEMORY CARD............................................................................. 37
TROUBLESHOOTING........................................................................................................ 38
4
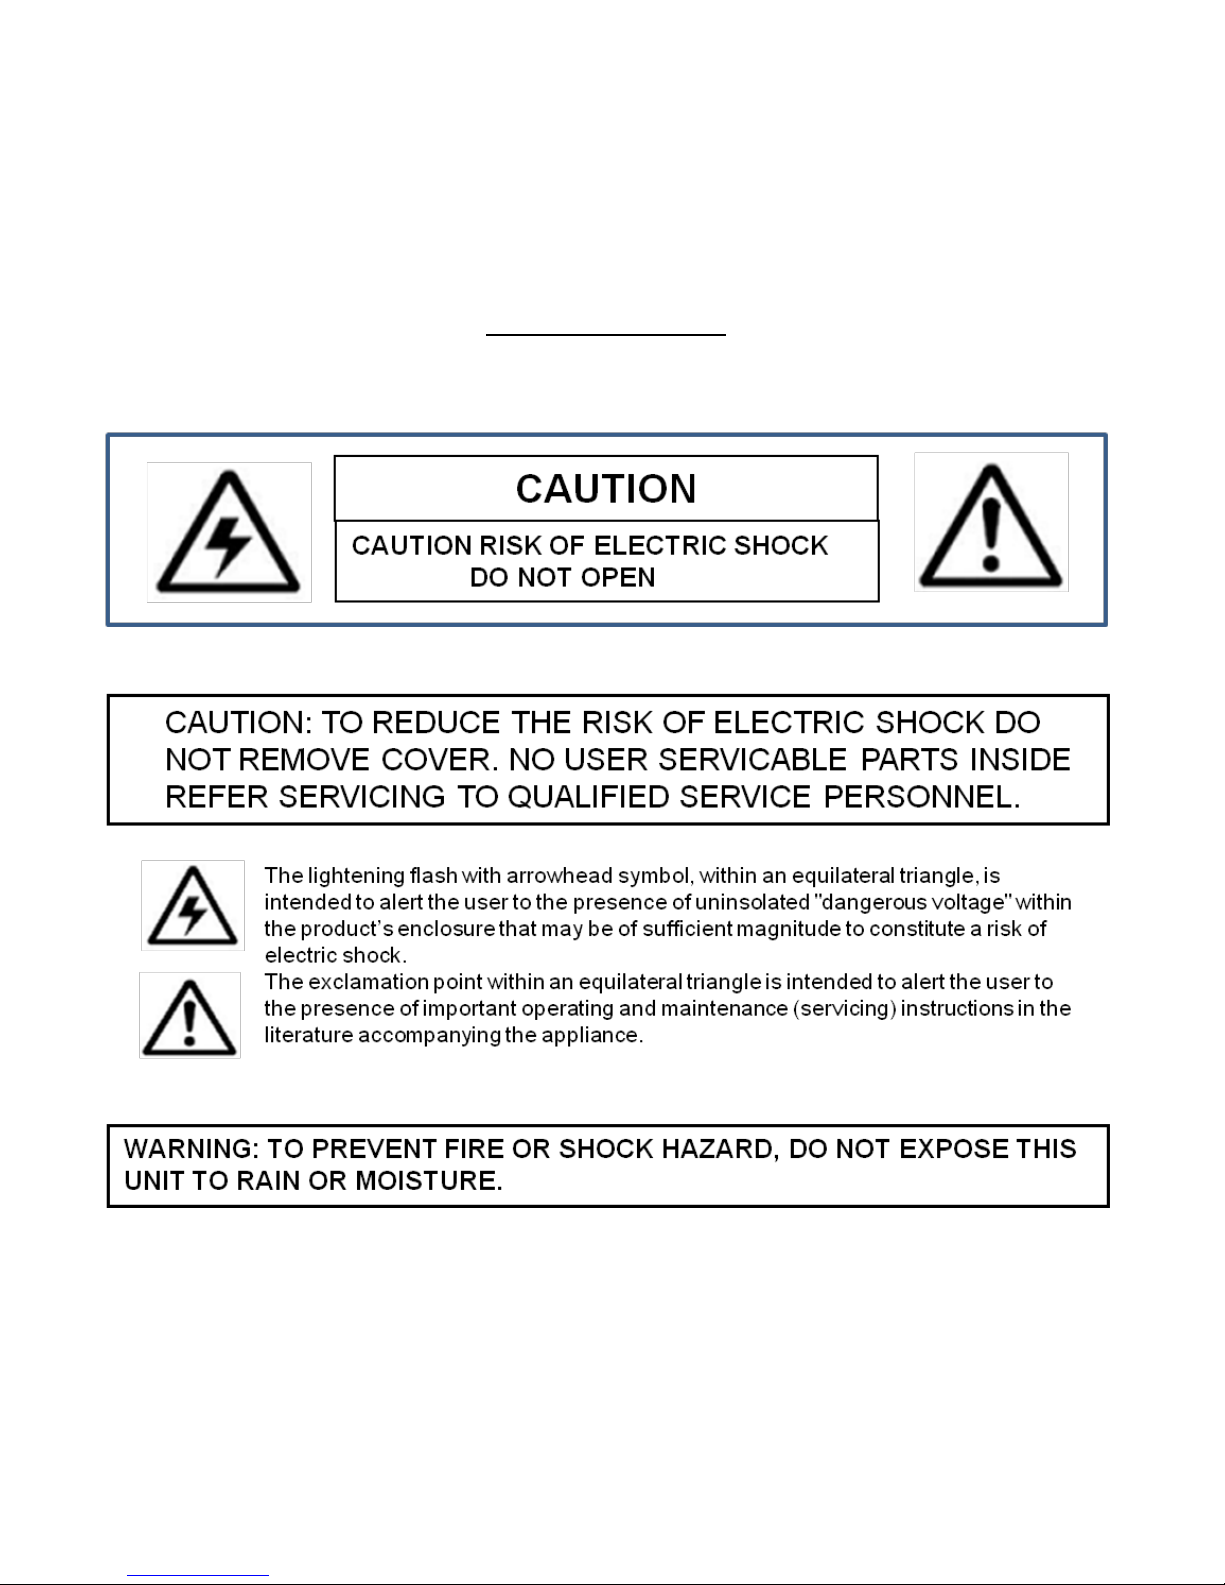
WARNING
5
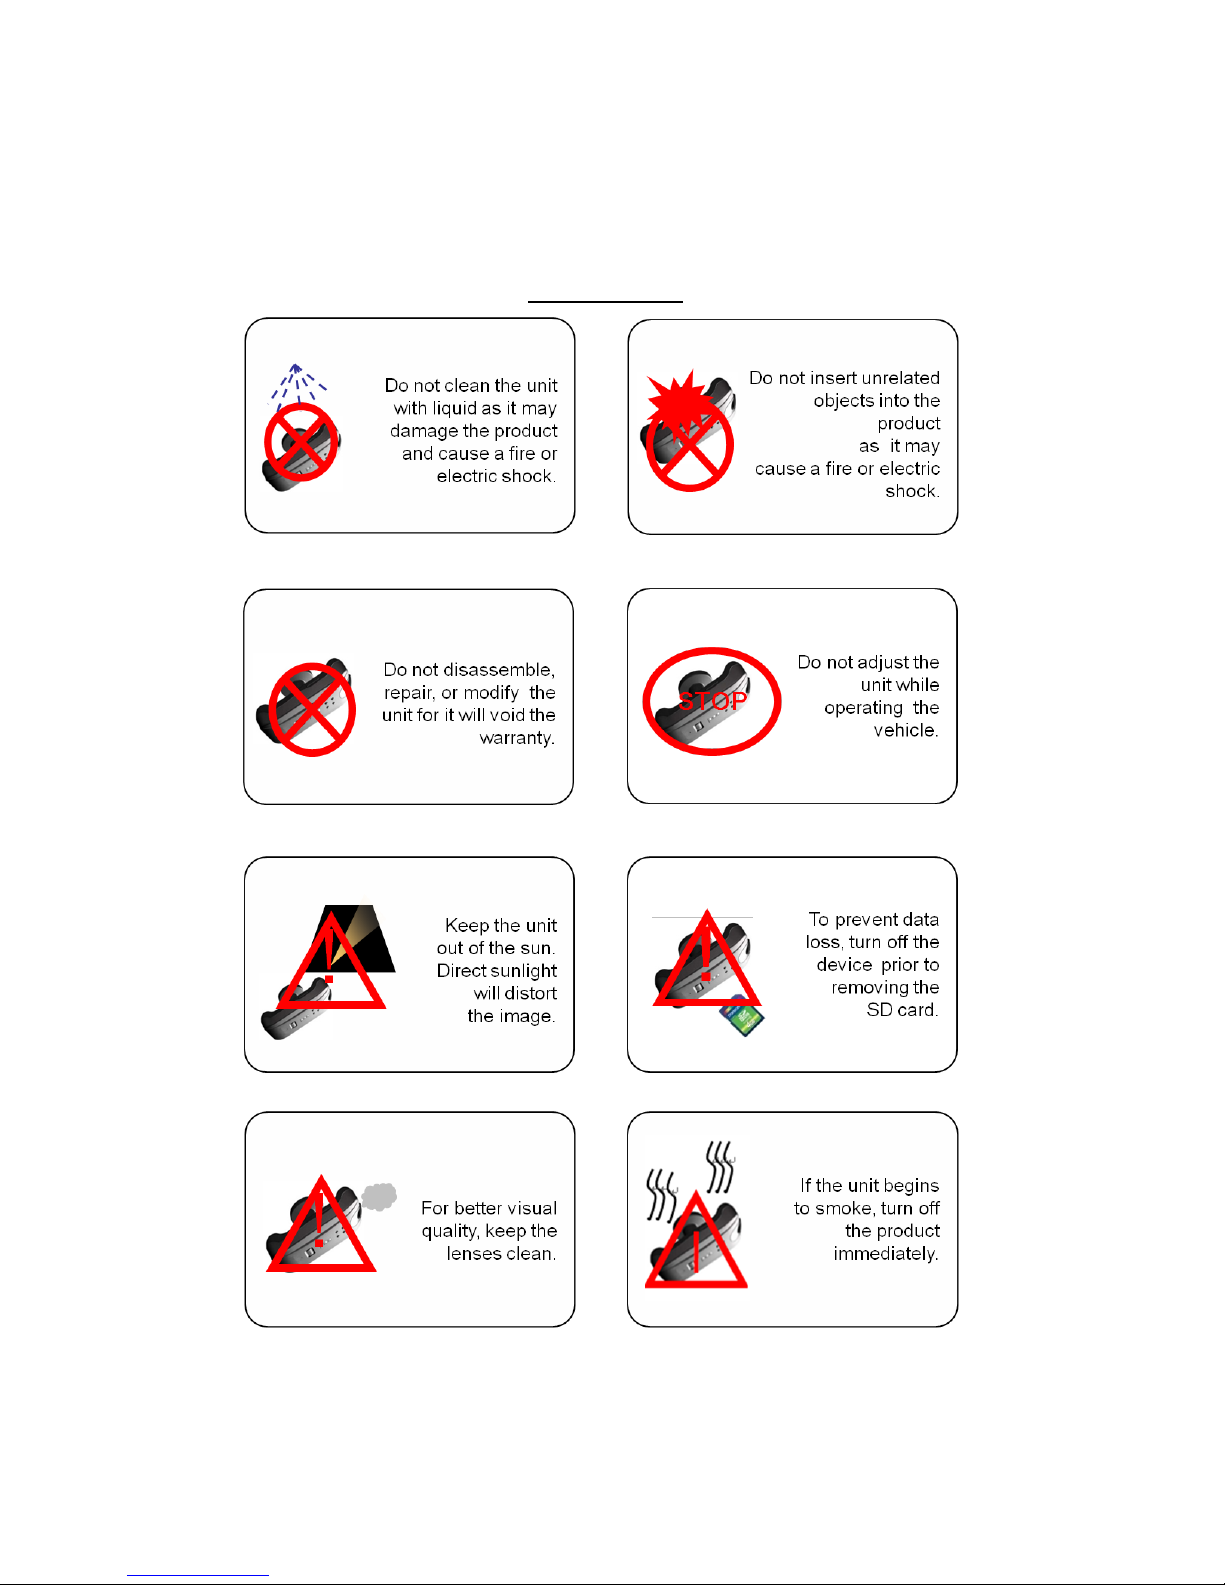
WARNINGS

6
PRODUCT FEATURES
The STREETCAM features a built-in GPS antenna, h.264 video compression for ultra-clear
video, and intuitive playback software for archiving and viewing recorded videos. STREET-
CAM is designed to record daily driving events inside your vehicle, and from the driver‟s view.
Use the included STREETCAM software to play back the events.
STREETCAM Features
• 4 hours(15f/sec) recording time on a 4 gigabyte SDHC memory card (included)
(Supports a maximum of a 32GB SDHC memory card)
• 2 high resolution color cameras to record a vehicle’s interior and driver’s view
• Viewing angles: Driver-view camera: 120° field of view
In-Car view camera: 175° field of view
• H.264 video compression for high quality, compact video files
• Record driving events and pinpoint the location of the event using Google Maps™
(Internet connection required).
• Integrated GPS antenna, impact sensor and microphone
• Automatically tags recording if an emergency event occurs
• Infra Red (IR) LEDs for night vision recording inside the vehicle
STREETCAM Viewer
• Manage, backup, and view your recorded videos
• Easy and intuitive menu navigation
• View your video while tracking the location of your vehicle with Google Maps™
(Internet connection required).
• Save video files for easy sharing
• Sort videos by event type
7
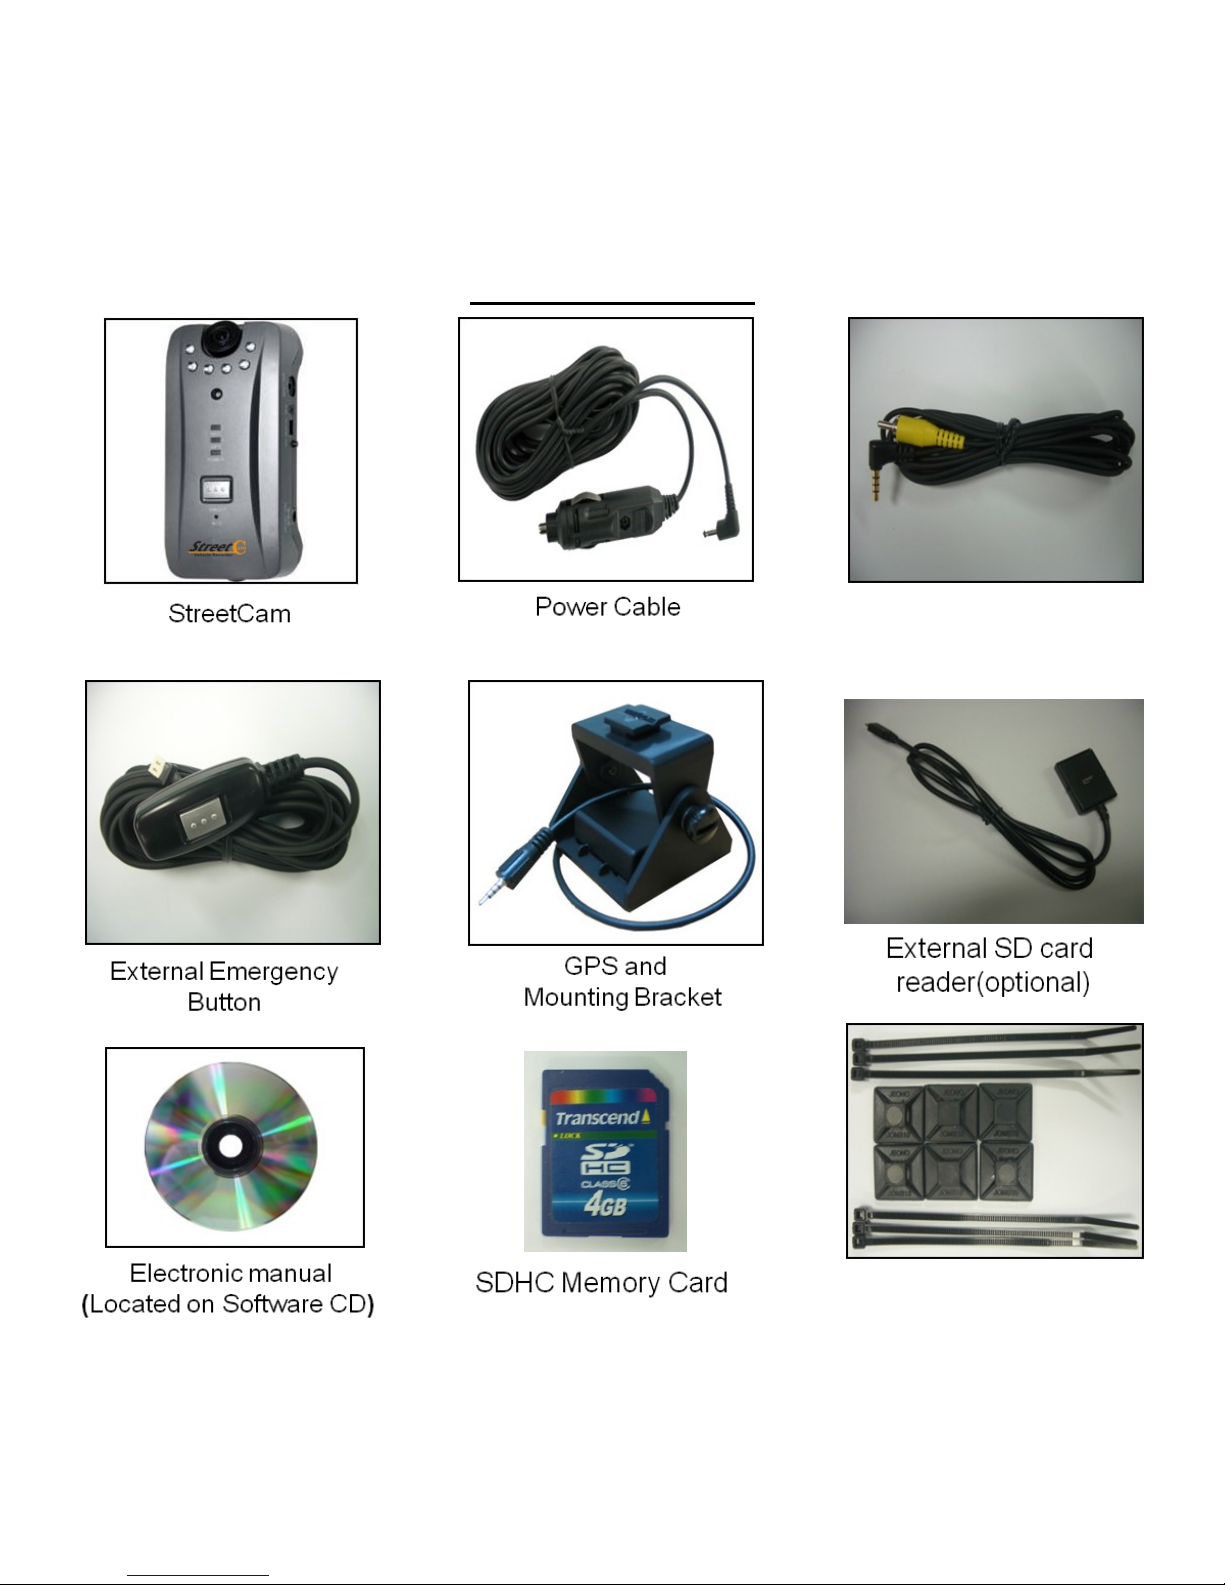
Product Contents
Video Out
8
Before You Begin
To set the time and date, you must first install the StreetCam Viewer software (included) on
your home computer.
To install the StreetCam Viewer software:
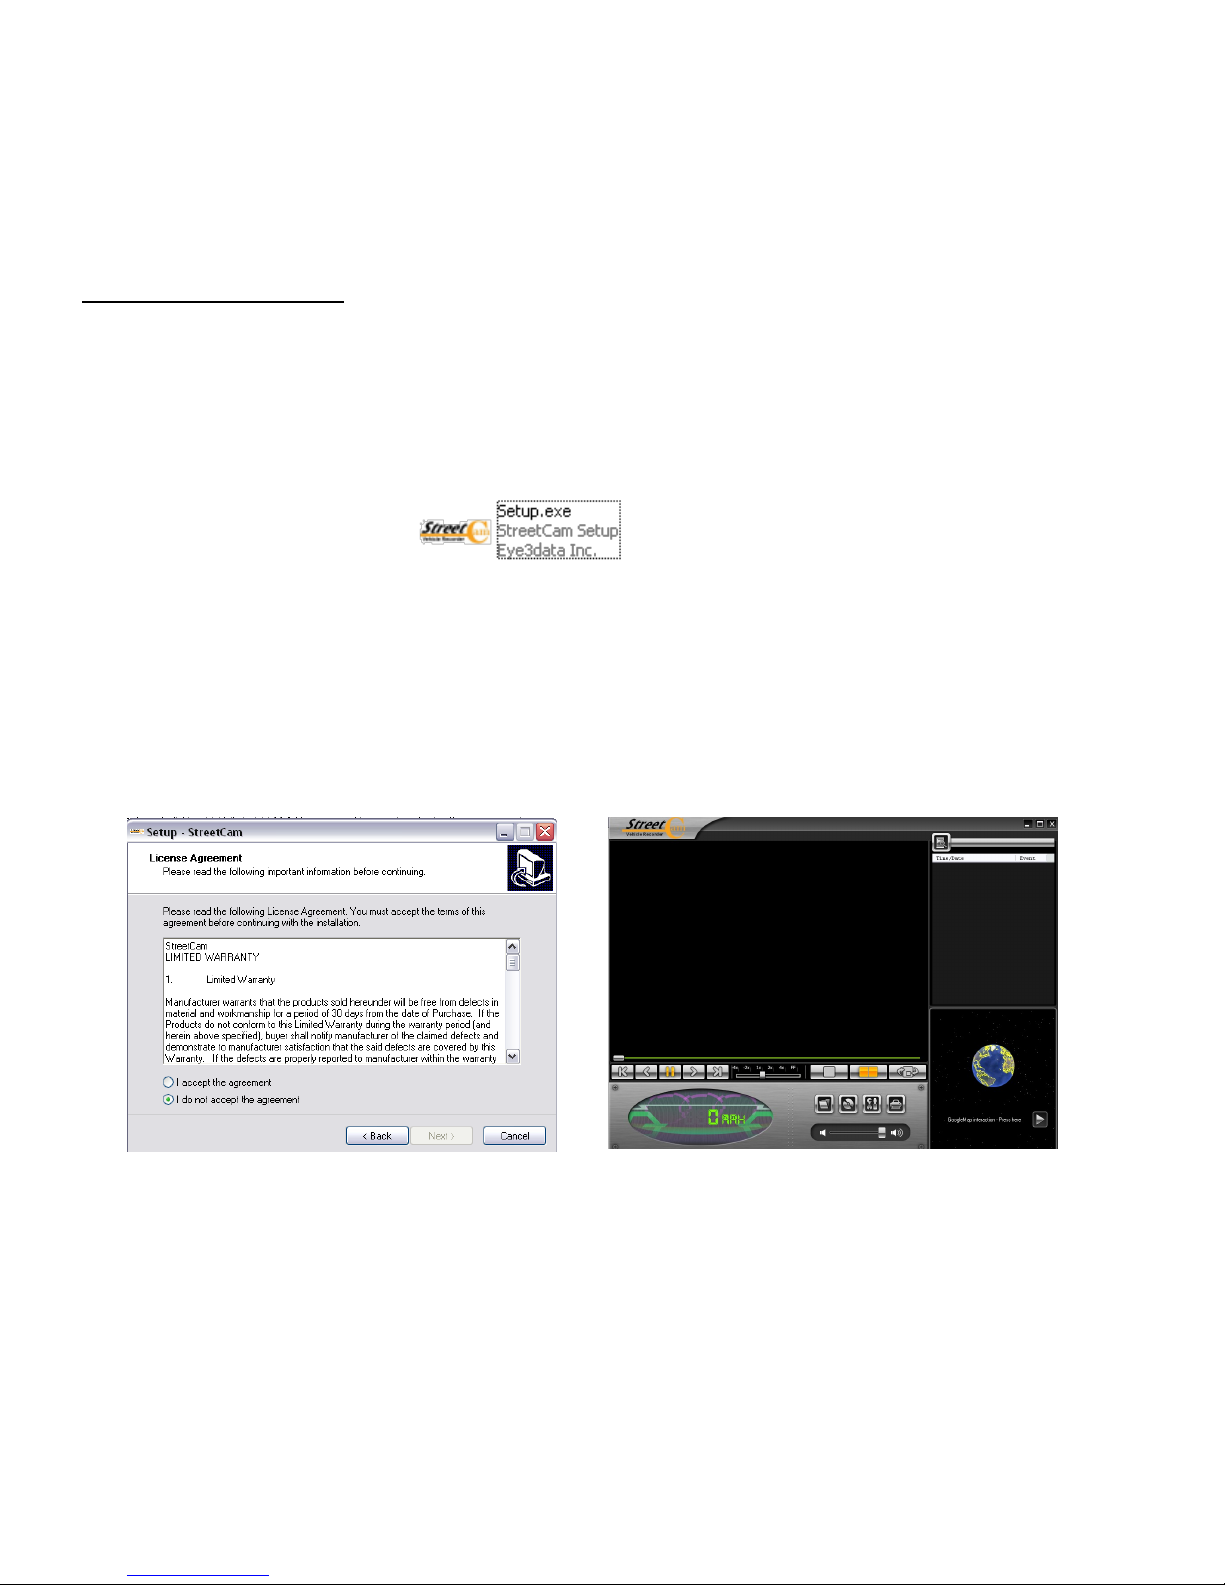
1. Insert the StreetCam Viewer CD into your PC‟s CD/DVD drive. Locate the StreetCam
(3.x.x).exe file on the CD:
2. Double-click the StreetCam (3.x.x).exe file. The installer window appears. Click Next.
3. Read and scroll to the very bottom of the software User Agreement. Select the
"I accept the agreement" box and click Next (Figure 1).
4. The "Select Installation Method" window appears. Choose Automatic Installation or Man-
ual Installation and click Next.
5. Click Finish when program installation completes. StreetCam Viewer opens (Figure 2).
Figure 2
Figure 1

9
Setting the Time and Date
To adjust the Time and Date with the StreetCam Viewer open:
1. Insert the SD memory card into the memory card reader and plug memory card reader into
your computer‟s USB port
NOTE: Use the included memory card reader to ensure compatibility.
NOTE: The SDHC memory card slides smoothly all the way into the memory card
reader.
The SDHC memory card goes in one way only. Do not force the card in.
3. Click OK on the log in window prompt. The default login is: admin. The default password is
left blank.
4. Click (setup). The Setup window opens:
5. In the Systems tab, under Standard time-zone, select your time zone and daylight savings
settings. Click OK. The Save As window appears.
6. Locate the SD memory card reader directory. Click Save.
NOTE: Make sure that you save the JDF file onto your SD memory card, and NOT
onto your PC hard drive (ie. C:\). All StreetCam Settings must save onto the SD mem-
ory card for settings to take effect.
7. Eject memory card and insert it into the StreetCam. Your StreetCam automatically synchro-
nizes the date with the satellite once powered on.
10
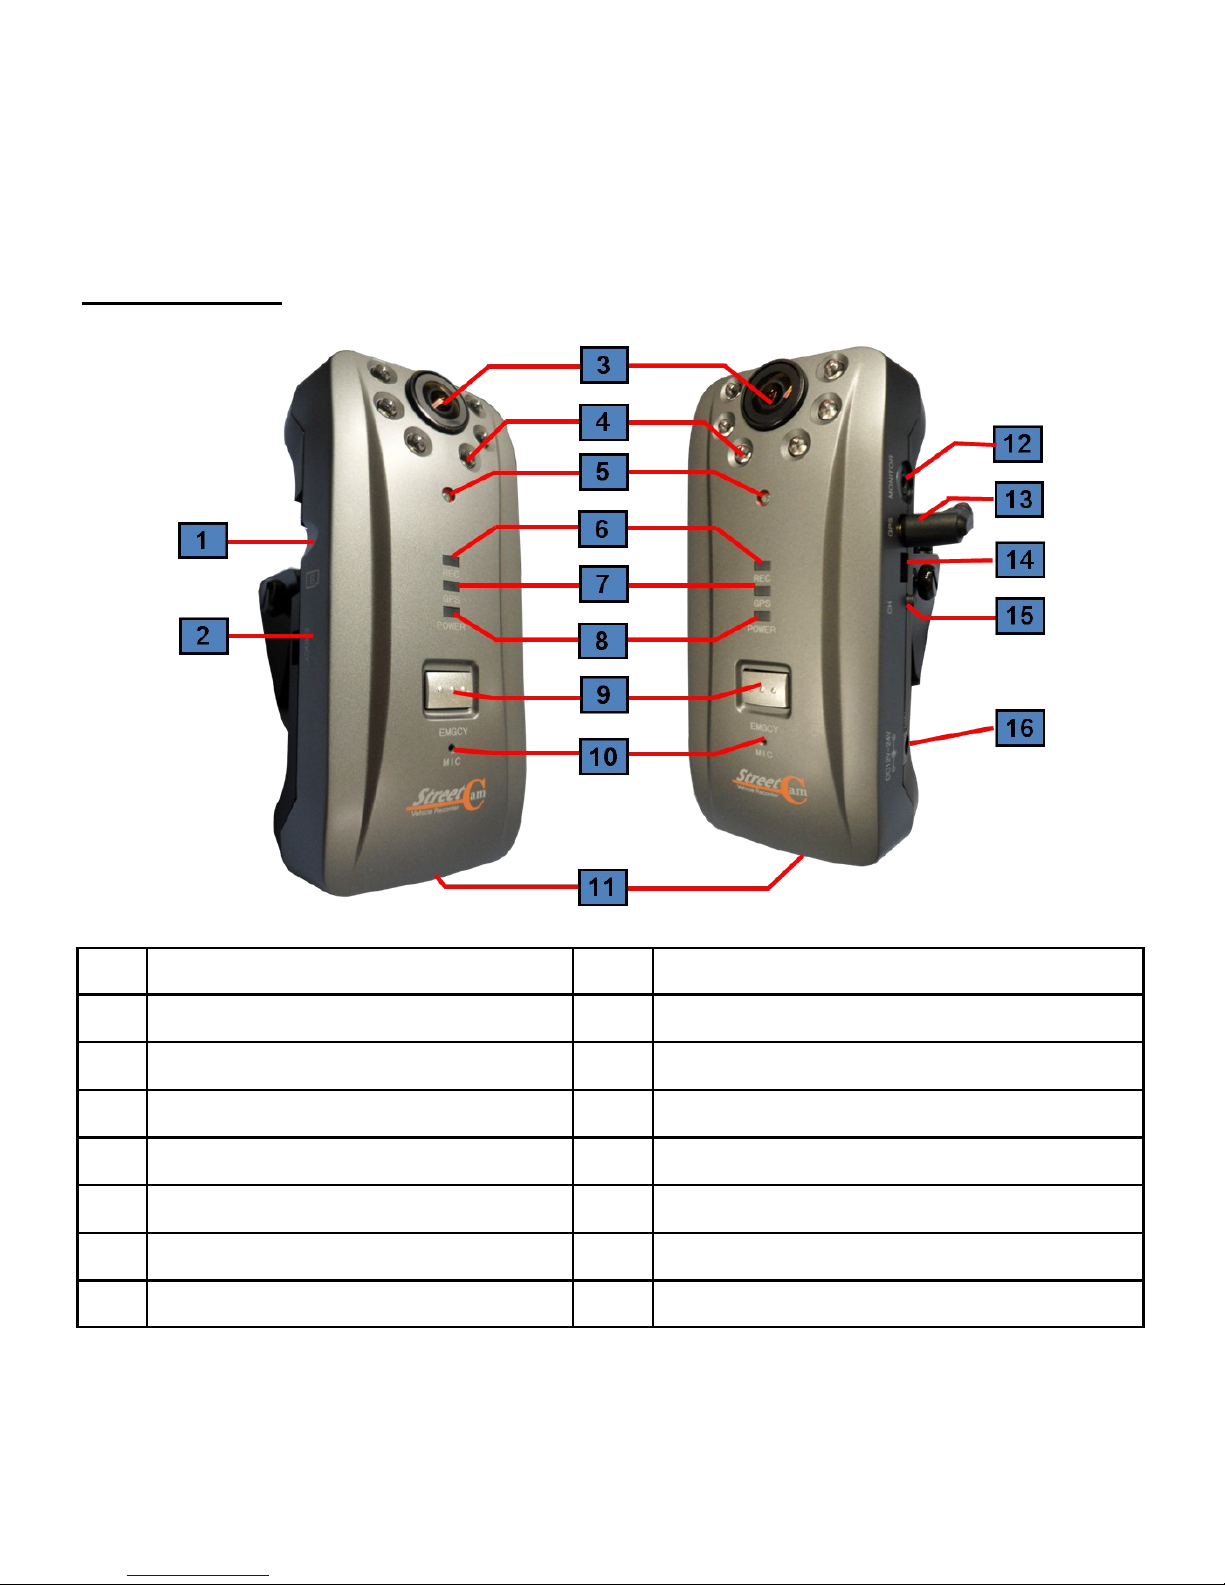
1 SD Memory Slot 9 Emergency Button
2 Emergency Extension 10 MIC
3 Inner-View Camera 11 Front-View Camera
4 IR LED 12 Video Out Port
5 CDS (daylight) Sensor 13 GPS Connector
6 Recording LED 14 Serial Port
7 GPS LED 15 Channel Switch
8 Power LED 16 Power Cable Connector
Product Key

11
CAMERA 2EA CMOS Built-in
VIDEO INPUT Digital 2CH built-in
AUDIO INPUT/OUTPUT C- MIC built-in
VIDEO COMPRESSION H.264
AUDIO COMPRESSION ADPCM
RECORDING RESOLUTION VGA 640X480
RECORDING SPEED Max 60fps (CH/30fps)
EMERGENCY SWITCH Emergency recording
VIBRATION SENSOR Impact detection and recording
GPS SENSOR Instantly records after sudden acceleration and breaking.
RECORDING MEDIA SDHC Memory card Class 6 (Max: 32GB, Default 4GB)
LENS Driver-view 120° and In-car view 175° Wide angle
IR LED 850n 6PCS with CDS Sensor
VIEWER Windows XP/ VISTA support
POWER DC 12V~24V (enable Car Battery)
OPERATING TEMPERATURE 0° ~ 50°C (maintain temperature: -25° ~ 85°C)
HUMIDITY 10~95%
WEIGHT 150g
DIMENSION (W x D x H) 65 (W) x 140 (D) x 30(H)mm
Specifications
12
Basic Installation
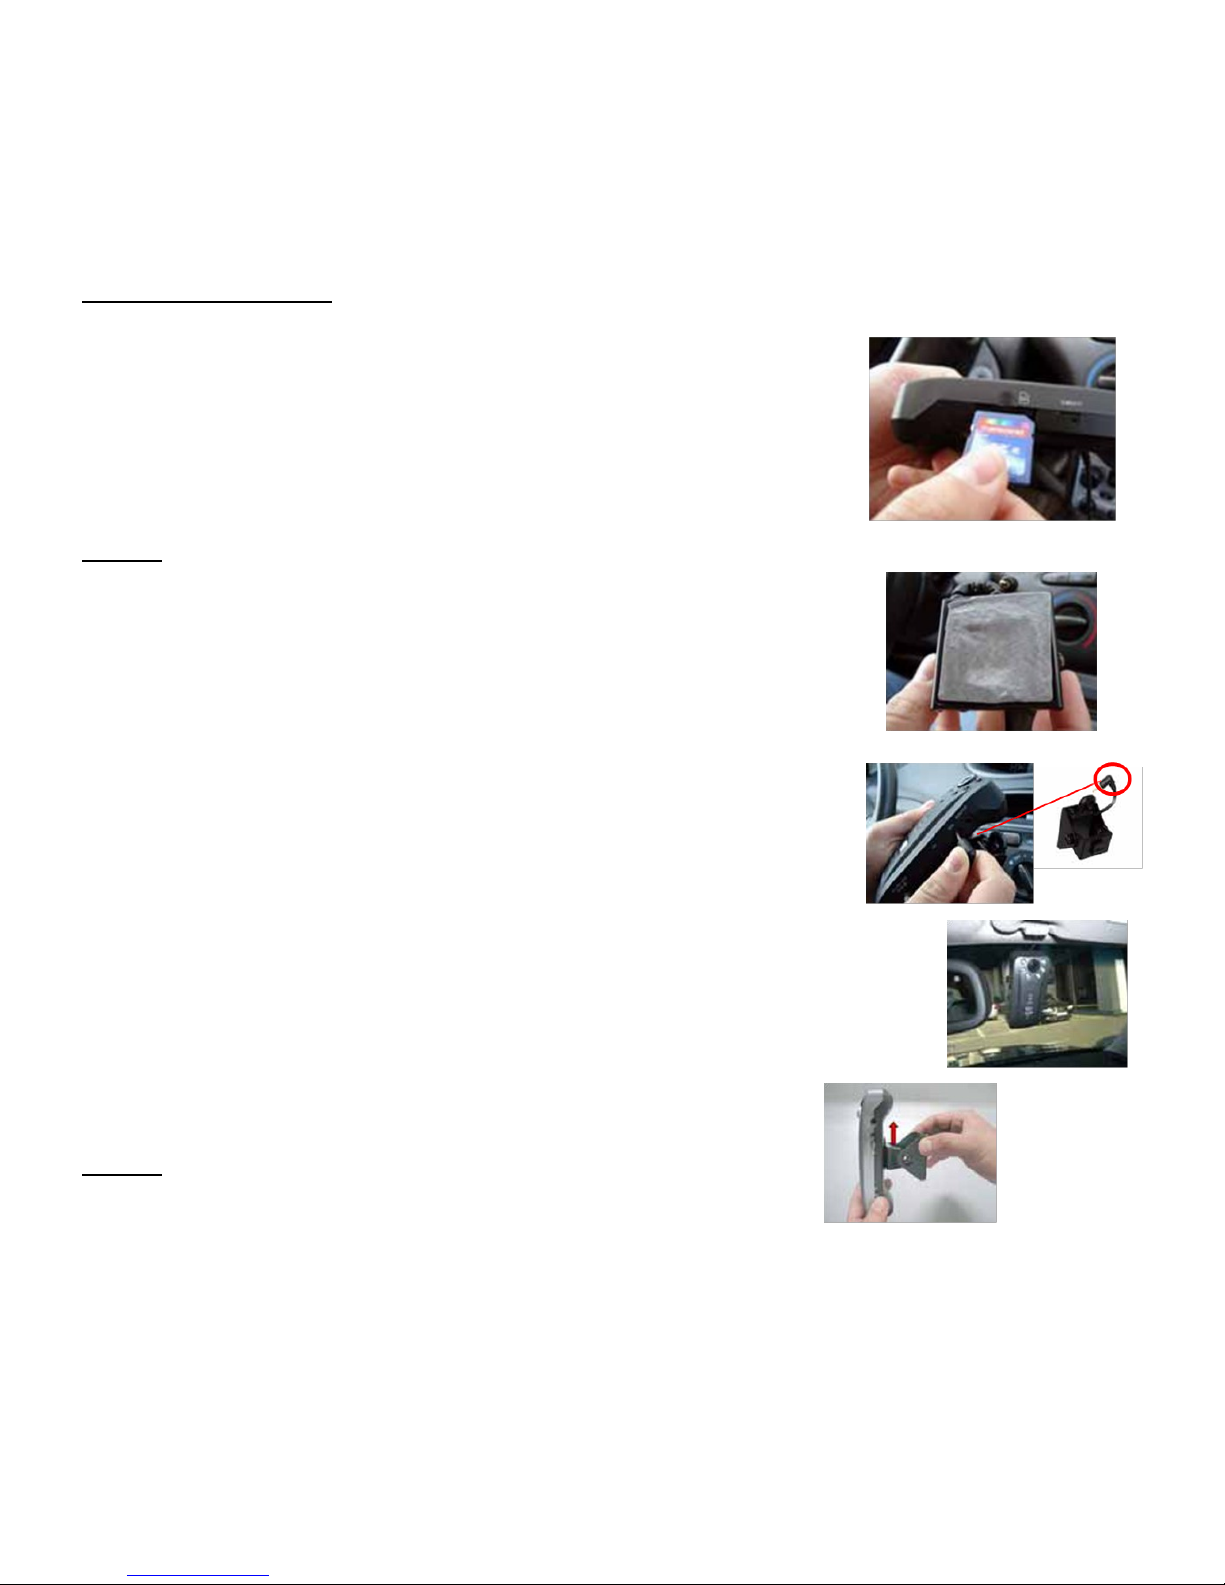
1.Insert the SD memory card.
a. Open the SD memory slot cover
b. Insert the SD memory card into the slot with the sticker face
up, and upright. Push memory card firmly until you hear a
click. Memory card locks in place.
c. Close SD memory slot cover.
NOTE: The SD memory card should slide smoothly into the
memory slot. The SDHC memory card is designed to go in
one way only. Do not force in the card.
2. Install the mounting bracket
a. Stick the double-sided adhesive onto the base of the mount-
ing bracket.
b. Plug the mini-jack connector from the mounting bracket into
the side of the StreetCam labeled GPS.
c. Slide mounting bracket upwards on the back of the device .
The mounting bracket locks in place.
d. Connect the car adapter to the StreetCam and cigarette
lighter.
3. Mount the STREETCAM
a. Orient the unit upright. Firmly press the mounting bracket
onto the windshield. Hold for three seconds to secure.
b. Loosen the screws on the mounting bracket to adjust the
mounting angle. Tighten screws to secure mounting position.
NOTE: See “Mounting StreetCam” (page 14) for mounting tips.
CAUTION: Always have a clear view of the road. Adjust the positioning of the StreetCam so
that it does not affect your driving reflexes and traffic awareness. Check local laws before
mounting unit on windshield.
1
2a
2b
3a
3b
13
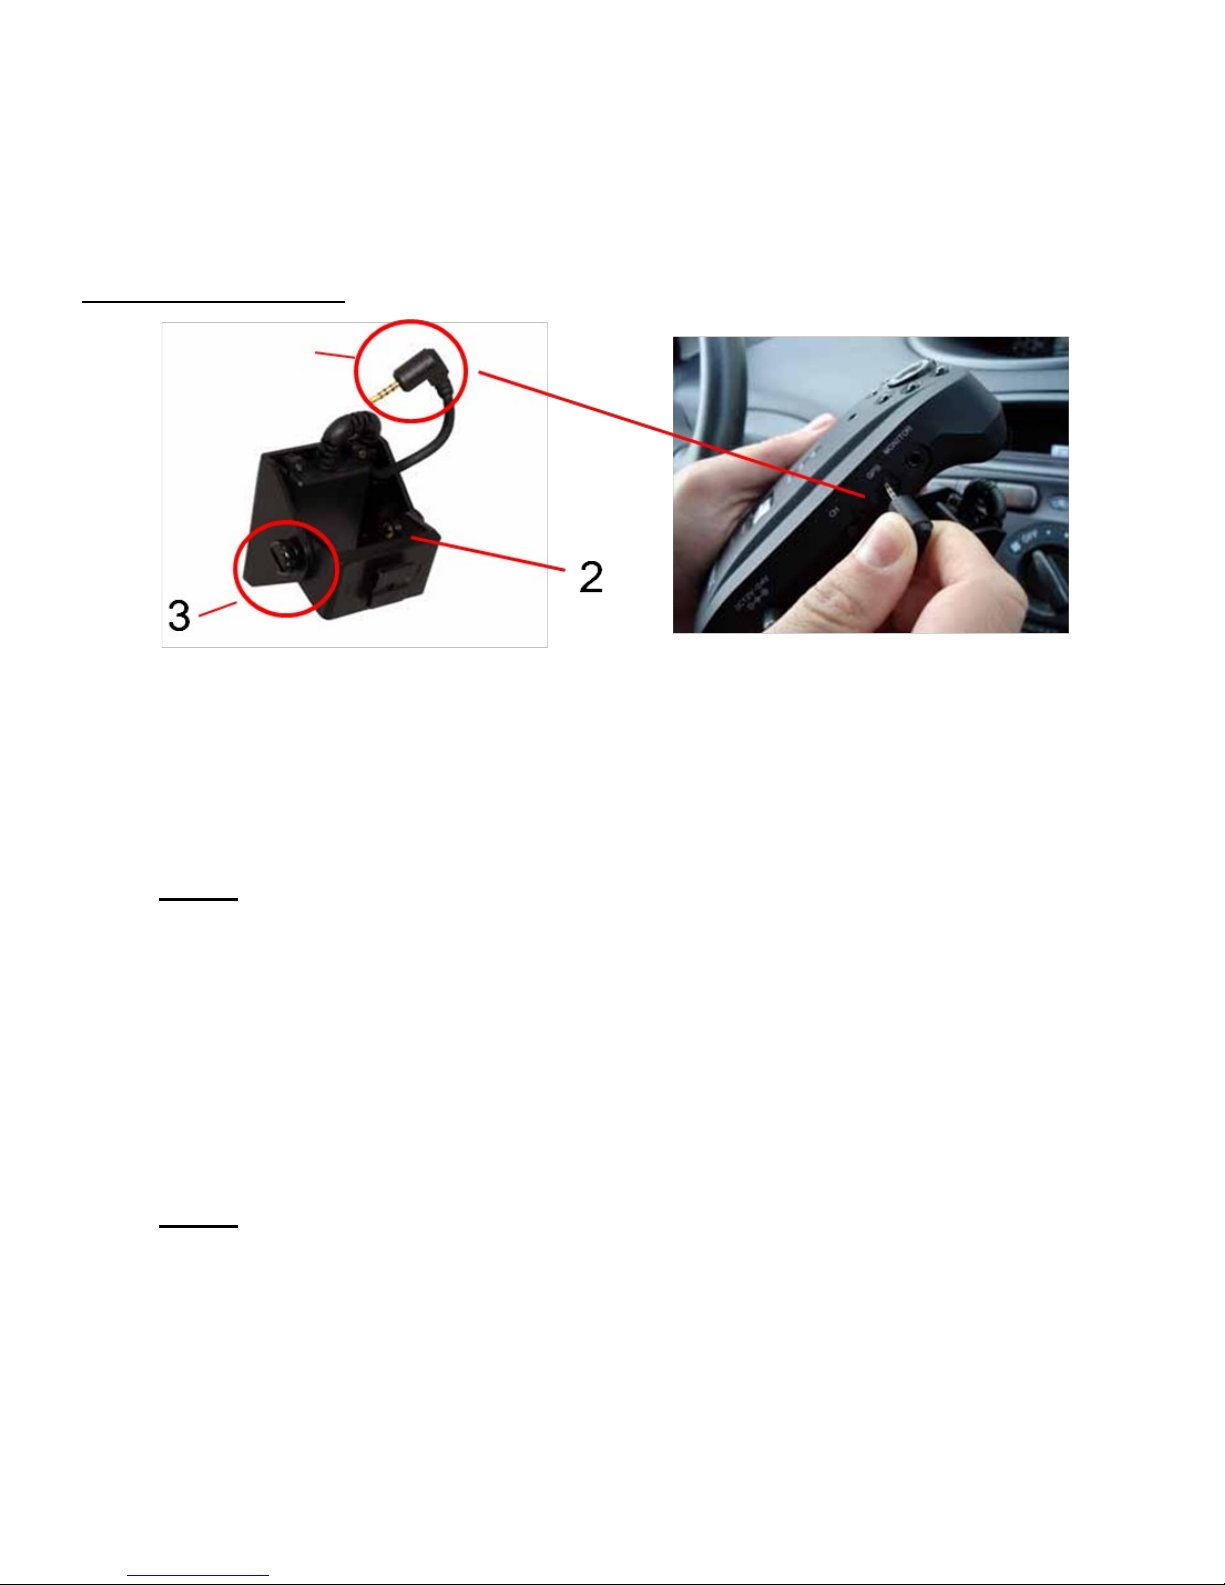
1. Mini-jack connector: Transmits GPS tracking information to the StreetCam.
2. GPS Antenna: The GPS (Global Positioning System) antenna tracks your current location
in relation to satellites orbiting around the globe and records this information onto the SDHC
memory card. When watching videos with the StreetCam Viewer, you can track the location
and speed of your vehicle on Google Maps.
NOTE: The built-in GPS antenna DOES NOT act as a portable navigation system.
The purpose of the GPS antenna on the mounting bracket is to track your location, and
transmit the information to the SDHC memory card only. See “Enabling Google Maps
View”.
3. Mounting Bracket Screws: Tightens and loosens the mounting bracket elbow. Twist screws
clockwise to tighten, counter clockwise to loosen.
4. Mounting the StreetCam at the correct angle allows the unit to receive optimal
GPS reception and recording angles.
NOTE: Apply double-sided adhesive to the mounting bracket base, and orient unit up-
right before mounting.
Mounting Bracket
1

14
Mounting StreetCam
To mount your STREETCAM for the first time:
1. Secure unit to the right of your rear-view mirror.
NOTE: Position the unit so that it does not interfere with your
view.
2. Press and hold the mounting base firmly to the windshield for three seconds to secure the
unit in place.
3. Plug in the car adapter to the StreetCam and into the cigarette lighter to power up.
REMINDER: The mounting bracket adhesive has a powerful bond to surfaces. Double-check
the mounting position before securing in place.
4. The Driver-View Camera adjusts to three angles. Push cam-
era up or down to lock in place. Adjust the angle of the mount-
ing bracket by loosening the screws on the side .
5. Tighten screws to secure position.
NOTE: The StreetCam takes 30 seconds to start up. Wait for
the GPS LED to glow solid green, followed by a beep before
driving. The REC and POWER LEDs glow solid red. During
normal operation, the REC, GPS and POWER LED will always
be on.
15
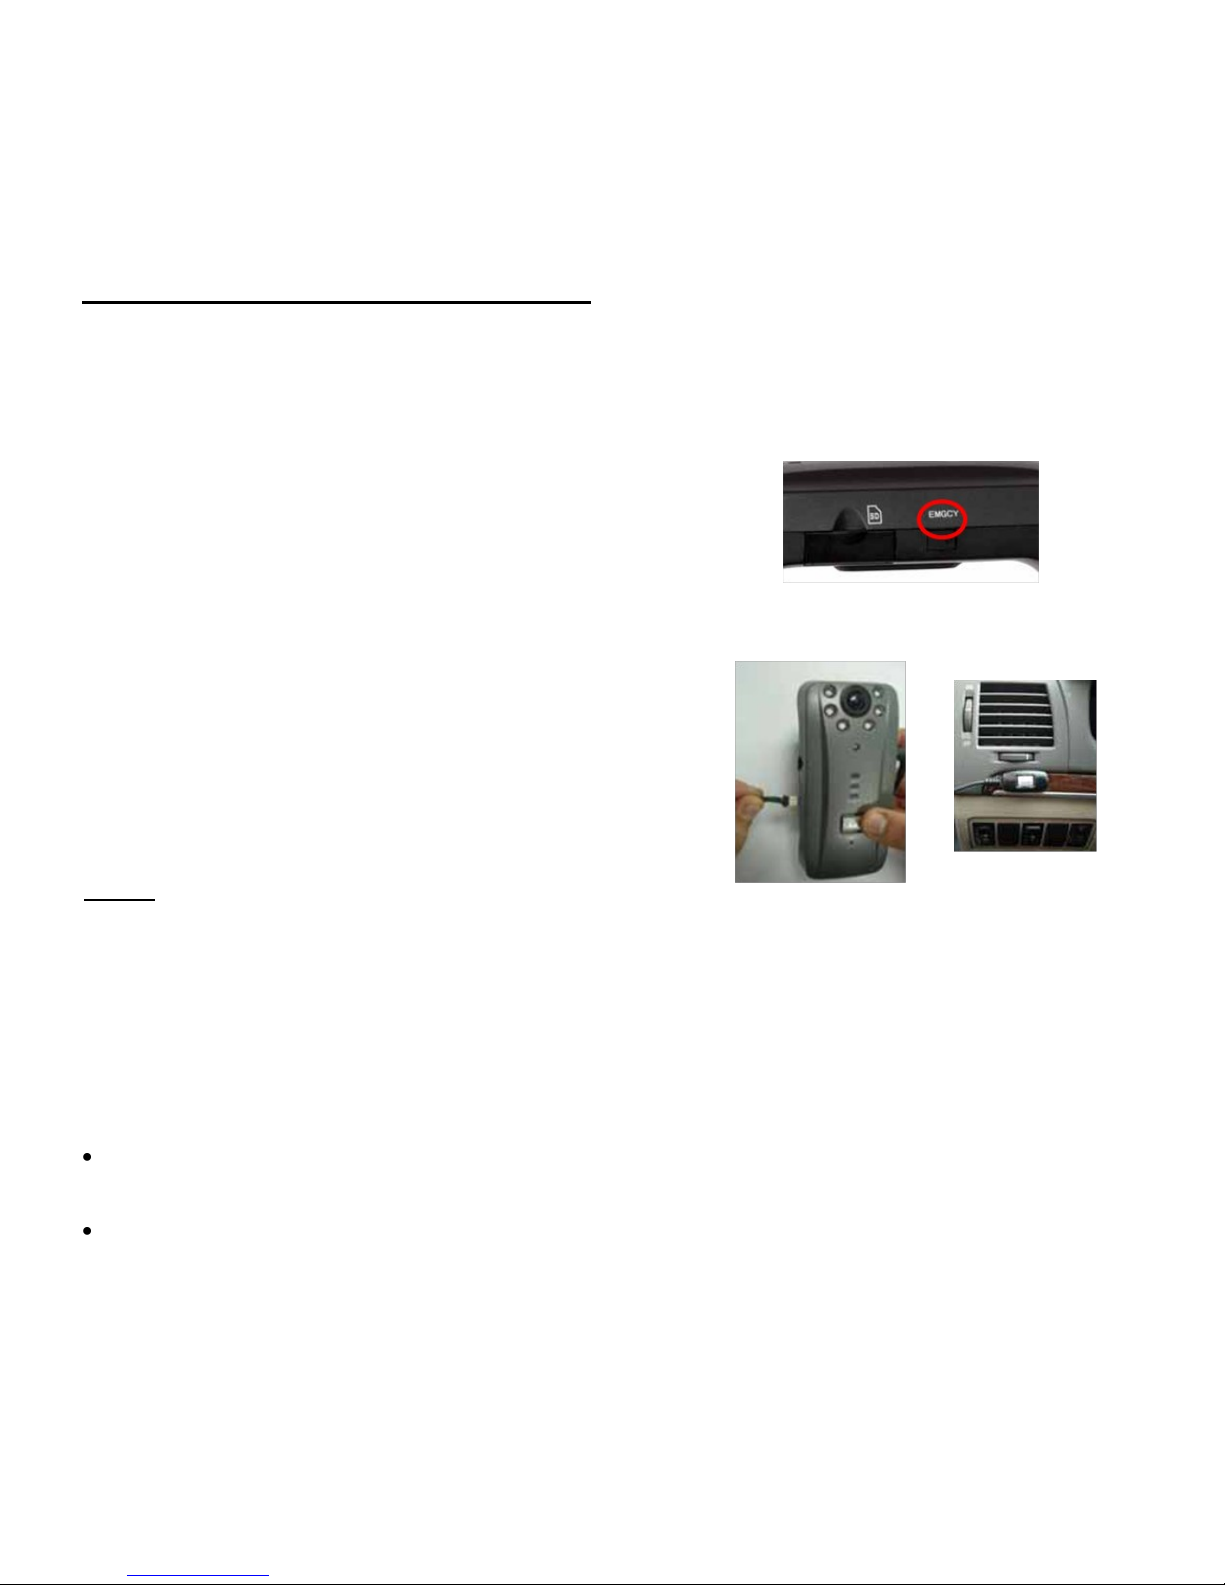
To install the Panic Button extension cable:
1. Remove rubber cover on the side of the unit with a
thin, rigid object (Figure 1).
2. Insert the end of the panic button extension into
the EMGCY port (Figure 2).
3. Run the cable along the dashboard to conceal the
cable out of view.
4. Remove the double-sided adhesive on the back of
the panic button, and stick on surface (Figure 3).
NOTE: The end of the panic button extension con-
nects one way into the EMGCY port. Do not force.
The Emergency button extension allows you to bookmark an event as an "Emergency" for
easy searching in the StreetCam Viewer. Emergency recordings capture video at 30 frames
per second (FPS) for enhanced detail. Place the emergency button extension where you can
easily reach.
Installing an Emergency Button
Using the Emergency Button
The emergency button engages the StreetCam to record at maximum quality, and marks the
event as Emergency" when viewing the file in the StreetCam viewer. When you press the
emergency button:
The video automatically pre-records and post records a set duration that you can config-
ure.
The video is tagged as an "Emergency" event that you can later search and categorize the
video using the included StreetCam Viewer. The video records at maximum resolution (30
FPS).
Figure 1
Figure 2
Figure 3

16
To connect your portable display to the StreetCam :
1 .Connect the mini-jack from the video cable into the MONITOR
port on the side of the unit.
2. Connect the yellow RCA video cable into the portable display
(not included). The video then displays on the monitor (figure 2).
3. Adjust camera angles as needed.
To change camera views:
Press the CH button on the side of the unit to change between
channel 1 and channel 2. This switches camera views between the
in-car camera and the Driver-View camera.
Recording with StreetCam
The StreetCam records continuously once it receives power. Before recording, familiarize
yourself with how the StreetCam records events. The StreetCam comes with a built-in video-
out port. You can hook up a portable monitor (not included) to view what the StreetCam re-
cords in real-time. This ensures that you have the best possible recording angle.
Fig. 2
How the STREETCAM Interprets Bumps and Impacts:
When your vehicle goes over a bump or receives a sudden force, the built-in sensor causes
the REC LED on the unit to flash for several seconds. This means the StreetCam has book-
marked the event. When an event is bookmarked, you can easily categorize and find the par-
ticular moment in the Event window when you encountered the sudden bump or impact. See
“Viewing Recorded Video Files” for details on how to find videos by events.

17
StreetCam Viewer installation
1. Run “STREETCAM (3.X.X).exe” file from the Installation CD. (If the Operating System (OS)
is VISTA, right click the mouse and install. Foreign languages are provided and the program
will be translated according to the PC‟s OS)
Click Finish.
StreetCam
Viewer will
automatically
launch.
For more information, refer to the Before You Begin section on page 8 of the user manual.
18
StreetCam Viewer Main Screen
StreetCam„s main screen (Before opening the recording data):
If security is needed for the recorded data on the SD card, you can restrict access of other
people by creating a separate User ID and password.
Caution: Recorded data can not be accessed if the ID and the password are forgotten.
StreetCam recommends writing down the ID and Password and storing it in a safe place.
Be sure to insert the SD card into the StreetCam„s SD card slot while driving & recording. To
play video,pull out the SD card from the StreetCam and insert it into your PC‟s card reader.
You will have to enter the ID and password on StreetCam viewer.
Click on the Settings Icon and
then the User Settings tab to
enter a new user name and
password. Click OK to save
them in the system.

19
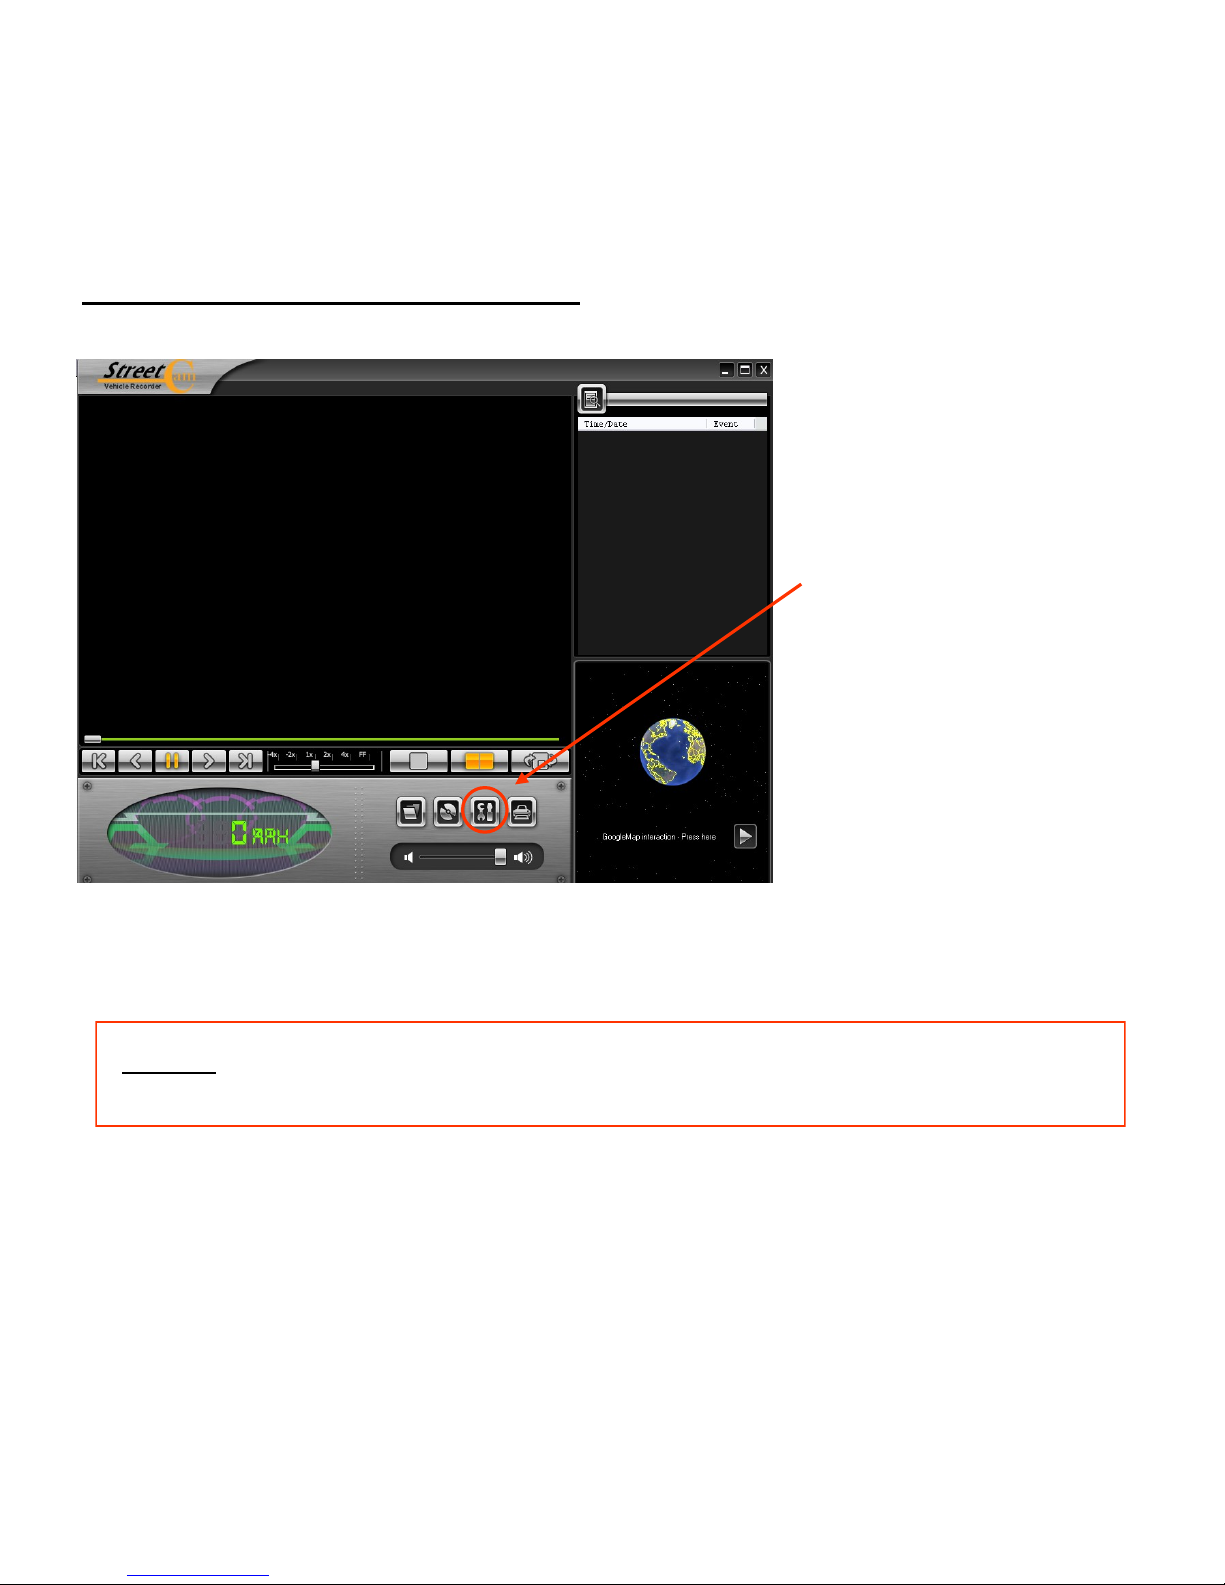
StreetCam Viewer Main Screen (Continuted)
1Event Searching Button 6Open Files
2Minimize 7Backup to (JDF, AVI,JPEG, BMP)
3Maximize 8Configuration
4Shut Down 9Print
5Play Buttons 10 E-map Open

20
Play Modes
Play Buttons:
X axis : Front & Rear movement
Yaxis : Left & Right movement
Zaxis : Up & Right movement
G-Sensor Graph : When the event happens, the impact level
of left & right, up & down, front & rear will display.
Event Data will
be shown here
automatically.
Table of contents
Other StreetCam Dashcam manuals


