Streetwize SWMCJ Specification sheet

1
Hydraulic
Motorcycle
Jack(SWMCJ)
Information for Use

2
Table of Contents
Intention for Use
Product list
How to Assemble the Streetwize Hydraulic Motorcycle Jack
How to Use the Streetwize Motorcycle Jack
Maintenance
Maintaining the Hydraulic Unit
Adding Oil
Changing oil
Health & Safety
Troubleshooting
Technical Specification
Spare parts
Manufacturer’s Warranty
Technical support
3
4
5
5-7
9
9
10
11
12
13
14
14
14

3
Intention for use
Thank you for purchasing the Streetwize Hydraulic Motorcycle Jack. This
hydraulic jack is designed to lift motorcycles of up to a maximum weight of
680kg. It is suitable for either changing motorcycle wheels or for carrying
motorcycle maintenance. The jack is also suitable for lifting snowmobiles,
riding lawn mowers, and other vehicles that have the frame that is
compatible for lifting with this hydraulic lift.
PLEASE NOTE: THE STREETWIZE HYDRAULIC MOTORCYCLE JACK IS NOT SUITABLE FOR
LIFTING OR LEVELING CARS, 4X4S, TRUCKS AND SUVS.
IMPORTANT: ALWAYS LIFT YOUR MOTORCYCLE BY THE CRADLE FRAME AND NEVER BY
THE EXHAUST SYSTEM OR PLASTICS/FAIRING. EXHAUSTS AND FAIRINGS MAY NEED TO BE
REMOVED TO ALLOW OPERATION OF THE JACK.
ATTENTION: Before using the Streetwize Hydraulic Motorcycle Jack, we highly advise that you
read through the instructions and health & safety guidance in this document.
The owner and operator of this Streetwize Hydraulic Motorcycle Jack should have an
understanding of how to safely operate this motorcycle jack before use. The owner and operator
shall be aware that the use and repair of this product may require special skills and knowledge.
If any doubt or issue exists regarding safe and proper use of this jack, remove from service
immediately.
Please keep this document for future for future reference.

4
Product list
WHEN UNBOXING THE STREETWIZE HYDRAULIC MOTORCYCLE JACK, YOU
WILL FIND THE FOLLOWING ITEMS
1. Hydraulic unit
2. Motorcycle jack base unit
3. T-handle bar
4. Lift foot pedal
5. Safety latch handle bar
6. 2 x M8 x 25mm bolts (with washers)
7. Small hex head bolt
8. T-handle bar pin
9. 2 x 12mm bolt (with flat washers & spring washers)
WARNING: Please inspect before each use. If the motorcycle jack or any of the parts of the motorcycle jack
is broken, bent, cracked or damaged, please do not use it. If you do a lift with the jack and you notice any
abnormalities in the lift, please remove from service immediately. If the lift has been, or suspected to have been,
subjected to a shock load (i.e a load dropped suddenly or unexpectedly upon it), immediately discontinue use
until lift has been checked by a competent professional.
We highly recommend that you get the Streetwize Hydraulic Motorcycle Jack inspected and services annually by
a qualified professional.

5
How to Assemble the Streetwize
Hydraulic Motorcycle Jack
The instructions below explain how you need to assemble the Streetwize
Hydraulic Motorcycle Jack.
1. Remove the jack and its components from its packaging and dispose of
the packaging in the correct manner.
2. Install the hydraulic unit onto the motorcycle jack base unit and secure
it using the two M8 x 25mm bolts and washers. See figure 1 below.
3. Then position the hydraulic ram found on the top of the hydraulic unit
into the lifting frame. To do this, lift the Lift Saddle (see figure 2), so you
can insert the hydraulic unit’s ram into the frame.
fig. 1
fig. 2

6
4. Secure the safety latch handle bar to the Height Lock/Unlock Safety
Latch using the 12mm bolts with flat & spring washers. When securing
the bolts, please ensure you place the flat washer in first, followed by
the spring washer. See figure 3 below.
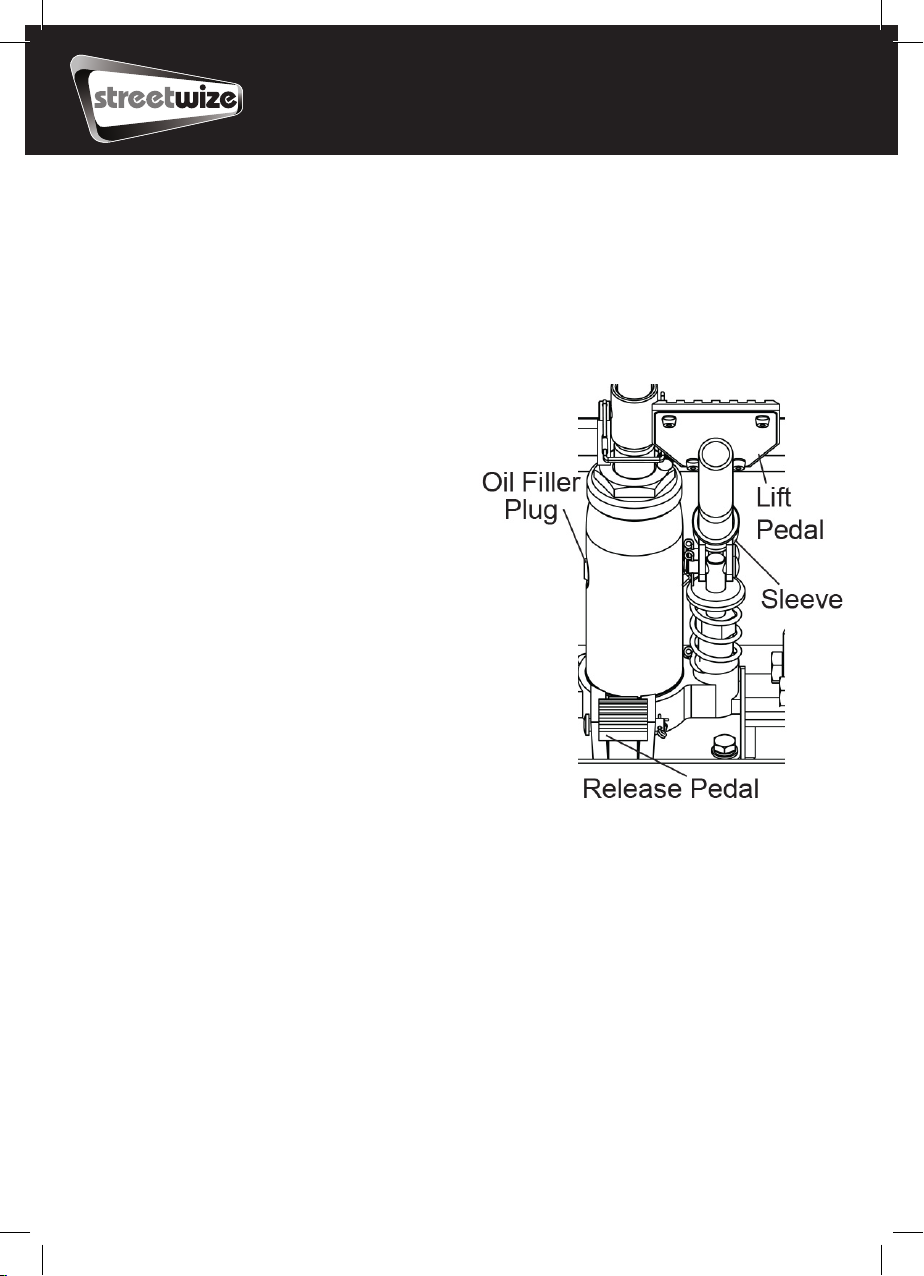
5. Insert the lift foot pedal into the sleeve found on the hydraulic unit and
then secure with the small hex head bolt. See figure 4 below.
fig. 3
fig. 4

7
6. Then, install the T-handle onto the lifting frame and secure with the
T-handle bar pin. See figure 5below.
7. The assembly is now complete. Before using the motorcycle jack,
ensure the jack can move, lift and lower freely.
fig. 5
How to Use the Streetwize
Hydraulic Motorcycle Jack
1. To use the jack, first position the lifting saddle of the jack under an
appropriate lift point. Make sure the lift point balances the load and
doesn’t pose any risk of unbalancing. If the lift point is lower than the
minimum height of the lifting saddle, use a wedge to lift the load so that
you can load it onto the lift.
2. Once the jack is in position, screw down adjustable feet so that the jack
is secured in place and doesn’t move.
8
3. Use the lift foot pedal to lift the saddle until it comes in contact with the
lift point. Make sure that the load is balanced. If not, press the release
pedal on the hydraulic unit, and lift the adjustable feet to position the
jack correct. When the correct position is achieved, lower the adjustable
feet.
4. Once the load is centred, slowly
and carefully raise the lift saddle
by pumping the lift foot pedal and
continue pumping until the lift has
reached your desired height.
5. Secure the lift using the Height
Lock/Unlock Safety Latch.
6. To ensure the load is secured
in place on the lift saddle, use
the appropriate tie-downs (not
included). The motorcycle jack
comes with four tie down loops (2
fore and 2 aft).
Please note, the safety tie-downs are sold
separately and they are required for safe
operation of this device. The tie-downs help
to hold motorcycles in place on this jack.
7. Once you have finished using the jack, remove the tie-downs and then
press the release pedal to lower the lift saddle. Then, carefully remove
the load.

9
Maintenance
When the Streetwize Hydraulic Motorcycle Jack is not in use, ensure the
lifting platform is fully retracted (i.e. fully lowered and not lifted). To get the
best lifespan of the product, we highly recommend cleaning and lubricating
all the pivoting joints with a suitable mechanical oil. Please wipe off any
excess oil to prevent any slippage or falling.
Maintaining the Hydraulic Unit
The hydraulic unit is the main component of the jack that undertakes the
lifting of the load. To ensure the long life of the hydraulic unit, we advise
that you top up or change the oil as and when needed.
WARNING: Please do not expose the hydraulic jack to moisture. If the jack becomes wet,
please dry immediately. We also advise that you check the pump piston and the ram of the
hydraulic unit periodically for any signs of rust or corrosion. Clean mildly affected areas with a
clean oilcloth. Never use abrasives on the pump piston or ram surfaces.
Adding Oil
If the hydraulic unit is not able to lift to its optimum performance level,
then there is likelihood that the oil level inside the hydraulic unit is low. To
add oil or check the oil levels inside the hydraulic unit, please follow the
instructions below:
1. To check hydraulic oil level, remove the hydraulic unit from the
motorcycle jack and place it upright on a stable, level surface.
Remove the oil filler plug (see figure 6). The oil should be level to the
oil filler plug hole.
2. If oil level is low, refill with high-quality hydraulic jack oil ONLY. Never
use ANY other fluid. Use of other fluid may result in hydraulic system
failure, causing sudden and unexpected loss of load height.
3. Place the oil filler plug back in its place and then install the hydraulic
unit back onto the receiver of the motorcycle jack. Secure with provided
bolts and washers.

10
Changing Oil
To ensure a long service life, we advise that you change the hydraulic oil
inside the hydraulic unit every 7 years. However, it may be more frequent
(every 5 years or less) if you have used the motorcycle jack in a dust and grit
filled environment.
To change the oil in the hydraulic unit, please follow the instructions below.
1. To change the hydraulic oil, remove the hydraulic unit from the
motorcycle jack and place it upright on a stable, level surface.
2. Remove the oil filler plug (see figure 6.) and draw oil into a suitable
container.
IMPORTANT: DISPOSE OF USED HYDRAULIC FLUID IN ACCORDANCE WITH
YOUR LOCAL GOVERNMENT REGULATIONS.
3. Replace with high-quality hydraulic jack oil and put the oil filler plug
back in place.
4. Then install the hydraulic unit back onto the receiver of the motorcycle
jack. Secure with provided bolts and washers.
Table of contents
Popular Jack manuals by other brands

Omega Lift Equipment
Omega Lift Equipment 18122C Operating instructions & parts manual

Pittsburgh
Pittsburgh 58816 Owner's manual & safety instructions

Unimec
Unimec TP Assembly instructions

Sonic
Sonic 4800703 instructions

BGS technic
BGS technic 70039 instruction manual

TradeQuip
TradeQuip 1128T owner's manual

VEVOR
VEVOR TJD-12000SP-F quick start guide

ULTIMATE SPEED
ULTIMATE SPEED URW 2 A1 HYDRAULIC TROLLEY JACK operating instructions

Stels
Stels 51131 user manual

Bushranger
Bushranger RJX01 instruction manual

Clarke
Clarke CTJ2500QLG Operating & maintenance instructions

Valex
Valex 1650520 Translation of the original instructions


