String Effects Guitar-Jo User manual

GUITAR-JO®, a product by String Effects, Inc. All Rights Reserved.

facebook.com/guitarjopage
youtube.com/guitarjo
instagram.com/guitar_jo_company
twitter.com/guitarjo
CONNECT WITH US
guitarjo.com

www.youtube.com/guitarjo
Check out the GUITAR-JO
YouTube channel for video
instructions:

TABLE OF CONTENTS
Warnings ..........................................................................
Diagram ............................................................................
Setup Instructions ...........................................................
Step 1 .........................................................................
Step 2 .......................................................................
Step 3 .......................................................................
Step 4 .......................................................................
Helpful Tips ....................................................................
Determine the frets you'll be playing on .................
Pickups and EQ ........................................................
Multiband EQ ...........................................................
Rest main body on the lip of the mounting base ....
Disabling GUITAR-JO quickly ..................................
Cleaning microsuction .............................................
4
5
7
8
10
11
12
13
13
14
15
16
17
18

CHOKING HAZARD – Small parts not for children under
3 years or any individuals who have a tendency to
place inedible objects in their mouths.
If the GUITAR-JO unit is left on your guitar for a
period of several days, part of the microsuction
material may stick to your guitar after removing the
unit. To avoid this, please take the unit off of your
guitar when not in use.
•
• It is recommended that you do not use GUITAR-JO
on any guitars with an especially delicate nish to
avoid the risk of stripping the nish from the body
when removing the unit. In any case, always remove
the unit slowly.
• Be aware of the sharper edges of the unit and use
caution when handling it near your guitar.
4
WARNING:
CAUTIONS:
!
5
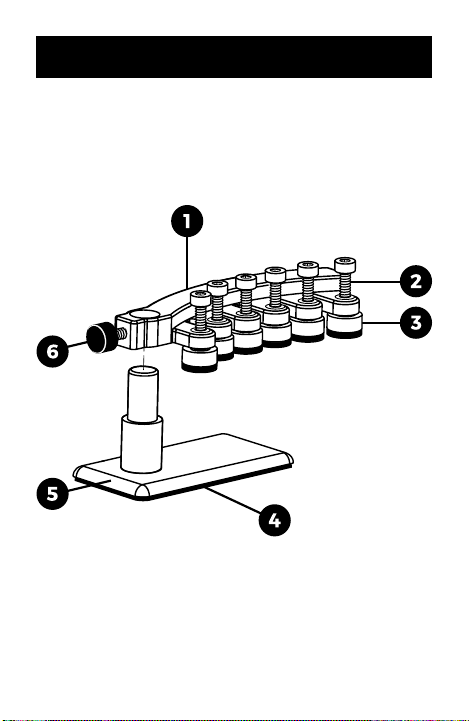
DIAGRAM

6
The Main Body goes over the strings and houses
the adjusters.
The Side Screw allows you to adjust the height of
the main body over the strings of the guitar. More
precise tuning is done with the adjusters for each
dampener on the main body.
The Adjusters are turned to lower and raise the
dampeners.
The Dampeners are lowered so that they come
into contact with the strings. When contact is
made, the fabric alters the timbre of the strings to
give it a banjo twang.
The Mounting Base is used to attach the entire
unit to the body of the guitar and contains the
microsuction material underneath.
The Microsuction Material has thousands of
microscopic air pockets that create partial
vacuums between the material and the body of
the guitar without leaving sticky residue when
removed.

7
SETUP INSTRUCTIONS
INTRODUCTION
Please note:
GUITAR-JO® is an electric guitar accessory used
to create the sound of a banjo. The following
instructions will show you how to mount and use
the device. We recommend visiting our YouTube
channel or our website to learn more about how
to maximize the sound of your unit.
GUITAR-JO mounts to at body guitars,
not arch tops.
•
This is designed to make an electric guitar
sound like a banjo, not an acoustic.
•

8
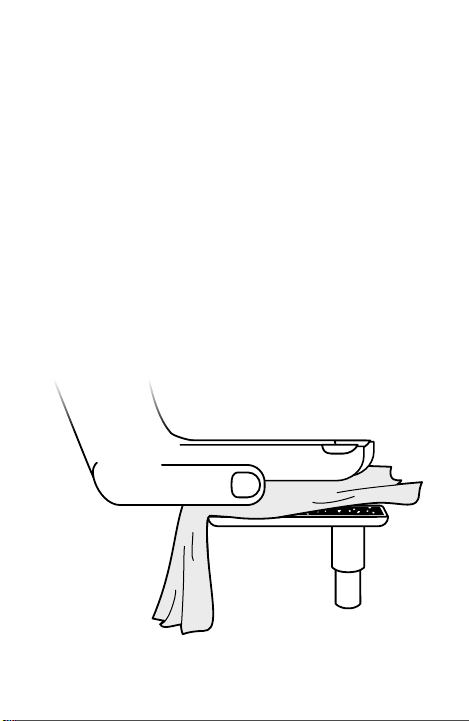
LOCATE PROPER POSITION
ON GUITAR BODY
The device should be positioned more towards
the neck than the bridge to get the optimal
sound. With the main body attached to the
mounting base and the side screw loosened to
allow it to swivel, slide the foot of the mounting
base underneath the strings so that it is
perpendicular with the guitar strings. Do not press
down yet.

9
ALTERNATE POSITIONS
You can position the mounting base other ways as
well based on where space is available on your
guitar. Here are some examples:

10
LINE UP DAMPENERS
WITH STRINGS
Swivel the main body on the mounting base until
the 6 dampeners line up with each guitar string.
Note that depending on the style of your guitar,
the main body might need to be positioned at an
angle rather than perpendicular to line up the
dampeners with the strings. Adjust the overall
height of the main body by loosening the side
screw and sliding the body up or down the
mounting base. When properly positioned, the
dampeners should softly rest on the strings with
room for them to be lowered or raised more.
Tighten the side screw to keep the main body in
place. Once positioned, press down on the foot
of the mounting base to secure its position.

11
ADJUST HEIGHT OF
DAMPENERS
The goal is to lightly touch the electric guitar
strings with the dampeners to give it a banjo
twang. Use the adjusters to raise or lower each
dampener so that they gently touch each string.
Note that the more you apply pressure, the more
it will mute the strings and decrease the sustain,
so it’s important that you take the time to get an
even balance.
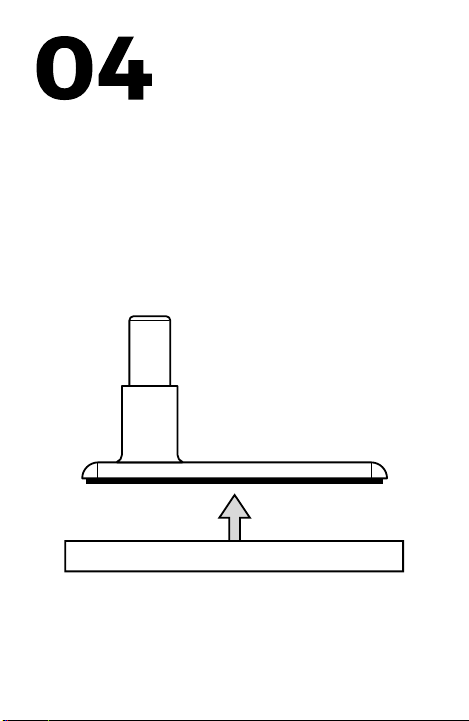
COVER BOTTOM OF
MOUNTING BASE
12
Keep the bottom of the mounting base covered with the
mounting base protector when GUITAR-JO is not
mounted to your guitar. This will prevent dust and other
particles from sticking to the bottom, which will
maximize the life of the microsuction material.
Be sure to read the tips in the next section.

HELPFUL TIPS
DETERMINE THE FRETS
YOU'LL BE PLAYING ON
The higher you go on the fretboard, the more the strings
will pull away from the dampeners. Therefore, you
should determine the general span of frets you will be
playing on ahead of time so you can base the height of
the dampeners on that.
As an example, if you will be playing mostly on the rst
7 frets, it’s recommended that you tune your open frets
so that the notes are staccato. That way, when playing in
between the open and 7th fret, you will have a nice even
banjo sound. When you go past the 7th fret in this
particular case, you will start to lose the banjo twang.
If you plan on playing higher up on the fretboard, you
should lower the dampeners even more. However, it will
mute the lower frets to the point where they are
extremely staccato, which won’t sound very good. We
nd the former tuning settings are the most versatile
when using GUITAR-JO, as you can play both chords
and lead on the rst 7 frets.
13
14
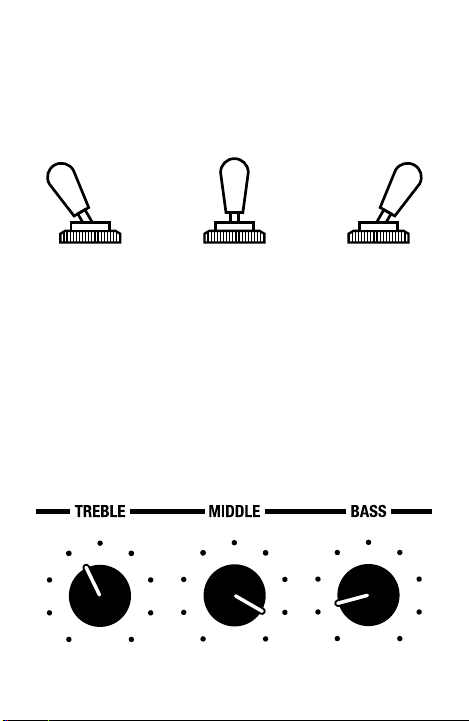
PICKUPS AND EQ
Since the pickups on your guitar produce different
tones, try out each pickup to nd the best sound.
Adjusting the EQ on your amp or mixer can also
maximize the sound. In general, it is best to boost the
mids and lower the bass, but it also depends on the
guitar pickup you are using and your own sound
preference.
To minimize the high-pitched harmonics that can occur
when you let certain notes ring out, keep the treble on
the lower side. If you have access to a multiband EQ,
see next page.

15
MULTIBAND EQ
With a multiband EQ, you can more precisely target and
reduce any unwanted high-pitched frequencies without
turning down the overall treble. You can nd a
multiband equalizer in any recording program, but there
are also individual guitar effects pedals you can
purchase. In addition, some multi-effects pedals have
built-in multiband equalizers.
In general, the most prevalent peaks are between 1-2k
Hz and around 4.5k Hz. Below is an example of the EQ
settings for a GUITAR-JO studio recording. You can use
this as a starting point, but again, it might vary based on
the guitar pickups, placement of the GUITAR-JO, notes
being played, your own sound preference, etc.

LEDGE
LEDGE
16
REST MAIN BODY ON LIP OF
THE MOUNTING BASE
We suggest resting the main body on the ledge of the
mounting base. The ability to raise the main body
higher than the ledge is to accommodate guitars with
strings that are farther away from the body than most
guitars.
When resting on the ledge, you can pivot the main body
away or raise it up so that it is not touching the strings
to temporarily disable/enable GUITAR-JO and easily
move it back into position, matching the exact height as
before.

Raise the main body
until it no longer
touches the strings.
Tighten the side screw
to keep it in place.
17
DISABLING GUITAR-JO
QUICKLY
If you would like to disable GUITAR-JO relatively quickly
without taking the unit off, follow these steps:
Loosen the side screw.
As an alternative to step 2,
you can pivot GUITAR-JO
so that it is out of the way.
18
If the microsuction material gets dirty to the point where
it loses its stick, take a clean, damp cloth and wipe any
dust or particles off. Wipe it down again with a dry area
of the cloth to remove any wetness.
Depending on how damp the cloth is, water may seep
into the microscopic air pockets found in the
microsuction, making it less sticky. In this case, let it dry
for a while.
CLEANING MICROSUCTION
MATERIAL

Table of contents
Popular Accessories For Musical Instruments manuals by other brands


Auralex Acoustics
Auralex Acoustics Deep6 Installation & user guide

AXESS ELECTRONICS
AXESS ELECTRONICS AXSGTR OTS1 user manual

Harley Benton
Harley Benton Spaceship Power 50M quick start guide

Kaman
Kaman Gibraltar 6600 Series Setup instructions

Behringer
Behringer V-TONE ACOUSTIC ADI21 user manual

Behringer
Behringer V-TONE BASS DRIVER DI BDI21 manual


