manuals.online logo
Brands
  1. Home
  2. •
  3. Brands
  4. •
  5. EMG
  6. •
  7. Accessories For Musical Instruments
  8. •
  9. EMG JMASTER Service manual

EMG JMASTER Service manual

Other EMG Accessories For Musical Instruments manuals

EMG JMASTER SET Service manual

EMG

EMG JMASTER SET Service manual

EMG PJ5 Service manual

EMG

EMG PJ5 Service manual

EMG EMG-91 ARCHTOP Service manual

EMG

EMG EMG-91 ARCHTOP Service manual

EMG ZW Set Service manual

EMG

EMG ZW Set Service manual

EMG LES CLAYPOOL Service manual

EMG

EMG LES CLAYPOOL Service manual

EMG 66-7H PICKUP Service manual

EMG

EMG 66-7H PICKUP Service manual

EMG MMTW Service manual

EMG

EMG MMTW Service manual

EMG Pi2 User manual

EMG

EMG Pi2 User manual

EMG F-H1 Service manual

EMG

EMG F-H1 Service manual

EMG 40P5-X User manual

EMG

EMG 40P5-X User manual

EMG MM-CS Service manual

EMG

EMG MM-CS Service manual

EMG EXG Service manual

EMG

EMG EXG Service manual

EMG EMG-707 User manual

EMG

EMG EMG-707 User manual

EMG 60-8X Service manual

EMG

EMG 60-8X Service manual

EMG Pso VG-20 Series Service manual

EMG

EMG Pso VG-20 Series Service manual

EMG EMG-S7 Service manual

EMG

EMG EMG-S7 Service manual

EMG 35J User manual

EMG

EMG 35J User manual

EMG PASSIVE Service manual

EMG

EMG PASSIVE Service manual

EMG X Series Service manual

EMG

EMG X Series Service manual

EMG PA2 Service manual

EMG

EMG PA2 Service manual

EMG NECK 89R User manual

EMG

EMG NECK 89R User manual

EMG 35-TW Service manual

EMG

EMG 35-TW Service manual

EMG SA/SA/85 Set Service manual

EMG

EMG SA/SA/85 Set Service manual

EMG BQC-HZ SYSTEM Service manual

EMG

EMG BQC-HZ SYSTEM Service manual

Popular Accessories For Musical Instruments manuals by other brands

Behringer AIRPLAY GUITAR AG10 quick start guide

Behringer

Behringer AIRPLAY GUITAR AG10 quick start guide

FEURICH BASIC user manual

FEURICH

FEURICH BASIC user manual

thomann Harley Benton JA user manual

thomann

thomann Harley Benton JA user manual

NeoTech PAD-IT TUBA HARNESS instructions

NeoTech

NeoTech PAD-IT TUBA HARNESS instructions

Duncan SH-8n Invader Wiring diagram

Duncan

Duncan SH-8n Invader Wiring diagram

Palmer The Junction PDI-09 user manual

Palmer

Palmer The Junction PDI-09 user manual

GuitarPCB Fuzzy Bee v2 Build instructions

GuitarPCB

GuitarPCB Fuzzy Bee v2 Build instructions

Yamaha Tough-Terrain T-335 Assembly instructions

Yamaha

Yamaha Tough-Terrain T-335 Assembly instructions

LEWISMIDI CZ Patch Library quick start

LEWISMIDI

LEWISMIDI CZ Patch Library quick start

Free The Tone LB-2 owner's manual

Free The Tone

Free The Tone LB-2 owner's manual

Duncan Apollo Jazz Bass - neck Wiring diagrams

Duncan

Duncan Apollo Jazz Bass - neck Wiring diagrams

dbx dB10 owner's manual

dbx

dbx dB10 owner's manual

TLA Tuning-Set CTS-32-C manual

TLA

TLA Tuning-Set CTS-32-C manual

Solo Music Gear JEK-1 Assembly manual

Solo Music Gear

Solo Music Gear JEK-1 Assembly manual

Duncan HyperSwitch manual

Duncan

Duncan HyperSwitch manual

CNC Design QUAD COIL WINDER MK2 instructions

CNC Design

CNC Design QUAD COIL WINDER MK2 instructions

FuzzDog 3PDT manual

FuzzDog

FuzzDog 3PDT manual

Hipshot Universal Mounting Plate quick start guide

Hipshot

Hipshot Universal Mounting Plate quick start guide

manuals.online logo
manuals.online logoBrands
  • About & Mission
  • Contact us
  • Privacy Policy
  • Terms and Conditions

Copyright 2025 Manuals.Online. All Rights Reserved.

General INFORMATION:
The JMASTER* Pickguard Assembly is EMG’s full tilt active system for Fender Jazzmaster** guitars.
The Pickguard is a direct replacement, with some exceptions for non-USA made guitars. The system is
completely hum and buzz free, typical of EMG design. A 9 Volt battery will run the system for many months.
The pickguard is a multi-laminate style to reduce microphonics and unwanted feedback.
PICKUPS:
Both pickups feature Alnico 5 rods and large, squat coils for a vintage look and full-bodied attack.
A resonance of 3.15kHz and a low Q give the pickups a balanced tone with smooth high end.
STANDARD CONTROLS:
There is the standard 3-position selection switch on the lower bout, in addition to a Master Volume and Tone.
EFX CONTROLS:
The master controls on the upper bout feature our well known SPC Presence Control - a broad mid-range boost designed to give the instrument
a fatter overall tone. In addition, a 2-position switch lets you transform the SPC into a flat boost of up to 12db over the full bandwidth.
Also on the top bout of the instrument is EMG’s EXG Expander. The EXG boosts both low and high frequencies, giving the instrument a very liquid
tone with full bottom end and enhanced highs.
Both the EXG and SPC/Boost controls are engaged when turned toward the bridge and bypassed when turned fully toward the neck.
All controls effect the master signal, and are applied to whichever pickups are selected by the 3-position toggle.
0230-0377rB
PO BOX 4394
SANTA ROSA, CA
95402 USA
P (707) 525-9941
F (707) 575-7046
EMGPICKUPS.COM
0.025 LOG FREQ (kHz) 10
6 dB/div
SPC/BOOST
EXG
0.025 LOG FREQ (kHz) 10
6 dB/div
UP POSITION
BOOST
DOWN POSITION
SPC
0.025 LOG FREQ (kHz) 10
6 dB/div
SPC
BOOST
EXG
INSTALLATION INFORMATION
EMG MODEL: JMASTER* SYSTEM
**JAZZMASTER is a trademark of Fender Musical Instruments Corporation
*JMASTER is a registered trademark of EMG, Inc.
Warranty
All EMG Pickups and accessories are warranted for a period of two years. This warranty does not cover failure due to improper installation, abuse or damage. If
upon examination the pickup is determined to be defective, a replacement will be made. Warranty replacement products are covered by this same warranty. This
warranty covers only those pickups and accessories sold by authorized EMG Dealers. This warranty is not transferable.
JMASTER Page 2
SPECIFICATIONS: MODEL:
JMASTER
Logo Color Gold
Magnet Type Alnico V
Resonant Frequency (kHz) 3.15
Output Voltage (String) 0.50
Output Voltage (Strum) 0.80
Output Noise (dBV) -120
Output Impedance (kΩ, Complete System) 2.00
Current @9V (Milliamps, Complete System) 1.20
Battery Life (Hours)† 400
Maximum Supply (Volts DC) 27
†estimate for two pickups powered by a single 9V, 500mAh battery
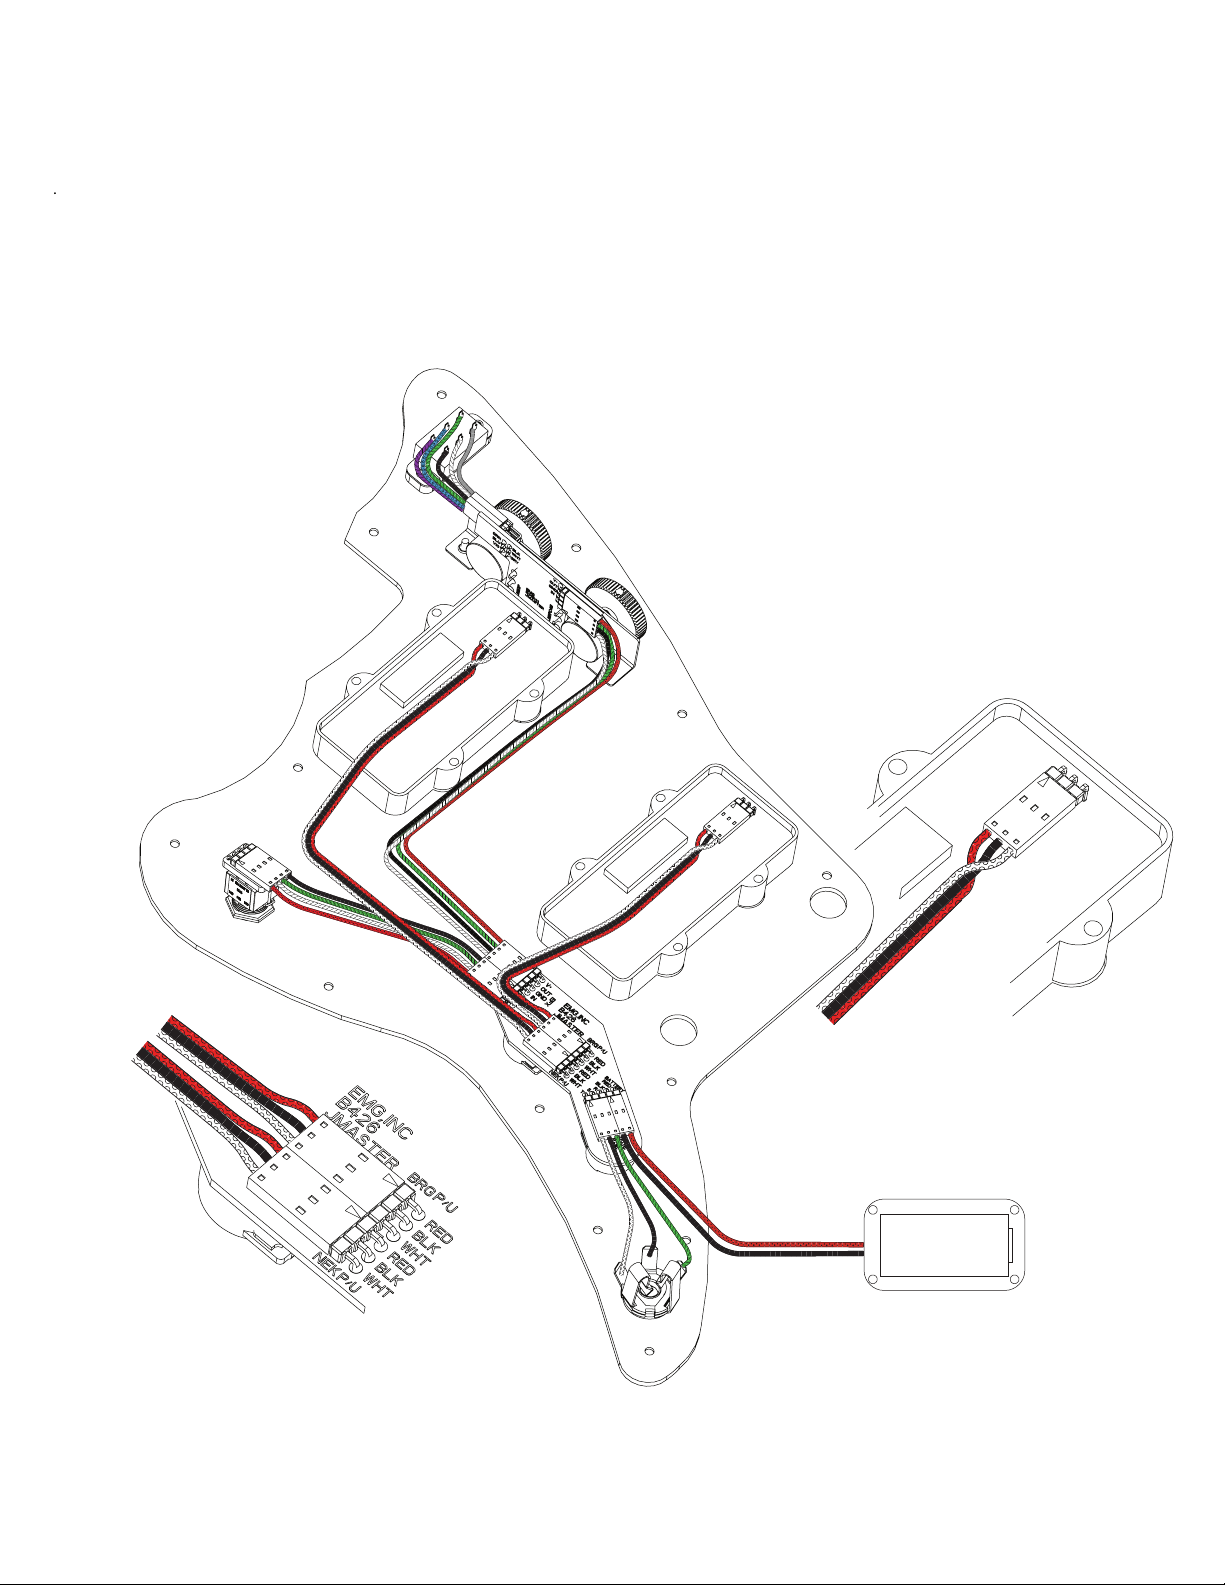
INSTALLATION INSTRUCTIONS:
1) Remove your strings, bridge, existing pickguard and pickups.
2) Install the pickup cables onto the back of the pickups as shown.
You can use any existing foam riser pads or replace them.
3) Install the pickups into place. Both pickups are identical.
4) Plug the pickup cables onto the Control PC Board as shown,
with the terminals facing up and visible.
5) Place a 9 Volt battery into the control cavity and insulate it
with some foam or tape. Alternatively, install a battery box.
6) With the battery in place and connected, it’s a good idea to test
the system before you reinstall the pickguard and bridge.
Plug a cable from the jack to your amp, and turn up the
volume slightly. Tap on the pickups with a small metallic
screwdriver to make sure each pickup is working. You can
also test the function of all onboard controls at this time.
7) If everything tests OK, screw the pickguard and pickups into
place, reinstall bridge, restring and adjust pickup height
to your preference.
9/18 VOLT
BATTERY
HOLDER