Structural Concepts Reveal User manual

Rev A Date: 6.12.2019
CAREFULLY FOLLOW THESE INSTRUCTIONS
Operating Manuals\Specialty\Reveal Case Adjoinment Guide_21-08289.pub
888 E. Porter Road ∙ Muskegon, MI 49441 Phone: 231.798.8888
Fax: 231.798.4960 www.structuralconcepts.com
P/N 21-08289
Reveal
® Case-To-Case
Adjoinment Guide
Refrigerated Service To
Refrigerated Service
Case Adjoinment
Refrigerated or Ambient Service
To Refrigerated or Ambient
Self-Service Adjoinment
Ambient Service To
Ambient Service
Case Adjoinment
Ambient Service To
Refrigerated Service
Case Adjoinment

2
Table of Contents
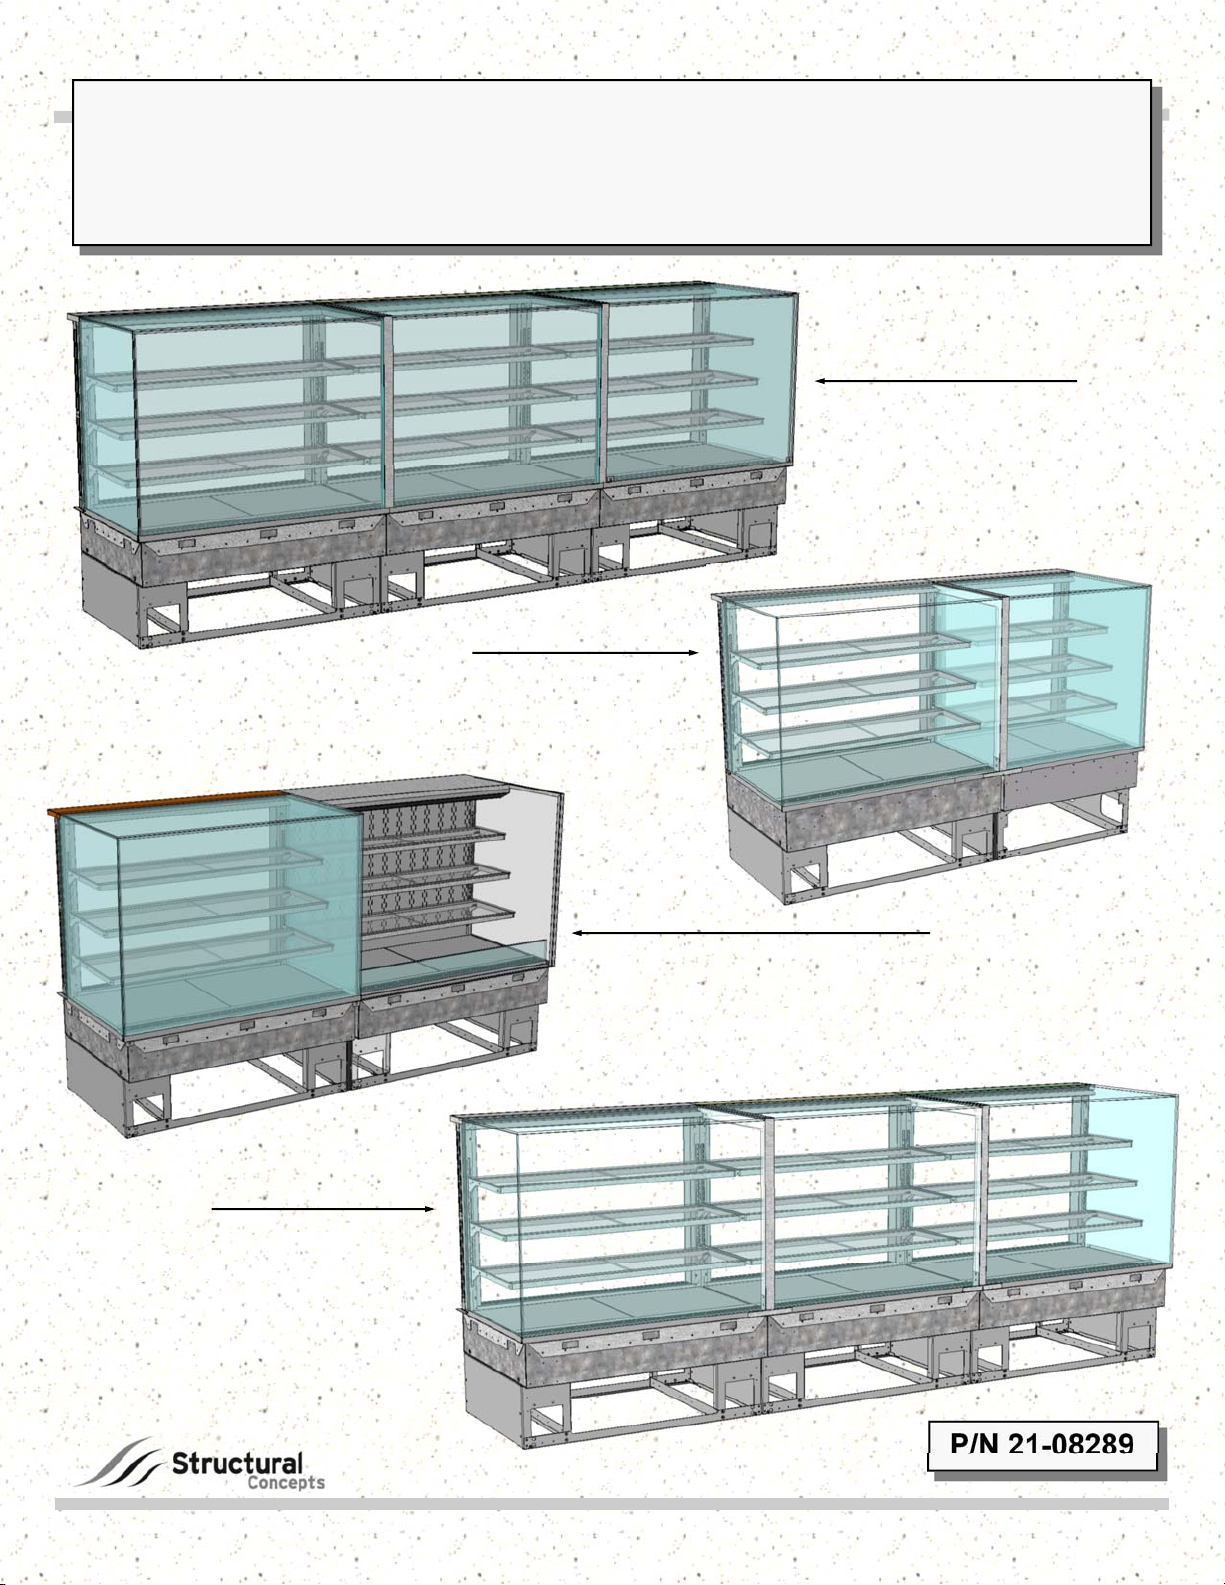
Refrigerated Service To Refrigerated Service Case Adjoinment Section .……………….
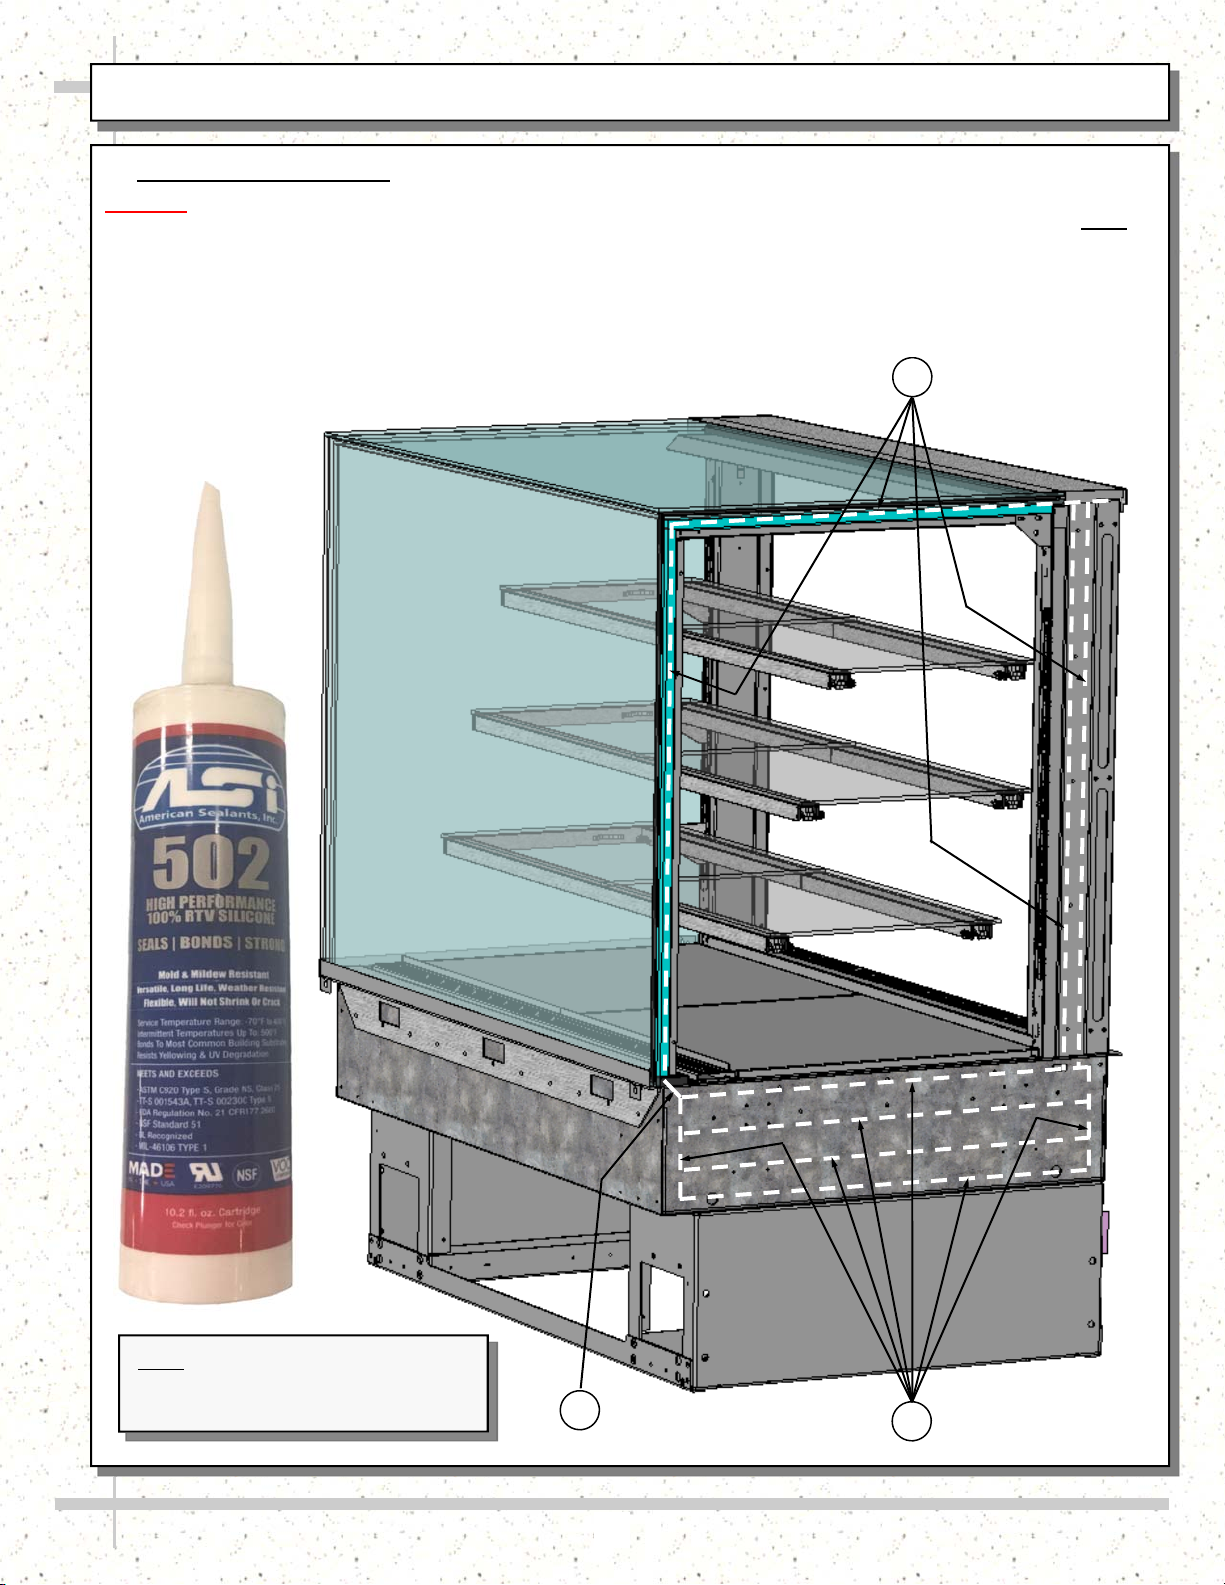
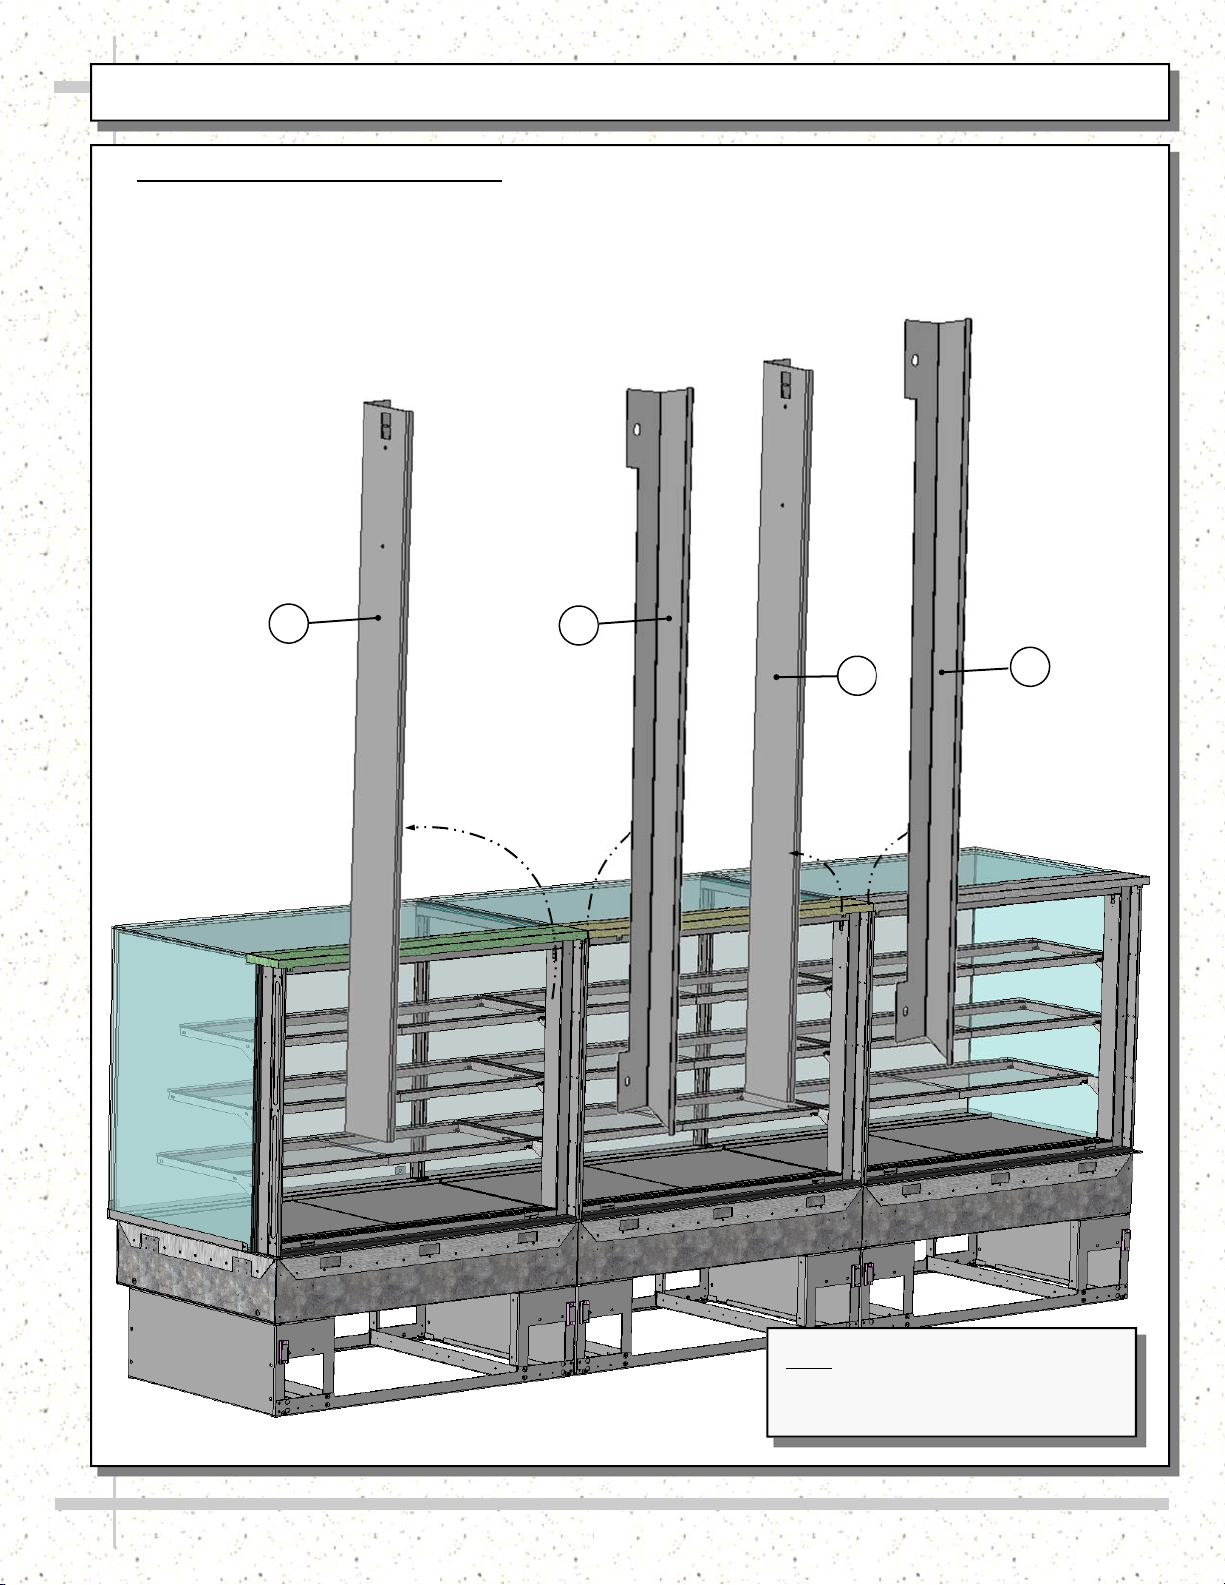
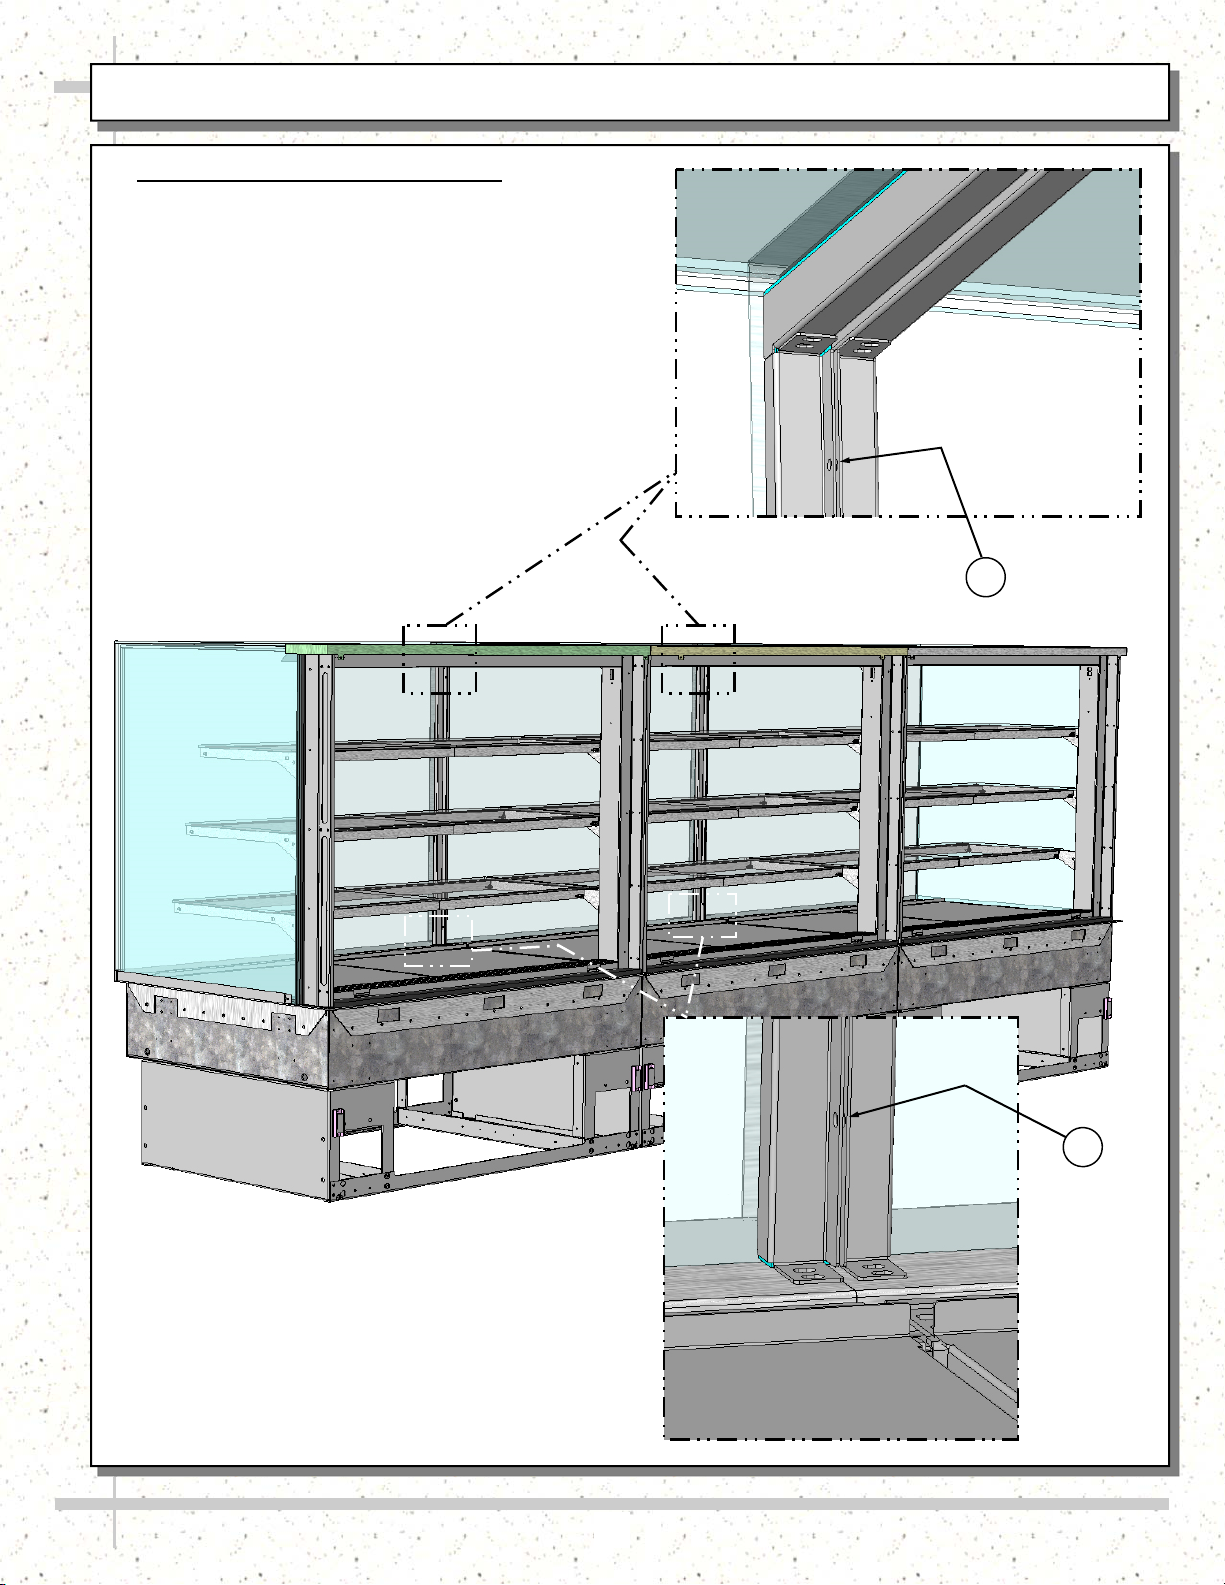
Refrigerated Service To Refrigerated Service Case Adjoinment Kit Information ..…..…
Refrigerated Service To Refrigerated Service Case Adjoinment Guide ..………………...
Ambient Service To Refrigerated Service Case Adjoinment Section .……...…………….
Ambient Service To Refrigerated Service Case Adjoinment Kit Information ...………....
Ambient Service To Refrigerated Service Case Adjoinment Guide …..…………………...
Refrigerated or Ambient Service To Refrigerated or Ambient Self-Service Case
Adjoinment Section ………………………………………….…………………………….
Refrigerated or Ambient Service To Refrigerated or Ambient Self-Service Case
Adjoinment Kit Information ..…..………………………………………………………….
Refrigerated or Ambient Service To Refrigerated or Ambient Self-Service Case
Adjoinment Guide ..…………….…………………………………………………………..
Ambient Service To Ambient Service Case Adjoinment Section .……...………………….
Ambient Service To Refrigerated Service Case Adjoinment Kit Information ...………....
Ambient Service To Refrigerated Service Case Adjoinment Guide …..…………………...
3
4
5-13
14
15
16-22
23
24
25-33
34
35
36-42

3
Refrigerated Service To Refrigerated Service Case Adjoinment Section
REFRIGERATED
SERVICE
TO
REFRIGERATED
SERVICE
CASE
ADJOINMENT
SECTION

4
Refrigerated Service To Refrigerated Service Case Adjoinment Kit Information
>> Adjoinment Instructions Applicability: These adjoinment instructions apply to Structural Concepts
Corporation’s Reveal® Refrigerated Service to Refrigerated Service Merchandisers only.
>> Adjoinment Kit: Structural Concepts Kit #20-92359SS contains all of the components as part of this
adjoinment process. The list of parts is listed below. If list is included in kit box, it supersedes this list.
>> Check Adjoinment Kit: Confirm that all items are included in adjoinment kit before beginning process
NOTE: THIS PART NUMBER WILL VARY, DEPENDING UPON CASE HEIGHT.

5
Refrigerated Service To Refrigerated Service Case Adjoinment Guide
>> Case Adjoinment Process:
Caution! Before beginning adjoinment process,
make sure case is not connect to any power
source.
1. Before adjoining case, apply a CONTINUOUS
bead of SCC supplied silicone sealant at center of
glass edge, on uprights, and on sides of case. Note:
Sealant is represented by dashed lines for illustrative
purposes only.
>> Adjoinment instructions continue on next page.
Note: Illustrations Shown May Not
Reflect Every Feature Or Option Of
Your Particular Case.
1
1 1

6
Refrigerated Service To Refrigerated Service Case Adjoinment Guide, Continued
>> Case Adjoinment Process:
2 Remove screws at upright’s upper raceway covers.
3. Remove screws at upright’s lower raceway covers.
>> Adjoinment instructions continue on next page.
2
3
3
2
Note: Illustrations Shown May Not
Reflect Every Feature Or Option
Of Your Particular Case.

7
Refrigerated Service To Refrigerated Service Case Adjoinment Guide, Continued
>> Case Adjoinment Process, Continued:
4. Remove rear-left raceway covers from case.
5. Remove rear-right raceway covers from case.
>> Adjoinment instructions continue on next page.
4 5
4 5
Note: Illustrations Shown May Not
Reflect Every Feature Or Option
Of Your Particular Case.

8
Refrigerated Service To Refrigerated Service Case Adjoinment Guide, Continued
6
7
Note: Illustrations Shown May Not
Reflect Every Feature Or Option
Of Your Particular Case.
>> Case Adjoinment Process, Continued:
6. Use SCC-supplied screws, washers and nuts to adjoin case at upper uprights.
7. Use SCC-supplied screws, washers and nuts to adjoin case at lower uprights.
>> Adjoinment instructions continue on next page.

9
Refrigerated Service To Refrigerated Service Case Adjoinment Guide, Continued
8 9
8 9
Note: Illustrations Shown May Not
Reflect Every Feature Or Option
Of Your Particular Case.
>> Case Adjoinment Process, Continued:
8. Reattach rear-left raceway cover to case (see step #2 in this guide for attachment locations).
9. Reattach rear-right raceway covers to case (see step #3 in this guide for attachment locations).
>> Adjoinment instructions continue on next page.

10
Refrigerated Service To Refrigerated Service Case Adjoinment Guide, Continued
>> Case Adjoinment Process, Continued:
10. Use SCC-supplied screws, washers and nuts to
adjoin upper glass support brackets.
11. Use SCC-supplied screws, washers and nuts to
adjoin lower glass support brackets.
>> Adjoinment instructions continue on next page.
10
11

11
Refrigerated Service To Refrigerated Service Case Adjoinment Guide, Continued
13
Note: Illustrations Shown May Not
Reflect Every Feature Or Option
Of Your Particular Case.
>> Case Adjoinment Process, Continued:
12. Use SCC-supplied screws, washers and nuts to adjoin case at front-lower base area.
13. Use SCC-supplied screws, washers and nuts to adjoin case at rear-lower base area.
>> Adjoinment instructions continue on next page.
12

12
Refrigerated Service To Refrigerated Service Case Adjoinment Guide, Continued
15
>> Case Adjoinment Process, Continued:
Note: Proper silicone sealant helps to maintain proper case temperature by preventing warm air from
entering case (or cool air from exiting case). Carefully follow these instructions!
14. After removing decking, apply a continuous bead of SCC-supplied silicone sealant along both horizontal
and vertical adjoinment seams (inside case). Note: Sealant is represented by dashed lines for illustrative
purposes only.
15. Use SCC-supplied silicone sealant to seal along UV-bonded glass adjoinment points (outside).
16. Use SCC-supplied silicone sealant to seal along front-outer adjoinment points (outside).
17. Use SCC-supplied silicone sealant to seal along filler and rear seam (outside case).
>> Adjoinment instructions continue on next page.
14
14
16
16
17

13
Refrigerated Service To Refrigerated Service Case Adjoinment Guide, Continued
Note: Illustrations Shown May Not
Reflect Every Feature Or Option
Of Your Particular Case.
>> Case Adjoinment Process, Continued:
Note: Proper silicone sealant helps to maintain
proper case temperature by preventing warm air
from entering case (or cool air from exiting case).
Carefully follow these instructions!
18. Apply TWO beads of SCC-supplied silicone
sealant to UNDERSIDE of trim covers. Carefully
18
place atop (horizontal) and against (vertical)
UV-bonded glass adjoinment areas and secure in
place with tape. Allow time for curing. Remove
tape after trim has cured. Note: Sealant is
represented by dashed lines for illustrative
purposes only.
>> After trim has cured, adjoinment instructions
are now complete.
>> Attachment of cladding, providing power to the
case, etc., may now commence.

14
Ambient Service To Refrigerated Service Case Adjoinment Section
AMBIENT
SERVICE
TO
REFRIGERATED
SERVICE
CASE
ADJOINMENT
SECTION

15
Ambient Service To Refrigerated Service Case Adjoinment Kit Information
>> Adjoinment Instructions Applicability: These adjoinment instructions apply to Structural Concepts
Corporation’s Reveal® Ambient Service to Refrigerated Service Merchandisers only.
>> Adjoinment Kit: Structural Concepts Kit #20-92359SS contains all of the components as part of this
adjoinment process. The list of parts is listed below. If list is included in kit box, it supersedes this list.
>> Check Adjoinment Kit: Confirm that all items are included in adjoinment kit before beginning process
NOTE: THIS PART NUMBER WILL VARY, DEPENDING UPON CASE HEIGHT.
21-09341 RETRO INSTR REVEAL SERVICE [AMBIENT] TO SERVICE
[REFRIGERATED] ADJOINMENT GUIDE

16
Ambient Service To Refrigerated Service Case Adjoinment Guide
>> Case Adjoinment Process:
1. Remove screws at upright’s upper raceway covers.
2. Remove screws at upright’s lower raceway covers.
>> Adjoinment instructions continue on next page.
1
2
Note: Illustrations Shown May Not
Reflect Every Feature Or Option
Of Your Particular Case.

17
Ambient Service To Refrigerated Service Case Adjoinment Guide, Continued
>> Case Adjoinment Process, Continued:
3. Remove rear-left raceway cover from case.
4. Remove rear-right raceway cover from case.
>> Adjoinment instructions continue on next page.
3 4
Note: Illustrations Shown May Not
Reflect Every Feature Or Option
Of Your Particular Case.

18
Ambient Service To Refrigerated Service Case Adjoinment Guide, Continued
5
6
Note: Illustrations Shown May Not
Reflect Every Feature Or Option
Of Your Particular Case.
>> Case Adjoinment Process, Continued:
5. Use SCC-supplied screw, washer and nut to adjoin
case at upper upright.
6. Use SCC-supplied screw, washer and nut to adjoin
case at lower upright.
>> Adjoinment instructions continue on next page.

19
Ambient Service To Refrigerated Service Case Adjoinment Guide, Continued
>> Case Adjoinment Process, Continued:
7. Reattach rear-left raceway cover to case (see step #2 in this guide for attachment locations).
8. Reattach rear-right raceway covers to case (see step #3 in this guide for attachment locations).
>> Adjoinment instructions continue on next page.
Note: Illustrations Shown May Not
Reflect Every Feature Or Option
Of Your Particular Case.
7 8

20
Ambient Service To Refrigerated Service Case Adjoinment Guide, Continued
Note: Illustrations Shown May Not
Reflect Every Feature Or Option
Of Your Particular Case.
>> Case Adjoinment Process, Continued:
9. Use SCC-supplied screw, washer and nut to adjoin case at front-lower base area.
10. Use SCC-supplied screw, washer and nut to adjoin case at rear-lower base area.
>> Adjoinment instructions continue on next page.
10
9
Table of contents