Studebaker SB2140 User manual


1
WARNING
The Caution Marking is located at the back enclosure of the apparatus.
The Rating plate is located at the back enclosure of the apparatus
IMPORTANT SAFETY INSTRUCTIONS
TO PREVENT FIRE OF SHOCK HAZARD, DO NOT USE THIS PLUG WITH AN EXTENSION
CORD, RECEPTACLE OR OTHER OUTLET UNLESS THE BLADES CAN BE FULLY
INSERTED TO PREVENT BLADE EXPOSURE. TO PREVENT FIRE OR SHOCK HAZARD,
DO NOT EXPOSE THIS APPLIANCE TO RAIN OR MOISTURE.
1. Read these instructions.
2. Keep these instructions.
3. Heed all warnings.
4. Follow all instructions.
5. Do not use this apparatus near water.
6. Clean only with dry cloth.
7. Do not block any ventilation openings. Install in accordance with the manufacturer’s
instructions.
8. Do not install near any heat sources such as radiators, heat registers, stoves, or other
apparatus (including amplifiers) that product heat.
9. Do not defeat the safety purpose of the polarized or grounding-type plug. A polarized plug
has two blades with one wider than the other. A grounding type plug has two blades and
a third grounding prong. The wide blade or the third prong is provided for your safety. If the
provided plug does not fit into your outlet, consult an electrician for replacement of the
obsolete outlet.
10. Protect the power cord from being walked on or pinched particularly at plugs, convenience
receptacles, and the point where they exit from the apparatus.
11. Only use attachments/accessories specified by the manufacturer.
12. Use only with a cart, stand, tripod, bracket, or table recommended by the
manufacturer, or sold with the product. When a cart is used, use caution
when moving the cart/apparatus combination to avoid injury from tip-over.
13. Unplug this apparatus during lightning storms or when unused for a long
period of time.
14. Refer all servicing to qualified service personnel. Servicing is required when the apparatus
has been damaged in any way, such as power-supply cord or plug is damaged, liquid has
been spilled or objects have fallen into the apparatus, the apparatus has been exposed to
rain or moisture, does not operate normally, or has been dropped.
15. This appliance shall not be exposed to dripping or splashing water and that no object filled
with liquids such as vases shall be placed on the apparatus

2
SAVE THESE INSTRUCTIONS
16. Do not overload wall outlet. Use only power source as indicated.
17. Use replacement part as specified by the manufacturer.
18. Upon completion of any service or repairs to this product, ask the service technician to
perform safety checks.
19. Power Sources - This product should be operated only from the type of power source
indicated on the marking label. If you are not sure of the type of power supply to your
home, consult your product dealer or local power company. For products intended to
operate from battery power, or other sources, refer to the operating instruction.
20. Object and Liquid Entry - Never push objects of any kind into this product through
openings as they may touch dangerous voltage points or short-out parts that could result
in a fire or electric shock. Never spill liquid of any kind on the product.
21. Damage Requiring Service - Unplug this product from the wall outlet and refer servicing
to qualified service personnel under the following conditions:
a) When the power-supply cord or plug is damaged,
b) If liquid has been spilled, or objects have fallen into the product,
c) If the product has been exposed to rain or water,
d) If the product does not operate normally by following the operating instructions. Adjust
only those controls that are covered by the operating instructions as an improper
adjustment of other controls may result in damage and will often require extensive work
by a qualified technician to restore the product to its normal operation.
e) If the product has been dropped or damaged in any way, and
f) When the product exhibits a distinct change in performance - this indicates a need for
service.
22. Mains plug is used as disconnect device and it should remain readily operable during
intended use. In order to disconnect the apparatus from the mains completely, the mains
plug should be disconnected from the mains socket outlet completely.
23. Battery shall not be exposed to excessive heat such as sunshine, fire or the like.
24. Excessive sound pressure from earphones and headphone can cause hearing loss.
25. Minimum distances of 4 inches around the apparatus for sufficient ventilation.
26. The ventilation should not be impeded by covering the ventilation openings with items,
such as newspapers, table-cloths, curtains, etc.
27. No naked flame sources, such as lighted candles, should be placed on the apparatus.
28. The use of apparatus in moderate climates.
29. Attention should be drawn to the environmental aspects of battery disposal.

3
COMPLIANCE WITH FCC REGULATIONS
FCC ID: 2ASQA6962140
CAUTION
Follow the advice below for safe operations.
ON PROTECTION AGAINST LASER ENERGY EXPOSURE
This device complies with Part 15 of the FCC Rules. Operation is subject to the following two
conditions:
(1) This device may not cause harmful interference, and
(2) This device must accept any interference received, including interference that may cause
undesired operation.
This equipment has been tested and found to comply with the limits for a Class B Digital Device,
pursuant to Part 15 of the FCC Rules. These limits are designed to provide reasonable
protection against harmful interference in a residential installation. This equipment generates,
uses and can radiate radio frequency energy and, if not installed and used in accordance with
the instructions, may cause harmful interference to radio communications. However, there is no
guarantee that interference will not occur in a particular installation. If this equipment does cause
harmful interference to radio or television reception, which can be determined by turning the
equipment off and on, the user is encouraged to try to correct the interference by one or more of
the following measures:
- Reorient or relocate the receiving antenna.
- Increase the separation between the equipment and receiver.
- Connect the equipment into an outlet on a circuit different from that to which the receiver is
connected.
- Consult the dealer or an experienced radio/TV technician for help.
WARNING
Changes or modifications to this unit not expressly approved by the party responsible
for compliance could void the user's authority to operate the equipment.
The equipment complies with FCC radiation exposure limits set forth for an uncon-
trolled environment. The equipment should be installed and operated with minimum
distance 20cm between the radiator & your body.
• As the laser beam used in this compact disc player is harmful to the eyes, do not attempt to
disassemble the casing.
• Stop operation immediately if any liquid or solid object should fall into the cabinet.
• Do not touch the lens or poke at it. If you do, you may damage the lens and the player may not
operate properly.
• Do not put anything in the safety slot. If you do, the laser diode will be ON when the CD door is
still open.
• If the unit is not to be used for a long period of time, make sure that all power sources are
disconnected from the unit. Remove all batteries from the battery compartment.
• This unit employs a laser. The use of controls or adjustment or performance of procedures other
than those specified here may result in exposure to hazardous radiation.

4
PROTECT YOUR FURNITURE
Caution:
- Any use of the controls or performing any of the procedures in a way other than those specified
herein may result in hazardous radiation exposure.
- This unit should not be adjusted or repaired by anyone except qualified service personnel.
ON PLACEMENT
• Do not use the unit in places which are extremely hot, cold, dusty or humid.
• Place the unit on a flat and even surface.
• Do not restrict the air-flow of the unit by placing it in a place with poor ventilation, by covering
it with a cloth or by placing it on a carpet.
ON CONDENSATION
• When left in a heated room where it is warm and damp, water droplets or condensation may
form inside the unit.
• When there is condensation inside the unit, the unit may not function normally. Let it stand for
1 to 2 hours before turning the power on, or gradually heat the room up and dry the unit
before use.
Should any trouble occur, disconnect the AC Adapter and refer servicing to qualified
personnel.
This system is equipped with non-skid rubber ‘feet’ to prevent the product from moving when you
operate the controls. These ‘feet’ are made from non-migrating rubber material specially
formulated to avoid leaving any marks or stains on your furniture. However certain types of oil
based furniture polishes, wood preservatives, or cleaning sprays may cause the rubber ‘feet’ to
soften, and leave marks or a rubber residue on the furniture.
To prevent any damage to your furniture we strongly recommend that you purchase small
self-adhesive felt pads, available at hardware stores and home improvement centers
everywhere and apply these pads to the bottom of the rubber ‘feet’ before you place the product
on fine wooden furniture.
KEEP YOUR SB2140 WITHIN ACCEPTABLE OPERATING TEMPERATURES
The built-in rechargeable battery should not be exposed to excessive heat such as sunshine, fire
and humidity. Use this unit where the ambient temperature is between 32º to 113ºF (0º and
45ºC). Using this unit in very hot conditions can permanently shorten battery life and deform the
enclosure which is not covered by the warranty. Store this unit where the temperature is between
-4º to 140ºF (–20º and 60ºC). Do not leave the unit in your car because temperatures in parked
cars can exceed this range.
Protect your SB2140 from higher temperature conditions and activities that might cause
damage to the unit or affect performance
• Do not leave this unit in direct sunlight.
• Do not leave this unit in a car on a hot day.
• Do not use certain features in hot conditions or direct sunlight for an extended period of time.

5
DEAR STUDEBAKER ® CUSTOMER
Model Number: SB2140 Serial Number:
CONTENTS OF YOUR PRODUCT
Selecting fine audio equipment such as the unit you've just purchased is only the start of your
musical enjoyment. Now it's time to consider how you can maximize the fun and excitement your
equipment offers. This manufacturer and the Electronic Industries Association's Consumer
Electronics Group want you to get the most out of your equipment by playing it at a safe level. One
that lets the sound come through loud and clear without annoying blaring or distortion and, most
importantly, without affecting your sensitive hearing. Sound can be deceiving. Over time your
hearing "comfort level" adapts to higher volumes of sound. So what sounds "normal" can actually be
loud and harmful to your hearing. Guard against this by setting your equipment at a safe level
BEFORE your hearing adapts.
To establish a safe level:
OStart your volume control at a low setting.
OSlowly increase the sound until you can hear it comfortably and clearly, and without distortion.
Once you have established a comfortable sound level:
OSet the dial and leave it there.
Taking a minute to do this now will help to prevent hearing damage or loss in the future. After all, we
want you listening for a lifetime.
We Want You Listening For a Lifetime
Used wisely, your new sound equipment will provide a lifetime of fun and enjoyment. Since hearing
damage from loud noise is often undetectable until it is too late, this manufacturer and the Electronic
Industries Association's Consumer Electronics Group recommend you avoid prolonged exposure to
excessive noise.
Customer's Record:
The serial number of this product is found on its back cover. You should note the serial number of
this unit in the space provided as a permanent record of your purchase to aid in identification in the
event of theft of loss.
OMain Unit X 1
OAC adaptor (DC 12V 1.5A ) X 1
OUser Manual X 1

1 MASTER VOLUME
2 TREBLE KNOB
3 BASS KNOB
4 BALANCE KNOB
5 FM ANTENNA
6 CHARGE INDICATOR
7 BT INDICATOR
8 FM ST. INDICATOR
9 POWER INDICATOR
10 FUNCTION SWITCH (Power Off/Tape,
CD/USB/AUX, Radio, Bluetooth)
11 BAND SWITCH
12 USB PORT
13 AUX IN JACK
14 TUNING KNOB
15 LED DISPLAY
16 STOP BUTTON
17 SKIP/FAST BACKWARD BUTTON
18 +10 / LIGHT SHOW BUTTON
19 REPEAT / PROGRAM BUTTON
20 DIAL POINTER
21 BLUETOOTH OUT BUTTON
22 CD / USB MODE; PLAY/PAUSE ;
BLUETOOTH PAIR / BUTTON
23 SKIP/FAST FORWARD BUTTON
24 HEADPHONE JACK
25 TWEETER
26 VU METER
27 CD COMPARTMENT
28 CD DOOR LATCH
29 WOOFER
30 CASSETTE RECORD BUTTON
31 CASSETTE PLAY BUTTON
32 CASSETTE REWIND BUTTON
33 CASSETTE FAST FORWARD BUTTON
34 CASSETTE STOP/EJECJT BUTTON
35 CASSETTE PAUSE BUTTON
36 CASSETTE COMPARTMENT
37 BUILT-IN MICROPHONE
38 CARRYING HANDLE
39 DC INPUT JACK
6
LOCATION OF CONTROLS
AUTO STOP
PAUS ESTOP/EJF.FWDREWPLAYRECORD
50
0
100%
20
10 75310
2
1
3
VU
50
0
100%
20
10 75310
2
1
3
VU
OUT
BLUETOOTH
MIN MAX MIN MAX L R
TAPE
12345678910 11 12 13 14
15 16 20 21 22 23 24
26
17 18 19
27 28 26
29 32
30 31
33
34 35 36 29 39
38
25 25
DC 12V
1.5A
37

7
POWER SOURCE
This unit can be operated using either AC power or the built-in Li-Polymer rechargeable battery
AC POWER OPERATION
An AC-DC Adaptor with the output of DC 12V, 1.5A (included) is required for operating the main
unit when using AC power mode. To connect the AC-DC Adaptor to the unit and 120V~ 60Hz AC
Outlet:
1.
Firmly and securely insert the DC plug of the adaptor into the DC Jack on the back of the unit.
2. Plug the AC Adaptor plug into the 120V AC outlet. CHARGE LED will be lighting Red during
battery charging. Connecting this system to any other power source may cause damage to
the system
3. Slide the FUNCTION switch on the top panel to CD/USB/AUX, RADIO or BLUETOOTH
mode to turn on the unit, the POWER INDICATOR will light.
Note: When the unit is not operated for long periods of time, unplug the AC adaptor from the unit
and wall outlet.
BUILT-IN RECHARGEABLE BATTERY OPERATION
1. This unit will also operate using the built-in Lithium rechargeable battery. Fully charge the
built-in rechargeable battery before first use, the CHARGE INDICATOR will turn from Red to
Green when the built-in battery is fully charged.
2. Unplug the DC INPUT jack of main unit. The unit will enter Battery Operating mode
automatically.
LOW BATTERY INDICATION
1. When the built-in battery power remains around 5%, the CHARGE INDICATOR will light Red
and flash, please connect the unit to AC adaptor for charging.
2. After prolonged use, the battery voltage may discharge and operation might become
intermittent. When this happens, please recharge the internal battery.

CHARGING THE BATTERY WITH THE INCLUDED AC ADAPTOR
1. Charge the built-in Lithium battery a minimum of 5 hours prior to first use. Firmly and securely
insert the DC plug of the adaptor into the DC Jack on the back of the unit.
2. Plug the AC Adaptor plug into the 120V AC outlet. Connecting this system to any other power
source may cause damage to the system.
3. When the AC power is connected, the battery charging indicator will light solid Red showing
that the internal battery is being charged.
4. After the battery is fully charged, the charging indicator will turn to solid Green.
Notes:
1.) Charging time will vary if you are listening to music while charging the internal battery. We
recommend you place the unit in Power off mode during the charging process or until SB2140
batteries are fully charged.
2.) To prolong the life of a rechargeable battery, it is recommended to completely discharge it
before fully charging it again.
3.) Rechargeable batteries need to be cycled for maximum performance and longer battery life. If
you don’t use the player that often, be sure to recharge the battery at least once a month in
order to keep the internal battery working properly.
Battery Note and Care
• Do not burn or bury batteries.
• Do not puncture or crush.
• Do not disassemble.
• Recycle Lithium batteries. Do not dispose of in the trash.
• Use only chargers rated for Lithium cells. Be sure the charger’s voltage and current
settings are correct for the battery pack being charged.
• Charge batteries on a fireproof surface away from flammable items or liquids.
• Batteries should NEVER be left unattended while charging. Only adults should charge the
batteries.
• Follow the manufacturer’s instructions for charging the product and do not charge longer
than recommended. Unplug the charger when the battery is charged or not in use.
NOTE: These speakers are not magnetically shielded and may cause color distortion on the
screen of some TVs or video monitors. To avoid this, you may need to move the
speakers further away from the TV or monitor if unnatural color shifts or image distortion
occurs.
1. Slide the FUNCTION SWITCH to RADIO position, the unit will be "On" and power LED
indicator lights.
2. Select the desired AM/FM band by switching the AM/FM/FM ST. BAND SELECTOR on unit
top panel.
3. Tune to your desired station with the TUNING knob. If FM STEREO mode is selected and
you tune to an FM Stereo station, the FM STEREO LED Indicator will light.
4. Adjust the MASTER VOLUME knob to obtain the desired sound level.
FM & FM-STEREO RECEPTION
O Set the BAND SELECTOR to “FM” position. Stations will now be received in MONO mode.
When a FM station is weak or distorted, listening is usually improved by switching the band
selector to the FM (mono) position.
O Set the band selector to “FM-ST” position to receive stereo broadcasts. The FM-Stereo LED
indicator will light up to show a FM stereo station is detected.
8
CHARGING INSTRUCTIONS
RADIO OPERATION

9
CD OPERATION
TIPS FOR BEST RADIO RECEPTION
AM - The AM antenna is built inside the radio. If AM reception is weak, change the position of the
unit until the internal antenna picks up the strongest signal.
FM - If a stereo broadcast program is being received, the FM STEREO INDICATOR will light.
During FM Stereo reception, always keep the FM TELESCOPIC ANTENNA fully extended
for best performance. However, if FM reception is weak, try repositioning the unit near an
open window until you get the best reception.
PLEASE READ THIS IMPORTANT INFORMATION:
CD mechanisms used in devices like this are designed to fully read all commercial CDs. They
will also read self-compiled CD-R/CD-RW discs but it may take up to 10 seconds for playback to
start. If playback does not start, it is likely due to the quality of the CD-R/RW disc and/or the
compatibility of the CD compilation software. Manufacturer is not responsible for the playback
quality of CD-R/RW discs.
Do not attach a label or seal to either side of the CD-R/RW disc. It may cause a malfunction.
(Make sure AUX cable is not plugged into the AUX IN jack).
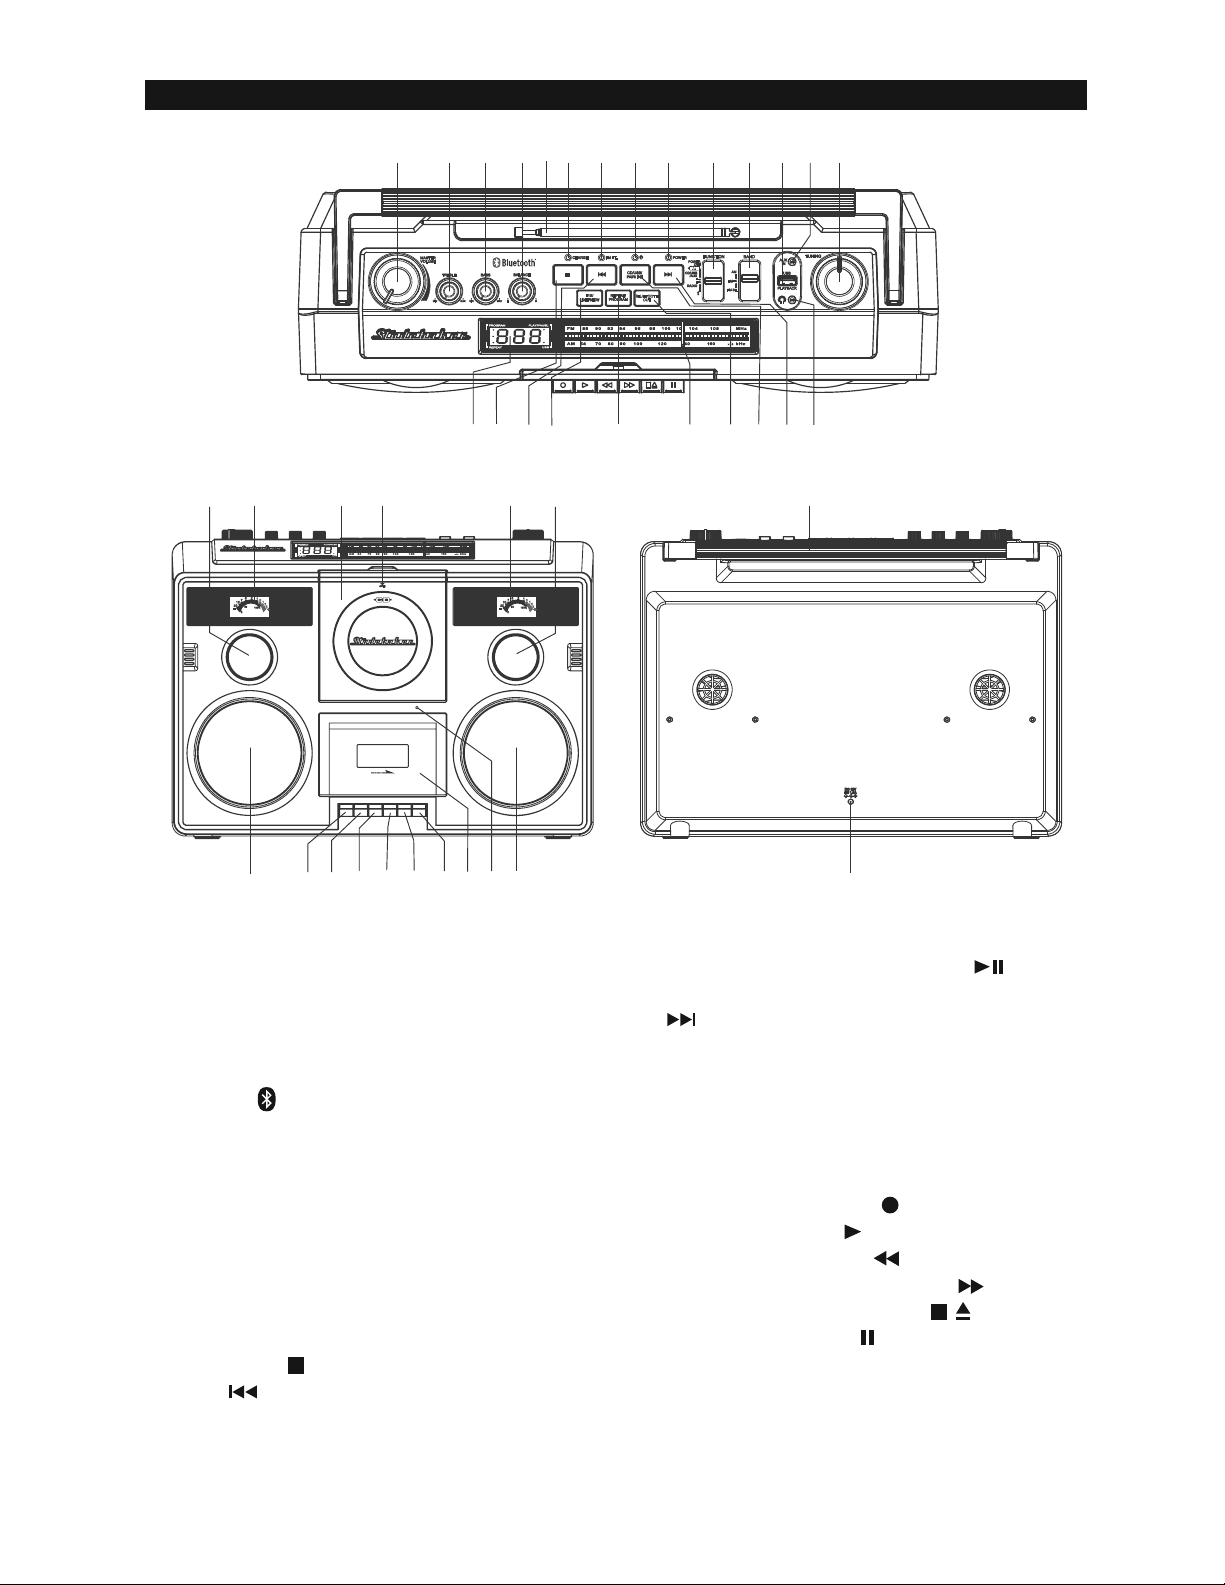
1. Slide the FUNCTION switch to CD/USB/AUX position. The display will show “- - -“ briefly. If
no CD has been loaded in the CD compartment, LED display will change to show “no”.
2. Grip the “OPEN” mark on the CD Door and pull gently to open it.
3. Carefully load an audio CD with its label side outward in the CD compartment then gently
close the CD door.
4. The player will start reading TOC of the disc, total number of tracks on the CD will appear
on the LED DISPLAY after a few seconds.
5. Press the PLAY/PAUSE button to start playing.
6. Adjust the MASTER VOLUME knob to obtain the desired sound.
7. To temporarily stop playing, press the PLAY/PAUSE Button. The play/pause indicator
will be flashing. To resume playing, press the PLAY/PAUSE Button again. The
play/pause indicator will be solid on.
8. You can skip up or down to a specific track number by pressing the SKIP BACKWARD
button or SKIP FORWARD button. The LED Display will indicate the correct track
number selected.
9. To locate a particular section within a track, press and hold the / button until the
section is found.
10. To stop playing, press the STOP button
11. Slide FUNCTION switch to POWER OFF position after listening.
+10 button control
Press the +10 button once to advance the music search by increment of 10 tracks.
REPEAT MODE
Repeat 1
To repeat the current track, press the REPEAT BUTTON once, the REPEAT INDICATOR will
flash in LED display. The track will continue to play until the repeat function is turned off.
Repeat All
To repeat all the tracks, press the REPEAT BUTTON twice, the REPEAT INDICATOR will be
solid on. All the tracks on the disc will be played repeatedly.
To Cancel Repeat Function: Press the REPEAT BUTTON until REPEAT indicator goes off
from LED display.

10
USING TREBLE/BASS/BALANCE CONTROL KNOBS
• TREBLE: Adjust TREBLE level of music playback.
• BASS : Adjust BASS level of music playback.
• BALANCE : Adjust BALANCE for balance left and right speaker.
USB OPERATION
PROGRAM OPERATION
This function allows the tracks to be played in a programmed sequence.
NOTE: Programs can be set in STOP mode.
1. In CD stop mode, press REPEAT/PROGRAM button, the PROG indicator will light and
Program Number “P01” will show on LED display.
2. Press the SKIP or button to select the desired track. The track number “1” will blink
(MP3 CD will not blink) on the LED display to prompt for input.
3. Press the PROGRAM button to confirm the selection. Program Number advances to “P02”.
4. Repeat step 2 to 3 to program up to maximum of 20 tracks.
5. When maximum of 20 tracks have been programmed, the LED display will show “FUL” to
indicate program is full.
6. When you have completed programming, press the PLAY/PAUSE button to start
playing. Both PROG and Play/Pause indicators are lighting steadily.
7. To cancel programmed play, press the STOP button twice. PROG indicator goes off.
The unit is designed to play MP3 files stored in the USB flash-drive. If the files on the USB device
do not conform to the standard, they may not be played (Make sure AUX cable is not plugged
into the AUX IN jack).
1. Slide the FUNCTION switch to CD/USB/AUX position. Press and hold the CD/USB/PAIR/
button until USB mode indication “USB” shows on LED display and USB indicator
flashing.
2. Insert your USB flash-drive into the USB port, unit starts to read the USB flash-drive.
Notes:
1.) USB supports flash drive capacity up to 32 GB maximum.
2.) Due to various USB flash drives in the market, please always fold down the carrying
handle before insert USB flash drive into the USB port.
3.) When carrying this unit, be sure your USB flash drive is not taller than the space under
the carrying handle to avoid damaging.
3. After reading the USB flash-drive, the unit will display the total number of files on the
flash-drive.
USB playback
After reading the USB flash-drive, press the PLAY/PAUSE button once, the first track/file on
the USB flash-drive will be played back. The “USB” and “PLAY/PAUSE” indicators will be solid
on during playback.
Play/Pause Control
To temporarily stop playing, press the button, music playback will be paused and the
PLAY/PAUSE indicator will be blinking. Press the button again to resume playback.
Stop playback
To stop playback, press the STOP button on the unit. The total number of tracks/files on the
USB flash-drive will be shown on the LED display.

Skip track
During playback, press the SKIP backward or forward buttons to skip to the previous
or next track/file.
+10 control
Press the +10 button to advance the music search by increments of 10 tracks.
REPEAT MODE
Repeat 1
To repeat the current track, press the REPEAT/PROGRAM BUTTON once, the REPEAT
INDICATOR will flash in LED display. The track will continue to play until the repeat function is
turned off.
Repeat All
To repeat all the tracks, press the REPEAT BUTTON twice, the REPEAT INDICATOR will be
solid on. All the tracks on the disc will be played repeatedly.
To Cancel Repeat Function: Press the REPEAT BUTTON until REPEAT indicator goes off
from LED display.
Programmed USB playback
This unit can be programmed to play up to 20 tracks/files in USB mode.
1. Plugged in your flash-drive into USB port, make sure unit is in stop mode.
2. Press REPEAT/PROGRAM button, the PROGRAM Indicator will light and program
Channel Number "P01" will show on the LED DISPLAY.
3. Press or button to select the track to be programmed. The track number “1” will
show on the LED DISPLAY.
4. Press the PROGRAM button again to store selection. The Program Channel Number will
change to “P02”.
5. You may repeat steps 3 - 4 to program as many as 20 tracks. When the memory full, “FUL”
will show on the LED DISPLAY.
6. Press the PLAY/PAUSE button to start the programmed play.
7. Press STOP button once to stop playback.
8. Press the button to resume programmed play.
9. To cancel programmed play, press the STOP button twice.
BLUETOOTH OPERATION
PAIRING A SMARTPHONE OR BLUETOOTH ENABLED DEVICE
The Bluetooth feature enables you to stream and play the digital music on your Bluetooth
enabled device to your unit.
1. Slide the FUNCTION switch to Bluetooth position, the Bluetooth indicator will flash.
2. The unit will start in auto connection mode and search for a previously paired device that is
active and in range (30 feet/10 meters). If found, a brief welcome melody will be heard and
Bluetooth indicator will change to solid on. If no active device is found, the unit will switch to
interactive pairing mode and the Bluetooth indicator keeps flashing.
3. To establish a new link, turn on the Bluetooth function of your Bluetooth enabled device and
enable the search or scan feature to find “SB2140” in the list of discoverable Bluetoot
devices. Select the “SB2140” from your available device list when it appears on its screen
and a brief welcome melody will be heard if pairing and connection is successful. If you are
asked for a password, enter “0000”.
4. If no successful pairing and connection is made within 5 minutes, the unit can enter manual
pairing mode. You need to press and hold the PAIR button until Bluetooth indicator flashes
to initiate a pairing/connecting request to a new or old Bluetooth enabled device. Follow
step #3 to complete the process.
11

12
5. After successfully pairing and connecting your device with SB2140, the unit will emit a brief
welcome melody and the Bluetooth indicator will change to solid on. You can now play
music from your Bluetooth enabled device wirelessly to the SB2140.
6. If you want to connect the SB2140 to another new external Bluetooth enabled device while
paired with another device, press and hold the PAIR button for few seconds to disconnect
the existing connection. The unit will emit two short beeps and Bluetooth indicator will
change to flash. Repeat steps #3 to #4 above to make a new link.
7. Rotate the VOLUME CONTROL on the top panel to increase the listening volume gradually
until a comfortable listening level is reached.
8. Press the PLAY/PAUSE BUTTON to control play/pause.
9. Press the SKIP FORWARD BUTTON to skip to next song and SKIP BACKWARD
BUTTON to skip to previous song.
Notes:
• If you cannot pair the unit with your Bluetooth enabled device, try solving the problem by
turning the unit power off, then power on, and then starting the pairing process again.
• The Bluetooth function of the unit will remain paired unless the paired device goes out of
range of 30 feet (10 meters). If the broken link is re-established within 20 seconds, the
SB2140 will reconnect to the current paired device automatically. Otherwise you will need
to make a manual connection again later.
• You may need to turn off the Bluetooth function of the paired external device first before
make a new link.
• Refer to manual of your smartphone or external Bluetooth enabled device for correct
Bluetooth operation instructions since it may vary from model to model.
• If your Bluetooth enabled device does not support A2DP, it will not play the music through
the SB2140 system even after it is paired and connected successfully.
• If you are pairing and connecting your personal computer to the SB2140 using Bluetooth,
you may need to set the SB2140 as your computer’s default sound device.
RE-LINKING TO A SMARTPHONE OR BLUETOOTH ENABLED DEVICE
Even if your smartphone or Bluetooth device is already paired with the SB2140 and with both
Bluetooth functions turned on, they can become unlinked at some point due to intentional
manual disconnection or undesirable external signal interferences or over-range for more than
10 seconds. If this happens, the unit will emit two short beeps. You can re-link them and resume
play by:
1. Select “SB2140” from the device list on your smartphone or Bluetooth device. The SB2140
should re-link to your Bluetooth enabled device within 5 seconds.
2. Tap the play button of the music player on your Bluetooth enabled device to resume
playback
Bluetooth Out (Transmitter)
1. POWER on the unit, slide the FUNCTION switch to desired function mode except the
Bluetooth receiver and AM or FM radio modes.
2. Press the BLUETOOTH OUT button, unit is in Bluetooth transmit pairing mode and
Bluetooth indicator flashes Green
3. Set your Bluetooth receiver such as headphone or speaker to ON and begin searching for
devices.
NOTE: 1.) If you have several Bluetooth receivers, switch off those receivers that are not
in use and place the one to be linked near the unit to avoid SB2140 linked to
other unwanted Bluetooth enabled devices.
2.) The effective distance between your external device and this apparatus is within
10 meters (30 feet).

13
AUX IN OPERATION
You can play other music sources (iPod, MP3 or other digital audio players) through the
speakers of the unit by connecting the AUX IN JACK to your external player’s audio out jack or
headphone jack.
1. Plug one end of an audio cable (not included) into the AUX IN JACK and the other end of
the cable to the headphone jack of your digital audio player.
2. Slide the FUNCTION SWITCH to the CD/USB/AUX IN position.
3. Turn on and start playing the external device you plugged into the AUX IN JACK.
4. Slowly adjust both the volume controls of your unit and the external device until you reach
a comfortable listening level.
5. Turn off both the external audio player and this unit after use. Unplug the audio cable from
AUX IN jack
Notes:
• If you connect the unit to the Line-Out Jack of your external device, you only need to adjust
the VOLUME CONTROL of your unit. If you connect to the Headphone Jack of your external
device, you may need to adjust both the volume controls of your external device and the unit
to obtain the desirable listening level.
• Remember to turn off the unit when you have finished listening. Don't forget to switch off the
power of your external audio device as well.
4. SB2140 will auto scan and pair with your Bluetooth receiver nearby, Pair indicator will
change to light Green steadily to indicate a connection has been established.
5. Play music on SB2140 in CD, USB, Tape or AUX mode, unit speaker sound will be off, you
can listen to music by using your Bluetooth receiver such as a headphone or speaker
wirelessly.
6. If you want change to pair with another Bluetooth Enabled Device, switch off the Bluetooth
function of your Bluetooth receiver which was paired previously. Press the BLUETOOTH
OUT button to turn off the function and press the BLUETOOTH OUT button again to pairing
mode (repeat step 2 to 5).
7. Press the BLUETOOTH OUT button when you finish listening in Bluetooth transmitter
mode, Green LED will be off and unit speaker will sound again.
Notes:
1.) When Bluetooth Receive/In or AM/FM Radio modes are in use, the Bluetooth
Transmit/Out function is disabled.
2.) There will be a brief sound delay when enabling the Bluetooth Transmit/Out function
3.) The VU meters will be inactive when headphones are plugged in or Bluetooth
Transmit/Out is enabled.
4.) Bluetooth Out (Transmitter) can only pair with Bluetooth receiver such as headphone or
speaker for music streaming wirelessly. Use your Bluetooth device volume control if
necessary.
USING HEADPHONES (NOT INCLUDED)
AUX IN OPERATION
Inserting the plug of your stereo headphones (not included) into the headphone jack located on
the top panel will enable you to listen in private. When using headphones, the speakers will be
disconnected.
Read this Important Information before Using Your Headphones
1.) Avoid extended play at very high volume as it may impair your hearing.
2.) If you experience ringing in your ears, reduce the volume or shut off the unit.
3.) Keep the volume at a reasonable level even if your headset is an open-air type designed to
allow you to hear outside sounds. Please note that excessively high volume may still block
outside sounds.

1. Press the Cassette STOP/EJECT button to open the Cassette Door and insert a
pre-recorded cassette tape with the exposed tape facing downwards. Push the Cassette
Door to close it.
2. Slide the FUNCTION SWITCH to “POWER OFF/TAPE” position, press the Cassette PLAY
Button to start playback and adjust the Rotary Volume Control to obtain the desired
sound level.
3. Press the Cassette FAST FORWARD Button or the Cassette REWIND Button to
rapidly advance or rewind the tape.
4. Press the Cassette RECORD Button to record either from the Built-in microphone, Radio,
CD, USB, AUX IN or Bluetooth. Use the Function Selector to choose your signal source
accordingly.
5. Press the Cassette PAUSE Button to pause the playback, press it again to resume the
playback.
6. Press the Cassette STOP/EJECT Button to stop operation.
Note: To avoid damage to the unit and your cassette tape, press the STOP/EJECT in between
each operation. For example; when fast forwarding your cassette while playing, always
press STOP button before pressing the F.FWD button.
AUTOMATIC STOP
To protect your cassette tapes and prevent unnecessary wear to the pinch roller of the cassette
mechanism, this unit is equipped with an Automatic Stop System. When the tape ends during
play, the Cassette Play Button will automatically release to stop the cassette from running.
A. RECORDING FROM THE BUILT-IN MICROPHONE
1. Slide the FUNCTION SWITCH to “POWER OFF/TAPE” position.
2. Press the STOP/EJECT button to open the cassette door and insert a blank cassette
tape into the cassette compartment.
3. Press the RECORD and PLAY button at deck.
4. Speak into the built-in microphone near the cassette door to record your voice. For best
results, make sure you are facing the cassette door and speak at a distance of approximate
2 - 3 inches from microphone
5. Press the PAUSE button at deck and STOP/EJECT button when finish.
6. To playback the recording, press the REW button to rewind, then press the PLAY button to
start playing.
B. RECORDING FROM RADIO
1. Slide the FUNCTION SWITCH to “RADIO” position, the POWER indicator will light.
2. Slide AM/FM switch to select band.
3. Tune to the desired station and insert a blank cassette tape in the cassette compartment
4. Press the RECORD & PLAY button to start recording.
5. Press the PAUSE button and then STOP/EJECT button when finish.
C. RECORDING FROM A CD
1. Slide the FUNCTION SWITCH to “CD/USB/AUX” position.
2. Insert a blank cassette tape which suitable for recording in the cassette compartment.
3. Press the PAUSE button first and then RECORD & PLAY button at cassette.
Recording function is now on STANDBY.
4. Activate the CD player, and then press PAUSE at cassette to start recording.
5. To stop recording, press the STOP button on CD player first, then press the PAUSE
button and then STOP/EJECT button on cassette deck.
14
CASSETTE OPERATION

15
D. RECORDING FROM USB
1. Slide the FUNCTION SWITCH to “CD/USB/AUX” position.
2. Press and hold the CD Play/Pause button to enter USB mode.
3. Insert your USB flash-drive into the USB port, unit starts to read the USB flash-drive.
4. After reading the USB flash-drive, the unit will display the total number of files on the
flash-drive
5. Insert a blank cassette tape which suitable for recording in the cassette compartment.
6. Press the PAUSE button first and then RECORD & PLAY button at cassette.
Recording function is now on STANDBY.
7. Activate the USB player, and then press PAUSE at cassette to start recording.
8. To stop recording, press the STOP button on USB player first, then press the PAUSE
button and then STOP/EJECT button on cassette tape deck.
E. RECORDING FROM AUX IN
1. Slide the FUNCTION SWITCH to “CD/USB/AUX” position.
2. Connect Line out or headphone out of your external audio device to AUX IN jack via a
3.5mm plug audio cable (not included).
3. Insert a blank cassette tape into the cassette compartment.
4. Press the PAUSE button and then press the RECORD and PLAY button at deck.
5. Press play button of your external audio device to start playback and then release
PAUSE button at deck to start recording.
6. Press the PAUSE or STOP/EJECT button at cassette deck when finish.
F. RECORDING FROM BLUETOOTH
1. Slide the FUNCTION switch to Bluetooth " “position.
2. Follow the Bluetooth operation section to pair the unit with your Bluetooth device, play the
song through the SB2140 unit.
3. Insert a blank cassette tape into the cassette compartment.
4. Press the PAUSE button first and then RECORD & PLAY button at cassette.
Recording function is now on STANDBY.
5. Activate your Bluetooth device playback, and then press PAUSE at cassette to start
recording.
6. To stop recording, press the STOP button on your Bluetooth device first, then press the
PAUSE button and then STOP/EJECT button on cassette deck.
NOTES:
1. When recording from Radio, CD or USB, the volume control does not affect the recording
level due to ALC circuit inside unit.
2. When recording from AUX IN and Bluetooth, you may need to adjust volume level of your
external audio player for the best result.
3. When recording from built-in microphone, to obtain the best result and reduce saturation
risks, speak at a distance of approximate 2 - 3 inches from microphone.
4. When recording from AM radio, you may receive interference.
5. Keep SB2140 at least 3 feet (1 meter) away from mobile phone or WiFi router to avoid any
possible interference noise from being recorded.
SPEAKER and TWEETER LED LIGHT SHOW
- To turn off the LED light show, press and hold the LIGHT SHOW button.
- To turn on the LED light show, press and hold the LIGHT SHOW button once again.
Note: If the brightness is glaring, turn on room lights or turn off LED light show.

If later you do wish to record on side A of the cassette, cover the tab opening with a piece of
cellophane tape. This will allow the Record to function again.
CASSETTE CARE
Two common causes of trouble experienced when using cassettes are:
1) Tape Jamming – Leading to uneven speed in playback, and
2) Tape Tangling – Where the tape wraps itself around ital parts of
the mechanism.
To reduce the likelihood of these problems occurring, the following precautions should be
observed:
• Check that there are no loose layers of tape visible through the cassette center window (see
Fig. 1). Take up any loose layers, using a pencil or hexagonal barrelled ballpoint pen, before
inserting the cassette into the machine (see Fig.2).
• If the cassette feels tight while performing operation shown (see
Fig.2), the tape may be jamming due to ridges formed in the winding
of the tape (visible through the center window). These may be
removed, in most cases, by fast winding of the cassette from one
end to the other and back again.
• Use only well-known brands of tape. Avoid use of C-120 cassettes.
Furthermore, do not expose cassettes to direct sunlight, dust or oil, and do not touch the tape
surfaces.
16
CARE AND MAINTENANCE
1. Do not subject the unit to excessive force, shock, dust or extreme temperature.
2. Do not tamper the internal components of the unit.
3. Clean your unit with a dry cloth. Solvent or detergent should never be used.
4. Avoid leaving your unit in direct sunlight or in hot, humid or dusty places.
5. Keep your unit away from heating appliances and sources of electrical noise such as
fluorescent lamps or motors.
ABOUT CASSETTE TAPES
Whenever you record on a cassette any previously recorded material is erased as the new
material is recorded. To prevent you from accidentally erasing material which you wish to save,
blank cassettes are equipped with erase prevention tabs for each side of the tape. If the erase
prevention tab for side A is removed, you cannot accidentally record on side A. The Record
button cannot be depressed if the erase prevention tab on the cassette has been removed.
To prevent accidental erasing on side A of a cassette use a small screw driver or similar tool to
break off the erase prevention tab for side A. This prevents the record button form locking.
RREESSEETTTTIINNGG TTHHEE UUNNIITT
In case of malfunction due to electrostatic discharge, reset the unit by sliding the FUNCTION
switch to POWER OFF position to reset the unit. Wait for 30 seconds before power on the unit
again.

17
HEAD CLEANING
The tape heads, pinch roller and capstan require periodic cleaning. This removes particles of the
metal oxide coating that wear off the tape and accumulate on these parts and impair performance.
Switch off the power, press the Stop/Eject button to open the cassette door, and press the
Play button. Clean the tape heads, pinch roller and capstan with a soft cloth or cotton pad
dampened in isopropyl alcohol or special tape head cleaner.
1. Avoid operating your unit under direct sunlight or in hot, humid or dusty places.
2. Keep your unit away from heating appliances and sources of electrical noise such as
fluorescent lamps or motors.
3. For better Clock Display clarity, avoid operating the unit under direct sunlight or in strong
room illumination.
4. Unplug the unit from the electrical power outlet immediately in case of mal.
COMPACT DISC CARE
OHandle the disc only by its edges. Never allow your fingers to come in contact with the shiny,
unprinted side of the disc.
ODo not attach adhesive tape, stickers etc., to the disc label.
OClean the disc periodically with soft, lint-free, dry cloth. Never use detergents or adhesive
cleaners to clean the disc. If necessary, use a CD cleaning kit.
OIf disc skips or gets stuck on a section of the disc, it is probably dirty or damaged (scratched).
OWhen cleaning the disc, wipe in straight lines from the center of the disc to the edge of the
disc. Never wipe in circular motions.
OTo remove a disc from its storage case, press down on the center of the case and lift the disc
outs, holding it carefully by the edges.
OFingerprints and dust should be carefully wiped off the disc's recorded surface with a soft
cloth. Unlike conventional records. compact discs have no grooves to collect dust and
microscopic debris so gently wiping with a soft cloth should remove most particles.
CLEANING THE UNIT
OTo prevent fire or shock hazard, disconnect your unit from the AC power source when
cleaning.
OThe finish on the unit may be cleaned with a dust cloth and cared for as other furniture, Use
caution when cleaning and wiping the plastic parts.
OIf the cabinet becomes dusty wipe it with a soft dry dust cloth. Do not use any wax or polish
sprays on the cabinet.
OIf the front panel becomes dirty or smudged with fingerprints it may be cleaned with a soft
cloth slightly dampened with a mild soap and water solution. Never use abrasive cloths or
polishes as these will damage the finish of your unit.
CAUTION: Never allow any water or other liquids to get inside the unit while cleaning.
&RWWRQ 6ZDE &DSVWDQ
3LQFK
5ROOHU
(UDVH
+HDG
7DSH
+HDG

18
TROUBLE SHOOTING GUIDE
Symptom
The unit does not
respond (no power)
Unit is ON but there is
low or no volume
AM/FM no sound
Bluetooth No Sound
Noise or sound distorted
on AM/FM broadcast
USB player will not play
CD player will not play
CD skips while playing
Intermittent sound from
CD Player
Poor cassette sound
quality
Recording does not work
Sound is distorted
Unit gets warm after
extended play at high
volume
Possible Cause
The unit is disconnected from
the AC outlet.
The AC outlet has no power.
Volume set too low.
Unit not in Radio mode.
Unit is not linked with your
Bluetooth enabled device.
Unit placement out of range.
Your Bluetooth enabled device
Volume set too low.
Station not tuned properly.
FM: telescopic antenna is not
fully extended.
AM: Internal antenna is not
positioned correctly.
Unit not in USB function mode.
Can’t read USB data
Unit not in CD function mode.
CD is installed incorrectly.
If the CD is self-compiled, the
media used may not be
compatible with the player.
Disc is dirty or scratched.
Dirty or defective disc.
Dirty pick up lens.
Player is subject to excessive
shock or vibration.
Dust and dirt on the heads,
capstan or pinch roller
Cassette tab(s) maybe broken
out
Volume level is set too high.
Sound source is distorted.
This is normal.
Solution
Reconnect to the AC outlet.
Try the unit on another outlet.
Slowly rotate the MASTER VOLUME knob
to increase the volume level.
Slide FUNCTION switch to select RADIO.
Go through “Bluetooth Operations”
process to link the speakers.
Relocate the unit within Bluetooth
operating range (30 feet)
Increase Volume level of your Bluetooth
enabled device.
Fine tune the AM/FM broadcast station.
Fully extend the FM telescopic antenna.
Reposition the unit until the best reception
is obtained.
Slide FUNCTION switch to CD/USB/AUX
and long press the CD/USB/PAIR/
button until USB indicator is flashing.
USB flash drive fault, change another
good one.
Slide FUNCTION switch to select CD.
Insert CD with label side outward.
Use better quality blank media and retest.
Wipe CD with clean cloth or use another
disc.
Clean or replace the defective disc.
Use a CD-lens cleaning disc to clean the
lens.
Relocate the player away from shock or
vibration.
Clean the heads etc…
Apply a piece of adhesive tape over the
missing tab space
Decrease the volume.
Try a different sound source.
If you are using an external sound source
like older generation of iPod, try reducing
the output volume on the device itself.
Also try turning bass boost OFF or change
the EQ setting.
Turn the unit off for a period of time or
lower volume

19
SPECIFICATION
Radio Frequency Range : AM: 530 – 1710 KHz
: FM: 88 – 108 MHz
Audio Output Power : 2 X 5W (RMS)
Tweeter : 2 x 1.5 inch / 6 ohms
Woofer : 2 x 4 inch / 6 ohms
Bluetooth : V5.0 + EDR
USB : Support USB device up to 32GB
Power Source :
AC Adapter : Input AC 120V~ 60Hz
: Output DC 12V ,1.5A
Built-in Rechargeable Lithium Battery : DC 7.4V , 2200mAh
Due to continuing improvement, the features and the design are subject to change without
notice.
At Spectra, environmental and social responsibility is a core value
of our business. We are dedicated to continuous implementation
of responsible initiatives with an aim to conserve and maintain the
environment through responsible recycling.
Please visit us at http://www.spectraintl.com/green.htm for more
LQIRUPDWLRQRQ6SHFWUDெVJUHHQLQLWLDWLYHVRUWRILQGDUHF\FOHULQ
your area.
The Bluetooth®word mark and logos are registered trademarks owned by Bluetooth SIG, Inc.
and any use of such marks by Spectra Merchandising Intl, Inc. is under license. Other
trademarks and trade names are those of their respective owners.
Other manuals for SB2140
1
Table of contents
Other Studebaker Portable Stereo System manuals