Studio Electronics SE-3X User manual

!
1

CIRCUIT AND SOFTWARE DESIGN
Tim Caswell
USER INTERFACE, CIRCUIT BENDER & FEATURE SPECIALIST
Greg St. Regis!
!
GRAPHIC DESIGN
Marc St. Regis
SOUND PROGRAMMING
Marc St. Regis Greg St. Regis Featured Designers
USER MANUAL
Greg St. Regis Marc St. Regis Tim Caswell Carlo St. Regis
NEAR TOTALITARIAN EDITORS
Daniel Wendell Carlo St. Regis
LEAD VENDOR LIAISON & CONTINUING GRAMMAR GENIUS
Daniel Wendell
VERY SPECIAL THANKS
Mary Capretta Theriot St. Regis Val (VE) St. Regis Rachael Herbison Lucy Bauer David Gale*
*Additional kudos to David Gale whose 11th hour queries and suggestions resulted in front panel, feature access fine-
tuning and a dedicated EXIT button!
Rev.6.23.2021
Information contained in this SE-3X Manual, including but not limited to specifications and appearances, are subject to change without
notice and do not represent a commitment on behalf of ANALOGIA INC. No portion of this manual may be produced or transmitted in
any form, or by any means—whether electronic or mechanical, or for any purpose other than purchaser’s personal use—without the
explicit written permission of ANALOGIA INC. All other products, logos or company names mentioned herein are trademarks or
registered trademarks of their respective owners. All STUDIO ELECTRONICS’ logos are trademarks of Analogia Inc./Studio Electronics.
COPYRIGHT © 2021 ANALOGIA INC. / STUDIO ELECTRONICS. All Rights Reserved.
A N A L O G I A I N C.
530 West Palm Ave., El Segundo California 90245
facebook.com/StudioElectronics • youtube.com/user/StudioElectronics
soundcloud.com/studio-electronics!
2

TABLE OF CONTENTS
4
LIMITED WARRANTY
5-6
SAFETY ESSENTIALS - SEC. 1
6
UNPACKING & INSPECTION - SEC. 2
7
SETUP, CONNECTIONS & CARE - SEC. 3
8
REGISTRATION - SEC. 4
9
FEATURES & CONTROLS - SEC. 5
10
TIM CASWELL SPEAKS - SEC. 6
11-21
FRONT PANEL - SEC. 7
13 PROGRAMMER - SEC. 7a
14 CONTROL - SEC. 7b
15 MOD - SEC. 7c
16 - 17 OSC BANK - SEC. 7d
18 FILTER - SEC. 7e
19 - 21 ENVELOPE GENERATORS - SEC. 7f
22 - 24
EDIT WINDOWS - SEC. 8
25
COMMON FUNCTIONS - SEC. 9
26
SCREEN JUMPS & SHORTCUTS - SEC. 10
27
EXTERNAL INPUT - SEC. 11
28-34
PATCH - BANKS - SEC. 12
35
BACK PANEL - SEC. 13
36
GLOSSARY - SEC. 14
37-40
MIDI DOCUMENTATION - SEC. 15
41
TROUBLESHOOTING - SEC. 16
42-43
SPECIFICATIONS - SEC. 17
44
LEGAL - SEC. 18
3

LIMITED WARRANTY TERMS AND CONDITIONS
This Limited Warranty applies only to ANALOGIA INC./STUDIO ELECTRONICS products purchased in the United States of
America. Outside the USA, warranty policy and service is determined by the laws of the country of purchase and followed by
our local authorized distributor. A listing of our authorized distributors is available at http://www. studioelectronics.com/shop/
distributors/
ANALOGIA INC./STUDIO ELECTRONICS warrants to the 1st owner of a covered product purchased directly from
ANALOGIA INC./STUDIO ELECTRONICS, or an authorized ANALOGIA INC./STUDIO ELECTRONICS dealer in the US, that
this product will be free from defects in materials and or workmanship for a period of one year from the date of purchase.
Please register this product online via https://studioelectronics.com/register/ to establish the date of purchase (NOT A
REQUIREMENT FOR WARRANTY SERVICE BUT A GOOD IDEA).
To exercise your rights under this Warranty as the 1st owner/purchaser, YOU MUST SHIP THIS PRODUCT IN ITS
ORIGINAL PACKAGING (which we can replace and send to you for $10) at your expense, with proof of purchase
documentation and the ANALOGIA INC./STUDIO ELECTRONICS supplied power adapter, to ANALOGIA INC. An RMA
(Return Material Authorization) number from ANALOGIA INC./STUDIO ELECTRONICS must be obtained 1st before returning
any product. Email RMA requests to [email protected], or call us at (310) 640-3546 to secure an RMA #. Products
shipped to ANALOGIA INC. without an RMA will be refused and returned. Shipping insurance is optional, but highly
recommended.
ANALOGIA INC./STUDIO ELECTRONICS will repair or replace this product at its sole option and at no charge to you for
parts and labor—when deemed necessary and within the warranty period—provided that ANALOGIA INC./STUDIO
ELECTRONICS reserves the right to determine whether the product is “defective” for purposes of this Limited Warranty. This
Warranty does not apply if damage to this product occurs as a result of abuse or misuse, abnormal use or handling, improper
packaging, another product’s interaction, exposure to temperature extremes, or if the product has been altered or modi ed/
customized in any way, or the damage was caused by unauthorized repair or service. The original product must return to
ANALOGIA INC. unaltered.
IN NO EVENT SHALL ANALOGIA INC./STUDIO ELECTRONICS BE LIABLE FOR ANY INDIRECT, INCIDENTAL,
COLLATERAL, EXEMPLARY, PUNITIVE, CONSEQUENTIAL OR SPECIAL DAMAGES OR LOSSES ARISING OUT OF
YOUR PURCHASE OF PRODUCTS AND/OR OUT OF THIS WARRANTY, INCLUDING WITHOUT LIMITATION, LOSS OF
USE, PROFITS, GOODWILL OR SAVINGS OR LOSS OF DATA, MUSIC, ELECTRONIC FILES, OR PREFERENCES
THAT MAY HAVE BEEN STORED BY A USER OF THE PRODUCT, EVEN IF ANALOGIA INC./STUDIO ELECTRONICS
HAS BEEN ADVISED OF THE POSSIBILITY OF SUCH DAMAGES OR CLAIMS, SOME STATES DO NOT ALLOW THE
EXCLUSION OR LIMITATION OF INCIDENTAL, PUNITIVE, OR CONSEQUENTIAL DAMAGES, SO THE ABOVE
LIMITATION OR EXCLUSION MAY NOT APPLY TO YOU.
This Limited Warranty and the right of replacement is in lieu of any and all other warranties—which you hereby waive—and it
gives US purchasers specific legal rights. You may also have other rights which vary from State to State.
ANALOGIA INC., 530 West Palm Ave. El Segundo, CA 90245"
4

1SAFETY ESSENTIALS
!
Warnings, Precautions, and Advice
WARNING! - When using electric products basic precautions should always be followed to avoid the possibility of
serious injury or even death to you or others, as well as damage to the device or other property from electrical shock,
re, or other risks. These precautions include, but are not limited to, the following “to do” list
• Read, save, and understand all of the instructions before using product.
• Do not use product near any water source—such as a bathtub, wash basin, kitchen sink, or swimming pool.
• Clean with a soft, dry cloth with unit unplugged from AC outlet.
• This product, either alone or in combination with an amplifier and headphones or speakers, may be capable of
producing sound levels that could cause permanent hearing loss. Do not operate for a long period of time at a high
volume level or at a level that is uncomfortable. If you experience any hearing loss or ringing in the ears, you should
consult an Audiologist.
•Do not place anything heavy on the instrument.
•The product should be situated so that its location or position does not interfere with its proper ventilation.
• The product should be located away from heat sources such as radiators, heat registers, or other items that produce
heat.
• Avoid using the product where it may be affected by dust or hot sunlight.
• Make sure the line voltage in your location matches the input voltage specifications on the DC power adapter.
• Mute channel volume before making audio connections to prevent malfunction and speaker damage.
• Unplug power supply cord from outlet when not in use for an extended period.
• Do not trample the power supply cord, trip over it, or pull at it; grasp the plug portion when unplugging.
• Care should be taken so that objects do not fall and liquid is not spilled into the enclosure through openings.
• Protect the unit from strong jolts and vibration and never apply strong pressure to the front, back or side panels, or
strike them in any manner.
The product should be serviced by qualified service personnel when:
a) The power supply cord or the plug has been damaged."
b) Solid objects or liquid either have fallen or spilled into the product."
c) The product has been exposed to rain."
d) The product does not appear to operate normally or exhibits a marked change in performance."
e) The product has been dropped, or the enclosure is damaged.
• Do not attempt to service the product beyond that described in the user maintenance instructions. All other servicing
should be referred to qualified technicians.
5
DANGER! INSTRUCTIONS RELEVANT TO RISK OF FIRE, ELECTRIC SHOCK, OR INJURY TO PERSONS:
Do not open the chassis. There are no user serviceable parts inside. Refer all servicing to qualified personnel only.
• Mute channel volume before making audio connections to prevent malfunction and speaker damage.
• Unplug power supply cord from outlet when not in use for an extended period.
• Do not trample on the power-supply cord, trip over it, nor pull at it, but grasp the plug portion when unplugging.
• Care should be taken so that objects do not fall and liquid is not spilled into the enclosure through openings.
• Protect the unit from strong jolts and vibration and never apply strong pressure to the front, back or side panels, or
strike them in any manner.
GROUNDING INSTRUCTIONS: This product must be grounded. If it should malfunction or break down, grounding
provides a path of least resistance for electric current to reduce the risk of electric shock. This product is equipped with
a cord with equipment grounding conductor and a grounding plug, which must be plugged into an appropriate outlet
that is properly installed and grounded in accordance with all local codes and ordinances.
DANGER! Improper connection of the equipment grounding conductor can result in a risk of electric shock. Check with
a qualified electrician or serviceman if you are in doubt as to whether the product is properly grounded. Do not modify
the plug provided with the product. If it does not t the outlet, have a proper outlet installed by a qualified electrician.
SAVE THESE INSTRUCTIONS!"
6

2UNPACKING & INSPECTION
!
Check the contents of the shipping carton. Be careful when unpacking your Midimini to insure nothing is missing or
damaged. Save the carton and packing materials for possible factory calibration or repair issues in the future.
SE-3X ships with the following items:"
1. IEC power cord"
2. User Manual"
3. SE Sticker
3SETUP, CONNECTIONS & CARE
!
WHAT YOU WILL NEED
1. A clean and sturdy surface where you can set your SE-3X ."
2. A properly grounded AC outlet supplying 115 Volts to 240 Volts AC; 50/60 Hz."
3. One 1/4 Inch (TS) Male Instrument Cable, and means of amplification or monitoring: there is no headphone
connection.
POWER !
Plug the included IEC cable’s female end into the IEC power jack on the back of your SE-3X , and then plug the male
end of the cable into an AC outlet. The SE-3X’s auto-switching regulated supply will operate properly on either 115
volt or 240 volt AC line voltage.
NOTE: Allow SE-3X 5-10 minutes to warm up before use, as it is an Analog Instrument. If the unit has been
subjected to temperatures under 60 degrees for an extended period, optimal oscillator tuning and stability may
require 15-20 minutes of warm-up time, during which time you could dig deeper into this manual. Avoid operation
in direct sunlight.
AUDIO OUTPUT!
With the CONTROL VOLUME knob turned to 0, plug one end of a 1/4” instrument cable into the Audio output and
the other end of the cable into your mixer, amplifier, or audio interface. Adjust VOLUME to desired level.
NOTE: The AUDIO out jack is TS and TRS 1/4” cable compatible.
CARING AND CLEANING!
Clean the ‘3X with a soft, nearly dry cloth only; do not use solvents or abrasive detergents. The semi-matte finish is
unique and requires thoughtful handling and maintenance—like anything of beauty; it’s a luxury finish to be sure.!
7

4REGISTRATION
!
Registering your SE-3X synth creates a handshake between owner and manufacturer, insures access to Analogia Inc.
tech. support, warranty service, product updates, and if desired, promotional offers. As always, our Facebook,
SoundCloud, and Instagram outlets are current and generally helpful, so swing by.
8

5FEATURES & CONTROLS
!
The SE-3X brings paraphonic expression to the “‘1X” monophonic rackmount analog classic; we didn’t stop there.
SOFTWARE
•Paraphonic Mode: for easy and electric '3X chords and colors
•Front Panel Control for Oscillator 2 & 3 Fine Tune
•Front Panel Control for Oscillator Levels
•LFO Gate from our BOOMSTAR / MIDIMINI V30
•LFO Gate Tempo Hold: rate stays steady during program changes
•SE-02 Envelope Routines with their Cleaner Attack & Decay Stages + Original Linear & Magical Quasi-Exponential ENVs
•Exponential Glide Routine from the OMEGA & '1X Linear Glide
•New Front Panel Screen Jumps & Shortcuts
•Last Patch Used Recall on Power Recycle"
HARDWARE
• Two fuzz modes: 70s & 90s. Front panel switchable."
• RESONANT FILTER COLLECTION: Four filters, six modes: 24 dB MINI; 24 dB ARP; 24dB, 6dB, “Mix Mode” JUNO/JUPITER.
SEM remains the built-in filter. Front panel switchable.
FRONT PANEL LAYOUT
PROGRAMMER, CONTROL, MOD, OSC BANK, FILTERS, ENVELOPE GENERATORS.!
9

6TIM CASWELL SPEAKS
!
Maiden Rock, WI 5-25-2021
The SE-1 was Studio Electronics’ first original product. We had spent several years adding MIDI, doing mods, and rack-
mounting older synths. By 1991, we were ready to create our own product. Based largely on the MiniMoog, but
incorporating many features from other classic Analog synths, it stored 255 patches and had extensive MIDI control;
quickly it greased & boomed the bottom and wormed its way to the top on a multitude of hit records, soundtracks,
video games, and touring racks.
After making it for 10 years or so and getting a lot of customer requests, we decided a major update was in order. The
original ROM chip that held the operating system was full, so we designed a new CPU board, using a much larger Flash
chip which enabled updating the OS over MIDI. Other standouts included 4 banks of 128 ROM patches, 4 RAM banks
(an upsized battery-backed SRAM chip made that possible), and a CV generator boost to produce smoother envelopes
and LFOs. The pot reading was greatly improved as well, making that vital programming aspect much faster and
smoother.
We continued to sell them for another 10 years...
In 2020, we got a request from one of our top dealers and good friends, Lewis Chiodo at Awave, to make a second
special '1X model for him. In addition to the custom hardware he wanted—2 extra VCFs, ARP & “Juno”—he wondered if
we could include some potent software updates too. At first I declined, since I hadn't been working with the Motorola
(now Freescale) chip that ran it for several years, added to that, my development system for it didn't work anymore.
After some persuasion, however, I decided to try. Progress was painfully slow at first, but I was eventually able to put it
all together, with the usual optimistic and determined circuit-bending assist from Greg St. Regis.
The SE-3X… Hard to believe it was nearly 30 years ago the SE-1 helped the world to play… TC
MY SOFTWARE NOTES:
1. The exponential glide routine from the Omega. Now you can choose that or the original linear glide.
2. The Omega/CODE Envelope routines. These show up as EXP2 in the Envelope window; this is in addition to the
original linear and magical quasi-exponential Envelopes.
3. Page 2 Mix knobs for the Oscillators. Due to space restrictions, the SE-1(X) didn't allow direct control, requiring
navigating to the Audio Mixer page for tweaks—tedious. Now holding Shift and using the Pulse Width pots to adjust
Oscillator mix levels brings balance and satisfaction.
4. OSC 2 & 3 Fine Tune: Hold Shift and rotate 2 & 3 Frequency knobs. Another useful and efficient jump-cut.
5. LFO Gate from our Boomstar and Mini V-30. A venerable and most funky feature from the ARP Odyssey and 2600;
LFO 3 can now gate the Envelopes: hold Shift and press LFO 3, or send it CC #9. MIDI sync applies, of course when
received. Will maintain tempo and effect once engaged when scrolling (with Q dial) through patches.
6. Lastly for spice and “poly” nice-nice, Paraphonic Mode: This allows the 3 oscillators to be played by 3 different MIDI
notes, for easy and electric 3X chords. All 3 oscillators still go thru the same VCF and VCA, so it's not truly polyphonic,
but with some care and creativity in programming, it can sure seem/swing like it. Check out Marc St. Regis’ demos to
see just how warm and snappy it can sound: https://soundcloud.com/studio-electronics/sets/se-3x
p.s. Last patch recall now happens upon power recycle.!
10
7FRONT PANEL
!
"
11
FRONT PANEL pg. 2
!
!
12
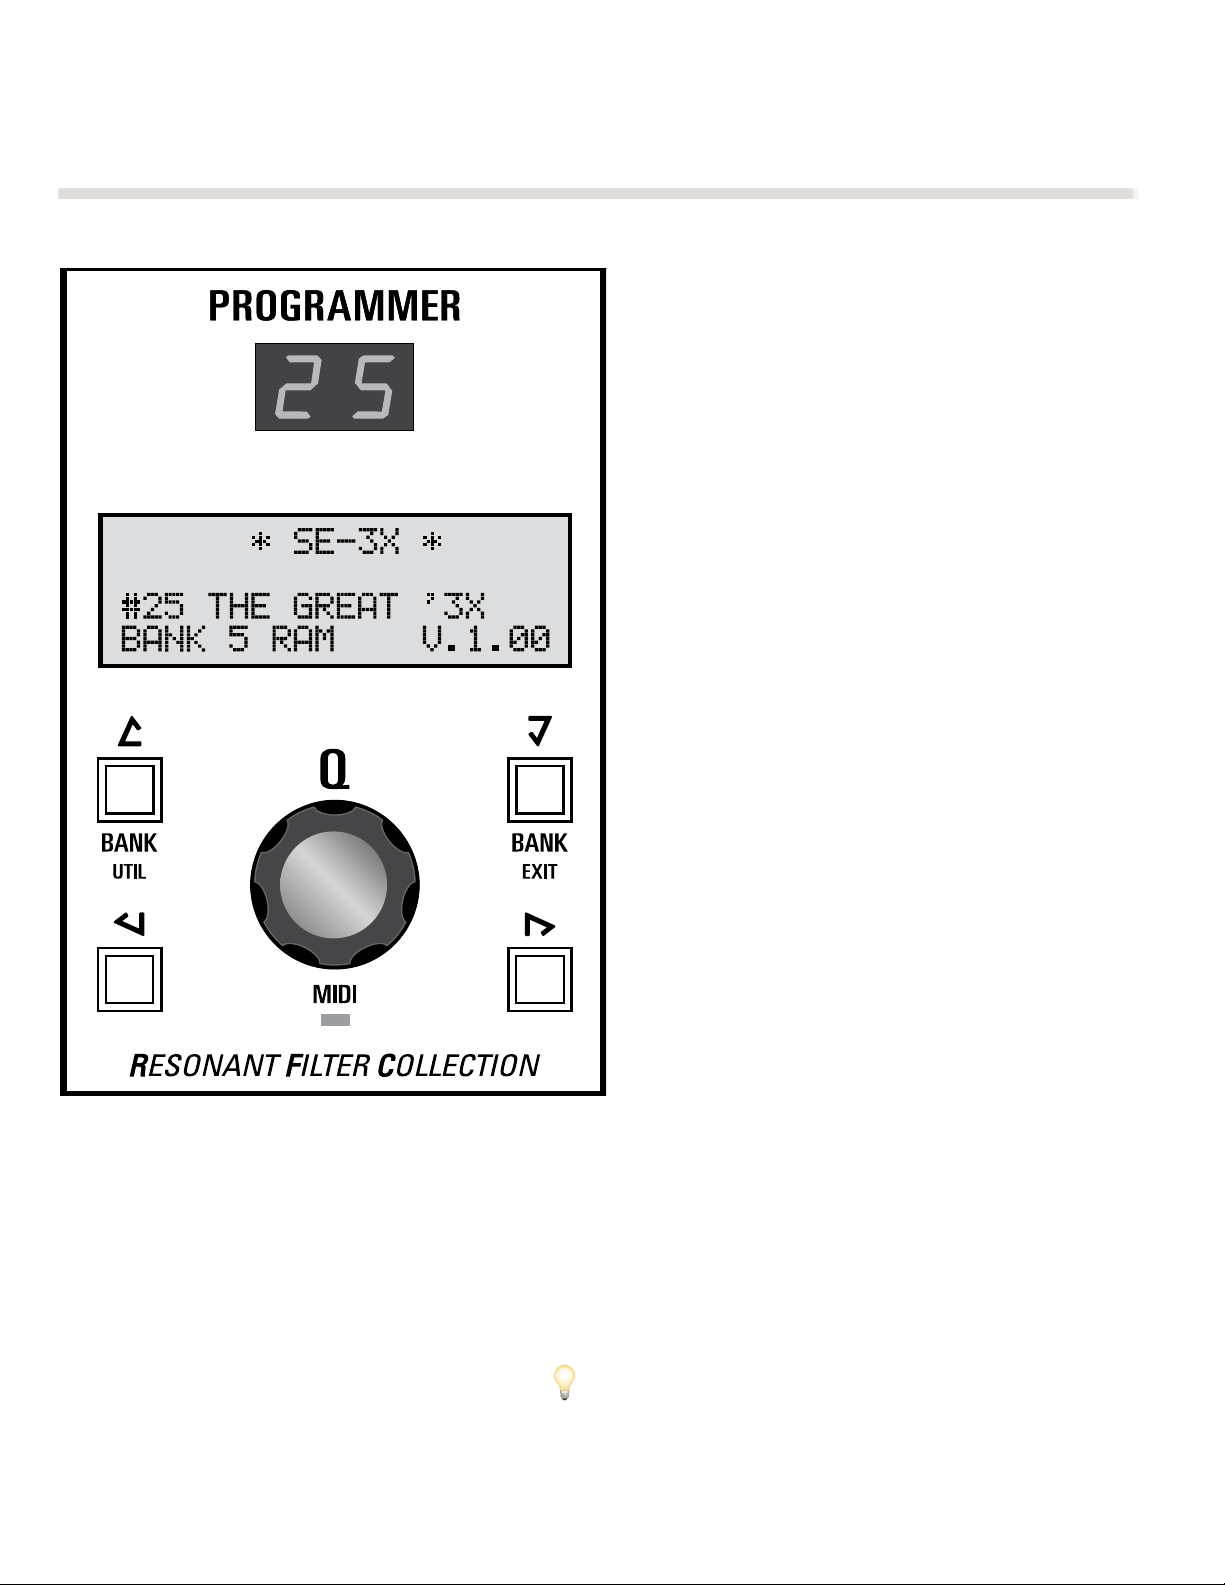
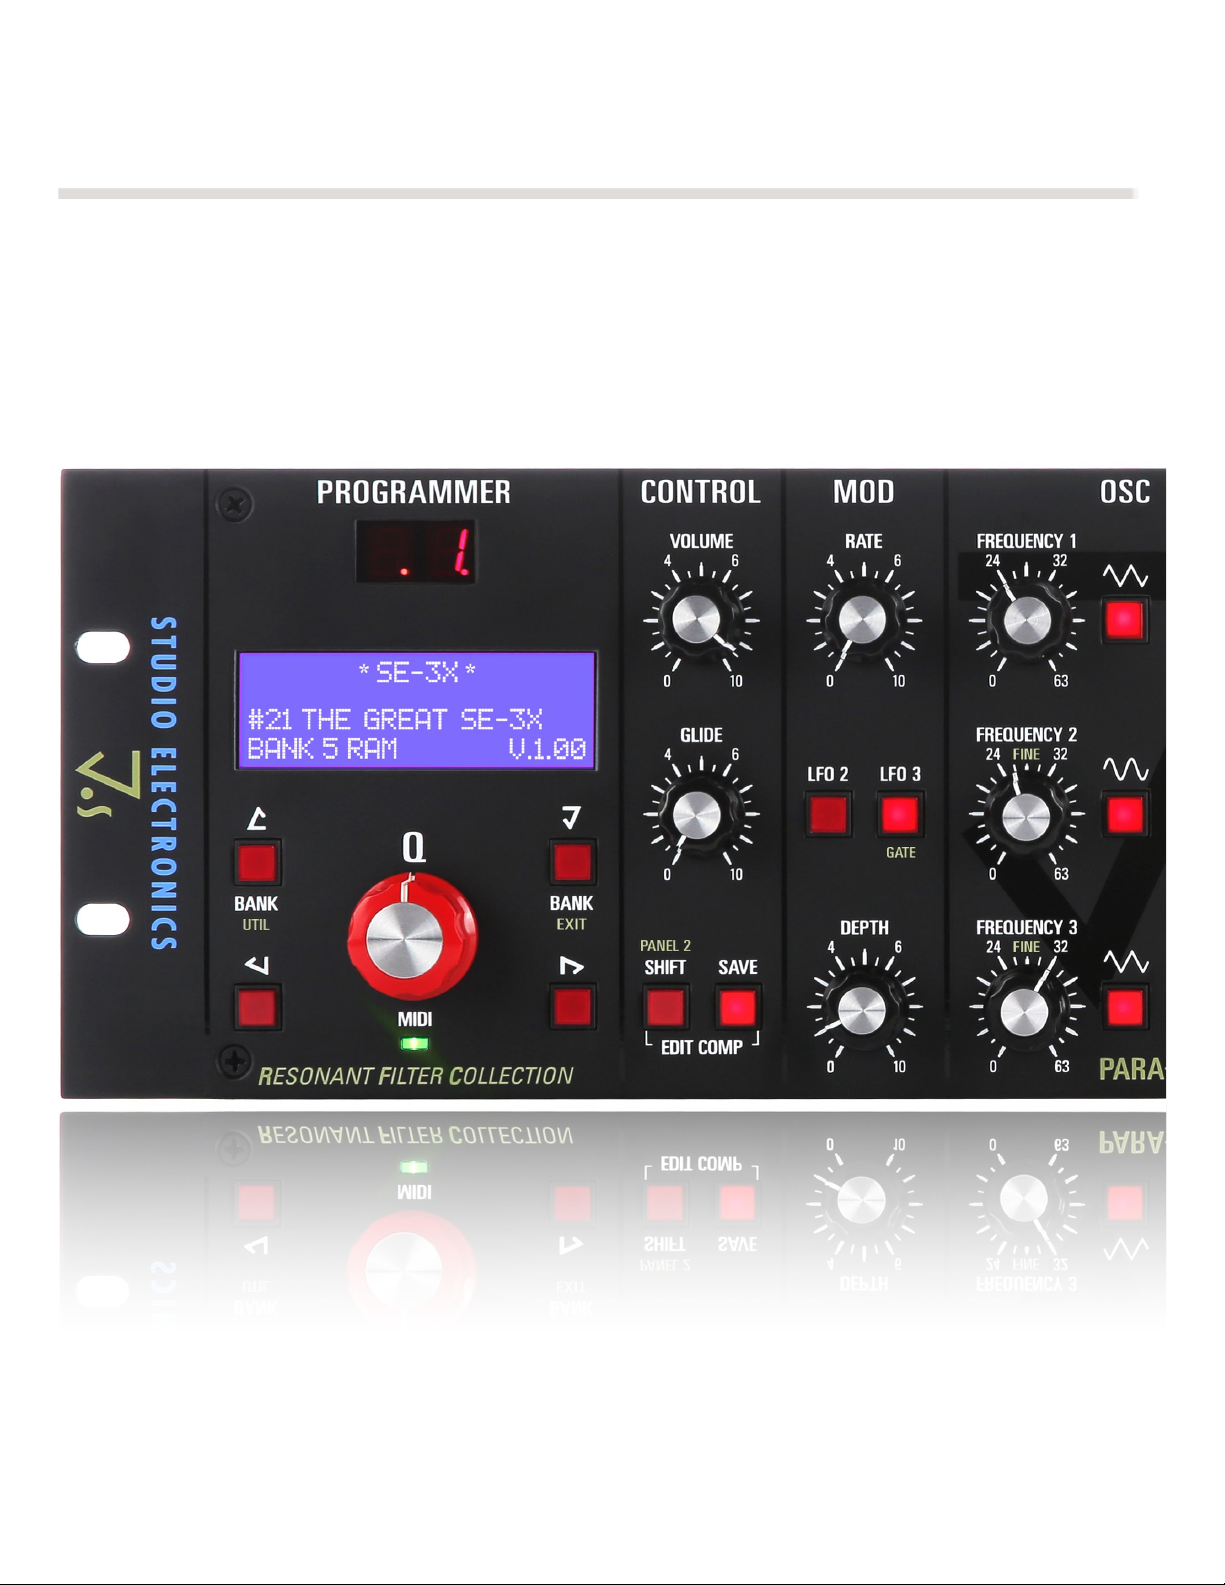
7a PROGRAMMER
!
Change the Channel Already
From basic patch info, to “deep into the weeds” values
and destinations settings… the place to find your voice.
LITTLE RED LED
Displays Patch # and edit state: 2 periods indicate
saved patch is in the process of being changed.
LCD PATCH & PARAMETER BLUE!
Displays patch number/name and destinations/values
when modified knob or switch setting is linked to an edit
page. Current OS shown on bottom right.
ARROW KEYS / BANK & PANEL 2 SHORTCUTS"
Up/down arrows select 1 of 8 banks: 4 ROM, 4 RAM; left/
right arrows and Q dial select 1-99 patches. In an edit
page, the arrow keys position the cursor into the
accessible, desired field. When periods appear patch has
been edited, temporarily stored in the edit buffer.
Pressing and holding SHIFT, while rotating the Qdial
or pressing left and right arrow keys, will scroll
through edit pages/windows; pressing and holding
SHIFT (PANEL 2) and UTIL will access PANEL 2
functions, displaying the MIDI CHANNEL/MEMORY
PROTECT/SYSX page for UTIL. SHIFT + EXIT clears all
edits and returns to the Patch Name page.[SAVE +
SHIFT… still operative?]
Q DIAL!
Spin to select patches or adjust parameters inside an edit
page: enter edit pages from an unedited patch by pressing and holding SHIFT and rotating encoder in either direction,
or skip the Q Dial and press and hold SHIFT and tap any of the arrow keys.
MIDI LIGHT!
MIDI signal receive indicator; also flashes LFO Gate tempo and trigger when GATE mode is enabled (PANEL 2 + LFO3)
[See 7c MOD: GATE]!
13
* SE- 3X *
# 25 THE GREAT 3X
BANK 5 RAM V. 1. 00
* SE- 3X *
# 25 THE GREAT 3X
BANK 5 RAM V. 1. 00
2 5
💡Holding SHIFT and pressing the left arrow twice, from an unedited
patch, will fly you to the MIDI Channel page.

7b CONTROL
!
Let it Begin with You
The ‘3X doesn’t go to 11, but it will feel like it, especially with the just the right dab of glide.
VOLUME
Sets the final gain stage.
GLIDE
Sets the Glide— a seamless, continuous shift in pitch when transitioning from one
semitone to the next. The GLIDE knob determines the amount of time taken between
notes: 0 = off, 10 is maximum. A familiar feature on early monophonic synthesizers.
Choose between LIN: linear, or EXP: a more dramatic and Tim Caswell-favored
exponential experience.
SHIFT / PANEL 2
Pressing and holding SHIFT while rotating the Qdial, or pressing the left and right arrow
keys, will scroll through edit pages/windows in the LCD; pressing and holding SHIFT
(PANEL 2) and the switches labeled with green text: UTIL, EXIT, GATE, PARA will access
those PANEL 2 functions, displaying the MIDI CHANNEL… edit window for UTIL, and the
GLIDE… window for PARA. PANEL 2 + rotation of the OSCVOL pot opens the AUDIO
MIXER window; PANEL 2 + rotation of the FINE pot, the TUNING window.
SAVE
Commits edits to RAM location. Pressing this button once will initiate "SAVE TO". Use
BANK, left /right arrow keys, or encoder to select RAM bank and patch #, then press SAVE
again to complete. Pressing SHIFT following SAVE will exit the SAVE function and restore
the blessed factory patch.
EDIT COMPARE
Pressing and holding SHIFT and then pressing SAVE enters EDIT COMPARE: do you like
the new you—wild & willful edits you have made to the ‘3X’s analog sound? Find out!
Repeating that switch pattern returns you to your programming, always with the option to
discard: SHIFT/EXIT rotate encoder forward and back to clear, or save your body of work for future generations.!
14
💡ROM patch edits must be saved to RAM locations; the SAVE button,
once depressed, will remain illuminated and ineffectual until a RAM spot
is selected, or SHIFT is pressed to exit saving process.
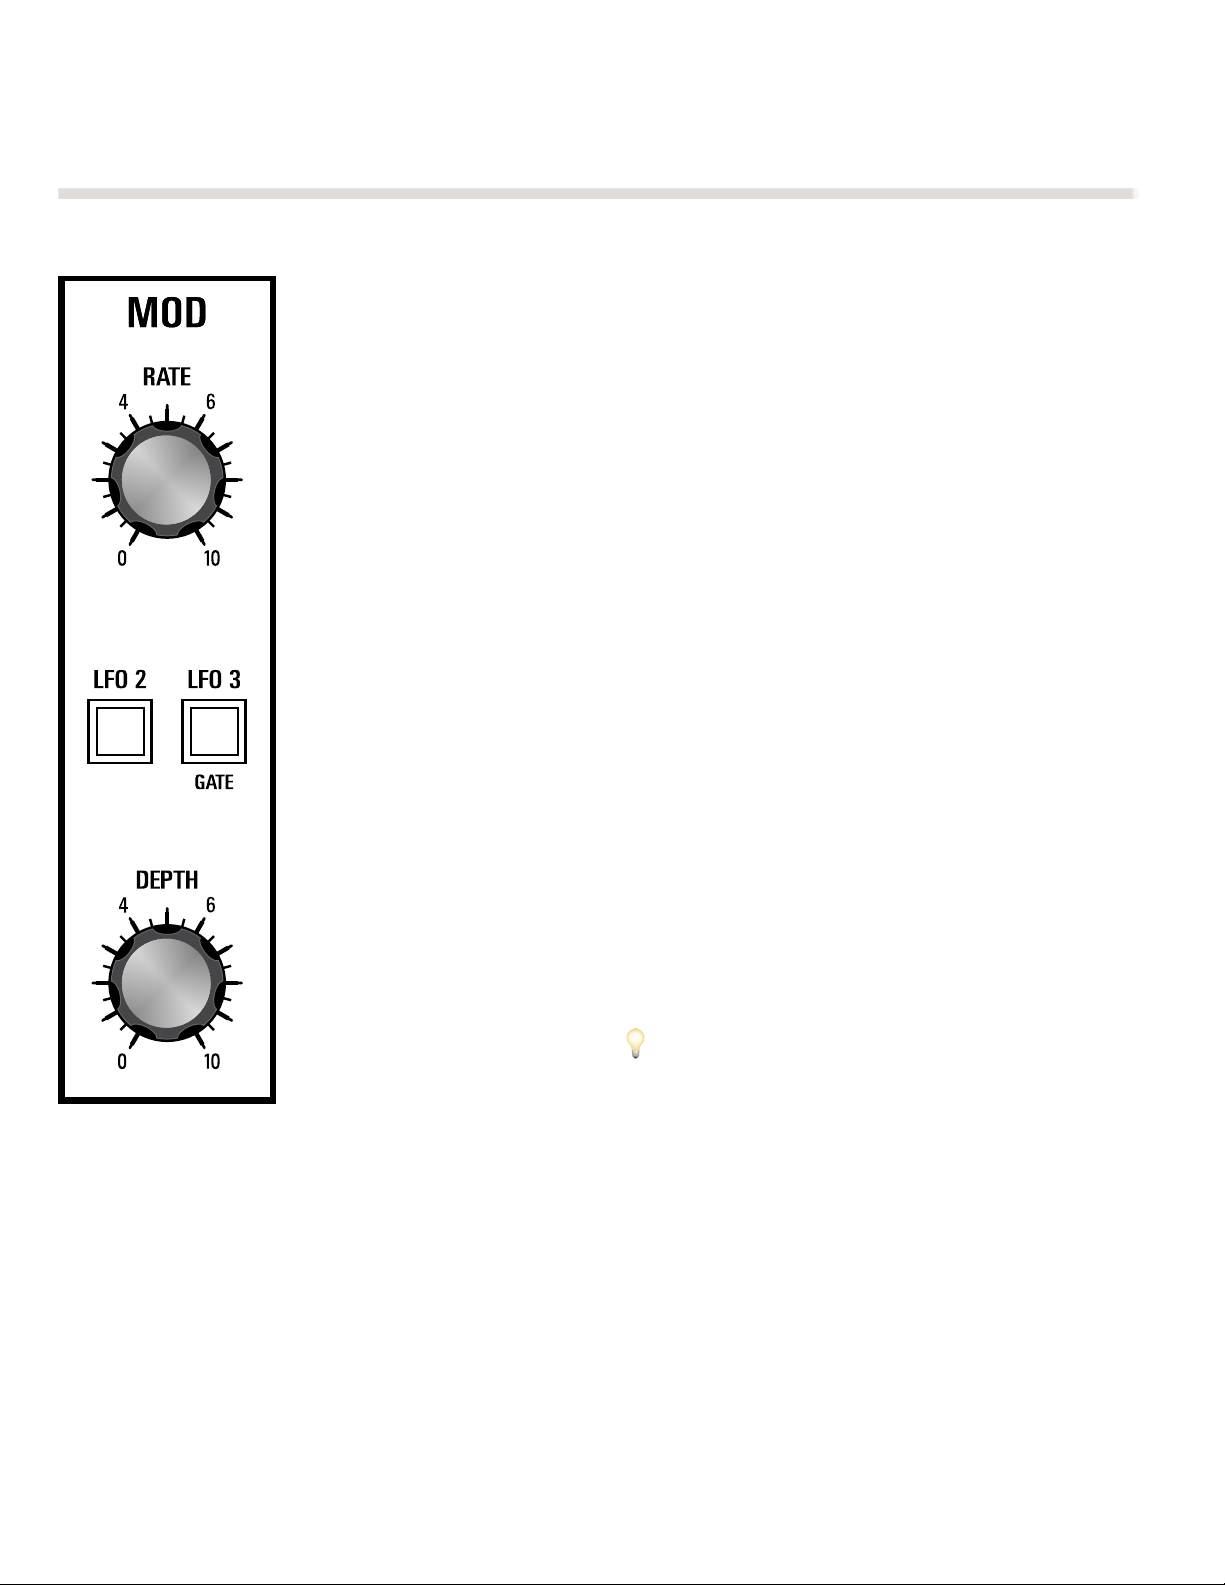
7c MOD
!
Movement Never Sounded so Good
Modulation is the use of a control signal to create an often repetitive pattern of pitch, level,
or harmonic and rhythmic content changes, infusing sound with movement, color, and
intriguing unpredictability, where random circuits or calculations are involved. If a simple but
lovely vibrato is all that is needed, so be it. Keep it plain preacher.
RATE
Adjusts the speed of LFOs 1 - 3. Each LFO being independent, can be set at a different rate.
[lock to clock rates?]
LFO2
When this switch is lit, RATE and DEPTH controls affect LFO2.
LFO3
When this switch is lit, RATE and DEPTH controls affect LFO3.
GATE
Pressing and holding PANEL 2 (SHIFT) and then pressing GATE (LFO3) directs Low Frequency
Oscillator 3 to trigger the gate of ENV1—filter envelope and ENV2—amp envelope. Amounts
can be adjusted in MOD area; sending CC #9 works too. MIDI sync applies, of course. [?]
Duplicate button press sequence to disable GATE effect and return to your regularly
scheduled programming.
DEPTH
Adjusts the amount of the selected LFO.!
15
💡Wait… wait… So how does one address LFO1? Best
dumb sounding correct answer: When neither switch is on
LFO1 is in line for adjustments.

7d OSC BANK
!
Oscillations Creative
Oscillators are the biogenesis of Analog synthesis,
producing periodic or regularly repeating waveforms
—familiar pitched sounds when in the right range.
Tuning controls alter the frequency or pitch of the
oscillators, whereas wave shape selectors, Pulse
Width, and Sync controls shape the harmonic
spectrum of the signal, its basic timbre, or tone
color.
Waveform Characteristics
Triangle: Fluty, with odd harmonics like the Square
wave, but its amplitude is quite weak in comparison
to its fundamental. The Triangle possesses more
brilliance than the similarly shaped sine.
Sawtooth: Bright, buzzy, brassy—the richest
harmonically—containing both even and odd
harmonics of the fundamental frequency. A very
smooth tone is yours with a low-pass filter on tap.
Square: In its even state, it is a full bouncy sound—
a bass beast for many. Near the edges of its duty
cycle, or width, the beloved becomes a “clavi,”
reedy, nasal affair, with odd harmonics only. The
(wide rectangle) introduces even numbered
harmonics changing the overall harmonic mix. The
(narrow rectangle) hypes lower numbered harmonics
—both odd and even.
FREQUENCY 1, 2, 3
Controls the pitch of each oscillator. Stepped (quantized) in semi-tones over a five octave range.
FINE 2, 3
Controls the fine tune of oscillators 2 & 3. PANEL 2 FINE tune shortcut: Press and hold PANEL 2 (left bottom of
CONTROL section) then rotate FREQUENCY 2 / 3.
WAVEFORM SWITCHES
Triangle, Sawtooth and Pulse Waves can be selected individually or combined for more complex shapes.
PARA
Allows the 3 oscillators to be played by 3 different MIDI notes; all 3 oscillators share the same VCF and VCA, so it's not
truly polyphonic, but with some care and creativity in programming, or even live playing, fancy colors and engaging
16

rhythms can surprise and even exceed expectations. Always starts with OSC1 and cycles through 2 & 3, “remembering”
notes played: more obvious with longer release times. Faux Prepared mode—each mode a different synth ala the
Omega 8—can be expressive, with different waveforms settings, independent LFO modulation, ENV3 & 4 contouring,
and competing & complimenting Pulse Width movement for starters. Keeping it basic and uniform is effective too.
Paraphonic Mode Shortcut: Press and hold SHIFT (left bottom of CONTROL section) then press PARA. Edit window will
open with PARA option selected. Paraphonic Mode is a ‘3X NOTE PRIORITY option (LOW, HIGH, PARA, LAST) located at
the bottom of the GLIDE / NOTE PRIORITY PAGE.
SYNC 2, 3
Forces the pitch of OSC2/3 to follow the pitch of OSC1 in hard synchronization, so that OSC2/3 will tune only to the
harmonic frequencies of Oscillator 1. Intermediate frequencies of OSC2/3 will produce almost digital sounding
“metallic” wave shapes and timbres; both Oscillators sharing the same base frequency makes it all possible.
Pulse WIDTH 1, 2, 3 Sets the width of the Square waveform, ranging from wide, square rectangular forms to narrow,
nasally tall skyscraper-like shapes. A classic Square wave dials in at ‘round about a 12 o’clock knob setting, for that
wonderfully warm and yet hollowed-out, rubbery bass tone and Lou-reedy lead.
OSC VOL 1, 2, 3
Sets the mix levels for OSC’s 1, 2, 3. Oscillator Volume Shortcut: Press and hold SHIFT (left bottom of CONTROL
section) then rotate Pulse WIDTH/OSCVOL pot; the LCD display will jump to the AUDIO MIXER page.
!
17
💡Not all green panel shortcuts are created equal—connected to LCD
edit windows—just UTIL (utility) and PARA (paraphonic mode).
💡Use sync feature in conjunction with Envelopes 3 and 4 assigned to
SWP2, or SP3, for subtle and dramatic harmonic filtering effects.
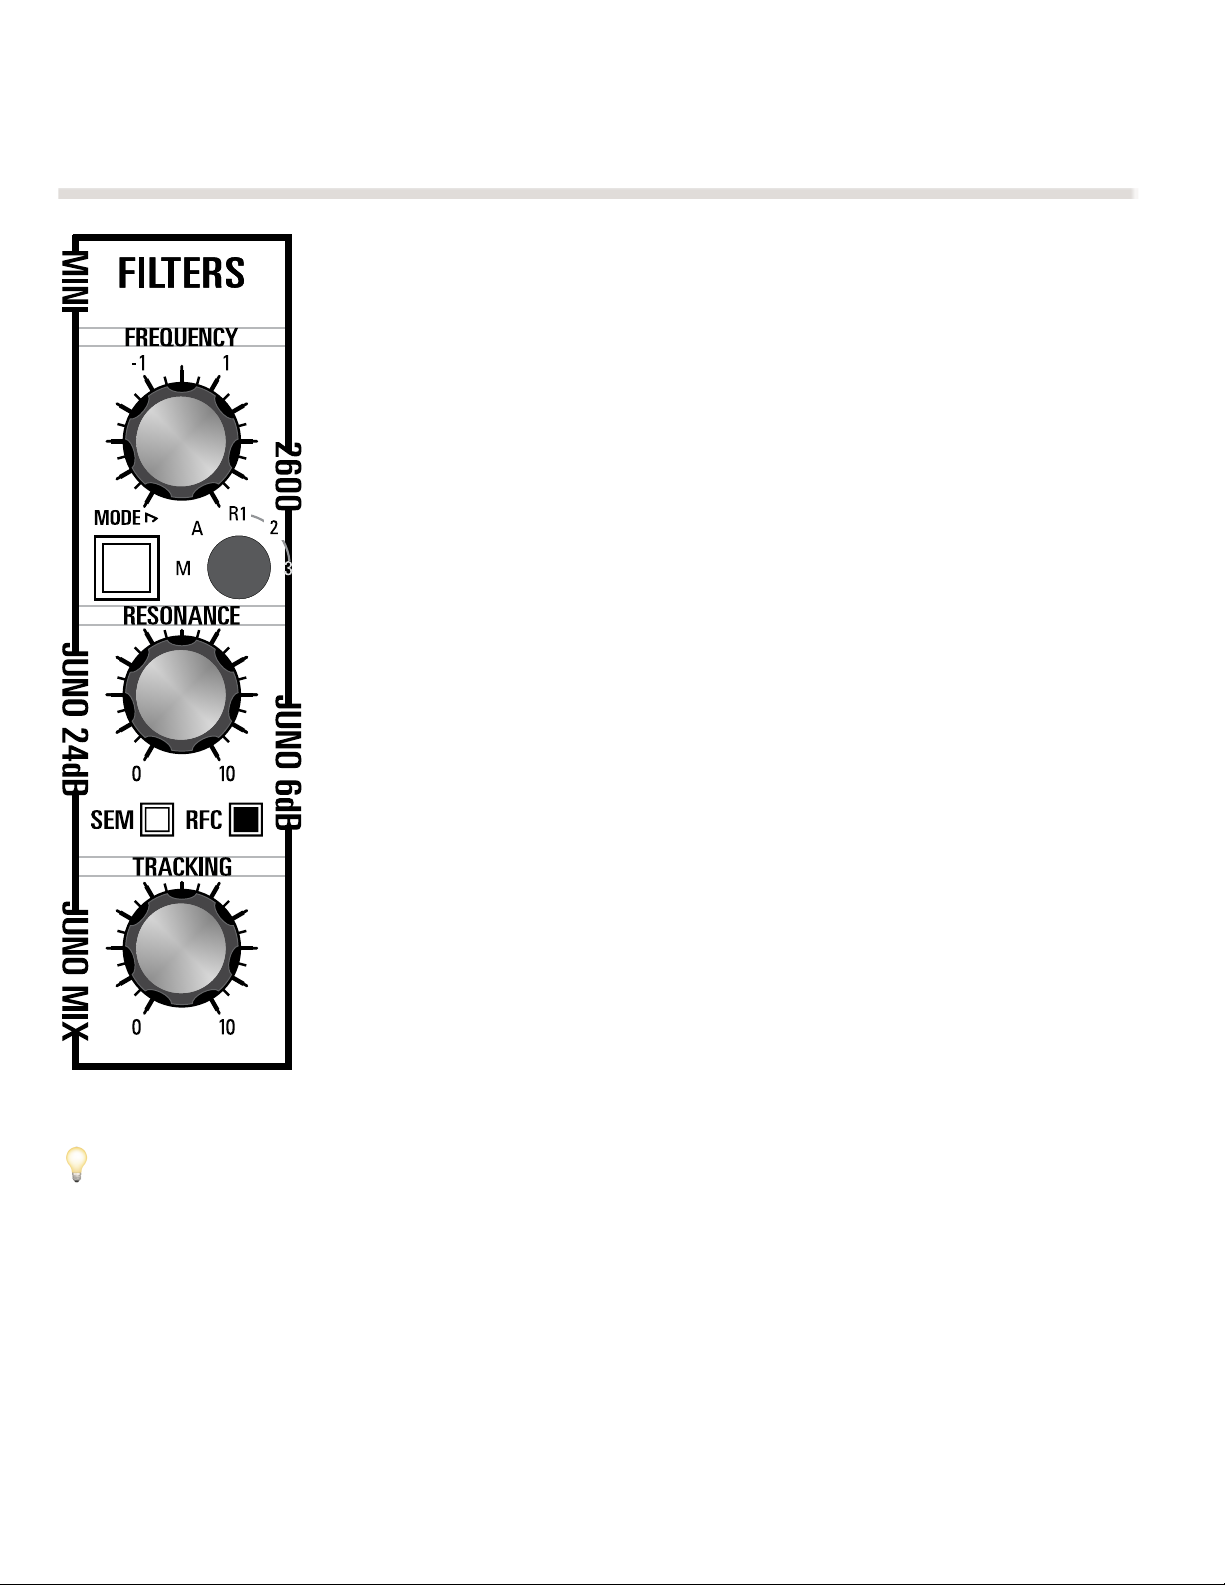
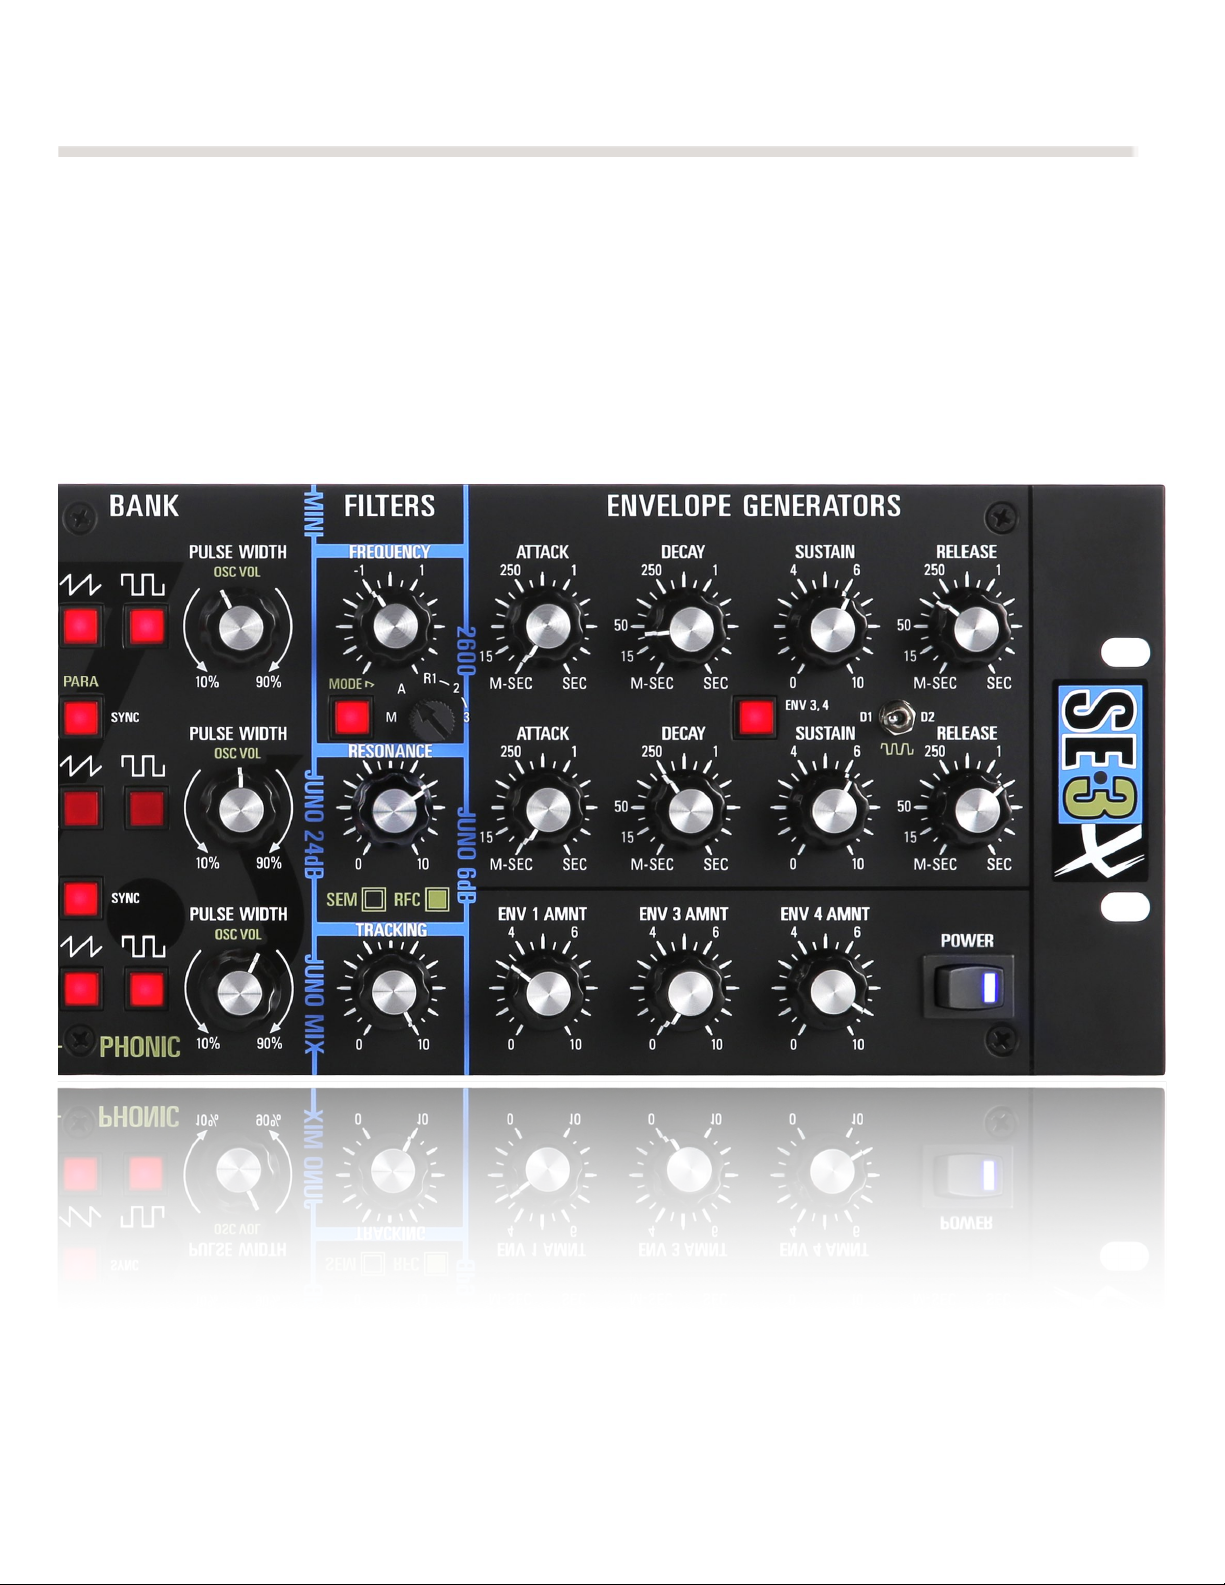
7e FILTERS
!
Resonant Filter Collection (and still SEM after all these years)
3 Classic Resonant Hardware Filters: MINI, 2600, Juno: 24dB, 6dB & Mix—a customized
blend of the Juno types. Put them to work in Paraphonic Mode and behold the Glory.
FREQUENCY
The lower the cutofffrequency, the less harmonic content the waveform will retain after
passing through the filter. A wave shape rounding and smoothing also occurs as this
cutofffrequency is reduced. Play, sequence, trigger a note, and harmonic content
produced above the cutofffrequency is reduced by the filter on a 24/12/6dB per Octave
slope; MIX Mode, which resembles a bandpass meets hipass meets band reject filter,
features a slope value of great mystery and suspense.
MODE SWITCH & MINI POT
When the MODE switch is pressed/lit the rotary switch setting determines the Resonant
Filter in circuit: Mini, ARP™ (2600), and the 3 Roland™ (Juno) modes. Unlit, the boxy,
boomy SEM filter of “Basic Record” built into the voice board is working its 12 dB alchemy."
Frustration Reducer: Hardware Resonant Filter setting not saved with patch data.
RESONANCE
The resonance, or “Q,” emphasizes, or boosts the cutofffrequency region, making the
presence of harmonics more apparent. Self-oscillation for our Resonant filters happens
when the knob passes the 3 o’clock position, resulting in a pure sine wave—use as a
separate unique tone source; it will track reasonably well over several octaves with
TRACKING at 10. Resonance is in fact positive feedback—a ubiquitous and signature
sound of subtractive synthesis. Note: The SEM filter does not self oscillate.
TRACKING
Applies keyboard CV (control voltage) to the filter. The more tracking used, the brighter
the sound will get as you ascend the keyboard. Maximum tracking is 1 v/octave.
18
💡Why all these filters (Maestro Greg St. Regis is asking you)?
The Resonant Filter Collection is a rich representation of history's most popular subtractive synthesis discrete filters: the creamy,
boomy depth of the Mini, the grunge and mid-range character of the 2600, and the clean crisp energy & resonance snap of the
8106, with its 6db and 24db outputs—those two additional modes combine in MIX (#3) for a snarl and bite you’ll soon wonder how
you lived without ;) There are mainly subtle differences between the Mini, ARP, and 8106 (Juno/Jupiter), but it is in the subtlety
wherein lies the magic. They all benefit from three discrete warm oscillators flowing through their circuits to pass, ultimately,
through a dual stage MiniMoog VCA, adding its own unique vintage coloration. Press all three Oscillators and waveforms into
service; push the resonance settings into chirp nirvana… a myriad of soul-calming, energizing harmonic timbres will come for you.
Switch in the overdrive, either soft or hard, for perhaps the most satisfying part: rich full bodied harmonic distortion/saturation
that pumps sub-harmonics and compresses sagely. The SEM filter is always there for you to take a break from that resonance life
and go lo-mid aggressive and boxy. Five unique authentic filters—there's never a dull moment. In early tests, R3 (the combo mode
of the 8106 filter) is turning out to be a fan favorite. What will be yours?
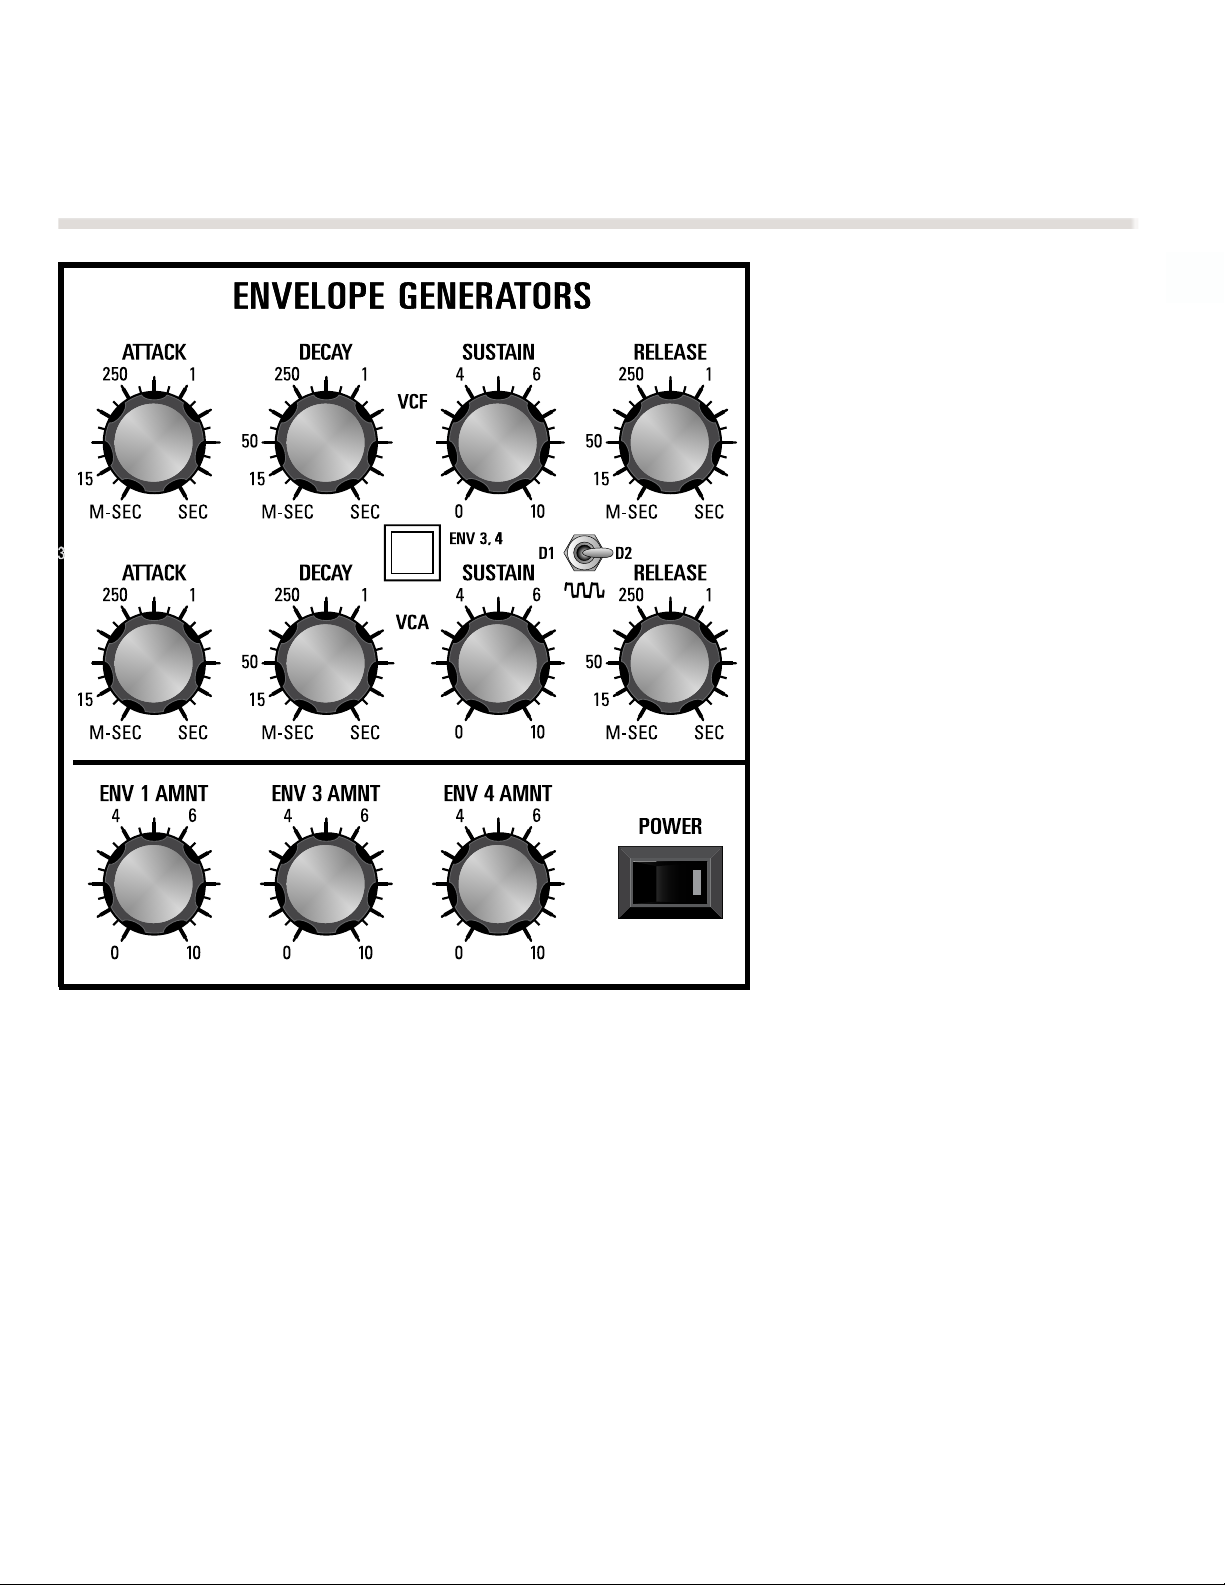
7f ENVELOPE GENERATORS
!
Shapers up & Fly
Right
FILTER ENV SERMON: The Filter envelope
shapes the timbre and overtone content
of the audio signal as it flows from the
circuitry of the mixer. This envelope or
contour generator is used to dynamically
move the cutofffrequency. It works as
such: Each time a note or noise is
triggered, an envelope or contour
generator attached to the Filter’s cutoff
frequency is actuated, and sending a
control signal to the filter; the control
signal rises at one rate: attack, falls at a
second rate: decay, levels out to a certain
point: sustain, a steady control voltage as
long as the gate or note is maintained,
finally falling offand vanishing at a third
rate: release, upon surrender of gate, or
fingers generally (though noses have
been employed when digits “run dry”).
ATTACK (VCF)
Sets the FILTER Attack time. The ATTACK
time determines the initial segment of
the envelope. The frequency at which the initial contour begins is determined by the FREQUENCY (filter) setting, while
the peak which it reaches is determined by the FREQUENCY and ENV1 AMNT amount settings combined.
Incrementing the ATTACK knob with a healthy ENV1 AMNT amount, from 1 m-sec to approximately 10 seconds, will
result in the brightness of the sound increasing sharply and dramatically at 1st, and then more gradually as the ATTACK
time lengthens.
DECAY (VCF)
Sets the FILTER DECAY time. DECAY time determines the duration of the second segment of the envelope, i.e., the fall
from the ATTACK peak to the SUSTAIN level. When repeatedly triggering a note/noise and increasing the value with a
robust ENV1 AMNT amount from 1 m-sec to approximately 20 sec., you will at 1st hear the brightness drop sharply
after the initial ATTACK. This drop will become more gradual as the DECAY time lengthens.
SUSTAIN (VCF)
Sets the FILTER SUSTAIN level. SUSTAIN level determines the filter frequency at which the envelope holds after the
initial rise and fall. The frequency of the SUSTAIN level can be as high as the initial peak, which would override the
19

DECAY stage, or it can be as low as the frequency at which the envelope contour began. SUSTAIN is only
active while a note is held. Note: The 3X’s envelope has a peak slightly higher then the SUSTAIN can reach.
RELEASE (VCF) Sets the Filter RELEASE time. Release is the fourth and final stage of the envelope contour:
after the initial rise and fall of the ATTACK and DECAY times surrender to the SUSTAIN level. RELEASE time
takes effect after key lift, determining the length of time for the envelope generator's output to go from the
SUSTAIN level to zero. Note: If sustain
is set at zero, then the release knob
setting is irrelevant. There is no level
from which the envelope can release.
EV1 AMNT
Sets the depth of Envelope 1 (filter)
modulation amount as it is applied to the
filter FREQUENCY. The shape of the filter
envelope is determined by the contouring
controls ATTACK, DECAY, SUSAIN, and
RELEASE. Our ENV1 draws the
FREQUENCY down, an accidental "feature"
of the MIDIMINI that is decidedly useful
and one of its trademark quirks/strengths!
ENV3, 4 SWITCH (VCA)
Selects auxiliary Envelopes 3 & 4 and
allocates panel knob control to them
Envelope 3 is topmost.
D1 D2 (VCA)
3-way switch toggles between Drive 1 and
Drive 2. Center offposition.
ATTACK (VCA)
Adjusts the length of time for the envelope
generator's output to go from zero level (when key is initially pressed) to maximum level.
DECAY (VCA)
Adjusts the length of time for the envelope generator's output level to go from maximum level to sustain level.
(SUSTAIN) (VCA)
Adjusts the sustain level from zero to maximum. This is a level control, not a time control. Sustain time is determined
by touch. If sustain is set at maximum, then the decay knob setting is irrelevant. There is no level below maximum to
which the envelope can decay.
20
Table of contents
Other Studio Electronics Synthesizer manuals


