STUDIOLUX SLi1000 Service manual

1
MODEL:SLi1000
Installation instructions and manuals
Installation instructions for skilled technicians!
After installation, please hand over the installation instructions to the user.

When using the electronic product, especially in the presence of children, basic safety precautions
should always be followed, including the following. Please read all instructions before use.
1.Do not use while bathing.
2.Do not place or store the product where it may fall or be dragged into a bathtub or sink.
3.Do not place in or drop into water or other liquid.
4.Do not touch the product if it falls into the water, and unplug the power supply immediately.
5.Please keep a close watch when children or disabled persons are using or near the products in use.
6.This product is used only for the intended purpose described in this manual. Do not use accessories
not recommended by the manufacturer.
7.Do not clog the vents of the product, or place the product on a soft surface, such as a bed or sofa,
where the vents may be blocked. Keep the air unblocked and no cotton wool or hair, etc.in the pores.
8.Don't use products while sleeping or drowsy.
9.Do not put or insert any object into any opening or hose.
10.Do not use outdoors or operate where aerosol (spray) products are being used or when oxidated
products are being administered.
IMPORTANT SAFEGUARDS
READ ALL INSTRUCTION BEFORE USING
11.Do not clean the product and power plug with water, it might cause electric shock or damage.
12.Do not disassemble, repair or modify the product, otherwise it might cause fire.
13.Do not stand or put heavy things on the seat, it might cause product damage.
14.Do not throw burning items like cigarette butts into the product, it might cause fire.
15.Do not open or close the cover or seat forcibly, and do not lean on the cover when the product
in use, it might cause product damage.
16.Please note that changes or modifications of this product is not expressly approved by the party
responsible for compliance could void the user's authority to operate the equipment.
2
Installation instructions and manuals
Installation instructions for skilled technicians!
After installation, please hand over the installation instructions to the user.
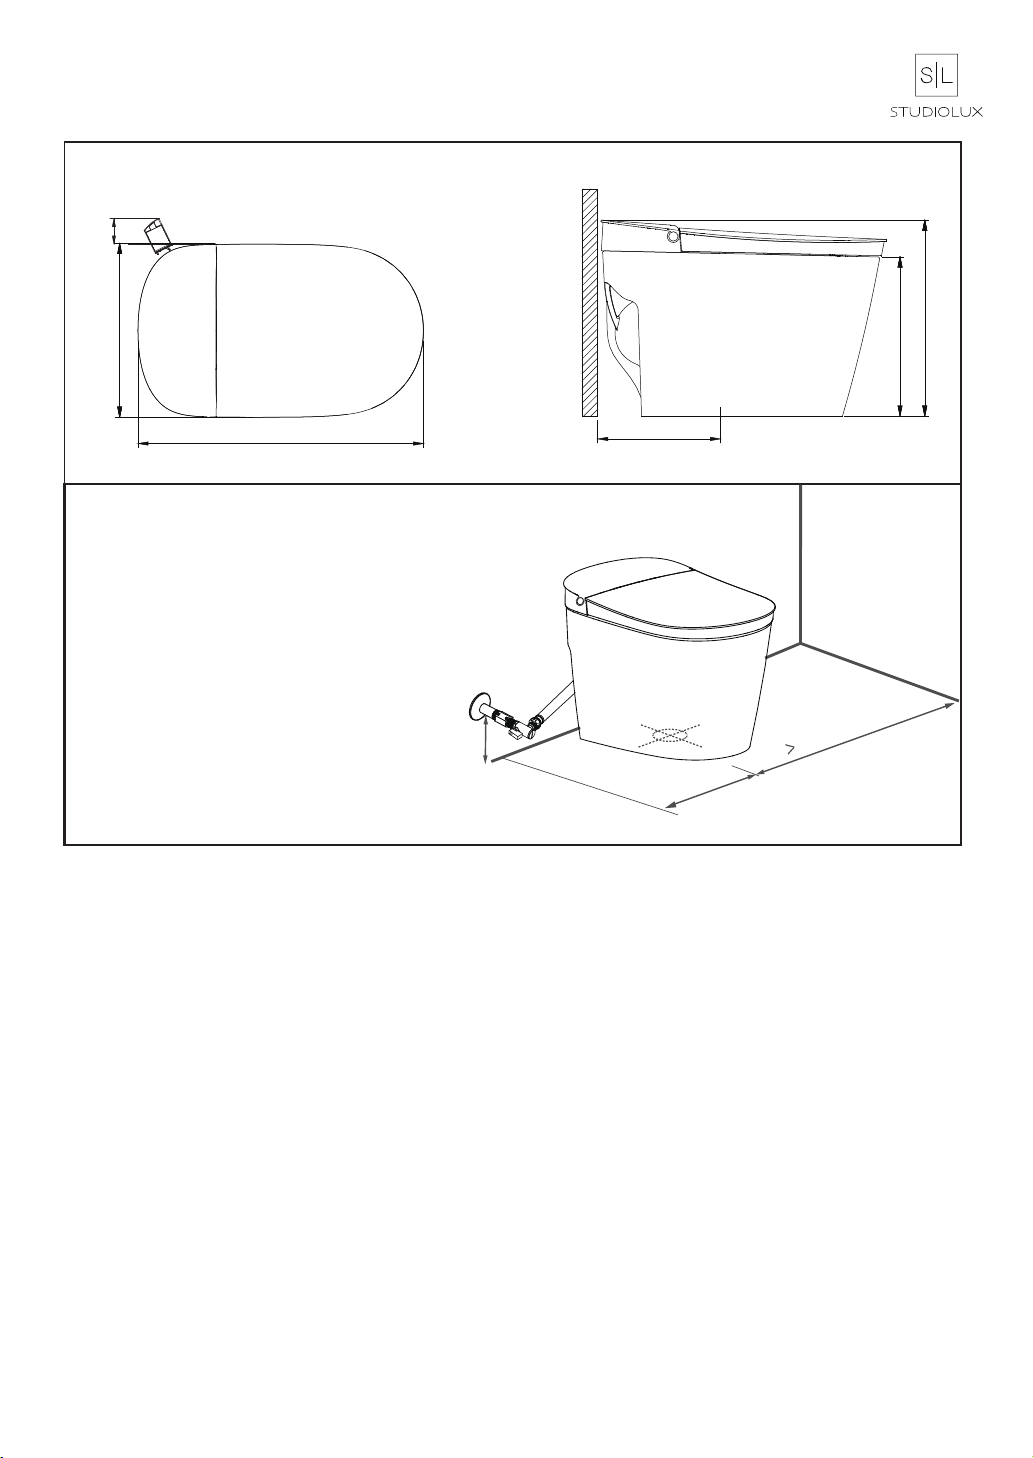
480mm/18.9in
390mm/15.35in
425mm16.73in
>80mm/
3.15in
701mm/27.6in
Battery box removal distance >80mm
Technical drawings
Pit spacing 305mm/12.01in
NOTE:
It is necessary to install the provided angle stop in an
accessiable area for quick shutoff in case of an emergency.
Suggestions on water supply connection
2
150mm/5.9in
400mm/15.75in
450mm/17.72in

Precautions before use
In order to avoid personal injury and property damage to users and other people, please read the
following safety precautions carefully and strictly observe them. After reading, please keep this
manual in a drawer where you can access easily.
PROHIBITED
NOTICE
☆It is strictly forbidden to disassemble, repair or transform the product by
yourself, otherwise it may cause fire or electric shock.
☆It is strictly forbidden to use this product when the seat and upper cover
are not fully opened or closed.
☆It is strictly forbidden to pour water, detergent, urine or other liquid on and around
the surface,otherwise it may cause fire or electric shock.
☆Do not operate products that have fallen into the water or soaked in water.
☆Please do not connect the inlet water line with the outlet water line of the
water heater. The inlet water temperature should be 3℃ - 35℃.
☆Do not let the sunlight directly irradiate the product, in order to avoid the
product discoloration or the burn due to the temperature instability.
☆Do not use industrial water, waste water, sea water, reclaimed water and
other water sources, otherwise it may cause skin inflammation and other
diseases.
☆The product must be connected to a separate circuit. No other electrical
product shares the circuit with this product. Sharing a circuit can cause a fuse
to blow out or a circuit breaker to trip. Continuous use in such cases may
result in fire or property damage.
☆This product is for household use only.
☆Do not use banana oil, gasoline, liquid medicine and detergent, insecticide
and hard brush to clean this product. Toilet cleaner may only be used for
ceramic body.
☆Do not use this product in rooms with humidity more than 90% RH, the use
environment should have a dry and wet separation, such as installing shower
room or shower curtain.
☆in cold winter,if do not use the product for a long time,please discharge the
tank water following the instructions.Or it might cause product damage.
☆For the newly decorated house, the residual mud and sand in the pipeline
are easy to damage the machine and affect human health. Please remove the
sewage from the pipeline before installation.
3
4
NOTICE
MUST
ABIDE BY
SAVE THESE INSTRUCTIONS
☆Do not stand on the seat, toilet cover, do not place heavy objects, and do not
press or lean on the toilet cover, so as not to damage the product.
☆Please set the temperature of water and seat on ‘low’when the old,weak,sick
and disabled or children use the product,and touch the sensor when you sit on the
seat properly.
☆This appliance is provided with a protective device that may make the appliance
inoperable under some abnormal conditions(such as immersion of the appliance).If
the appliance becomes inoperable,contact the STUDIOLUX service team.
☆Do not let children play with this product.
☆Do not supply water to the product before installation completed.
☆When installing, disassembling, repairing and maintaining the product, the water
supply valve must be closed.
☆After the appliance is scrapped, please hand it over it to a qualified professional
recycling company or organization for disposal. It should not be discarded at will, so
as to avoid harm to the environment.
☆To prevent damage caused by freezing, please take measures to keep warm. If
the room temperature is below 0℃, it is recommended to drain the water in the
product to prevent internal frost cracking.
☆Product installation and use should be away from heat and fire sources.
5
2.Technical specifications
IPX4
701X425X480mm
Water proof rate
Product size
Soft close
Flush
Dual flush
Seat and Cover
0℃~40℃
≥25L/min
3℃~35℃
Anbinate temp.
Pressure of Water supply
30psi~80psi(Static pressure)
Flow of Water supply
Temp of Water supply
Auto flush
3.Installation
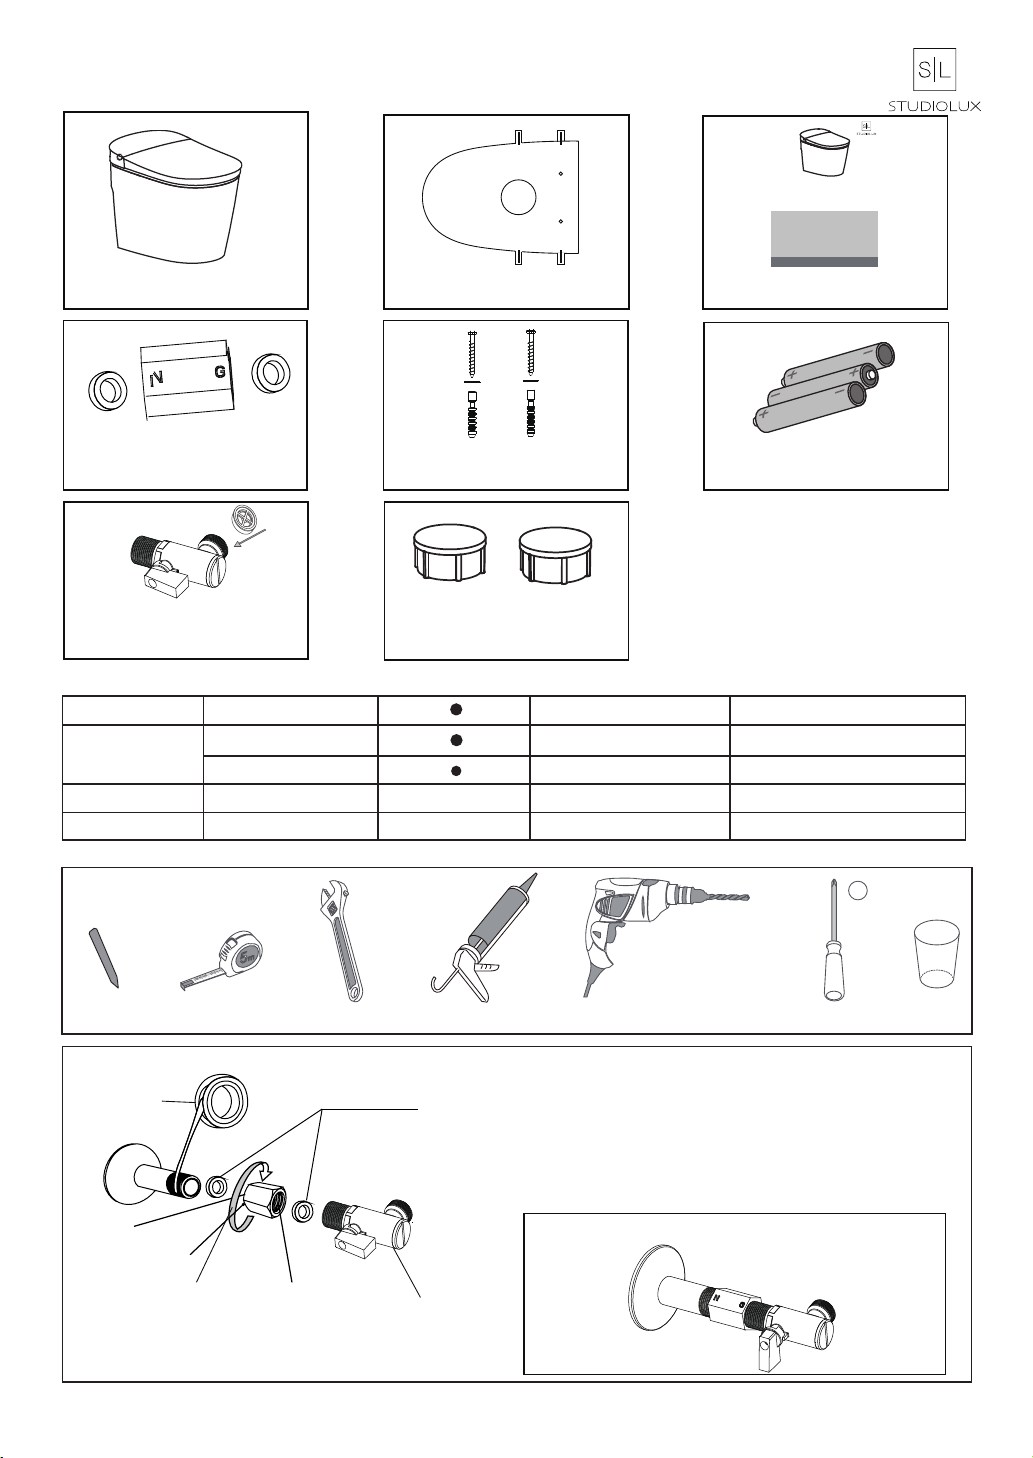
Marking pen Adjustable wrench Silicone Glass
Philips screwdriver
+
Electric drill (including
4.5mm bit & 10mm bit)
Tape
1. After external thread of water outlet pipe is wrapped with Teflon
tape, adapter nut need install sealing gasket ,tighten the adapter nut
to direction N, then after external thread of
angle stop
is wrapped with
Teflon tape, and tighten the connecting nut to direction G. If the angle
valve has been installed on the wall, to ensure proper installation of
new
angle stop
, the angle valve shall be replaced with the
angle stop
by professional personnel.
3.1 Install the Adapter Nut, Angle Stop
1/2”NPT Male
1/2”NPT Female
1/2”G Female
Adapter nut
Teflon tape
(not included)
sealing gasket
A
G
N
Angle Stop
Installed adapter nut and angle stop
MODEL:SLi1000
Installation instructions and manuals
Installation instructions for skilled technicians!
After installation, please hand over the installation instructions to the user.
User manual (Warranty card)
Material Number:1606106864-001
Remote control batteries
Material Number:1413K862002-01
Angle Valve
Material Number:1403K140056-3
Water flow
Material Number1408K603007
Multitap nut
Material Number:1403K110212
sealing gasket
Material Number:1407K220090-1
Rubber pads
Material Number:1407K220091
Anchor screws
Material Number:1408K603116
Product
1.List of materials
PIC for reference only
Installation card
Material Number:1606106910-001
6
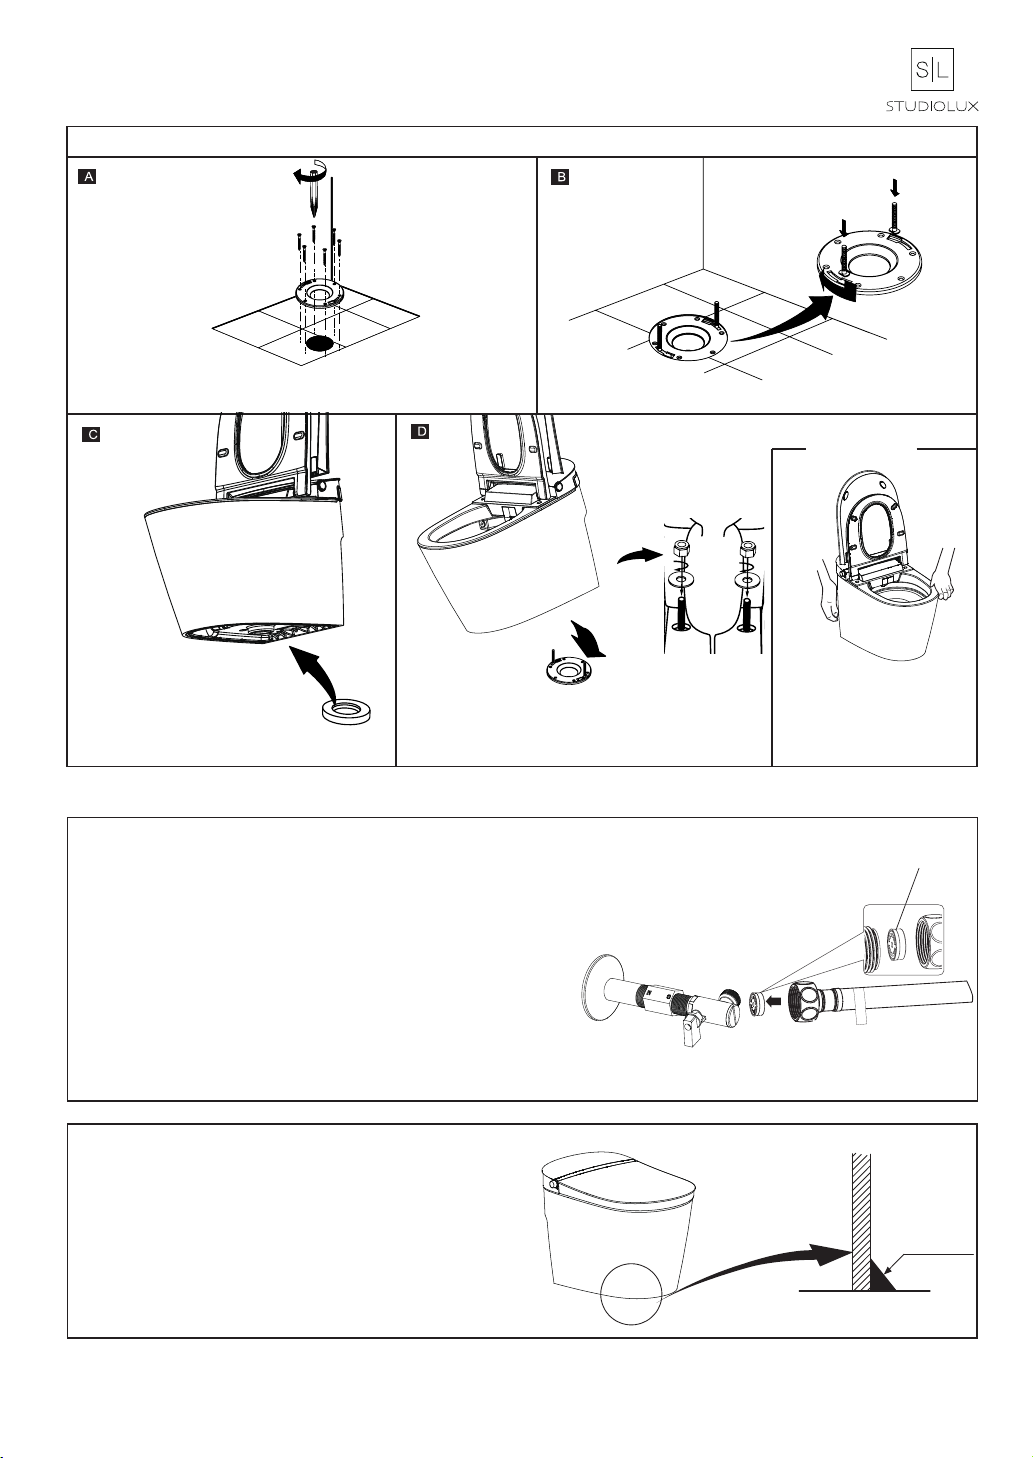
3.2 Install Toilet and Toilet Wax Ring( For Option B installation, please see template.)
Install the floor drain cover connector(not included) .
Position the toilet on the floor
drain,making sure the fixing bolts
are aligned with the toilet's holes.
Position correctly the two fixing bolts of the floor drain.
Firstly, open the cover and
seat; as the toilet is heavy,
lifting the product by two
persons at the same time is
needed.
Holding manner:
Insert the wax ring(not included)
under the toilet.
3.3 Install the Water Supply Hose
As shown in the figure, install water supply line to Angle stop.
1) If the water inlet pressure is greater than 30psi, please
install the flow limiting plate in the angle stop;
2) Only use the accessory parts that are shipped with the
product for installation;
3) After installation, turn on the power supply and check water
seal. Water leakage shall be avoided. Water Supply Line
Large end facing
ball valve
3.4 Tips for comfortable use
Glass cement
Outside the
ceramic side
One side of
the ceramic
Spots are easily found at the lower part of the
product after long time of water or urine penetration.
To avoid this, silicone is recommended to paste
around the lower part to seal the tiny gap between
the lower part and the ground.
B

7
4. Product function
1.Button operations
Press (about 1s) and release side button to full flush.
2.The mechanical seat switch function
While sitting on seat, the mechanical seat switch will be on to detect whether the user is on seat. The mechanical seat
switch on about 10s, achieve full flush after leaving seat 6s.
3.Men's toilet function
After opened seat for about 10s, close seat to achieve the flush function after gentle urinating.
4.Indicator light
The indicator light will flash when the battery is low.
工作时(臀洗、妇洗、烘干),按下旋钮执行停止命令。
5.Part identification
Trim cover
Trim strip
Rear cover
Angle stop
Toilet bowl
Flush button
Seat switch on area
Cover
Power indicator
Cover rubber pad
Searial No.:25201218000001
ZD74A3-SA-ASL305
Serial mumber DO NOT
REMOVE needed for
warranty purpose!

8
7.cleansing filter net
turn off the water supply
Close
Close
Clean the filter net
Install filter and
tighten plug
Turn on the water
Close
unscrew the plug and
remove the filter screen.
8. Removal and installation of Bidet seat
Bidet seat removal
(1) Turn off the
water supply.
(2) Open the cover & seat. Pull out the
rubber pads on both sides of the Bidet seat,
use the Phillips screwdriver to remove two
screws, and remove the gasket.
(3) Pull the complete Bidet seat up, remove the
clamp hose and disassemble the two braided
hoses by wrench. Then remove the Bidet seat
and place it on the floor correct side up.
6.Replacement of power
Press the button of the
battery box.
When the battery box
pops up, pull out it.
Unplug and take out the
battery box.
Replace
Replace batteries
Put back the battery box
and plug in.
Put back the battery box,
and press the button of the
battery box
Unplug
Insert Tip:※Used up
batteries should
be thrown into
corresponding
type of garbage
cans

9
Bidet seat installation
(1)connect and tight the three
braided hoses to Bidet seat by
wrench, then insert the hose and
install the clamp.
(2) Align the location hole of Bidet
seat with toilet bowl guide pillar, press
into the Bidet seat.
(3) Place the gasket on both sides of
the Bidet seat, lock the screw and
insert the rubber pads. Then turn on
the water supply and plug in.
9.Cleaning and maintenance
Cleaning the Cover & Seat:
Turn off the water supply.
Use a soft and wet cloth to clean the
product (Wring out a cloth)
Notices:
Do not use dry cloth or toilet paper
to clean the product or the
appearance of product will be
scratched.
Avoid putting water into the inside of
back cover, otherwise some
electronic components in the back
cover might be damaged.
Cleaning the toilet bowl:
Notices:
Clean the toilet bowl with
cleaner and flush the cleaner
within 3 minutes.

10
Product model
Manufacturing
number
Customer
name
Tel
Add
Sales
company
Tel
Date of
purchase
Warranty card
The 2nd copy send back

11
Maintenance record
There may be differences between the contents of this manual and the real object. Please
refer to the real object.If the products and attachments have any update, we will not notice.
Date of maintain Maintenance items Maintenance company Maintenance personnel
signature
1606106422-001 1.0
Type of Flush valve:FCS-6-KM-3
US Office
30131 Town Center Dr
Suite 298
Laguna Niguel, CA 92677
949-900-4353
www.studioluxcorp.com
Table of contents
Other STUDIOLUX Toilet manuals


Popular Toilet manuals by other brands


Kohler
Kohler K-3399 Homeowner's guide

Bischoff & Bischoff
Bischoff & Bischoff TSE-A user manual

American Standard
American Standard Cadet PRO 215AA Series INSTALLATION INSTRUCTIONS CARE AND MAINTENANCE

Olympia
Olympia CLEAR CLE220101 Installation and Maintenance

Maro
Maro DI600 Operating instructions manual

REDGUM Brand
REDGUM Brand SPACE SAVER RG515 user manual


