manuals.online logo
Brands
  1. Home
  2. •
  3. Brands
  4. •
  5. FV
  6. •
  7. Toilet
  8. •
  9. FV E112-E User manual

FV E112-E User manual

Other FV Toilet manuals

FV E192 User manual

FV

FV E192 User manual

FV E193 User manual

FV

FV E193 User manual

FV E183 User manual

FV

FV E183 User manual

FV A115-S User manual

FV

FV A115-S User manual

FV Ischia Elongado E187 User manual

FV

FV Ischia Elongado E187 User manual

FV E158-E User manual

FV

FV E158-E User manual

FV Ginebra E149 User manual

FV

FV Ginebra E149 User manual

FV E113 User manual

FV

FV E113 User manual

FV Ginebra E152 User manual

FV

FV Ginebra E152 User manual

FV Ginebra E152 User manual

FV

FV Ginebra E152 User manual

FV Parma E157 User manual

FV

FV Parma E157 User manual

FV E181 User manual

FV

FV E181 User manual

FV Bellini E184 User manual

FV

FV Bellini E184 User manual

FV Greco Touchless 4.8 L User manual

FV

FV Greco Touchless 4.8 L User manual

FV Liber E168 User manual

FV

FV Liber E168 User manual

FV Catania E194 User manual

FV

FV Catania E194 User manual

FV Roma E113-E User manual

FV

FV Roma E113-E User manual

FV Parma E157 User manual

FV

FV Parma E157 User manual

FV A115-S User manual

FV

FV A115-S User manual

FV Apolo E182 User manual

FV

FV Apolo E182 User manual

FV E149 User manual

FV

FV E149 User manual

FV Victoria E170 User manual

FV

FV Victoria E170 User manual

FV Trento E176 User manual

FV

FV Trento E176 User manual

FV E158-E User manual

FV

FV E158-E User manual

Popular Toilet manuals by other brands

nella LOCH NBMU-4062 ADA installation instructions

nella

nella LOCH NBMU-4062 ADA installation instructions

Toto WASHLET RG Lite installation guide

Toto

Toto WASHLET RG Lite installation guide

Crosswater US-PRO9005 manual

Crosswater

Crosswater US-PRO9005 manual

Kohler K-77780T-0 installation guide

Kohler

Kohler K-77780T-0 installation guide

Toto Washlet TCF4911 Series installation guide

Toto

Toto Washlet TCF4911 Series installation guide

Kohler K-6419 quick start guide

Kohler

Kohler K-6419 quick start guide

DENCK PURE-D user manual

DENCK

DENCK PURE-D user manual

Grohe Sensia ARENA user manual

Grohe

Grohe Sensia ARENA user manual

Kohler K-5171K Installation and care guide

Kohler

Kohler K-5171K Installation and care guide

Geberit AQUACLEAN MERA CLASSIC user manual

Geberit

Geberit AQUACLEAN MERA CLASSIC user manual

Kohler K-24097X Installation and care guide

Kohler

Kohler K-24097X Installation and care guide

Better Bathrooms BUN/BeBa 27555/78725 user manual

Better Bathrooms

Better Bathrooms BUN/BeBa 27555/78725 user manual

American Standard CONCEPT Cube TF-2704 installation manual

American Standard

American Standard CONCEPT Cube TF-2704 installation manual

BIOLAN ECO Instructions for installation, use and maintenance

BIOLAN

BIOLAN ECO Instructions for installation, use and maintenance

Thetford C260 Series user manual

Thetford

Thetford C260 Series user manual

KELISS T162A Series instruction manual

KELISS

KELISS T162A Series instruction manual

Silent Venus SVP600 Installation & maintenance

Silent Venus

Silent Venus SVP600 Installation & maintenance

Kohler K-22241K Installation and care guide

Kohler

Kohler K-22241K Installation and care guide

manuals.online logo
manuals.online logoBrands
  • About & Mission
  • Contact us
  • Privacy Policy
  • Terms and Conditions

Copyright 2025 Manuals.Online. All Rights Reserved.

FV se reserva el derecho de modificar,
cambiar, mejorar y/o anular materiales,
productos y/o diseños sin previo aviso.
MEDIDAS SUGERIDAS PARA LA INSTALACIÓN (en cm):
Código:
Asegúrese que la persona que vaya a instalar el
producto
sea un profesional en la materia, para
prevenir
errores que afecten las instalaciones o
el correcto funcionamiento del producto
.
Realice
los ajuste del sanitario UTILIZANDO
una
herramienta adecuada para que la
s
uperficie y el acabado del producto no se raye
o lastime.
Recuerde
que todos los productos tienen un
mecanismo
de control que debe ser revisado y
cambiado
de ser necesario, ya que este puede
deteriorarse debido a la frecuencia de uso.
To
prevent any error that may affect the facilities
or
the correct functioning of the product, make
sure
that the person who is going to install the
p
roduct is a professional. Install the product
u
sing suitable tools, so that it is not scratched.
Remember
that all products have a control
mechanism that must be reviewed and changed
if
necessary, since it can deteriorate due to the
frequency of use.
RECOMENDACIONES:
RECOMMENDA
TIONS:
MEDIDAS / MEASURES:
Dimensiones en milímetros / Dimensions in millimeters
Dimensiones en pulgadas / Dimensions in inches
410
16-1/8”
667
26-2/8”
305
12”
370
367
14-13/32” 737
28-1/16”
150
14-9/16”
5-7/8”
320
12-5/8”
270
10-5/8”
410
16-1/8”
667
26-2/8”
305
12”
370
367
14-13/32” 737
28-1/16”
150
14-9/16”
5-7/8”
320
12-5/8”
270
10-5/8”
1. Ubique el inodoro en la posición en la que irá, verifique la alineación del inodoro
respecto a la pared y posicione de acuerdo a las dimensiones indicadas en el
gráfico.
Verify the alignment of toilet regarding the wall and place it according to the dimen-
sions (see graphic).
LEA LAS INSTRUCCIONES COMPLETAMENTE ANTES DE INSTALAR / READ ALL INSTRUCTIONS BEFORE INSTALLING
3.
Retire el inodoro para perforar y colocar los tacos de jación #10 (no incluidos)
para jar el inodoro al piso.
 Removethetoilettodrillandtthe#10ttingplugs(notincluded)toattachthe
toilettotheoor.
4- Voltee el inodoro sobre una superficie suave para no rasparlo y coloque el anillo de
cera en la salida del desagüe.
 Turnthetoiletaround(onitsring)overasoftsurfacesothatitwillnotbescraped
andinstallthewaxringinthedrainoutlet.
2. Marque en el piso los orificios para su fijación.
 Marktheholesinthefloortomounttheproductcorrectly.
INSTRUCCIONES DE INSTALACIÓN / INSTALLATION INSTRUCTIONS:
COLORES DISPONIBLES /
COLORS AVAILABLE:
• Blanco / White : BL
• Bone / Bone : BO
• Caribbean Shell: CS
• Gris / Gray : GR
• Verde Primavera / Sea Foam : VP
E110.1-COLOR
30.5 cm
15 cm
15 cm
Llave angular F.V.
F. V. Angle valve
Agujeros
para fijación
Fixation holes
30.5 cm
15 cm
15 cm
Llave angular F.V.
F. V. Angle valve
Agujeros
para fijación
Fixation holes
30.5 cm
15 cm
15 cm
Llave angular F.V.
F. V. Angle valve
Agujeros
para fijación
Fixation holes
30.5 cm
15 cm
15 cm
Llave angular F.V.
F. V. Angle valve
Agujeros
para fijación
Fixation holes
E101.08-COLOR
ParainodoroE112-E
FortoiletE112-E
E112.2.2
E112.2-COLOR
E102.08-BL/CR
E112.2.1
E112-E
Inodoro Roma - 4,8 LPF / Toilet Roma - 4,8 LPF
E112-E
Fecha: 2019 - 04 - 23
FV - ÁREA ANDINA S.A. se reserva el derecho de modificar, cambiar, mejorar y/o anular materiales, productos y/o diseños sin previo aviso.
ECUADOR 1-800 FV FV FV (1-800 38 38 38)
Bogotá (57) 318 827 2964 / 315 335 0065
(51-1) 717 8744 / 715 3256
fvresponde@fvecuador.com
fvrespondecolombia@grupofv.net
[email protected]
COLOMBIA
PERÚ
FV Responde
Centro de atención al usuario
Encuentre
Repuestos Legítimos FV y
la Garantía Total FV en:
www.fvandina.com
Encuentre
Repuestos Legítimos FV y
la Garantía Total FV en:
www.fvandina.com
NTE INEN 3123
Sello de Calidad
Instituto Ecuatoriano de Normalización
NTE INEN 1571
Sello de Calidad
Sanitarios
Instituto Ecuatoriano de Normalización
30.5 cm
15 cm
15 cm
Llave angular F.V.
F. V. Angle valve
Agujeros
para fijación
Fixation holes
30.5 cm
15 cm
15 cm
Llave angular F.V.
F. V. Angle valve
Agujeros
para fijación
Fixation holes
30.5 cm
15 cm
15 cm
Llave angular F.V.
F. V. Angle valve
Agujeros
para fijación
Fixation holes
30.5 cm
15 cm
15 cm
Llave angular F.V.
F. V. Angle valve
Agujeros
para fijación
Fixation holes
Cód.: E266.02 DH CR
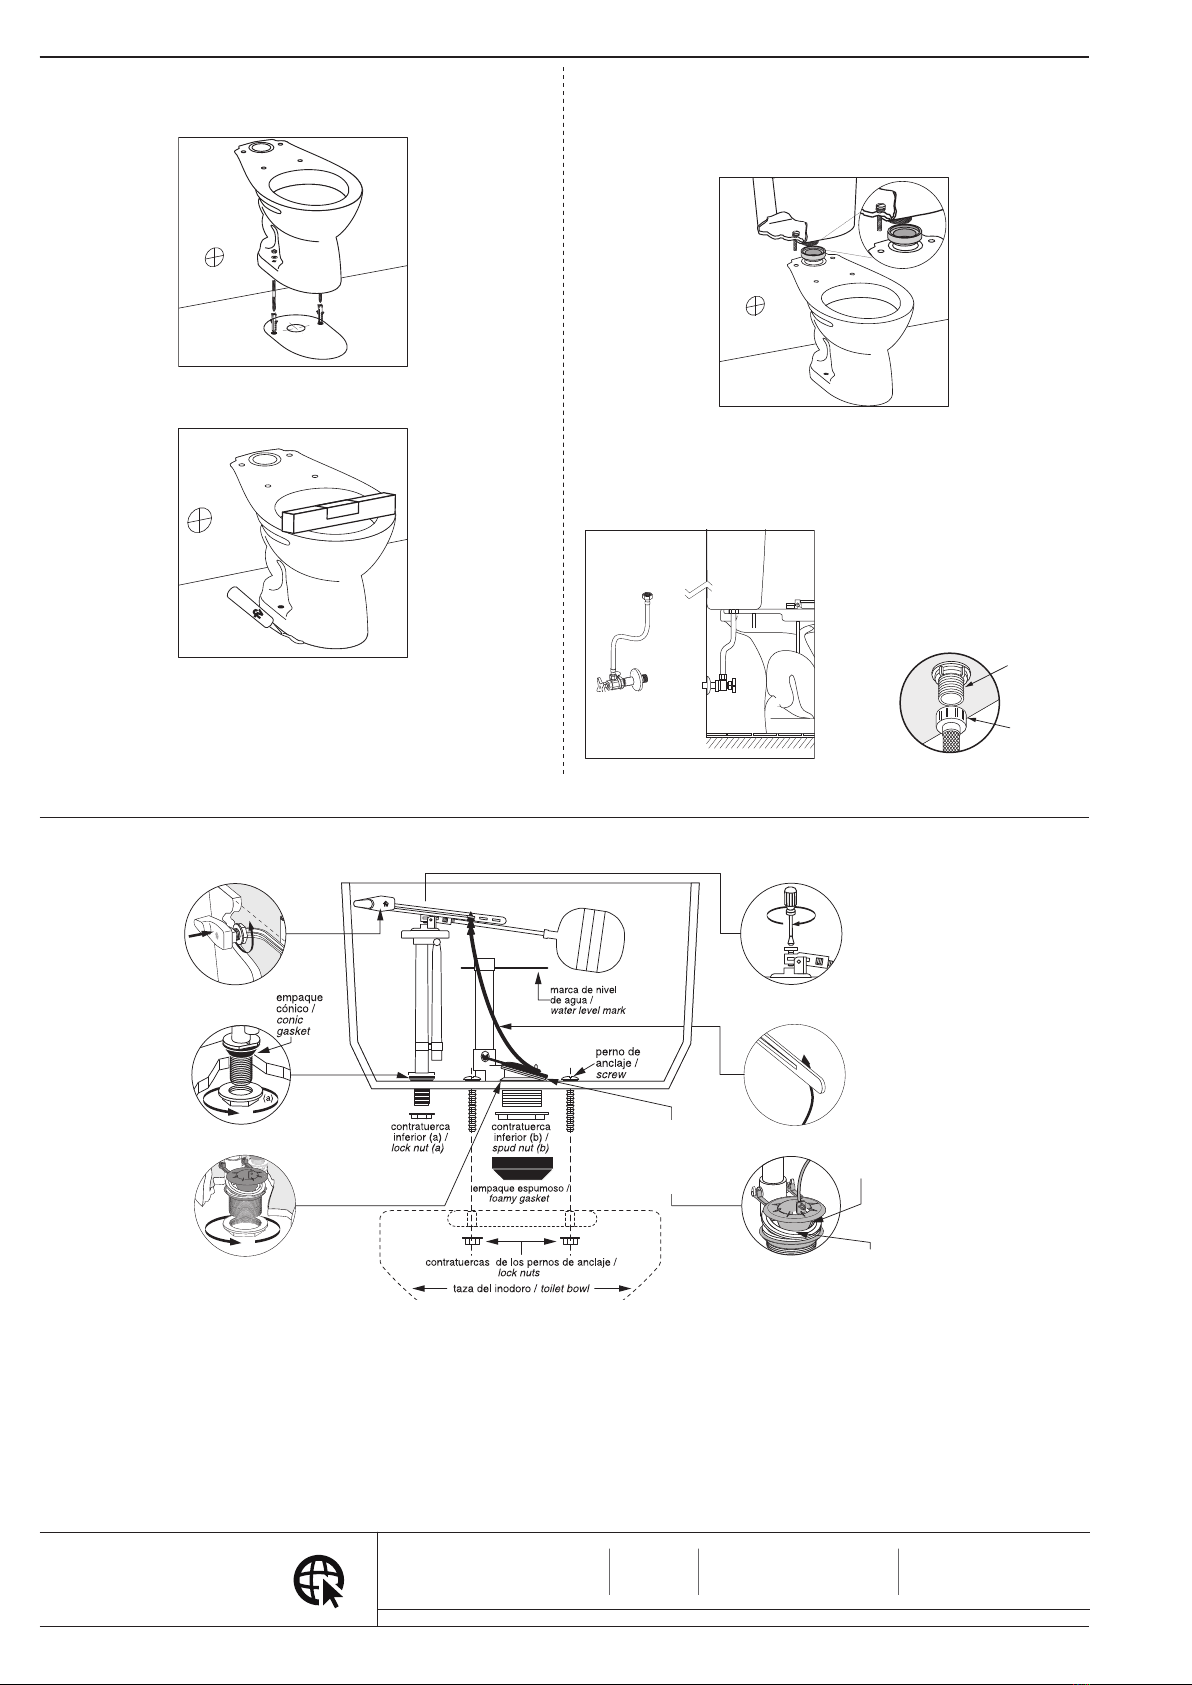
5. Coloque nuevamente el inodoro sobre el codo del desagüe, nivélelo y fíjelo al
piso con los tirafondos.
Placethetoiletoverthedrainagain,levelandsecureittotheoorwithscrews.
7. Instale el herraje al tanque (ver instrucciones en su embalaje). Coloque el em-
paque espumoso en la salida del herraje. Alinee el tanque sobre el inodoro y
fíjelo con los pernos de sujeción.
 Installthetankttings(seeinstructionsinthepackaging).Placethefoampack-
inginthetting’send.Alignthetankoverthetoiletandsecurewiththebolts.
6. Selle la unión entre el inodoro y el piso con un cordón de silicona.
Sealtheconnectionbetweenthetoiletandoorwithsiliconadhesive. 8. Conecte la válvula de ingreso del tanque a la acometida de agua mediante una
llave angular FV con manguera exible, ref.: E266.02 DH CR (no incluida).Por
último, coloque el asiento en el inodoro.
 ConnectwatersupplytothetoiletvalveusingaF.V.angle valve with exible
hose ref. E266.02 DH CR, (notincluded).
CONSEJOS DE MANTENIMIENTO / ADVICES MAINTAINANCE:
Ajuste /
Tight up
Ajuste /
Tight up
2
A
juste /
Tight up
1
3
(b)
6
Limpie el borde /
Clean the rim
flapper /
flapper
válvula de descarga /
flush valve
4
5
Calibre-Verifique el nivel
del agua / Calibrate-Verify
the water level
verifique que el cordel
de caucho no este
muy tenso / Verify that the
rubber string is not too tight.
Verifique que la base
del flapper este en
buenas condiciones /
Verify that the base of
the flapper is in good
conditions
En caso de tener algún problema con el herraje verifique los siguientes puntos / Ifyouhaveanyproblemwiththefitting,pleaseverifythefollowingpoints:
Nota: el exceso de ajuste de la tuerca B
puede causar la ruptura de la válvula de ingre-
so A.
Note: Over tightening screw B, can cause
rupture of the inlet valve A.
A
B
CONSEJOS DE MANTENIMIENTO
Los sanitarios F.V. son fabricados con porcelana sanitaria vitricada, cumpliendo
normas internacionales, garantizando así su larga vida útil. Por las características
propias de los materiales utilizados y la tecnología empleada en su desarrollo, se
limpian fácilmente evitando el desarrollo de gérmenes y hongos.
Realice la limpieza utilizando productos limpiadores y desinfectantes para baños
de marcas reconocidas. Ayúdese de una esponja o un paño húmedo. En lo posible
evite productos de limpieza fuertemente abrasivos. La porcelana sanitaria vitrica-
da no permite adherencias y las grasas se eliminan con facilidad.
La porcelana sanitaria mantiene el brillo propio de su esmalte sin necesidad de
pulimentos.
MAINTENANCE
F.V. - productsaremadeofvitreoussanitaryware,meetinginternationalstandards
and ensuring durability. The characteristics of the materials and the technology
usedtomaketheproductshelpbypreventingthedevelopmentofgermsandfungi.
Cleantheproductusingcleaningagentsandbathroomantiseptics.Useasponge
ordampcloth.Ifpossibleavoidhighlyabrasivecleaningproducts.Sanitaryware
doesn´tallowadhesionsanditcanbeeasilywashed.
Thereisnoneedtopolishsanitarywarebecauseitwillalwaysmaintainitsshine.
Cód.:HT- 1027F
Nota: No es recomendable usar cemento mortero en la base del inodoro. La
Garantía FV no cubre inodoros instalados con mortero.
Antes de instalar el tanque verifique que la tubería de alimentación este limpia y libre
de impurezas y residuos de construcción.
Note: Itisnotadvisabletousecementinthebaseofthetoilet.The warranty doesn't
cover toilets installed with cement.
TofixitBeforeinstallingthetank,verifythatthefeedingpipeiscleanandfreeofsludge
andconstructionresiduals.