STUDIOLUX SLi5200 User manual
MODEL:SLi5200
Installation instructions and manuals
Installation instructions for skilled technicians!
After installation, please hand over the installation instructions to the user.

Installation instructions and manuals
Installation instructions for skilled technicians!
After installation, please hand over the installation instructions to the user.
When using the electronic product, especially in the presence of children, basic safety precautions
should always be followed, including the following. Please read all instructions before use.
1.Do not use while bathing.
2.Do not place or store the product where it may fall or be dragged into a bathtub or sink.
3.Do not place in or drop into water or other liquid.
4.Do not touch the product if it falls into the water, and unplug the power supply immediately.
pores.
1.Please keep a close watch when children or disabled persons are using or near the products in use.
2.This product is used only for the intended purpose described in this manual. Do not use accessories
not recommended by the manufacturer.
3.Never operate this product if it has a damaged cord or plug or if it is not working properly,if it has
been dropped or damaged, or dropped into water. Return the product to a service center for
examination and repair.
4.Keep the power cord away from the heating surface.
5.Do not clog the vents of the product, or place the product on a soft surface, such as a bed or sofa,
where the vents may be blocked. Keep the air unblocked and no cotton wool or hair, etc.in the
6.Don't use products while sleeping or drowsy.
7.Do not put or insert any object into any opening or hose.
8.Do not use outdoors or operate where aerosol (spray) products are being used or when oxidated
products are being administered.
9.Unplug this product before filling. Fill (reservoir) with water. Do not overfill (or specify filling
instructions) .
IMPORTANT SAFEGUARDS
READ ALL INSTRUCTION BEFORE USING
DANGER-Reduce the risk of electric shock
WARNING-Reduce the risk of burns, electric shock, fire or personal injury
1
10.Do not clean the product and power plug with water, it might cause electric shock or damage.
11.Do not disassemble, repair or modify the product, otherwise it might cause fire.
12.Do not stand or put heavy things on the seat, it might cause product damage.
13.Do not throw burning items like cigarette butts into the product, it might cause fire.
14.Do not open or close the cover or seat forcibly, and do not lean on the cover when the product
in use, it might cause product damage.
15.Connect this product to a properly grounded outlet only.See Grounding Instructions.
16.This product must be plugged into a regular voltage Grounded GFCI outlet (North America 120V AC,
60Hz). The rated power consumption is 1000W.
17.Do not use extension cord.If you are not sure if the equipment is properly grounded,consult a
licensed electrician.

This device contains licence-exempt transmitter(s)/receiver(s) that comply with Innovation,
Science and Economic Development Canada’s licence-exempt RSS(s). Operation is subject to
the following two conditions:
1. This device may not cause interference.
2. This device must accept any interference, including interference that may cause undesired
operation of the device.
L’émetteur/récepteur exempt de licence contenu dans le présent appareil est conforme aux
CNR d’Innovation, Sciences et Développement économique Canada applicables aux appareils
radio exempts de licence. L’exploitation est autorisée aux deux conditions suivantes :
1. L’appareil ne doit pas produire de brouillage;
2. L’appareil doit accepter tout brouillage radioélectrique subi, même si le brouillage est
susceptible d’en compromettre le fonctionnement.
This device complies with Part 15 of the FCC Rules. Operation is subject to the following two
conditions: (1) this device may not cause harmful interference, and (2) this device must accept any
interference received, including interference that may cause undesired operation.
Caution: The user is cautioned that changes or modifications not expressly approved by the party
responsible for compliance could void the user's authority to operate the equipment and may void
factory warranty.
Note: This equipment has been tested and found to comply with the limits for a Class B digital
device, pursuant to part 15 of the FCC Rules. These limits are designed to provide reasonable
protection against harmful interference in a residential installation. This equipment generates uses
and can radiate radio frequency energy and, if not installed and used in accordance with the
instructions, may cause harmful interference to radio communications. However, there is no
guarantee that interference will not occur in a particular installation. If this equipment does cause
harmful interference to radio or television reception, which can be determined by turning the
equipment off and on, the user is encouraged to try to correct the interference by one or more of
the following measures:
—Reorient or relocate the receiving antenna.
—Increase the separation between the equipment and receiver.
—Connect the equipment into an outlet on a circuit different from that to which the receiver is
connected.
—Consult the dealer or an experienced radio/TV technician for help.
FCC Warning statements in User Manual
ISED Warning statements in User Manual
FCC Supplier’s Declaration of Conformity
Poduct name:Bathroom remote control
Model number:13D401-2004X
Suppliers Name:WUXI DENVEL INTELLIGENT ELECTRONIC INC.
Suppliers Address:Building A,No.8 LianHe Road,WuXi,JiangSu,China
Suppliers Website:www..denvel.com
2
*This product is suitable for AC120V/60HZ power supply. In order to ensure safe use, the socket and
its connecting wires must be able to withstand more than 15A current.
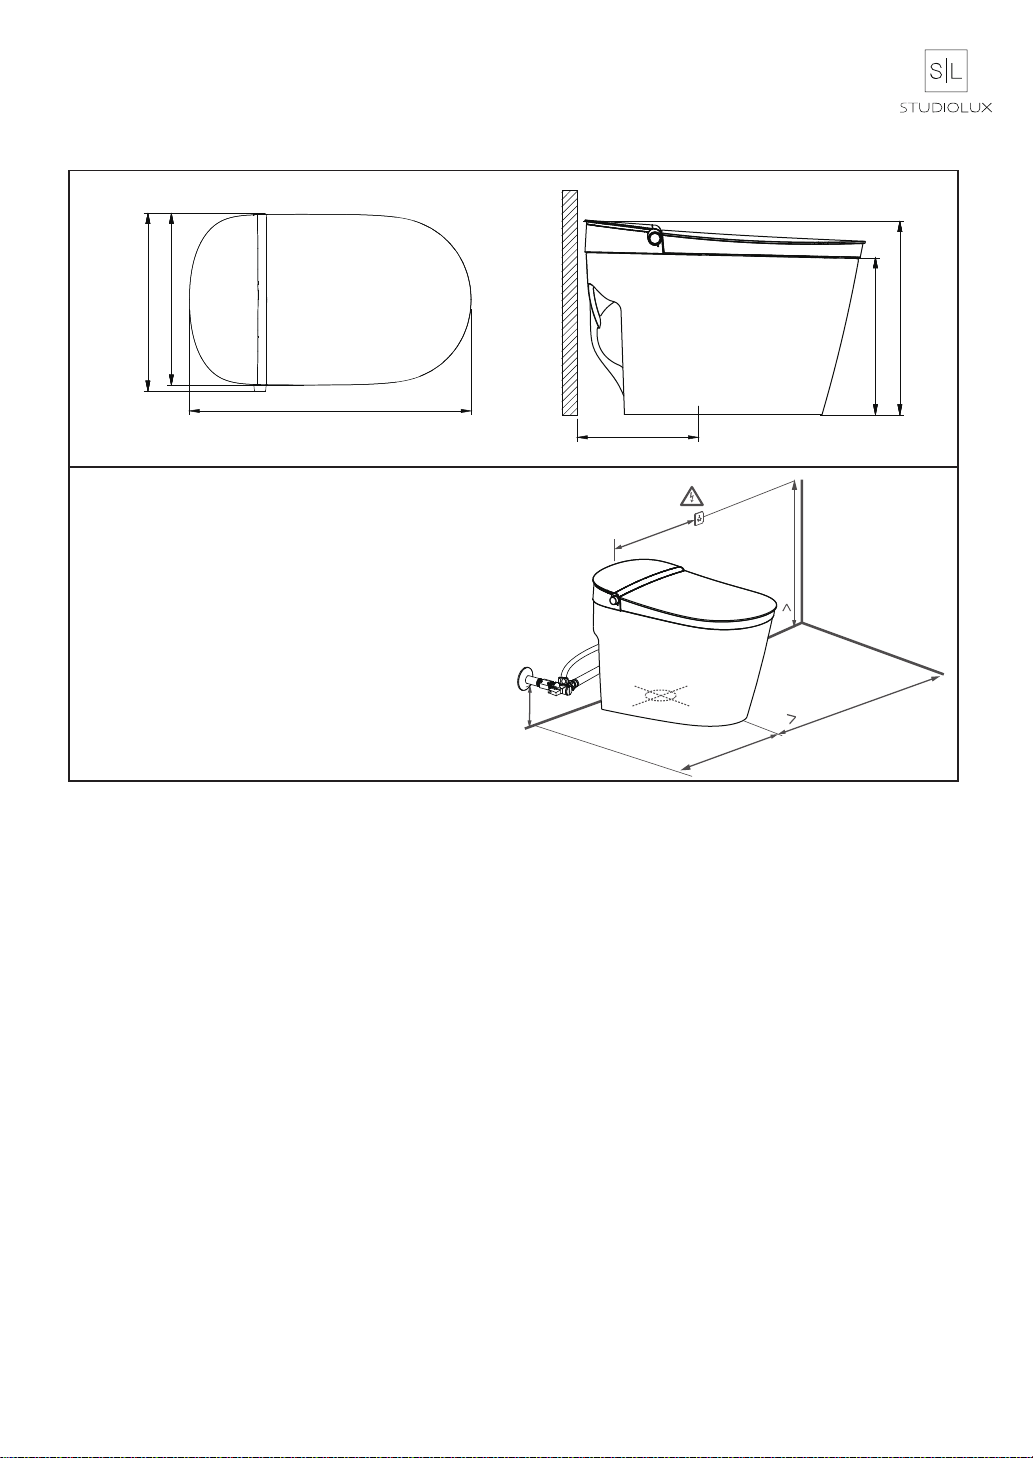
Technical drawings and power cord connections suggest
425mm/16.73in
441mm/17.36in
701mm/27.6in
NOTE:
It is necessary to install the provided angle stop in an
accessiable area for quick shutoff in case of an emergency.
The power socket can be installed on either left or right.
Suggestions on power line and water supply connection
390mm/15.35in
486mm/18.9in
Pit spacing 305mm/12in
150mm/5.9in
500mm/19.69in
350mm/13.78in
450mm/17.72in
3
400mm/15.75in
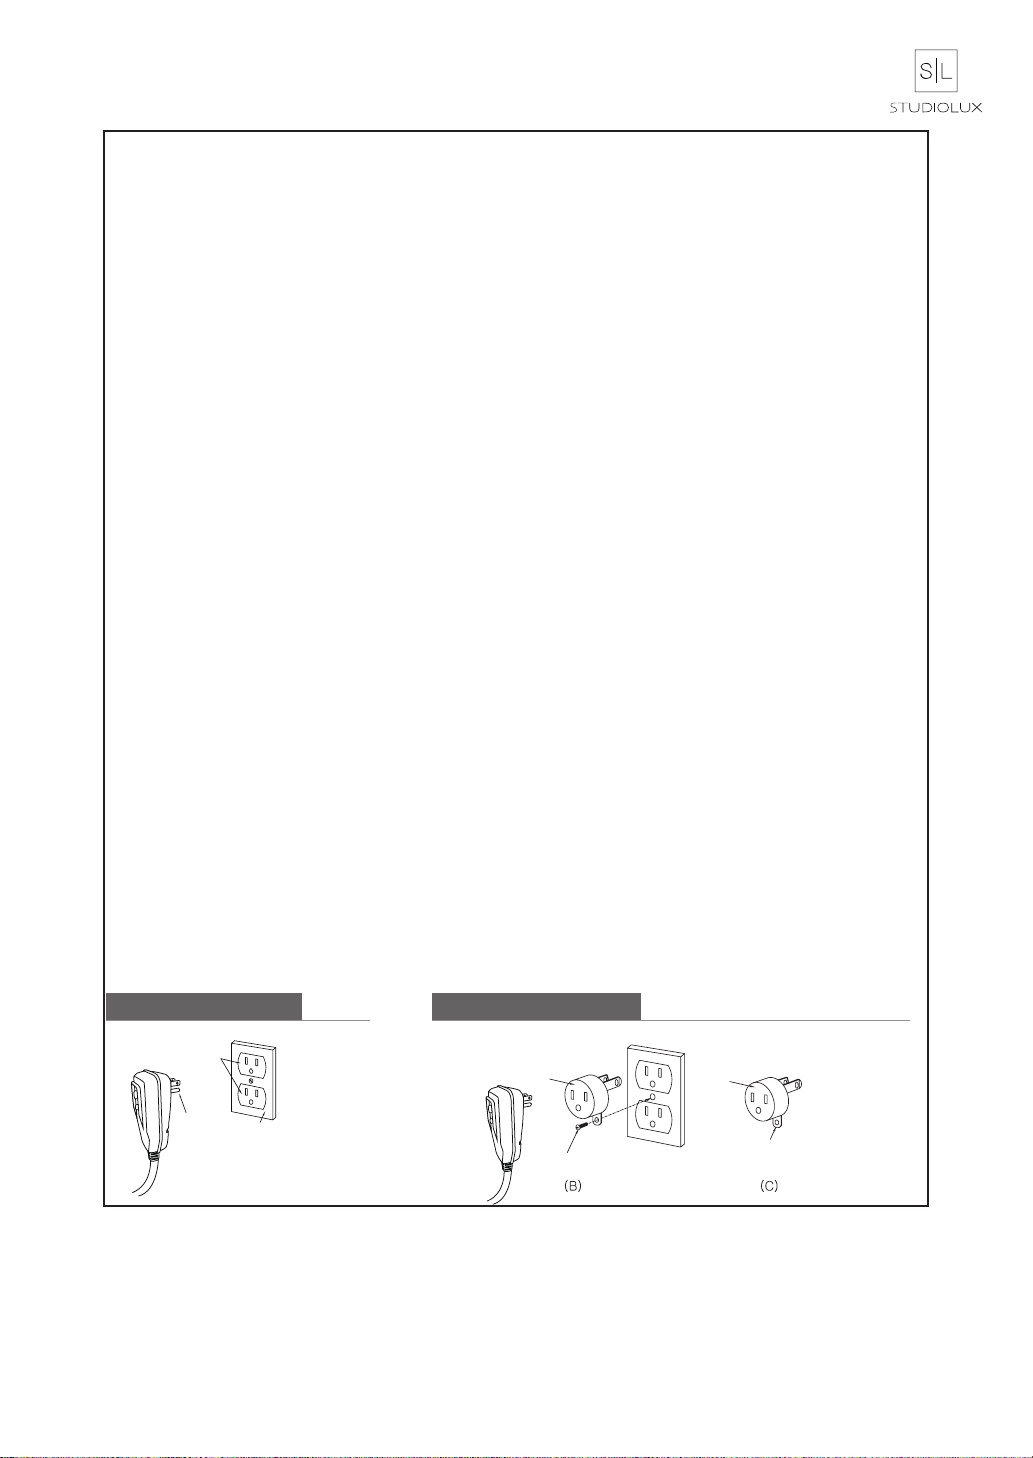
Grounding instructions
This product should be grounded. In the case of an electrical short circuit, grounding reduces the
risk of electric shock by providing an escape path for the current. This product is equipped with a
power cord with a ground wire and a properly grounded plug. The plug must be plugged into a
properly installed and grounded socket.
★★★DANGER: Improper use of the grounding plug may result in electric shock
If the power cord or plug needs to be repaired or replaced, do not connect the ground wire to any
of the flat pins. The conductor with green or yellow green stripe on the outer insulation surface
is grounding wire.
If you do not fully understand the grounding instructions or if you have questions about whether
the product is properly grounded, please consult a qualified electrician or maintenance personnel.
This product is for use on a normal 120 V circuit, and has a grounding plug that looks like the plug
illustrated in sketch A .in Figure 1. A temporary adapter, which looks like the adapter illustrated in
sketches B and C, may be used to connect this plug to a 2-pole receptacle as shown in sketch B.
if a properly grounded outlet is not available. The temporary adapter should be plugged into a
properly grounded outlet (sketch A) and should be installed by a licensed electrician. The green
colored rigid tab extending from the adapter must be connected to a permanent ground such as
a properly grounded outlet box cover. Whenever the adapter is used, it must be held in place by
the screw.
The product is factory-equipped with a specific power cord and plug that allow connection to the
appropriate circuit. Make sure the product is connected to the same socket as the plug
configuration. This product should not use adapters. Do not modify the supplied plug, if it is not
suitable for the socket, please install the appropriate socket by a qualified electrician. If the
product must be reconnected using different types of circuits, it should be reconnected by
qualified maintenance personnel.
If an extension cord is required, only use a 3-core extension cord with a 3-core grounding plug
and a 3-slot socket that accepts the plug on the product. The damaged wires must be replaced
or repaired.
ADAPTER ADAPTER
METAL SCREW
TAB for
Grounding Screw
Temporary Connection
Preferred Connection
Preferred Connection
GROUNDING PIN
GROUNDED
OUTLET
GROUNDED
OUTLET BOX
4

Precautions before use
In order to avoid personal injury and property damage to users and other people, please read the
following safety precautions carefully and strictly observe them. After reading, please keep this
manual in a drawer where you can access easily.
PROHIBITED
NOTICE
☆When thundering, please pull out the power plug.
☆Do not operate products that have fallen into the water or soaked in water, and
immediately unplug the power plug.
☆The socket should be installed in the place where it is not easy to get wet. It is
recommended to use waterproof socket. It is recommended to place the plug on
the wall. Please refer to the technical drawings and suggestions on power line and
water supply connection.
☆Please do not connect the inlet water line with the outlet water line of the water
heater. The inlet water temperature should be 3℃ - 35℃.
☆Do not let the sunlight directly irradiate the product, in order to avoid the product
discoloration or the burn due to the temperature instability.
☆Do not use industrial water, waste water, sea water, reclaimed water and other
water sources, otherwise it may cause skin inflammation and other diseases.
☆This product is for household use only.
☆The product must be connected to a separate circuit. No other
electrical product shares the circuit with this product. Sharing a circuit can cause
a fuse to blow out or a circuit breaker to trip. Continuous use in such cases may
result in fire or property damage.
☆Do not touch the power plug with wet hand, otherwise it may cause electric shock.
☆It is strictly forbidden to put the electrified product on its side or upside-down,
otherwise it may cause fire or burn down.
☆It is strictly forbidden to disassemble, repair or transform the product by yourself,
otherwise it may cause fire or electric shock.
☆It is strictly forbidden to put lighted cigarettes and other combustibles into the toilet
cover, otherwise it may cause fire.
☆It is strictly forbidden to use this product when the seat and upper cover are not
fully opened or closed.
☆It is strictly forbidden to use power extension cord or loose and unstable power
socket, otherwise it may cause fire or electric shock.
☆It is strictly forbidden to put fingers or other objects into the warm air outlet,
otherwise it may cause scalding, electric shock or burn.
☆It is strictly forbidden to pour water, detergent, urine or other liquid on and around
the surface, or power plug, otherwise it may cause fire or electric shock.
5

NOTICE
MUST
ABIDE BY
product.
☆Do not let children play with this product.
☆Do not supply water or power to the product before installation completed.
☆If it is not used for a long time, please unplug the plug and empty the water in the
☆When installing, disassembling, repairing and maintaining the product, the power
plug must be pulled off and the water supply valve must be closed.
☆This product uses AC 120V/ 60Hz power supply; in order to ensure safe use, the
socket and its connecting wires must be able to withstand more than 15A current.
☆After the appliance is scrapped, please hand it over to a qualified professional
recycling company or organization for disposal. It should not be discarded at will,
so as to avoid harm to the environment.
☆To prevent damage caused by freezing, please take measures to keep warm. If
the room temperature is below 0℃, it is recommended to drain the water in the
product to prevent internal frost cracking.
☆The plug should be installed in place, and the plug pin cannot be exposed to air.
☆Product installation and use should be away from heat and fire sources
☆Do not use banana oil, gasoline, liquid medicine and detergent, insecticide and
hard brush to clean this product. Toilet cleaner may only be used for ceramic body.
☆Do not use this product in rooms with humidity more than 90% RH, the use
environment should have a dry and wet separation, such as installing shower
room or shower curtain.
☆For the newly decorated house, the residual mud and sand in the pipeline are
easy to damage the machine and affect human health. Please remove the
sewage from the pipeline before installation.
☆Do not stand on the seat, toilet cover, do not place heavy objects, and do not
press or lean on the toilet cover, so as not to damage the product.
☆Please set the temperature of water and seat on ‘low’when the old,weak,sick
and disabled or children use the product,and touch the sensor when you sit on
the seat properly.
☆Pull out the power plug before cleaning,do not wet the product directly.
☆in cold winter,if do not use the product for a long time,please discharge the tank
water following the instructions.Or it might cause product damage.
☆This appliance is provided with a protective device that may make the appliance
inoperable under some abnormal conditions(such as immersion of the appliance).
If the appliance becomes inoperable,contact the STUDIOLUX service team.
SAVE THESE INSTRUCTIONS
6

MODEL:SLi5200
Installation instructions and manuals
Installation instructions for skilled technicians!
After installation, please hand over the installation instructions to the user.
7
Product
1.List of materials
Note: Rated power is the average power that under the conditions of ambient temperature of 23℃±2℃, inlet static
pressure of 30psi ± 2psi, inlet water temperature of 5℃±0.5℃, turn on the rear wash function and set the water
flow, seat temperature and water temperature to the highest level successively, and press Stop button then start
rear wash function immediately and continue to work steadily for one cleaning cycle.
120V~
60Hz
1000W
0℃~40℃
≥25L/min
3℃~35℃
IPX4
Water supply temp. ~41℃
1000W
Room temp.~41℃
60W
Room temp.~60℃
≥4m/s
250W
701X441(425)X486mm
Rear washing Night light
Remote controller
Rated voltage
Rated frequency
Rated power
Ambient temp
Pressure of Water supply
30psi
(Dynamic pressure)
~
80psi
(Static pressure)
Flow of Water supply
Temp of Water supply
Water proof rate
Water temp.
Water heating power
Seat temp.
Seat heater power
Ordinary dry temp
Maximum wind speed
Steam Air heater power
Product size
Nozzle manual cleansing
Nozzle self cleansing
Antibacterial nozzle
Seat sensor
Soft close
Seat temp. adj.
Dry temp. adj.
Warm dry
Cleans-
ing
Flush
Dual flush
Auto flush
Pre-wetting
Front washing
Auto washing
Oscillating
Fresh air
Cleans-
ing
2.Technical specifications
Seat and
Cover
Water pressure adj.
Water temp. adj.
Nozzle position adj. 5 level
3 level+Room temp.
3 level+Room temp.
3 level
5 level
Remote control & Holder
&expansion screw set
Material Number:13D401-2004-1
PIC for reference only
Remote control batteries
Material Number:1413K862002-01
Installation card
Material Number:1606106910-001
User manual (Warranty card)
Material Number:1606107475-001
Angle Valve
Material Number:1403K140044-5
Water flow limiter
Material Number1408K603007
Multitap nut
Material Number:1403K110212
sealing gasket
Material Number:1407K220090-2
Rubber pads
Material Number:1407K220091
Anchor screws
Material Number:1408K603116
8
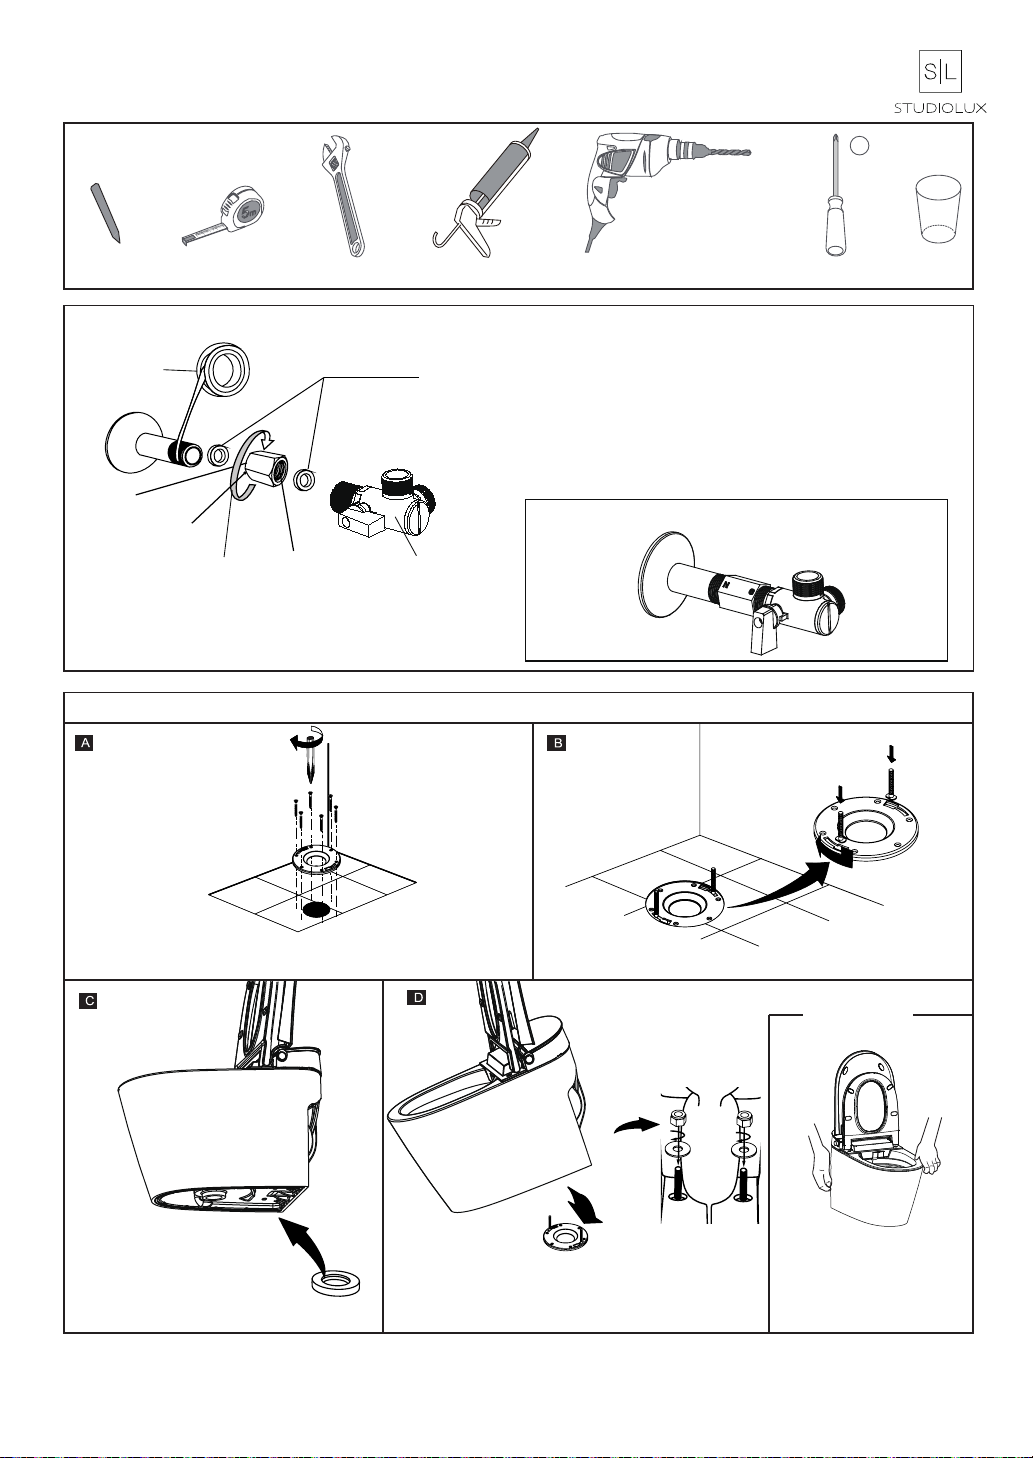
3.Installation
Marking pen Adjustable wrench Silicone Glass
Philips screwdriver
+
Electric drill (including
4.5mm bit & 10mm bit)
Tape
1. After external thread of water outlet
hose
is wrapped with Teflon
tape, adapter nut need install sealing gasket ,tighten the adapter nut
to direction N, then after external thread of
angle stop
is wrapped with
Teflon tape, and tighten the connecting nut to direction G. If the angle
valve has been installed on the wall, to ensure proper installation of
new
angle stop
, the angle valve shall be replaced with the
angle stop
by professional personnel.
3.1 Install the Adapter Nut, Angle Stop
1/2”NPT Male
1/2”NPT Female
1/2”G Female
Adapter nut
Teflon tape
(Not included)
sealing gasket
A
G
N
Angle Stop
Installed adapter nut and angle stop
A
3.2 Install Toilet and Toilet Wax Ring( For Option B installation, please see template.)
Install the floor drain cover connector(not included) .
Insert the wax ring(not included)
under the toilet.
Position the toilet on the floor
drain,making sure the fixing bolts
are aligned with the toilet's holes.
Position correctly the two fixing bolts of the floor drain.
Firstly, open the cover and
seat; as the toilet is heavy,
lifting the product by two
persons at the same time is
needed.
Handing manner:

9
3.4 Tips for comfortable use
Glass cement
Outside the
ceramic side
One side of
the ceramic
Spots are easily found at the lower part of the
product after long time of water or urine penetration.
To avoid this, silicone is recommended to paste
around the lower part to seal the tiny gap between
the lower part and the ground.
Wipe clean the walls Tear the paper of double sided tape
on the remote control holder Press for a moment to ensure the double
sided tape sticks with the tiles tight.
Insert the remote
control into holder
m
m37
Drill two holes with a diameter of 4.5mm
in the wall according to the position of holes
on the remote control holder
Secure the remote control holder
with expansion screws.
※Used up batteries should be thrown into
corresponding type of garbage cans
Recommended
installation position
of remote control
Install the remote
control battery
3.5 Install the Remote Control
Installation Method 1:
Installation Method 2:
3.3 Install the Water Supply Hose
As shown in the figure, install water supply line to angle stop.
1) If the water inlet pressure is greater than 30psi, please
install the flow limiting plate in the angle stop;
2) Only use the accessory parts that are shipped with the
product for installation;
3) After installation,check water seal and turn on the power
supply. Water leakage shall be avoided.
4)When turning on water supply (gray tab) turn on gray tab only half
way up NOT too max and check flush, if too weak gradually increase
gray tab, if too strong lower pressure by turning gray tab down.
E-bidet
braided hose
Water Supply Line
Large end facing
ball valve
A
A
B

10
GROUNDING PIN
GROUNDED
OUTLET
GROUNDED
OUTLET BOX
Open the angle stop,only turn gray tab
half way and check flush, if the flush is
too weak gradually increase gray tab, if
too strong lower gray tab.
Power on
Connecting remote control
GROUNDING PIN
GROUNDED
OUTLET
GROUNDED
OUTLET BOX
Connecting Remote Control
Long press the remote control stop key, the first, third and
fifth LED lights start flickering indicating the remote control
connection is ready. Then release the remote control stop
key and power on the smart toilet cover. If the connection
succeeds, the five LED lights on remote control will be on
for 3 seconds then go off; if it fails, the first, third and fifth
LED lights will flash for 30 seconds then automatically go
off. If you want to quit the process of connecting, please exit
by pressing the stop key.
Long press the stop key Power on
Leakage protection test
Indicator light
Reset button
Test button
Test frequency of 1-4 points below (once a month)
1. Under normal condition, press the "reset" button on the power
plug, the plug indicator light will be on and the product will start to
power on;
2. Normal working condition: under rated voltage condition, the
product will enter normal working state after the completion of the
self-checking procedure of water and electricity.
3. Press the "Test" button, when the leakage protection is normal,
the indicator light is turned off and the power is turned off;
4. Press the "Reset" button on the power plug again. The indicator
light will be on and the power supply is restored.
WARNING
1. Check if any leakage occurs when the power switch does not work properly.
2. The leakage protection plug only protects the product connected to the power supply through the plug.
When using other electrical appliances, the product does not guarantee the leakage protection of other
products; similarly, the product does not replace the basic safety measures of other electrical appliances.
3. Do not ground the live wire directly, test the leakage protection function of the product plug.
Functional Test
Press the “Seat Sensor” position with your hand, at
the same time press the Rear/ Front cleansing button.
Check whether the nozzle works well.
Tip: After switching on the power, the product will do
self-inspection.
11
All cycle times may vary
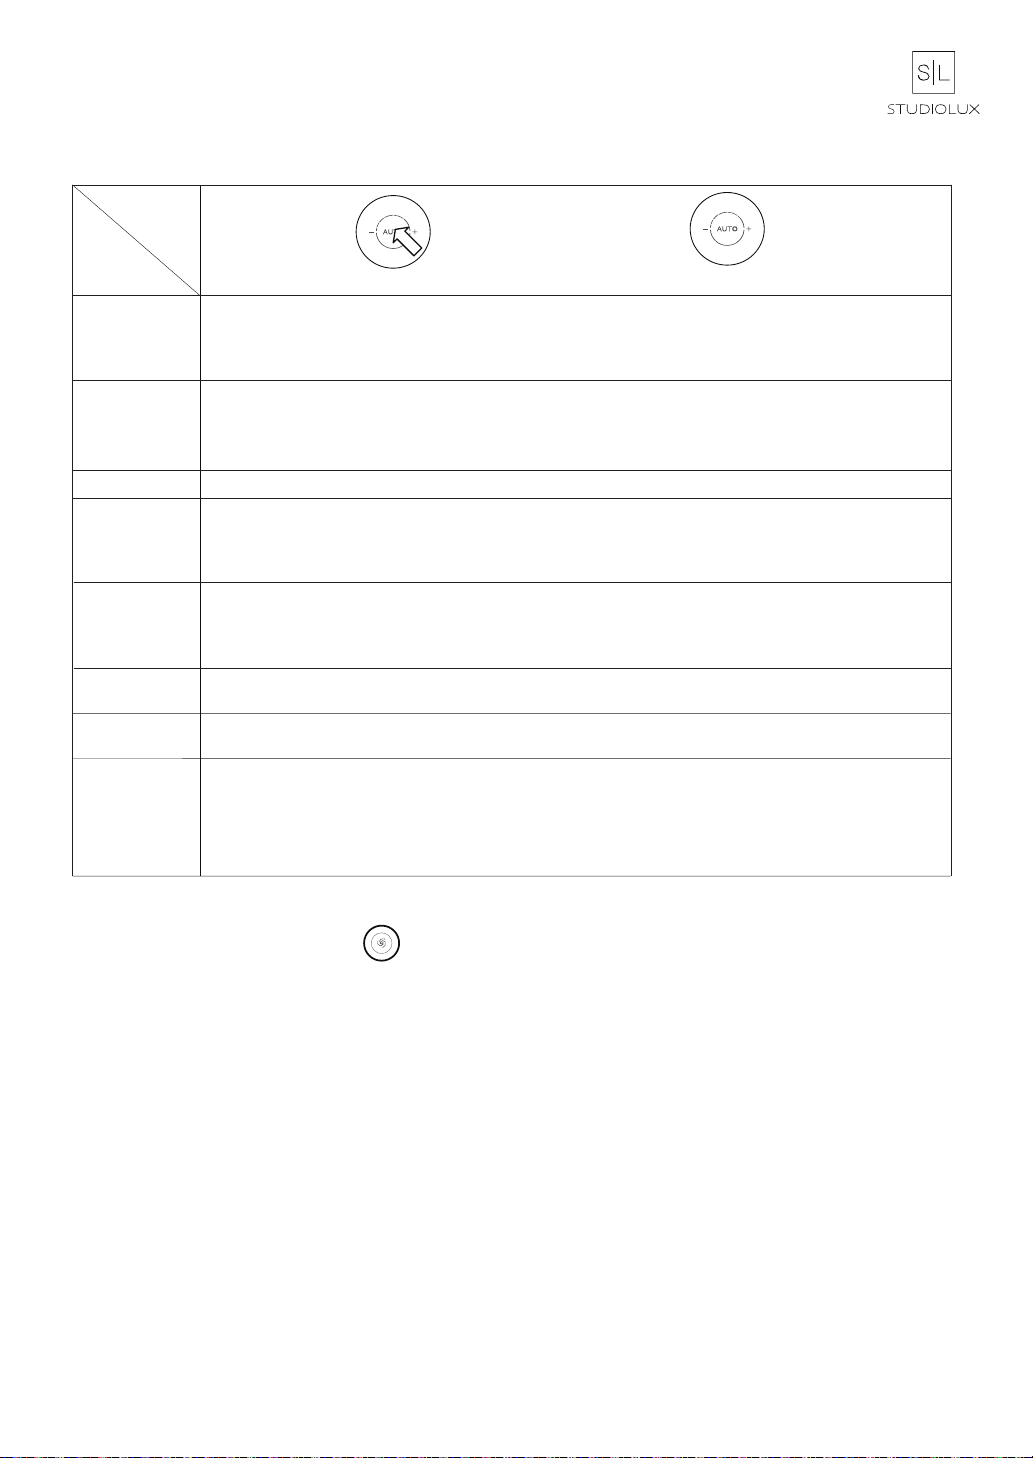
4. Side button description
1. Side button operation
Press the knob
Rotate clockwise and counterclockwise
Automatic rear
cleansing
Automatic front
cleansing
工作时(臀洗、妇洗、烘干),按下旋钮执行停止命令。
Press the knob to start flush function when the toilet is unseated.
Flush function
Water pressure
Dry temp
Stop function
Standby mode:
Light color
switch mode
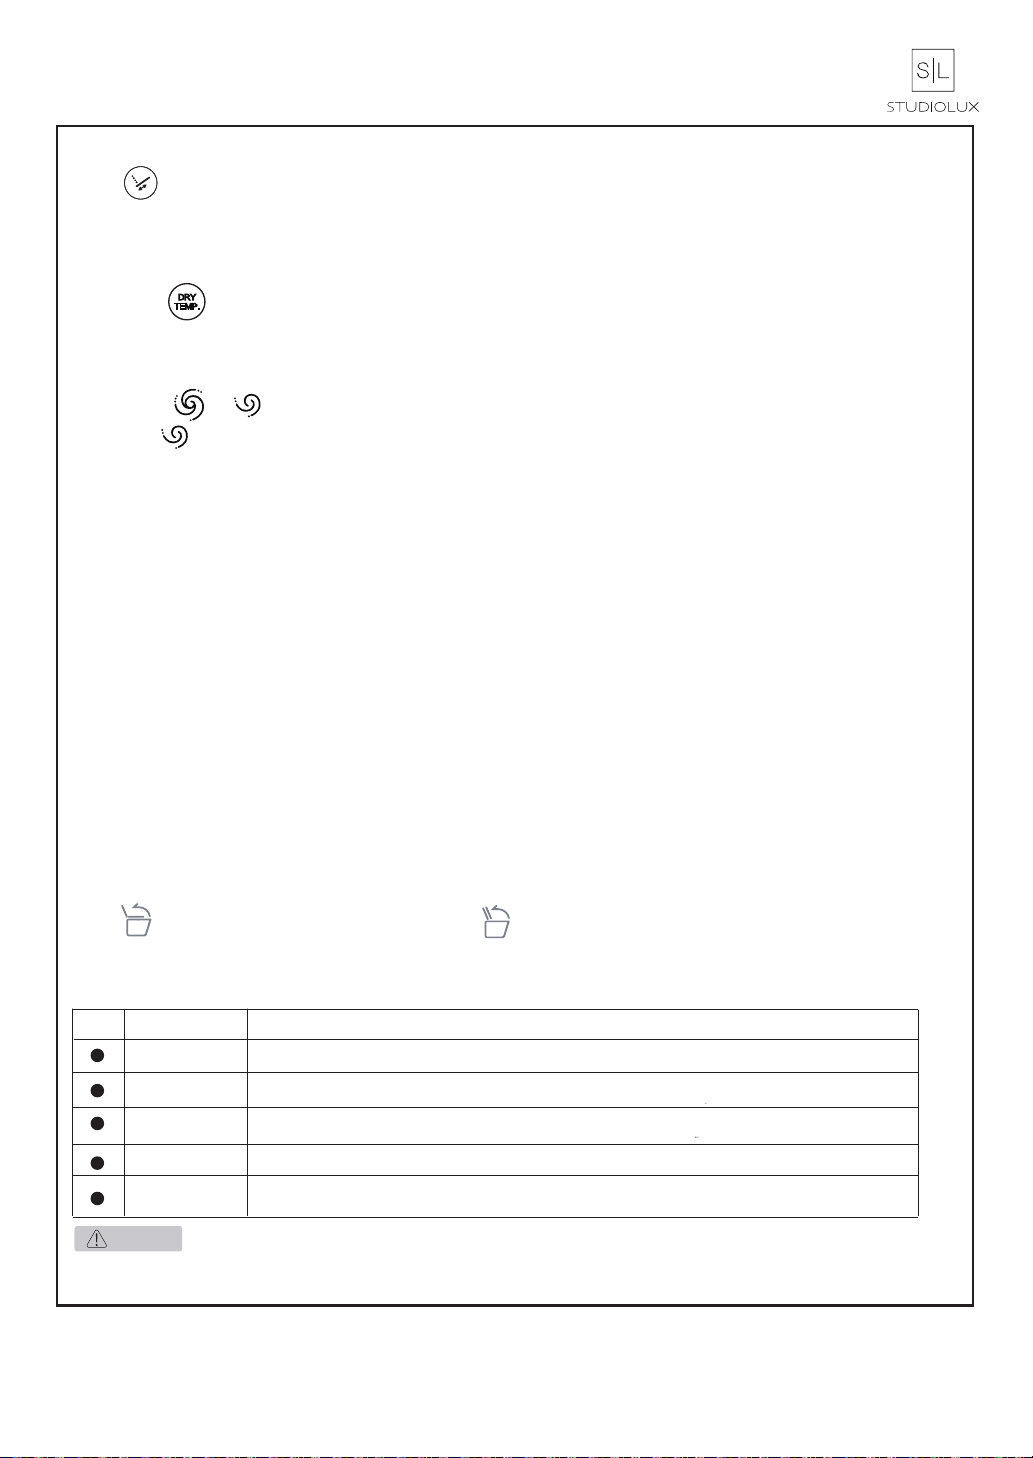
2. Button operations
During the cleaning phase, turn the knob clockwise to increase the water pressure. The toilet will
beep once for each level of pressure and beep twice when the max pressure is reached. Turn the
knob counter clockwise to decrease the pressure. The same sound alerts will apply when
decreasing the pressure.
During the drying phase, turn the knob clockwise to increase the dry temperature. The toilet will
beep once for each level of temperature and beep twice when the max temperature is reached.
Turn the knob counter clockwise to decrease the temperature. The same sound alerts will apply
when decreasing the temperature.
When working (rear cleansing, front cleansing, warm air drying), press the knob and execute the
stop command.
In the non-cleansing state, press the button to use the flushing function.
Knob
definition
Knob
function
3.Side indicator light
When the whole machine is in power-off or standby state,there is no indicator light display.
When the whole machine is in the sitting/working state,the side button indicator display blue.
When sitting, press knob to start automatic rear cleansing function. 15 seconds of rear cleaning at
fixed position→30 seconds of oscillate cleaning→rear cleaning at fixed position then stop (From
start m pressing knob to stop spraying will take about 60 seconds), and the wand automatic retract
→120 seconds of dry. Press "stop" to end the cycle at any time.
While leaving seat, long press the knob for 10 seconds will enter to standby mode. Press any
button on remote control or on seat will bring the bidet out of standby mode.
When sitting, long press knob for 3 seconds to start automatic front cleaning function. 15 seconds
of front cleaning at fixed position→30 seconds of oscillate cleaning→front cleaning at fixed position
then stop (From start m pressing knob to stop spraying will take about 60 seconds), and the wand
automatic retract →120 seconds of dry. press "stop " button to end the cycle at any time.
In off seat status, long press side knob for 3seconds untill you hear a "ding" to enter light color
switch mode. Turn the knob clockwise or counterclockwise to switch light color with each beep.
When turn the knob clockwise, the light color will switch as "Blue-Green-Yellow-Purple-Cyan
-White-off" in sequence. When turn the knob counterclokerwise, the light color will switch as
"off-White-Cyan-Purple-Yellow-Green-Blue" in sequence. Short press side knob again and
hear "ding" to quit the light color switch mode

12
5.Part identification
Remote control body
Remote control bracket
Trim cover
Trim strip
Rear cover
Angle stop
Side indicator light Toilet bowl
Nozzle
Seat sensor
Heated seat
Power plug
Cover
Cover rubber pad
Flush button
Knob
Searial No.:25201218000001
ZD74A3-SA-ASL305
Serial mumber DO NOT
REMOVE needed for
warranty purpose!

13
6.Remote control instructions
● Rear cleansing/Front cleansing
When sitting, press button or button, enter the rear cleansing or front cleansing mode, press the
button again to enter the oscillated cleansing mode. The cleansing cycle which stops automatically after 3
minutes; or press button to stop the cleansing function.
● Water Temperature Setting
Press to adjust water temperature between 3 different levels. Press once to raise one level. Once the
highest level is reached , each press will decrease by one level. The indicator light will display accordingly.
● Water Pressure Setting (In the cleansing mode)
While in the cleaning mode, pressing the " + "or " - " button once, the water pressure increases / decreases by 1
level (Total 5 level).
●Stop function
When working (rear cleansing, front cleansing, warm drying), press and execute the stop command.
● Nozzle automatic cleaning mode
In off-seat state, long press button, the nozzle extends out for automatic cleaning for about 2 minutes and
then retracts. Press button, stop the nozzle self-cleaning.
● Seat temperature setting
Press button to adjust seat temperature between 3 different levels. Press once to raise one level .Once the
highest level is reached, press again to lower one level. The indicator light will display accordingly.
● Warm dry setting
When sitting on seat, press to activate drying function. It will stop when (1) you press button (2)
about 5min later (3)stops at any time when users leaves the seat.Press to adjust drying temperature
between 3 different levels. Press once to raise one level .Once the highest level is reached, press again to lower
one level.When drying function is off, press again to raise one level. The indicator light will display accordingly.
All cycle times may vary
14
● Nozzle position adjustment
Press button to adjust the wand between 5 different position. Press once to move up one level .Once the
highest level is reached, press again to move back one level. The indicator light will display accordingly.
● Night Light Setting
Long press button, the night light will switch between turning on the night light and turning off the night
light mode.
All cycle times may vary
If the drainage hose is blocked, stop water drainage. Find professional personnel to unclog the hoses, otherwise water
may flow out of the ceramic.
Warning
● Flush function setting
Short press / to turn on large volume flush/ small volume flush function,
long press to turn on or off the automatic flushing function, and the corresponding
level indicator light is on.After sitting for more than 3 seconds the toilet will sense the
user. Then the toilet will auto flush approximately 6 seconds after leaving the seat.
● Pre-wetting
When sitting on the seat, the pre-wetting function is automatically turned on. (Brushing the ceramic bowl once
for pre-wetting ). And each time you return to the seat should be with more than 20s interval to achieve
pre-wetting function.
●Automatic deodorization
After the user is on seat, the deodorizing function will start automatically, Once the user leaves the seat, the
function will turn off after 20 seconds.
● Warm tips
If the rear/front cleaning function is not used for more than 72 hours, it will automatically turn on self-cleaning
for 30 seconds for water change when sitting again.
● Cover/Seat opening and closing
Press button to open or close the cover; press button to open or close the seat;
● Indicator light (The sequence of the indicator lights in the figure below corresponds to that on the
remote control)
Light Function
Status light The indicator light is on no matter whether the automatic flushing is turned on or off.
Meaning
/
/
/
Automatic
flushing
The indicator light is on indicating that the automatic flushing function is turned on;
the indicator light is off indicating that the automatic flushing function is turned off.
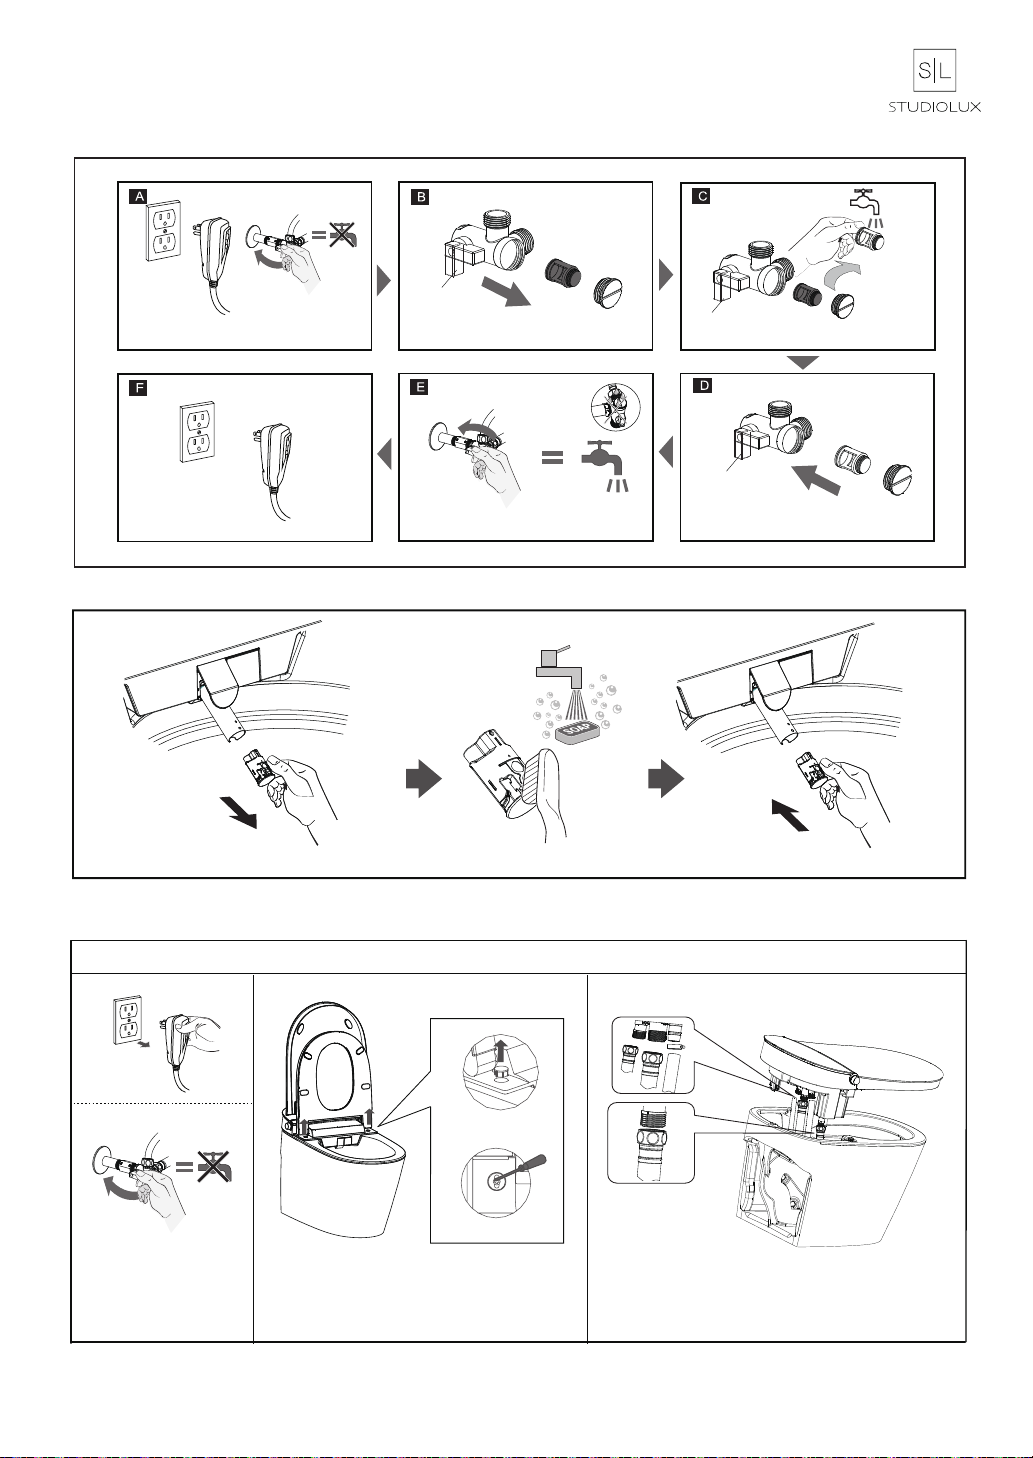
9. Removal and installation of E-bidet
8. Nozzle cleansing
7.cleansing filter screen
Pull power plug off and turn
off the water supply
Close
Plug in
Close
Close
unscrew the plug and
remove the filter screen. Clean the filter screen
Install filter and
tighten plug
Turn on the water
Soap
15
E-bidet removal
(1)Pull power plug
off and turn off the
water supply.
(2) Open the cover & seat. Pull out the
rubber pads on both sides of the electronic
cover, use the Phillips screwdriver to
remove two screws, and remove the gasket.
(3) Pull the complete E-bidet up, remove the
clamp hose and disassemble the two braided
hoses by wrench. Then remove the E-bidet and
place it on the floor correct side up.
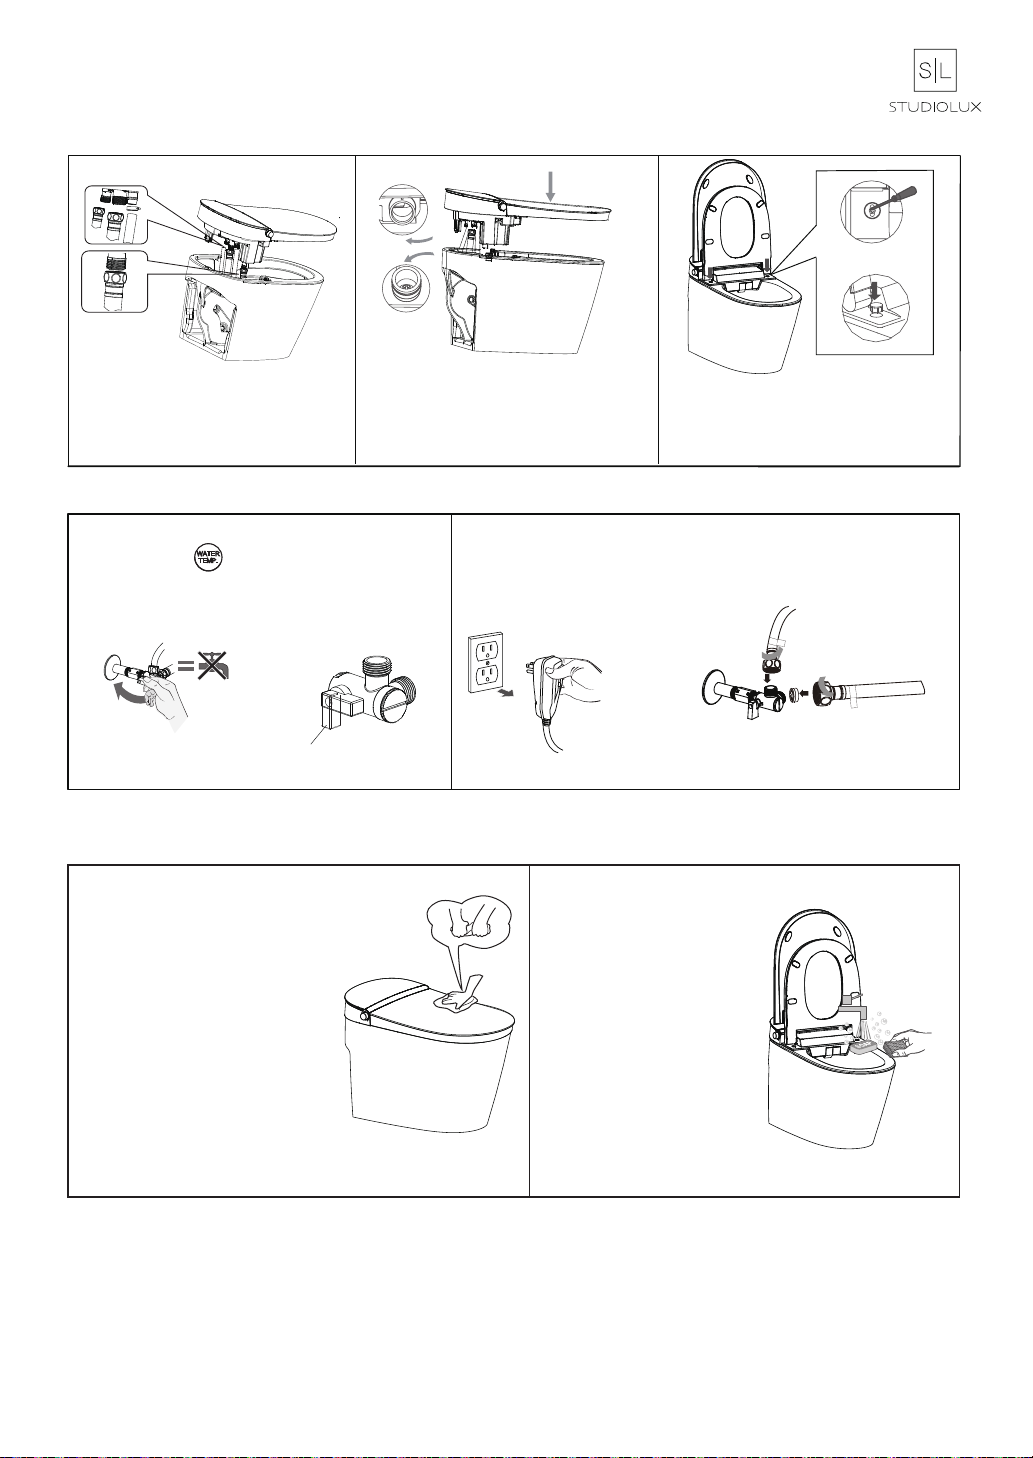
(1)connect and tight the three
braided hoses to E-bidet by wrench,
then insert the hose and install the
clamp.
(2) Align the location hole of E-bidet
with toilet bowl guide pillar, press into
the electronic cover .
(3) Place the gasket on both sides of
the E-bidet lock the screw and insert
the rubber pads. Then turn on the
water supply and plug in.
E-bidet installation
A
A
B
11.Cleaning and maintenance
10.Long time non-use processing mode
Step 2: Pull the plug out, loosen the braided
hoses, drain out the inside water.
Close
Turn off water supply
Pull out the power supply
Step1: Turn off the stop valve, When not in
use, long press button to enter self
cleansing mode. Move to step2 after self
cleansing completed.
16
Cleaning the Cover & Seat:
Turn off the water supply, pull out
the power plug.
Use a soft and wet cloth to clean the
product (Wring out a cloth)
Notices:
Do not use dry cloth or toilet paper
to clean the product or the
appearance of product will be
scratched.
Avoid putting water into the inside of
back cover, otherwise some
electronic components in the back
cover might be damaged.
Cleaning the toilet bowl:
Notices:
Clean the toilet bowl with
cleaner and flush the cleaner
within 3 minutes.
12.Troubleshooting
Frequently asked questions. (FAQ)
Please read the following questions carefully, and refer to the instructions. If the product still does not work contact your
local sales dealer or contact the manufacturer.
Tips:
If there is water leakage, immediately turn off the water supply and pull the power plug.
The following reasons may cause product's malfunction.
1.Check the power supply
(1)Is power supply working properly?
(2)Is the Plug plugged in?
(3)Is electricity-leakage protection switch off?
2.Check the water supply
(1)Is water supply working properly?
(2)Is the Water Supply off?
(3)Is the PSI lower than 30?
Once any of the following issue occur,please cut the power off immediately.Refer to the affected section in this manual.
Please contact the manufacturer for more assistance if necessary.
1.Power leakage protection switch on power plug trips frequently.
Product not working Is power supply turned off?
Remote controller
doesn't work
The button of
remote controller is
insensitive
Remote
controller
Rear
cleansing
/Front
cleansing
Nozzle extends too slowly
Lower water pressure
Is the setting too low?
Is the filter screen dirty?
Reset the water flow to a higher
setting on the remote control.
Clean or replace the filter screen.
Lock the nuts tightly.
Return to the sensor detection
position on the seat ring and activate
the front or rear cleaning function.
Reset the water temperature to
“high”or“on” status by the
remote control.
Is the connection nut of water
supply hose loosen? Does water
leak from the hose?
If the user moves too quickly or
move away from the seat, the sensor
may not be able to find the position
of user in a short time.
17
After 3 minutes of cleaning, the
nozzle will automatically stop
spraying and retract.
This is normal phenomenon.
Is the water temperature set on
“low” or “off” status?
Lower water temperature
Nozzle stops to spray
water suddenly
When activating the front or rear
cleansing function, the nozzle will
move back for self-cleaning, then
moves out for cleansing. This
operation will take several seconds.
This is normal phenomenon
Did the battery run out?
Does the positive and negative
pole of the battery set correctly?
Low battery? Replace with new batteries
Is the remote control too far away
from the product or not within the
sensor range of the remote
Please use the remote control
within the effective sensor range.
Reset the batteries in the correct
direction.
Replace with new batteries.
Power on
Cause
Issue Solution
Issue
Heated Seat
Seat temperature is
not warm enough
during usage.
Seat temperature is
too hot
Is seat temperature set to“off” or
on the lowest setting?
Is seat temperature set on the
highest setting?
Reset the seat temperature to a higher
setting.
Reset the seat temperature to a lower
setting.
Press the “Night Light” button to
turn on the light.
Nozzle will move back automatically
after 2mins from starting nozzle
self-cleaning mode.
Electro conductive material such as
water drops or wet paper will trigger
seat sensor.
Remove conductive media from the
seat.
Turn on water supply and power
supply recovery.
This is normal phenomenon.
Night light is set on “off” status.
Nozzle moves
back automatically
Nozzle does not
extend after pressing
the“nozzle clean”
button.
Press the flush button
of remote control, the
product can't flush
automatically.
Drying temperature is
not warm enough.
Drying stops suddenly.
Drying function does
not work.
During flush water
splashes in back of
toilet.
Is the seat sensor being contacted?
There is noise during
flushing.
Is the water supply and power are
cut off or not?
Is drying temperature set to “off”
or on the lowest setting?
Reset the drying temperature on a
higher setting.
Sit on the seat sensor again and
press the drying button.
Did you select any cleansing
function?
To high water pressure on gray tab
on angle stop
Turn off the cleansing functions and
press the drying button.
If the user leaves the seat suddenly,
the sensor may not be able to find
the correct position of user.
Sit on the seat sensor again and
press drying button.
No Water supply or the water
pressure is very low. This is normal phenomenon.
Clean the filter screen
Is the filter screen dirty?
Night light
function
Nozzle
cleansing
Drying
Flush function
Night Light Off
Night Light On Night light is set on “on” status. Press the “Night Light” button to
turn off the light.
Cause Solution
18
Water splash
in back of toilet
Turn down water pressure on Gray
tab on angle stop, if set at max lower
gray tab half way to reduce pressure
and adjust as needed.

19
Product model
Manufacturing
number
Customer
name
Tel
Add
Sales
company
Tel
Date of
purchase
Warranty card
The 2nd copy send back
This manual suits for next models
3
Table of contents
Other STUDIOLUX Toilet manuals


Popular Toilet manuals by other brands


Toto
Toto CS900KVU installation guide

Moen
Moen Intelligent Toilet HEIDI Series installation instructions

Gessi
Gessi Sanitary Ware 37573 manual

Kohler
Kohler OVE K-19950W installation instructions

Royal Line
Royal Line Onedrous Digital Bidet TH-0111 quick guide

American Standard
American Standard YORKVILLE VORMAX installation instructions