TECE TECEone User manual

8
Bedienungsanleitung
Operating instructions
Mode d'emploi
Istruzioni per l'uso
Instrucciones de uso
Gebruiksaanwijzing
Instrukcja obsługi
Инструкция по эксплуатации
Інструкція з експлуатації
Bruksanvisning
Bruksanvisning
操作说明书
Upute za uporabu
Návod k obsluze
Kasutusjuhend
Lietošanas instrukcija
Naudojimo instrukcija
Instrucțiuni de utilizare
Kullanım kılavuzu
Manual de instruções
DE
EN
FR
IT
ES
NL
PL
RU
UA
NO
SE
CN
HR
CZ
EE
LV
LT
RO
AR
TR
PT
TECEone
TECEone

2
AB
F
D
E
G
C

12

13
Dear customer,
By purchasing the TECEone, you have purposely chosen a product that sets
new standards in personal hygiene. We have condensed the TECEone right
down to the essential functions of a shower toilet.
Therefore, it is intuitive and easy to use. Nevertheless, before using the
TECEone for the first time, we recommend that you read this brochure carefully.
It contains information about the TECEone's function, safety and maintenance
which is important for ensuring trouble-free, durable operation.
We would like to thank you for placing your confidence in us and we hope that
you will enjoy our product.
Your TECE team.
Before using for the first time, please read through these operating instructions
carefully and observe all the operating and safety instructions.
EN

14
EN
CONTENTS
1. Overview 15
Scope of delivery 15
2. Safety information 15
Intended use 15
Safety information 15
3. Operation 16
Operating element 16
Starting the shower function 16
Removing the toilet lid 16
Replacing the shower nozzles 16
4. Cleaning and maintenance 17
Lid and toilet seat, water flow regulator 17
Toilet ceramic 17
Shower arm 17
5. Troubleshooting 18
6. Technical data 20
7. Spare parts 20

15
1. Overview
Scope of delivery
TECEone toilet ceramic
Shower nozzles, assembly material,
Assembly instructions, operating instructions
There are some illustrations on the inside front cover to which these instructions
refer:
AWater flow regulator
BShower arm with nozzle
CLid attachment with set screws
DSlightly turned water flow regulator
EFully turned water flow regulator
FPulling the shower arm out
GRemoving the shower nozzle from the shower arm
2. Safety information
Intended use
The TECEone is a wall-mounted toilet ceramic with a shower function intended
for intimate personal cleansing with water in a closed room. It can also be used
as an ordinary toilet ceramic without the shower function. Any other use is not
considered to be the intended use.
Safety information
Make sure that children do not play with the TECEone.
Do not leave any objects on the lid or let anything fall into the ceramic.
The lid is equipped with a soft-closing mechanism: it should therefore only
be opened and closed gently.
Do not climb on the lid or ceramic.
Do not sit on the lid!
Do not perform any repairs or amendments to the TECEone. This should only
be done by qualified specialists.
Do not install the TECEone in rooms subject to frost.
EN

16
EN
3. Operation
Operating element
The TECEone is operated intuitively using the regulator:
Water flow regulator (A): use this regulator to open the water supply to the
shower arm and to regulate the intensity of the water jet. After a certain
volume of water starts to flow, the shower arm extends “automatically” out-
wards.
Starting the shower function
If necessary, turn water flow regulator only slightly: the shower arm does not
yet extend and cooled water may run into the ceramic, at the same time the
shower arm is rinsed and washed with water (D).
Fully turn the water flow regulator: The shower arm now extends completely
and you can start washing with water (E).
You can increase or reduce the volume of water by turning the water flow
regulator until you achieve the required result.
To turn o the shower function, turn the water flow regulator back as far as it
will go.
Removing the toilet lid
Lift up the toilet lid and toilet seat.
Remove both set screws from the hinges (C) using an Allen key (2.5mm).
Hold the toilet lid and seat with both hands and pull them gently upwards.
Note: During assembly, after mounting both hinges, press down on the attach-
ment bolts – at the same time, applying slight pressure – until they audibly click
into place.
Replacing the shower nozzles
The scope of delivery includes three shower nozzles (standard 75°). To replace
them, proceed as follows:
Turn the water flow regulator until the shower arm extends a little.
Pull out the shower arm with your hand and turn o the water supply (F).
Hold the shower arm firmly with one hand and with the other, pull the nozzle
forwards until it comes o the shower arm (G).
Then push your chosen shower nozzle – with the opening pointing upwards
– onto the shower arm until it gently locks into position.
As an option, additional shower nozzles can be ordered which dier from each
other in terms of the intensity and position of the shower spray (see “Spare
parts” section).

17
4. Cleaning and maintenance
Lid and toilet seat, water flow regulator
Clean the lid, toilet seat and regulator every day using a soft cloth and warm
water with a mild household cleaner. Do not use abrasive, chlorine-based or
acidic cleaning products.
When cleaning the ceramic, always open the lid or remove it completely so that
any rising vapours cannot damage the plastic.
Toilet ceramic
Clean the ceramic regularly or as soon as it gets dirty. Use a commercial sanitary
cleaner to regularly clean the ceramic. To remove limescale, use a commercial
limescale remover or a vinegar-based cleaner. Always follow the manufacturer’s
instructions when using a cleaning product.
Avoid any contact with hard or metal objects which could damage or mark the
surface.
Shower arm
Slightly turn the water flow regulator (A) to self-cleaning: The shower arm
does not extend and the water rinses the shower arm and cleans it in this
position.
In the event of stubborn soiling, turn the water flow regulator until the shower
arm (B) extends with a small jet of water. Remove the dirt with the aid of a
suitable brush or a soft cloth. Only use a mild cleaning detergent when doing
so.
If using water with a very high lime content, lime deposit can build up on the
shower nozzle, shower arm and the safety and hygiene system. This can be
removed with a commercial limescale remover or vinegar-based cleaner, or
replaced in the event of more persistent deposits. These components are availa-
ble as spare parts (see “Spare parts” section).
EN

18
EN
5. Troubleshooting
The TECEone has been built in such a way that problems are extremely unlikely
and may only occur in very few cases. However, if a fault should occur, it is gen-
erally best to contact a suitable specialist (i.e. fitter).
Please follow the applicable assembly instructions. You can find these in the
product database at www.tece.com.
Problem Possible cause Solution
Shower arm does not
extend or retract fully
Water pressure is
too low
Check the water pressure in the supply line.
Shower arm is cal-
cified
If the shower arm is calcified, decalcify it with
citric acid or vinegar. Replace the shower arm
nozzle if necessary. If these measures are
unsuccessful, replace the entire shower arm.
Shower arm is dirty In the event of stubborn soiling, turn the right
rotary knob until the shower arm (C) extends
with a small jet of water. Remove the dirt with
the aid of a suitable brush or a soft cloth. Only
use a mild cleaning detergent when doing so.
Dismantle the shower arm and clean it with
water (do not re-lubricate). If this measure is
unsuccessful, replace the entire shower arm.
Shower jet is crooked Shower arm unit is
not seated correctly
Check that the shower arm unit is seated
correctly. If this is unsuccessful, realign the
shower arm housing (requires disassembly of
the toilet ceramics).
Shower jet is too weak Water supply hose
is bent
Call the fitter.
Shower cap or
shower arm is
blocked/calcified
Clean the showercap orthe shower armwith
a suitable brush or replace it in the same way
as when removing limescale.
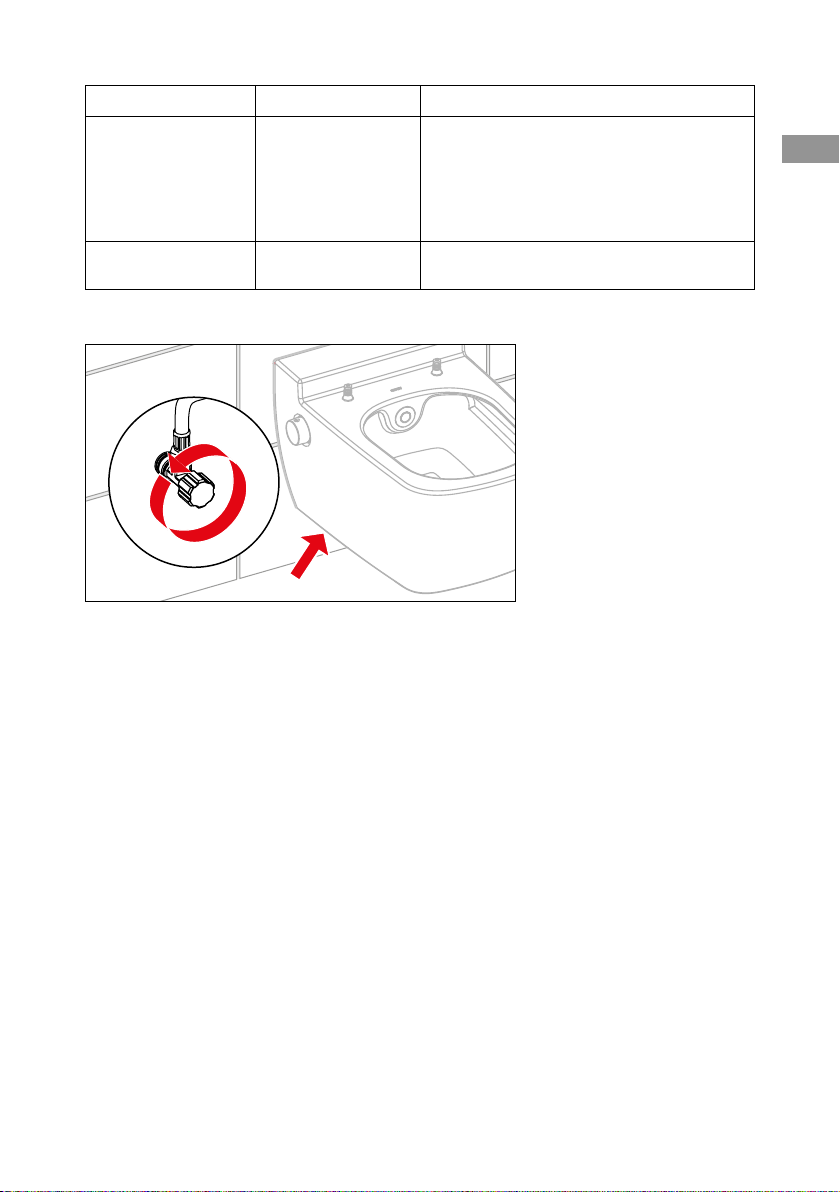
No water comes out of
the shower nozzle
Water supply has
been disrupted
Check whether or not the corner valves are
turned open (see illustration below) or check
the central water feed supply.
Water runs/drips out
of the ceramics during
the shower process
Clean the ceramic cartridge incl. the EN 1717
safeguard with citric acid or vinegar. If this
measure is unsuccessful, replace the ceramic
cartridge incl. the EN 1717 safeguard (order
no. 9820469).
Water runs/drips out
of the ceramics during
the flushing process
Connection set not
installed correctly
Check all components of the toilet connection
set (seal, whether the seal is fitted properly,
and the length of the connection set).
19
Problem Possible cause Solution
Water runs/drips
constantly out of the
ceramics
Check whether the cartridges are fitted
properly (note the maximum tightening torque
of 7 Nm), the seals, and the connection of
the reinforced hoses. If these measures are
unsuccessful, close the corner valves (see
figure below) or the main valve.
Limescale residues on
the ceramics
Clean the ceramics with a ceramic or porce-
lain cleaner.
Position of corner valve:
EN

20
EN
6. Technical data
Water pressure min. 1 bar (0.1 MPa), max. 10 bar (1 MPa)
Water consumption up to 5 l/min.
7. Spare parts
9820366
9820367
9820403 (3 x „standard“ 75°)
9820404 (3 x „standard“ 90°)
9820405 (3 x „medium“ 90°)
9820406 (3 x „small“ 90°)
9820366
9700600
9820362
9820367
9820359
9820363
9820465
9820423
Other manuals for TECEone
6
Table of contents
Other TECE Toilet manuals

TECE
TECE TECElux 100 Manual

TECE
TECE TECEone User manual

TECE
TECE one 9700200 User manual

TECE
TECE TECEone User manual

TECE
TECE TECEone User manual

TECE
TECE TECEone User manual

TECE
TECE TECEone User manual

TECE
TECE TECEplanus Installation manual

TECE
TECE TECEbox 8 cm Instruction Manual

TECE
TECE U2 TECEfilo Instruction Manual


Popular Toilet manuals by other brands


American Standard
American Standard CONCEPT Cube TF-2704 installation manual

BIOLAN
BIOLAN ECO Instructions for installation, use and maintenance

Thetford
Thetford C260 Series user manual

KELISS
KELISS T162A Series instruction manual

Silent Venus
Silent Venus SVP600 Installation & maintenance

Kohler
Kohler K-22241K Installation and care guide