Studiomaster Professional MUSE 81 User manual

Portable Active PA Speaker
1.................................................................................................................................................Introduction
2......................................................................................................................................................Features
3................................................................................................................................................Applications
4.................................................................................................................................Rear Panel Description
5.................................................................................................................USB/SD Media Player & Recorder
6....................................................................................................................................Bluetooth Operation
7..........................................................................................True Wireless Stereo (TWS) Function & Operation
8..................................................................................................................Handheld Transmitter Operation
9..........................................................................................................................IR Remote Control Features
10..............................................................................................................................Technical Specifications
Media Player,
Recorder
Bluetooth
Playback
REC
Recording
Power
Output
30W
Rechargeable
Battery
Wireless MIC
Supplied!
True Wireless
Stereo Pairing
Muse 81

1. Introduction
• Thank you for choosing the Studiomaster Professional Muse 81 Active Speaker.
• To ensure maximum performance and safety, please follow this instruction manual carefully.
• Please retain this manual for future reference. For any complaint, feedback or testimonials please
contact authorised Studiomaster Professional distributor/dealer.
• Retain the carton for future use should the product require servicing/maintenance.
2. Features
• Features a 8” LF Driver and a 3” Tweeter.
• Ships with 1 Wireless Handheld Microphone.
• USB, SD/MMC Media Player, Recorder and
Bluetooth.
• True Wireless Stereo (TWS) for Pairing Two Units.
• Wireless IR Remote Control.
• Inputs: 1 x 6.35mm (¼”) Mic, 1 x 6.35mm (¼”)
Guitar & 1 x 3.5mm EP Aux.
• Outputs: 1 x RCA (AUX) & 1 x RCA (Speaker 4-8 Ω)
• MIC/VOX Priority Feature.
• Sing-along Feature for Bluetooth, USB and
SD/MMC Media Player.
• Echo/Delay EFX on MIC Inputs with Level Control.
4. Rear Panel Description
2
• Individual Volume Controls for MIC, Guitar &
Aux/Media Player Inputs.
• 2-Band (Bass/Treble) EQ on Aux/Media Player
Input.
• Built-in Rechargeable 4500mAH/12V Lead Acid.
• Hours Long Lasting 5Battery Life.
• 15V DC Charging Adapter Supplied.
• 12V DC Car/Motorcycle Battery Operation.
• LED Lights with On/Off Switch.
• Integrated Carry and Trolley Handles with
Wheels for Easy Transportation.
• Sturdy PP+ABS Cabinet for Outdoor Use.
3. Applications
• Parties & Gatherings • Learning & Training Centers • Religious Functions • Group Presentations
1
2
5
4
3
11
10
7
8
6
9
12
*info@audioplus-india.com
91-8879028079
+91-22-42869000 / 001
MADE IN P.R.C.
LIGHTS
ON OFF
-
+
TREBLE
0
10
MIC
ECHO
0
10
GTR
VOL
DC 12V IN
DC 15V
IN
AUX OUT SPEAKER
OUT 4-8Ω
LOW
BASS
ON
FULL
Muse 81
-
+
GUITAR
MIC
BATT OFF DC15V
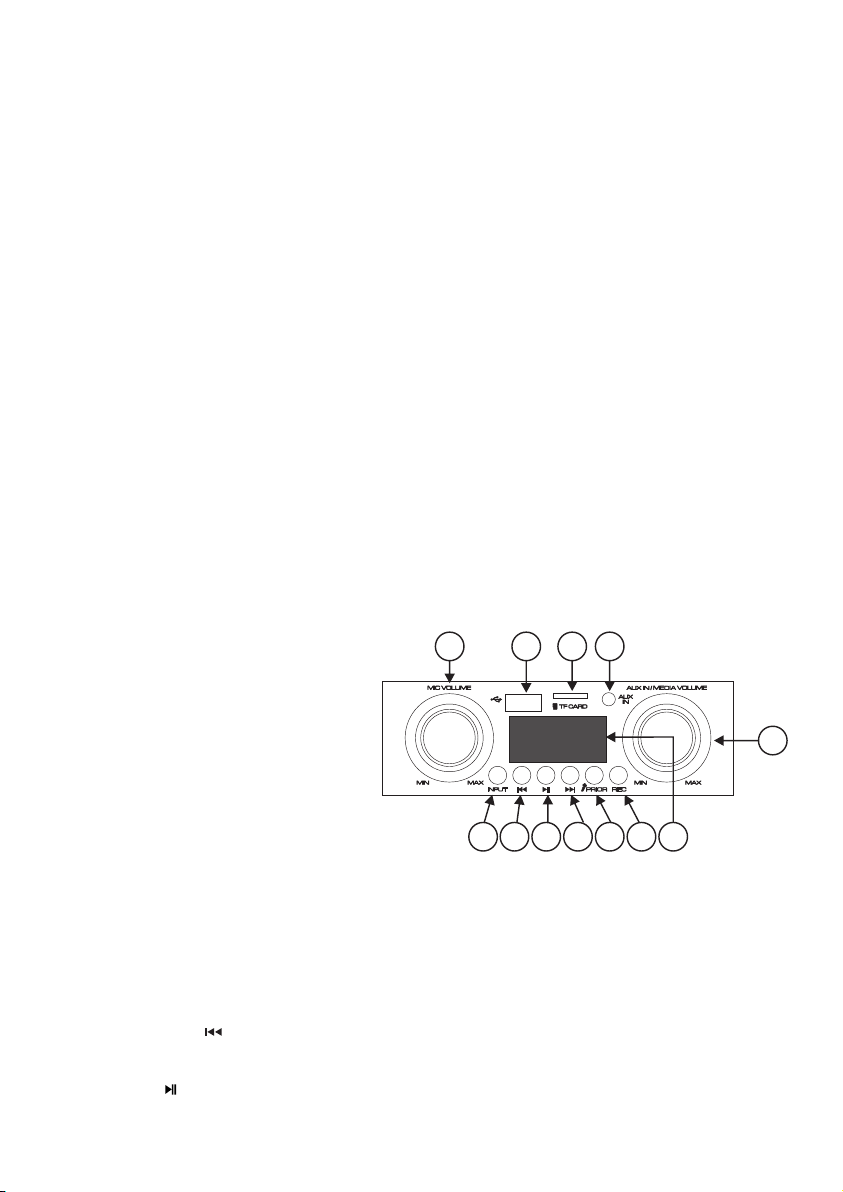
5. USB/SD Media Player & Recorder
1. Mic Input: These ¼” jack is designed to accept signal from low impedance wired microphones.
2. Guitar Input: These ¼” jack is designed to accept Guitar input.
3. Guitar Volume: This knob is used to adjust the output level of the Guitar.
4. Mic Echo: This knob is used to adjust the Echo (Delay) EFX.
5. Band EQ: This 2-band EQ is provided to cut or boost frequency as required.
6. Aux Out: This Aux out used to send audio signal to other speaker.
7. Speaker Out 4/8Ώ: To connect external passive speaker at different load i.e 4Ώ/8Ώ.
8. DC 12V Terminals: These terminals are provided to power up the device using on external 12VDC
car / motorcycle battery (battery not supplied).
9. DC 15V In Socket: Connect the supplied 15VDC adapter to charge this device.
Note: We recommend charging the battery for 8 hours before using the unit.
10. Deco LED ON/OFF: This switch is used to ON or OFF the led light on the front panel.
11. Power ON/OFF Switch: This switch is used to power ON or OFF the unit.
12. Battery Charge LED Indication:
a) On (Green LED ): Indicate battery is charging.
b) Full ( Yellow LED): Indicate battery fully charged.
c) Low (Red LED): Indicate battery is low, Please charge the device.
3
1. Mic Volume: This knob is used to adjust the
level of the Mic input.
2. USB Input: Use this to insert a flash-based
storage device (pen drive) for Mp3 playback
and recording.
3. TF /SD/MMC (Card Input): Use this to
insert a memory card for MP3 playback
& recording.
4. Aux Input: This 3.5mm EP Jack is provided to connect audio from auxiliary sources such as CD players,
iPads MP3 player, mobile phone and laptop etc.
5. Aux in/Media volume: This knob is used to adjust the level of Aux input and media player.
6. Input: This button is used to switch between Aux, Bulethooth and USB (when a device is inserted)
media player mode.
7. Previous/Rewind ( ): Press this button to select the previous song.
Long pressing the button rewinds the song.
8. Play/Pause ( ): Press this button to play or pause the song.
1 2 3 4
5
6 121110
9
8
7

9. Next/Fast Forward ( ): Press this button to select the next song. Long Pressing the button fast
forwards the song.
10. Priority (PRIOR):
10.1 MIC/VOX Priority: Press this button once to activate or deactivate the MIC/VOX priority mode.
It provides voice-activated priority (VOX) for the microphones inputs which overrides the remaining inputs.
Essentially, with this mode activated, when you speak into the microphone the volume of all other inputs
ducks (reduces) to let the vocals be more prominent. This feature is useful for announcements.
When priority button is pressed, the display shows “P ON” to indicate that the function is activated.
To deactivate the priority function, press the priority button until the display shows “P OFF”.
10.2 Sing-along Function: This function lets users sing along with any music being played back in the
Bluetooth and USB mode. Activating this function effectively reduces vocals/voice from any stereo
source being played while retaining most music elements. Effectively, it is a quick and easy way to
enjoy fun Sing-along sessions on-the-go!
1. To activate this function, long press the “PRIOR” button for 2-3 seconds. The display flashes “AC ON”
for a few seconds and returns to the default screen.
2. To deactivate this function, long press the “PRIOR” button for 2-3 seconds. The display flashes “AC OF”
for a few seconds and returns to the default screen.
Note: In TWS mode, the sing-along function will have to be activated or deactivated manually on both
the units.
11. Recording:
1. Insert a flash-based storage device (pen drive) into the USB/SD/MMC slot.
2. Long press the “REC” switch until the “REC” icon on display starts blinking. The icon keeps blinking to
indicate that the recording mode is active.
3. Recording begins as soon as the mode is activated.
4. To delete recordings, presse the REC switch and then press the INPUT button for around 2 seconds.
The displays shows “Del” to indicate that the recording is deleted.
Note: The recording mode only activates when a device is inserted into the USB/SD/MMC slot.
Terms of Use: Studiomaster Professional respects intellectual property rights and we request our users
to do the same. Please use MP3 downloads only from sources which you have legally purchased.
PLEASE DO NOT USE PIRATED MUSIC OR PROGRAMS.
Disclaimer: Your acceptance and use of this product will be treated as your agreement to the following
clause: Studiomaster Professional, Audioplus and all associated companies and sellers are indemnified
from any liability the end-user may incur by using illegally procured material or immoral content or any
other such similar program selection.
12. Display: It always useful information while operating the media player & recorder sector.
4
6. Bluetooth Operation & Indication
• Press the input button (on the top panel) to select Bluetooth mode.
• From your phone or device turn Bluetooth ON & search for a device named “Muse 81” Pair and
connect to it.
• Upon connection, any music or audio played on your device will be played via the Muse 81.
• The music can be controlled either using the button on the top panel or the IR remote control.
• If you move out of range or turn off the Bluetooth feature on your mobile device, the Bluetooth receiver
will disconnect from your device.
• To reconnect, click on the device name “Muse 81” on your paired device list.

TROUBLESHOOTING BLUETOOTH CONNECTION
PROBLEM POSSIBLE SOLUTION
Paired Bluetooth device
does not connect.
Already connected to other BT device. Disconnect and pair the
devices again.
Cannot pair the speaker
with your Bluetooth
device.
Make sure you select “Muse 81” in the pairing list on your device
to finalize the connection.
Your Bluetooth device may be out of range. Try moving it closer
to the speaker.
7. True Wireless Stereo (TWS) Function & Operation
5
True Wireless Stereo (TWS) technology lets you use two Muse 81 units paired via Bluetooth to form a
wireless left and right channel system to deliver true stereo sound. Apart from a louder output, TWS
empowers a wide stereo imaging and natural, more pleasing sound.
Requirements:
• 2 x Muse 81 units with TWS compatibility
• Bluetooth device (smartphone, laptop, and TV etc.)
TWS Connection:
Note: Steps to connect via Bluetooth are mentioned in Section 6 on Page 4.
1. Press the input button on the top panel to select the Bluetooth mode and long-press the
Next/Fast Forward ( ) button of the first Muse 81 unit. This will pair it as the master device to the
selected audio source (smartphone, player, PC, TV, etc.).
2. After successfully pairing the first unit with the audio source, press the input button on the top panel
to select the Bluetooth mode and long-press the Next/Fast Forward ( ) button of the second
Muse 81 unit. This will pair the second Muse 81 (the so-called “slave”) unit to the master device i.e.
the master Muse 81 unit, not the source. This way, you’ll get a stereo system, which plays separate
left and right channels.
3. For optimal results, ensure both the units are at the same volume level. You can also place the speakers
apart for a more spatial stereo sound and a wide dispersion area.
TWS Master
Bluetooth
Left Channel Right Channel
TWS Slave
• If you want to switch from one device to another, end the existing Bluetooth connection from your
device by either disconnecting via your device’s “Setting” section or by turning off Bluetooth.
6
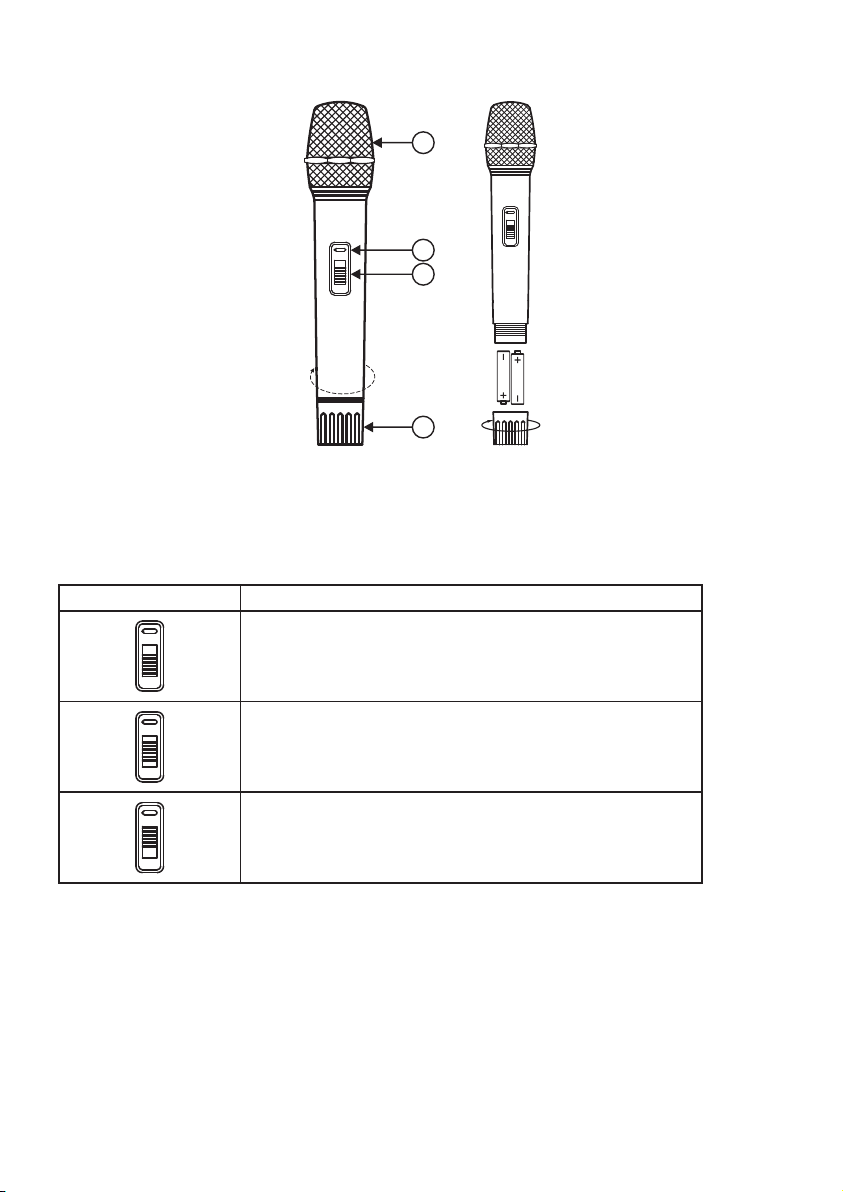
8. Handheld Transmitter Operation
1. Grill: This hardened meshed grill protects the microphone diaphragm and also serves as an effective
wind and pop filter.
2. Transmitter LED: This Green LED glows when the transmitter is switched ON.
3. Switch: The sliding switch has 3 positions:
4. Battery Housing Cover: Rotate the cover anti-clockwise to unscrew and gain access to the battery
compartment. Insert 2 x 1.5V AA Alkaline batteries to use the supplied wireless microphone.
Switch Position Operating Mode
In this position, the handheld transmitter is OFF.
In this position, the handheld transmitter send only the RF signal.
Essentially, it is a mute mode where the microphone is connected
to the speaker but no audio signal is being sent.
In this position, the handheld transmitter sends audio signal to the
main speaker unit. Activate this mode to speak into the
microphone and be heard.
ON
OFF
ON
OFF
ON
OFF
OFF
Mute
ON
1.5v
1.5v
2
3
4
1

7
1. Standby: Press this button to switch the USB/SD card MP3 media player ON or OFF.
2. Mute ( ): Press this button to mute or unmute the media player.
3. Number Keys: Use this numeric keypad for direct track selection.
4. Mode: This button is used to switch between the Aux, Bluetooth and USB/SD (when a device is inserted)
media player mode.
5. Record: Press this button to start recording any audio (Refer to section 5, Point 11 on page 4).
6. Repeat ( ): Press this button to repeat the track.
7. Folder (Prev / Repeat / Next): These 3 keys can be used to toggle between and the repeat the song
folders stored on the USB/SD/MMC memory cards.
8. Previous ( ): Press this button to select the previous song Long pressing the button rewinds
the song.
9. Next ( ): Press this button to select the next song. Long pressing the button fast forwards the song.
10. Play/Pause ( ): Press this button to play or pause the song.
11. Volume (+): During playback, press this button to increase the volume.
12. Volume (-): During playback, press this button to decrease the volume.
13. EQ: Press the button to toggle between and use any of the following bult-in-EQ presets.
9. IR Remote Control Features
1
4
5
3
6
7
8
9
11
10
12
13
a. Pop b. Rock c. Jazz d. Classical e. Club
2
A1/A2, Giriraj Industrial Estate, Mahakali Caves Road, Andheri (E), Mumbai - 400 093. India Tel.: +91-22-42869000/001
Whats App.: +91-8879028079 E [email protected] W www.studiomasterprofessional.com / www.audioplus-india.com
Rev0/SMMuse 81/Sep 2020
10. Technical Specification
Driver Size
Power Output (4Ω, 1kHz)
Frequency Response
S/N Ratio
Inputs
Output
Equalization
Battery
Battery Life
Charging Adapter
External Battery
Enclosure Material
Dimensions (W x D x H) mm
Weight (Kg)
LF - ” 8
HF (Tweeter) - ”3
W (RMS) @ 1% THD26
W (RMS) @ 10% THD30
45Hz-20kHz ±2dB
>71dB
1 x 6.35mm (¼”) Mic, 1 x 6.35mm (¼”)
Guitar, 1 x 3.5mm EP Aux.
1 x RCA (AUX) and 1 x RCA (Speaker 4-8 Ω)
Bass - ±10dB @ 100Hz
Treble - ±10dB @ 10kHz
Rechargeable 4500mAh 12V Lead Acid.
Hours (approx)5
+ V DC15
+12V DC via Terminals on Rear Panel
PP+ABS
360 x 210 x 525
.18
Model Muse 81
+91-22-42869000
+91-22-42869001
bit.ly/SMPYT-S
studiomaster professional
Subscribe to our Channel
+91-8879028079
WhatsApp
Table of contents


